FID – User Manual
Standard FID running
Section titled “Standard FID running”This section describes the additional, limited steps required to use FID with RPA when standard FID is already configured and working for Exact Synergy Enterprise and Exact Globe+.
Configure Synergy for RPA
Section titled “Configure Synergy for RPA”Check Synergy (Web) Redirect URIs
-
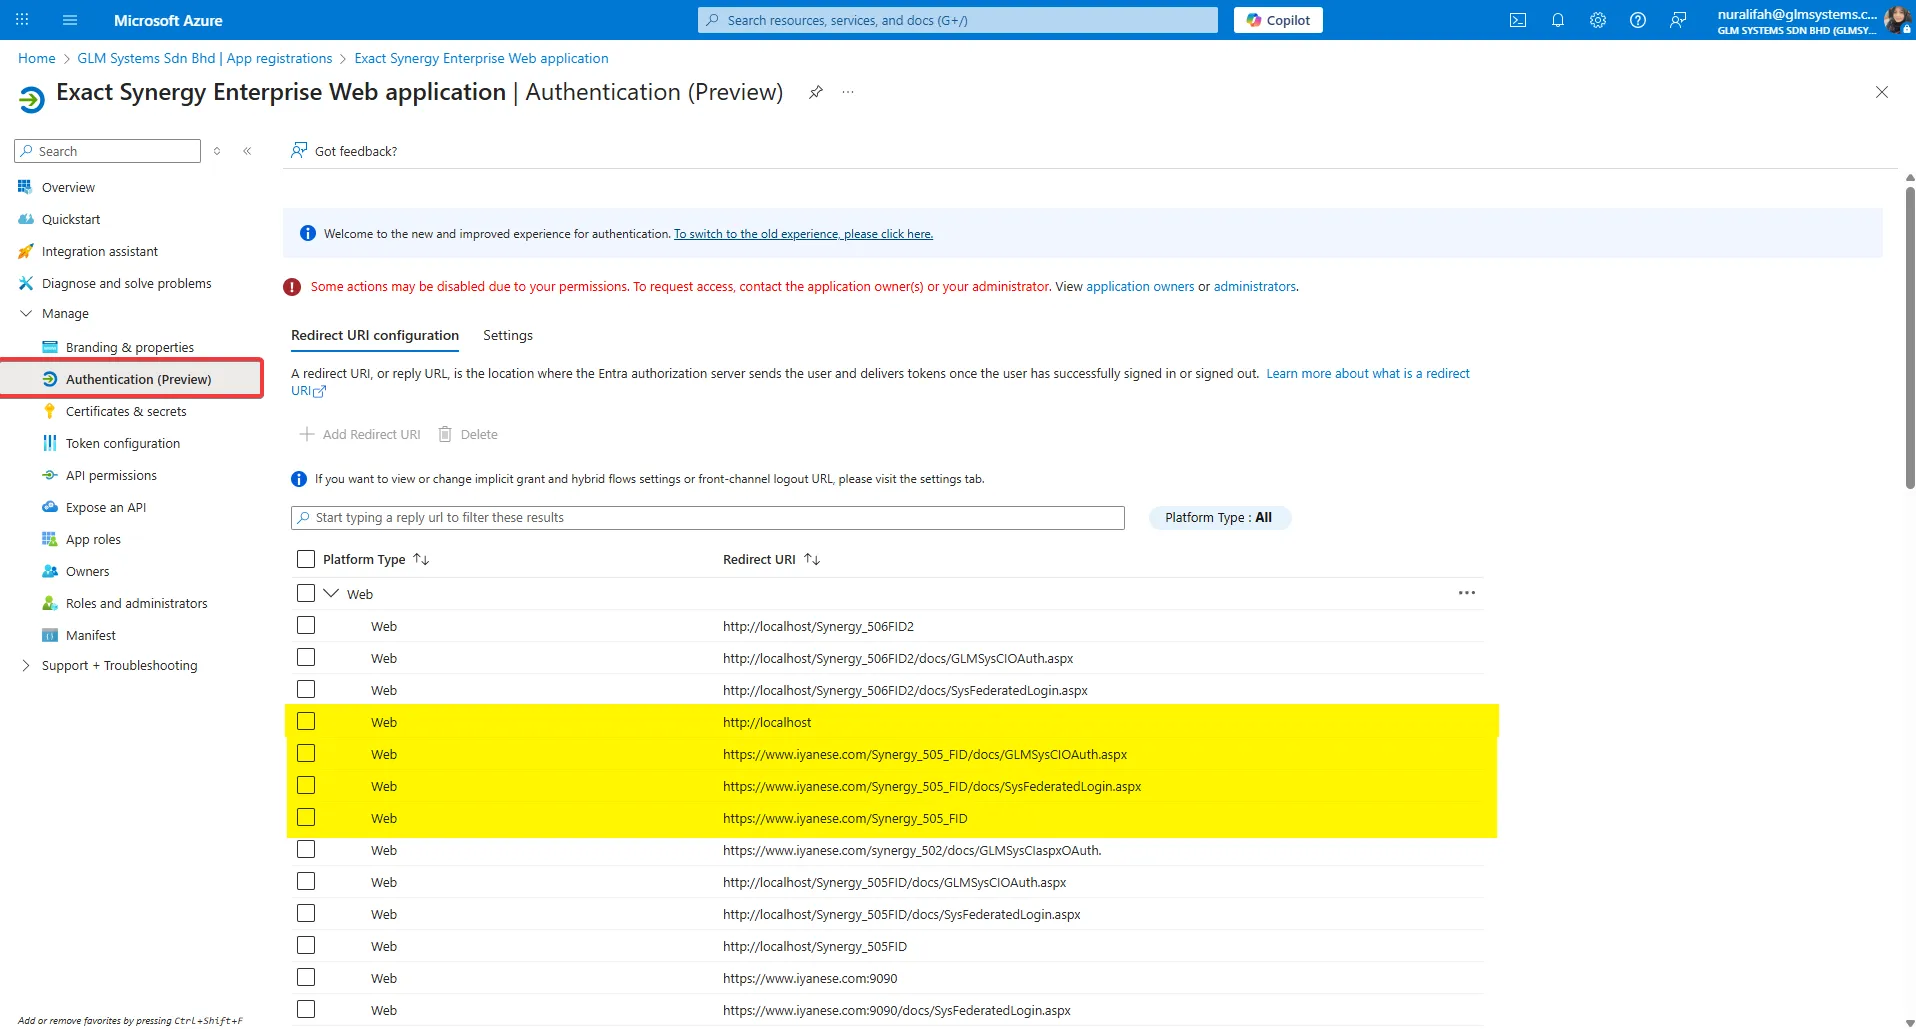
Go to Home > App registrations > Synergy (Web) > Authentication (Preview).
-
Under Implicit grant and hybrid flows, ensure ID Tokens is enabled.
Synergy RPA Providers, Connection and Rules Settings
Section titled “Synergy RPA Providers, Connection and Rules Settings”Synergy RPA Providers
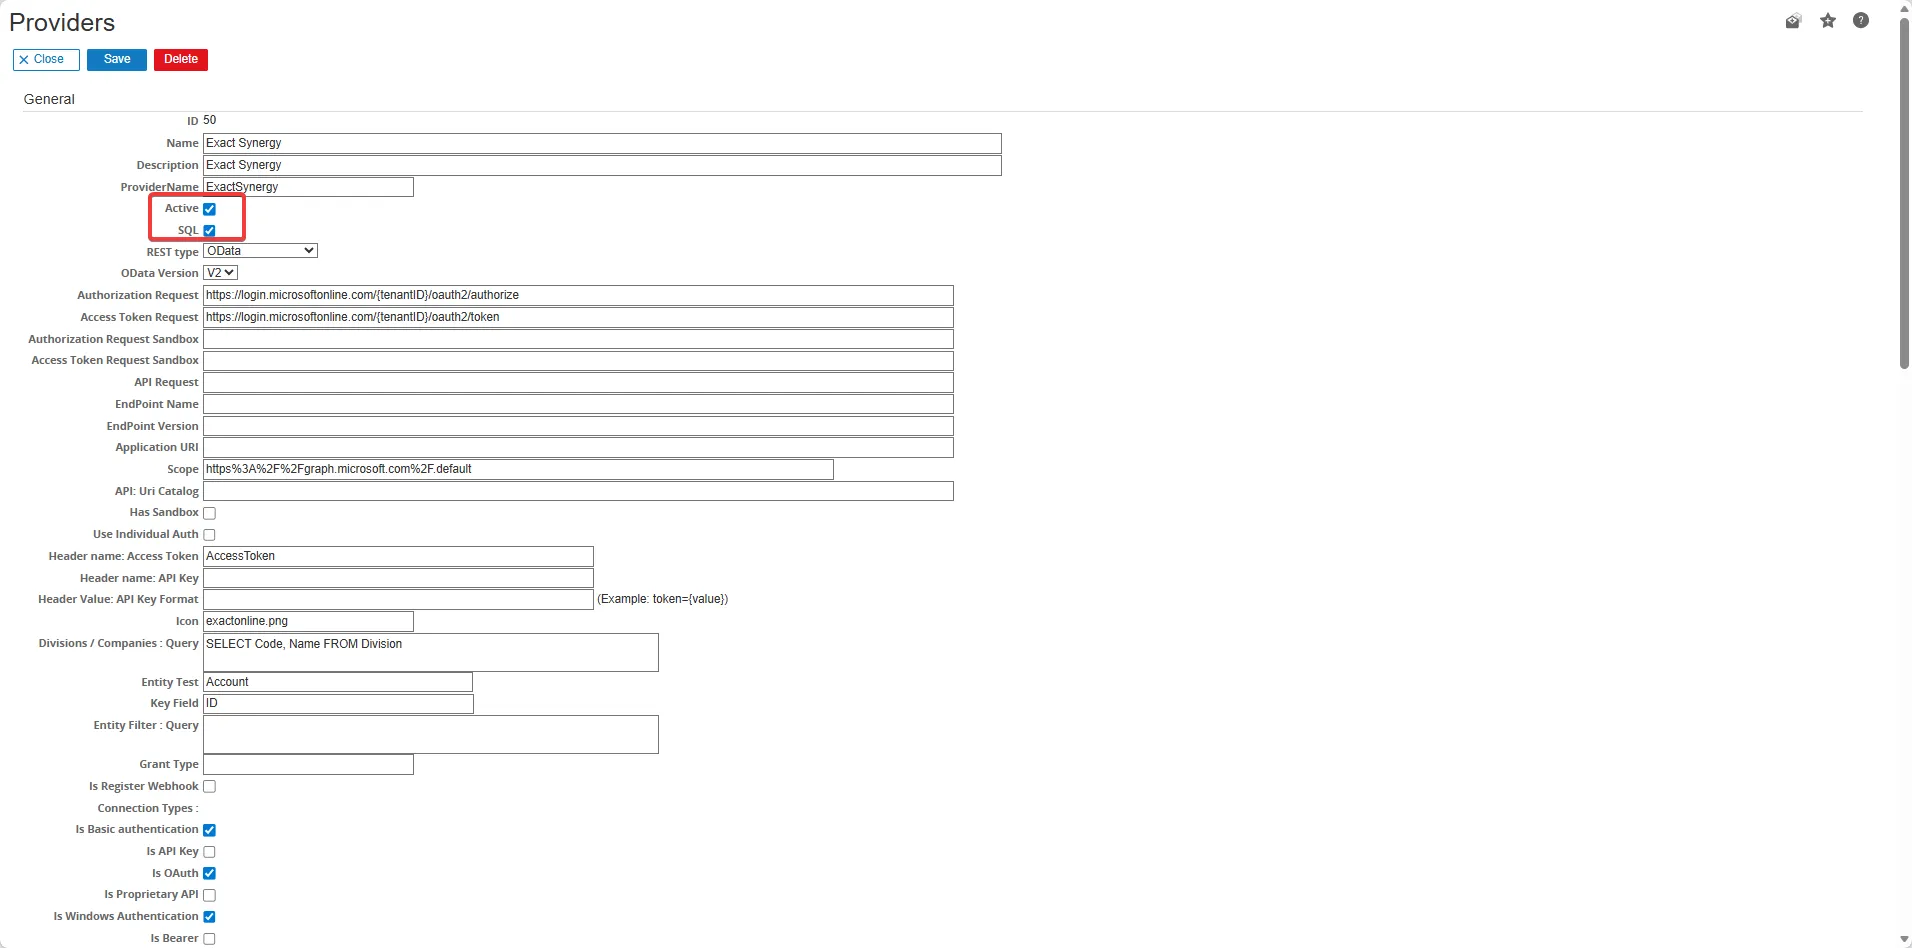
Section titled “Synergy RPA Providers”- In Synergy, go to Modules > RPA > Setup > Connection > Provider.
- Click Show, expand Exact Synergy, and verify:
- Active is checked
- SQL is checked
- Click Save.
Synergy RPA Connection
Section titled “Synergy RPA Connection”- Go to Modules > RPA > Setup > Connection > Connections and click New.
- Fill in the connection form:
- Software: Exact Synergy
- Type: FID
- Fill all required fields (Client ID, Client Secret, Tenant ID, Scope, Token type) using values from the Synergy (Web) app registration
- Click Save.
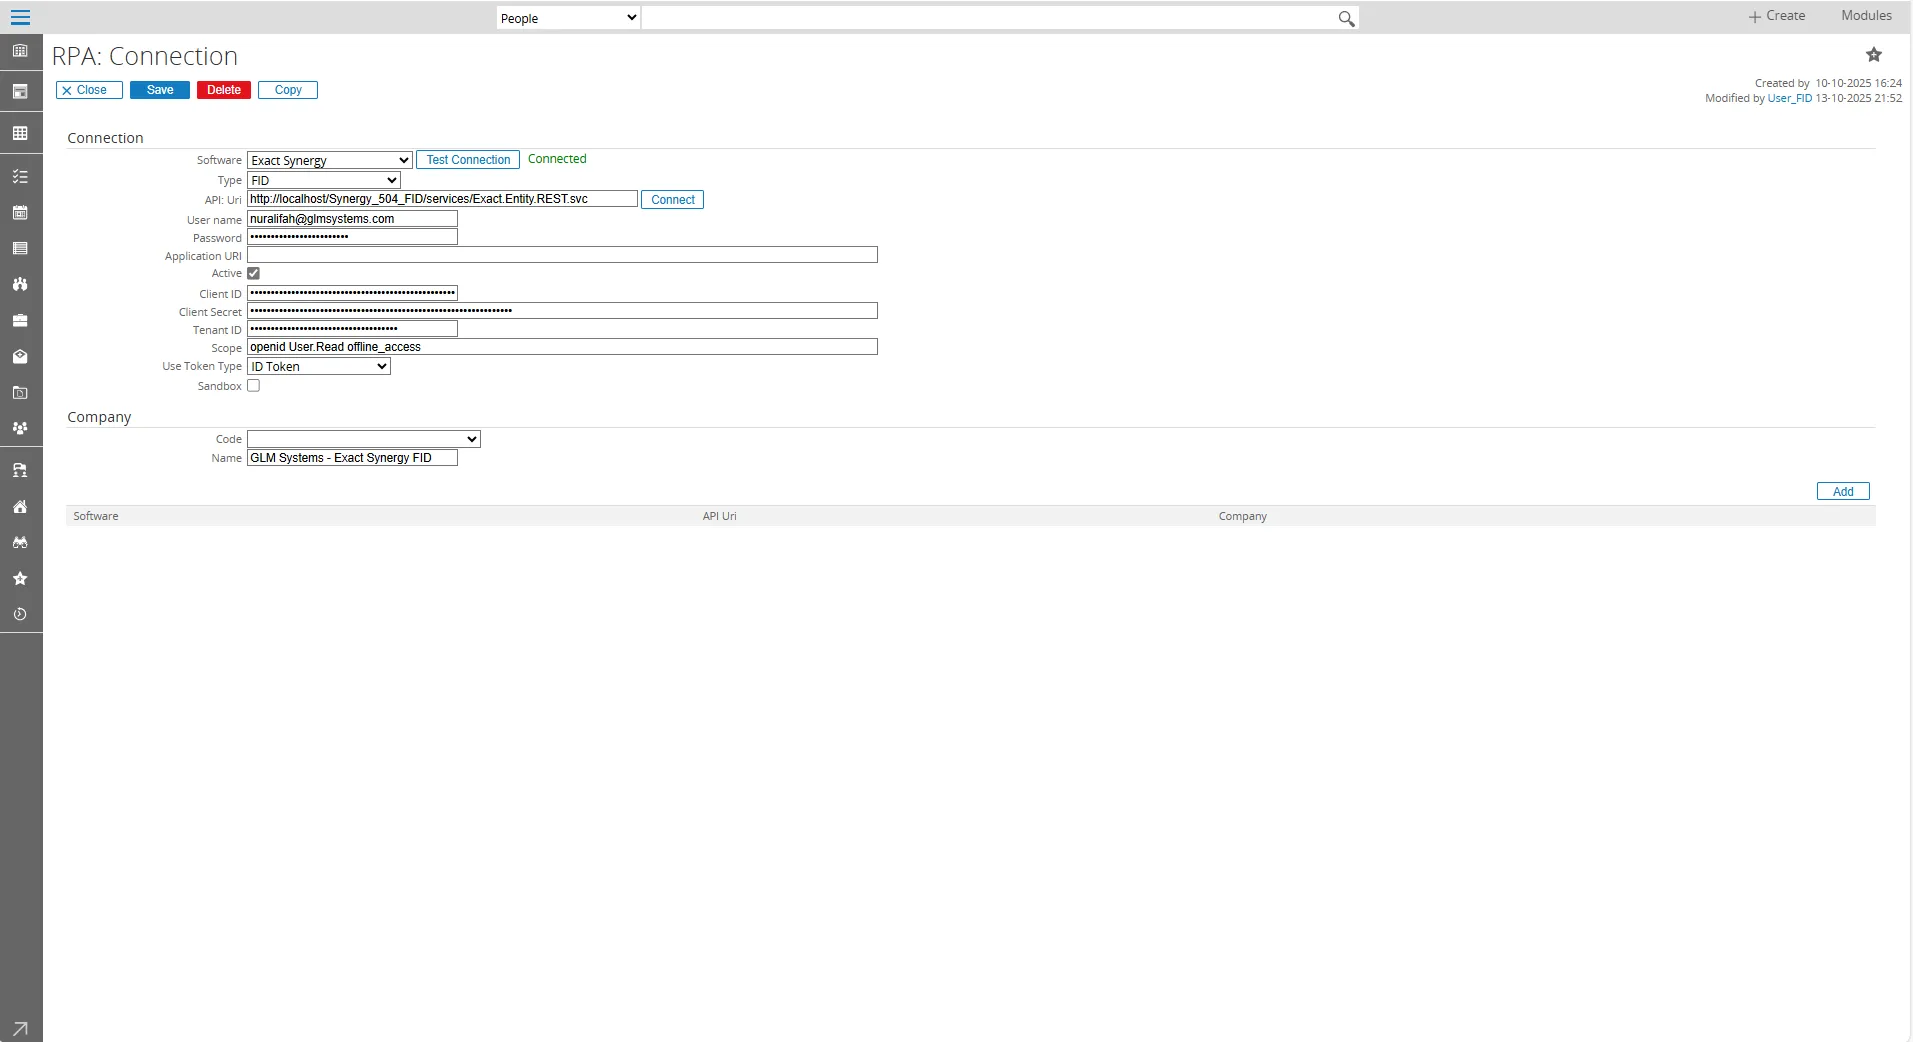
Synergy RPA Rules Settings
Section titled “Synergy RPA Rules Settings”- Go to RPA > Setup > Setting > Rules.
- Click Edit, select the RPA rule, and set:
- Type: FID
- FID Connection: the RPA Synergy connection created above
- Click Save.
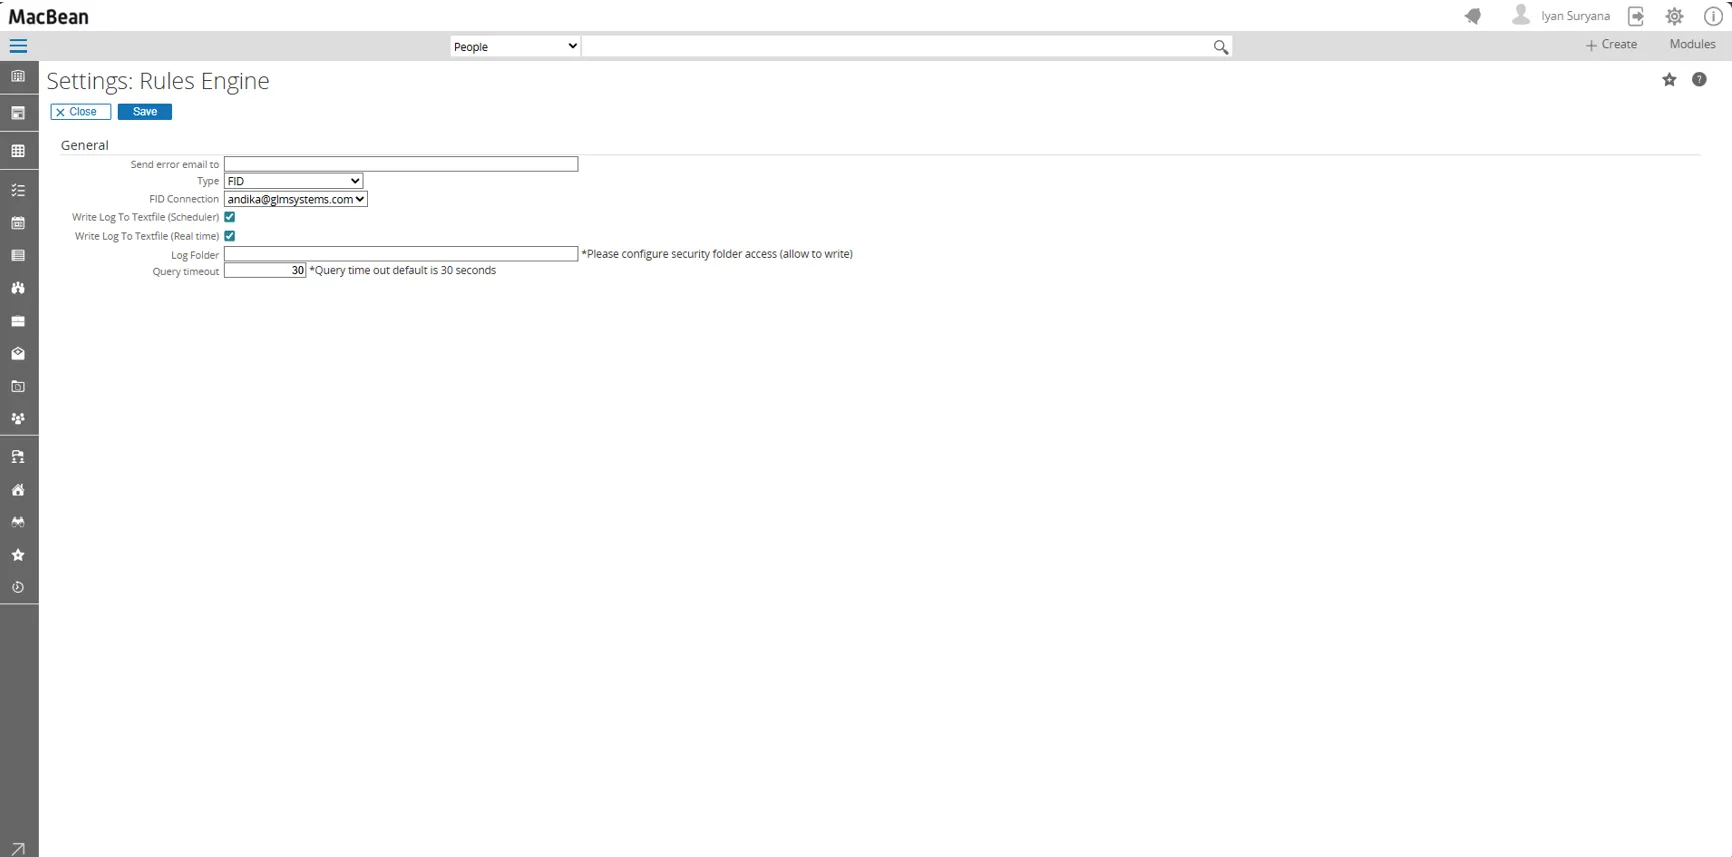
Configure Globe+ for RPA
Section titled “Configure Globe+ for RPA”Check Globe+ App Authentication
-
In Microsoft Entra ID, go to App registrations and open the Globe+ FID application.
-
Under Manage > Authentication (Preview) > Mobile and desktop applications, verify these Redirect URIs are present:
urn:ietf:wg:oauth:2.0:oobhttp://localhost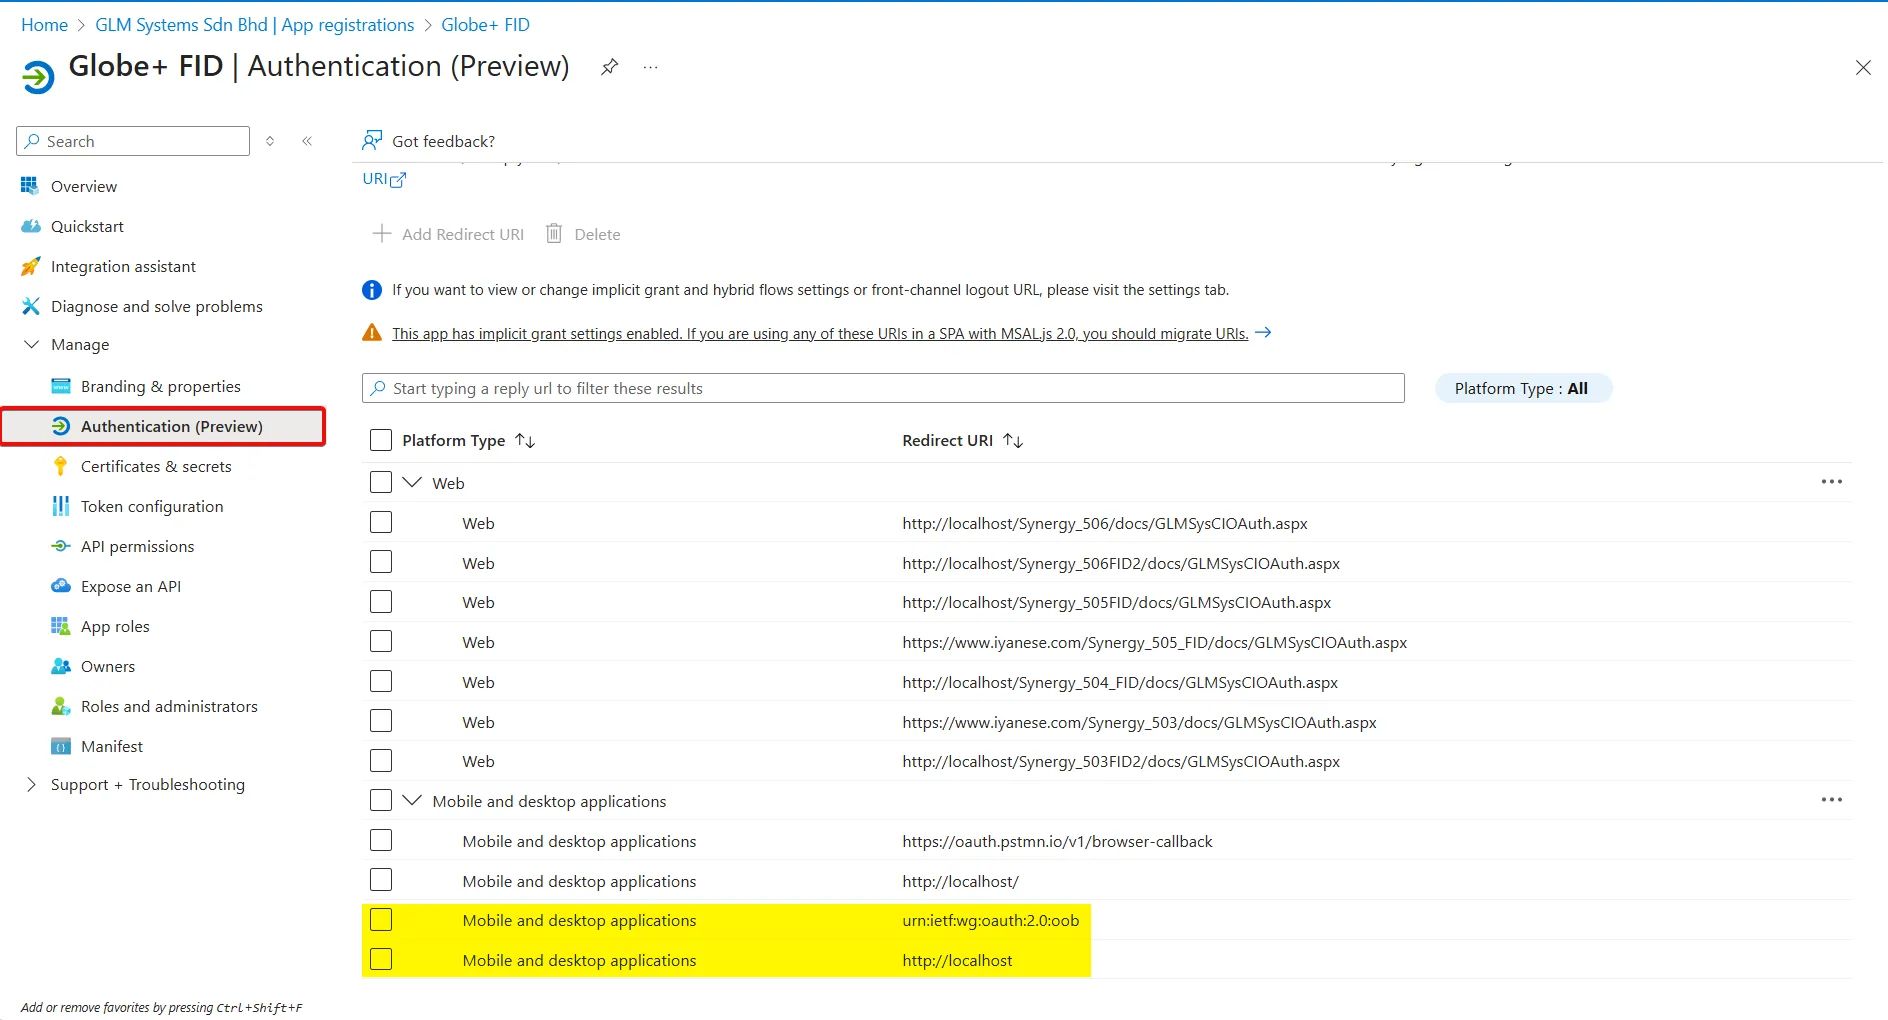
-
Under Web, verify:
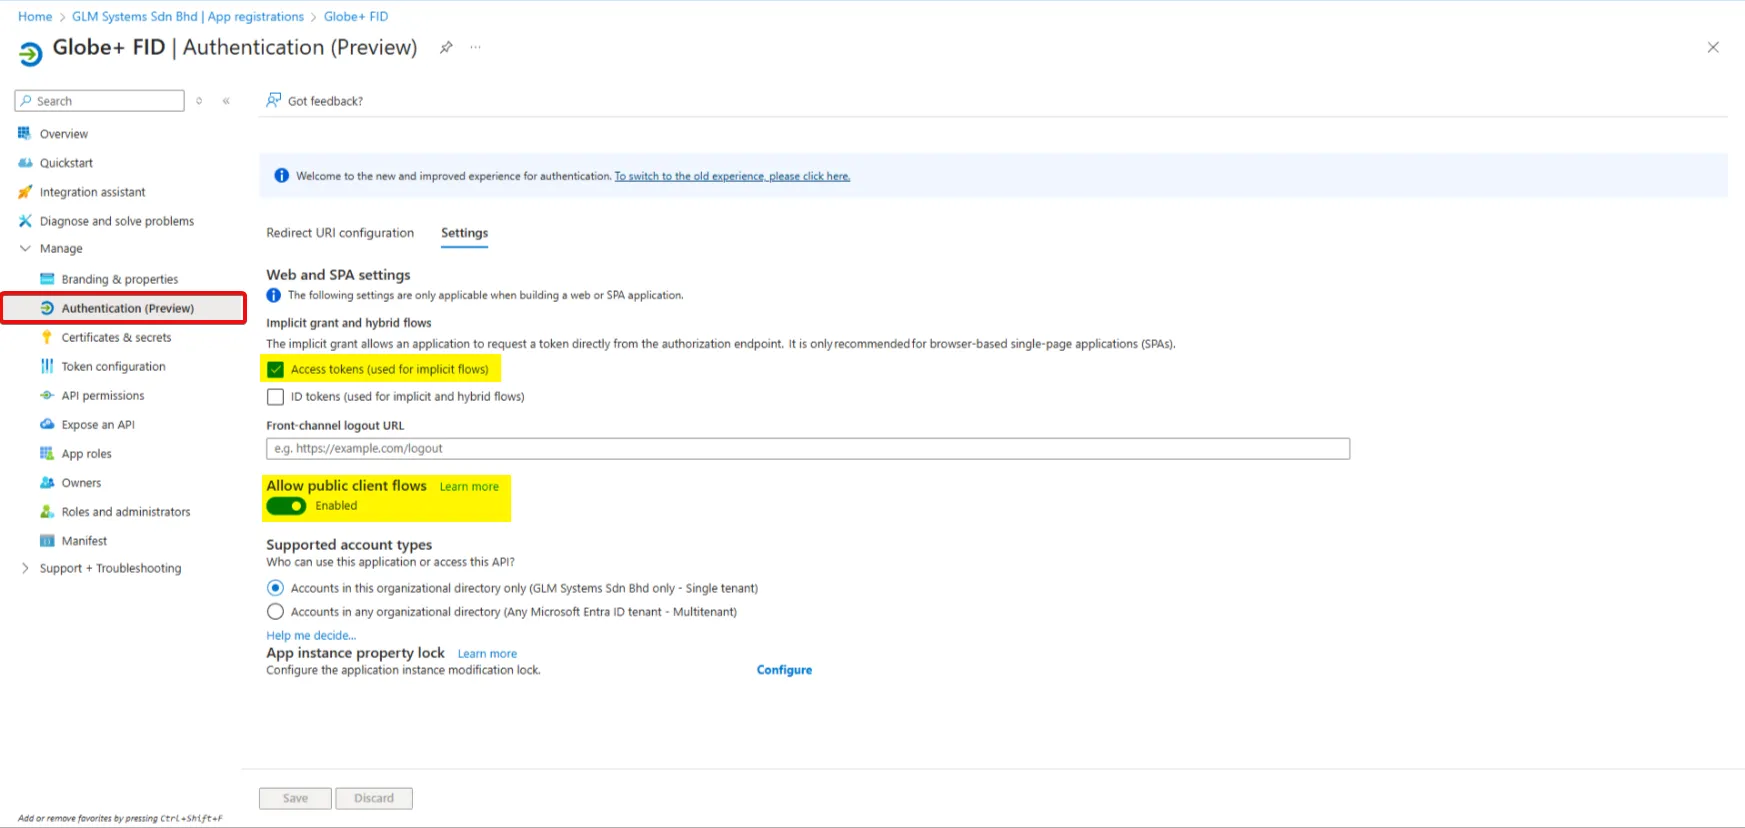
- Access tokens (used for implicit flows) is enabled
- ID tokens (used for implicit and hybrid flows) is enabled
-
Verify Allow public client flows is set to Enabled.
Globe+ RPA Providers, Connection and Rules Settings
Section titled “Globe+ RPA Providers, Connection and Rules Settings”Globe+ RPA Providers
Section titled “Globe+ RPA Providers”- In Synergy, go to RPA > Setup > Connection > Provider.
- Expand Exact Globe+, verify all required fields are filled, and ensure Active and SQL are checked.
- Click Save.
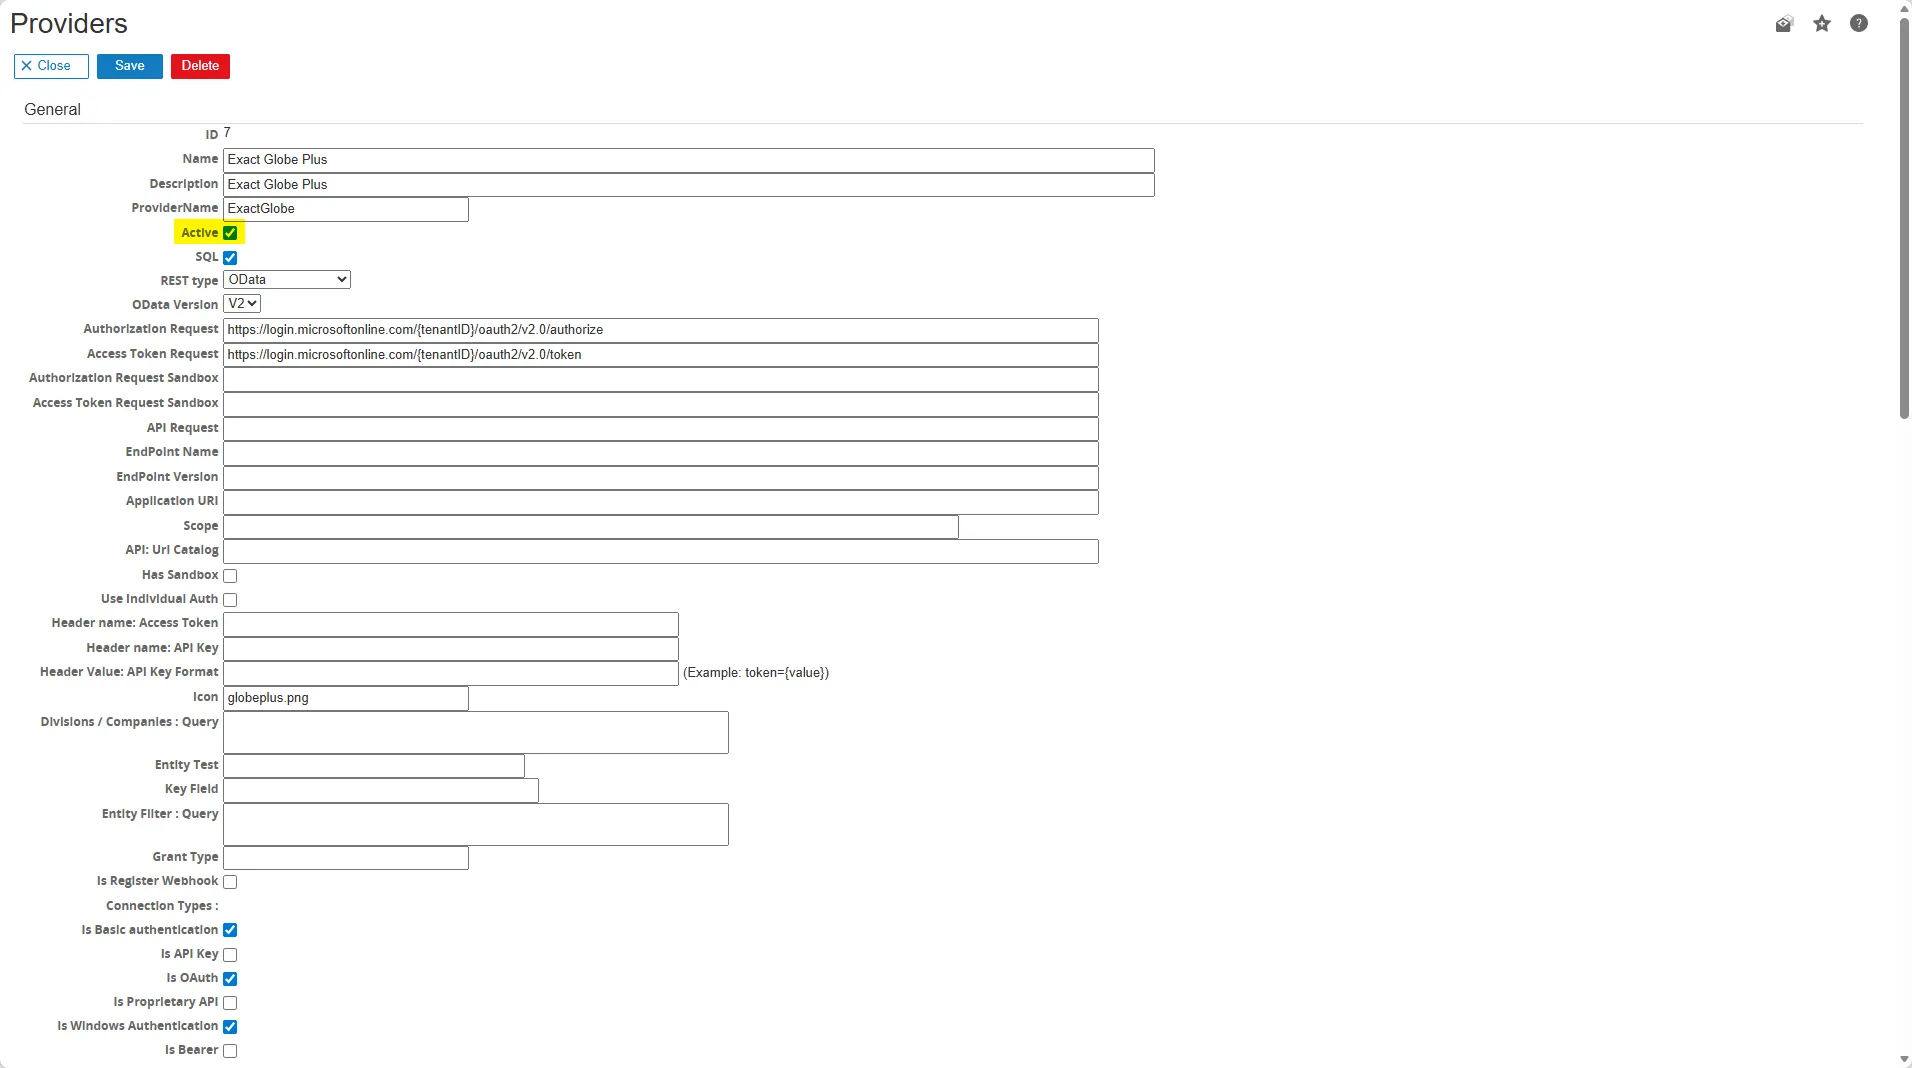
Globe+ RPA Connection
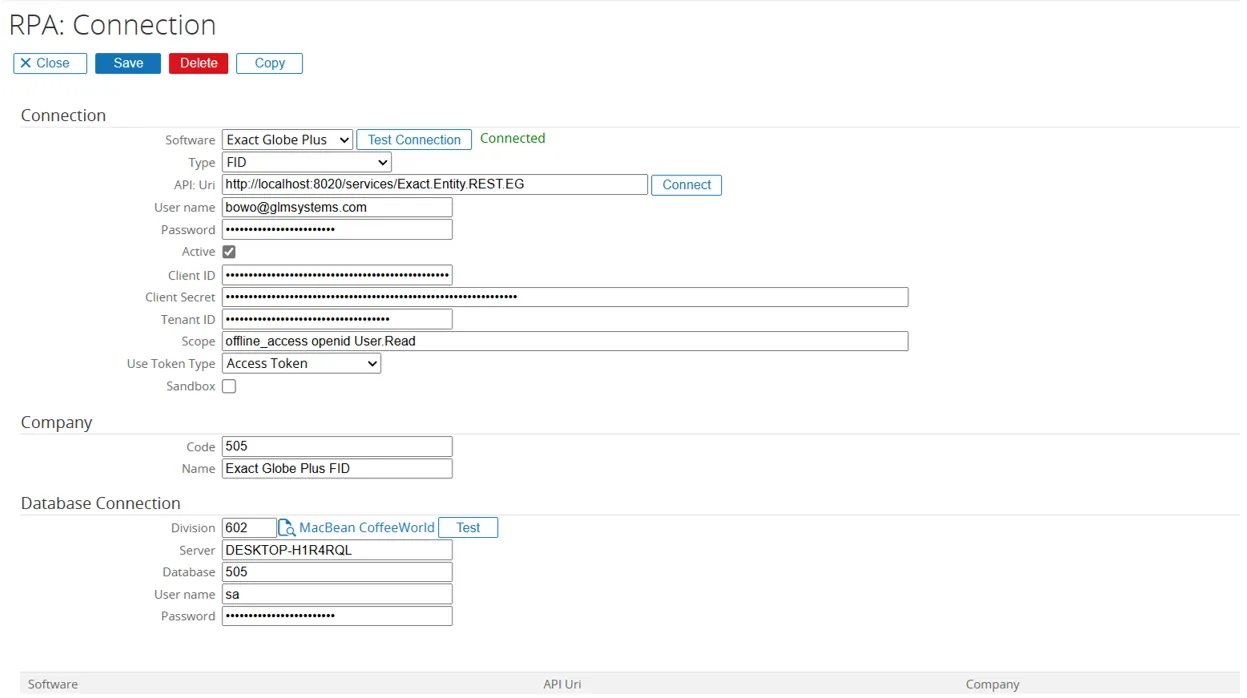
Section titled “Globe+ RPA Connection”- Go to RPA > Setup > Connection > Connections, click New, and fill:
| Field | Description |
|---|---|
| Type | FID |
| API URI | http://localhost:8020/services/Exact.Entity.REST.EG |
| Username | Azure AD account email |
| Password | Azure AD account password |
| Client ID | Application (client) ID from the Globe+ FID app |
| Client Secret | Value from Certificates & secrets |
| Tenant ID | Directory (tenant) ID |
| Scope | offline_access openid User.Read |
| Use Token Type | Access Token |
| Company / Database | Division, Server, Database, User, Password |
- Test the Database connection, the API URI connection, and the software test connection. All should show connected.
- Click Save.
Globe+ Rules Settings
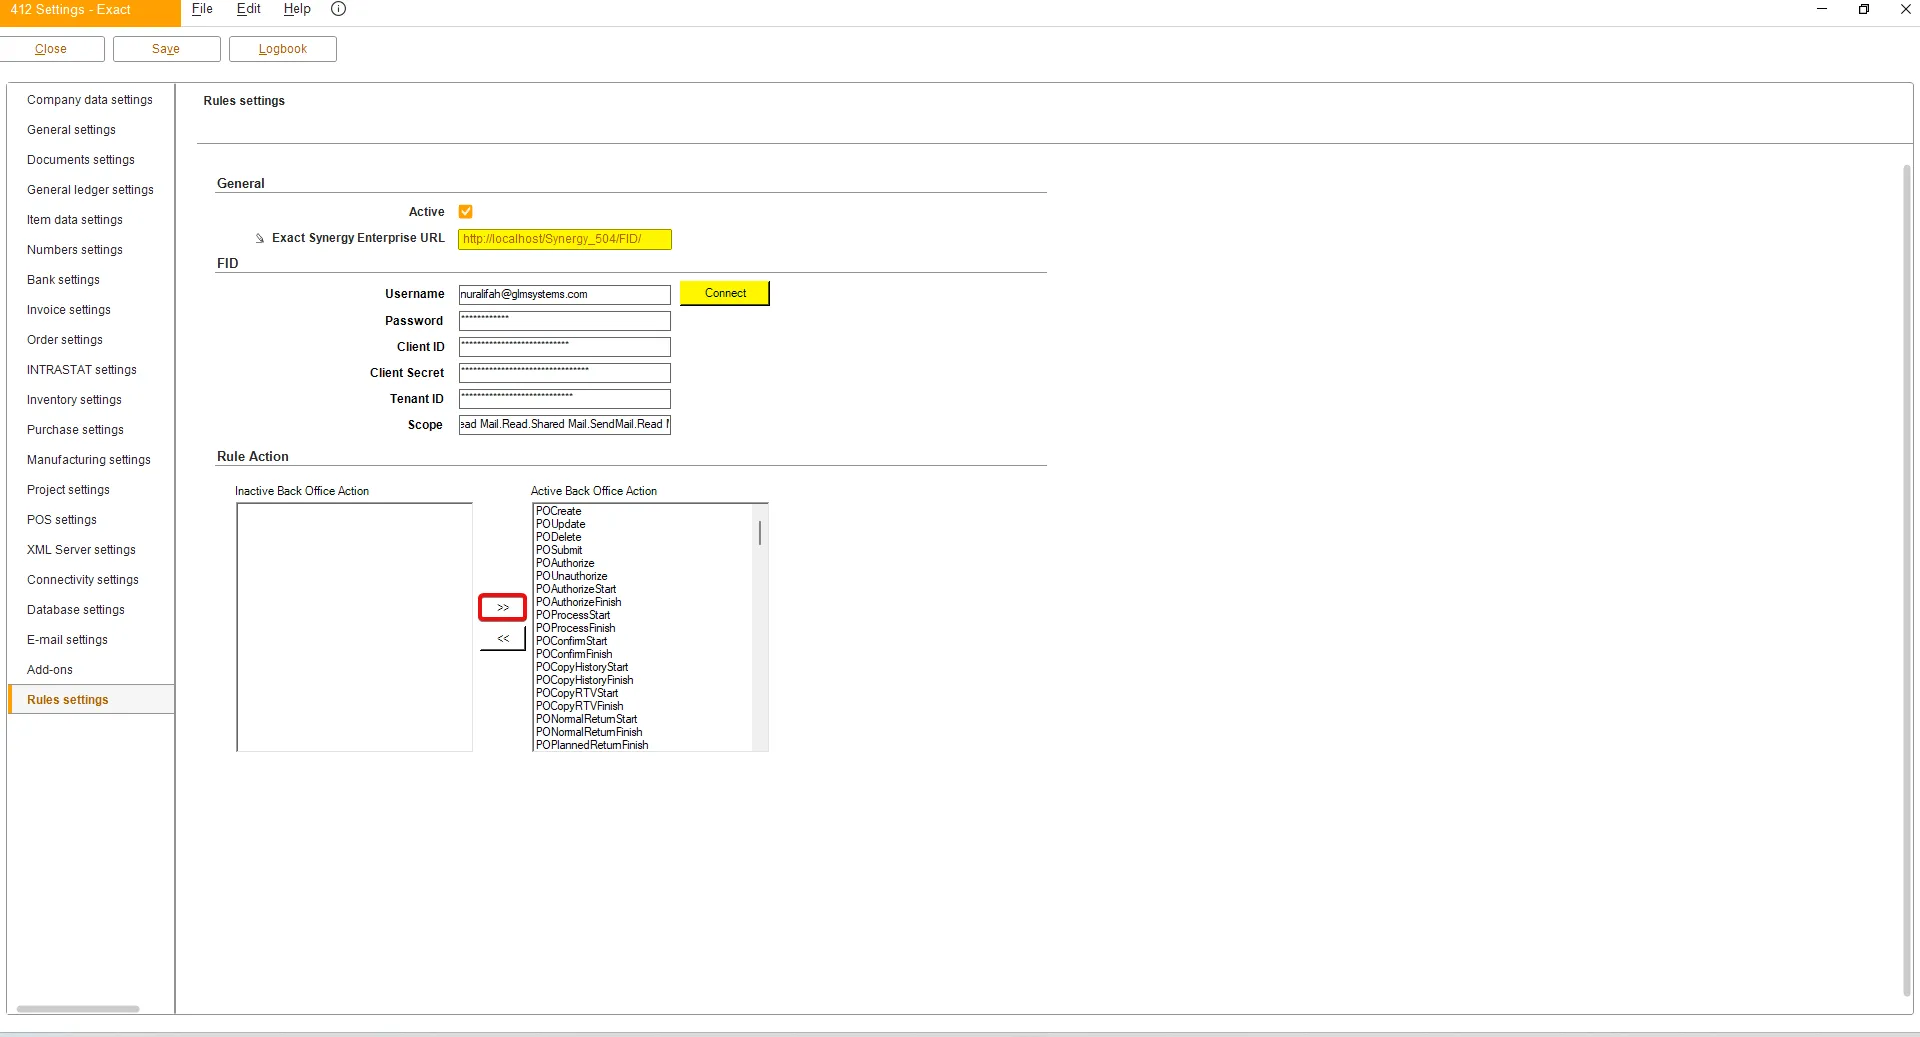
Section titled “Globe+ Rules Settings”- Open your Globe+ application and go to System > Settings > Rules Settings.
- Enter your Exact Synergy Enterprise URL.
- Fill all FID fields (using the same RPA values as in the Exact Synergy connection).
- Move the relevant Back Office action from Inactive to Active.
- Click Connect, then click Save.
Standard FID not set up yet
Section titled “Standard FID not set up yet”This section describes the scenario where FID has not been configured at all. In this case, you must first complete the standard FID setup for Exact Synergy Enterprise and Exact Globe+ before using RPA.
Exact Synergy Standard FID setup
Section titled “Exact Synergy Standard FID setup”Run FIDConfigurator
- Open
C:\Exact Synergy Enterprise 504\cabon your computer. - Run the FID Configurator application as administrator.
- After the application opens, fill in all fields in the Federated Identity Configurator box:
| Field | Description |
|---|---|
| Installation Folder | C:\Program Files\Exact Globe+ |
| Identity Provider | Windows Azure Active Directory |
| Protocol | OAuth |
| Metadata | |
| Authority | Auto-filled after Metadata |
| Client ID | |
| Client ID (Web) | |
| Client Secret | |
| Resource | |
| Allowed Audience | Auto-filled after Resource |
| Allowed Audience (Web) | Auto-filled after Client ID Web |
| Authorize Endpoint | Auto-filled after Metadata |
| Token Endpoint | Auto-filled after Metadata |
| Reply |
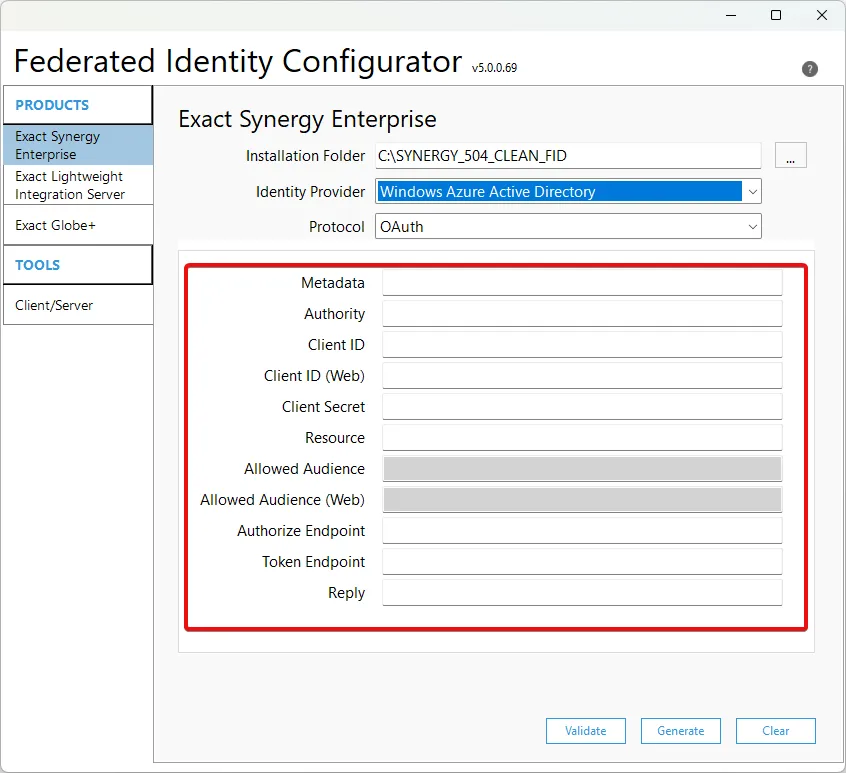
How to obtain the values in Microsoft Entra ID
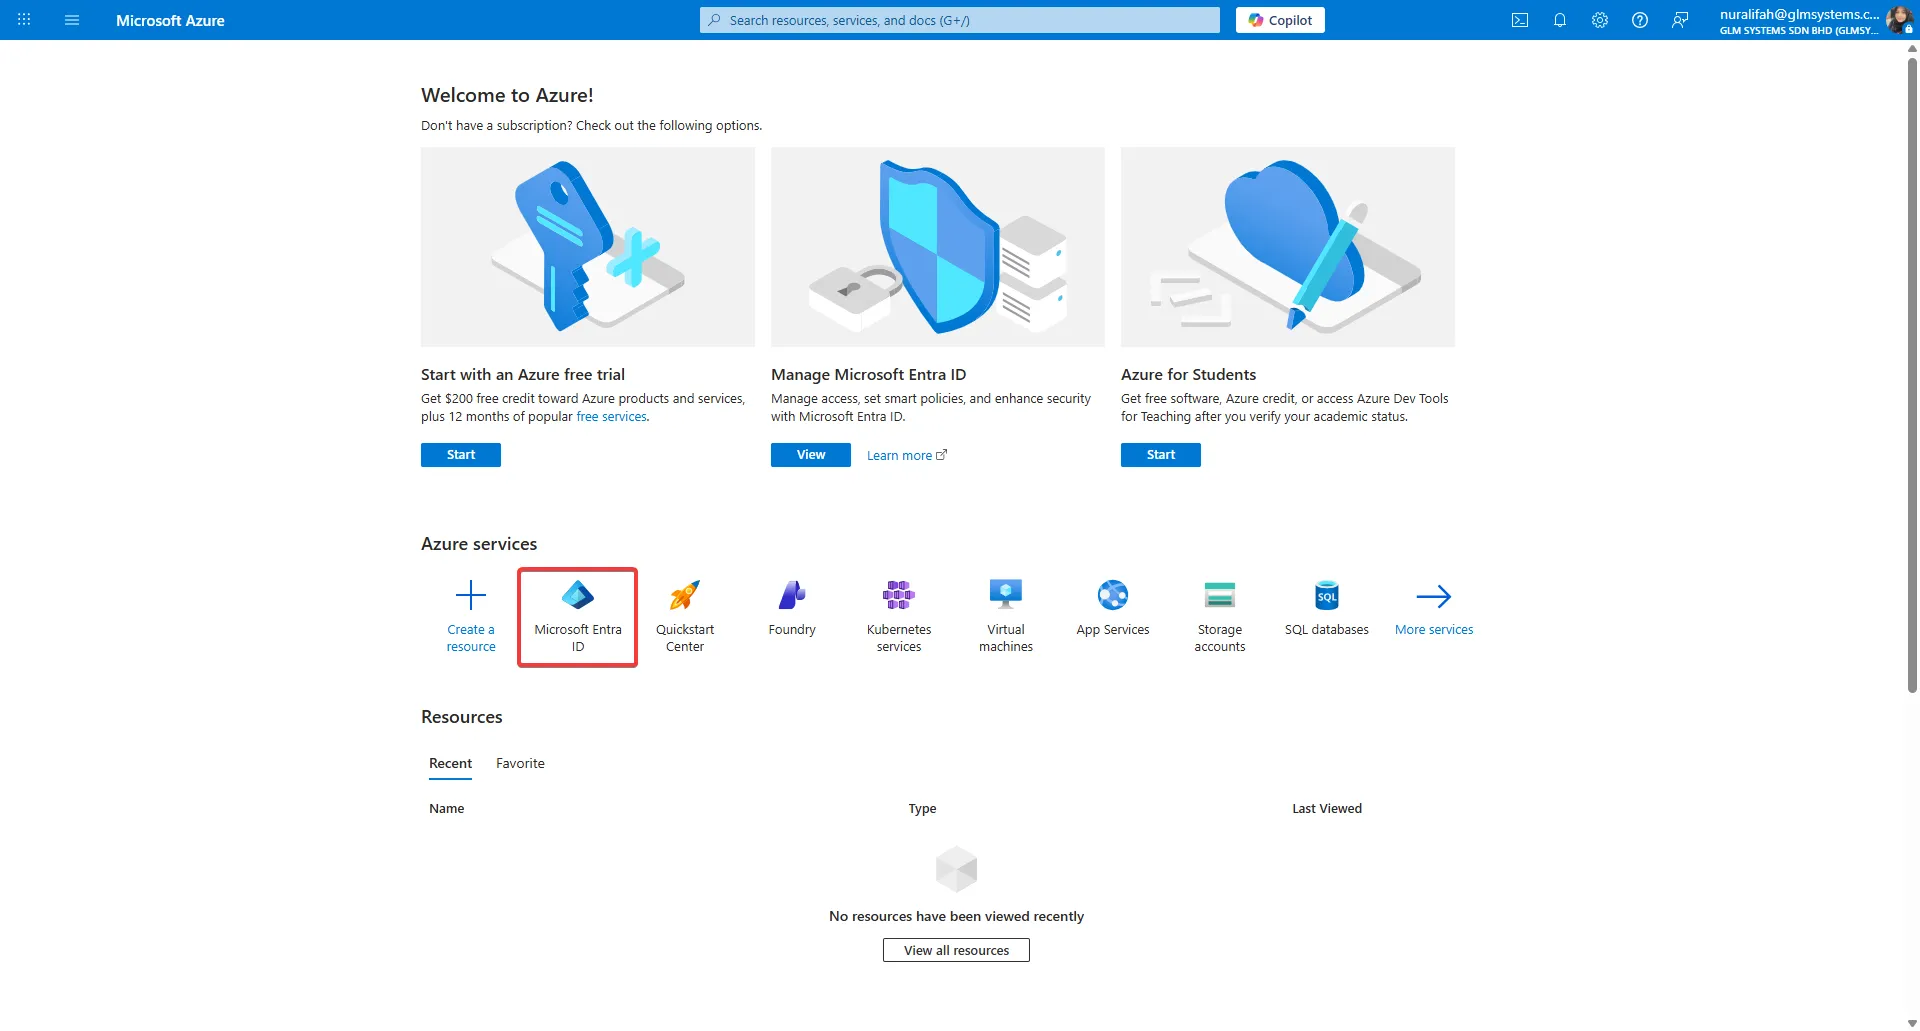
- Go to https://portal.azure.com and log in with a valid Microsoft account.
- Go to Microsoft Entra ID.
How to get the Metadata
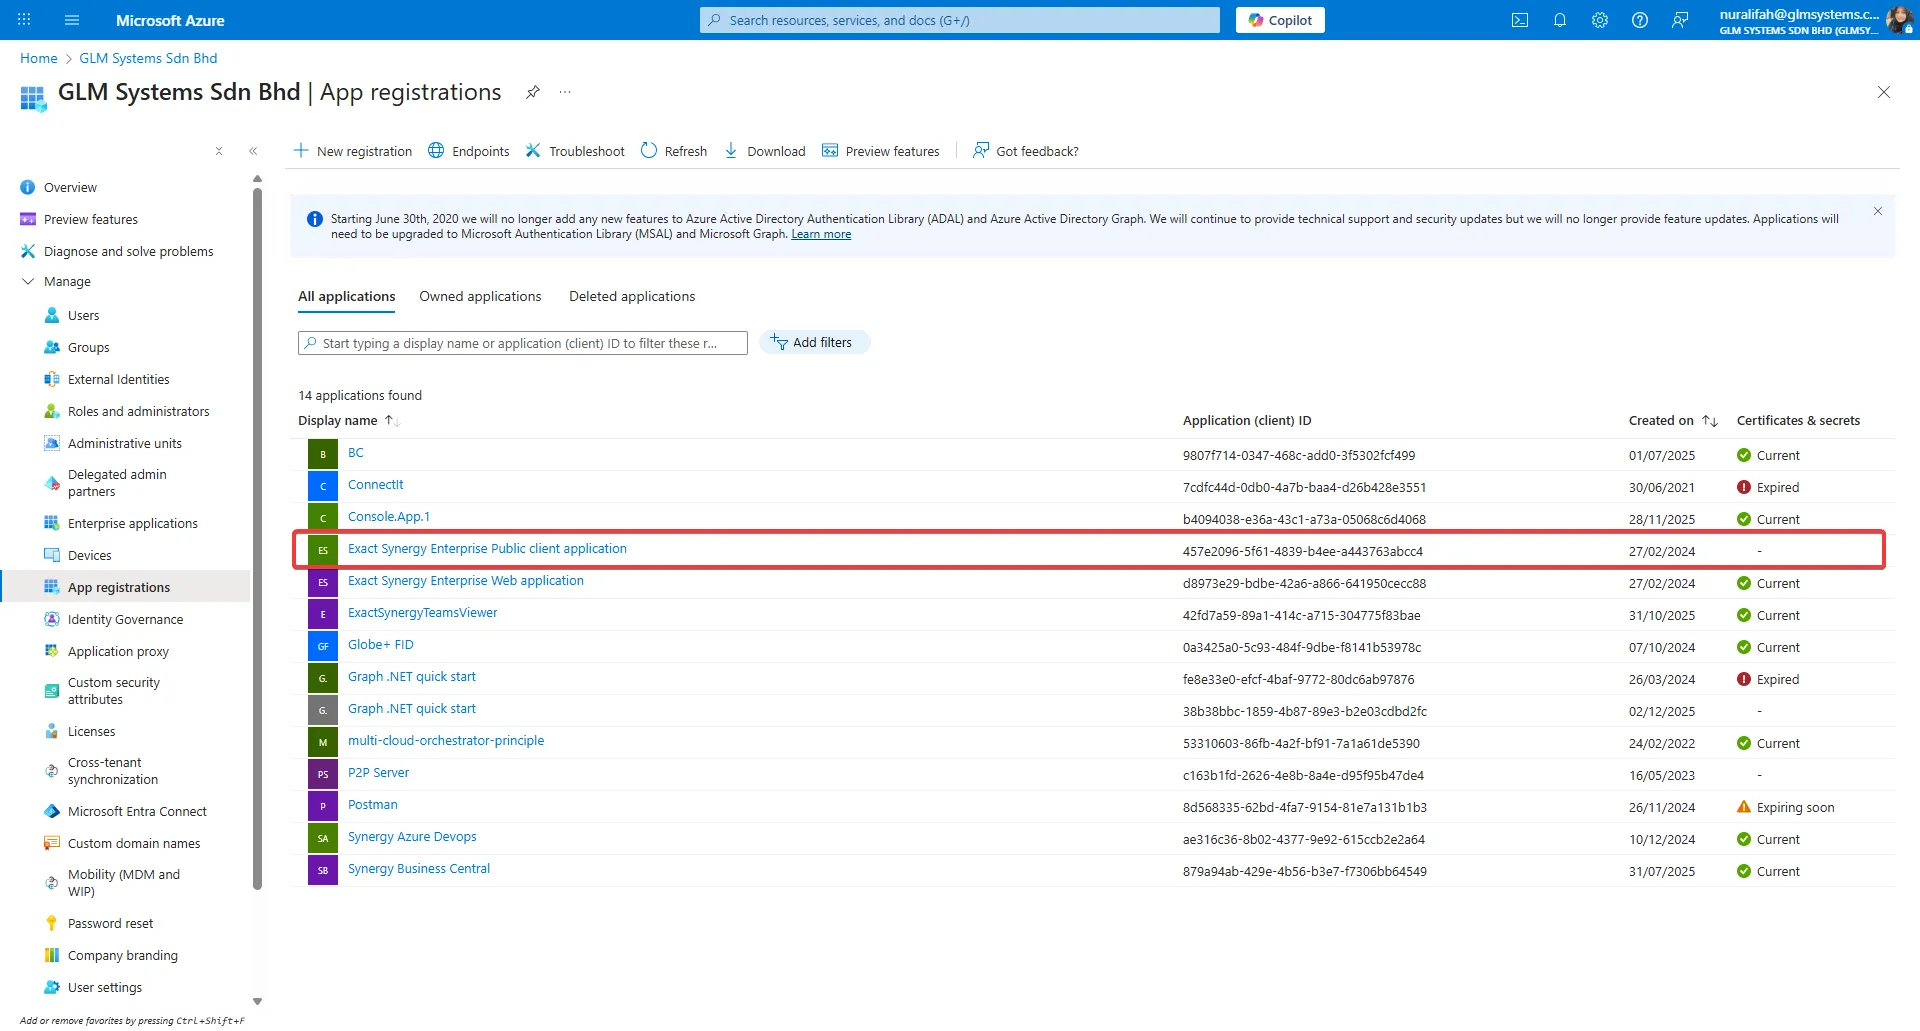
- Go to Manage > App registrations and select Exact Synergy Enterprise Public Client Application.
- Click Endpoints and copy the federation metadata document URL.
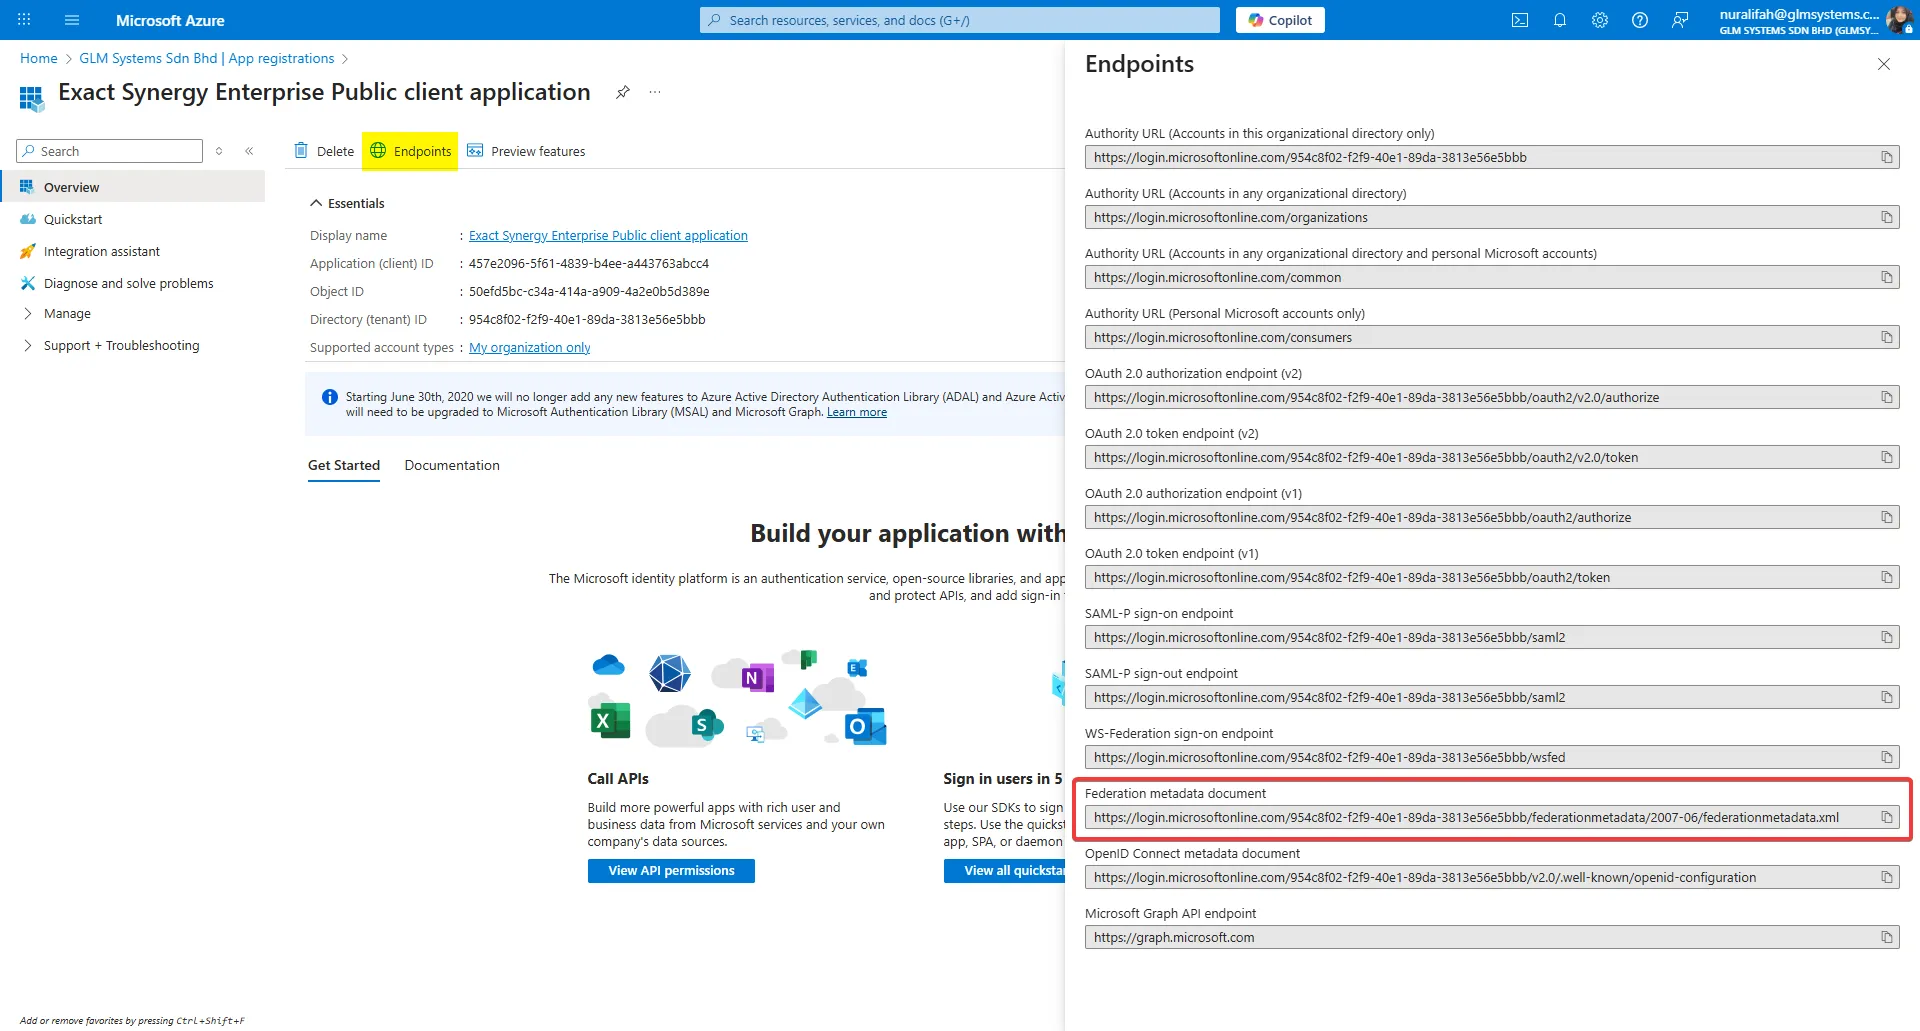
- Paste it into the Metadata field in FIDConfigurator.
- After entering Metadata, the Authority, Authorize Endpoint, and Token Endpoint fields are filled automatically.
How to get the Client ID (Public)
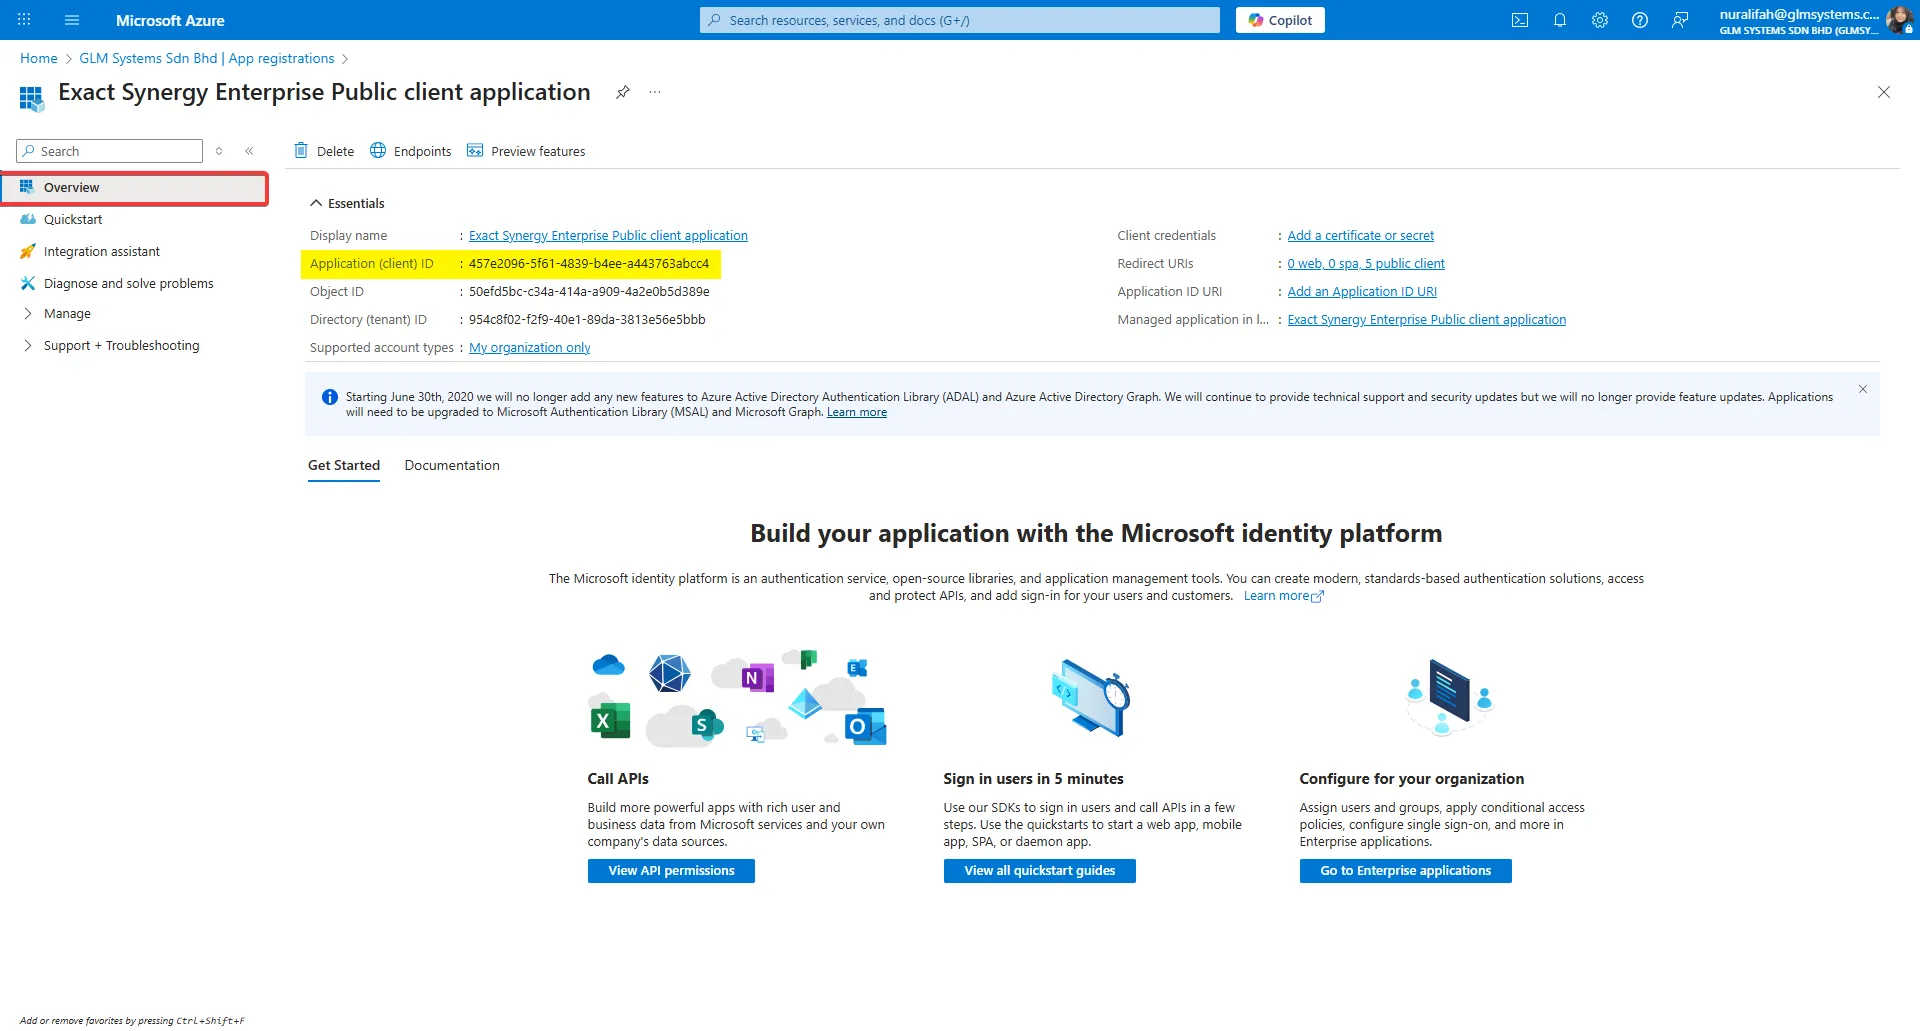
- In the Azure portal, open the relevant app registration and go to Overview.
- Copy the Application (client) ID and paste it into the Client ID field.
How to get the Client ID (Web)
- Go to Manage > App registrations and select Exact Synergy Enterprise Web Application.
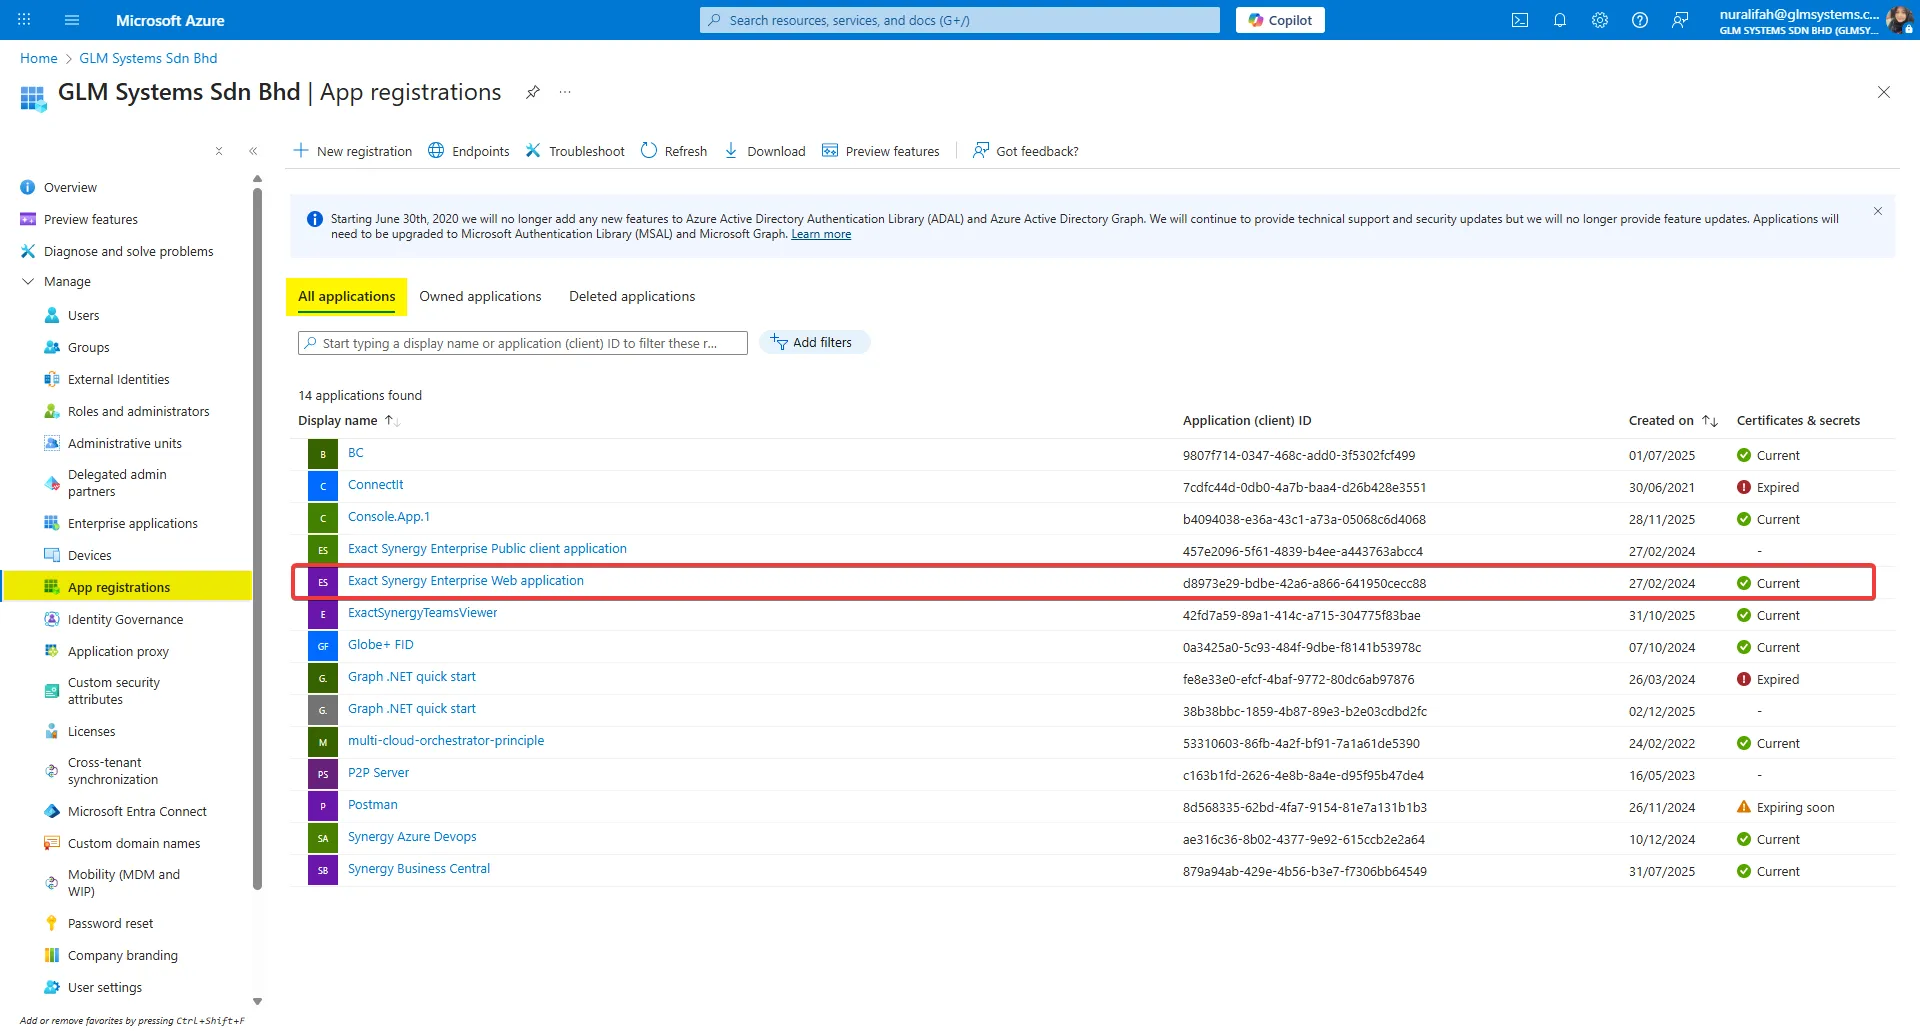
- Copy the Application (client) ID and paste it into the Client ID (Web) field.
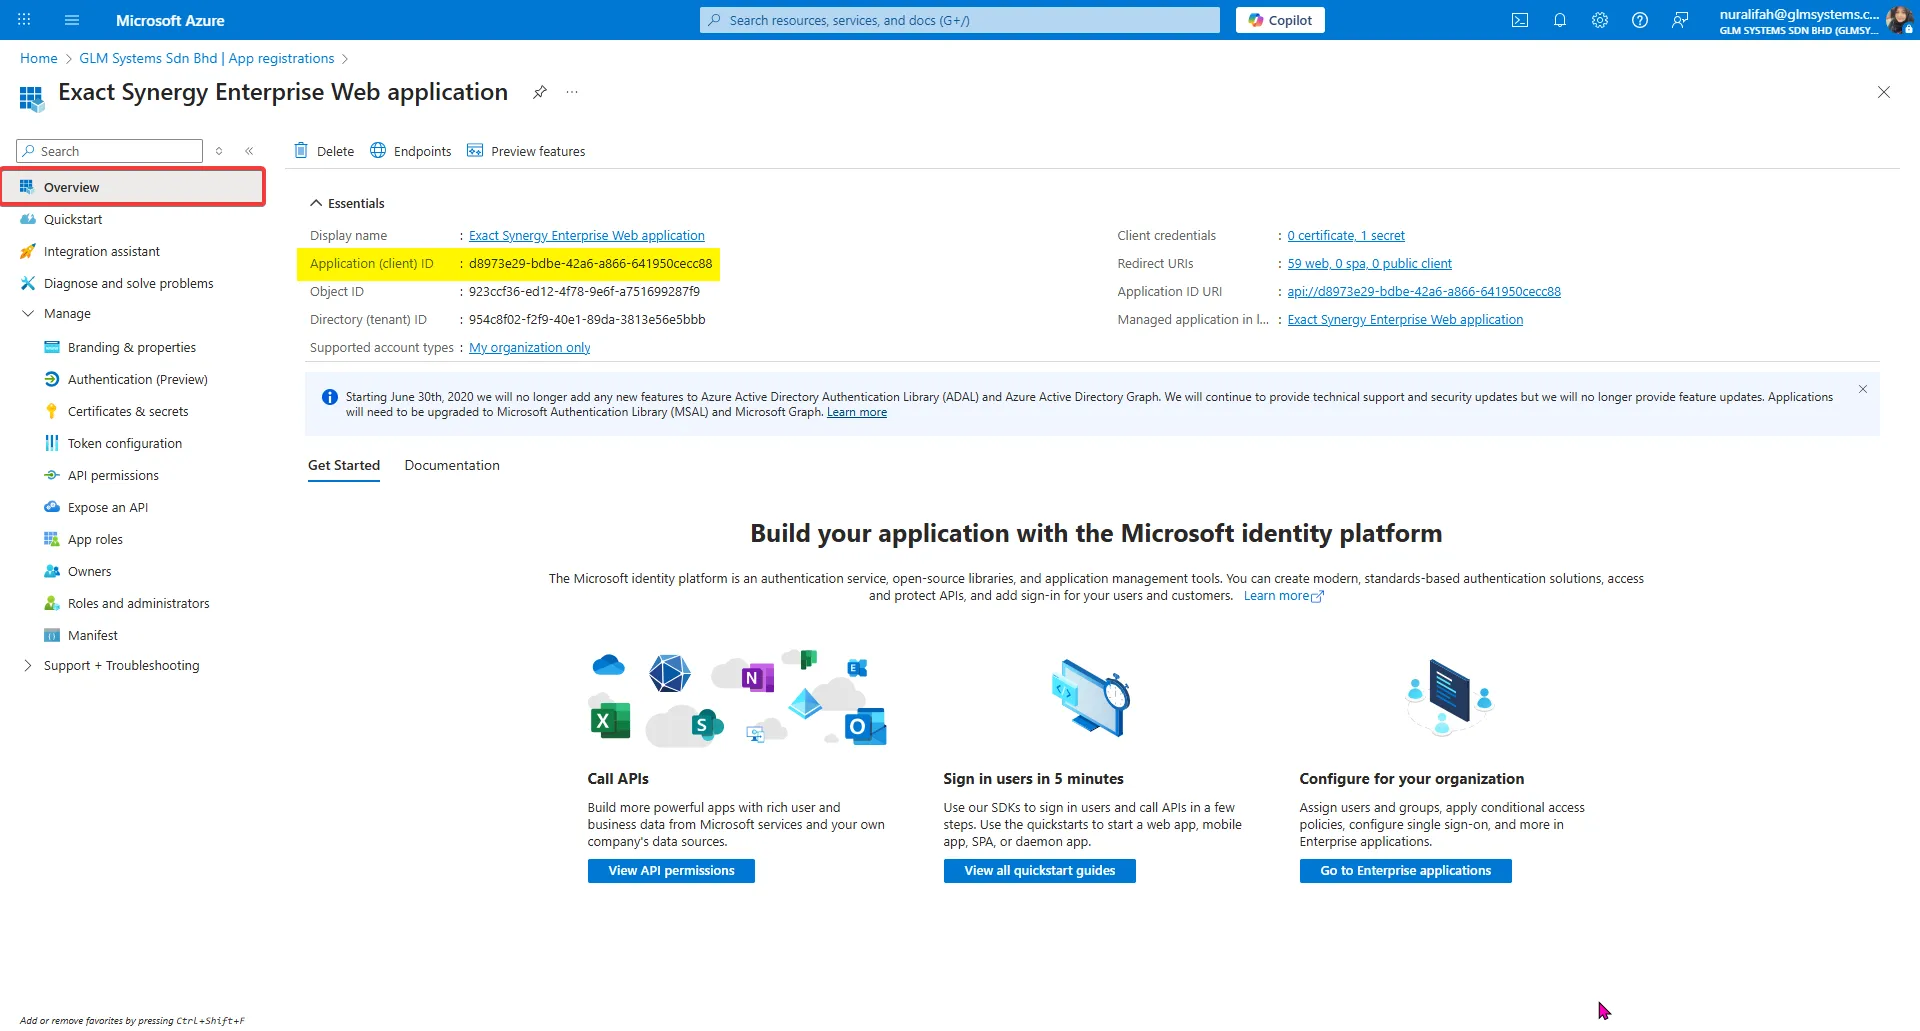
- After entering Client ID (Web), the Allowed Audience (Web) field is auto-filled.
How to get the Client Secret
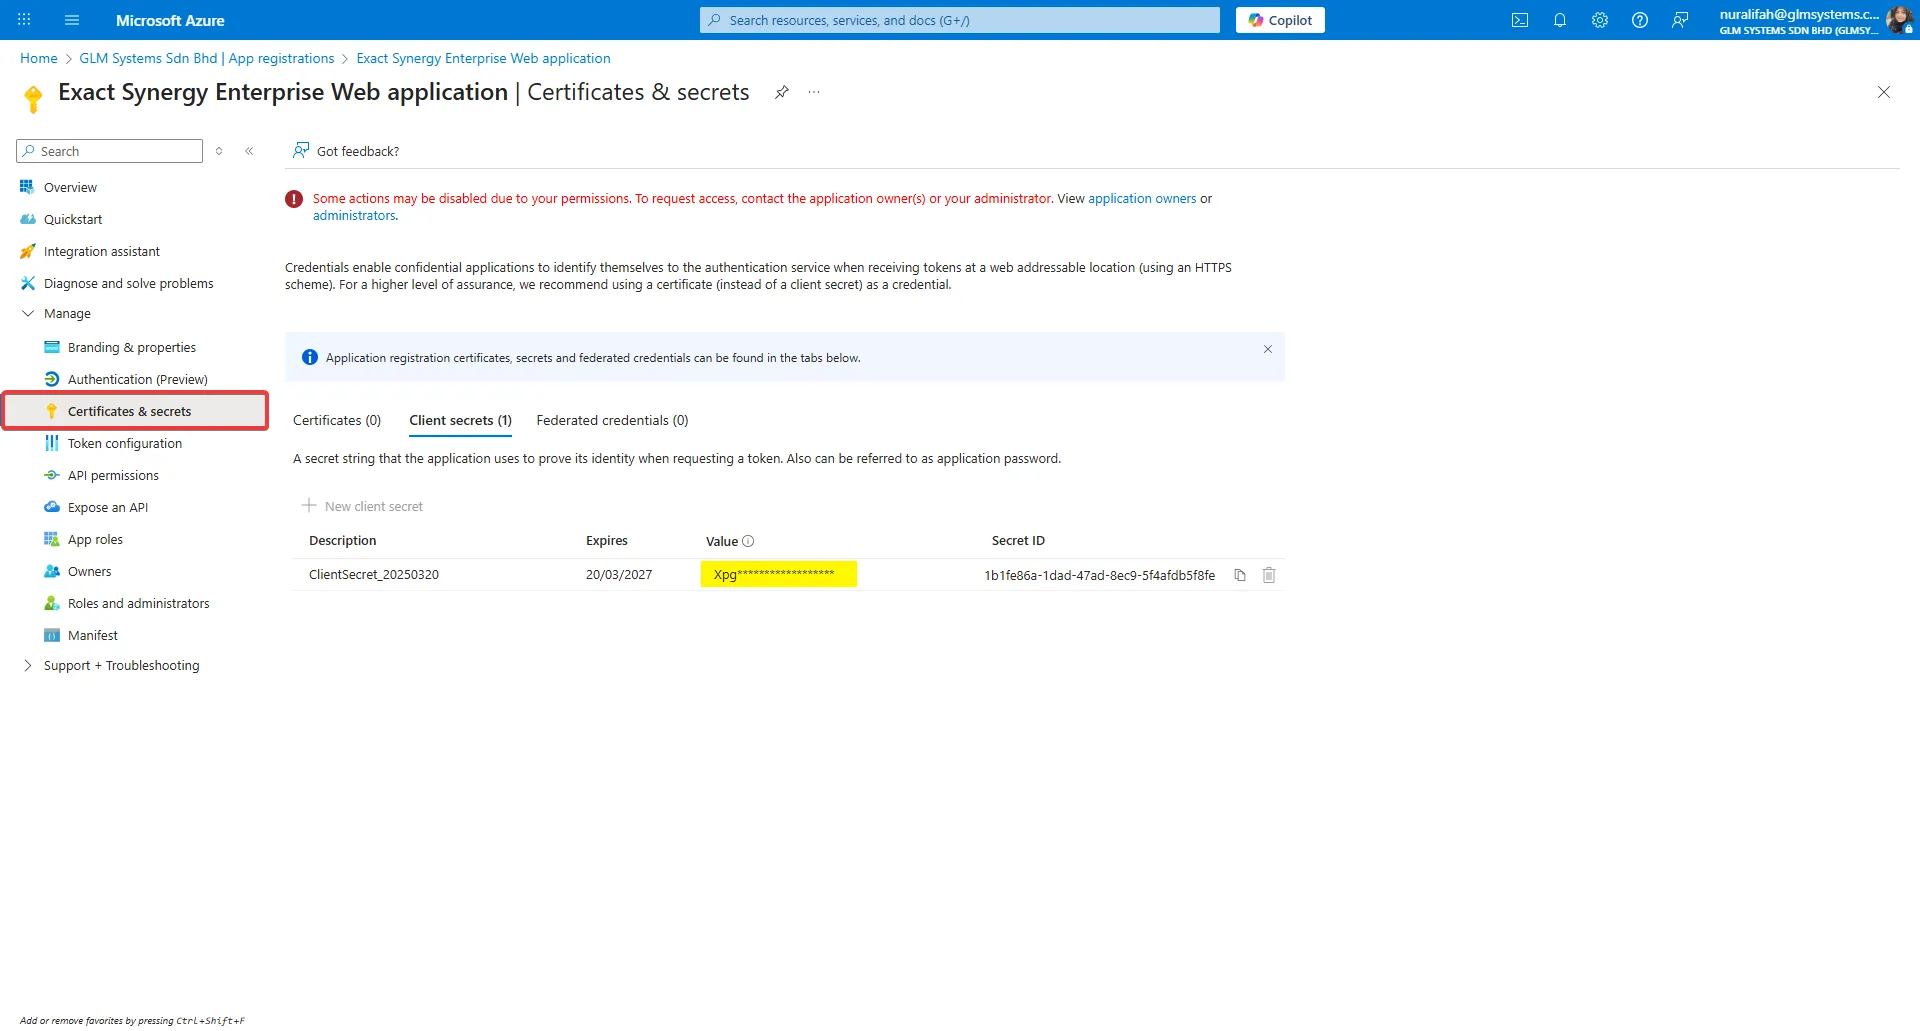
- Go to Manage > Certificates & secrets > Client secrets.
- Create or use an existing client secret, copy the Value, and paste it into the Client Secret field.
How to get the Resource
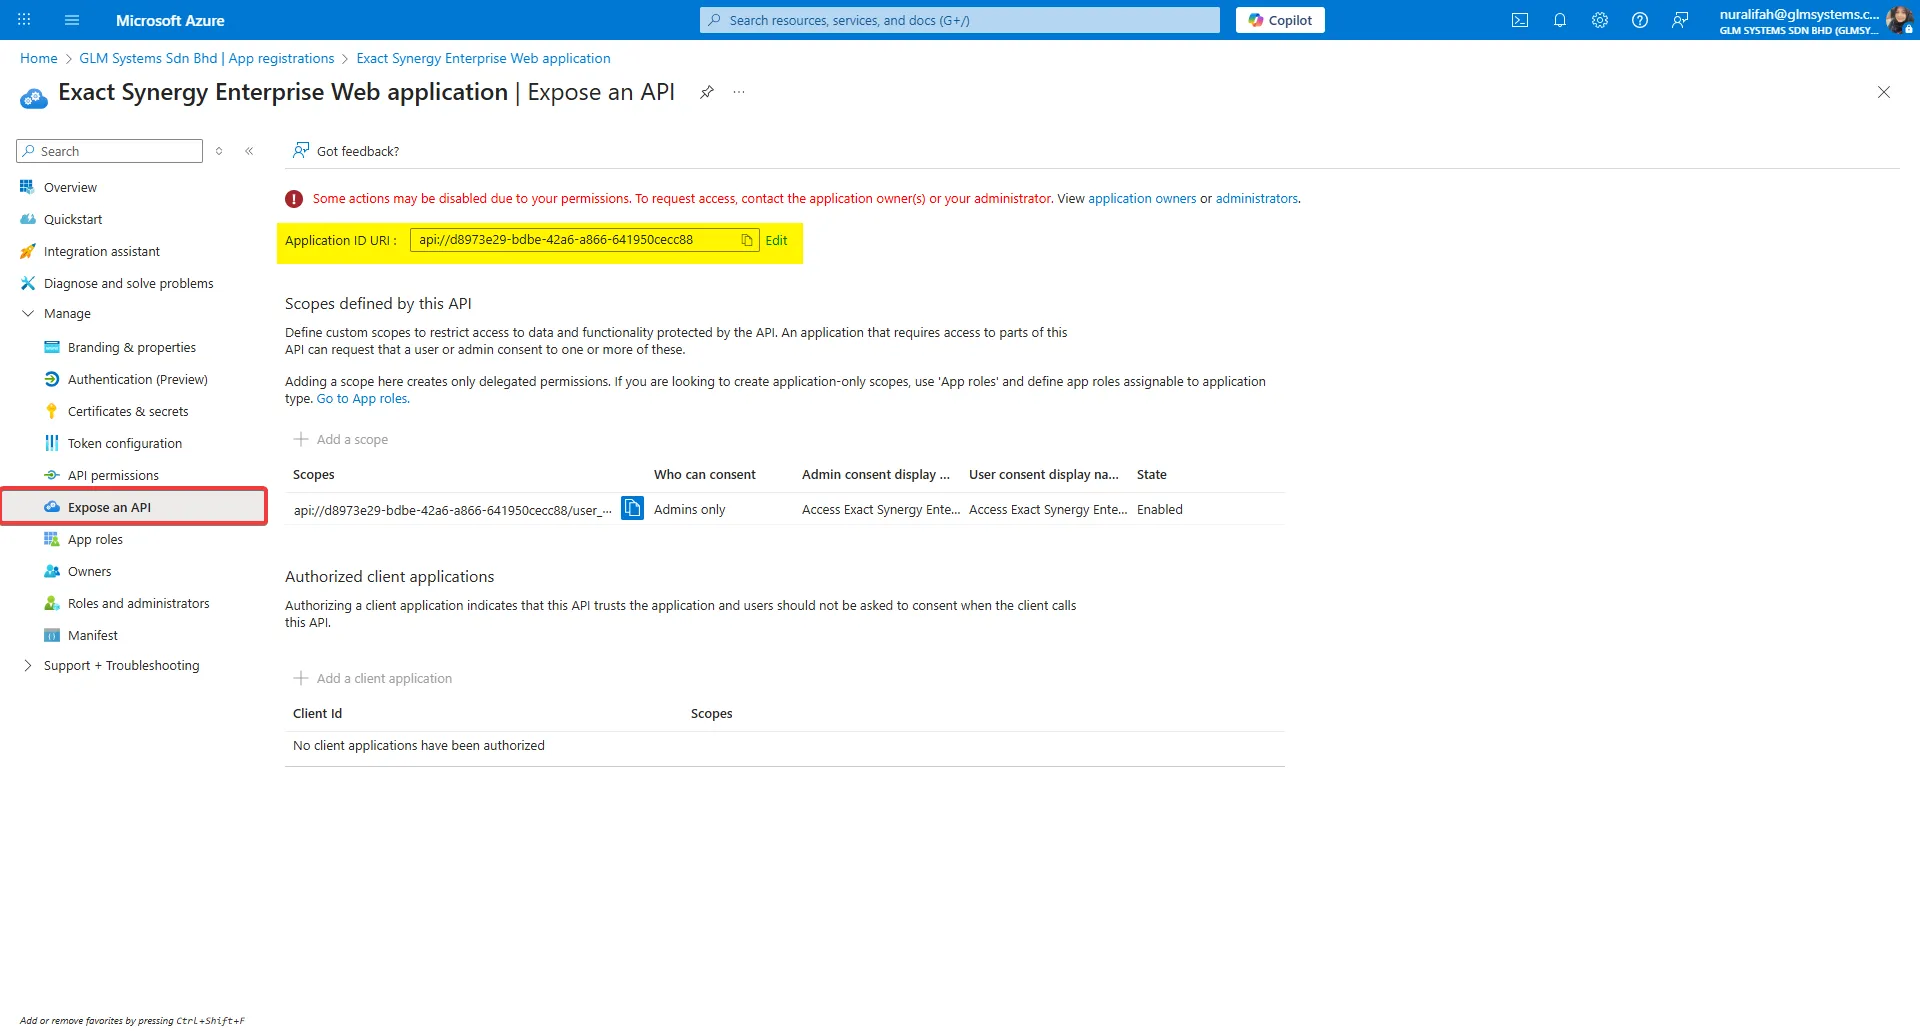
- Go to Manage > Expose an API.
- Copy the Application ID URI and paste it into the Resource field.
- After entering the Resource, the Allowed Audience field is auto-filled.
How to get the Reply URL
- Enter your Synergy URL, for example:
http://localhost<your_synergy_version>(e.g.,http://localhost/Synergy_504_FID/)
Validate and generate configuration
- After all fields are filled, click Validate.
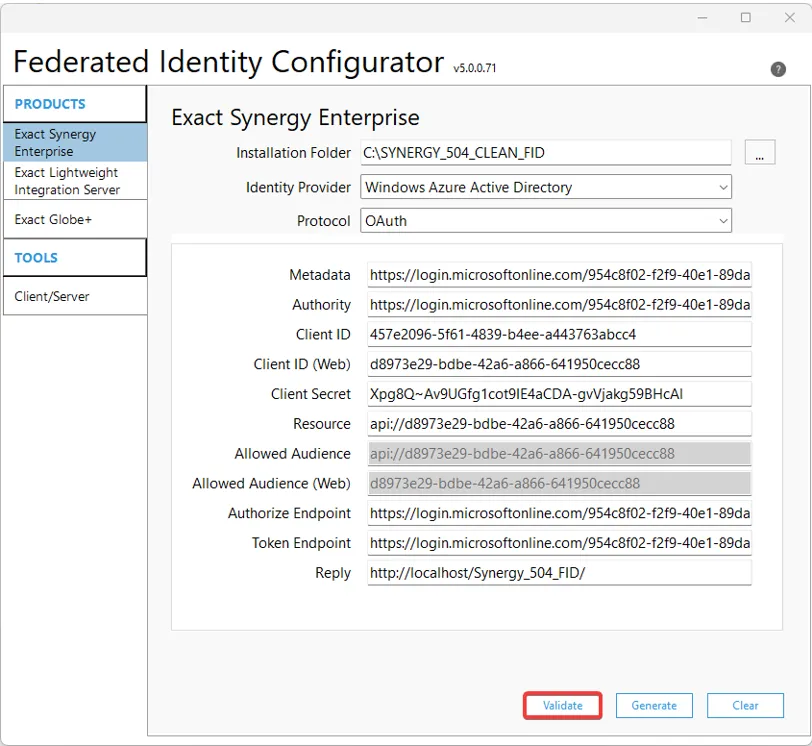
- When prompted, enter your username and password.
- If the token is valid, the status SUCCESS is shown.
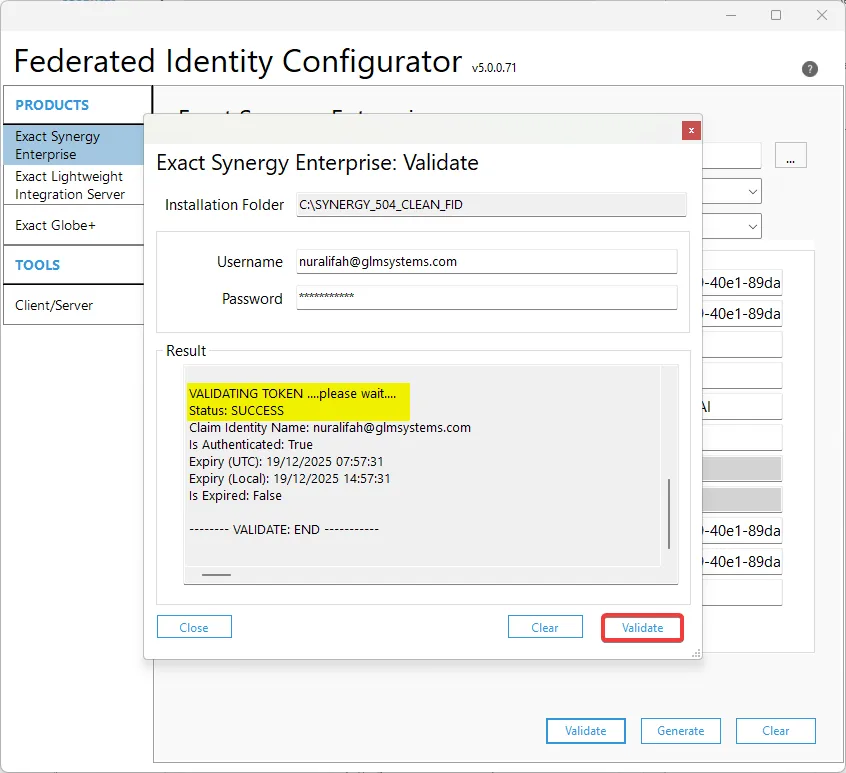
- Click Generate until the message Configuration successfully generated appears.
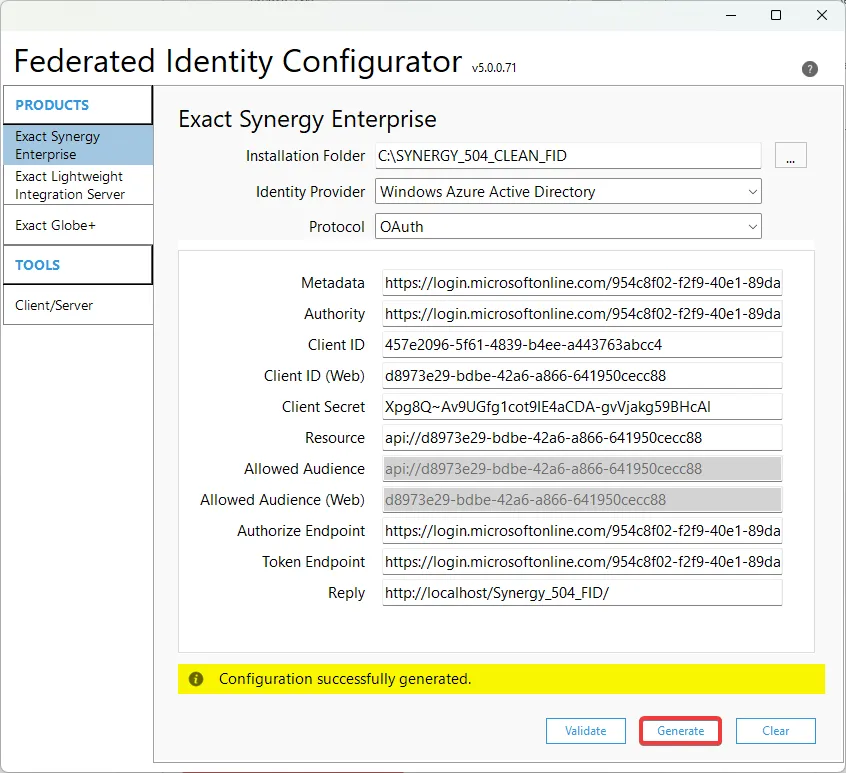
- Reload Synergy, select your account, and sign in to confirm FID works.
Exact Globe+ Standard FID setup
Section titled “Exact Globe+ Standard FID setup”Register Globe+ Application in Microsoft Entra ID
- Go to https://portal.azure.com.
- Navigate to Microsoft Entra ID > App registrations > New registration.
- Set the following:
- Name: Globe+ FID
- Supported account types: Accounts in this organizational directory only (Single tenant)
- Click Register.
Authentication for mobile and desktop application
- Go to Manage > Authentication (Preview) > Mobile and desktop applications and add:
urn:ietf:wg:oauth:2.0:oobhttp://localhost
Authentication for web application
- Go to Manage > Authentication (Preview) > Web and enable:
- Access tokens (used for implicit flows)
- ID tokens (used for implicit and hybrid flows)
- Set Allow public client flows to Enabled.
Certificates and Secrets
- Go to Certificates & secrets.
- Select + New Client Secret.
- Set:
- Description: globe+ secret
- Expiration: e.g., 2 years or custom date
- Click Add and store the value securely (used in RPA configuration).
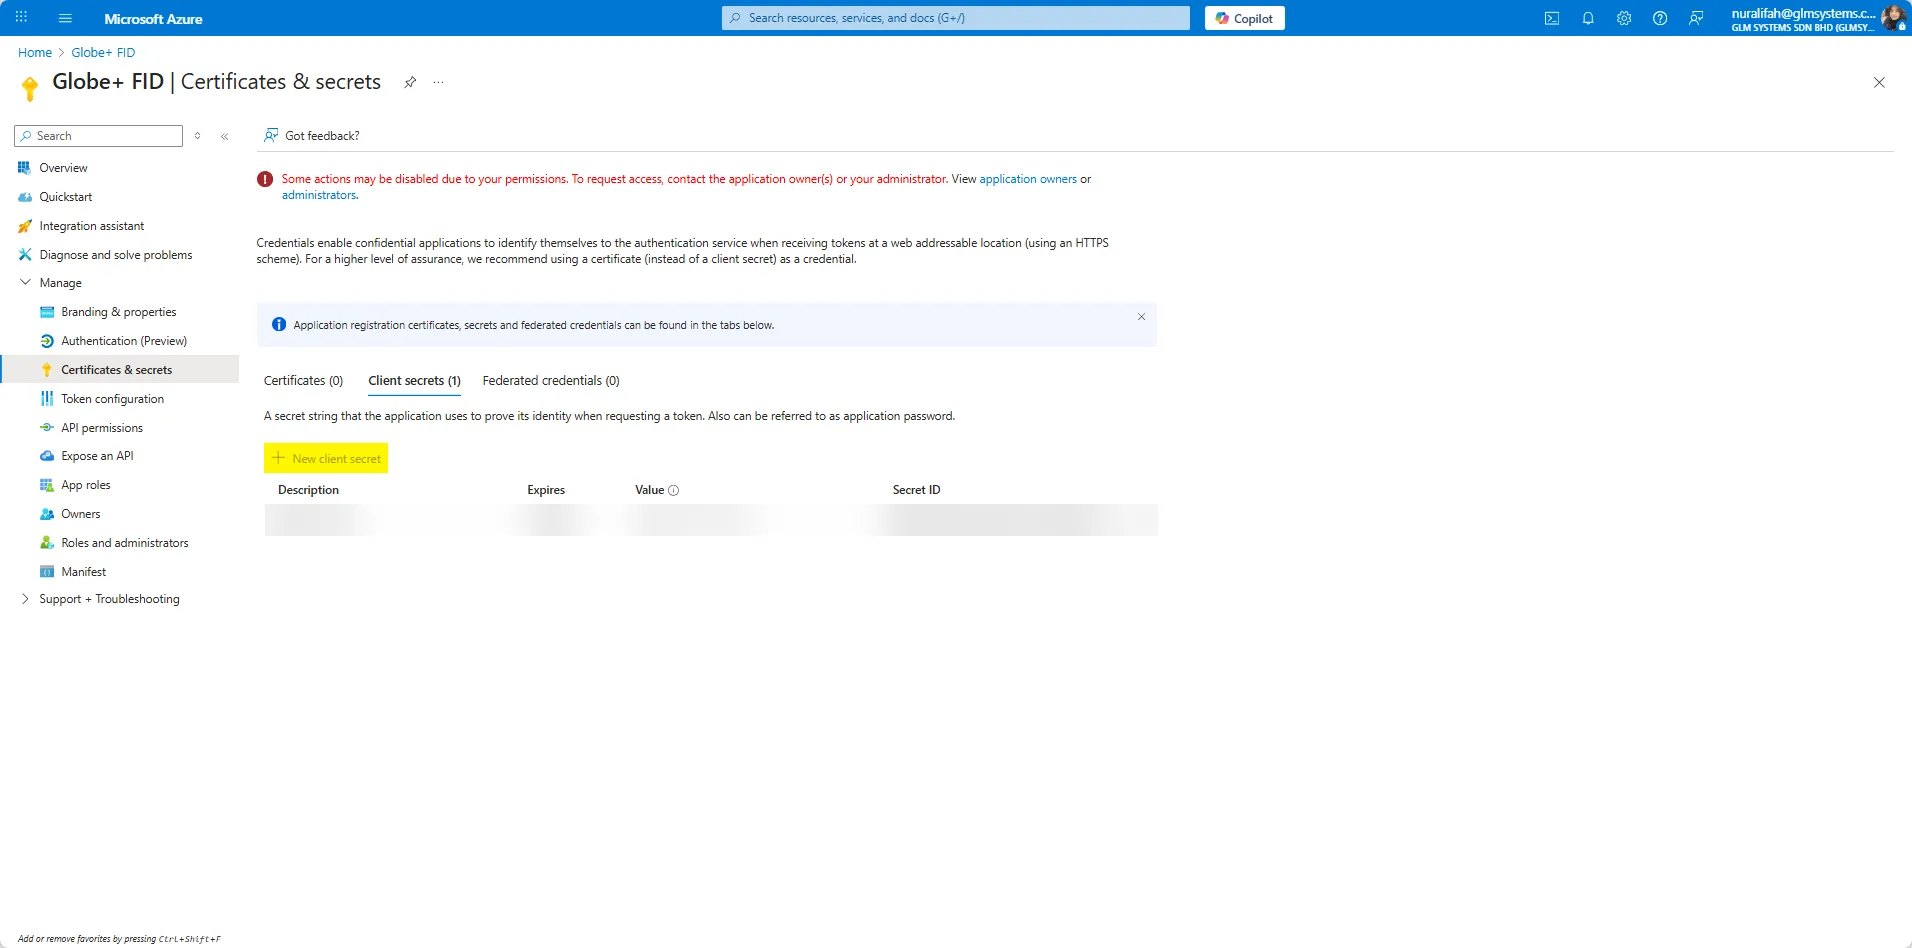
- The client secret has now been added.
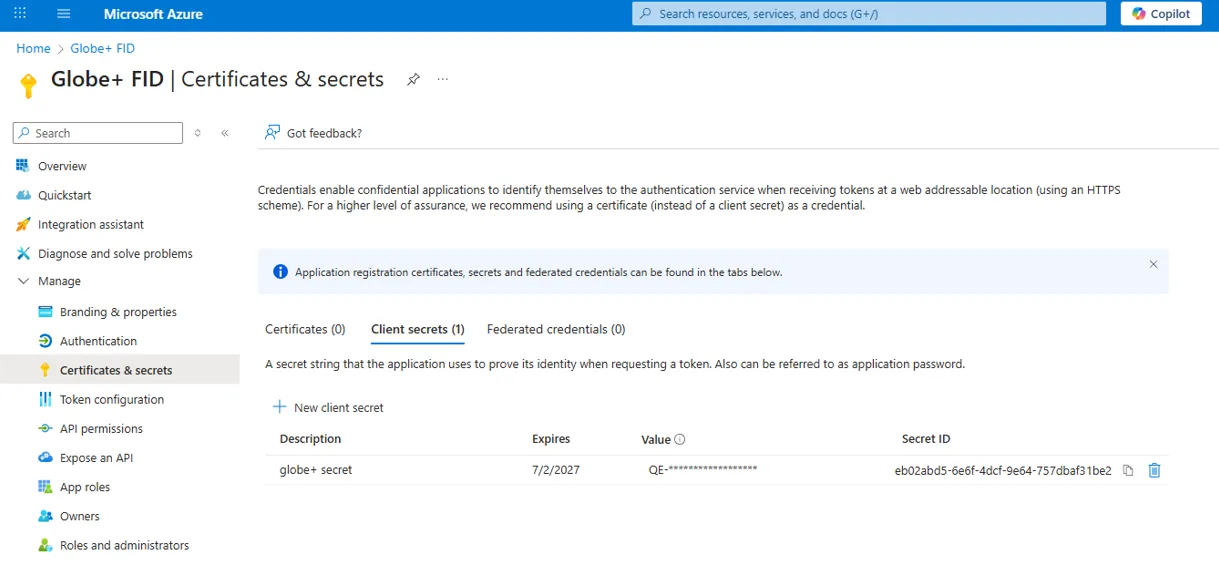
API Permissions
- Go to API Permissions > Add a permission > Microsoft Graph > Delegated Permissions.
- Add the following:
offline_accessopenidUser.Read
- Grant admin consent.
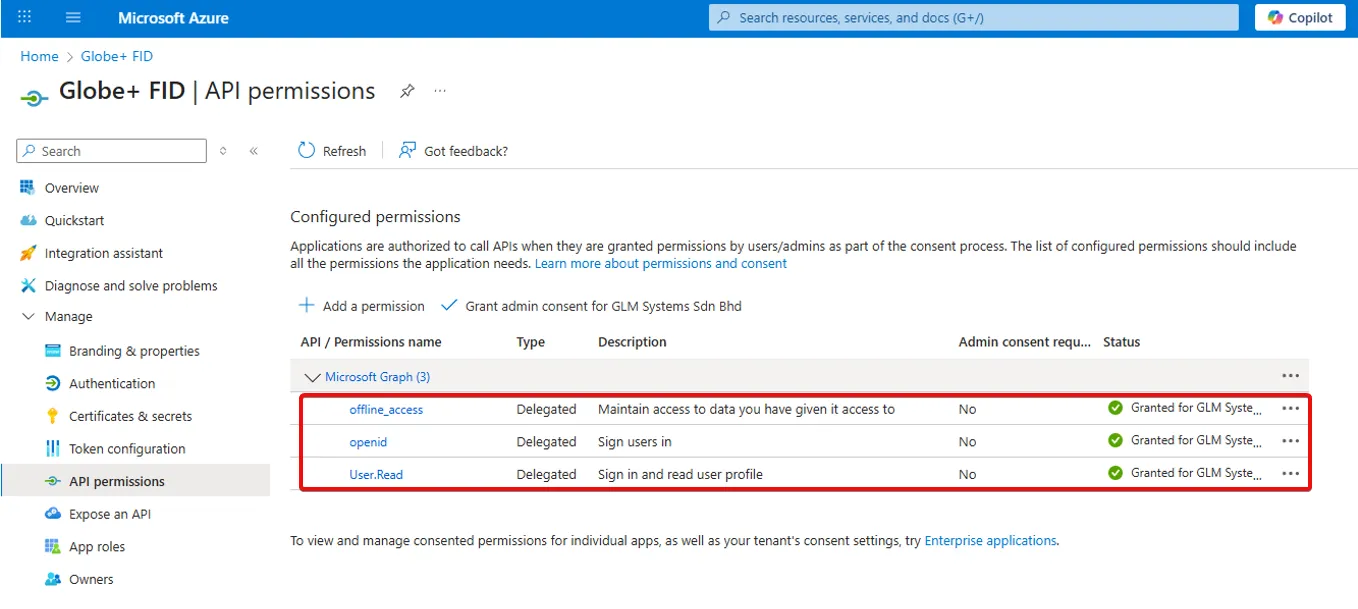
Expose an API
- Go to Expose an API and configure:
| Setting | Description |
|---|---|
| Application ID URI | api://[Your-Client-ID] |
| Scope name | user_impersonation |
| Who can consent | Admins only |
| Admin consent display name | Access Globe+ |
| User consent display name | Access Globe+ |
| State | Enabled |
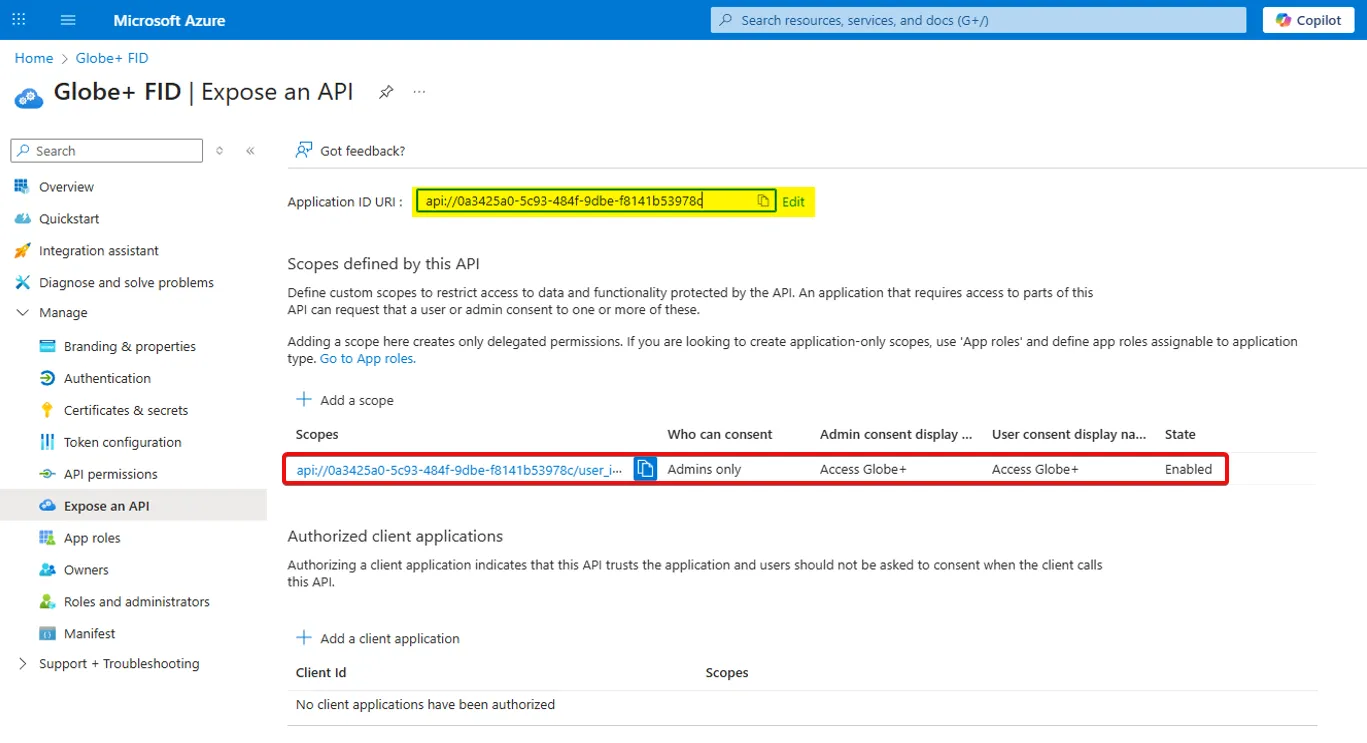
Configure Globe+ via FIDConfigurator.exe
- Open
C:\Program Files\Exact Globe+\cab\FIDConfigurator.exe. - In the Federated Identity Configurator, fill all required fields:
| Setting | Description |
|---|---|
| Installation Folder | C:\Program Files\Exact Globe+ |
| Identity Provider | Windows Azure Active Directory |
| Metadata | Federation metadata URL |
| SAML Issuer Name | The issuer name configured in SAML settings |
| Client ID | Application (client) ID |
| Resource | The resource URI/Identifier |
| Allowed Audience | Audience URI defined in the app registration |
| Thumbprint | Certificate thumbprint |
| Authority | The authority URL (e.g., login.microsoftonline.com) |
| Allowed Audience (Web) | Specific audience allowed for Web clients |
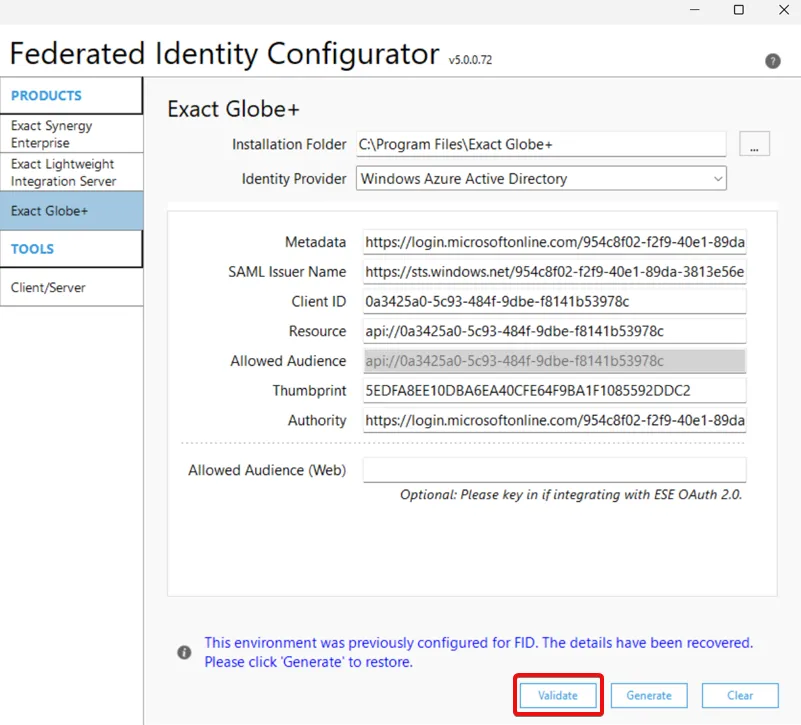
- Click Validate, enter your credentials, and check that validation is successful.
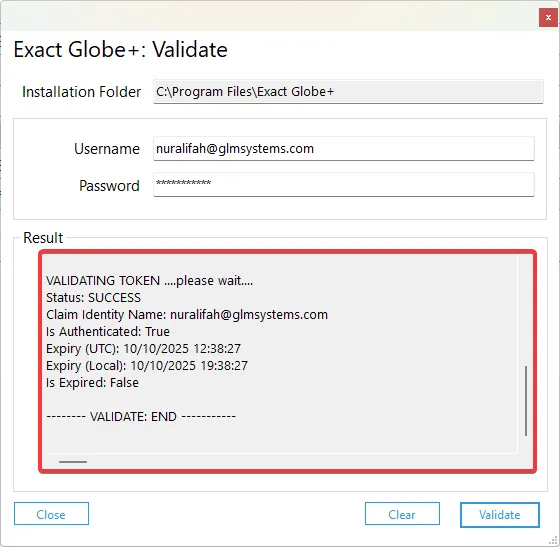
- Click Generate until the message Configuration successfully generated appears.
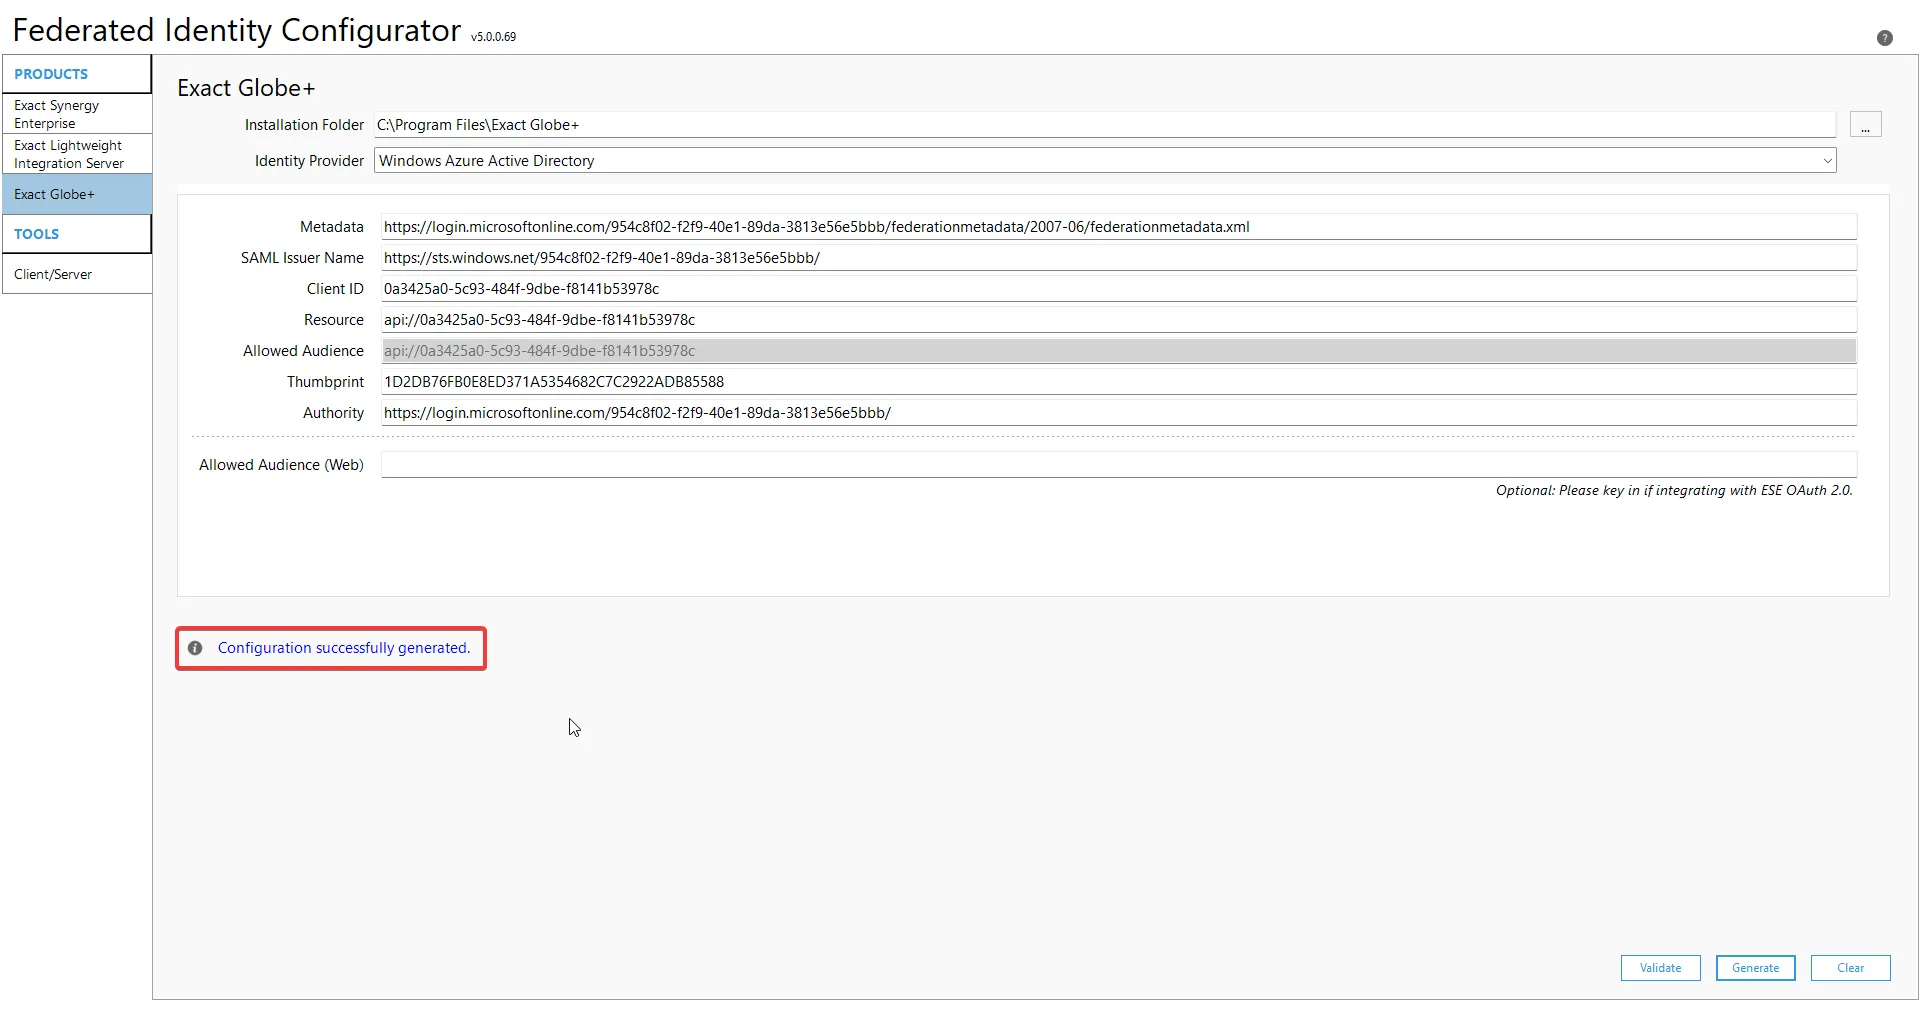
- Verify that users can log in to Exact Globe+ using FID.
Troubleshooting
Section titled “Troubleshooting”Error in the rule settings
Section titled “Error in the rule settings”The system displays the error message “Entity service on server is not reachable”, indicating that the server cannot be accessed caused by an incorrect address or SOAP action.
Step to resolve :
You need to configure the FID connection in the Rule settings.

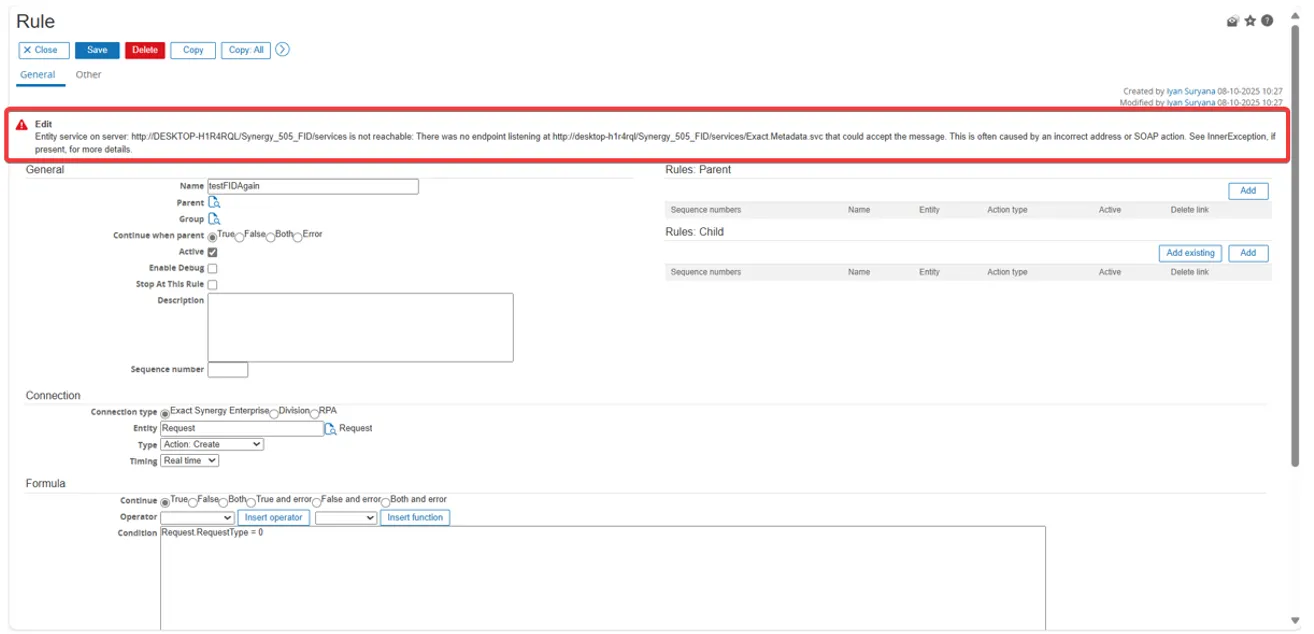
Error back office connection
Section titled “Error back office connection”If this error occurs in Globe+, you need to configure the back office connection in the Synergy Back Office. Go to System → Setup → Back office → Back office connection.
Step to resolve :
Try connecting to the Globe+ connection, make sure the “Fixed Back Office Credentials” option is unchecked, and then click Connect.
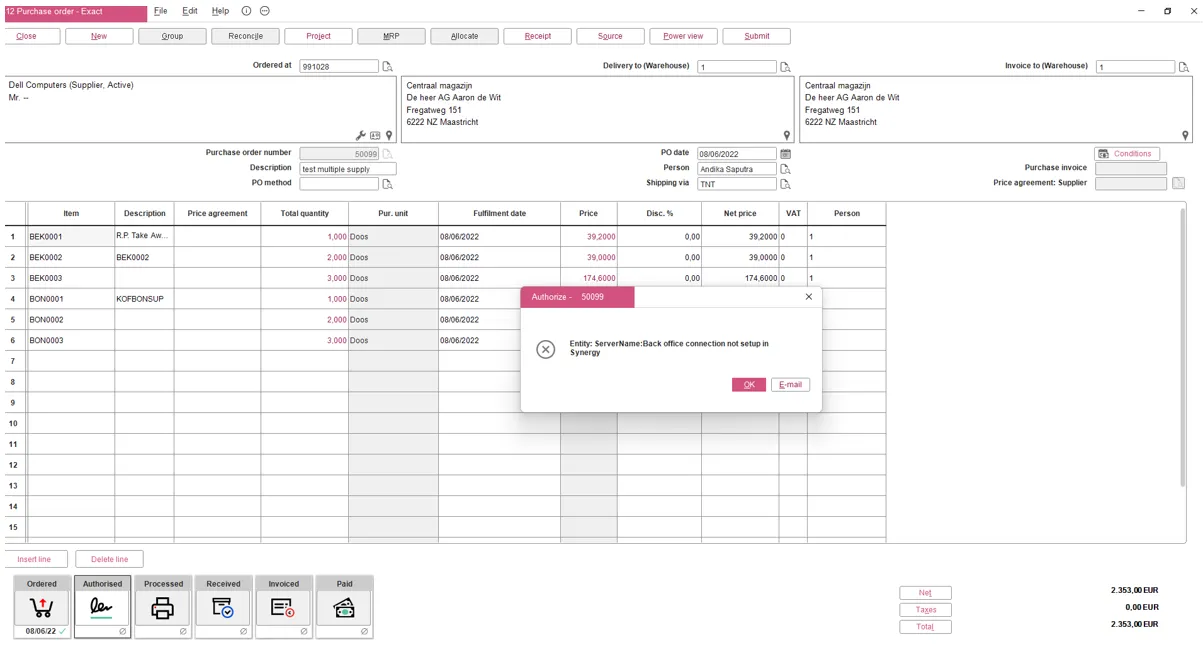

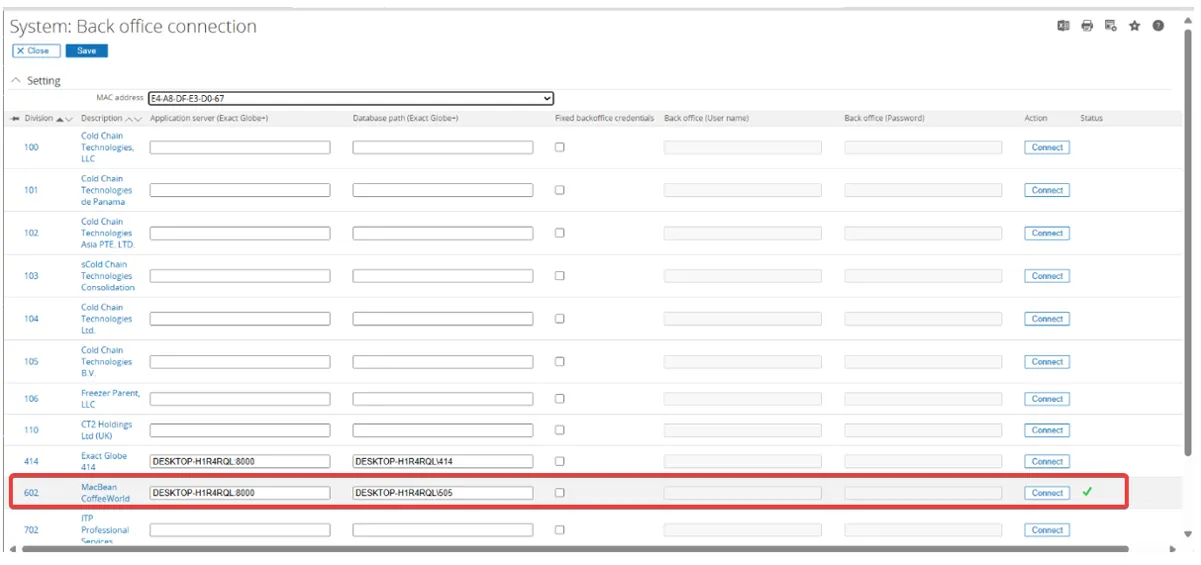
Error with message “One or more errors occurred”
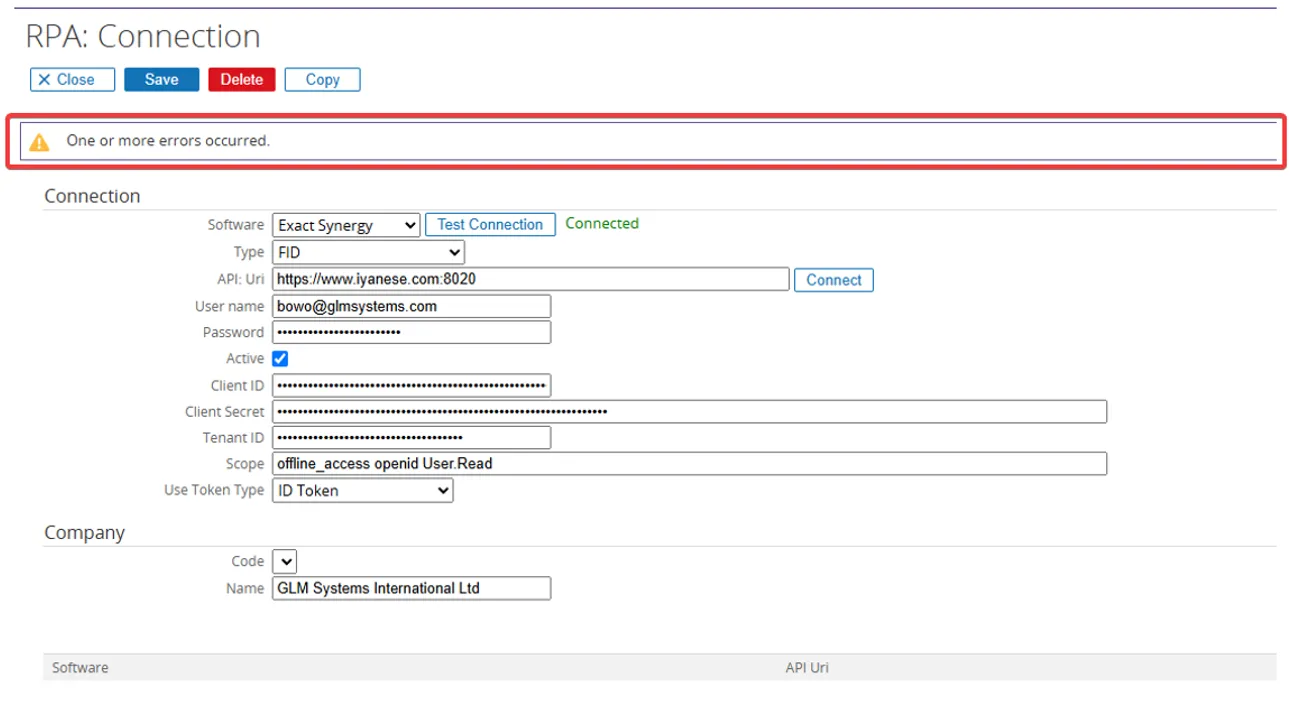
Section titled “Error with message “One or more errors occurred””The Synergy FID connection shows as “Connected”, but an error message appears : ‘One or more errors occurred.’
Step to resolve :
Ensure that the APIUri is correct and not using a port that already in use by another application.
Error SDK connect issue
Section titled “Error SDK connect issue”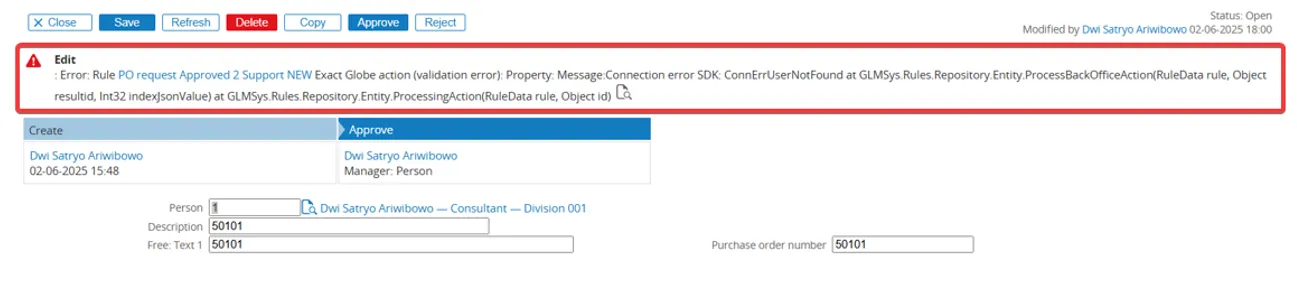
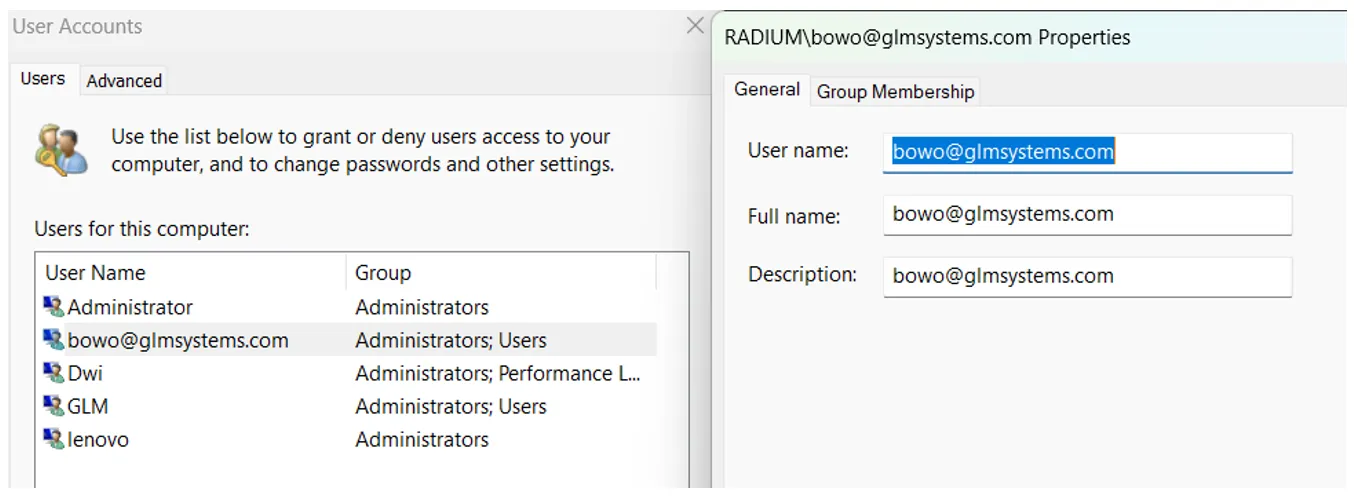
- Change username as user AD (will be used logon as service on Exact entity service)
- Open Windows + R or Run
- Type :netplwiz
- Double click on user & edit username same as user AD (e.g, bowo@glmsystems.com)
- Exact Entity Services
- Go to Services & choose the Exact Entity Service set log on as with your new user AD, then restart the service
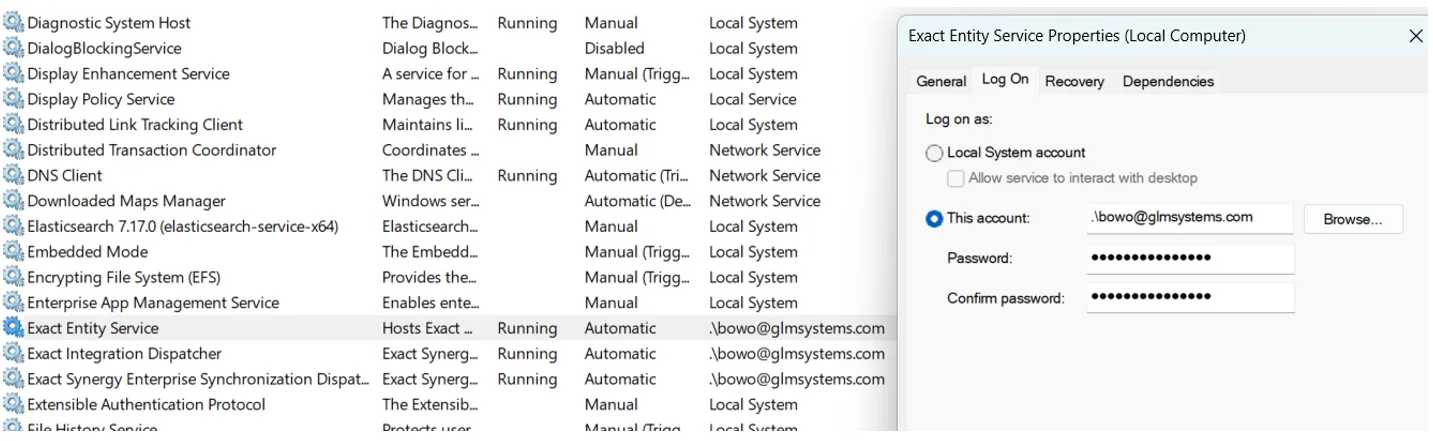
- Go to Services & choose the Exact Entity Service set log on as with your new user AD, then restart the service
Error Globe+ Connection
Section titled “Error Globe+ Connection”Failed: InternalServerError Internal Server Error Method: GET, RequestUri: http://localhost:8020/services/Exact.Entity.REST.EG/Item?$top=1, Version: 1.1, Content:0 |
|---|
Headers: Accept: application/json Accept: text/javascript; charset=utf-8 ServerName: <yourservername> DatabaseName: <yourdatabase> |
| AccessToken: PAQABAQIAAABlMNzVhAPUTrARzfQjWPtKbLsMZuMymAcoN2-b3RTIQoLR7Fna7ONoriC6bb-n_7XgGukHsGk__2kurjwSRFHw8oFtf0xxckIn8X1DALNqKSyehyME_8TPDoTMlEaZfsXxfOX3OuSxU9V0s36H6YtrfRyB727UC2Wx_UKfXYl1P0R—Pvw-Pvru27clTOKLQONBXdCQwYWmMQZlx-CJfBTxgLa_SPP1n1VzJBTl6rTn8Vuu4mMjOkgC_F3a0e8SDWezKsEn9HLgC6_W6WXBpMSTpyzv41nbctkkXxXgBv9cF6kReHmbw14QNxOcD-8HObZCbVBFRUt1eYYkNtTIFSHX81Fgb7-LiyXlntjdb-U6XqEXOo57dGKT7f0LNBmJdZQXjR1PKKWZV65aPMkUXNi2uOk0vAS1B39gbWmdnOGFTMDfmRHthv4auCuBZAumP8J4lFuq0le6bEeC8vagdqv6mBrQgnNMd7xnrBf24MiBe6mTB6cxivAHhh61sa3WjipjhXHgMeTESHSp0Kd29Fg-Y5xNJhHaEABbwj2xhzSjNNza35IcmQ6PvgTUgAA AccessTokenType:1 |
Step to resolve :
If you got error like the AccessToken value starts with “PAQ”, so it is not a JWT. A JWT typically starts with “eyJ”.
So what need to do is you need to make sure that Access tokens are enabled in the Azure Authentication settings for the Globe+ app registration.

Error: Failed Unauthorized Missing Authentication
Section titled “Error: Failed Unauthorized Missing Authentication”When you try to connect, and you receive this error message :Failed: Unauthorized Method:GET
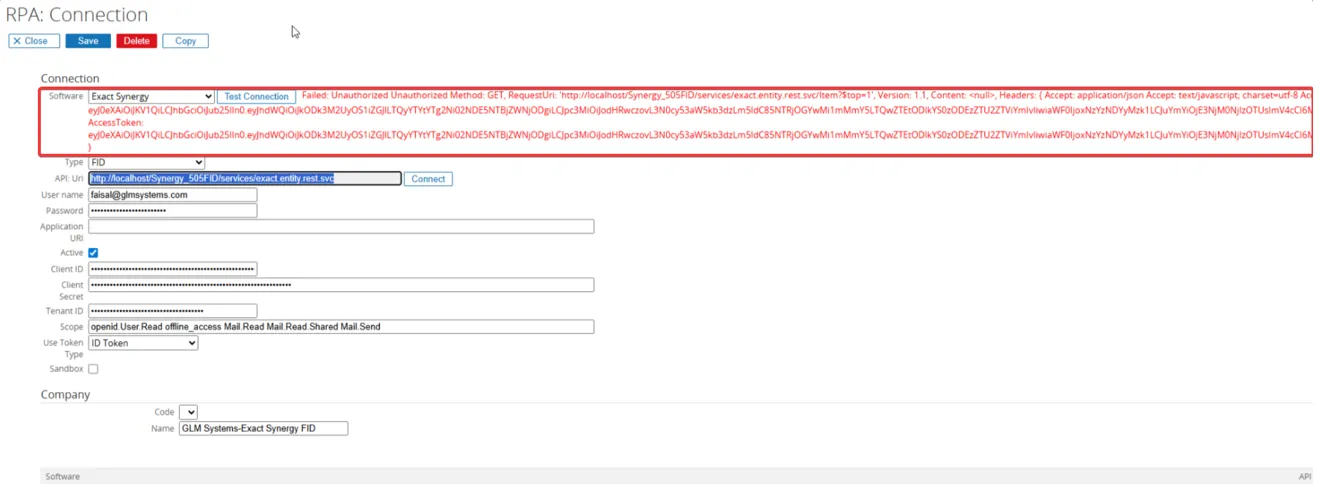
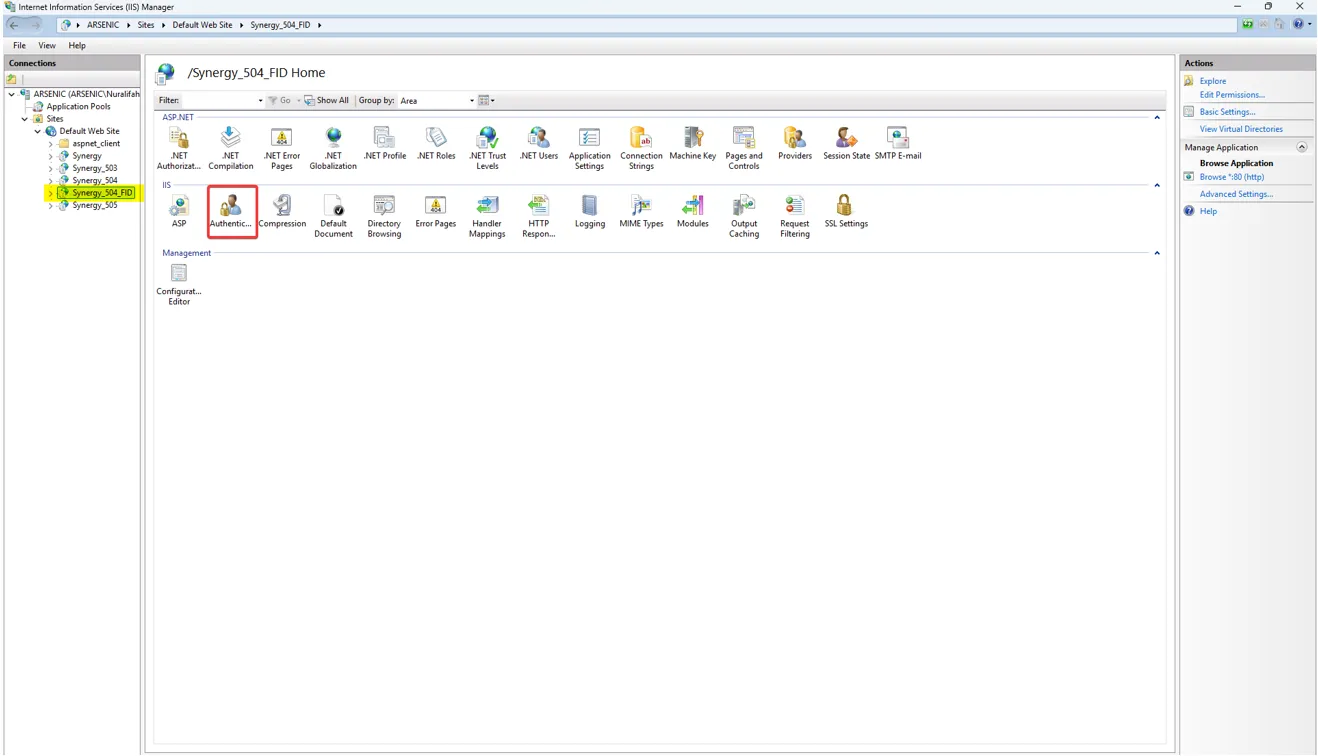
- Open your IIS (Internet Information Services) Manager.
- Go to your Connections.
- Open the Authentication menu.
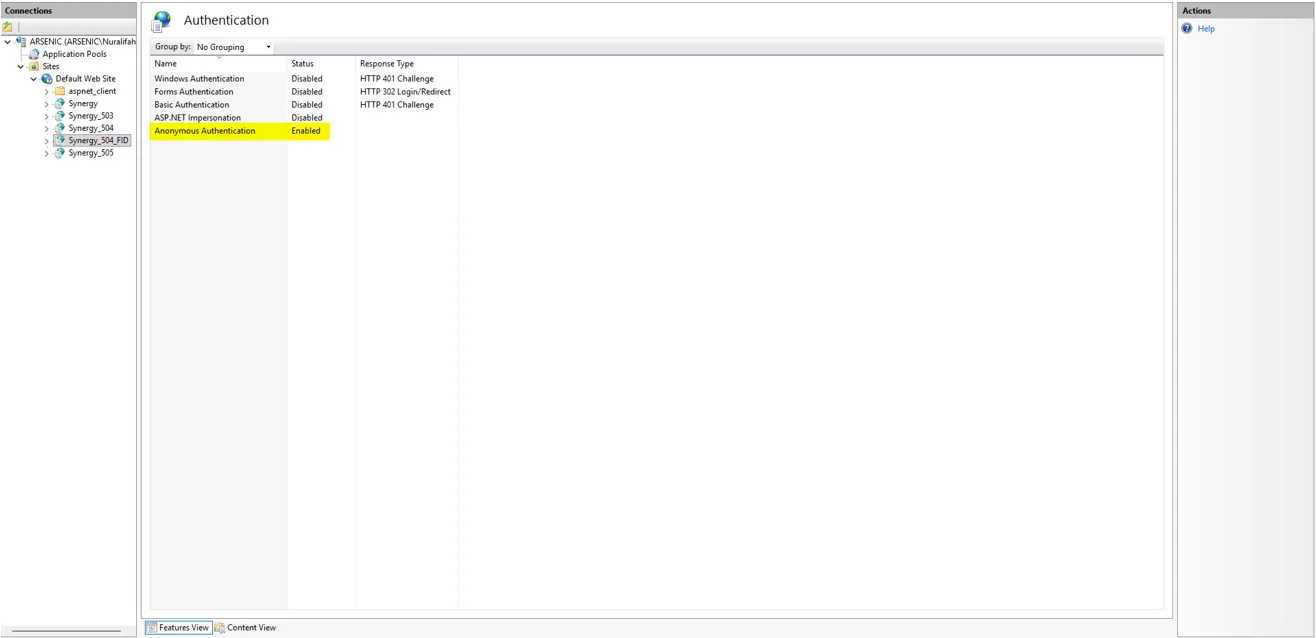
- For the FID Connection, make sure all Status Connections are set to Disabled, except Anonymous Authentication, which should be Enabled.
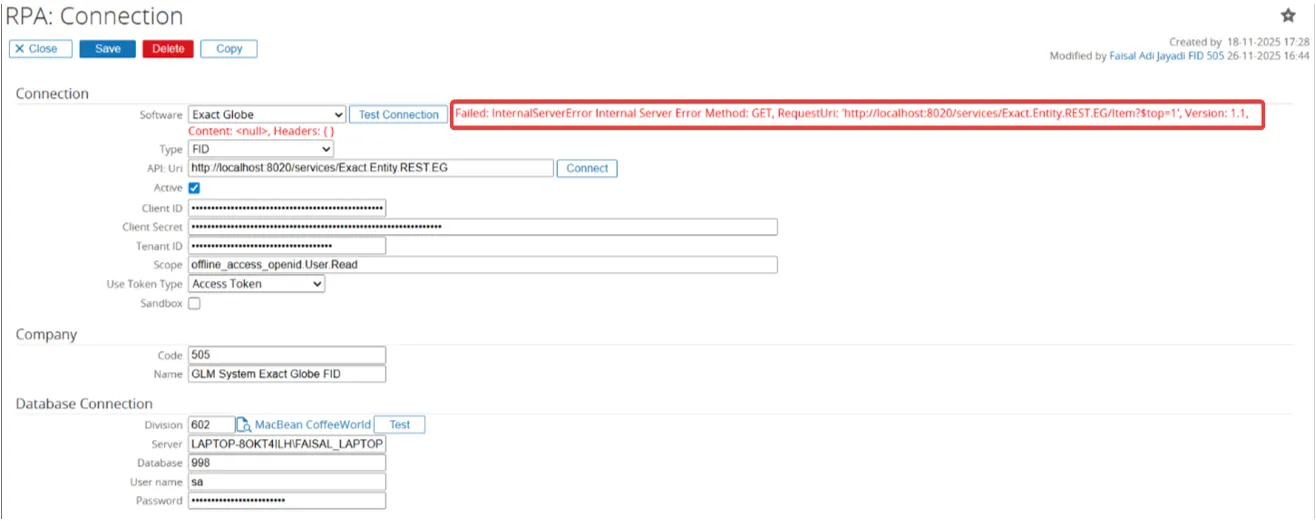
Error: Scope Filled Incorrectly
Section titled “Error: Scope Filled Incorrectly”The error occurs because the field Scope has a typo, with and added underscore characters:
offline_access_openid.User.Read
Step to resolve :
Ensure you input the correct scope, which should be:
offline_access openid.User.Read
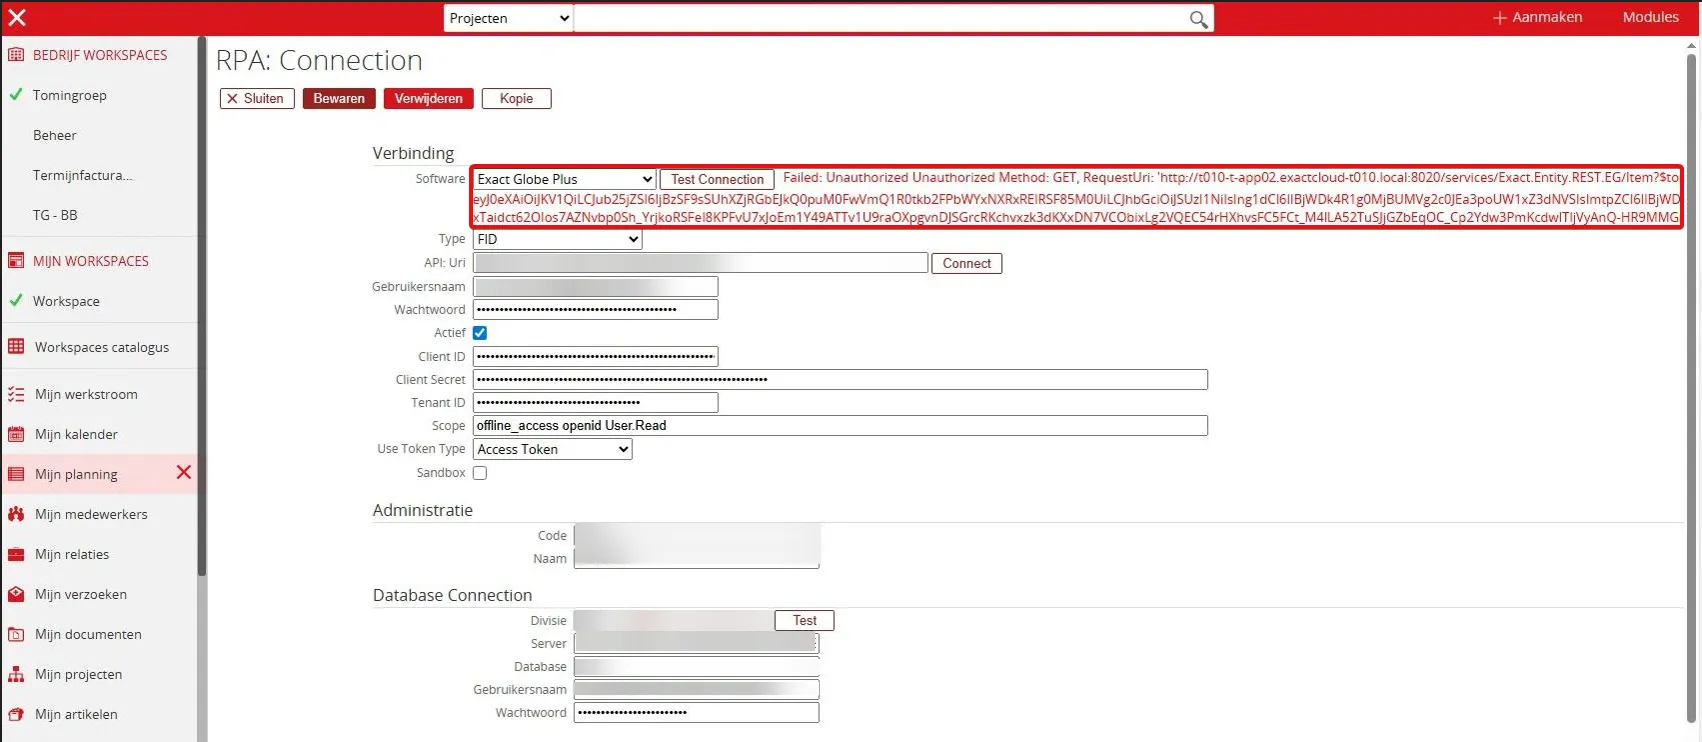
Error: Failed: Unauthorized Unauthorized Method: GET, RequestUri:…
Section titled “Error: Failed: Unauthorized Unauthorized Method: GET, RequestUri:…”If you got this error Failed: Unauthorized Unauthorized Method: GET, RequestUri: ‘http://t010-t-app02.exactcloud-t010.local:8020/services/Exact.Entity.REST.EG/Item?…’ eyJ0eXAiOiJKV1QiLCJub25jZSI6IjBzSF9sSUhXzJRGbEjKQopuM0FwVmQ1R0tkb2FPbWYxNXR…