Kanban – User Manual
Introduction
Section titled “Introduction”Kanban is a visual workflow management from Japan, where the term means “card” or “signboard.” By displaying all tasks on boards labeled “To Do” “In Progress” and “Done”. Kanban enables teams to match their workload to available capacity, promote transparency, and identify bottlenecks efficiently. When implemented using Exact Synergy workflows, the process of tracking, managing, and optimizing tasks becomes even more streamlined and effective.
Discover the Kanban Advantage
Section titled “Discover the Kanban Advantage”Streamlined task creation & intuitive management. Enjoy an interface that’s designed for real productivity.
Effortless team collaboration. Group, filter, and visualize workflows to boost transparency & progress.
Advanced & flexible configuration. Tailor solutions to your business, no matter how complex.
All your materials in one place. Attach, organize, and share documentation directly within every task.
Optimal integration. Seamlessly connect with Exact Synergy workflows for true efficiency.
Unlock your team’s full potential with Kanban add-on. Experience task management that’s easy, customizable, and highly effective. Empowering your team’s workflow!
Adding the Kanban role
Section titled “Adding the Kanban role”Make sure the Kanban role is assigned to your user account. This role grants access to the Kanban module and its features. If you don’t have it yet, ask your system administrator to assign it to your account.
If the role is not added, you’ll see this message when trying to open the Kanban board: “You do not have the Kanban role assigned. Please add the Kanban roles here or contact your system administrator to assign it to your account.”

You can add roles in two ways:
Via System module
Section titled “Via System module”-
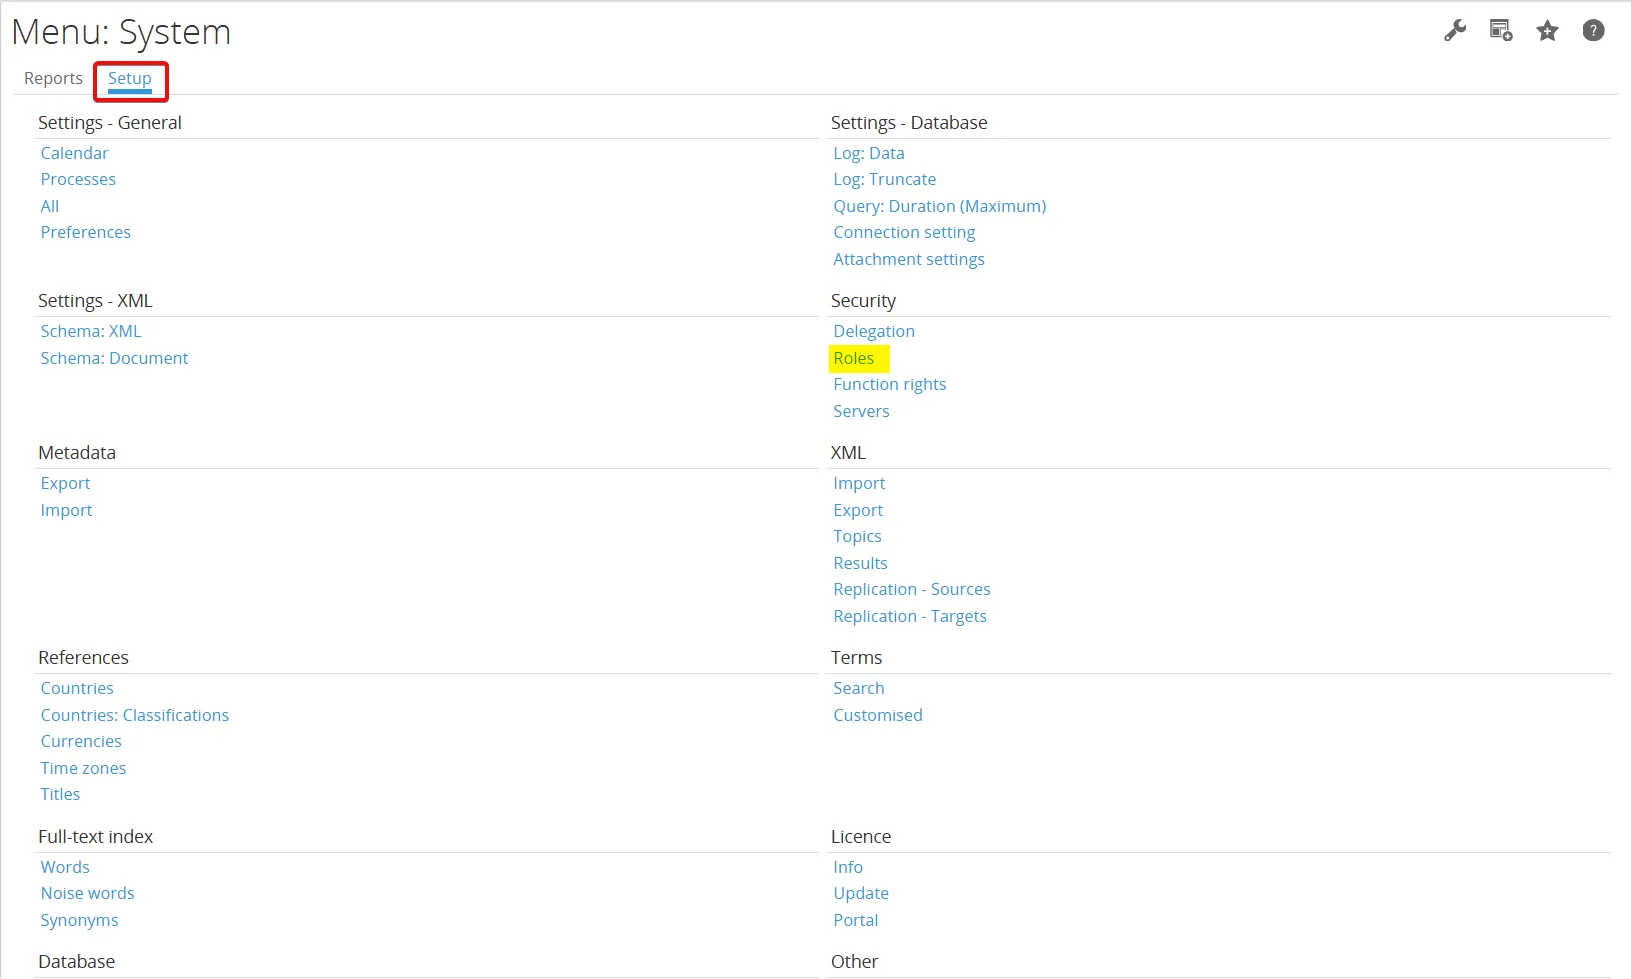
Go to System > Setup > Security > Roles.
-
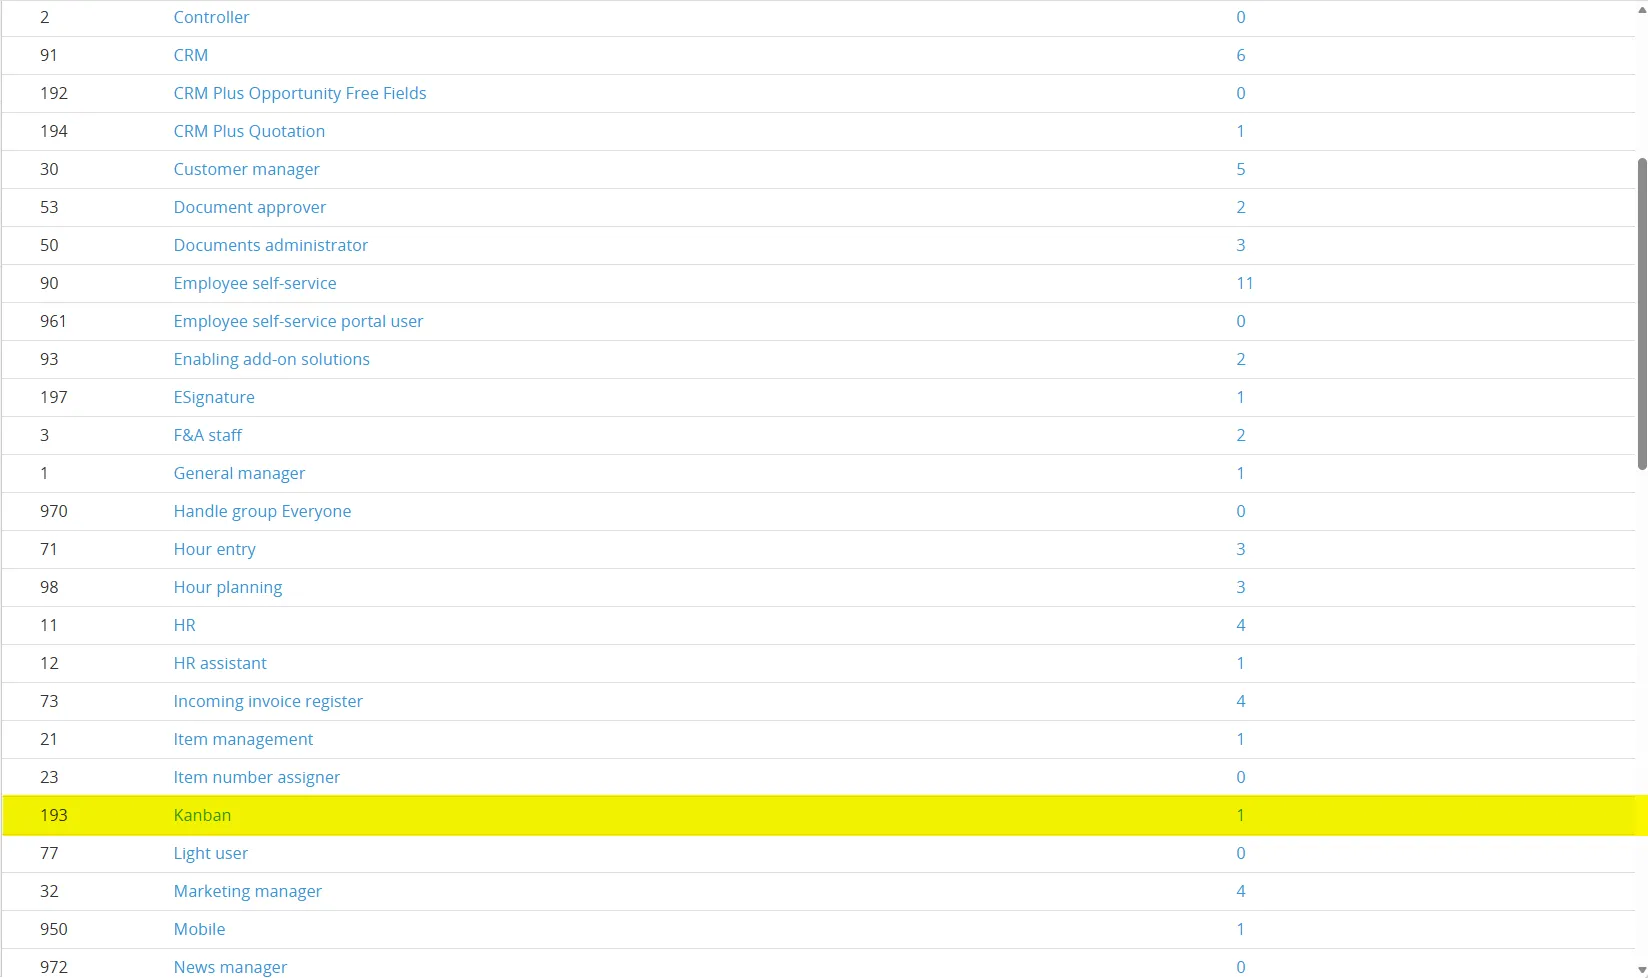
Click the role you want to add (for example, Kanban).
-
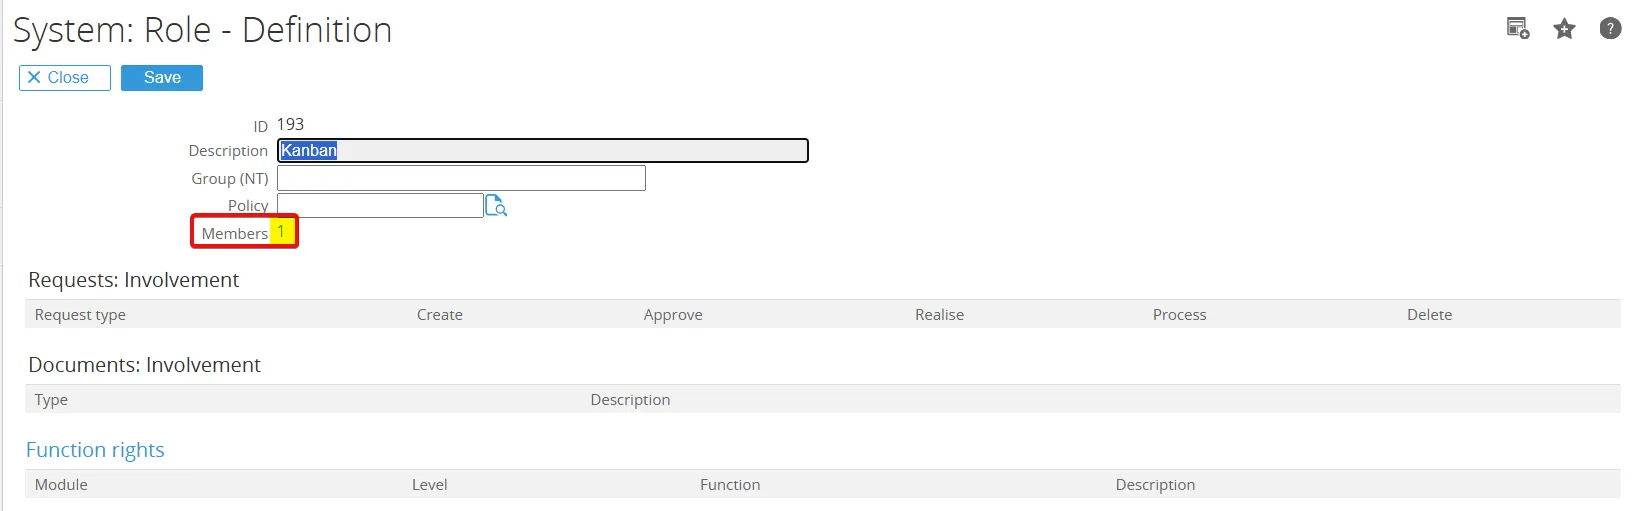
Click the Members (number) link.
-
Click the New button to add a new member to the role.

-
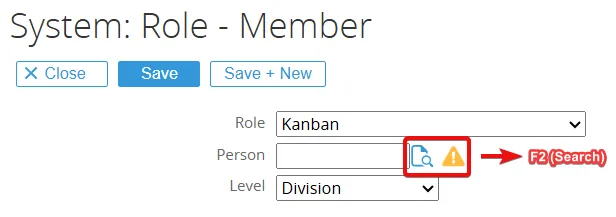
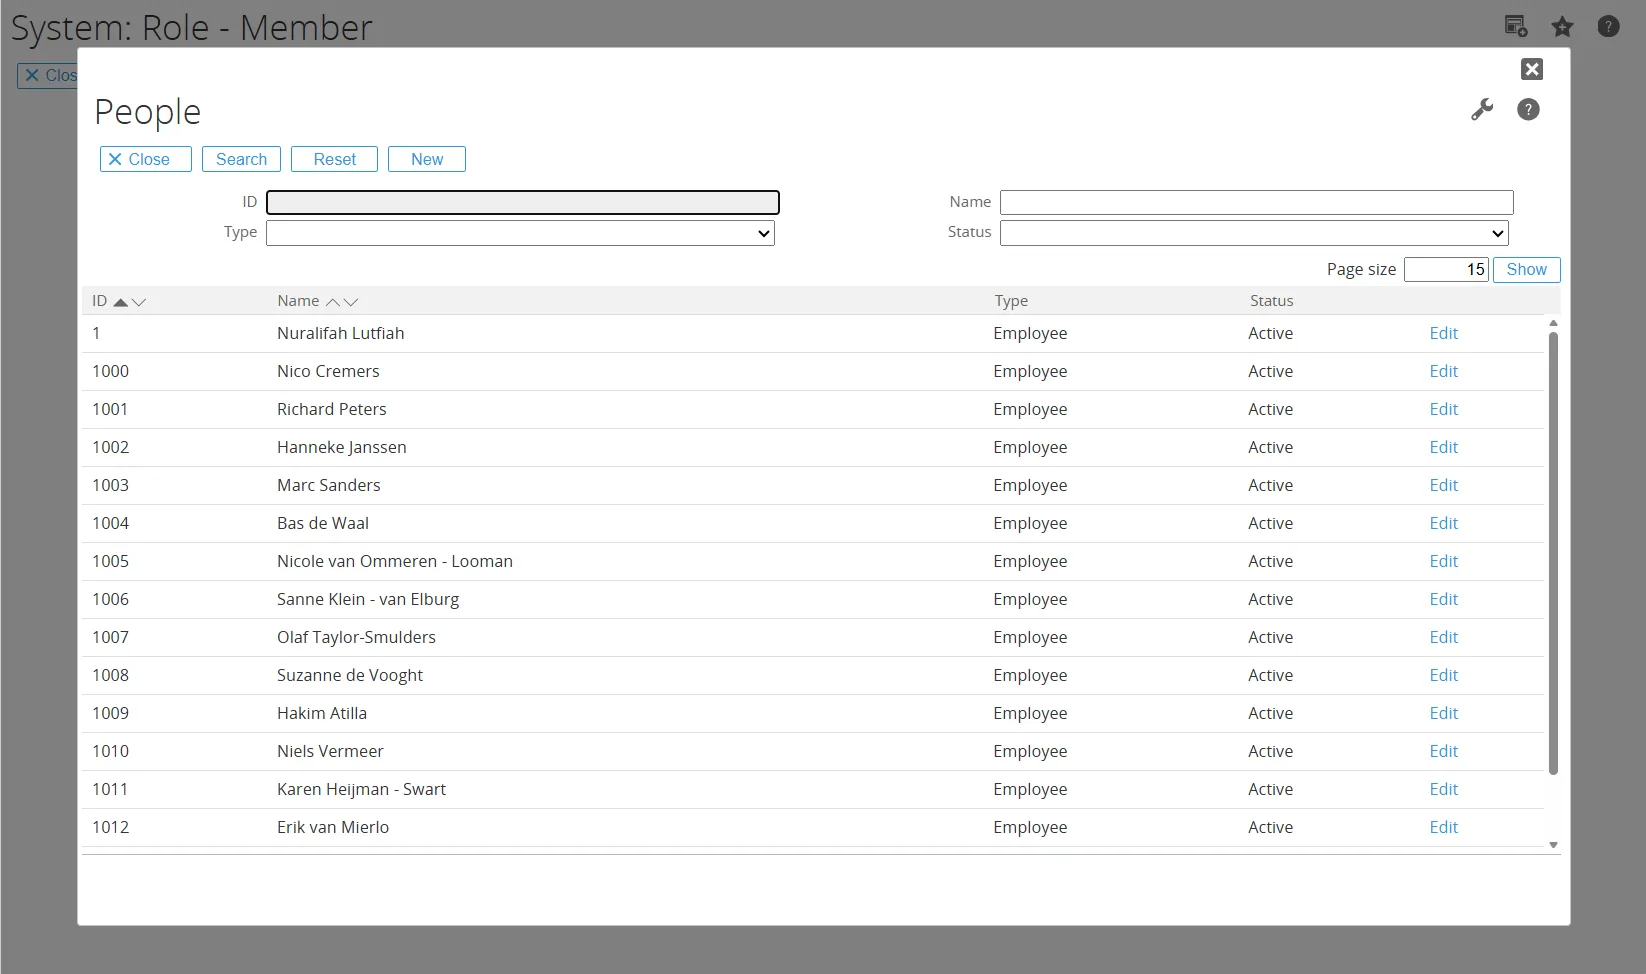
Click the F2 search button in the Person field to select the person you want to add to the role.
-
Select the person.
-
Select the level of the role (for example, Corporate, Group, Division, Cost Centre Group, or Cost Centre).
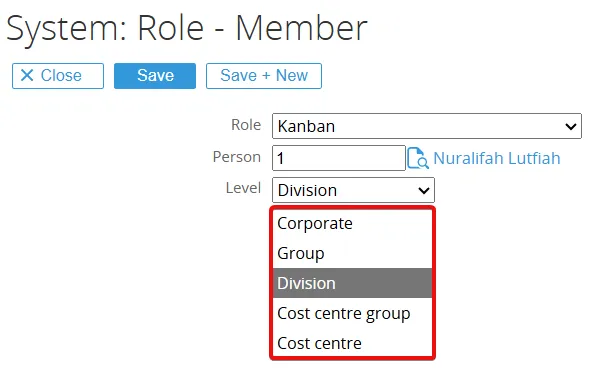
- Corporate: applies to the entire company (all groups, divisions, and cost centres).
- Group: applies to all divisions within one division group.
- Division: applies only to one specific division.
- Cost centre group: applies to a defined group of cost centres.
- Cost centre: applies only to one specific cost centre (for example, HR or IT).
-
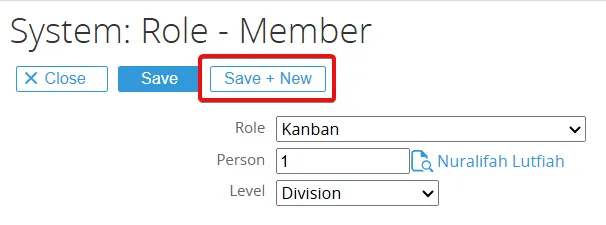
Click Save + New to add more members or Save to finish.
Via HRM Person
Section titled “Via HRM Person”-
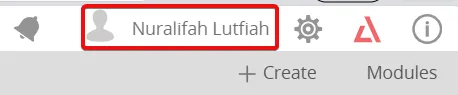
Open HRM > Person and click your profile.
-
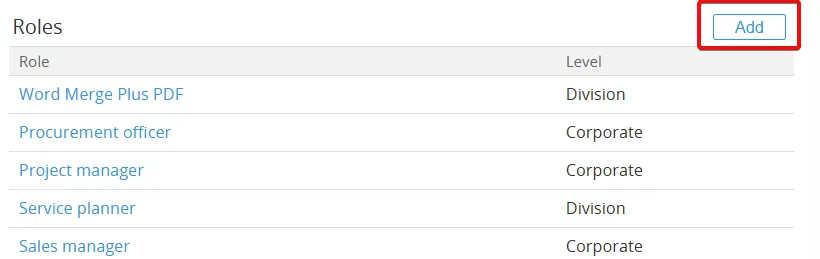
In the Roles section, click Add.
-
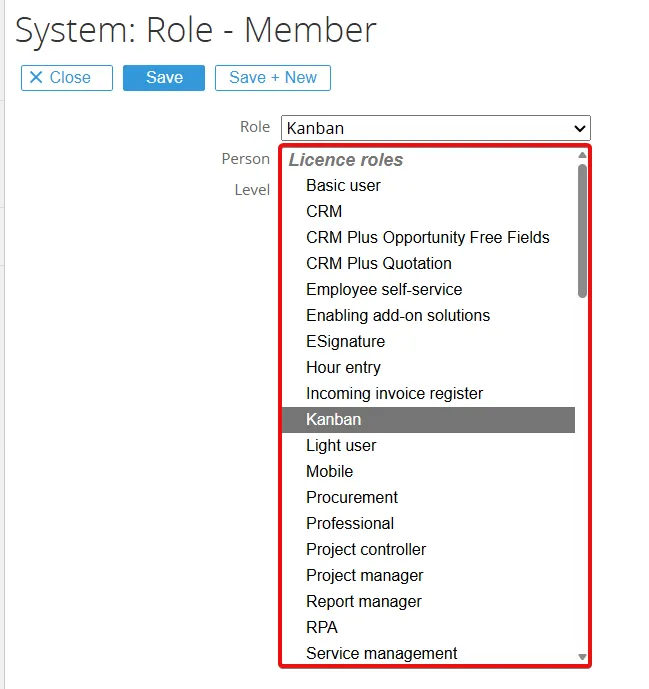
Select the Role, Person, and Level.
-
Click Save + New to add more members or Save to finish.
Kanban Setup Methods
Section titled “Kanban Setup Methods”There are several ways to set up and access Kanban :
-
🗂 Setup by Project
Quick setup directly from your project details. -
🏢 Workspace
Centralized access for your team members. -
🖼 IFrame
Embed the board anywhere you want. -
🌐 Customer portal
Perfect for your clients - no login hassles. -
🔗 URL
Direct access via customized links.
Each method has its own unique advantages. Explore below to find which works best for your workflow!
Setup Kanban Board by Project Card
Section titled “Setup Kanban Board by Project Card”This section explains how to configure the Kanban board by project card, where each card represents a specific project. Users can add, manage, and monitor the progress of tasks within a project using a structured card view.
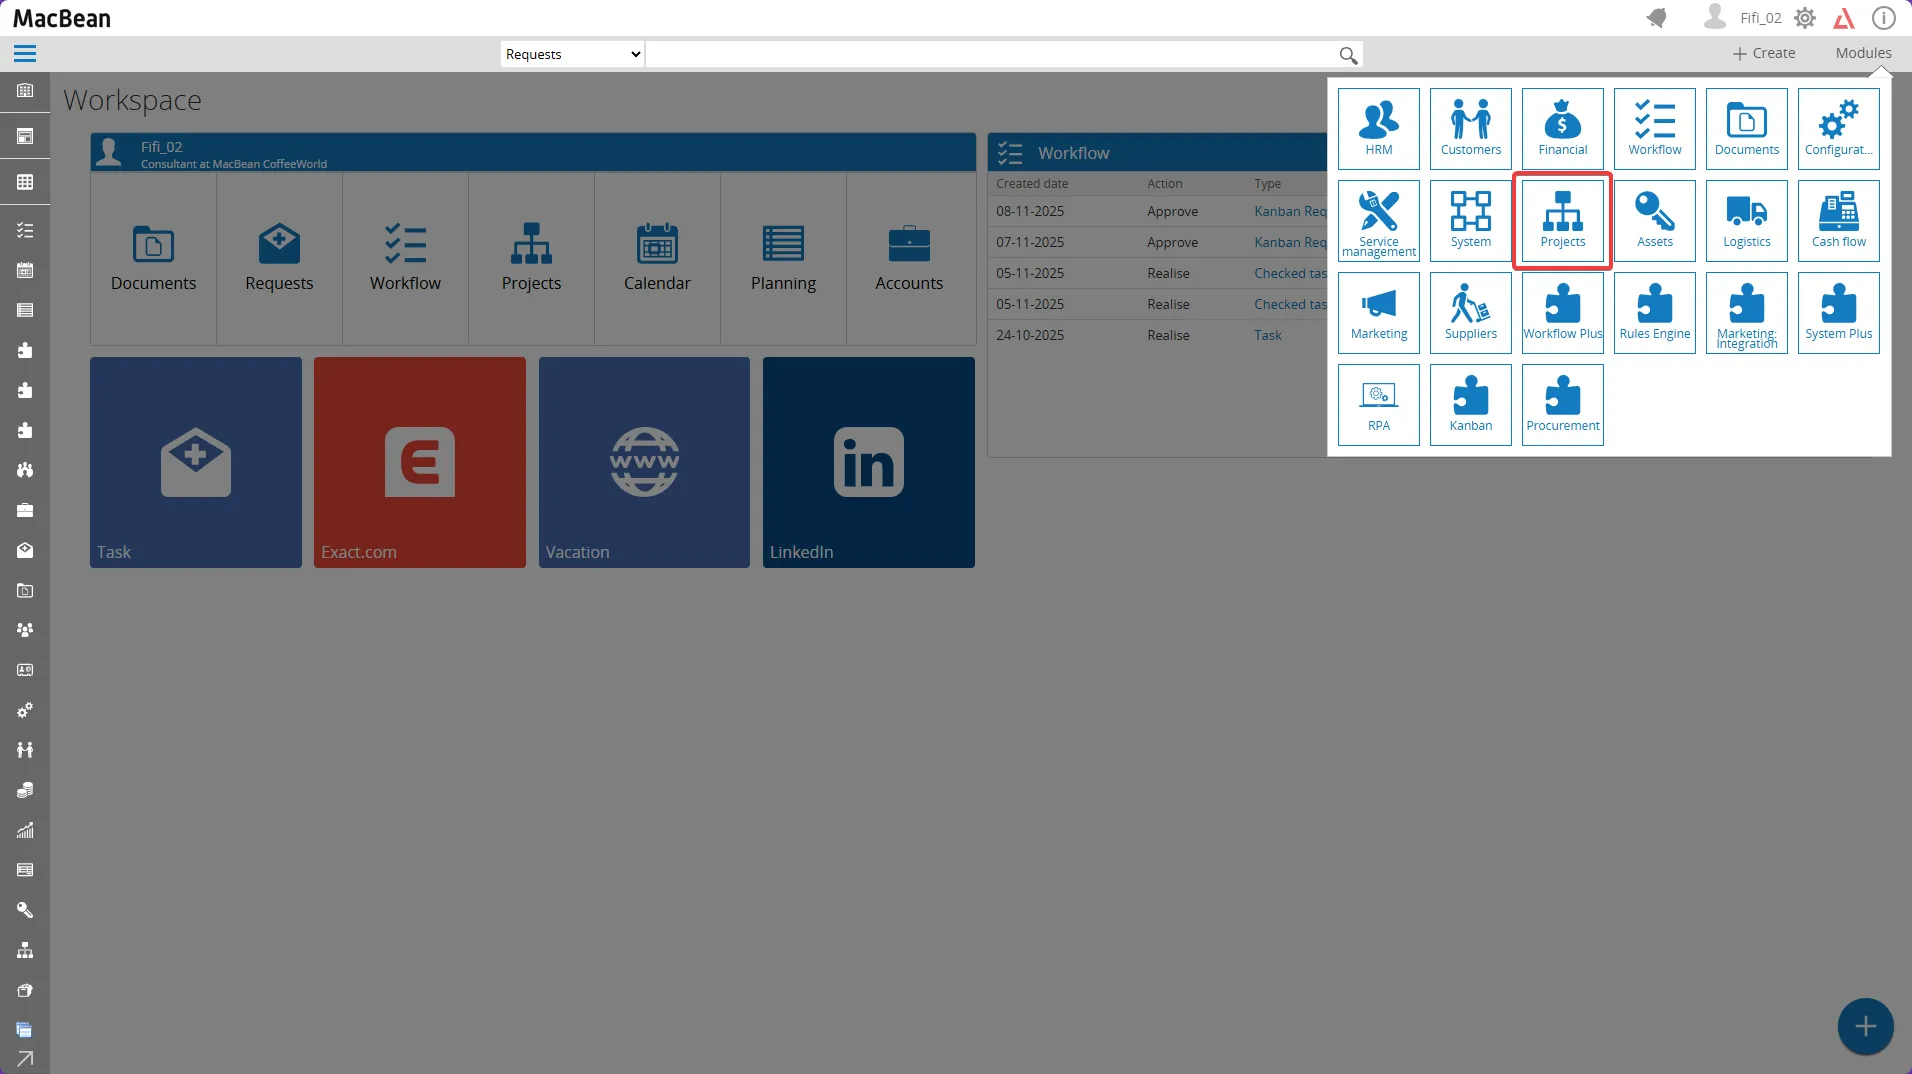
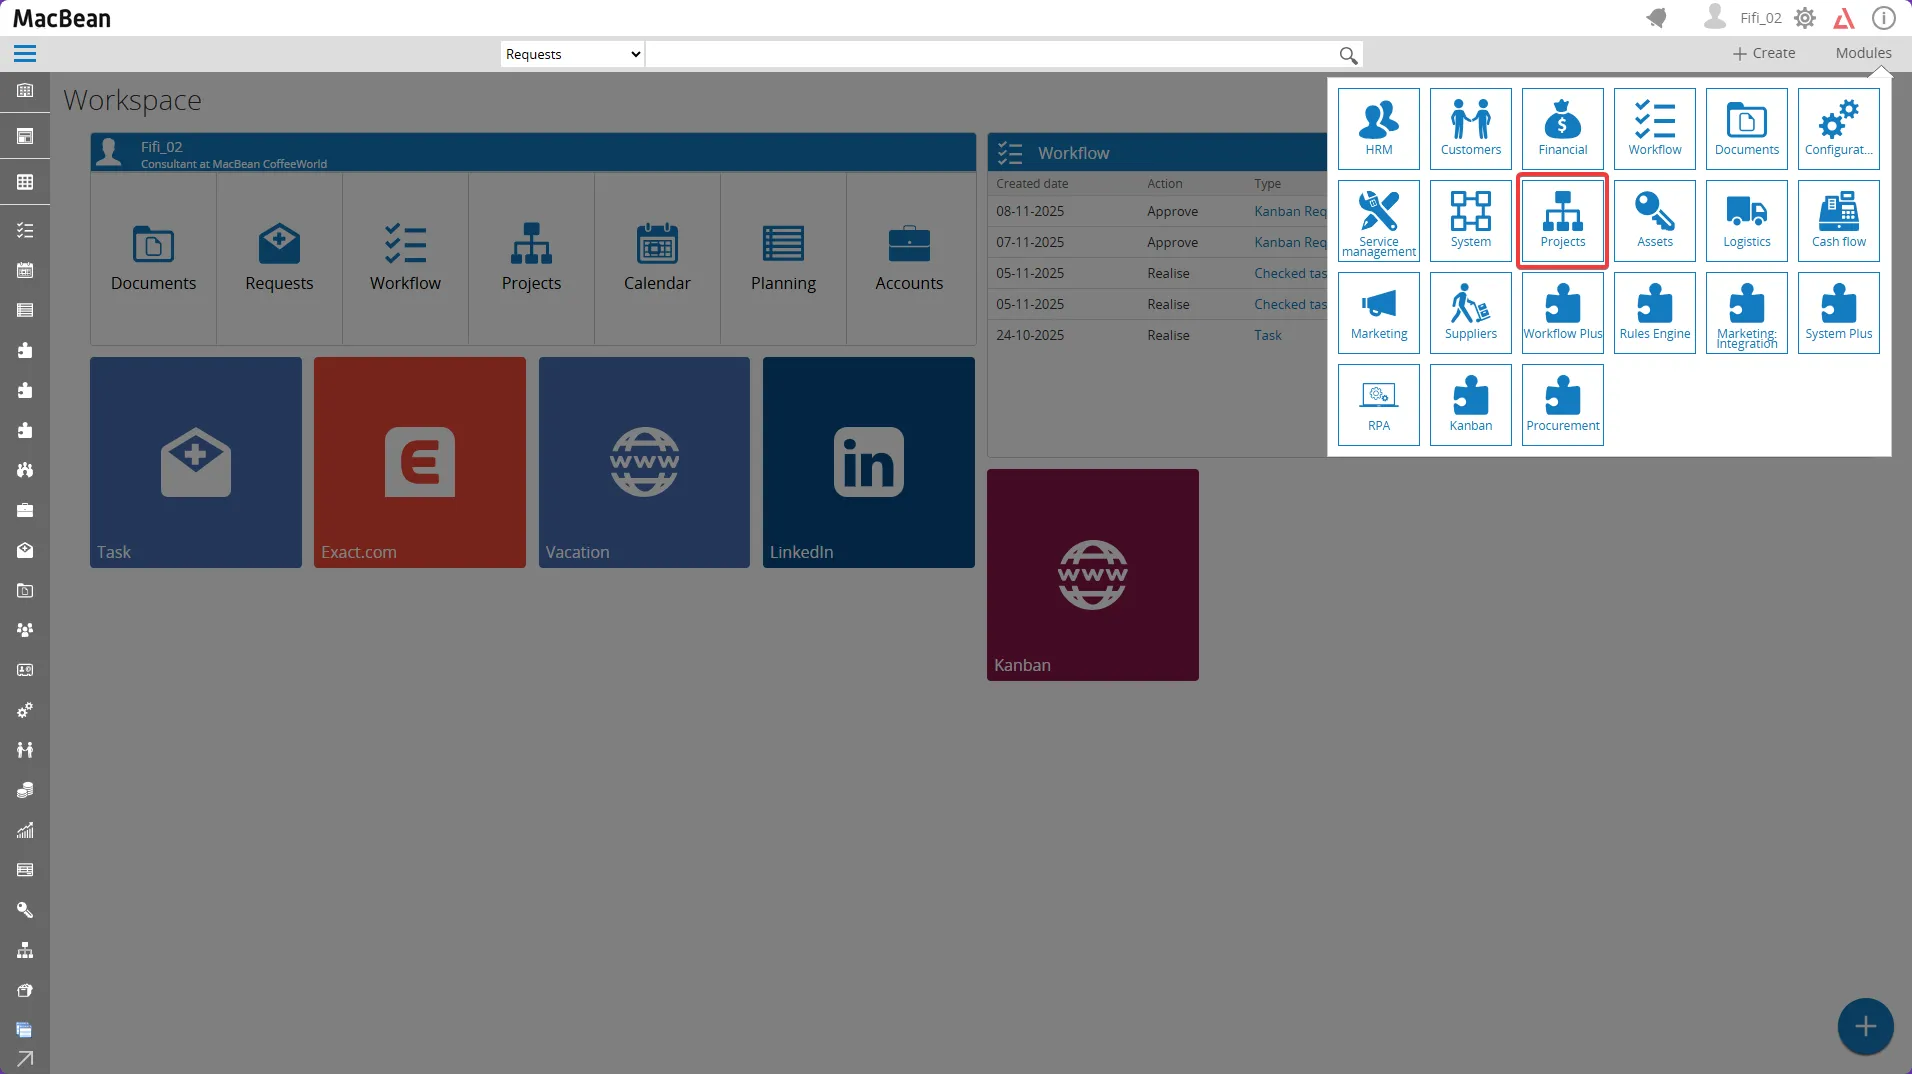
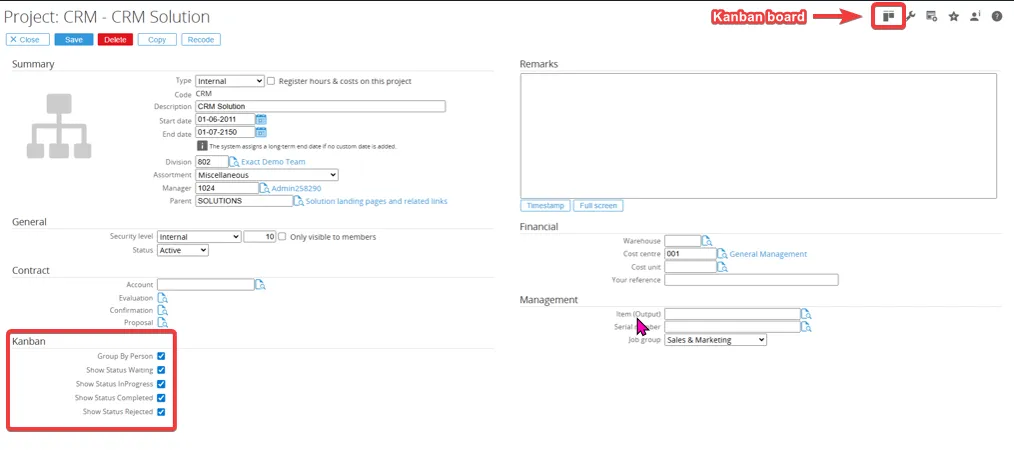
How to Setup Kanban via Project Card :- Go to Modules > Projects.
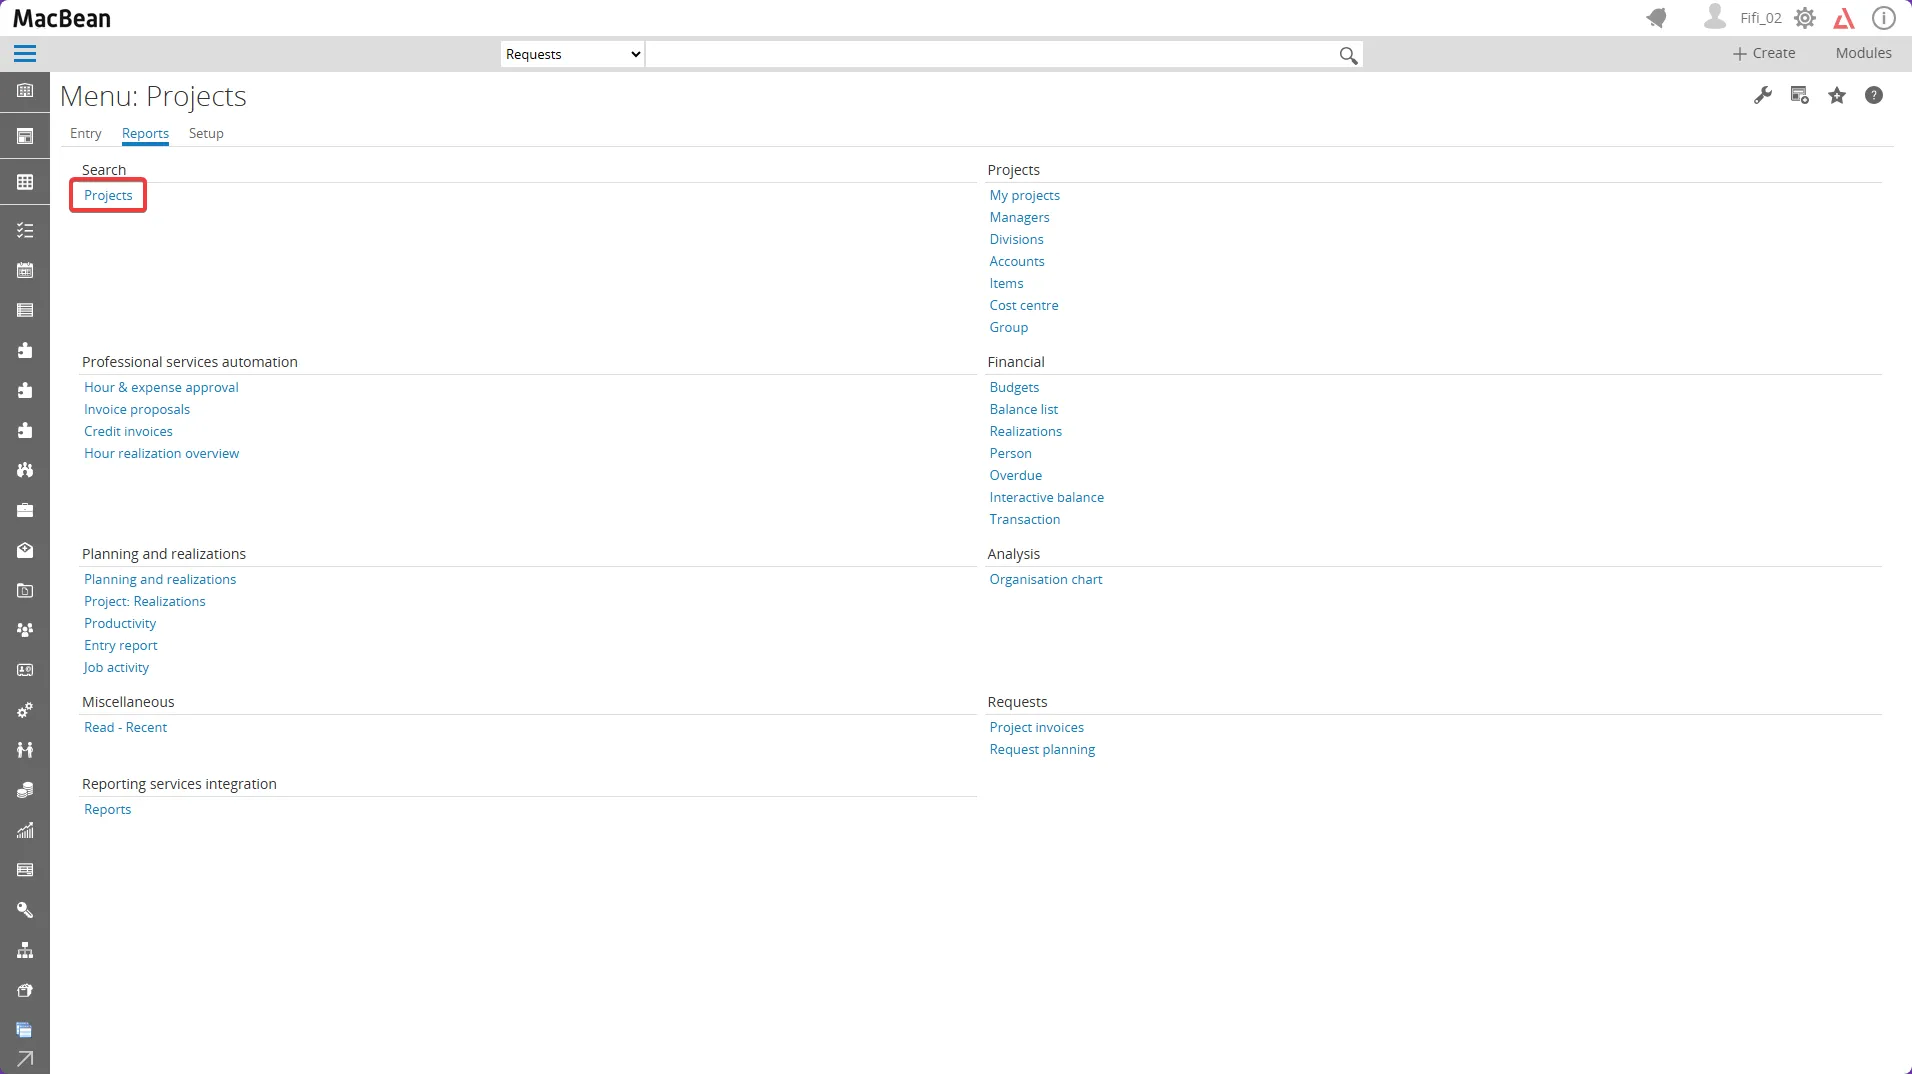
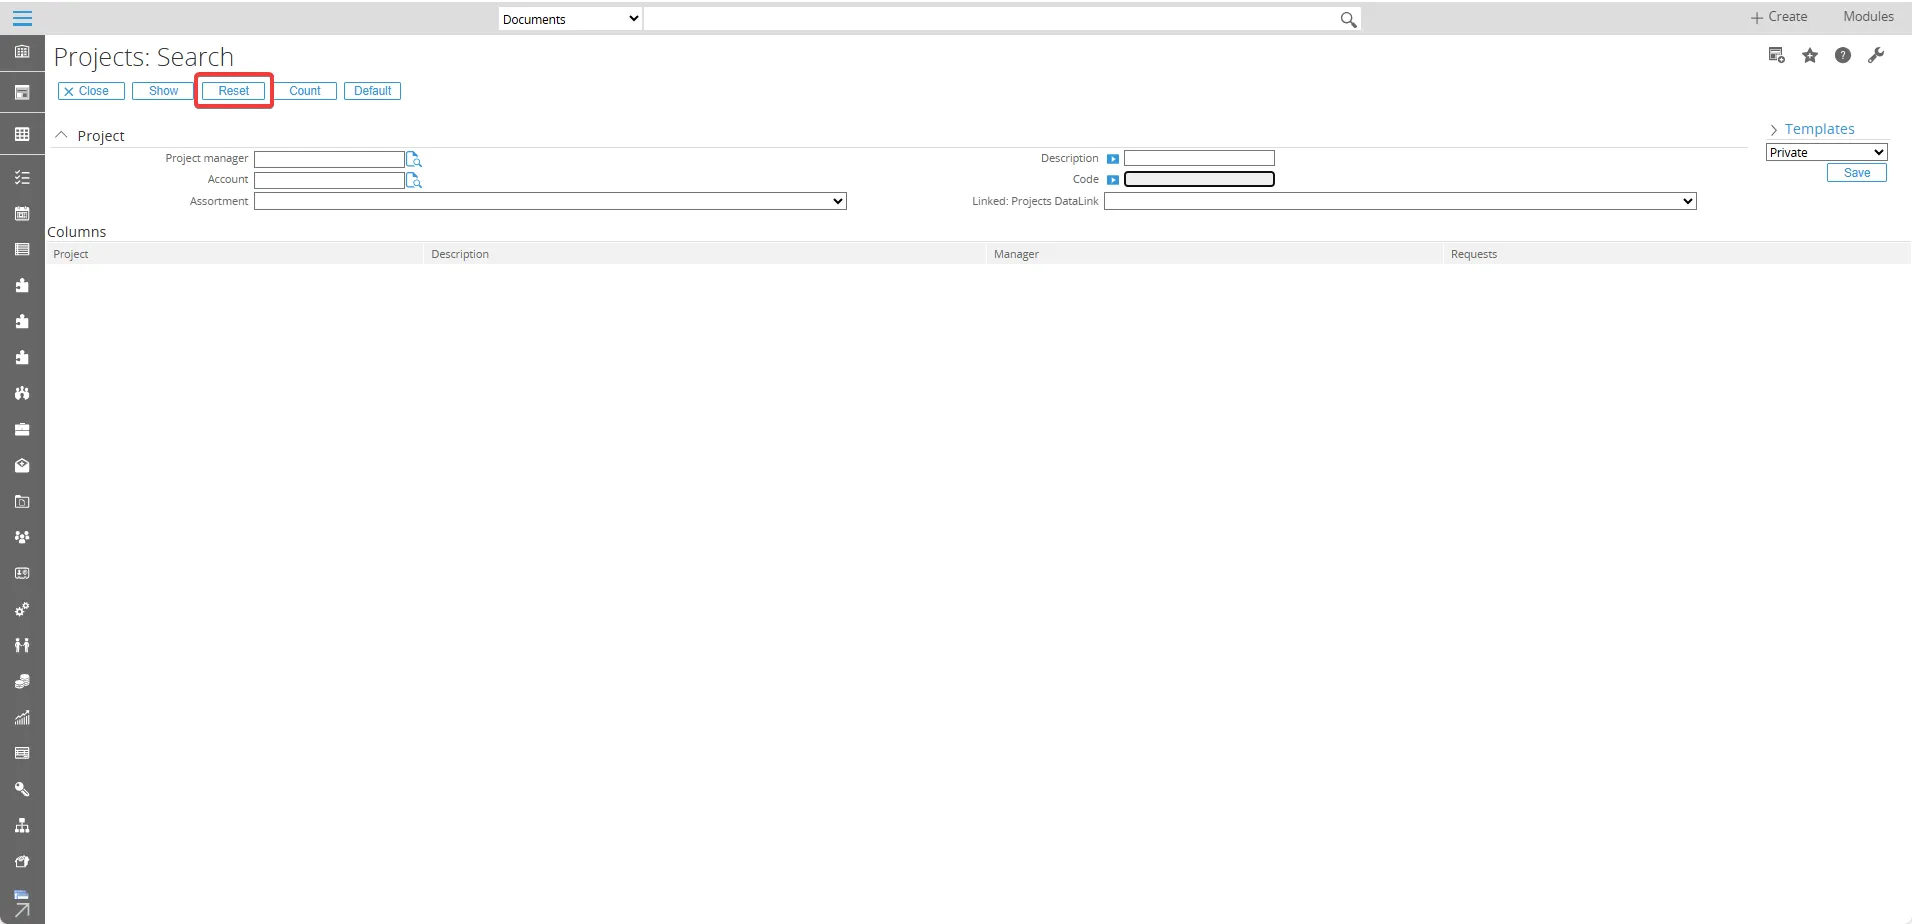
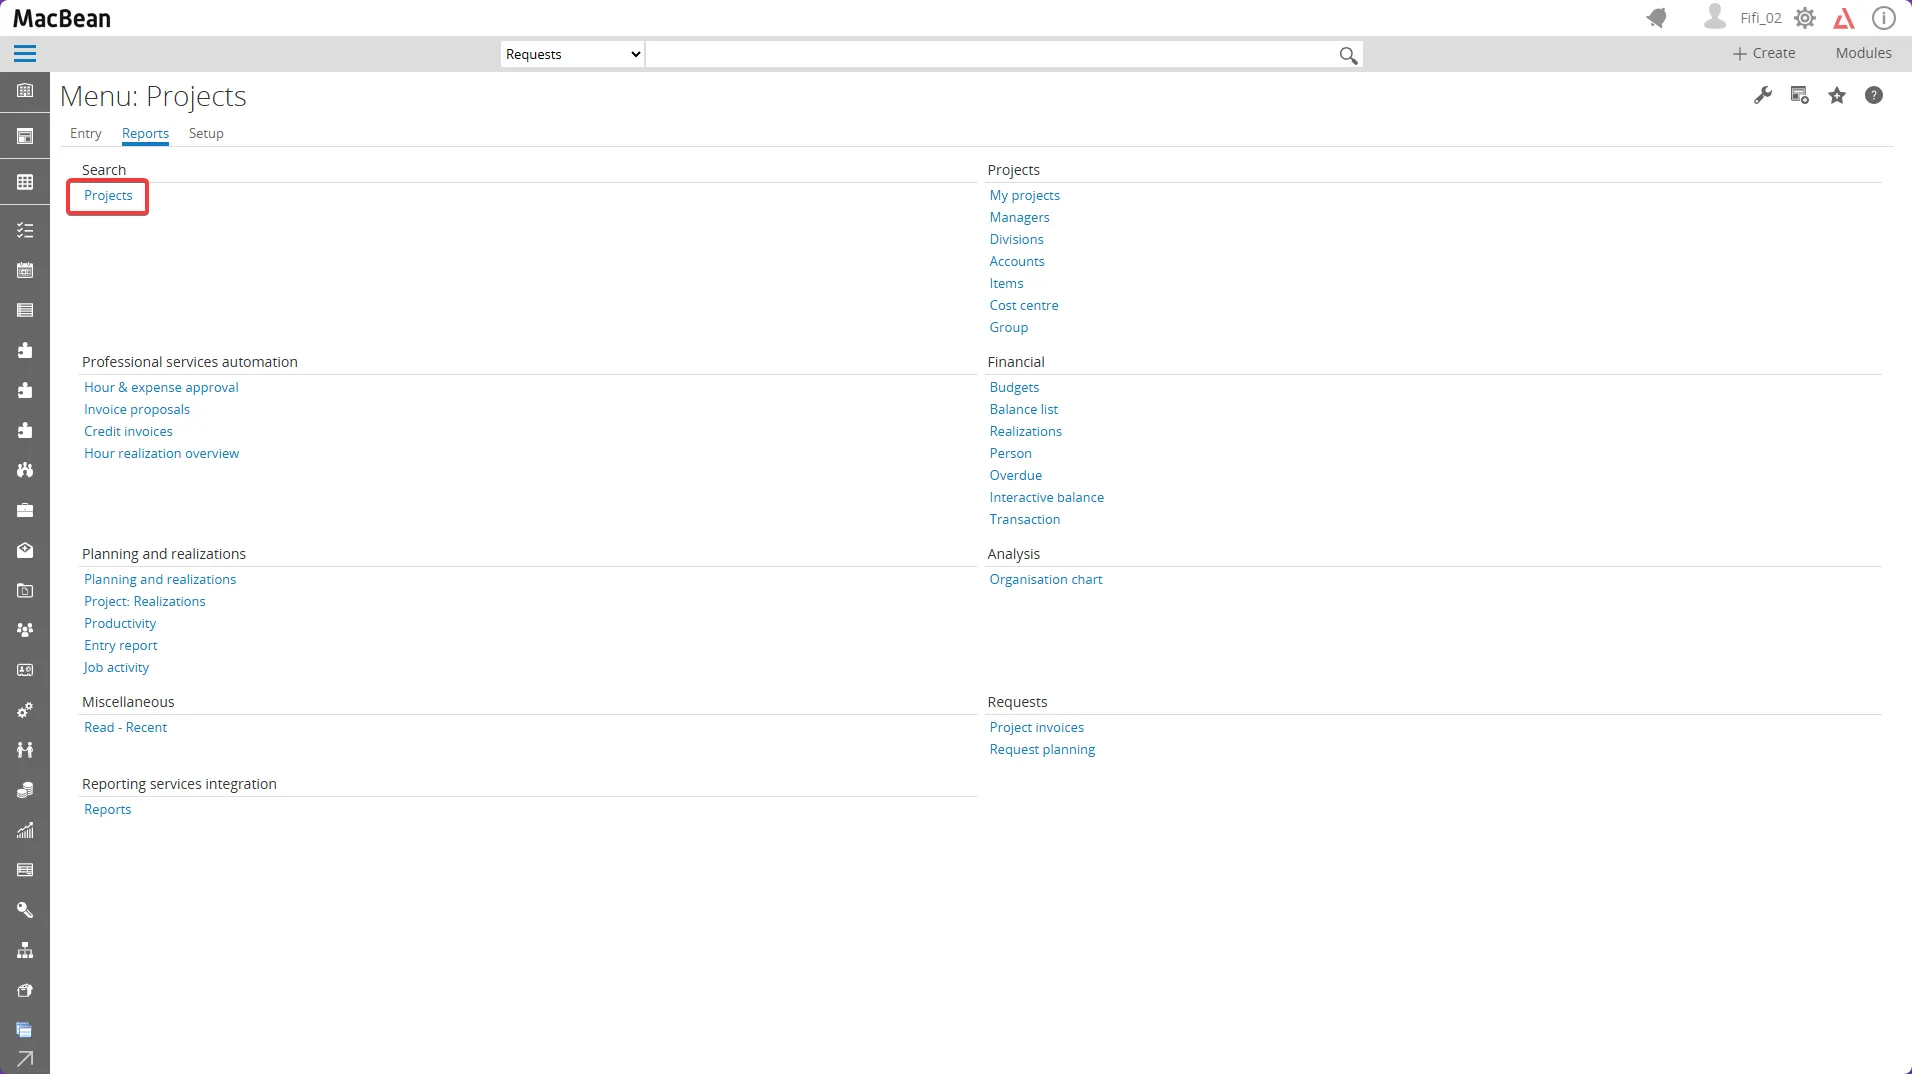
- Within the Reports menu, select Projects from the Search options.
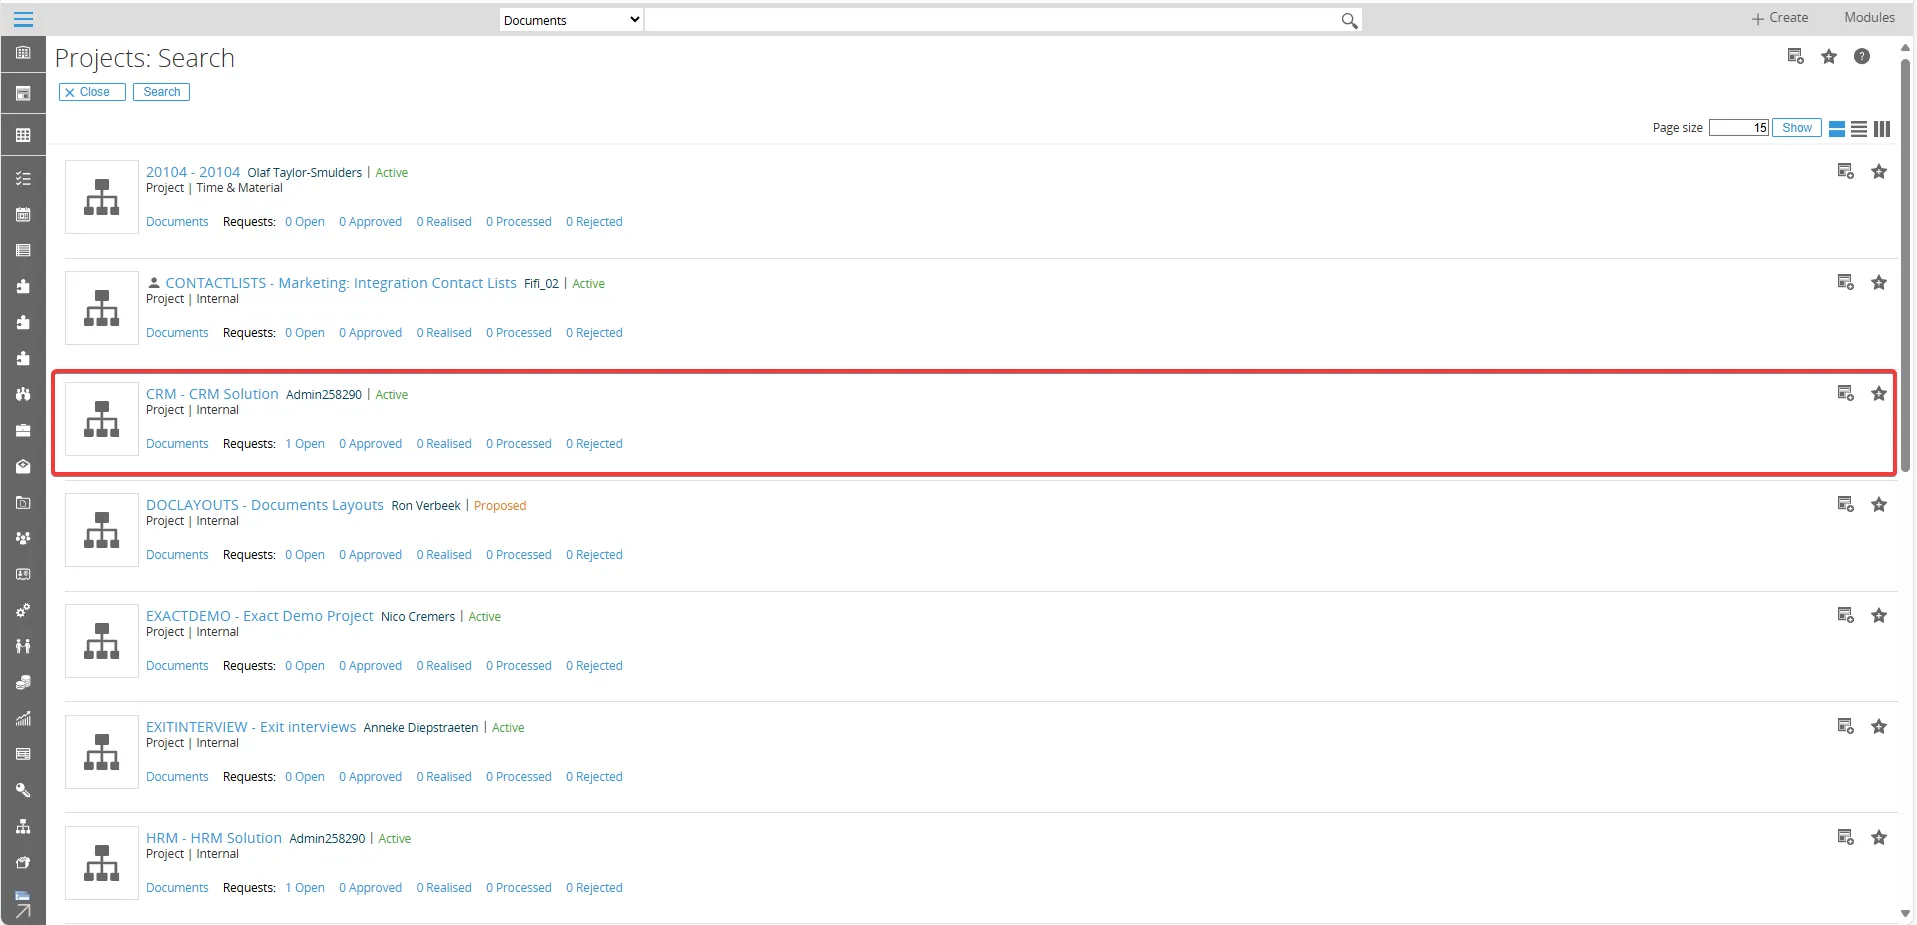
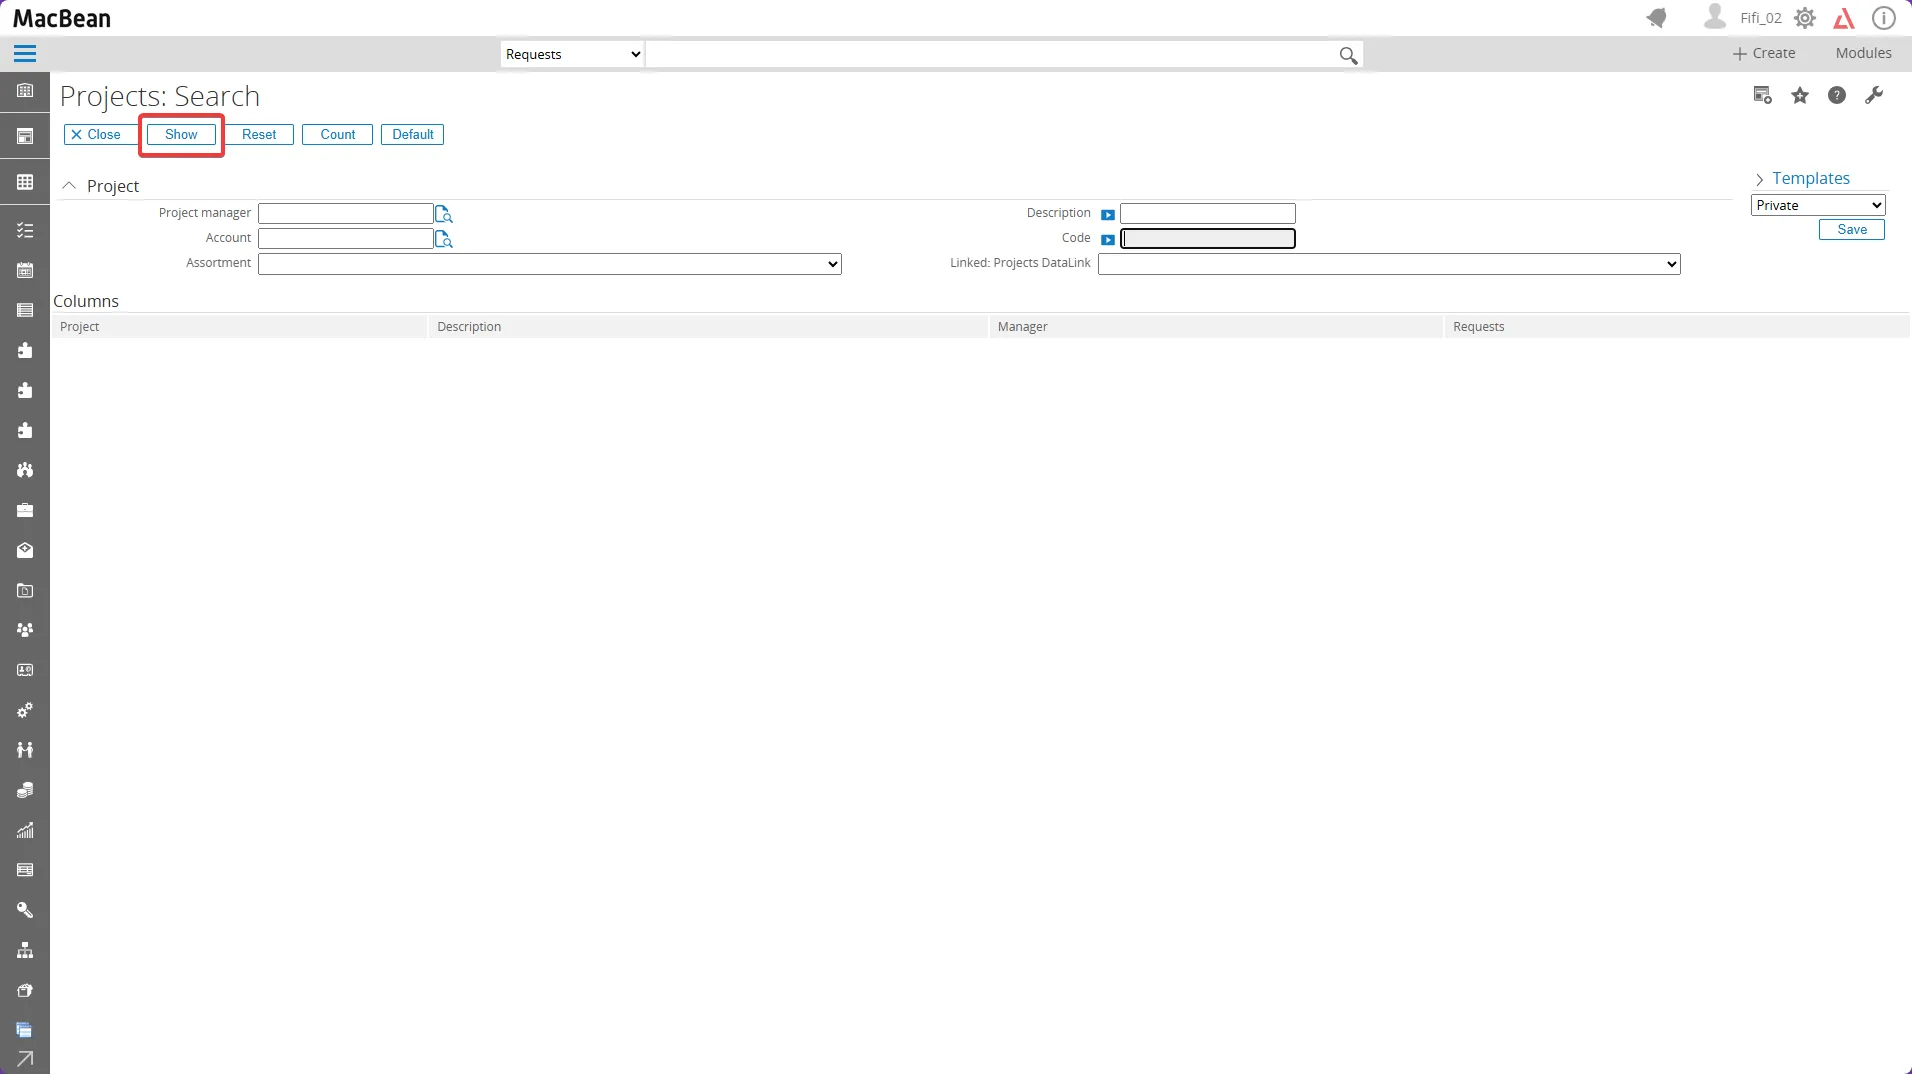
- Click the Show button to expand existing projects.
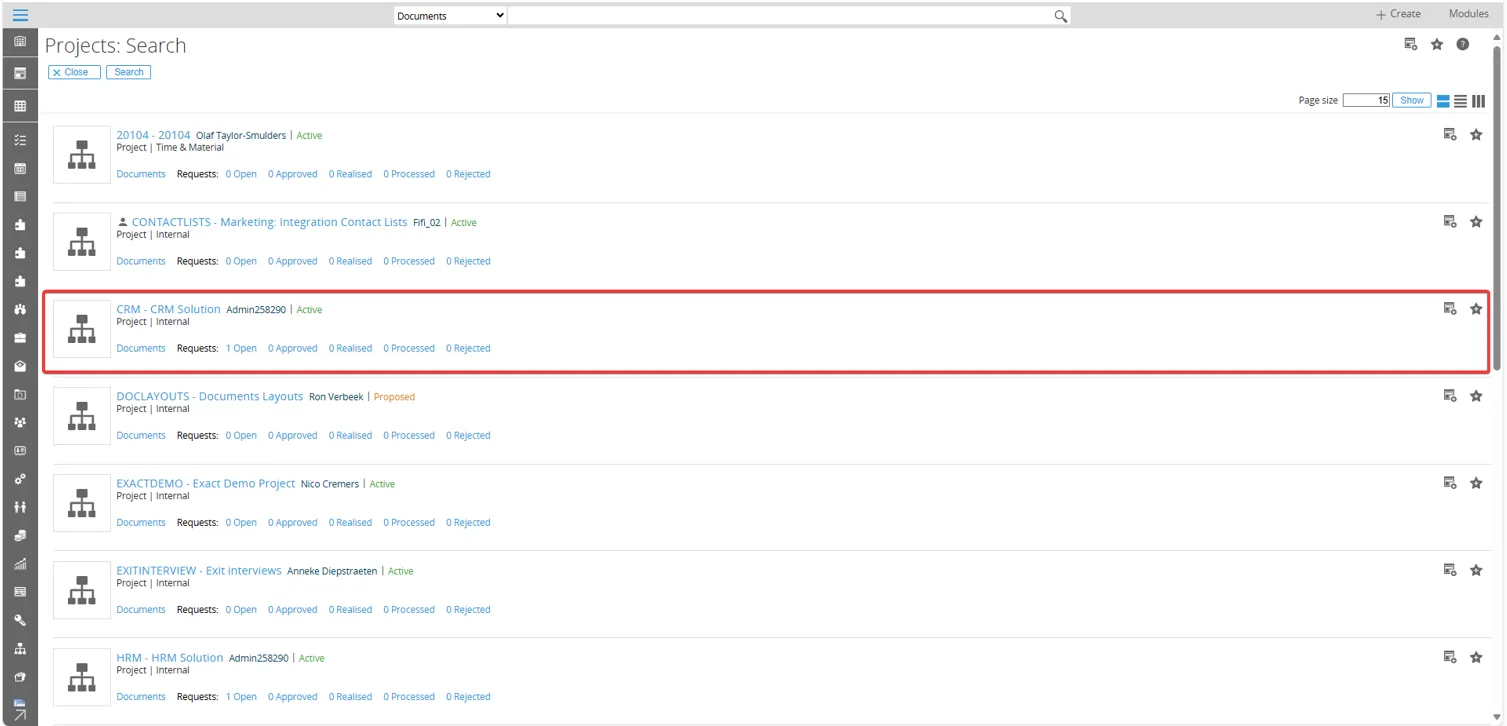
- Choose the relevant project (for example, “CRM – CRM Solution”).
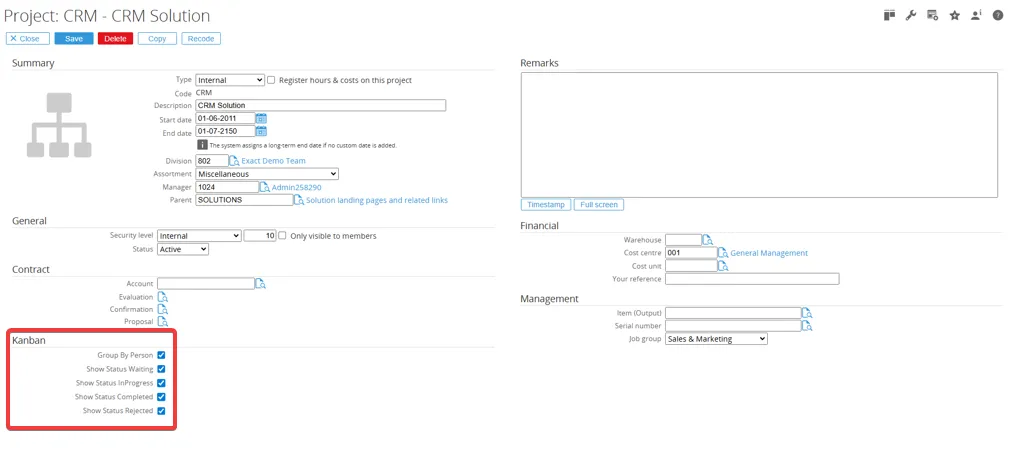
- In the Kanban menu, select all applicable options and click Save to apply the configuration. Then, click the Kanban board icon on the rights side to display the detailed list of Kanban boards.
- The task creation process is complete. The page will display, and the newly created task will appear in the Waiting section.
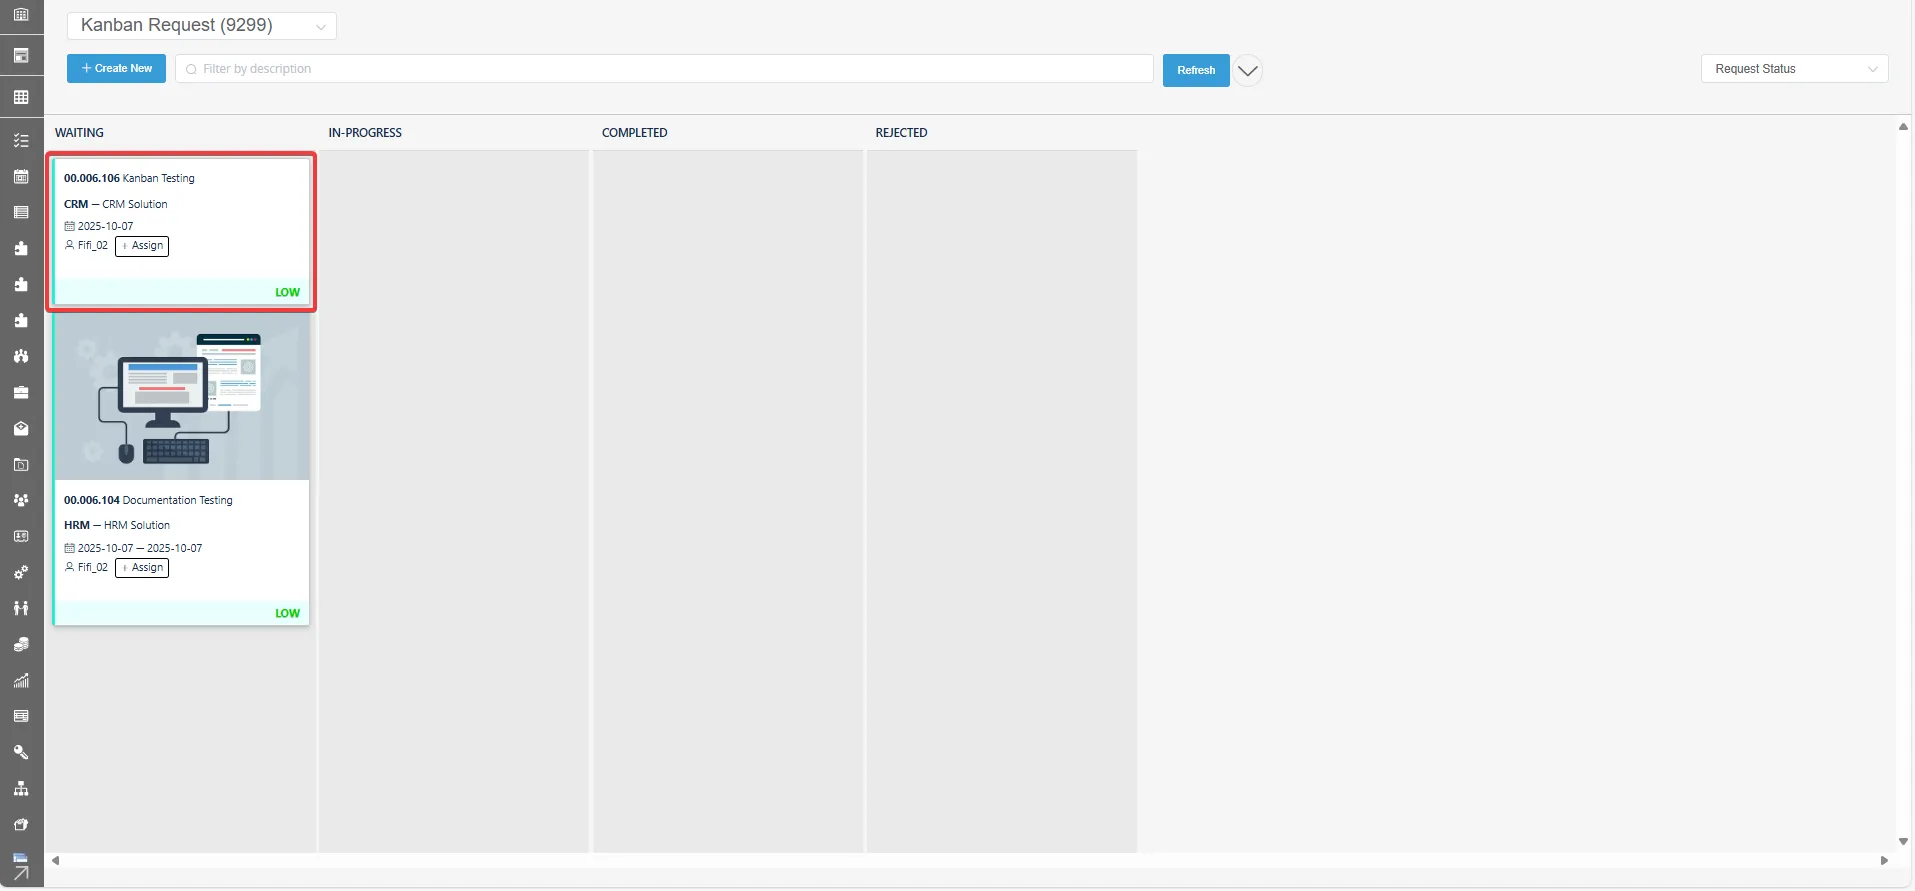
- Click the task description to display the details of the Kanban request.
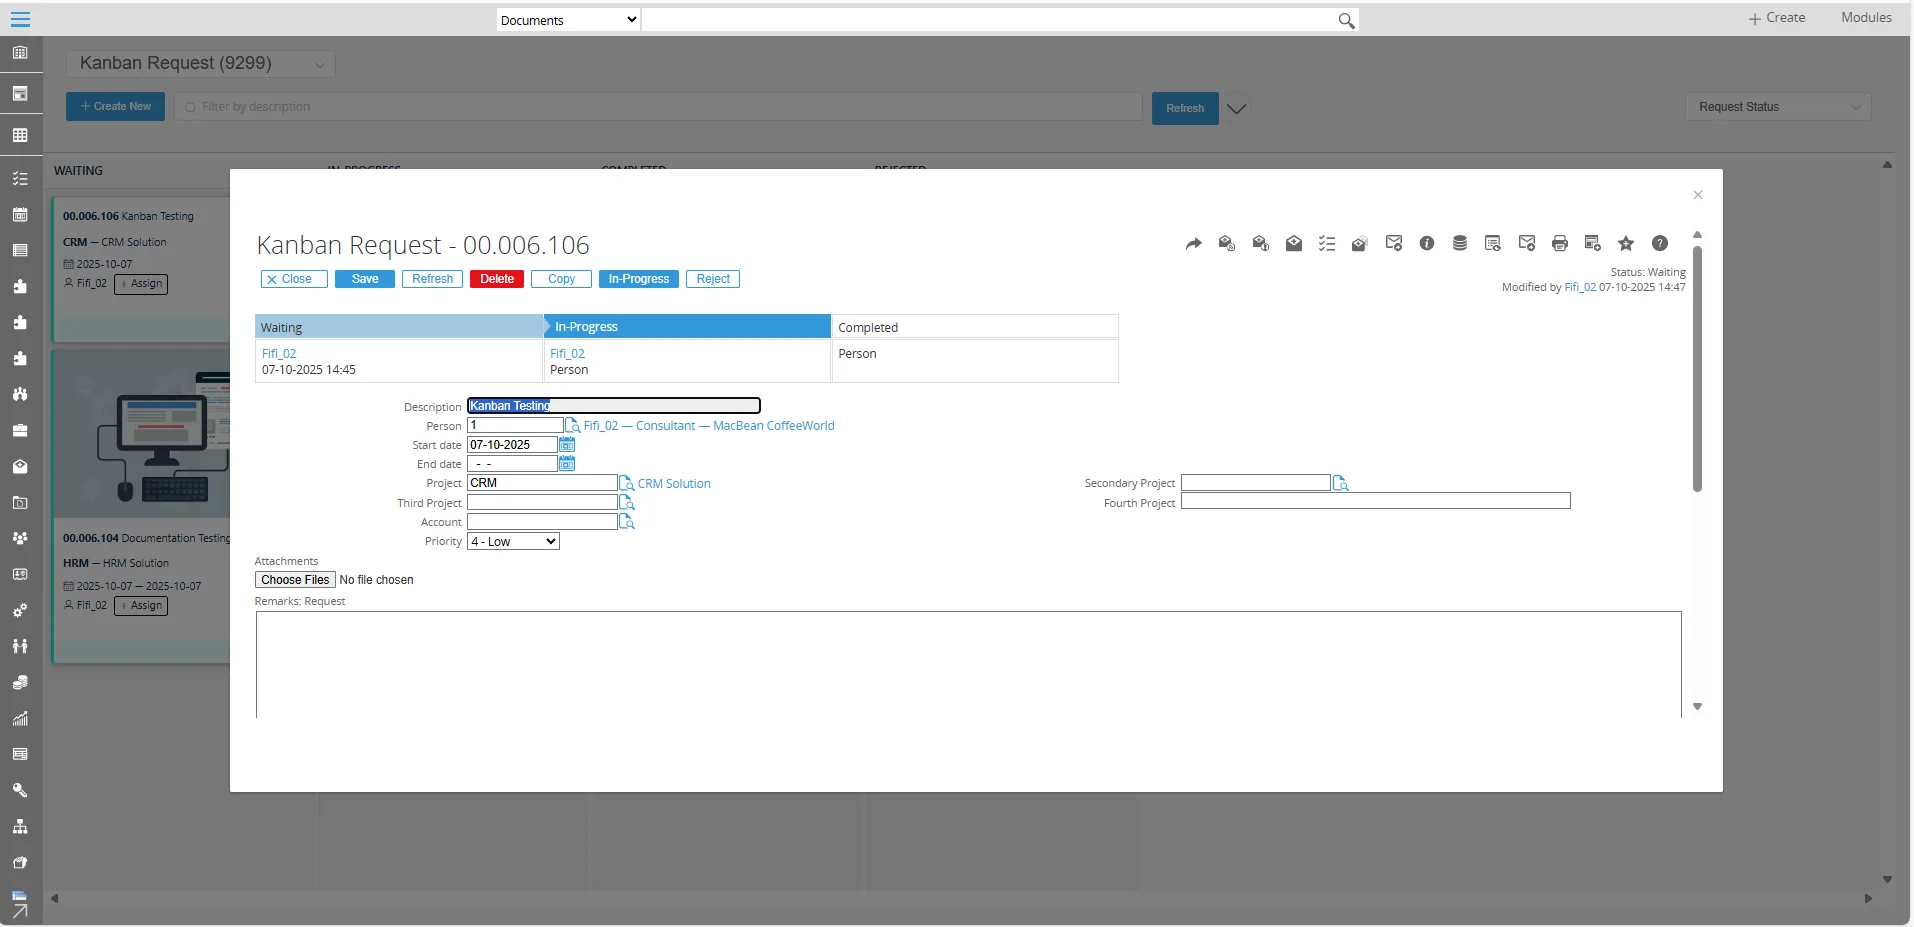
Setup Kanban Board by Workspace
Section titled “Setup Kanban Board by Workspace”This section explains Kanban configuration based on workspace. A workspace allows users to group projects and tasks into a single work environment, making team management and collaboration more efficient.
How to Setup Kanban via Workspace :- On the Workspace page, click the Add widget button at the bottom-right corner of the screen to open the widget list.
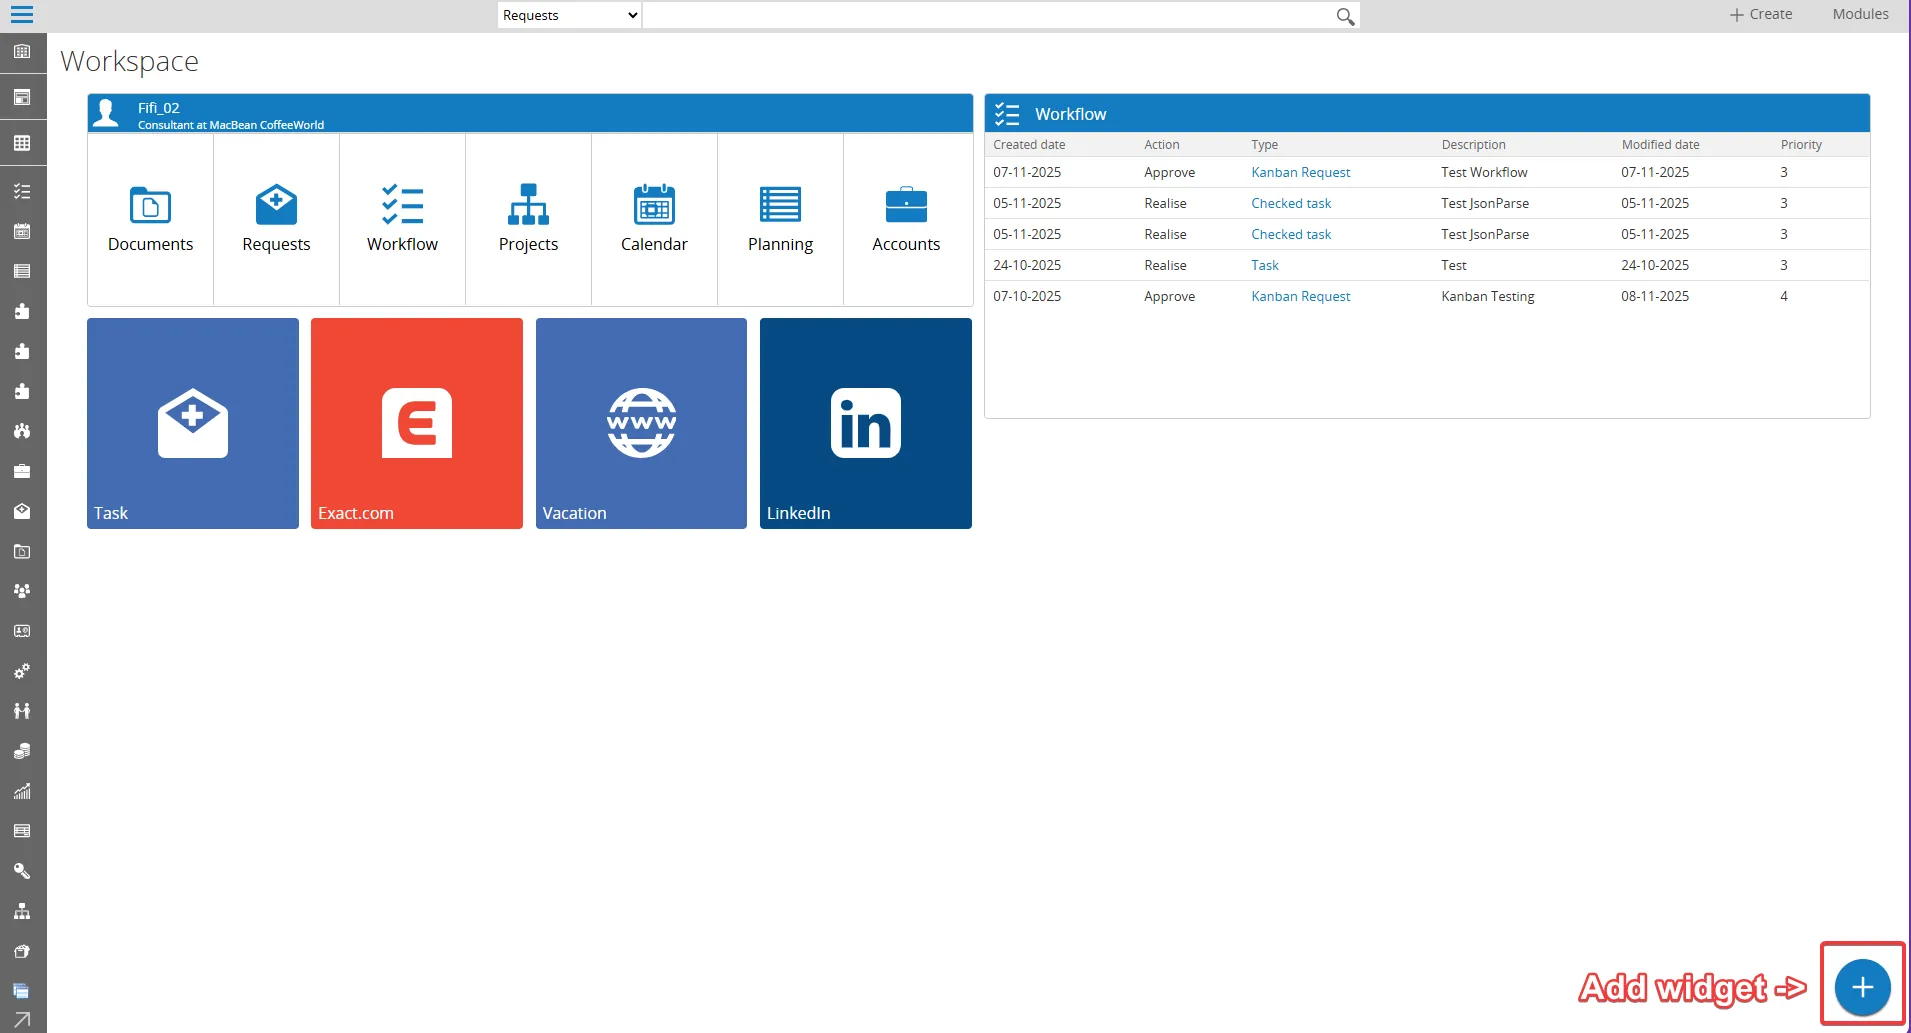
- Select New Link from the widgets
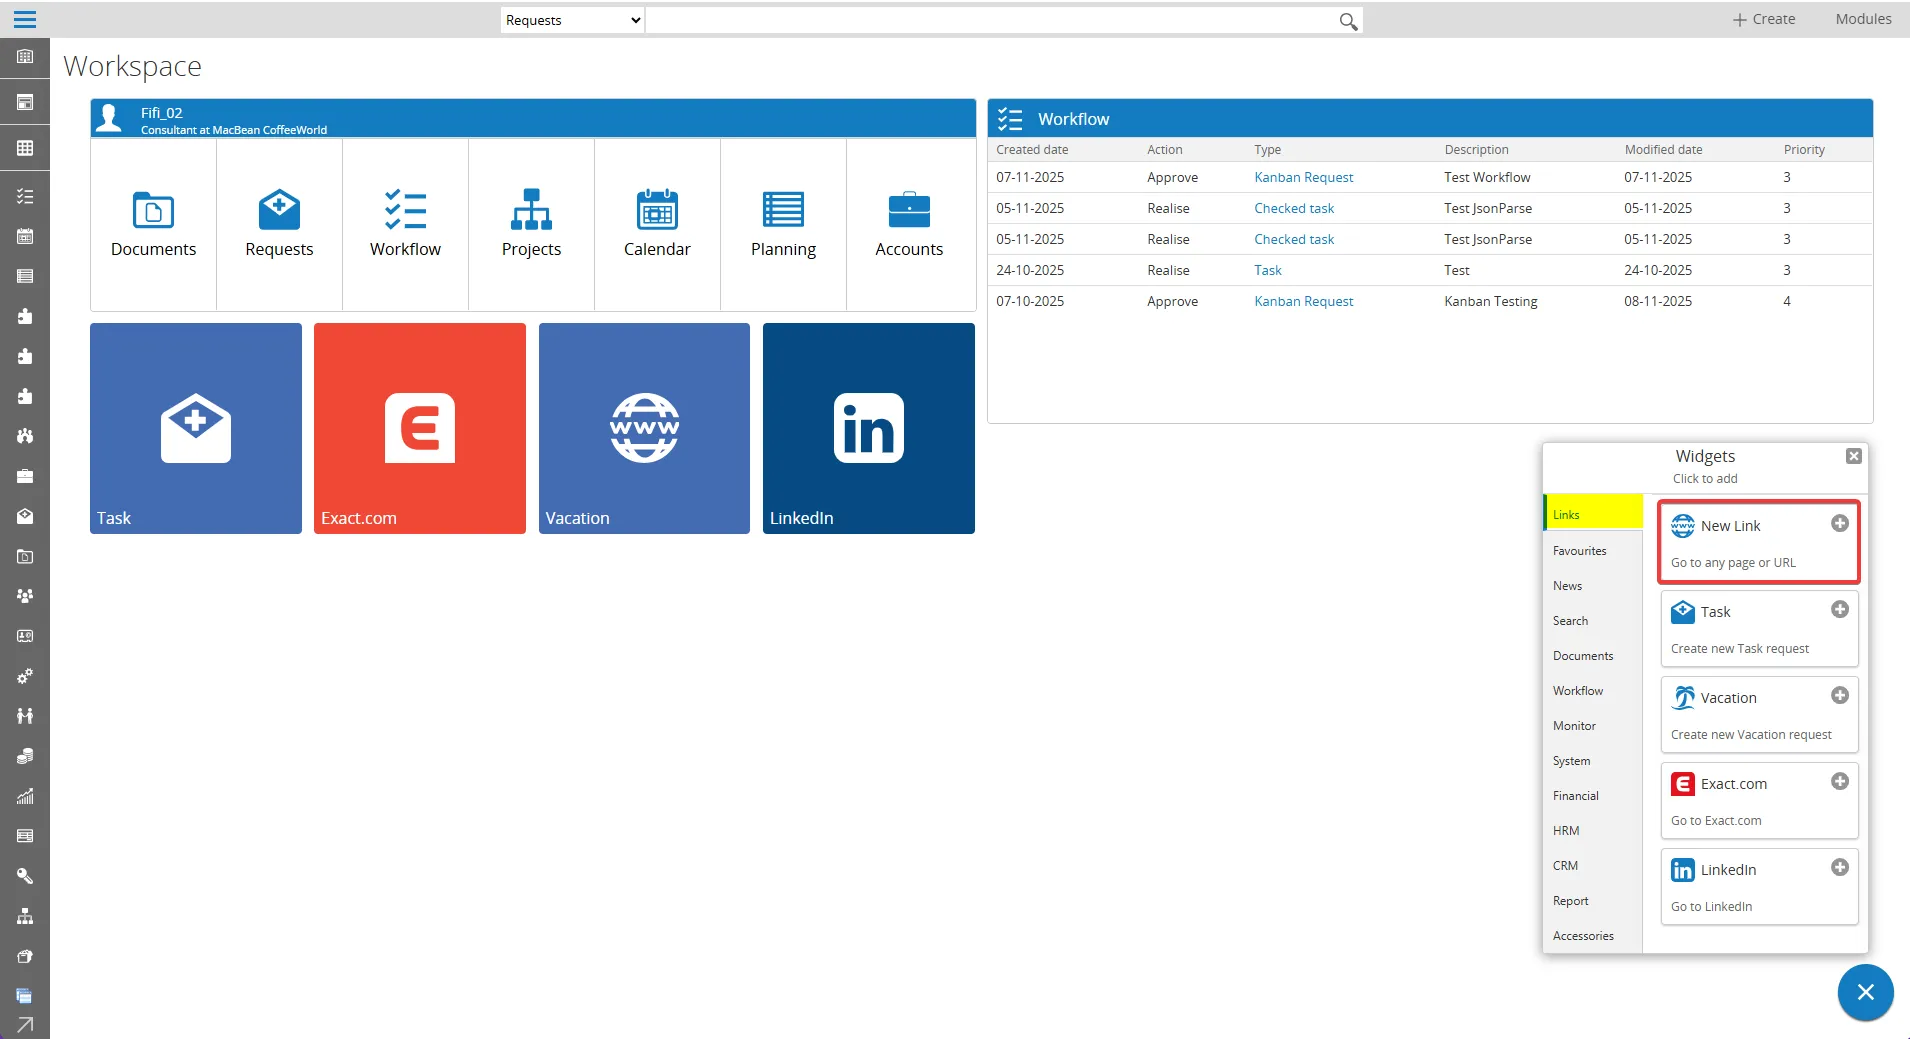
- Configuring Widget Properties:
In the Properties section: - Enter the widget title in the Title field.
- Add a description if necessary in the Description field.
- Select Type as “URL” to add a web link. Enter the target page address in the URL field (for example: https://synergy.glmsystems.com/docs/GLMSysKanbanBoard.aspx to display the Kanban board page).
In the Layout section:
- Change the icon or background by uploading a custom image, if desired.
- Choose a background color from the color palette or enter a specific color code.
- Click Save to apply the configurations.
- After finish configuration, click Save.
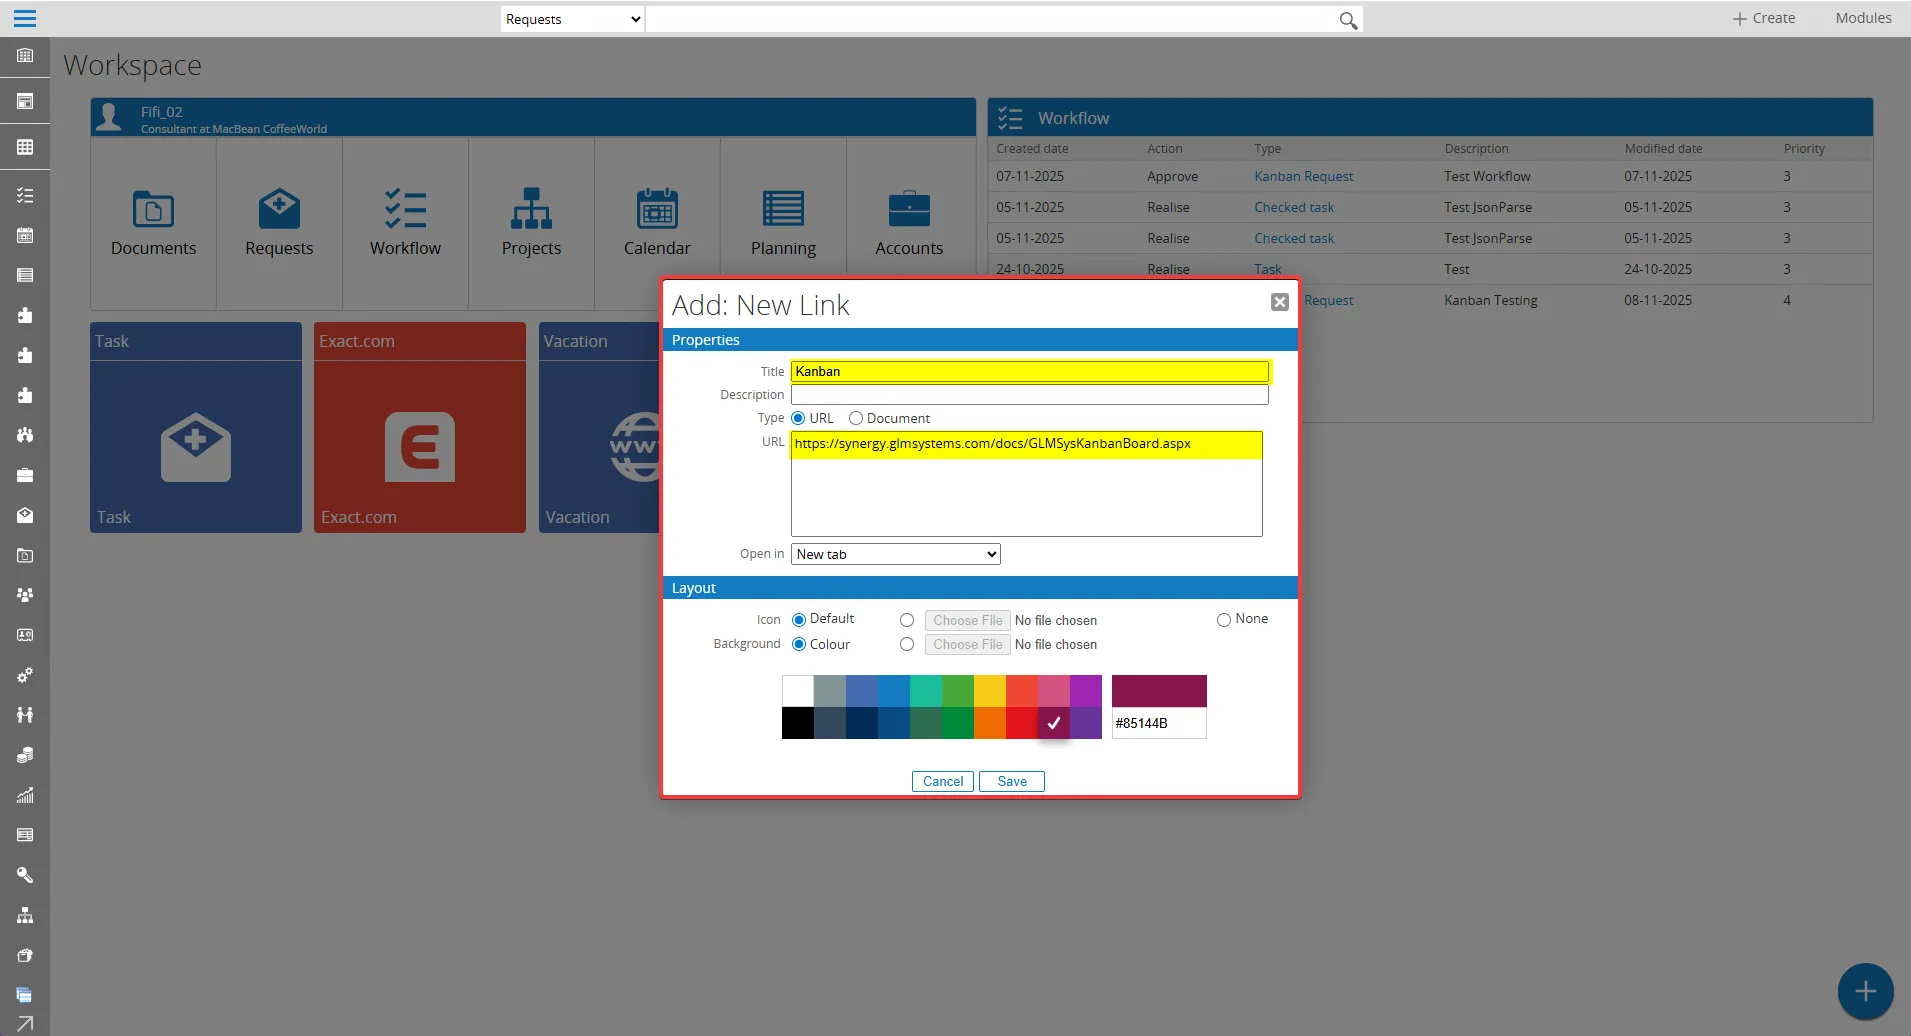
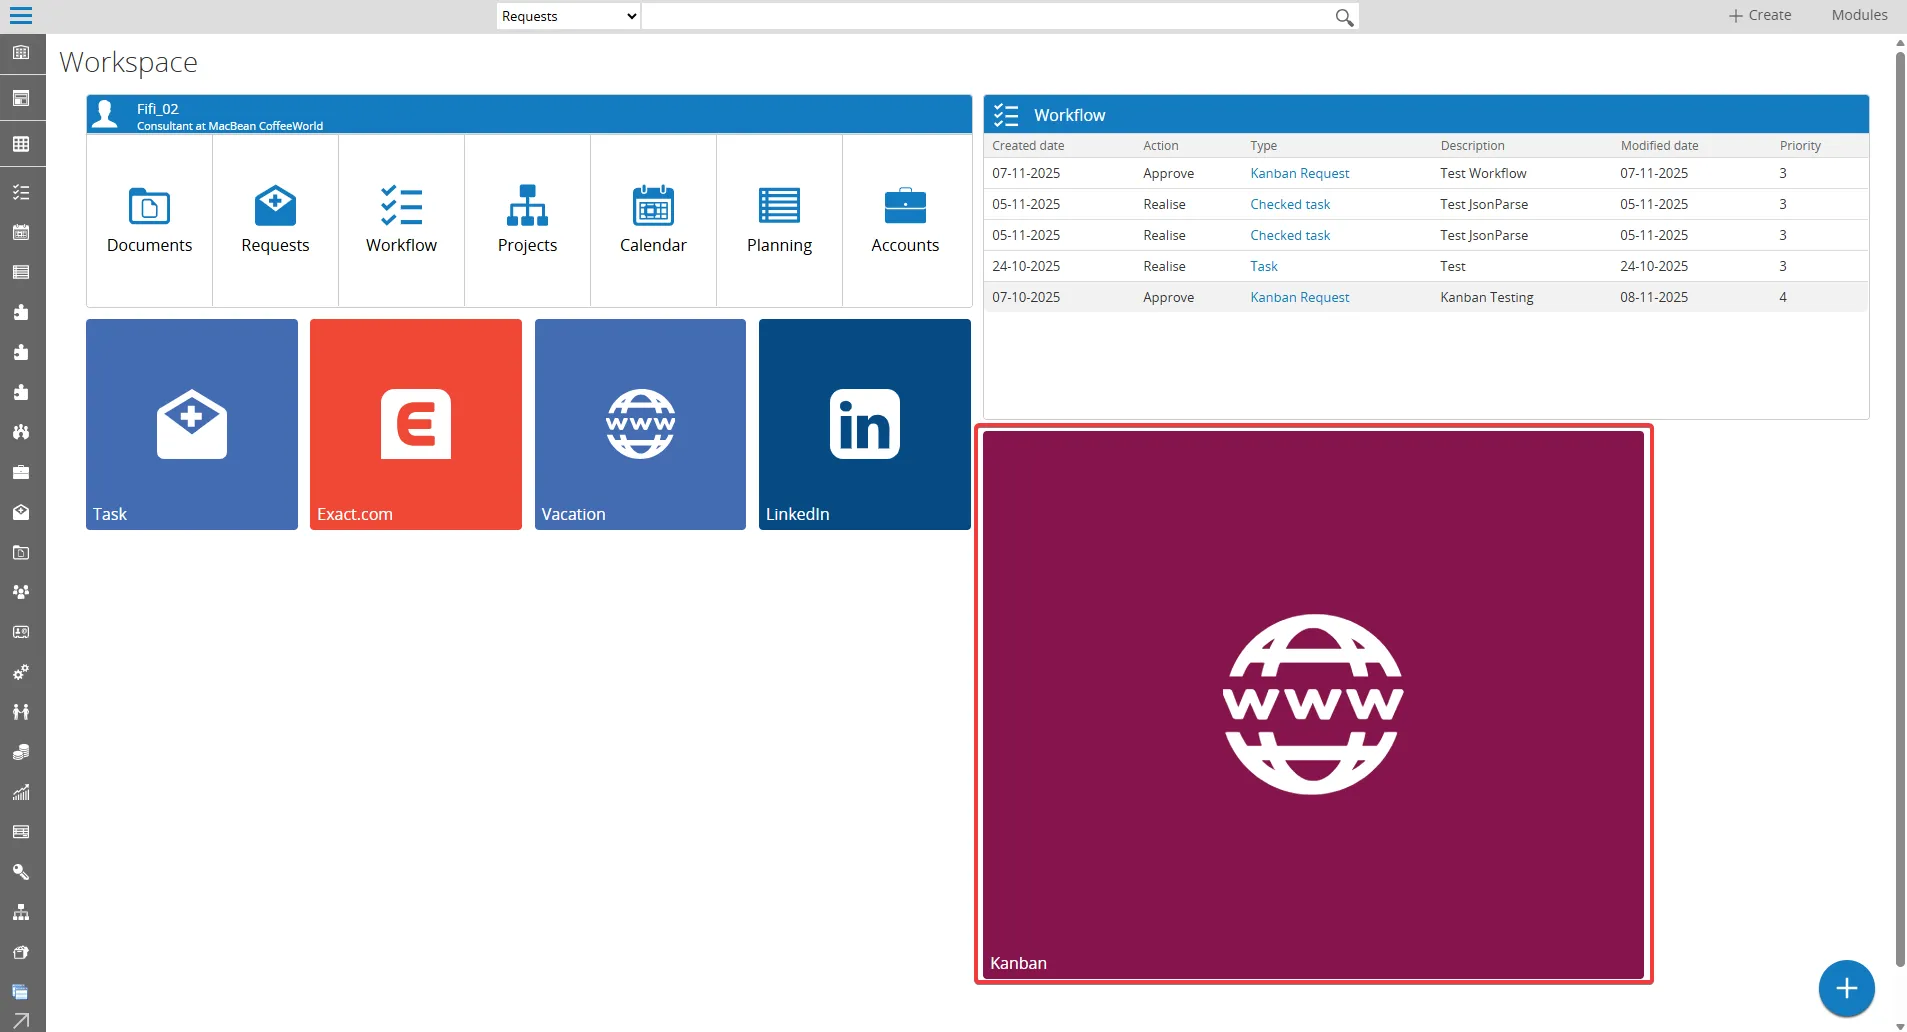
- The Kanban widget will be displayed on the Workspace page. The widget’s size can be adjusted using the resize handle button as needed.
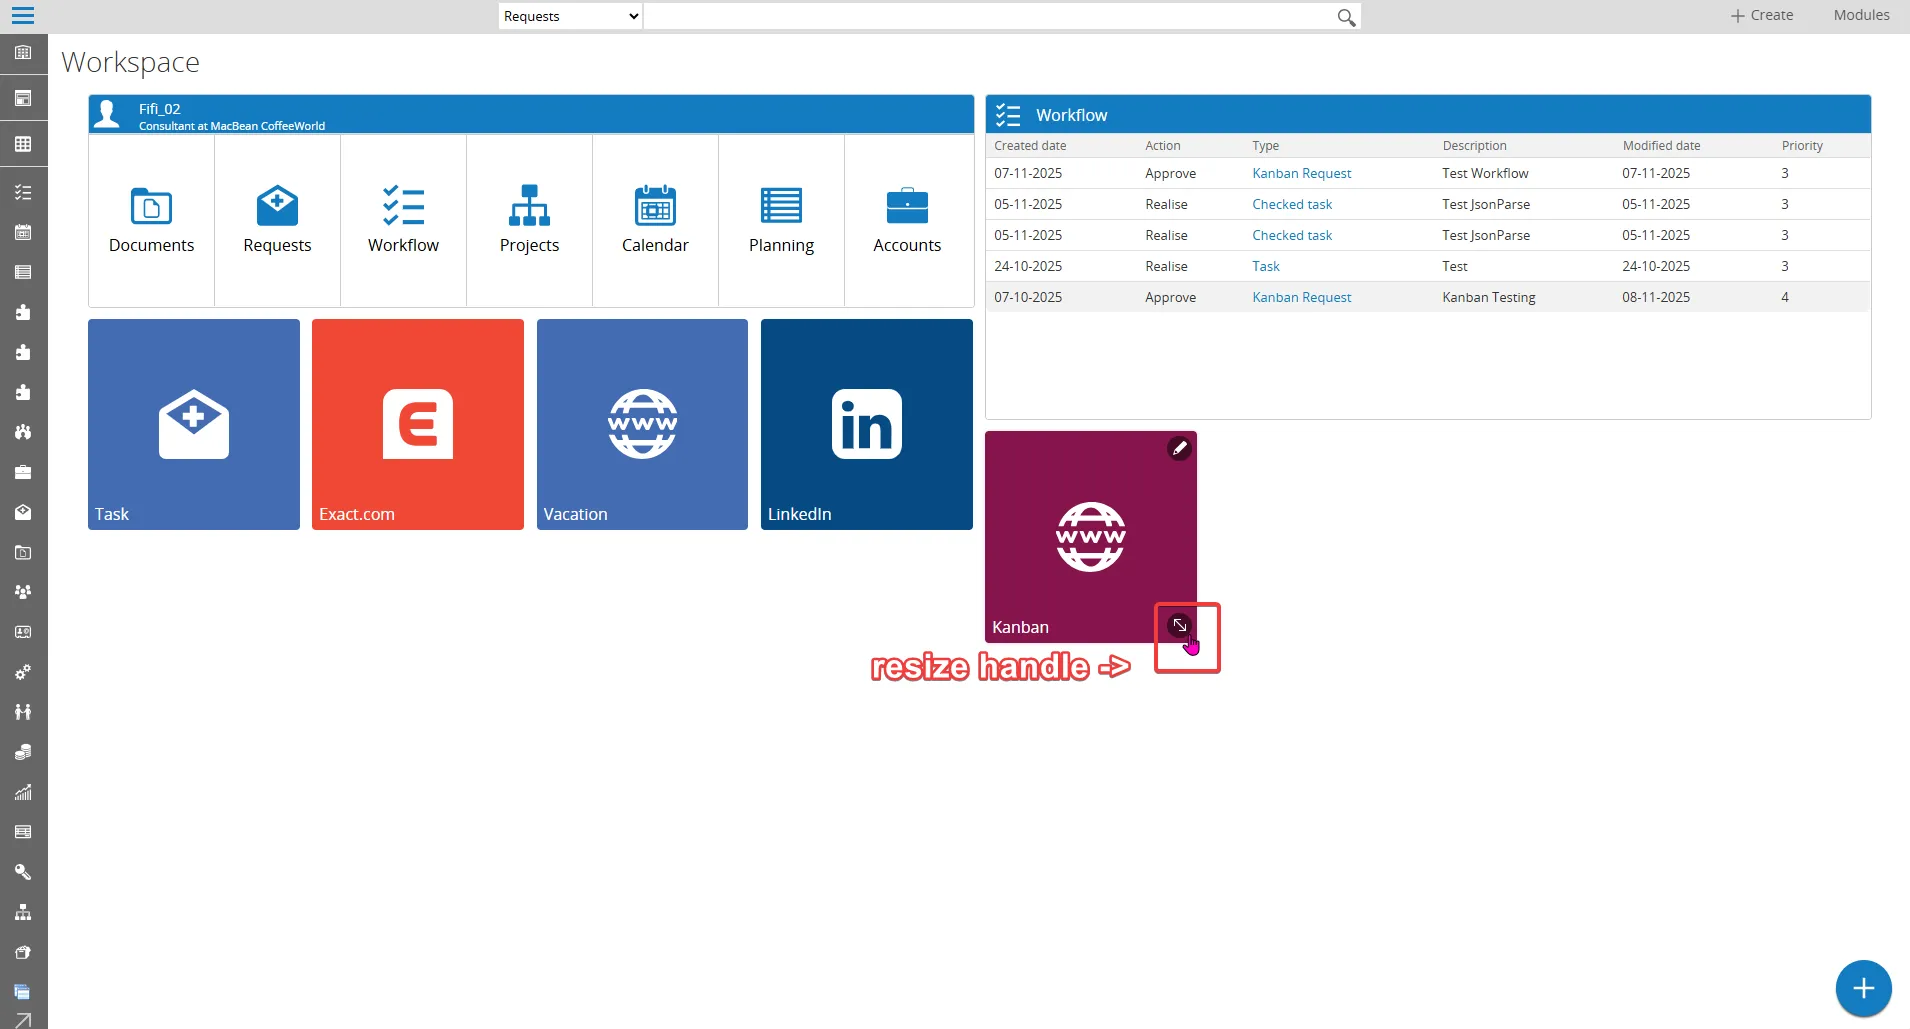
- As an example, the following shows the result after adjusting the widget’s size using the resize handle.
Setup Kanban Board by IFrame
Section titled “Setup Kanban Board by IFrame”This section explain about allows the Kanban board to be seamlessly embedded within a Workspace by adding it as a widget using an IFrame. The Kanban board can then be accessed and interacted with directly from the Workspace interface, providing users with a consolidated view of tasks alongside other workspace components.
How to Setup Kanban via IFrame :- Click the Add widget button at the bottom right corner of the page to add a new widget.
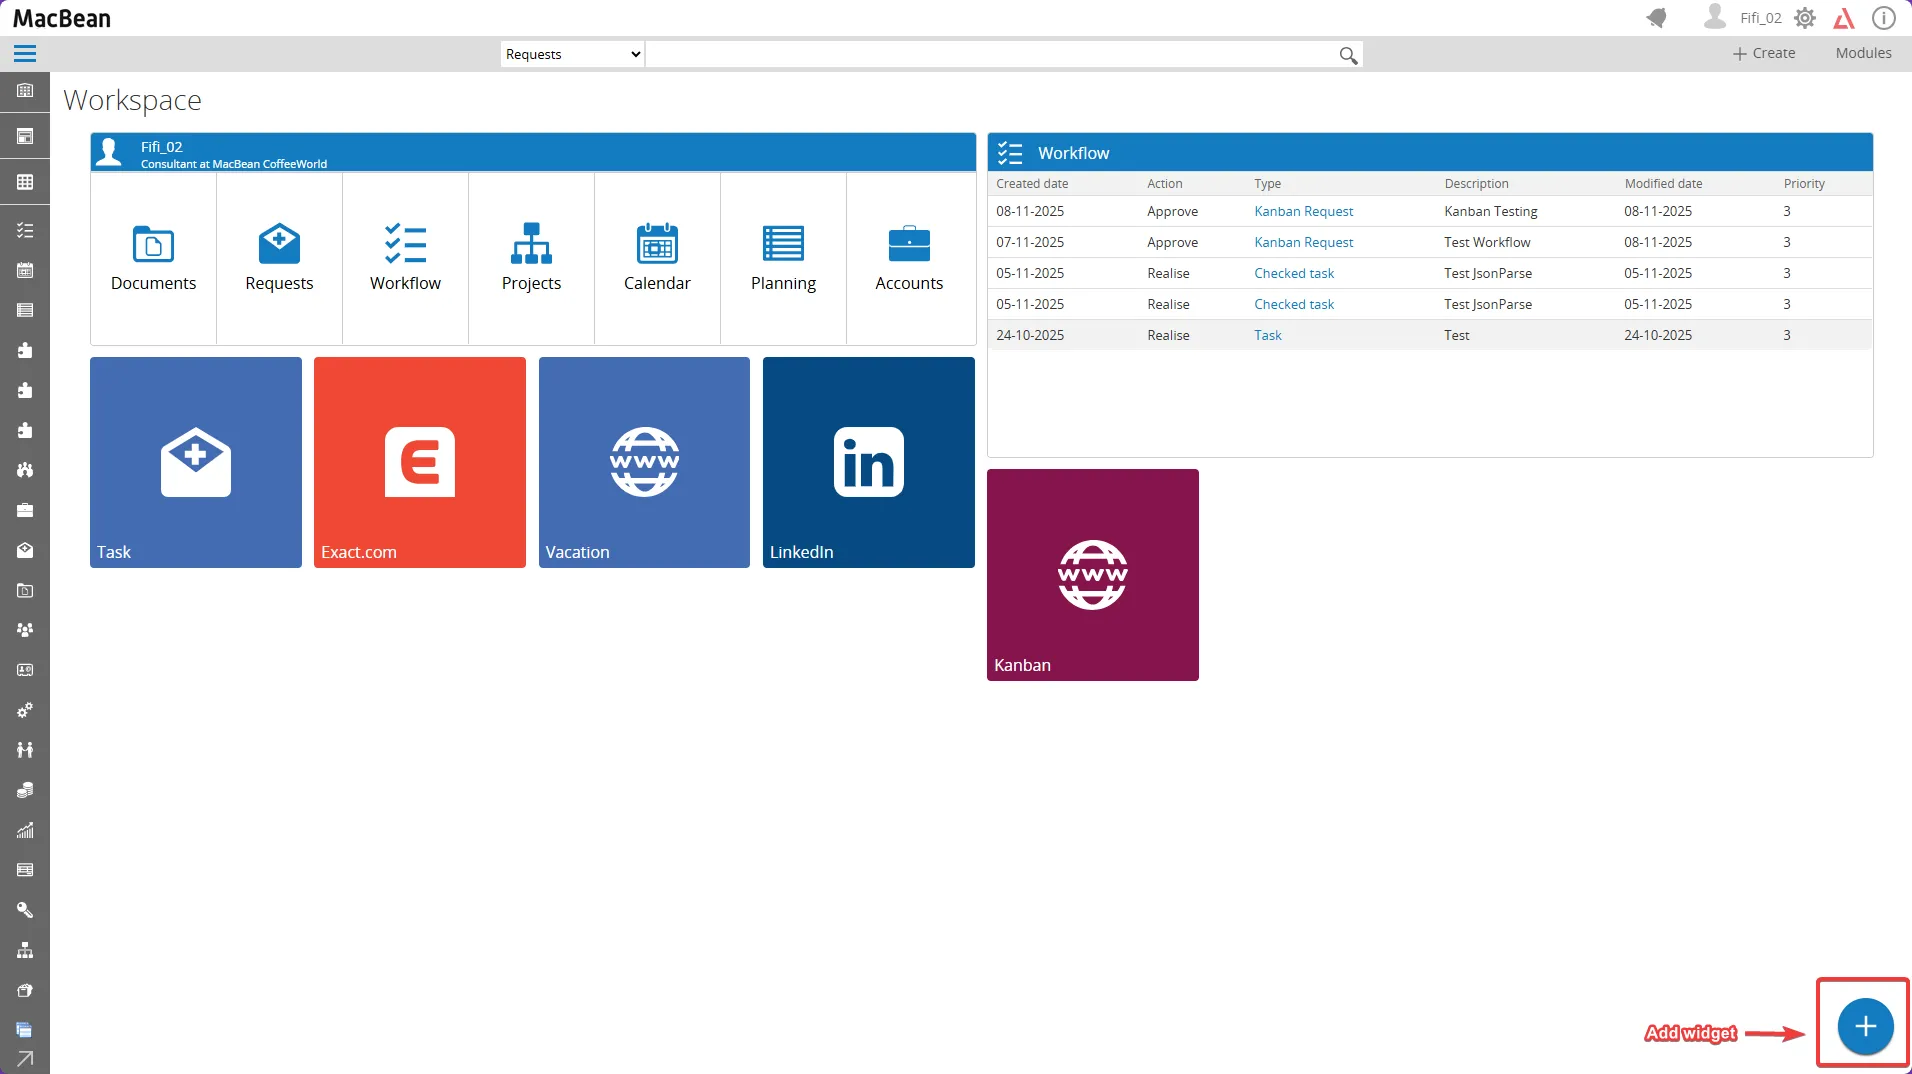
- Choose Accessories > Embed from the menu.
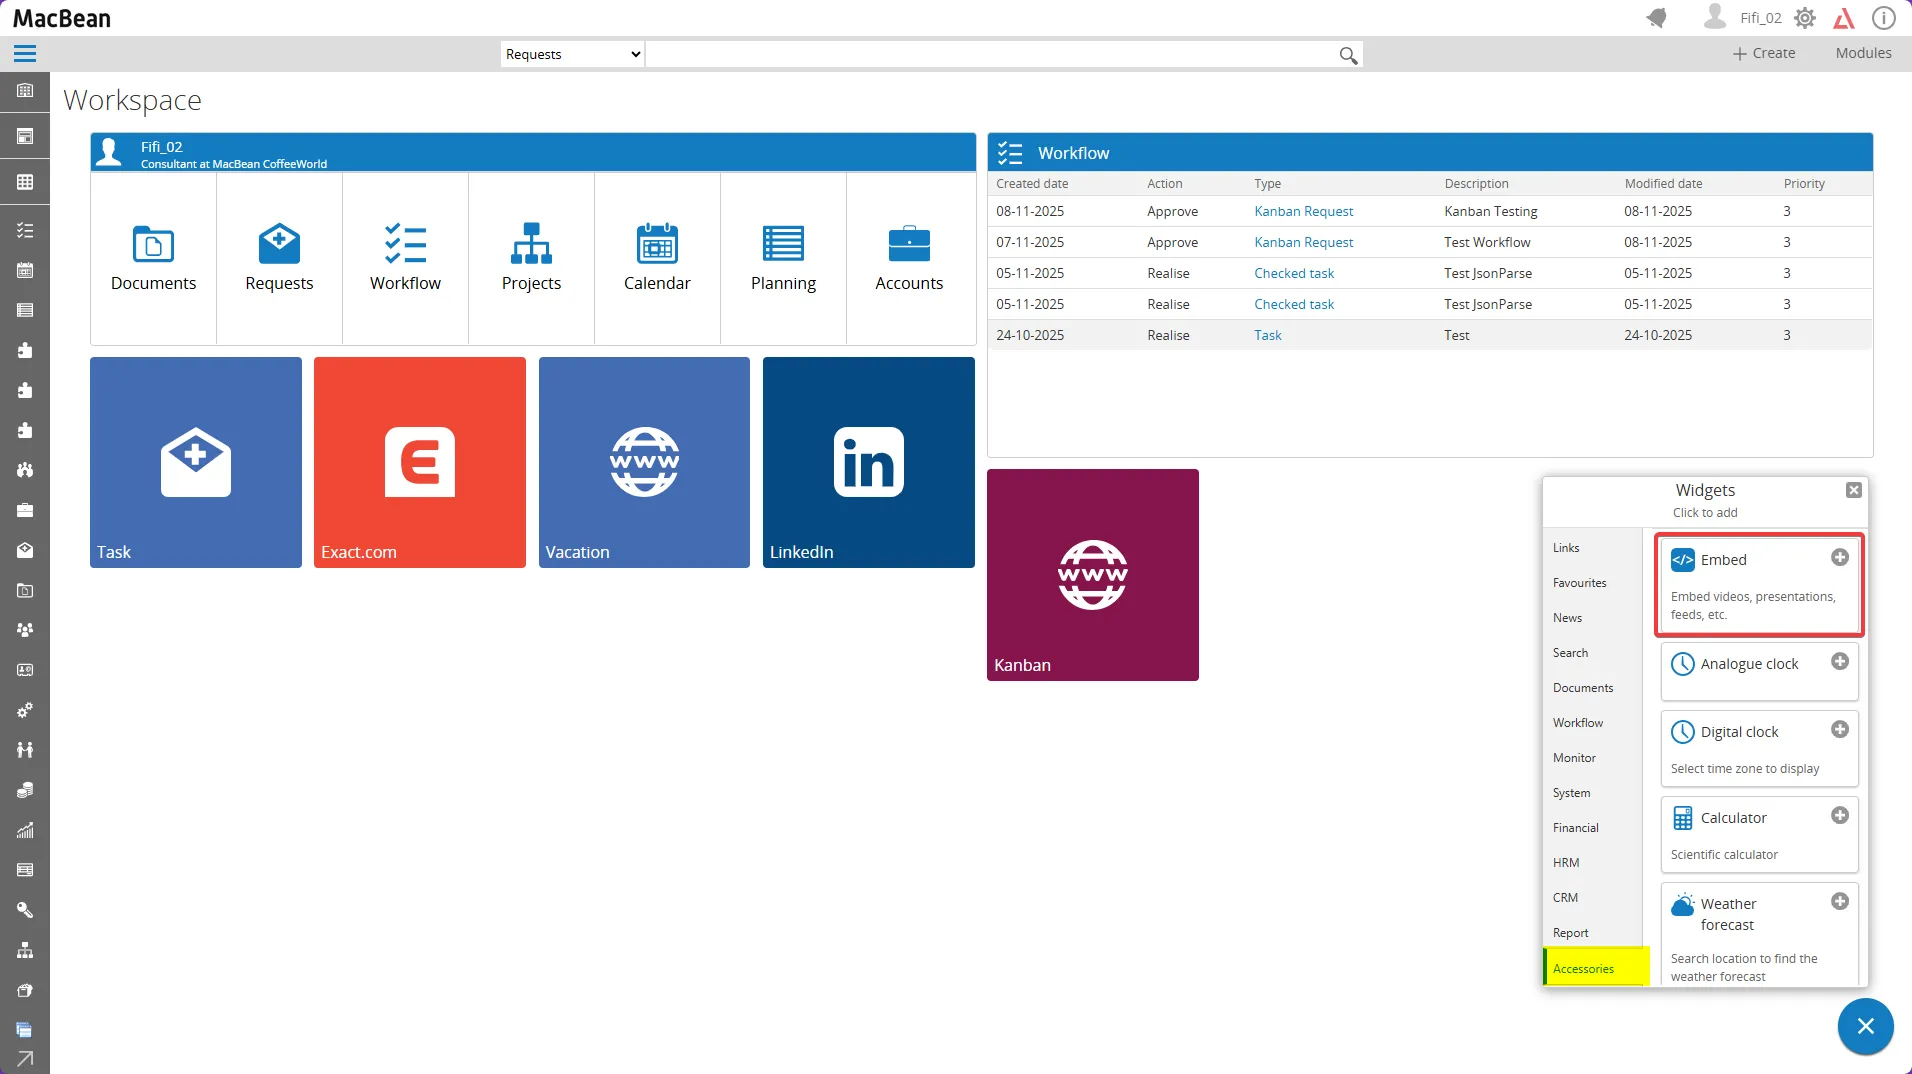
- Enter the embed code on Properties :
<iframe id="MainWindow" name="MainWindow" frameborder="0" style="width: 100%; height: 100%;" src="GLMSysKanbanBoard.aspx?projectCode=GLM.021&personId=1025"></iframe>
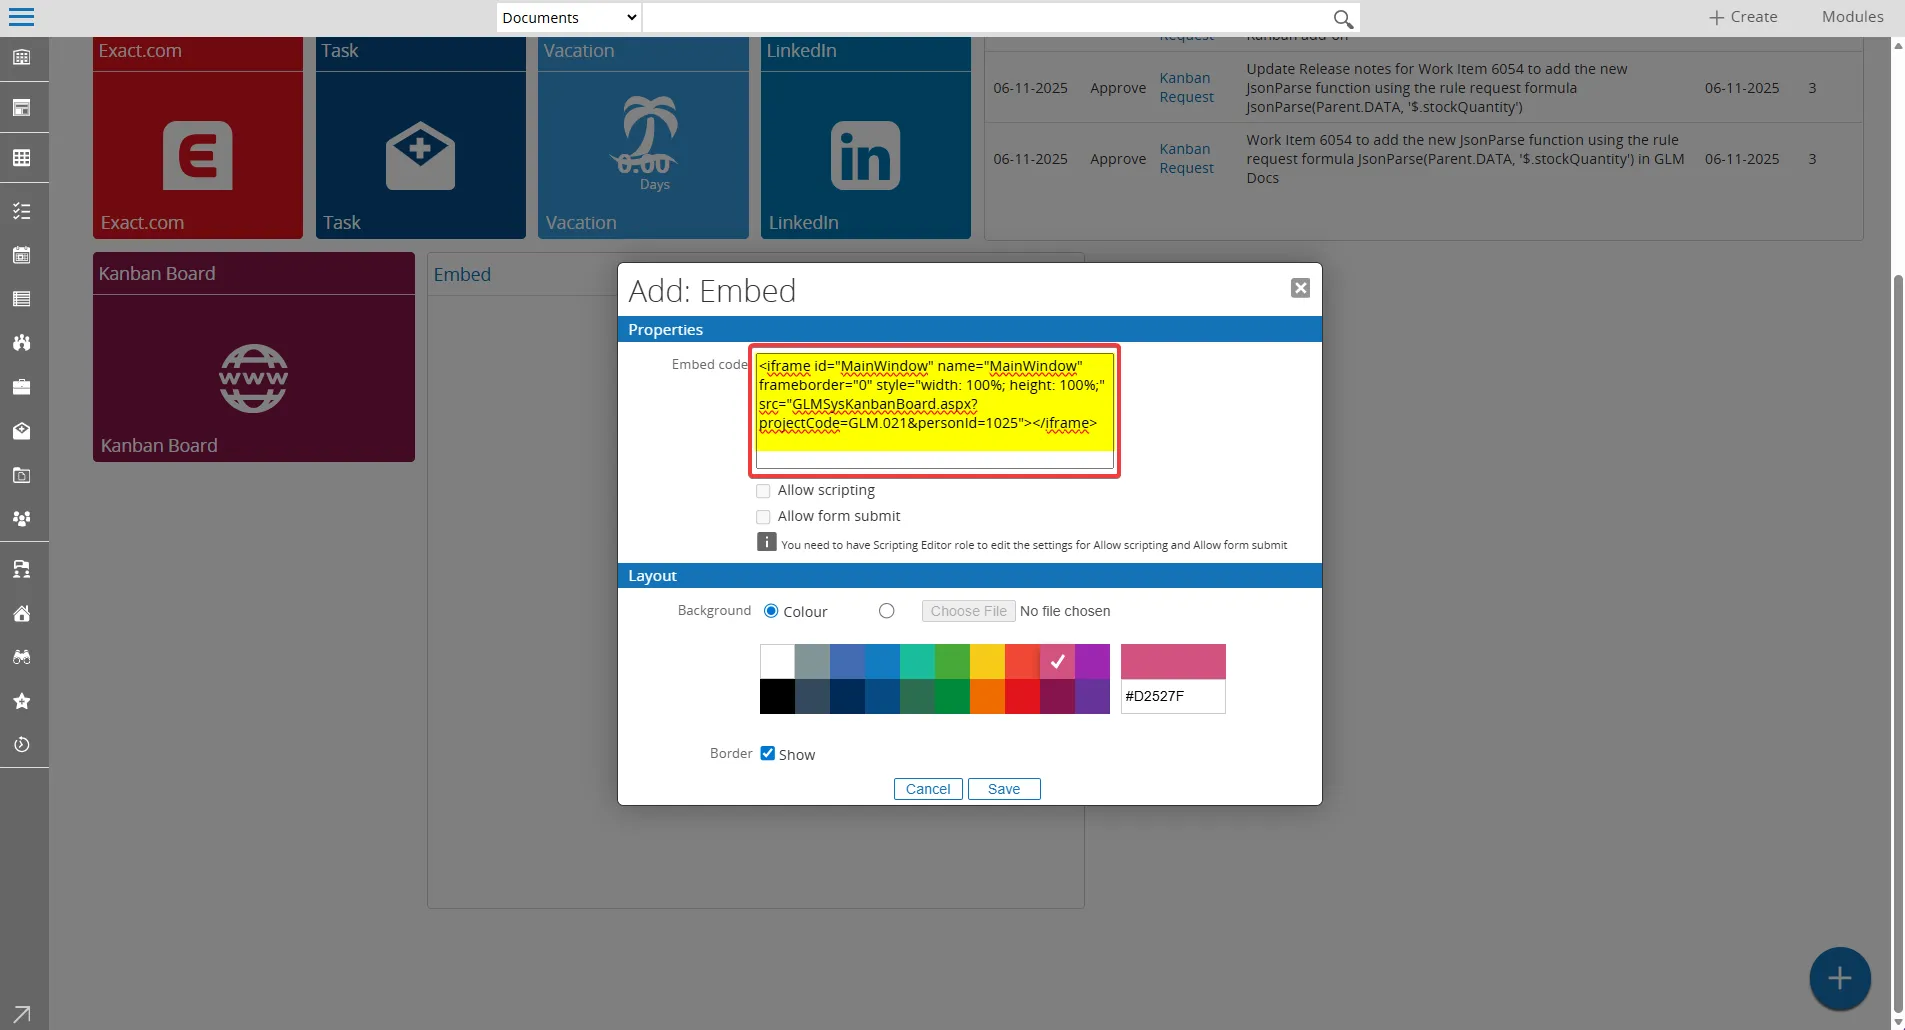
- This iframe link automatically displays the Kanban board for project code GLM.021 and person 1025 inside your widget.
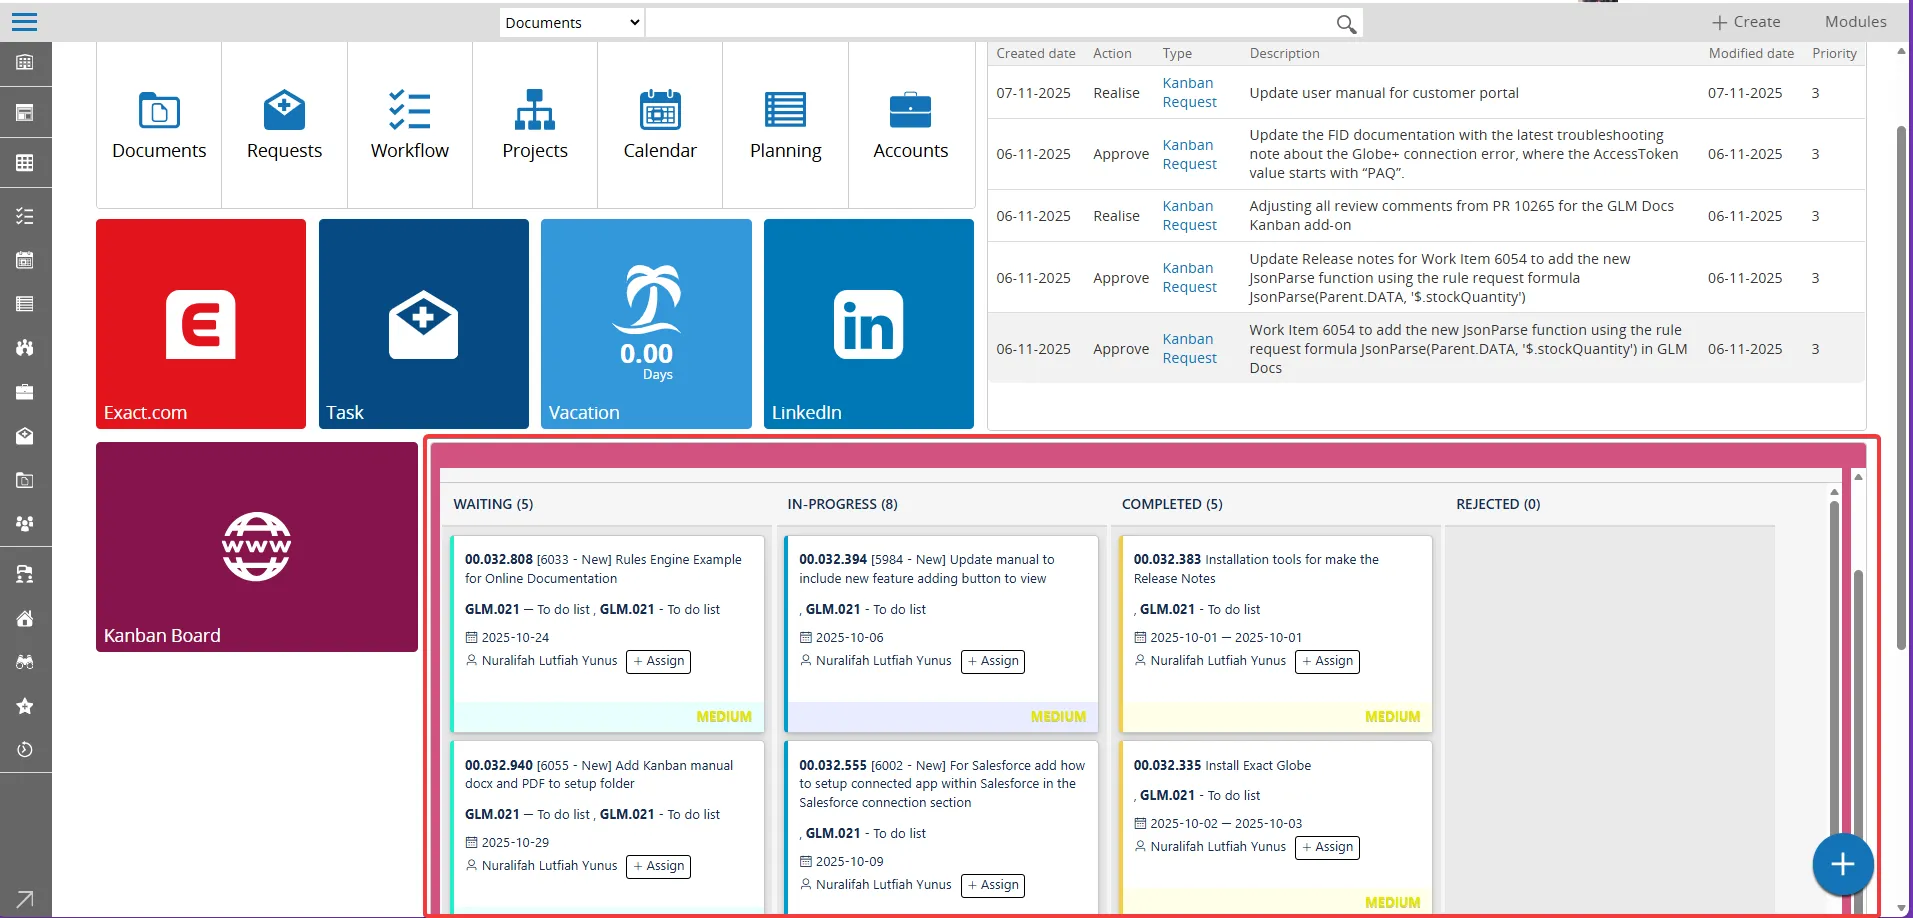
Setup Kanban Board for Customer Portal
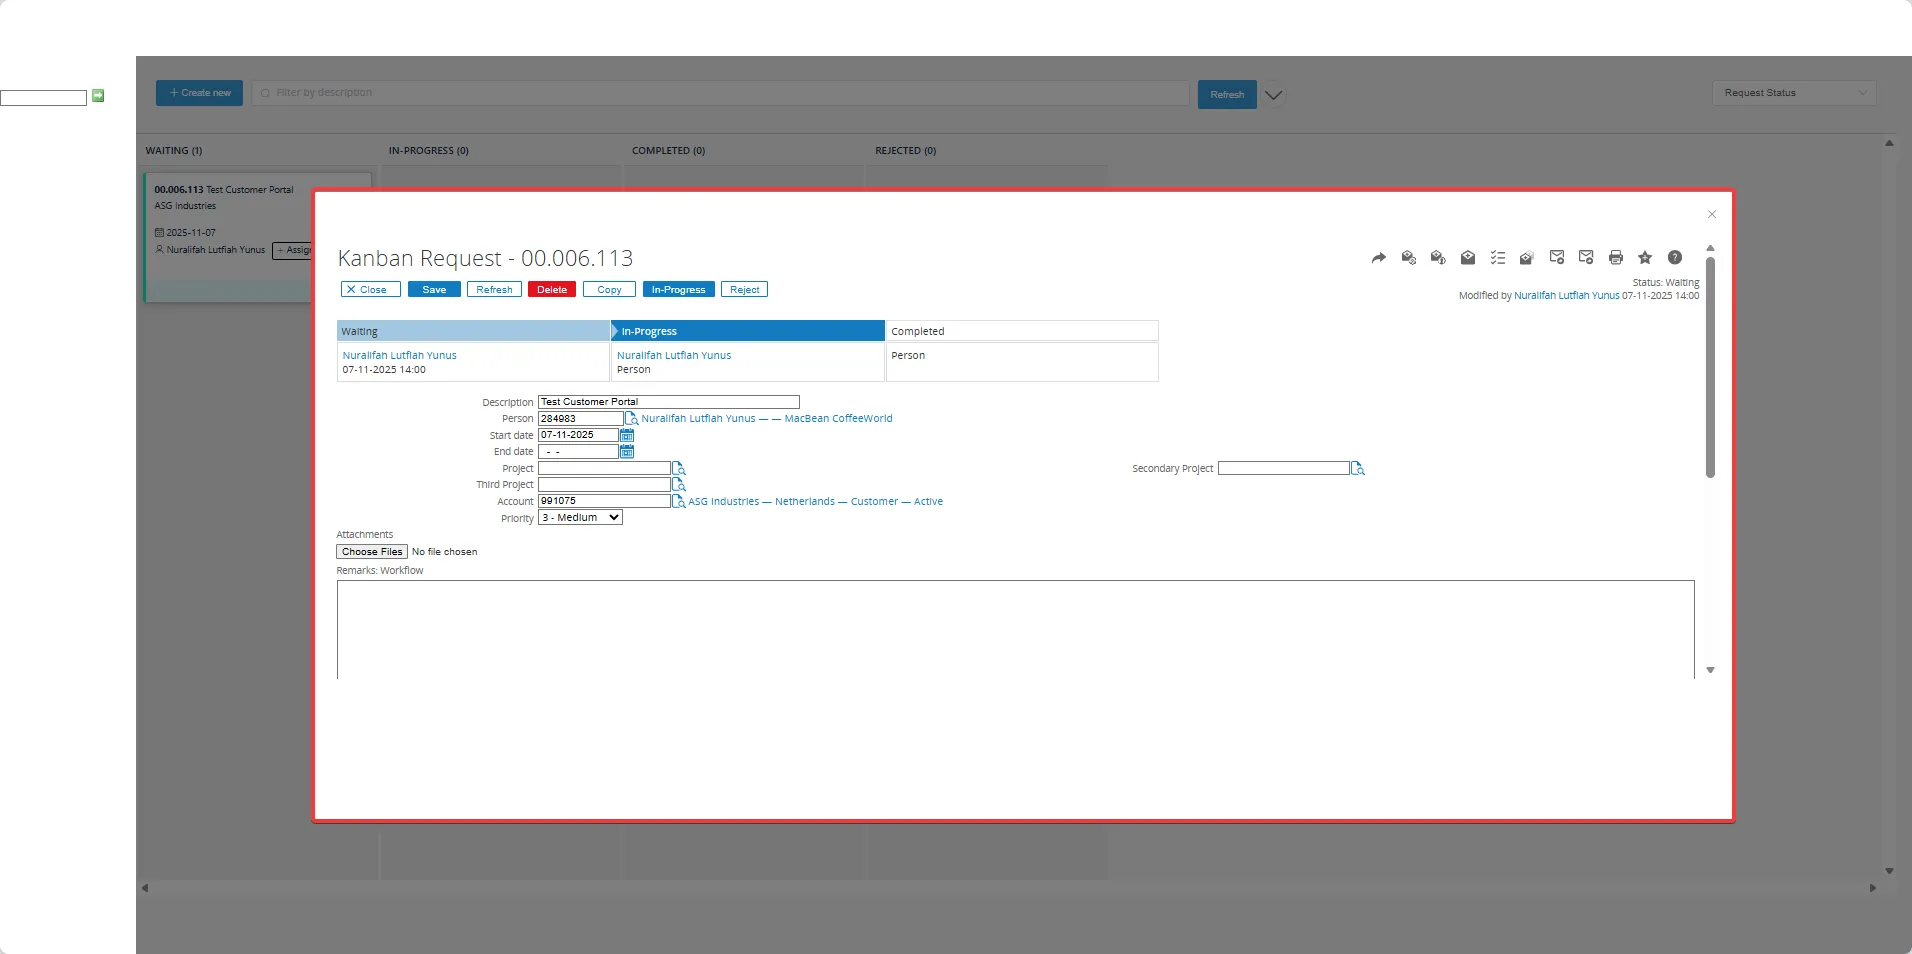
Section titled “Setup Kanban Board for Customer Portal”This section explains how customers, suppliers, and partners can access and interact with Kanban tasks using the Exact Synergy customer portal. The portal provides limited Synergy functionality, but authorized users can view and respond to workflow requests and Kanban tasks.
How to Setup Kanban board via Customer Portal :- This is the Kanban board display from the “Customer Portal” perspective.
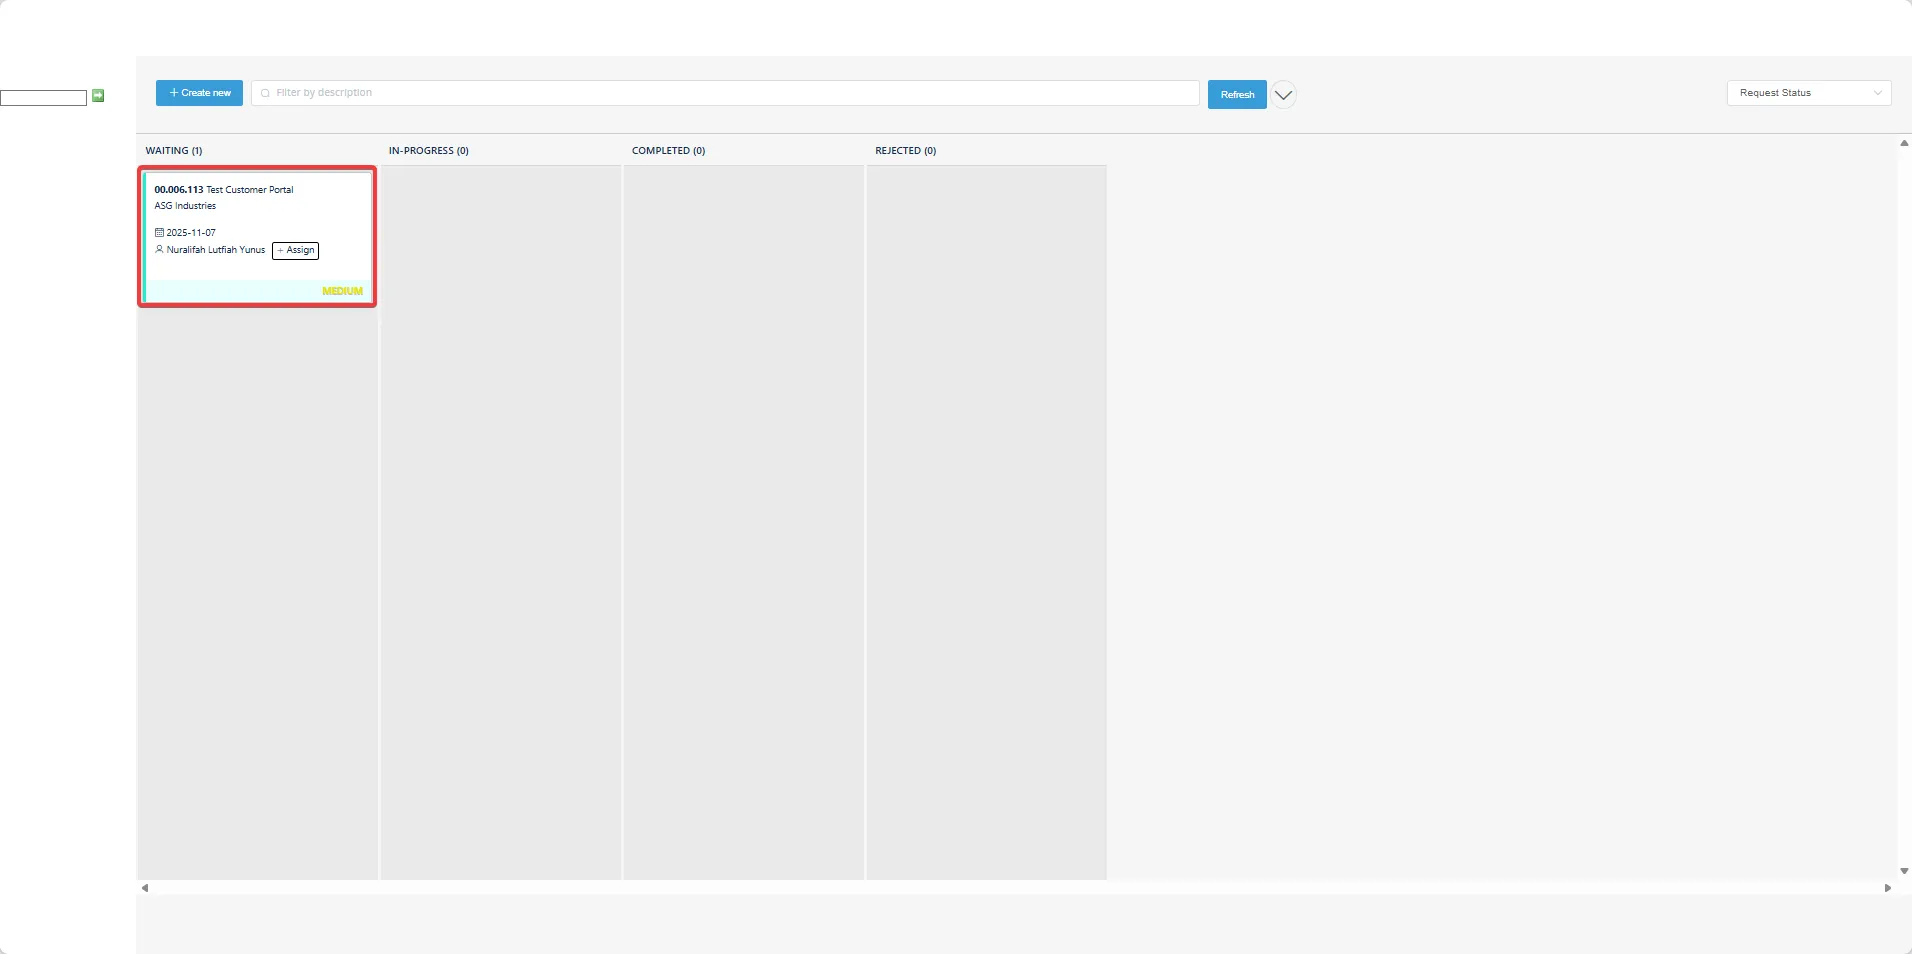
- For the Customer Portal, as long as the customer has registered as a project member, they can be linked to the project and gain portal access, including creating new tasks or maintaining existing tasks.
Setup Kanban Board by URL
Section titled “Setup Kanban Board by URL”This section explain about Kanban board is generated with a unique URL reflecting the parameters you selected during setup. Each option you select in the Kanban fields is represented as a specific value or parameter in the final URL.
How to Setup Kanban via URL :- Go to Modules > Projects.
- Select Projects from the Search options within the Reports menu.
- Click the Show button to expand existing projects.
- Choose the relevant project (for example, “CRM – CRM Solution”).
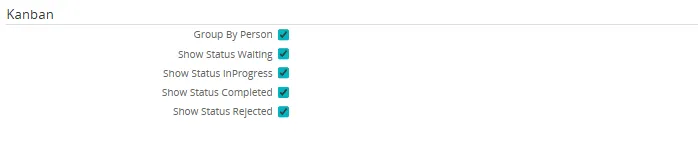
- Configure the Kanban options by check or uncheck the options in Kanban filter parameter as needed:
Explanation of each field parameter in the Kanban filter parameters:
Parameter Description GroupBy Indicates the grouping method (e.g., by Person) SelectedStatus Represents the task status filter as a sequence based on your choices
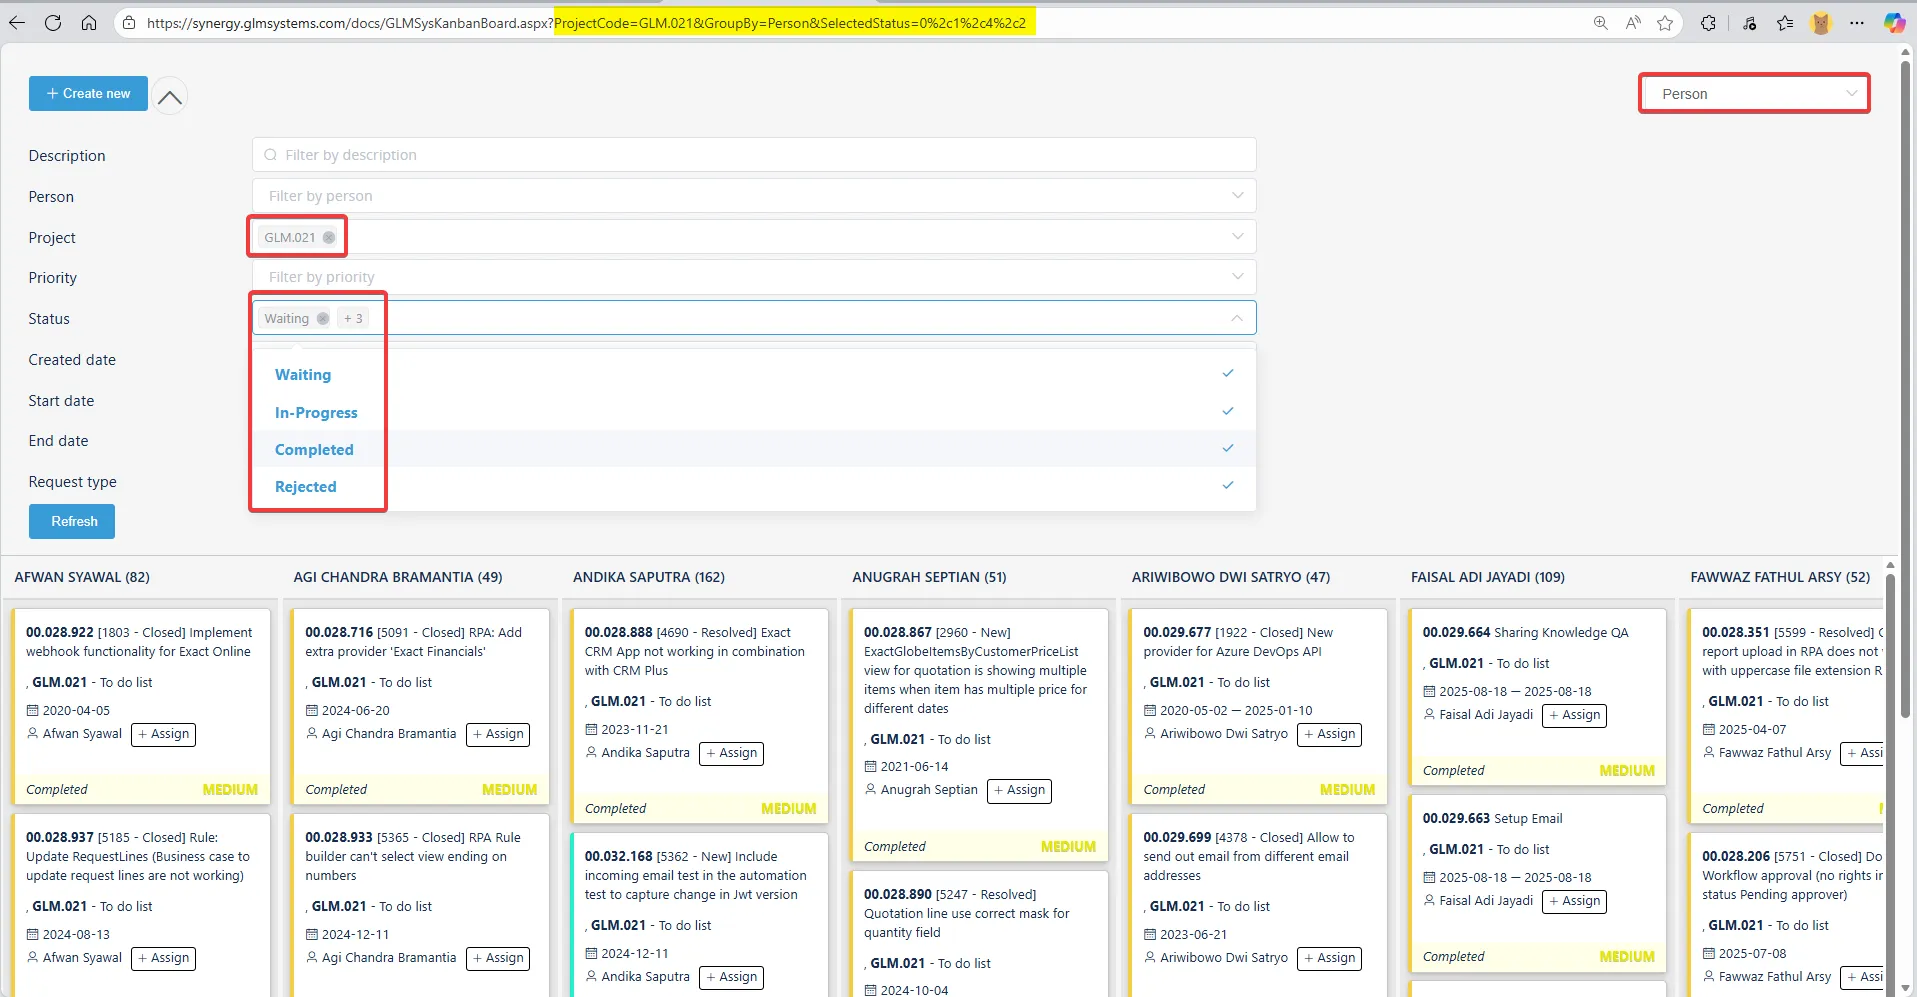
(e.g., 0 = Waiting, 1 = In progress, 2 = Rejected, 4 = Completed)ProjectCode Specifies the active project code selected in the setup PersonId Filters tasks by the assigned person (user or customer for the project) - Based on the parameters selected in the Kanban parameter filter, as shown in the image above, the output will show Project Code = GLM.021, Group By = Person, and Selected Status = 0, 1, 2, 4. This means the status is grouped by all parameters: “Waiting,” “In progress,” “Rejected,” and “Completed”.
- The Kanban board will display results according to the selected parameters.
- If the status is filtered in the Kanban parameter filter using this parameter:
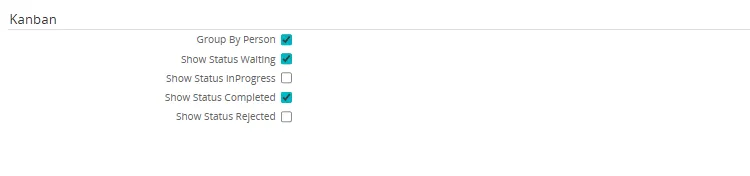
- The output will show Project Code = GLM.021, Group By = Person, and Selected Status = 0, 4. This means the status is grouped by only “Waiting” and “Completed.”
- For example:
To view all tasks for project code GLM.021, grouped by PersonID (1025) Nuralifah Lutfiah Yunus and showing tasks with the status In progress, the URL would look like this: Explanation of each field parameter based on the selection shown in the image above (if all parameters checked) :
Parameter Data type Example Description GroupBy String Groupby=PersonIndicates the grouping method available values ( RequestStatus,Person,Project,Priority)SelectedStatus String SelectedStatus=0,1,2,4Represent the task filter as a sequence based on your choices ( 0 = Waiting,1 = In progress,2 = Rejected,4 = Completed)ProjectCode String ProjectCode=GLM.021Specifies the active project code selected in the setup PersonId Integer PersonID=1025Filters tasks by the assigned person (user or customer for the project) - Based on the parameters selected in the Kanban parameter filter, as shown in the image above, the output will show Project Code = GLM.021, Group By = Person, and Selected Status = 0, 1, 2, 4. This means the status is grouped by all parameters: “Waiting,” “In progress,” “Rejected,” and “Completed”.
- The Kanban board will display results according to the selected parameters.
Example with selected status parameter unchecked and grouped by PersonID : - If the status is filtered in the Kanban parameter filter using this parameter:
- The output will show Project Code = GLM.021, Group By = Person, and Selected Status = 0, 4. This means the status is grouped by only “Waiting” and “Completed.”
- To view all tasks for project code GLM.021, grouped by PersonID (1025) Nuralifah Lutfiah Yunus and showing tasks with the status In progress, the URL would look like this:
https://synergy.glmsystems.com/docs/GLMSysKanbanBoard.aspx?ProjectCode=GLM.021&GroupBy=Person&SelectedStatus=1%2c&PersonID=1025 - The Kanban board displays output based on the parameters you selected earlier.
This means all your configuration choices project, grouping, status selection, and assigned person are reflected directly in the URL.
See the URL in the image below :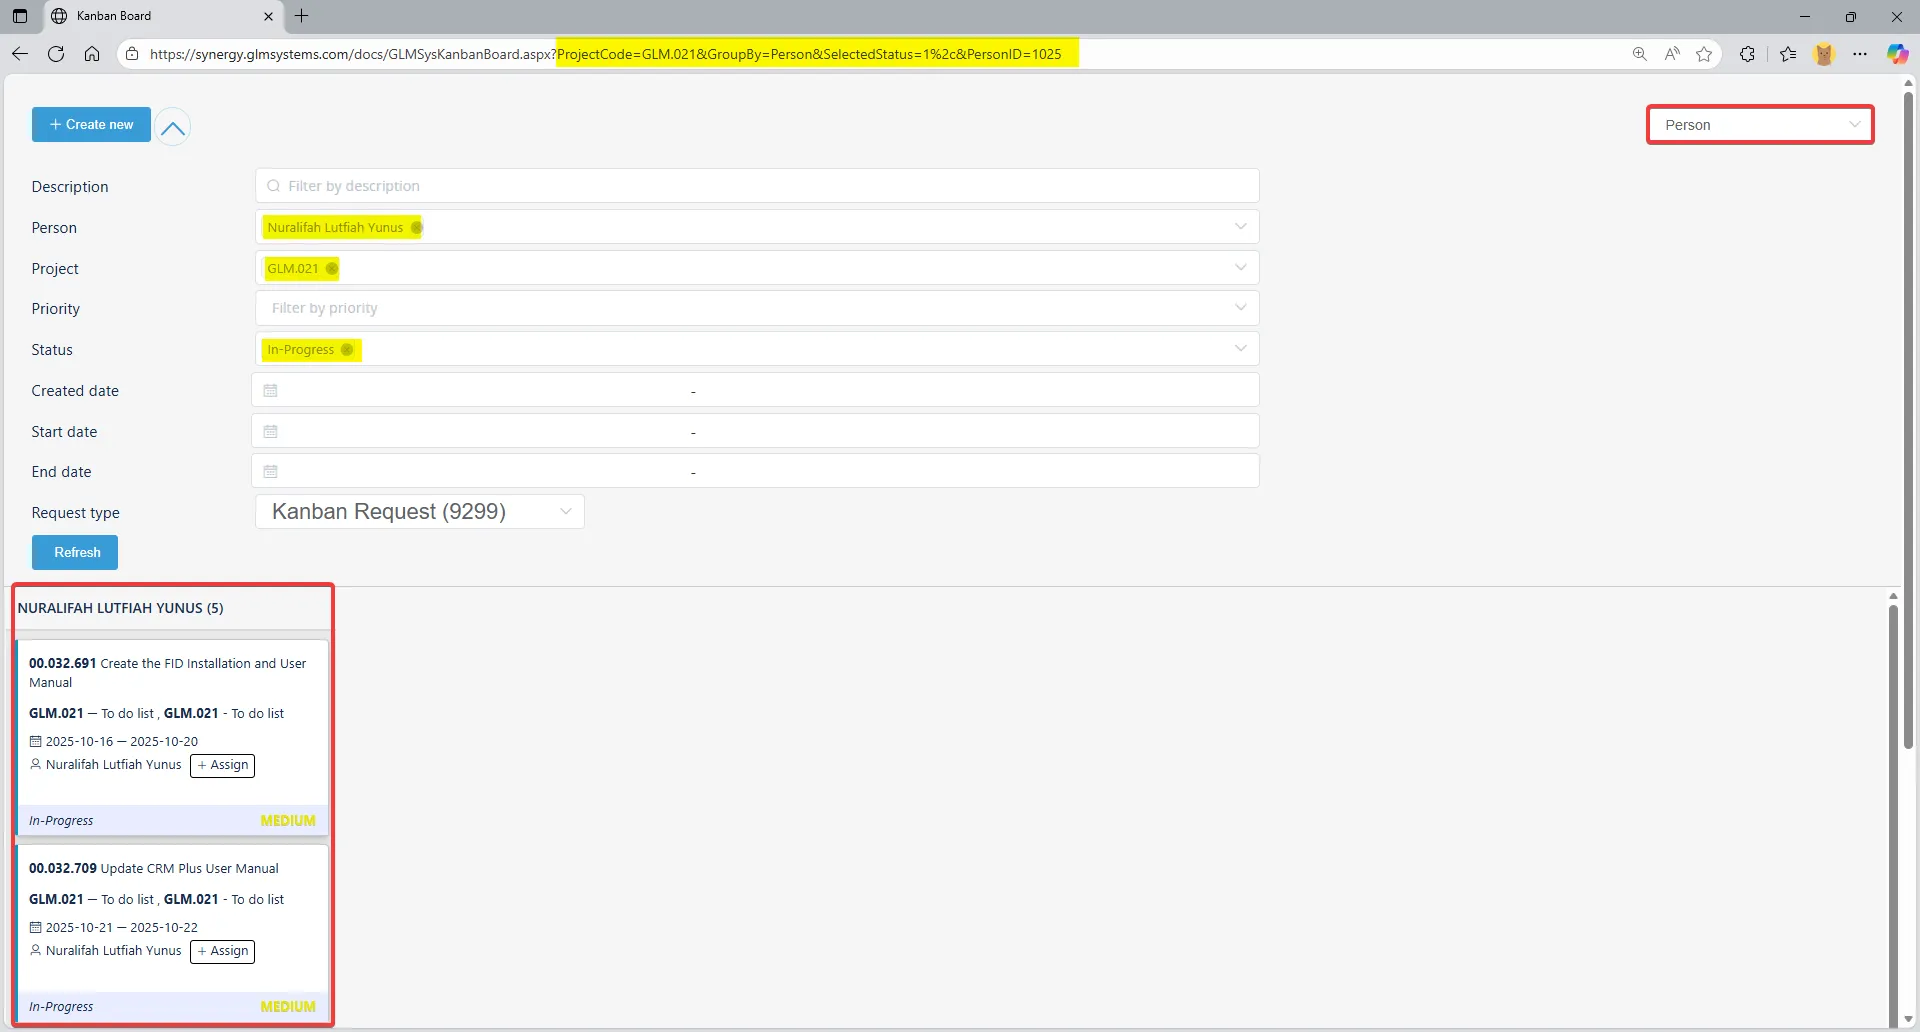
- The generated URL can be copied or bookmarked for quick access to the same view in future sessions.
Access Kanban Board through Menu
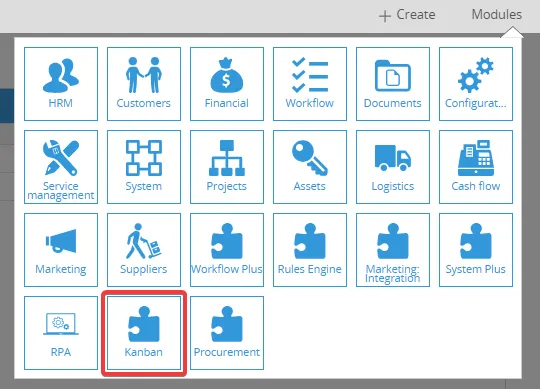
Section titled “Access Kanban Board through Menu”- Access the application link (for example :
https://synergy.company.com). - Once directed to the homepage, expand the add-ons menu on the right and select the Kanban module.
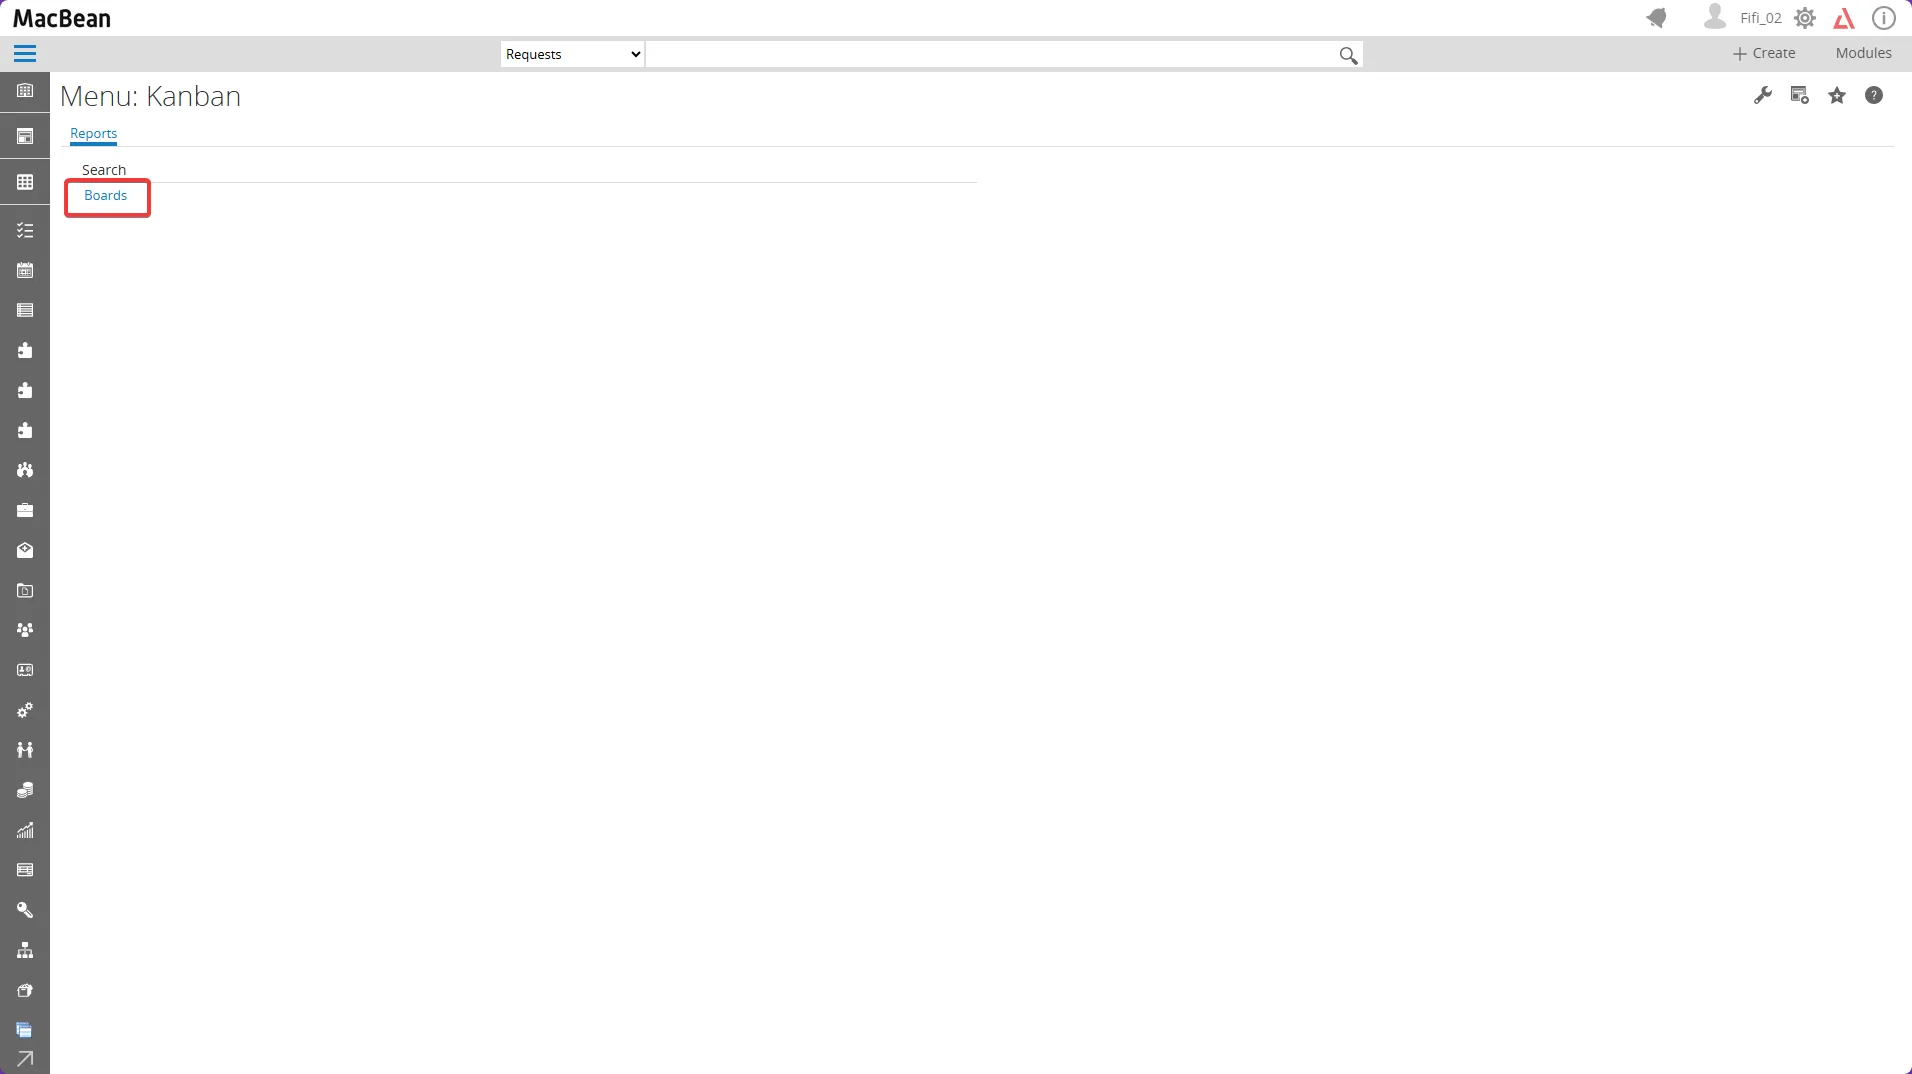
- Select Reports > boards.
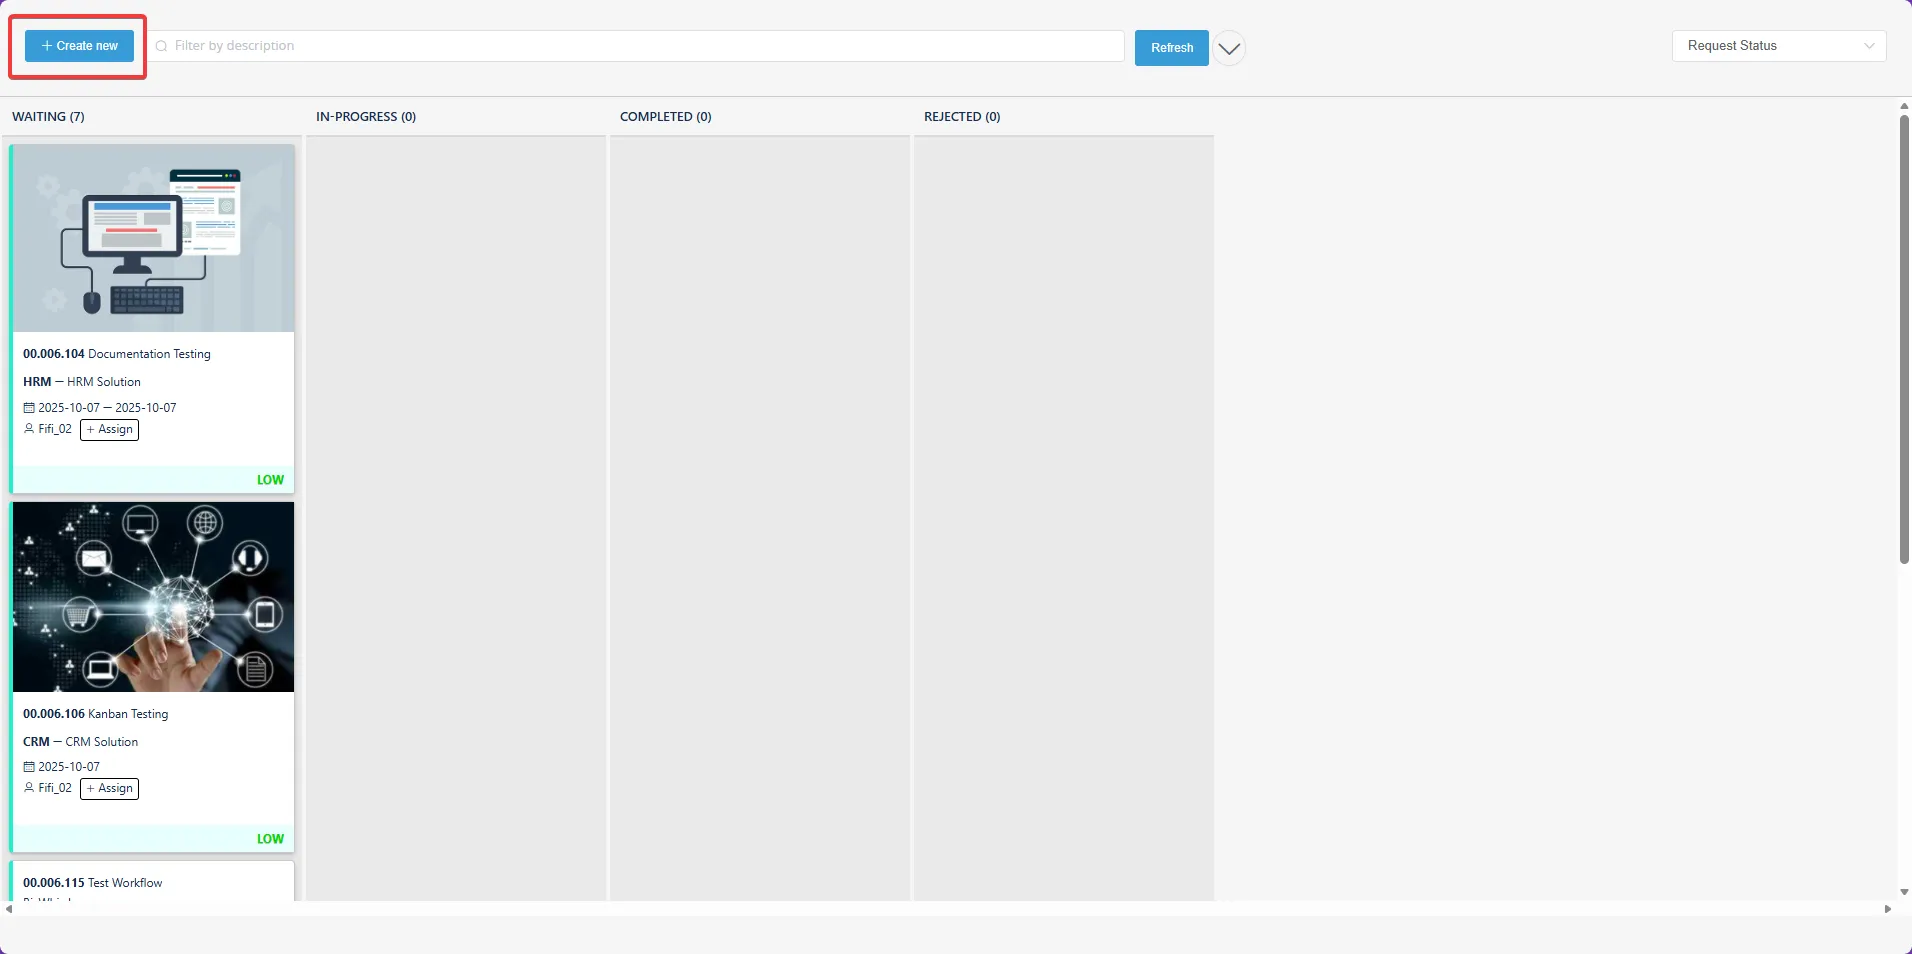
- Click “Create New” button to make a new Kanban Request.
Creating task
Section titled “Creating task”Request task can be created in two ways :
Create a task from Kanban Board
Section titled “Create a task from Kanban Board”- Go to Modules > Kanban.
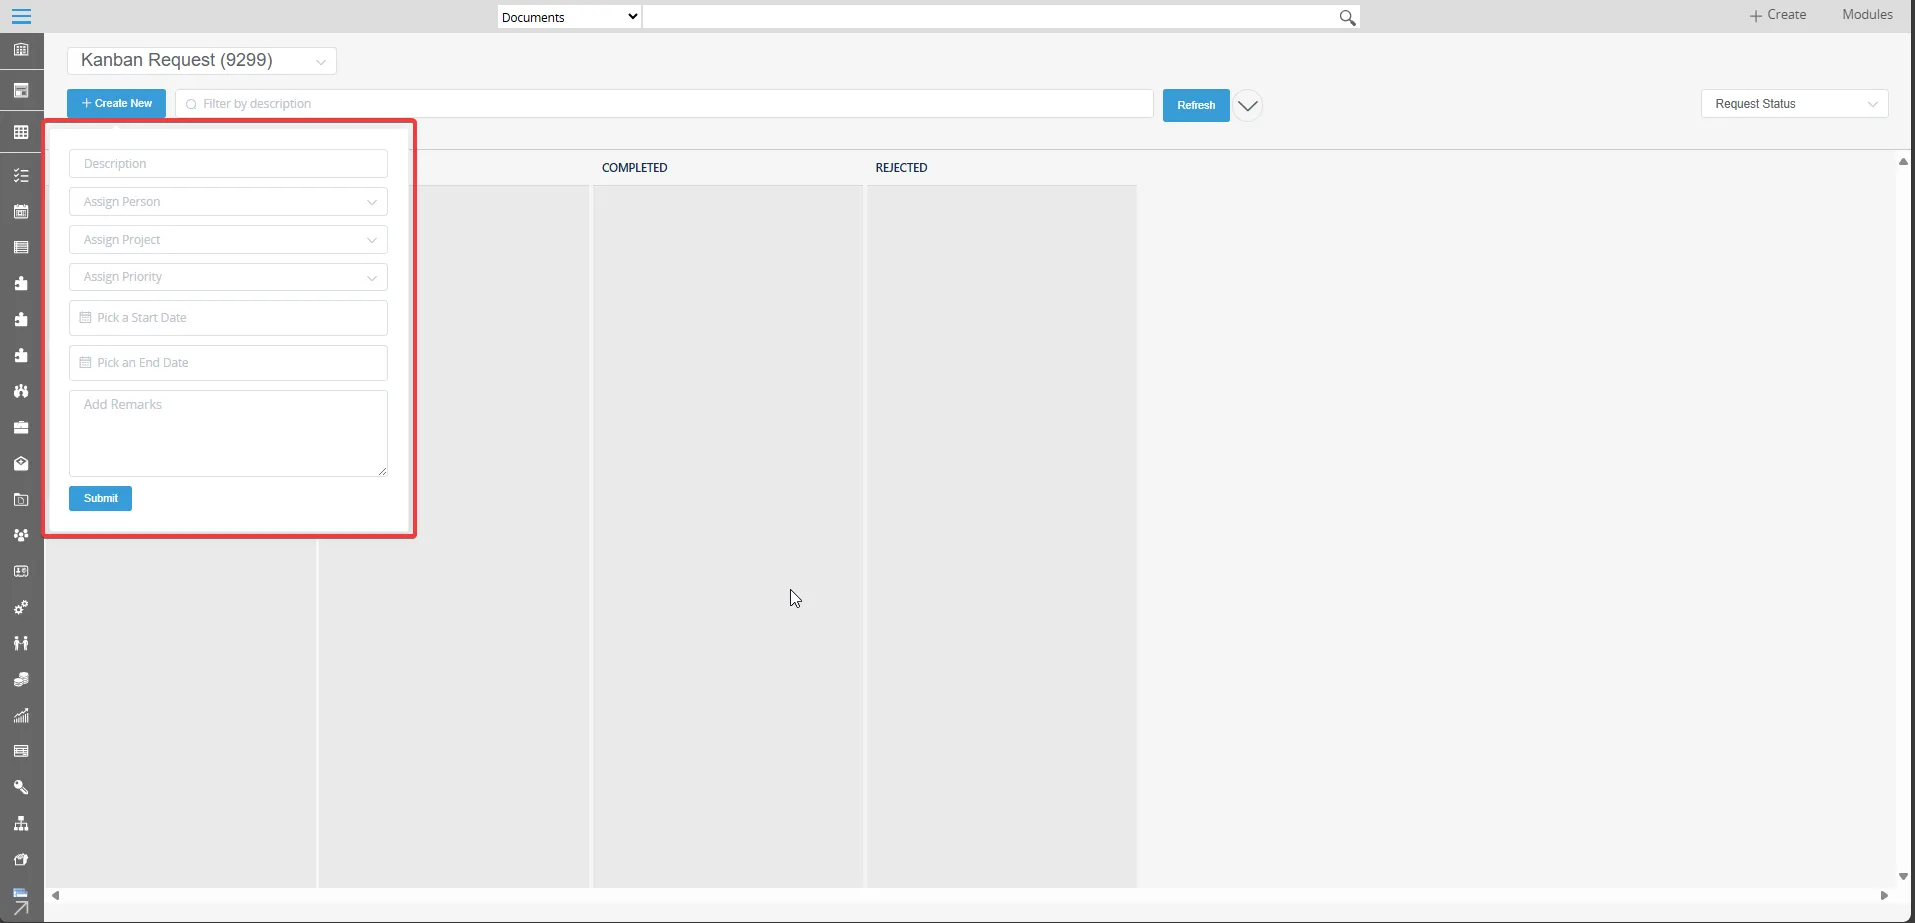
- To create a new Kanban request from Kanban board, click Create New button.
- Complete the fields:
- Description: Specify the task or project details.
- Assign Person: Search and select the responsible team member.
- Assign Project: Choose the corresponding project.
- Start Date: Select the task’s start date.
- End Date: Select the task’s end date.
- Remarks: Add additional notes or comments, if necessary.
- Click “Submit” to save the new task request.
Create a task from Workflow Module
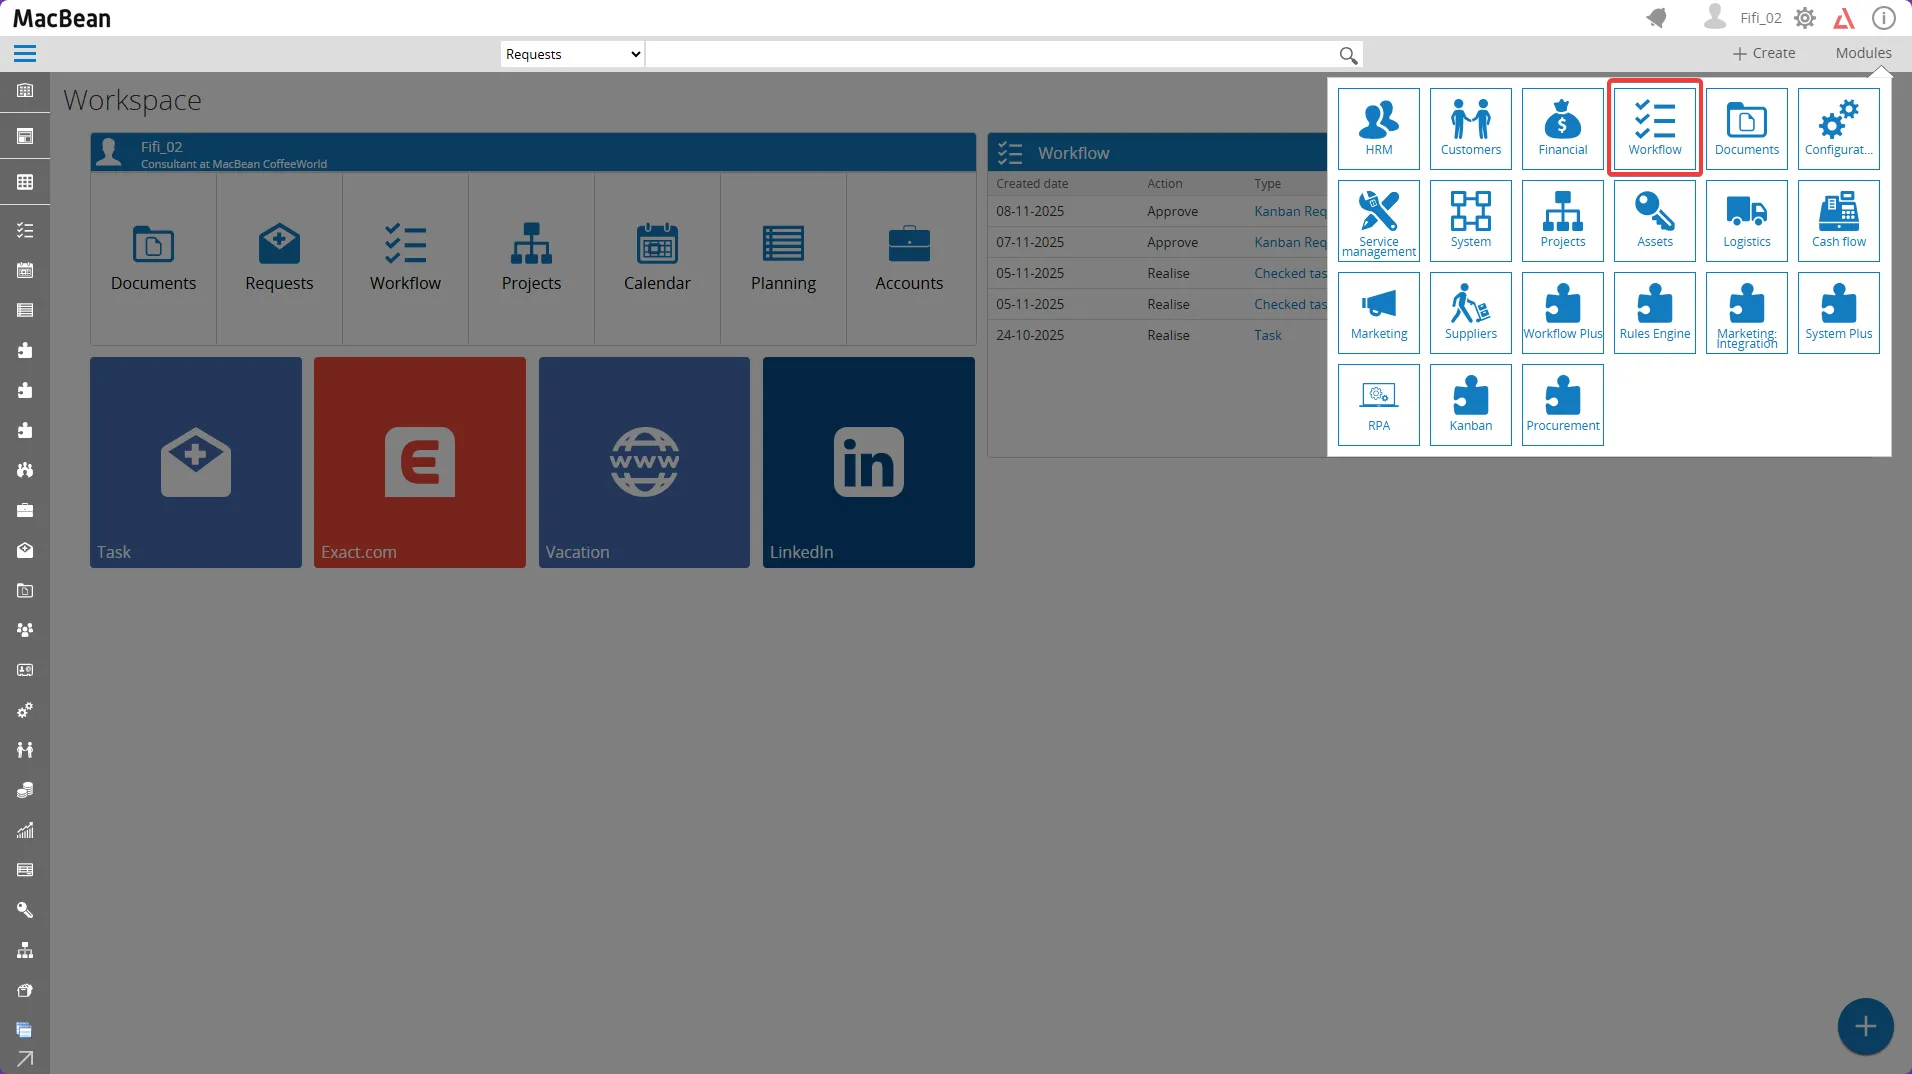
Section titled “Create a task from Workflow Module”- Go to Modules > Workflow.
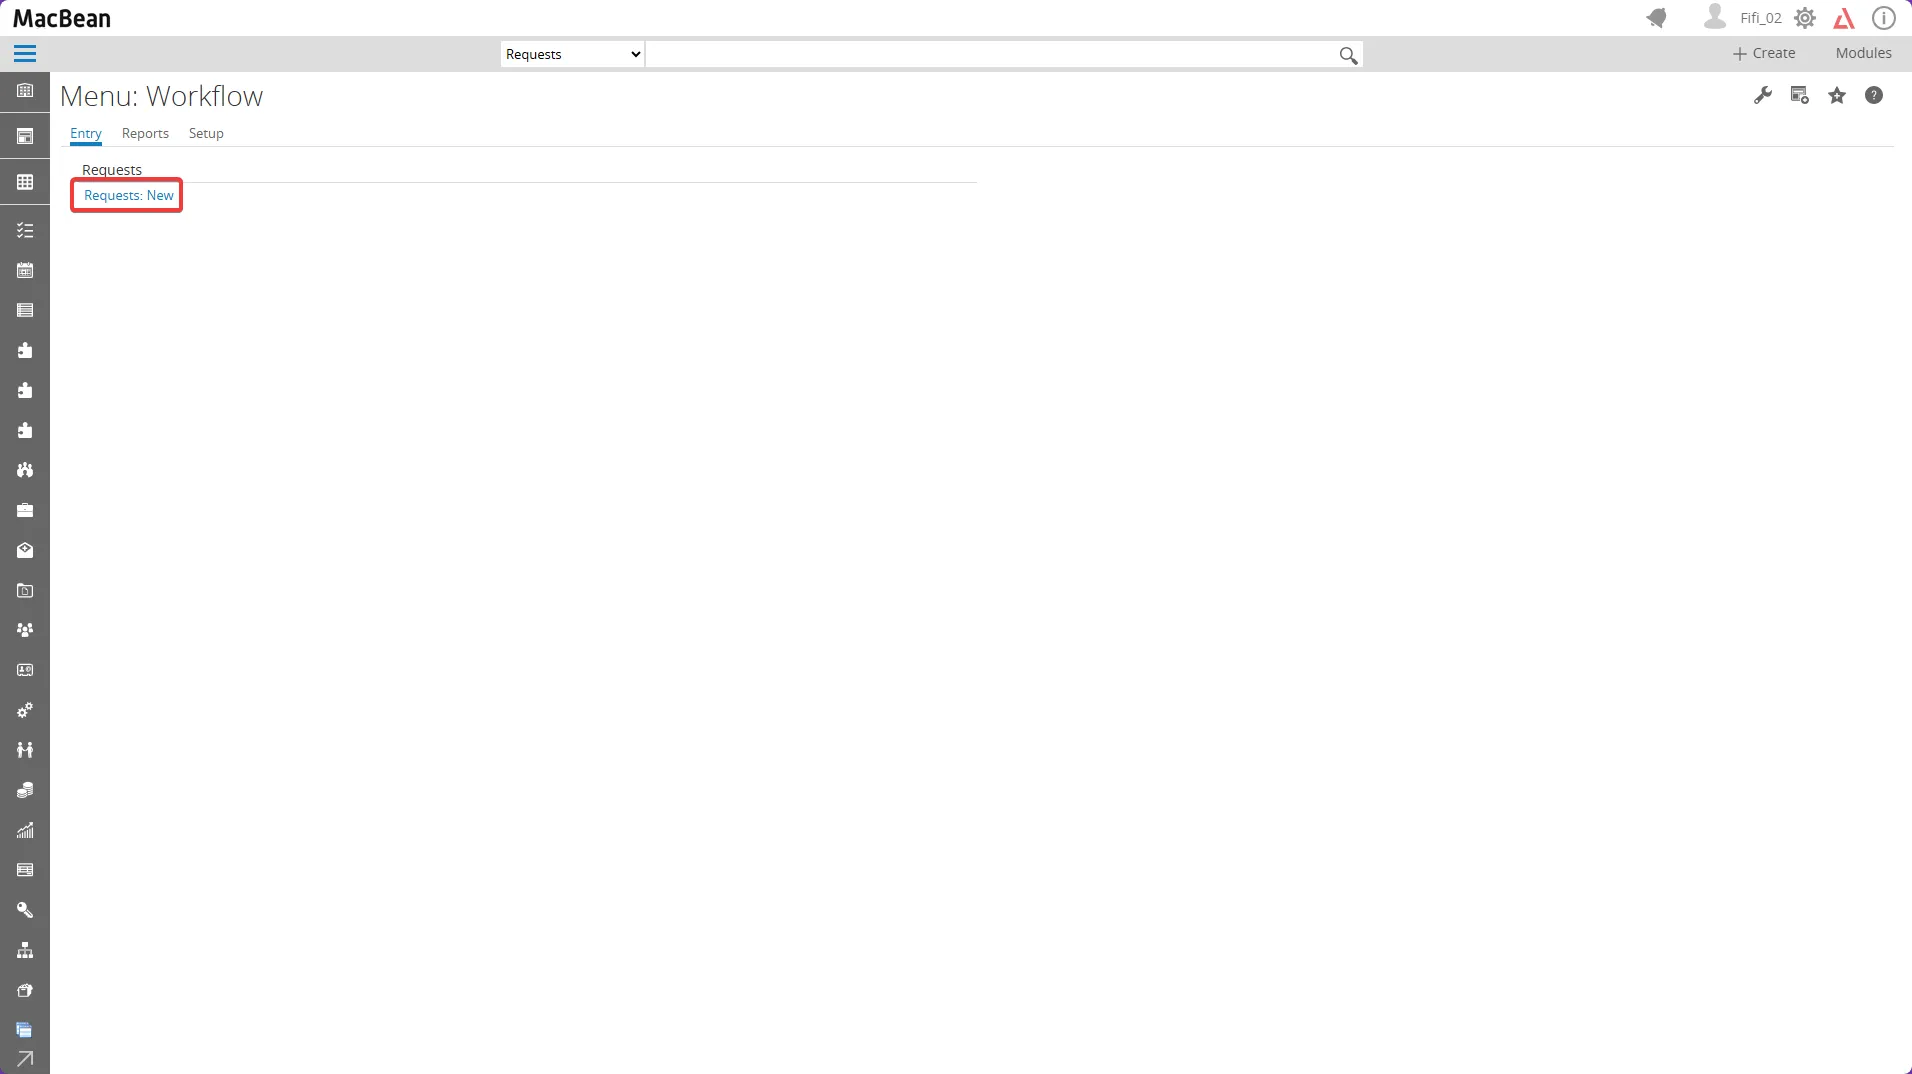
- Open Entry > Requests > Requests : New
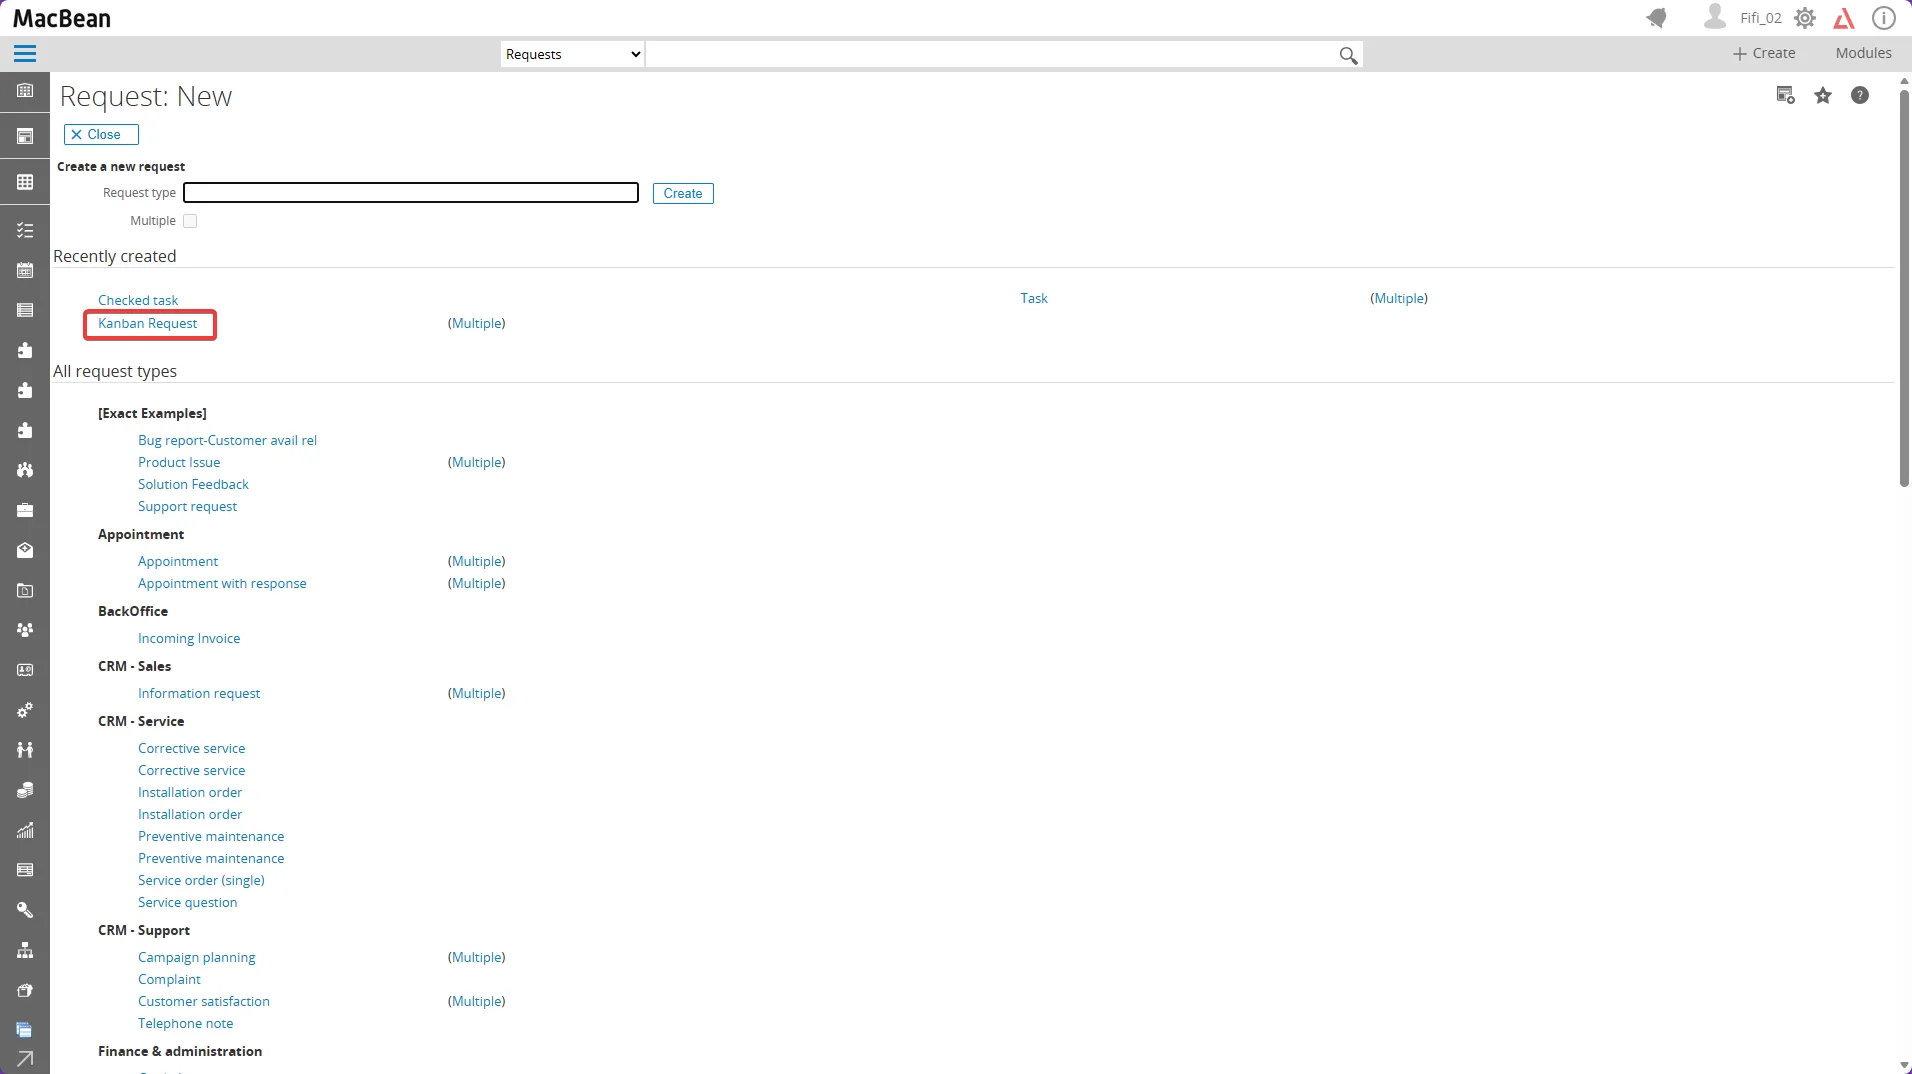
- Select the desired Kanban request.
- Enter the description and select the project, then click the** “Waiting” **button.
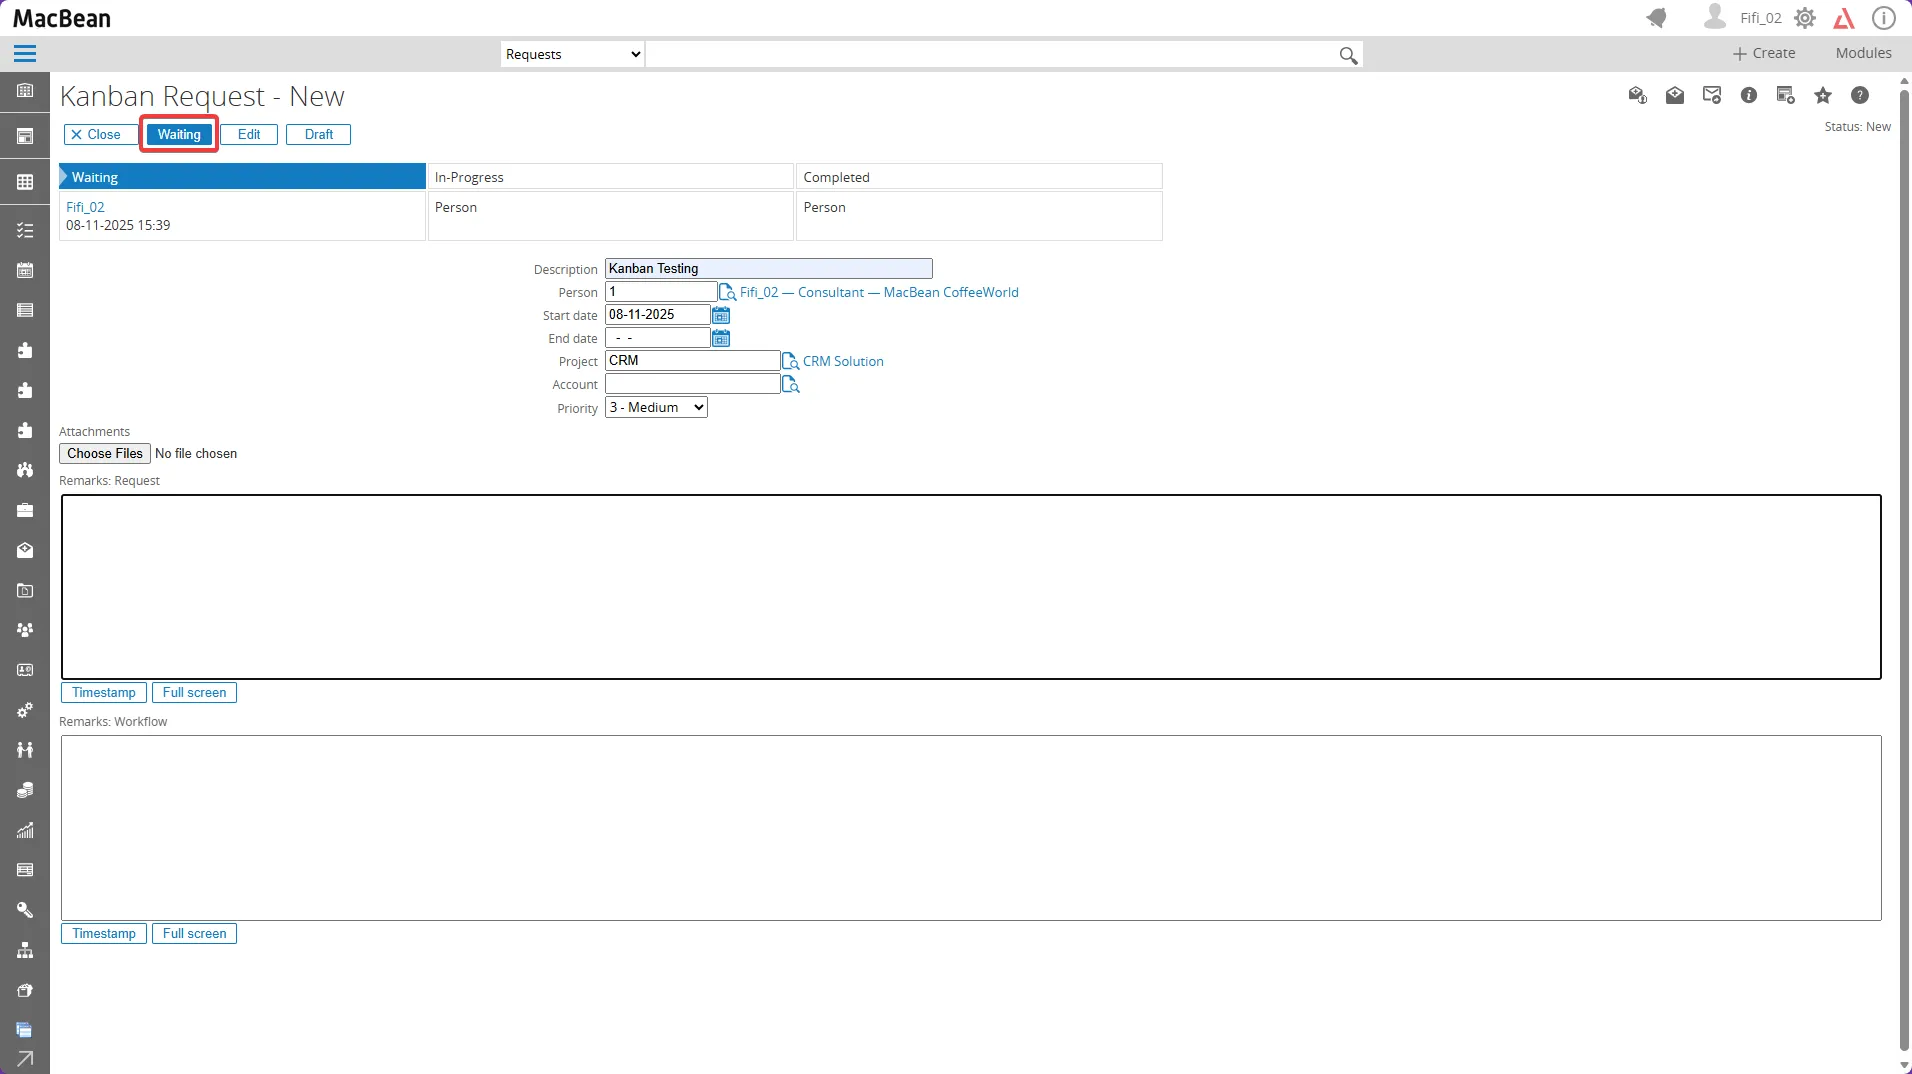
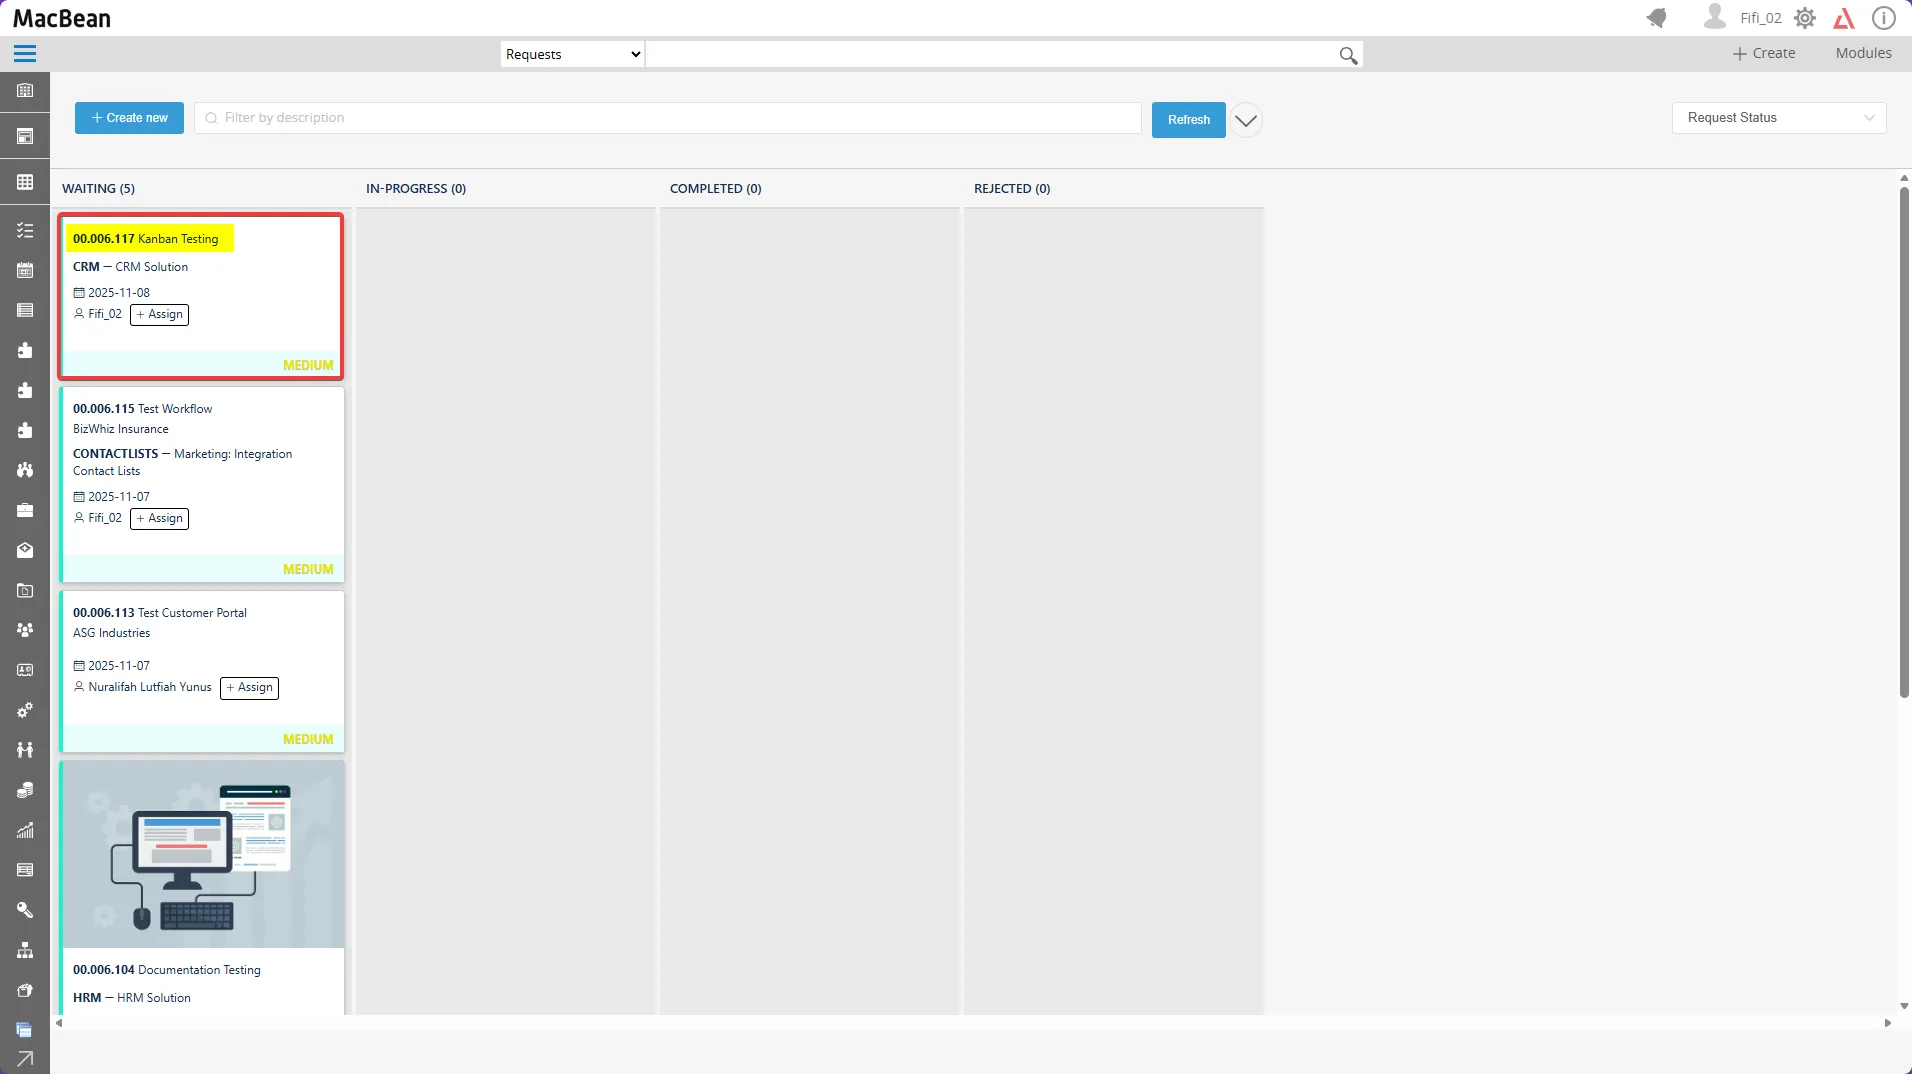
- The task request will appear on the Kanban board.
Editing task
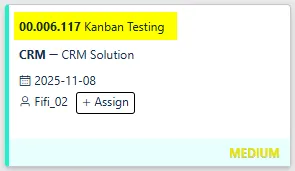
Section titled “Editing task”- Select the task description to open the workflow request
- Actions Available on the Kanban Request Page:
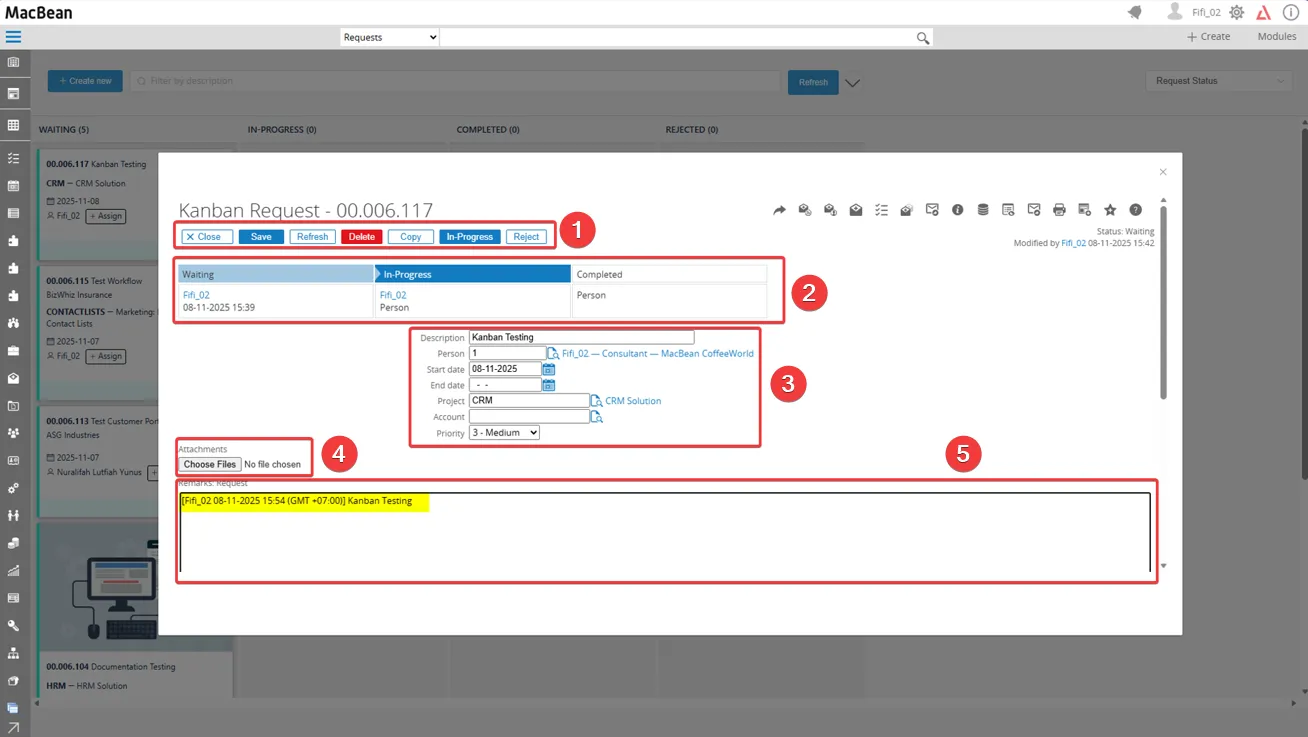
1. Action Buttons
This section contains buttons to Close, Save, Refresh, Delete, Copy, move In-Progress, or Reject the request. Use these buttons to manage the status and details of the Kanban request.- Click Save to store changes made to the request.
- Use Refresh to reload the request data.
- Click Copy to duplicate the request.
- Select Reject to change the status to Rejected.
- Click Delete to remove the request item.
- Use Close to exit the request view.
2. Request Status Table
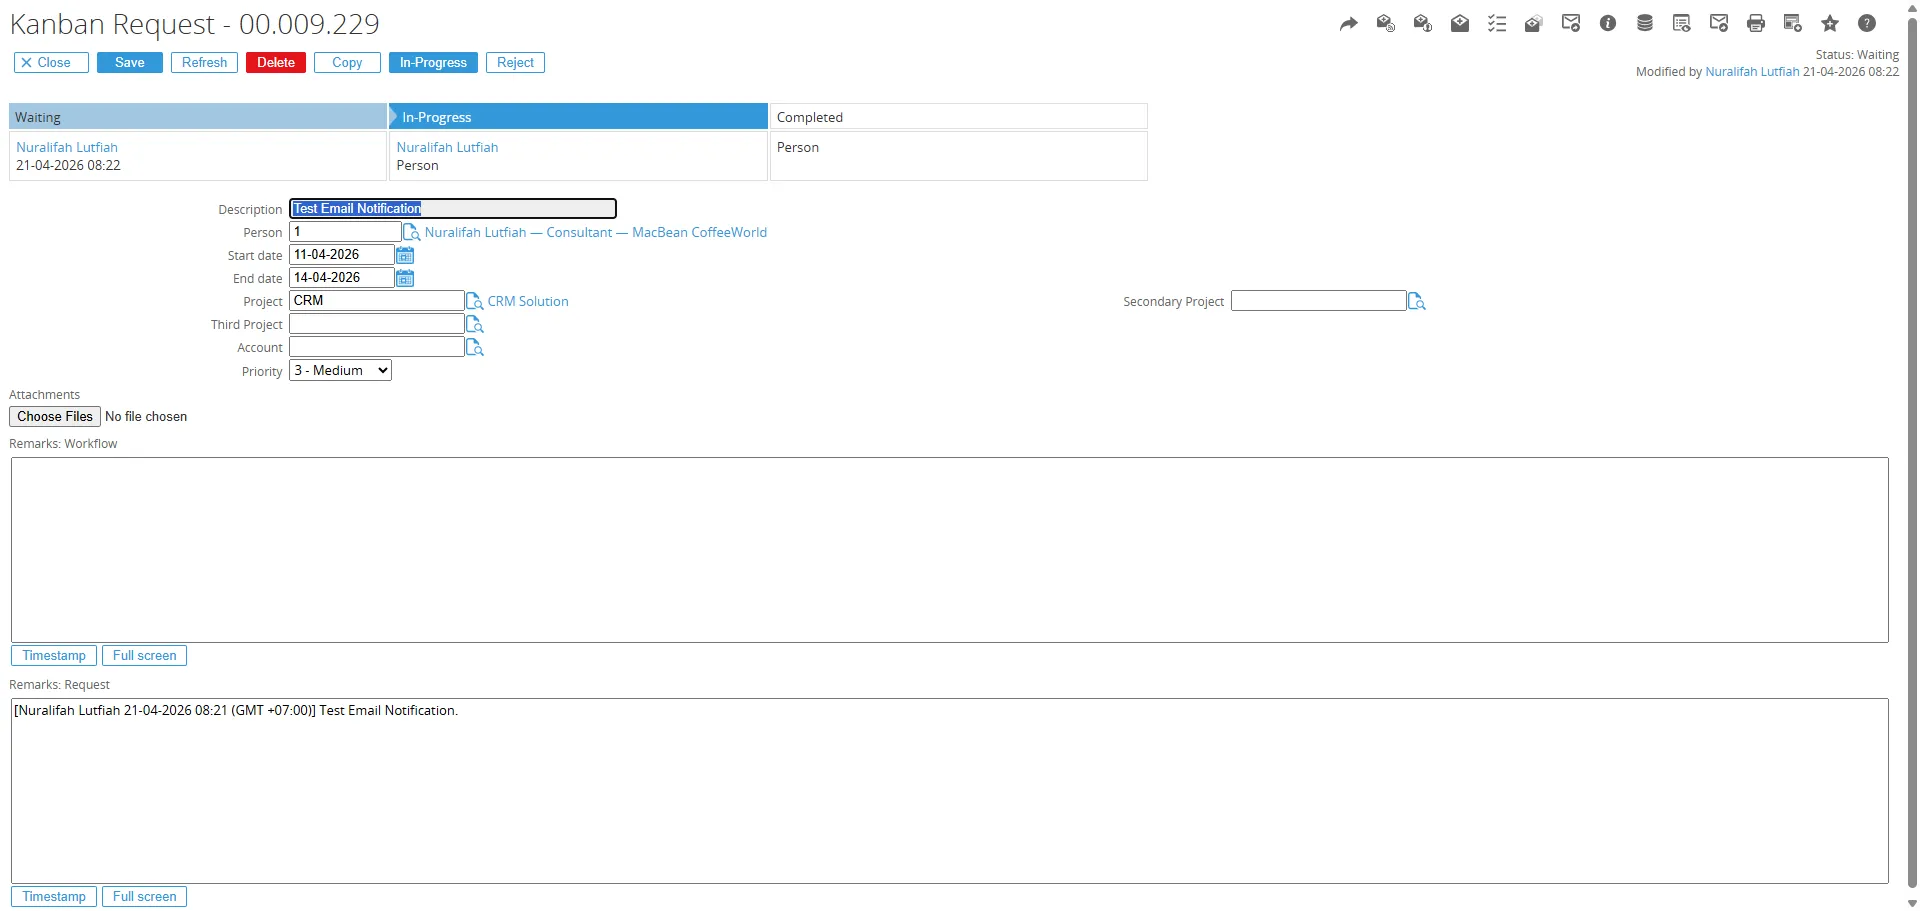
The current status of the request is displayed here. The table is divided into Waiting, In-Progress, and Completed columns, showing the assigned person and relevant date for each phase.
3. Request Details
Important request information such as description, assigned person, project, account, priority level, and start/end dates is filled out or reviewed in this section.
4. Attachments
File attachments for the request are added in this section. Click “Choose Files” to upload relevant documents or images.
5. Remarks or Comments
The bottom window section is provided for entering additional remarks, comments, or notes regarding the request. This field is used to document any relevant observations or instructions.Grouping tasks
Section titled “Grouping tasks”Tasks can be grouped to enhance visibility and streamline management :
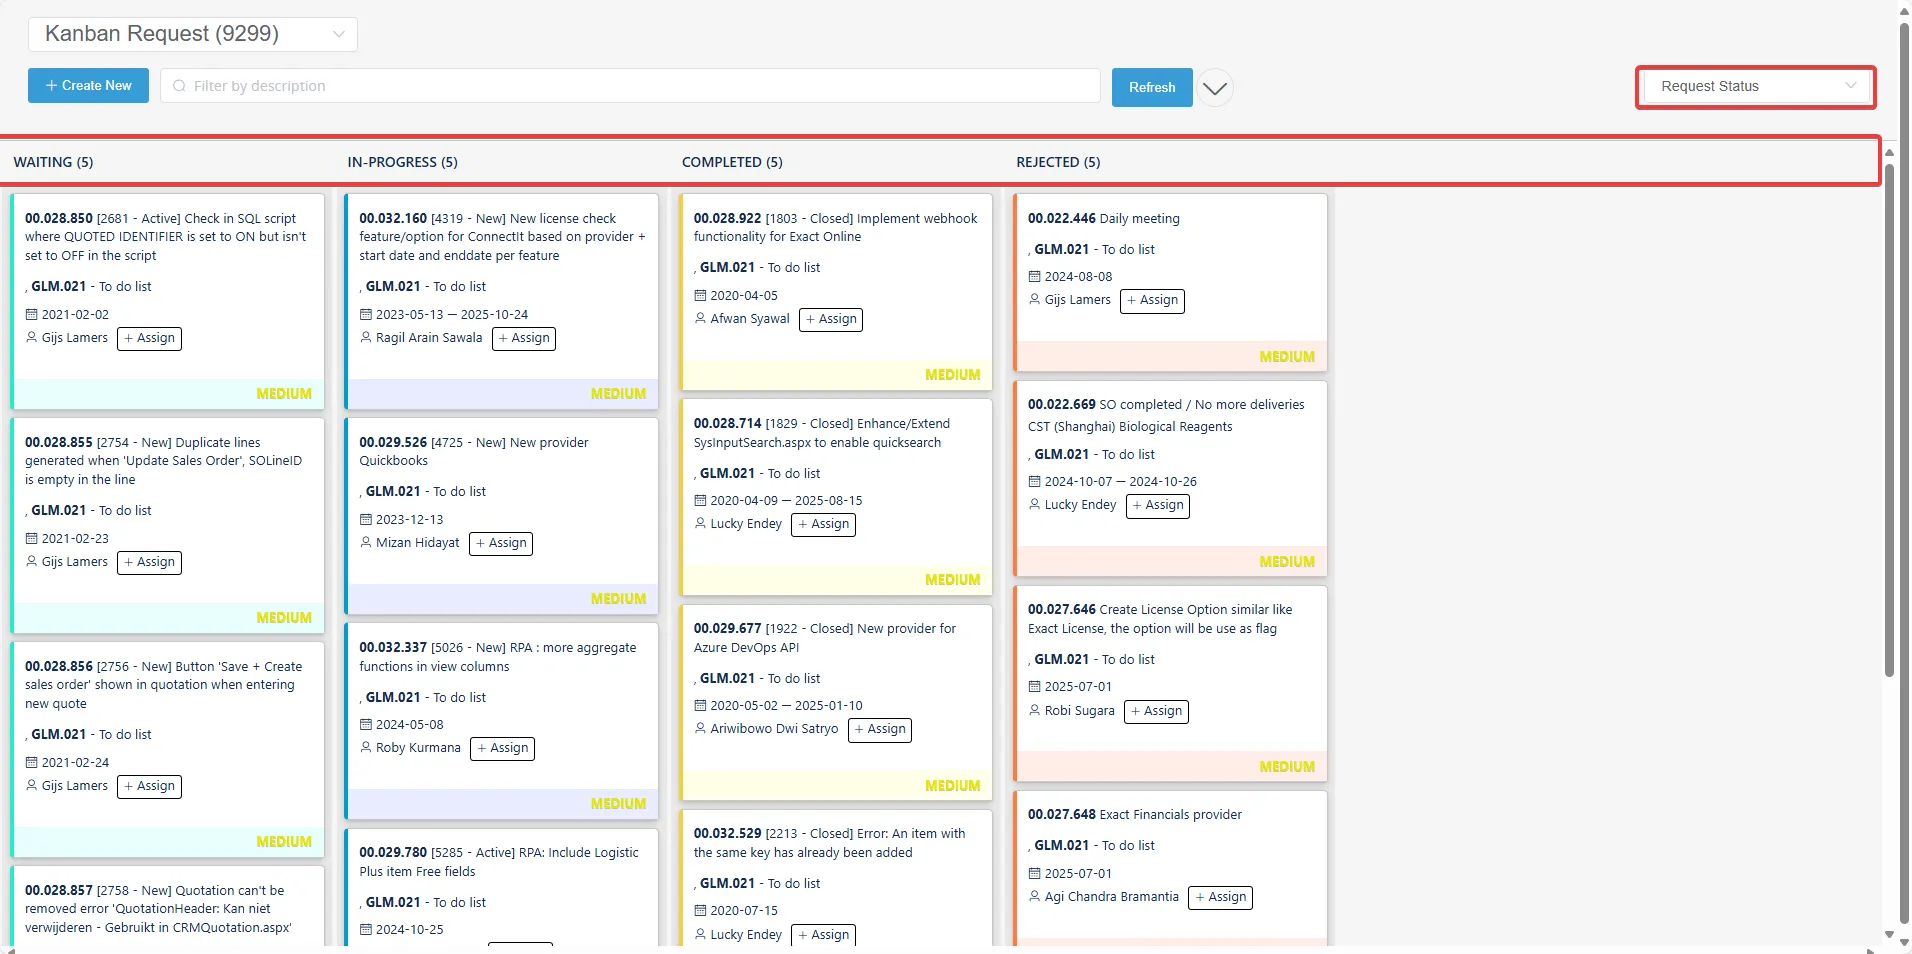
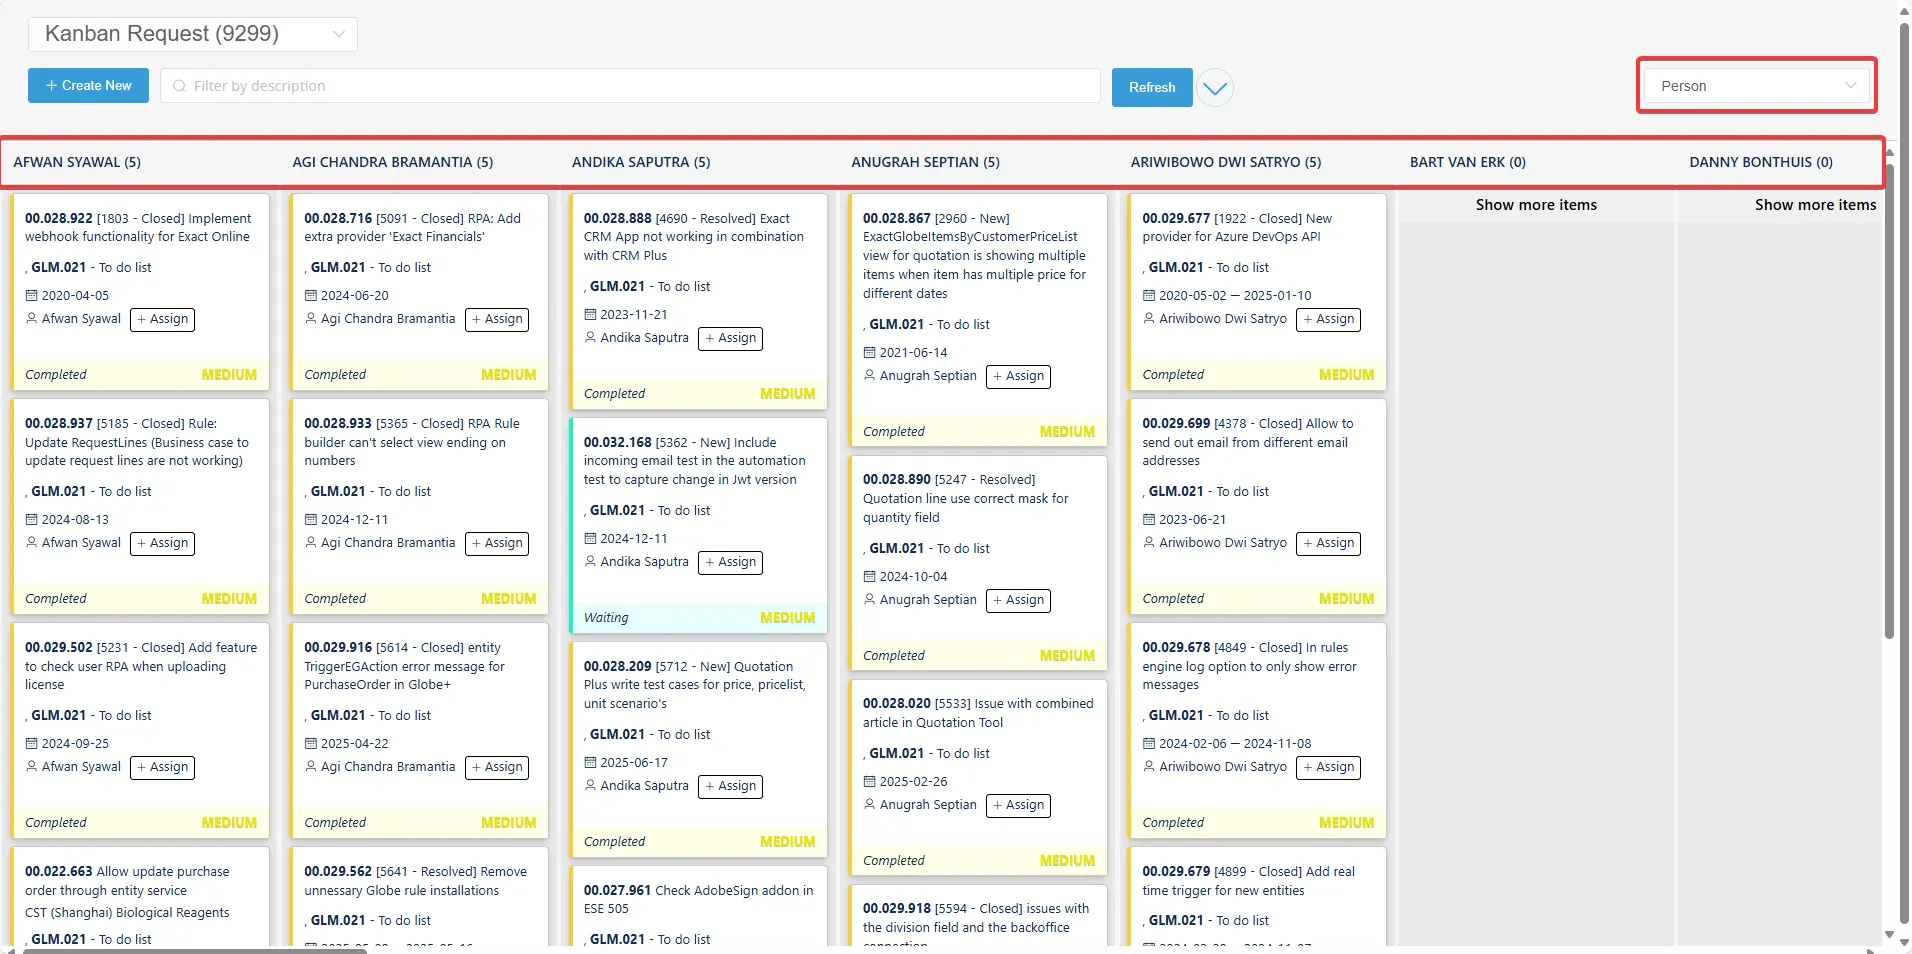
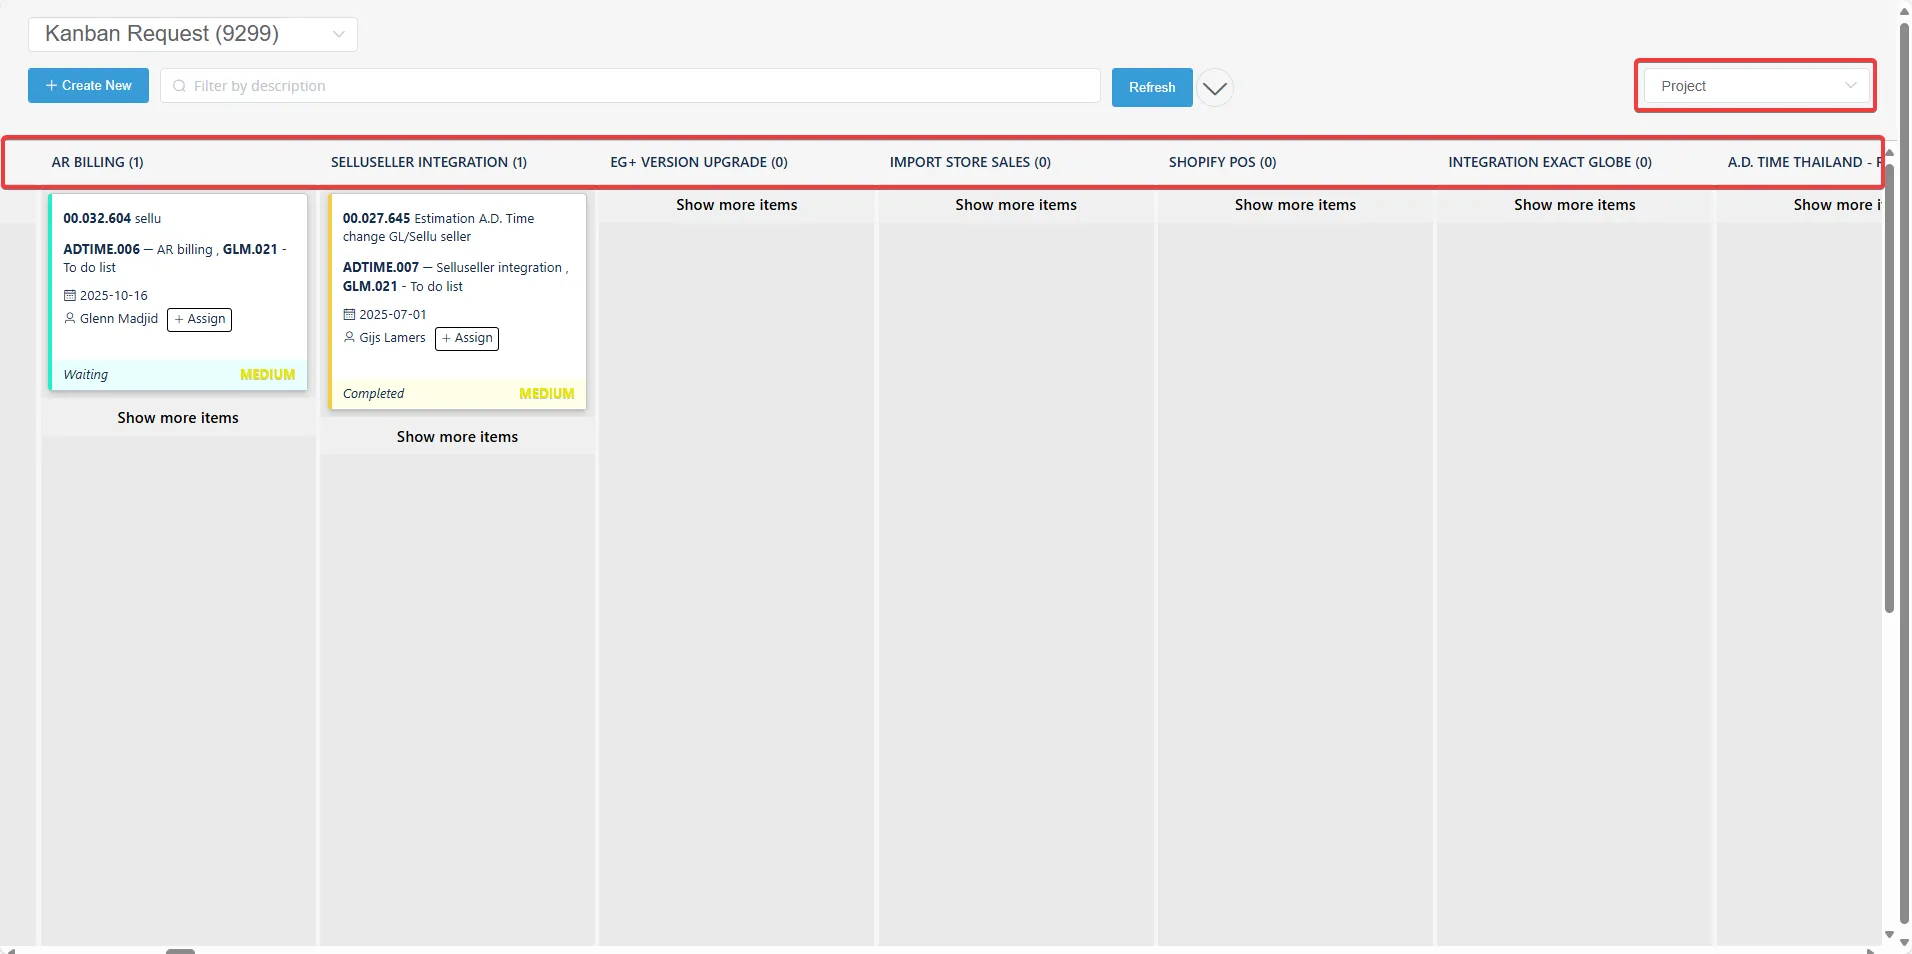
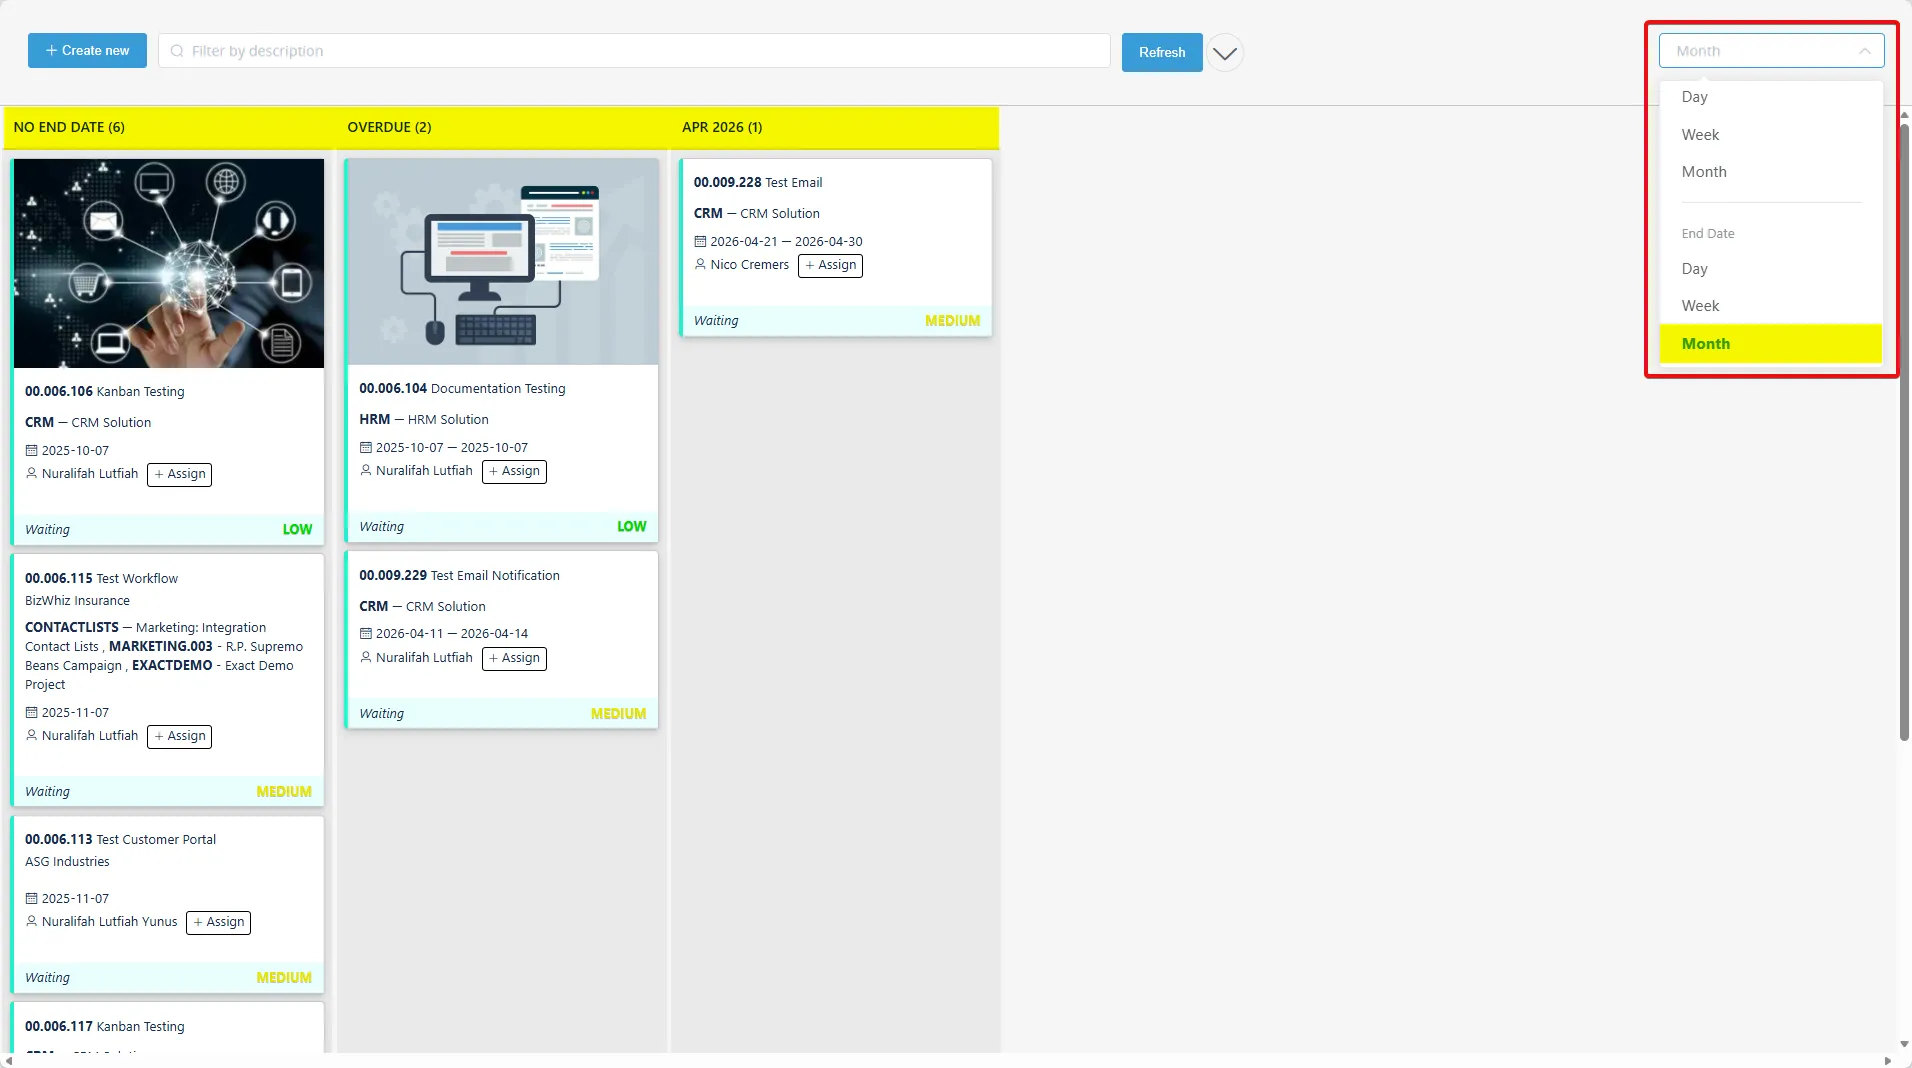
- Use the Request Status Bar on the right to group and display tasks by specific criteria:
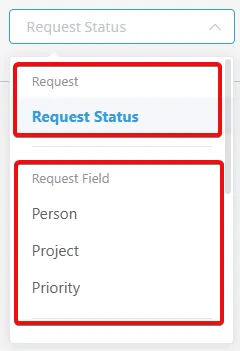
- Request Status: Organize tasks by progress status.
- Person: Display tasks by assignee.
- Project: Show tasks by project.
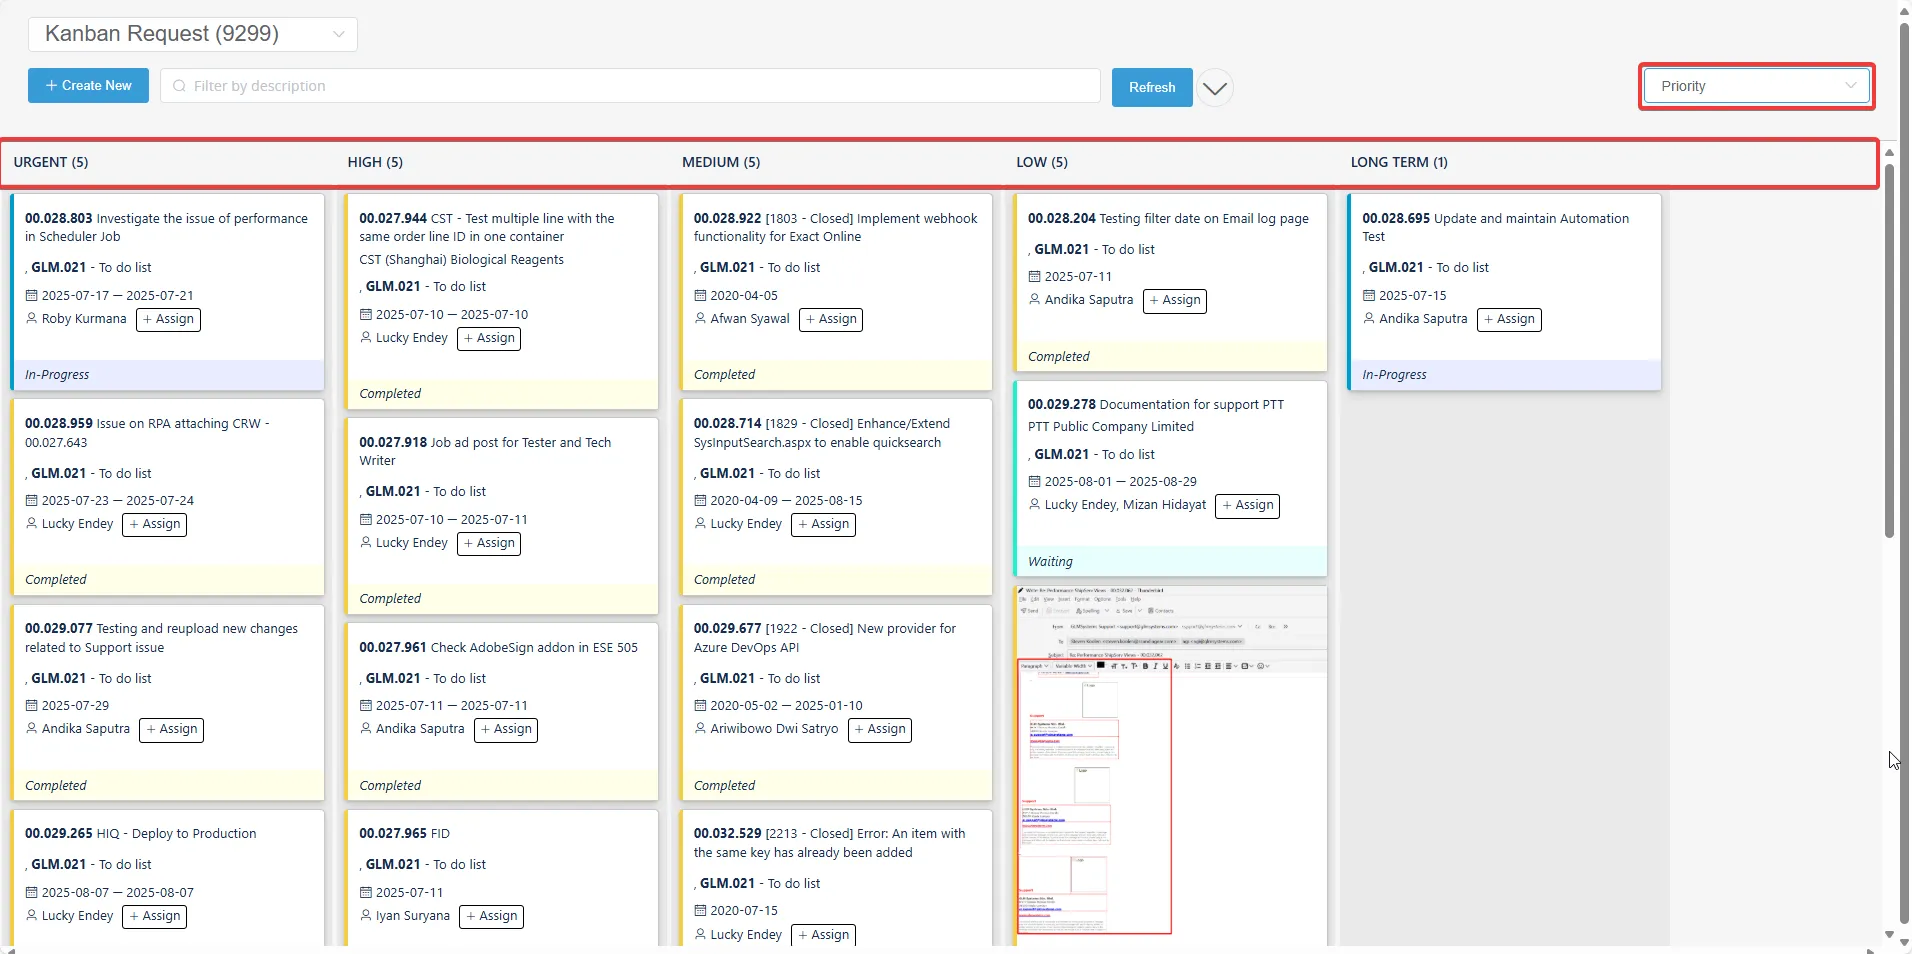
- Priority: Group tasks by priority level.
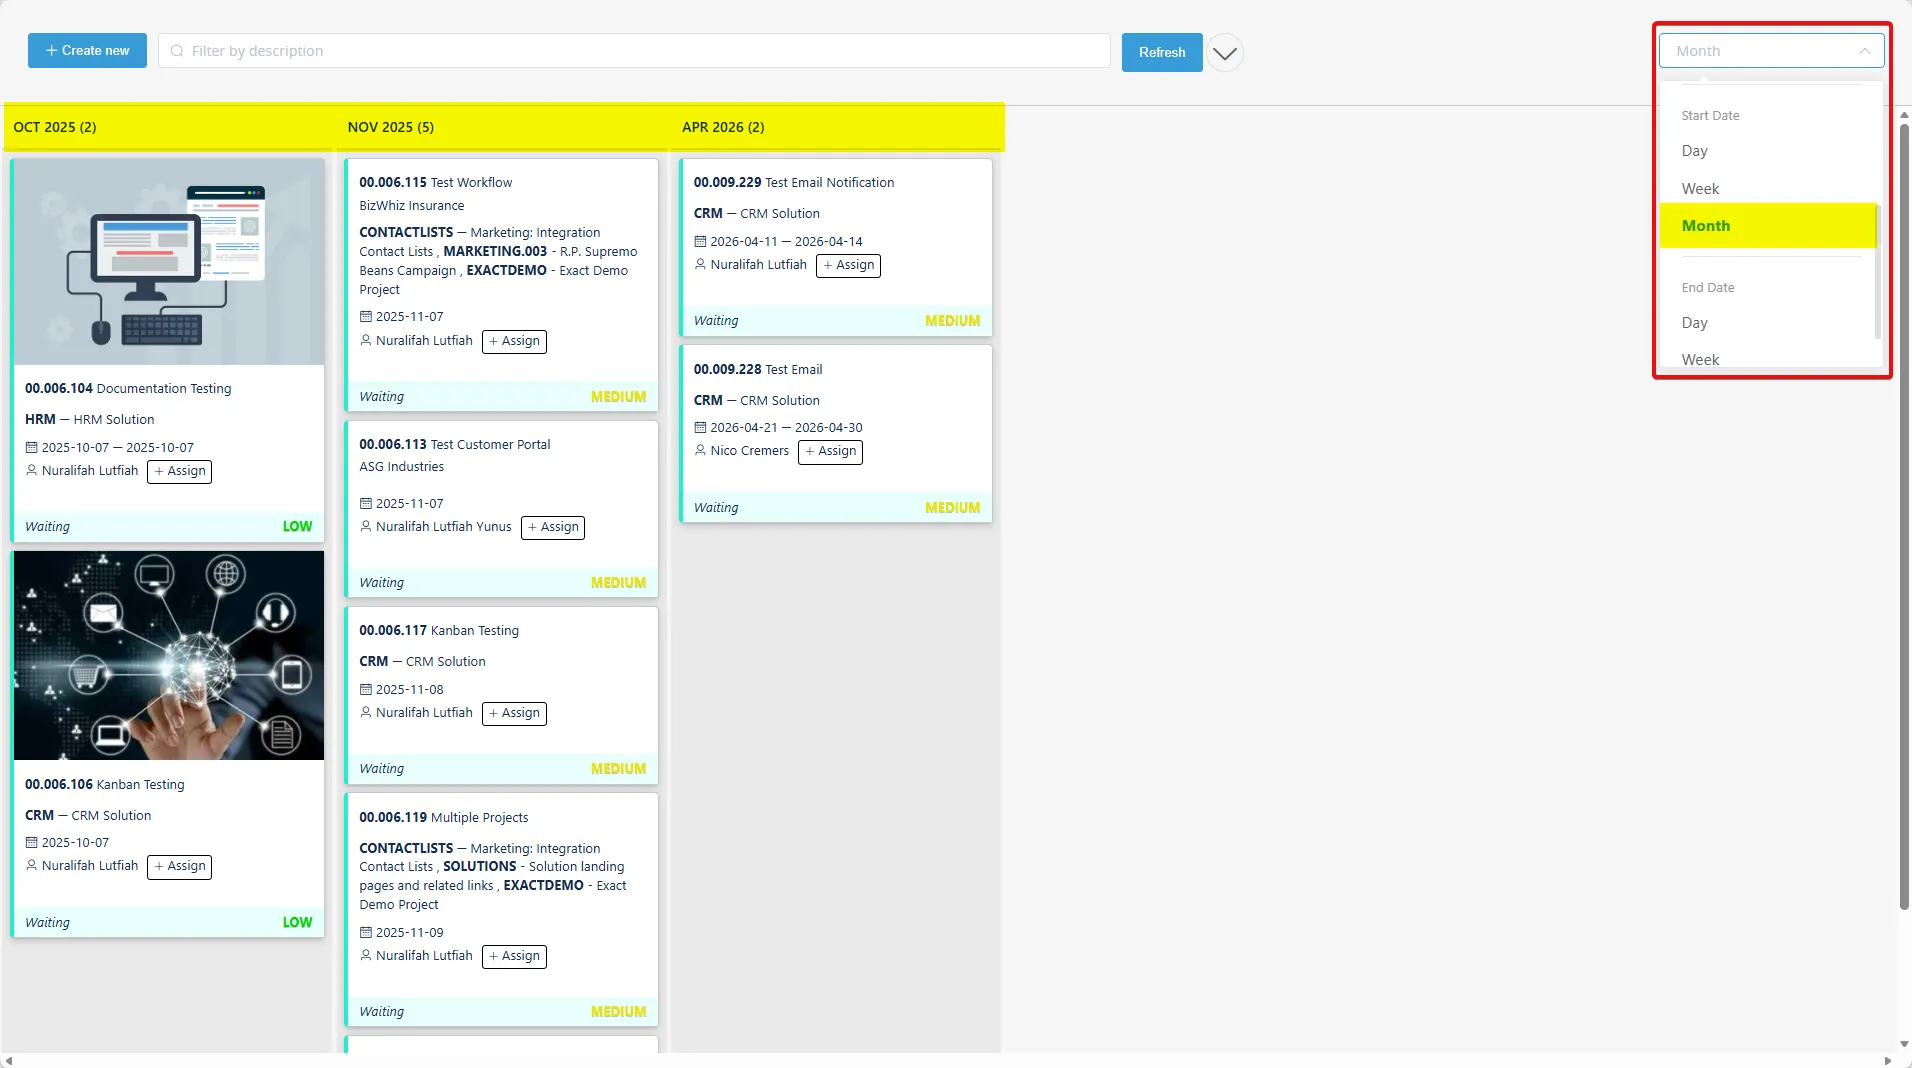
- Start Date: Arrange tasks by their start date.
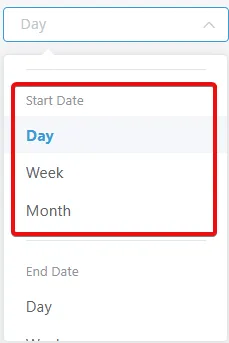
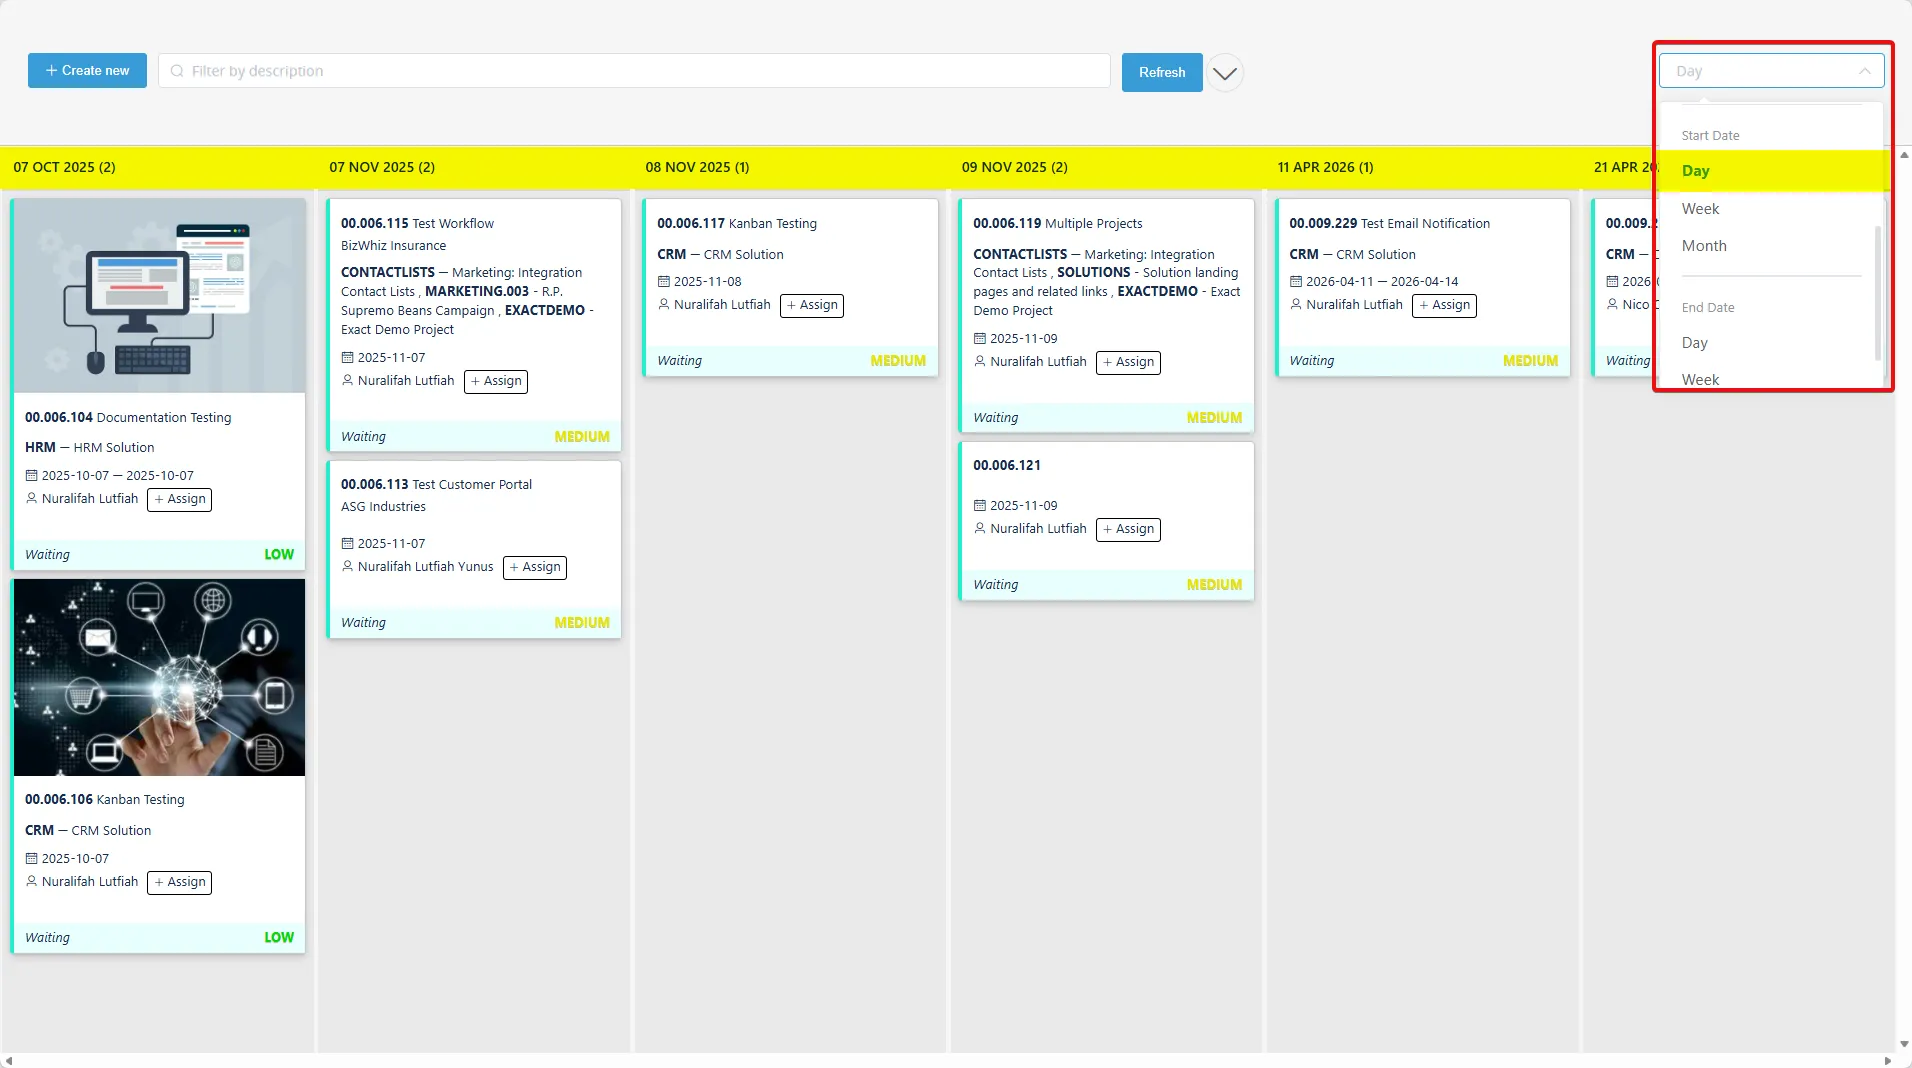
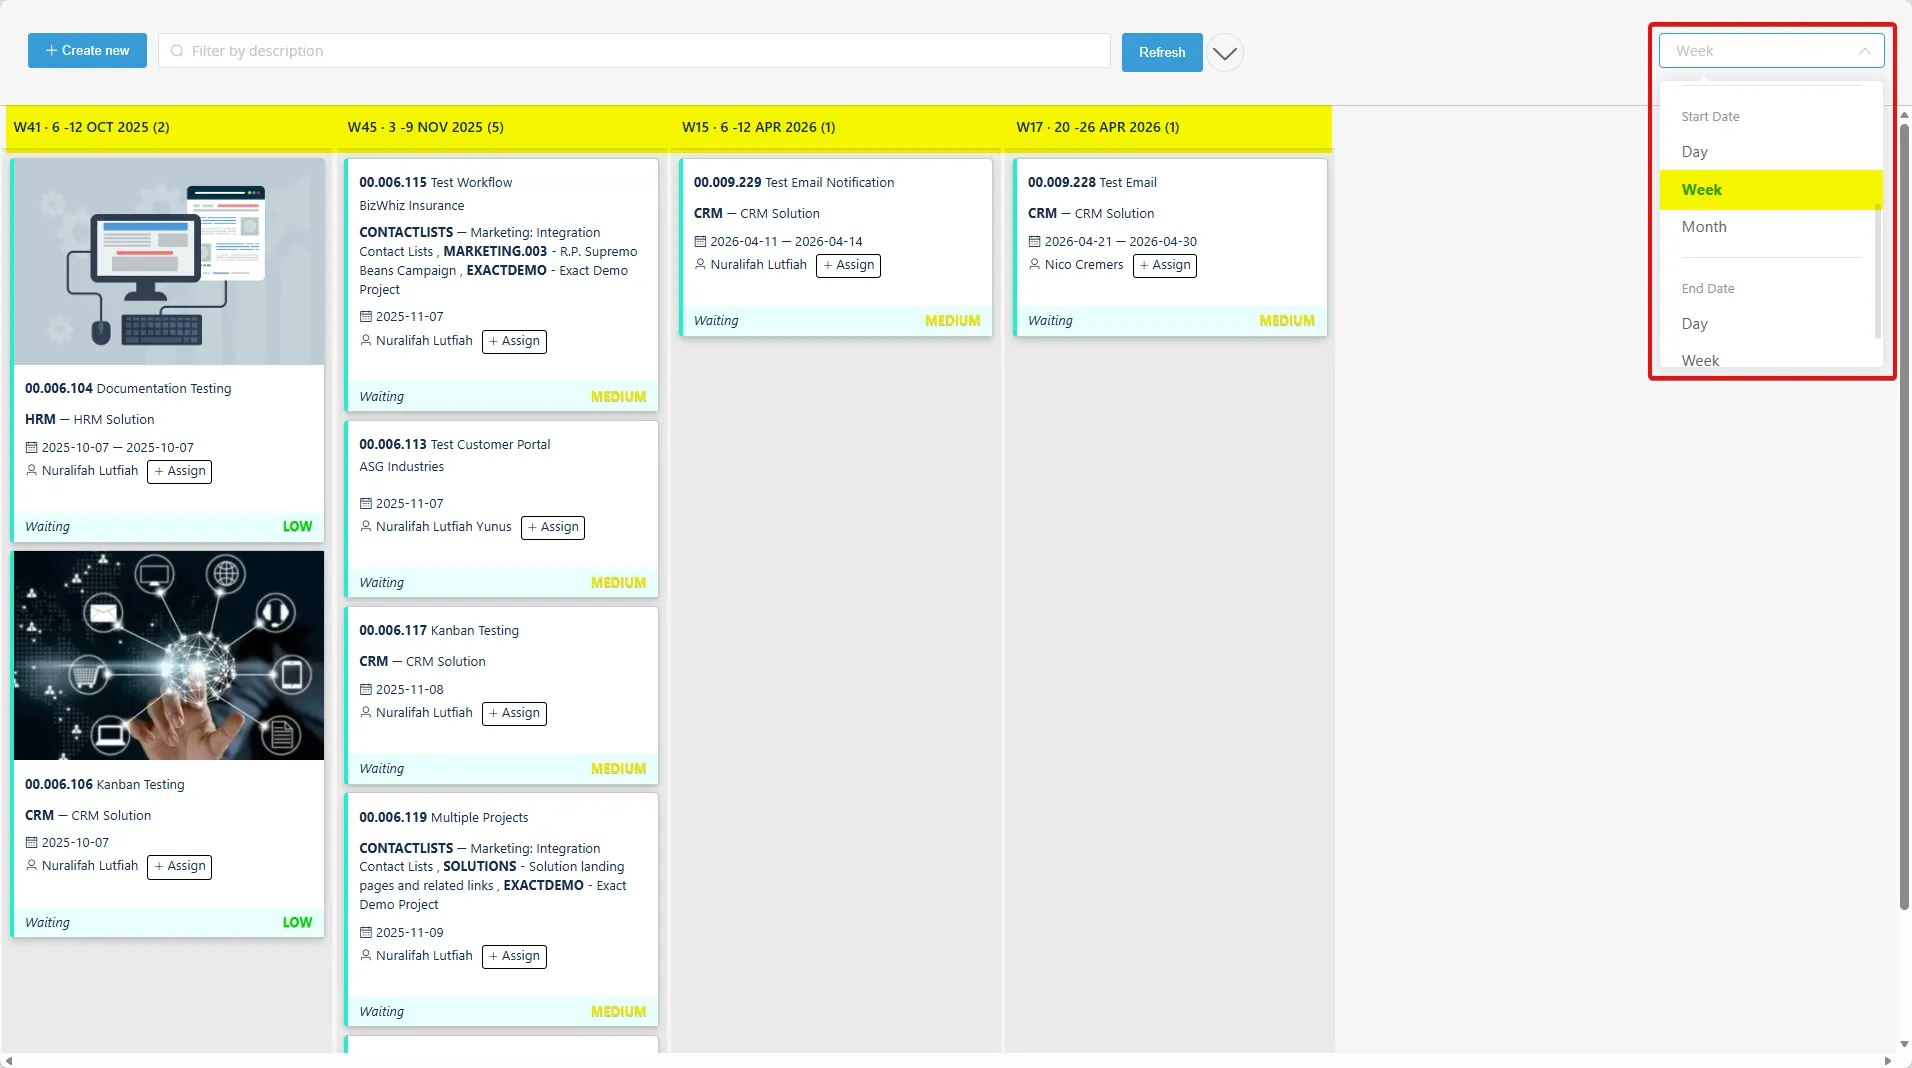
- When grouping by Start Date, tasks are organized based on their start date. The grouping can be separated by day, week, or month depending on the start date of the task. This allows users to easily visualize and manage tasks according to their scheduled start times.
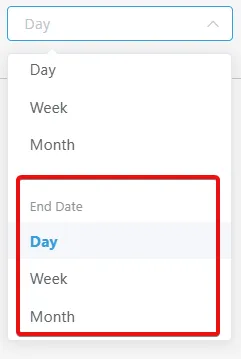
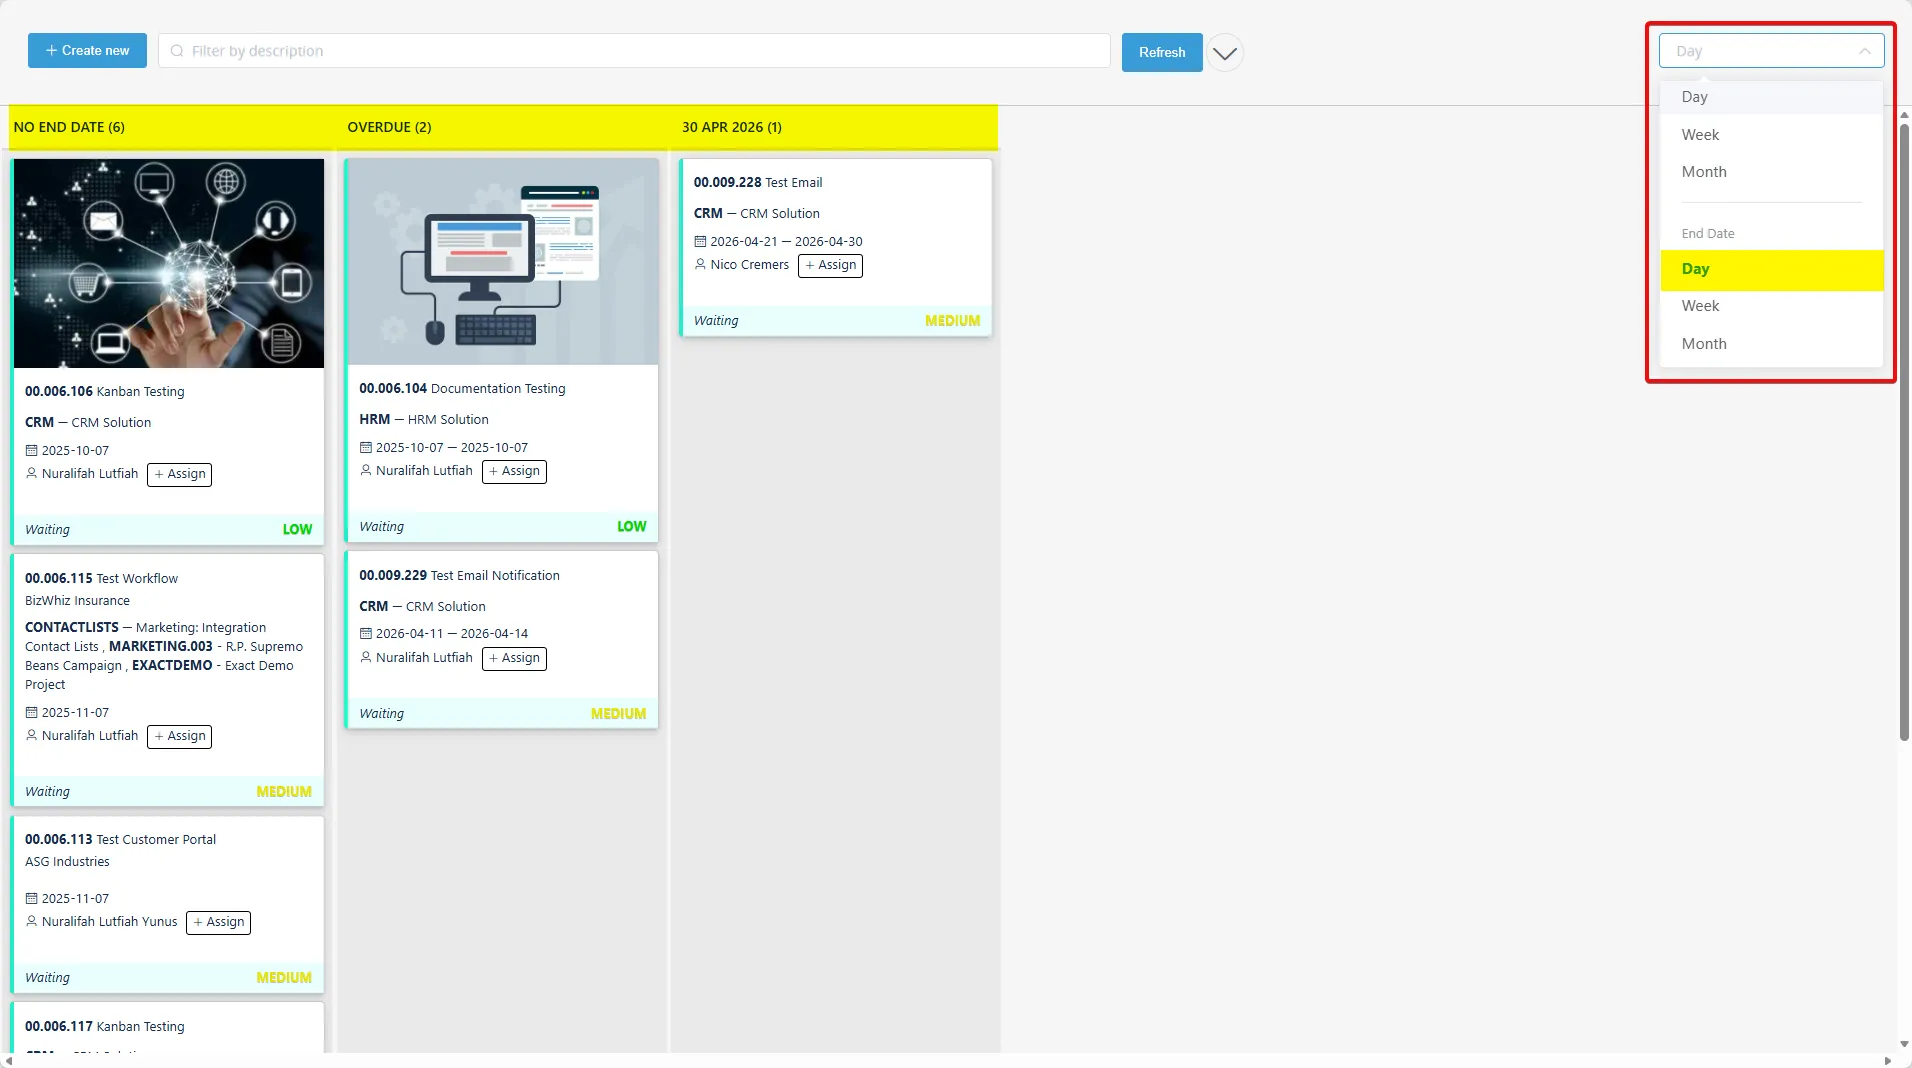
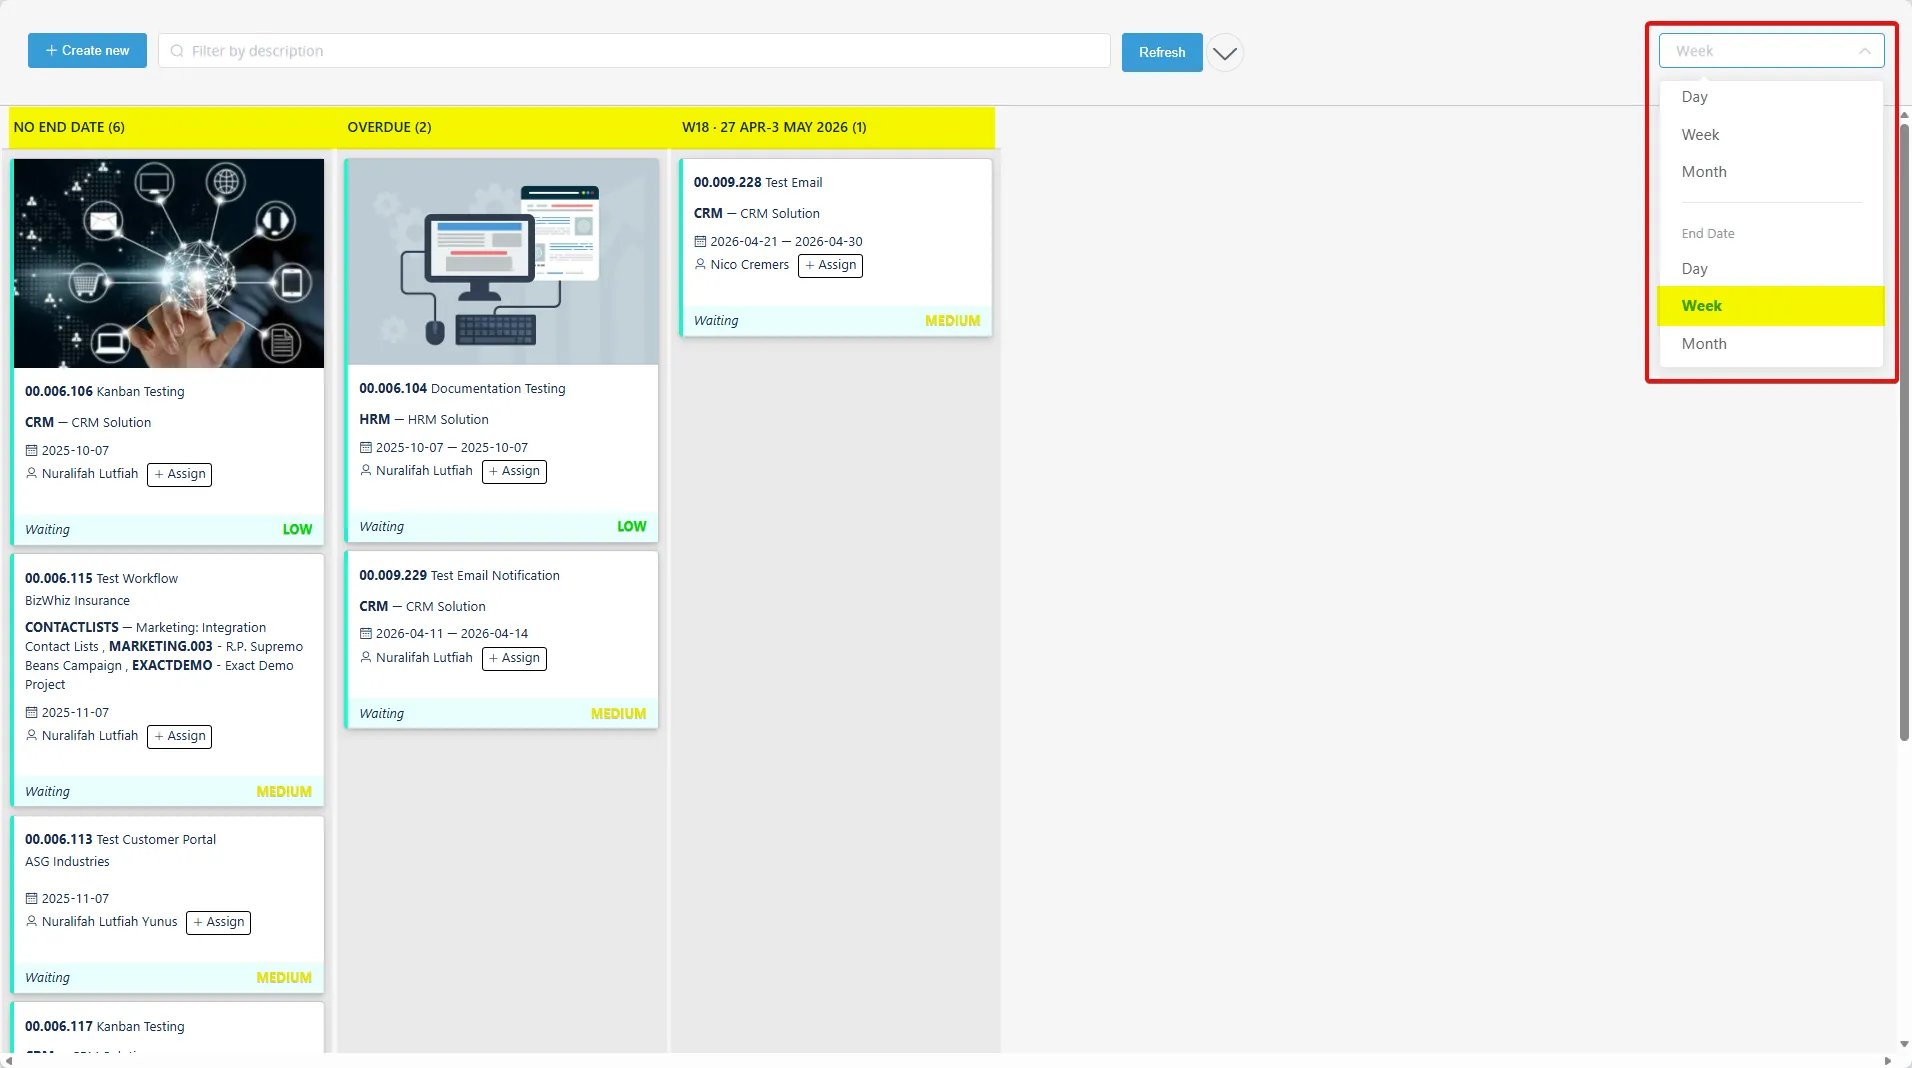
- End Date: Organize tasks by their end date.
- When grouping by End Date, tasks are organized based on their end date. Similar to grouping by start date, the tasks can be separated by day, week, or month based on their end date. This helps users track deadlines and prioritize tasks that are approaching their completion dates.
Filtering tasks
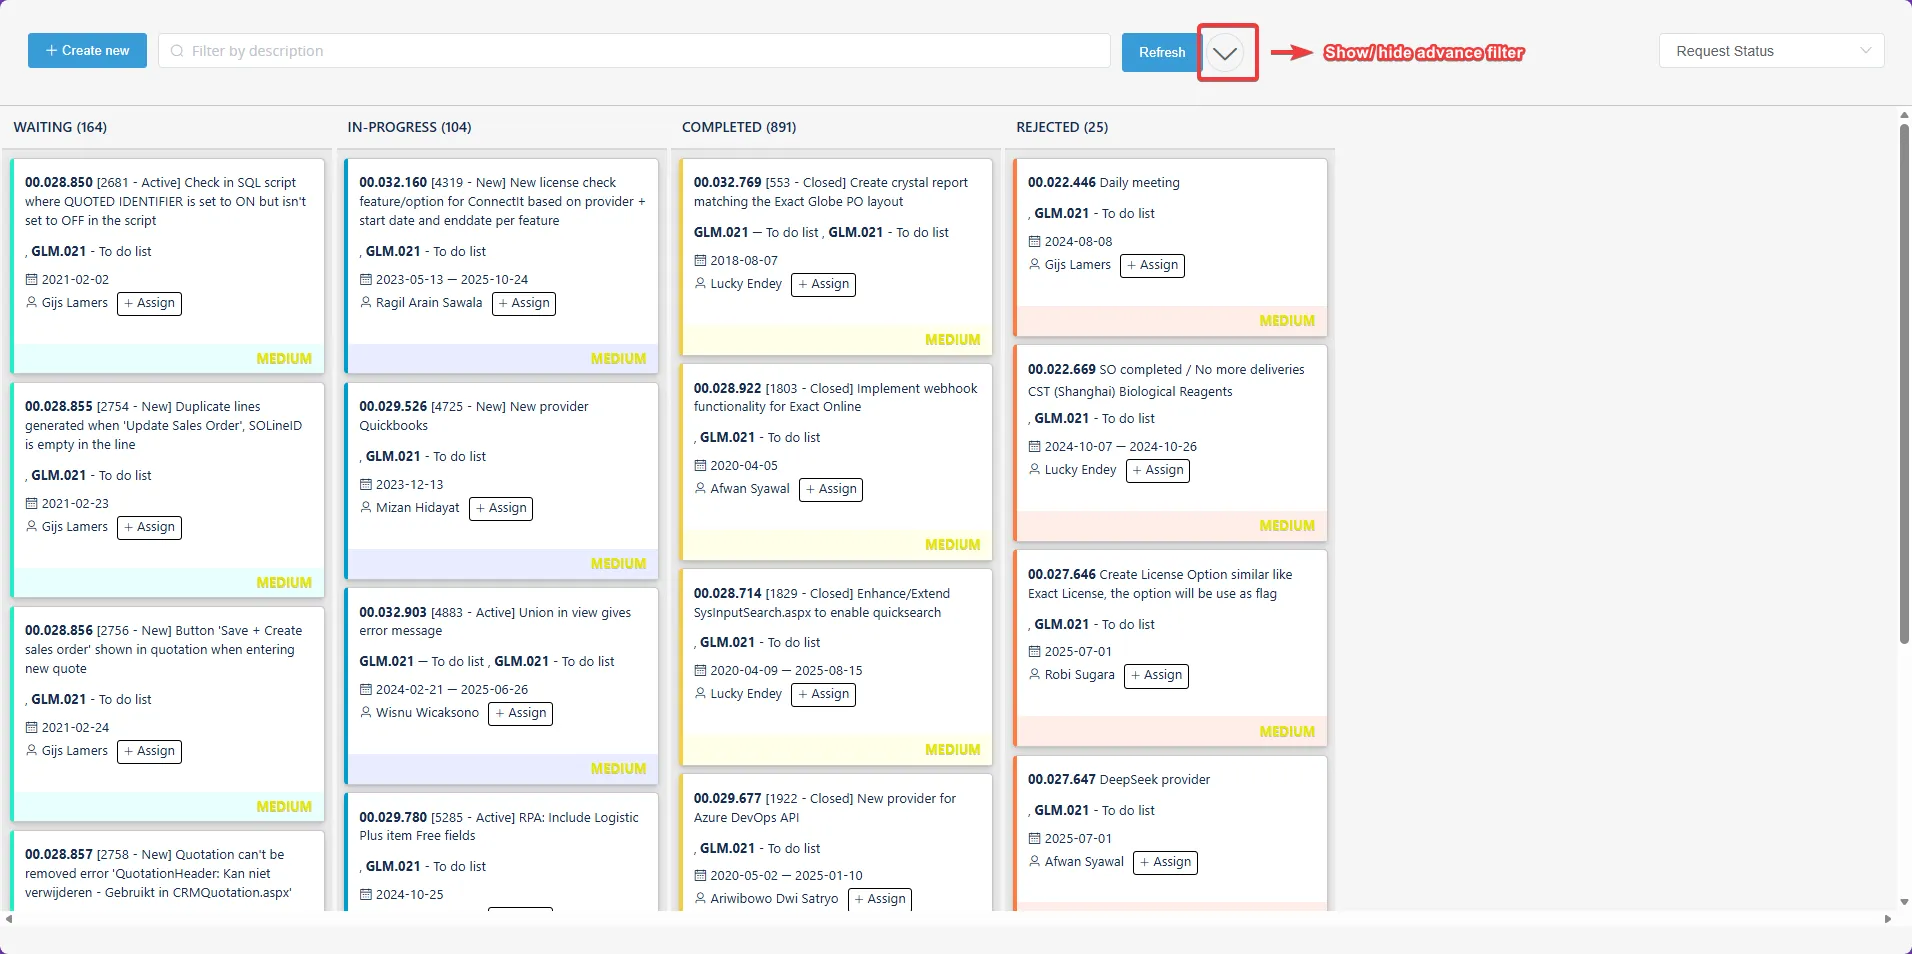
Section titled “Filtering tasks”- Click the Show/Hide Advanced Filter button next to Refresh to expand the filter bar.
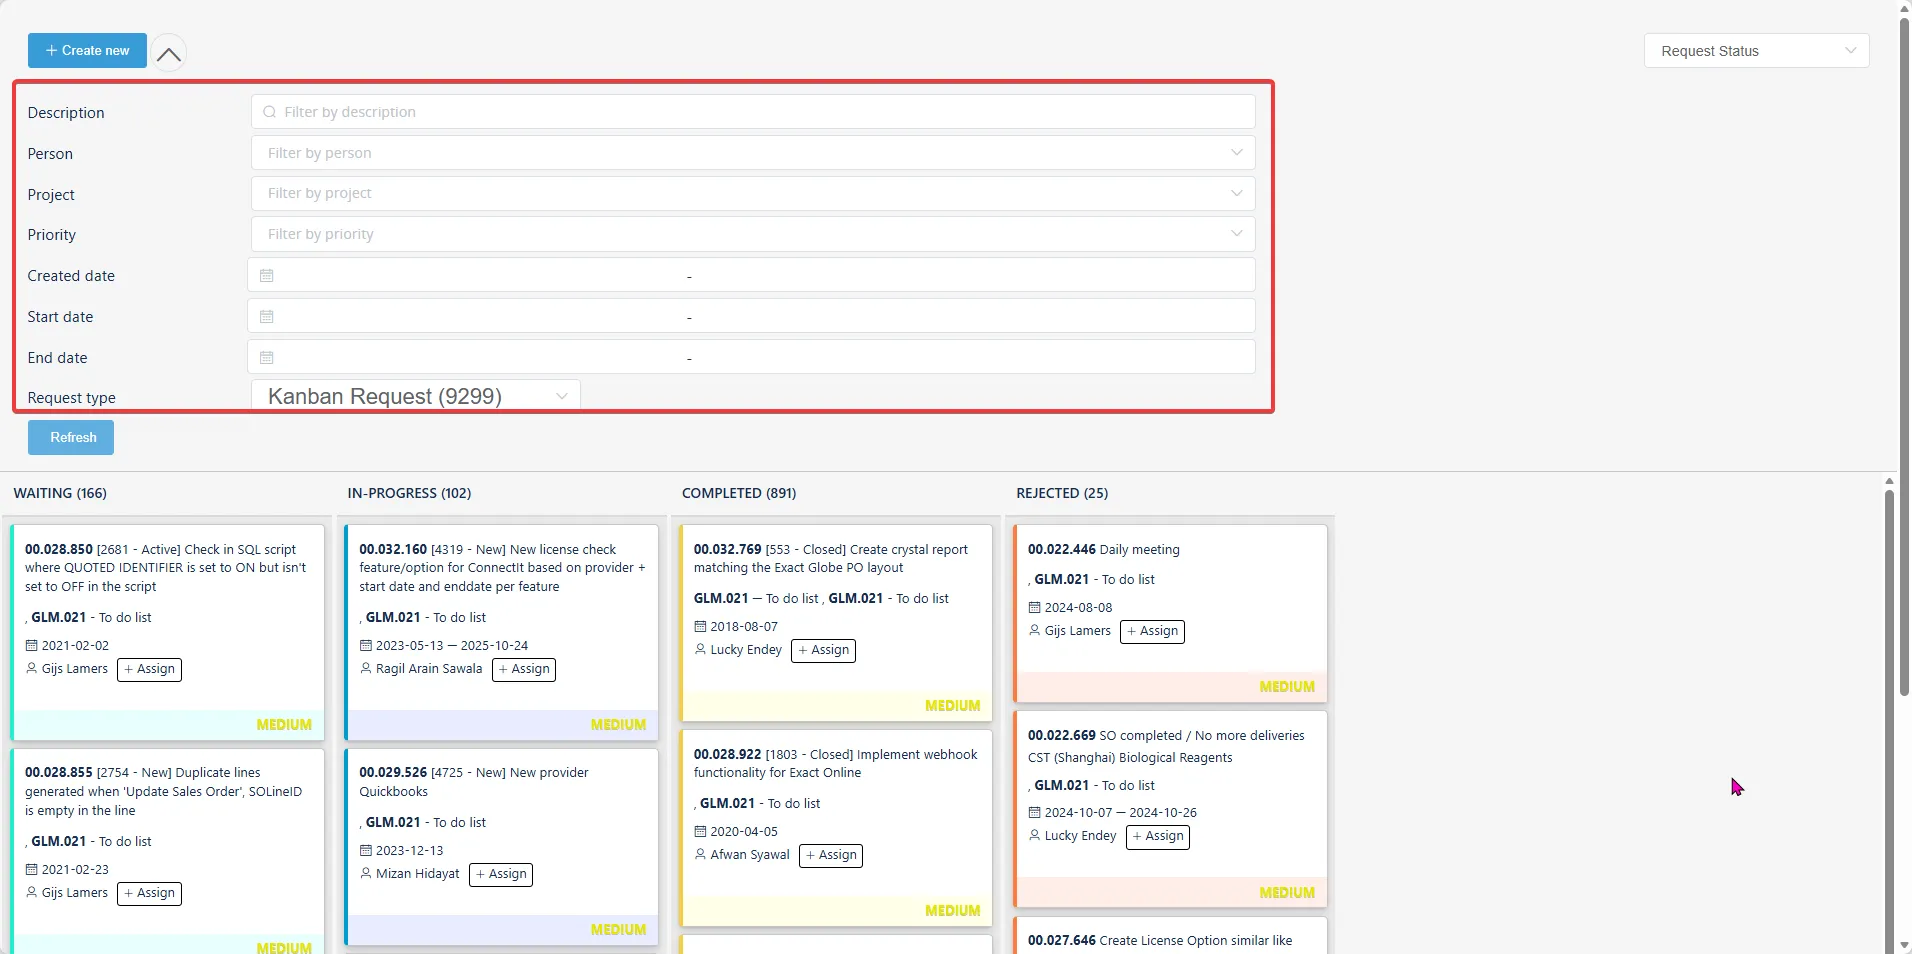
- Use the filter section to enter specific criteria such as Description, Person, Project, Priority, Created Date, Start Date, and End Date depending on what data you want to display or search for.
- For example, in the image below, if you set the filters to Person = “Nuralifah Lutfiah Yunus” and Project = “GLM.021 ,” the results will show only the matching data.
Then, click Refresh to apply the filters and display the relevant tasks.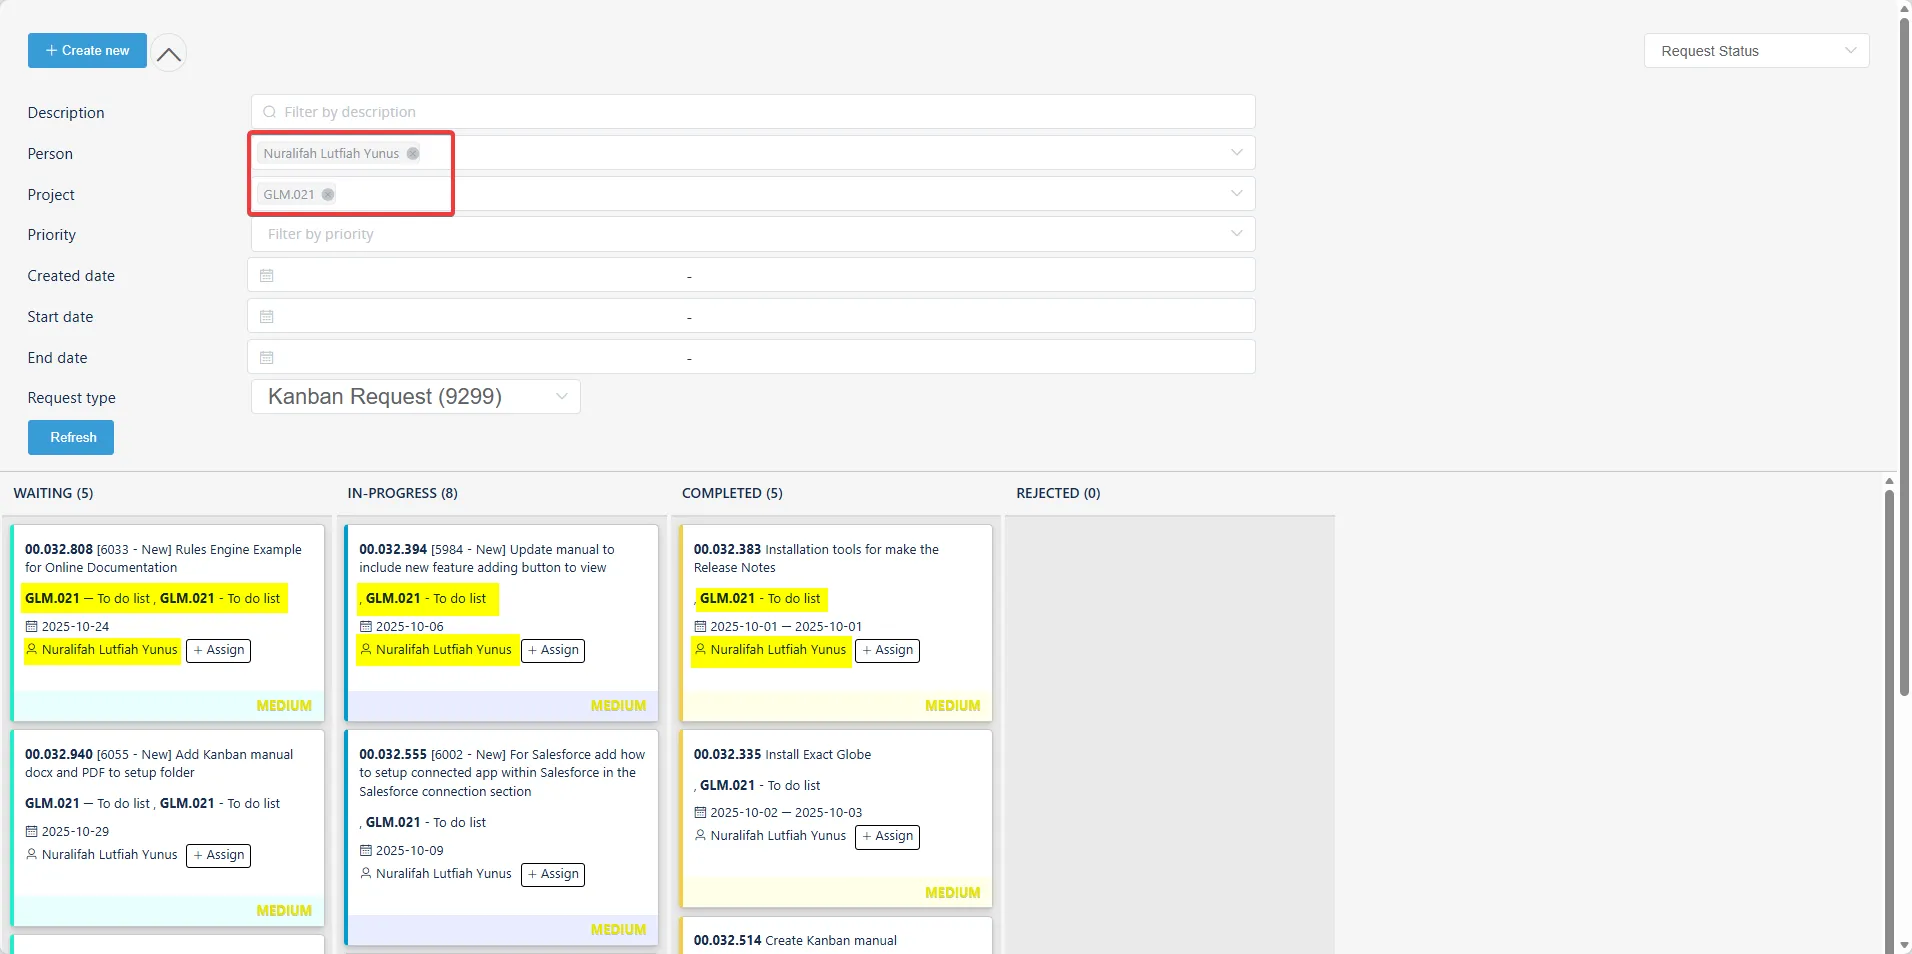
Displaying Images in Attachments
Section titled “Displaying Images in Attachments”- In Kanban board, click description of the task.
- Go to the attachment section and choose files or images to add.
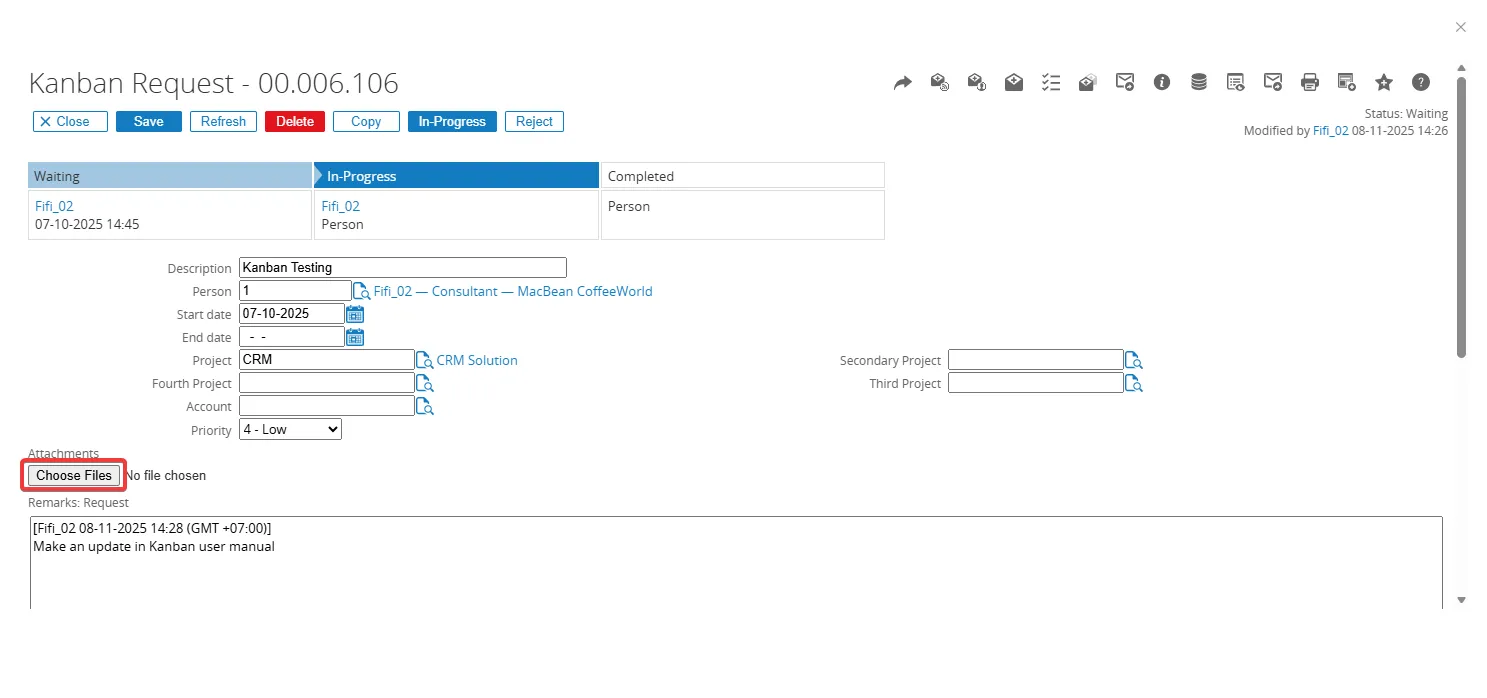
- Click Open to select the picture.
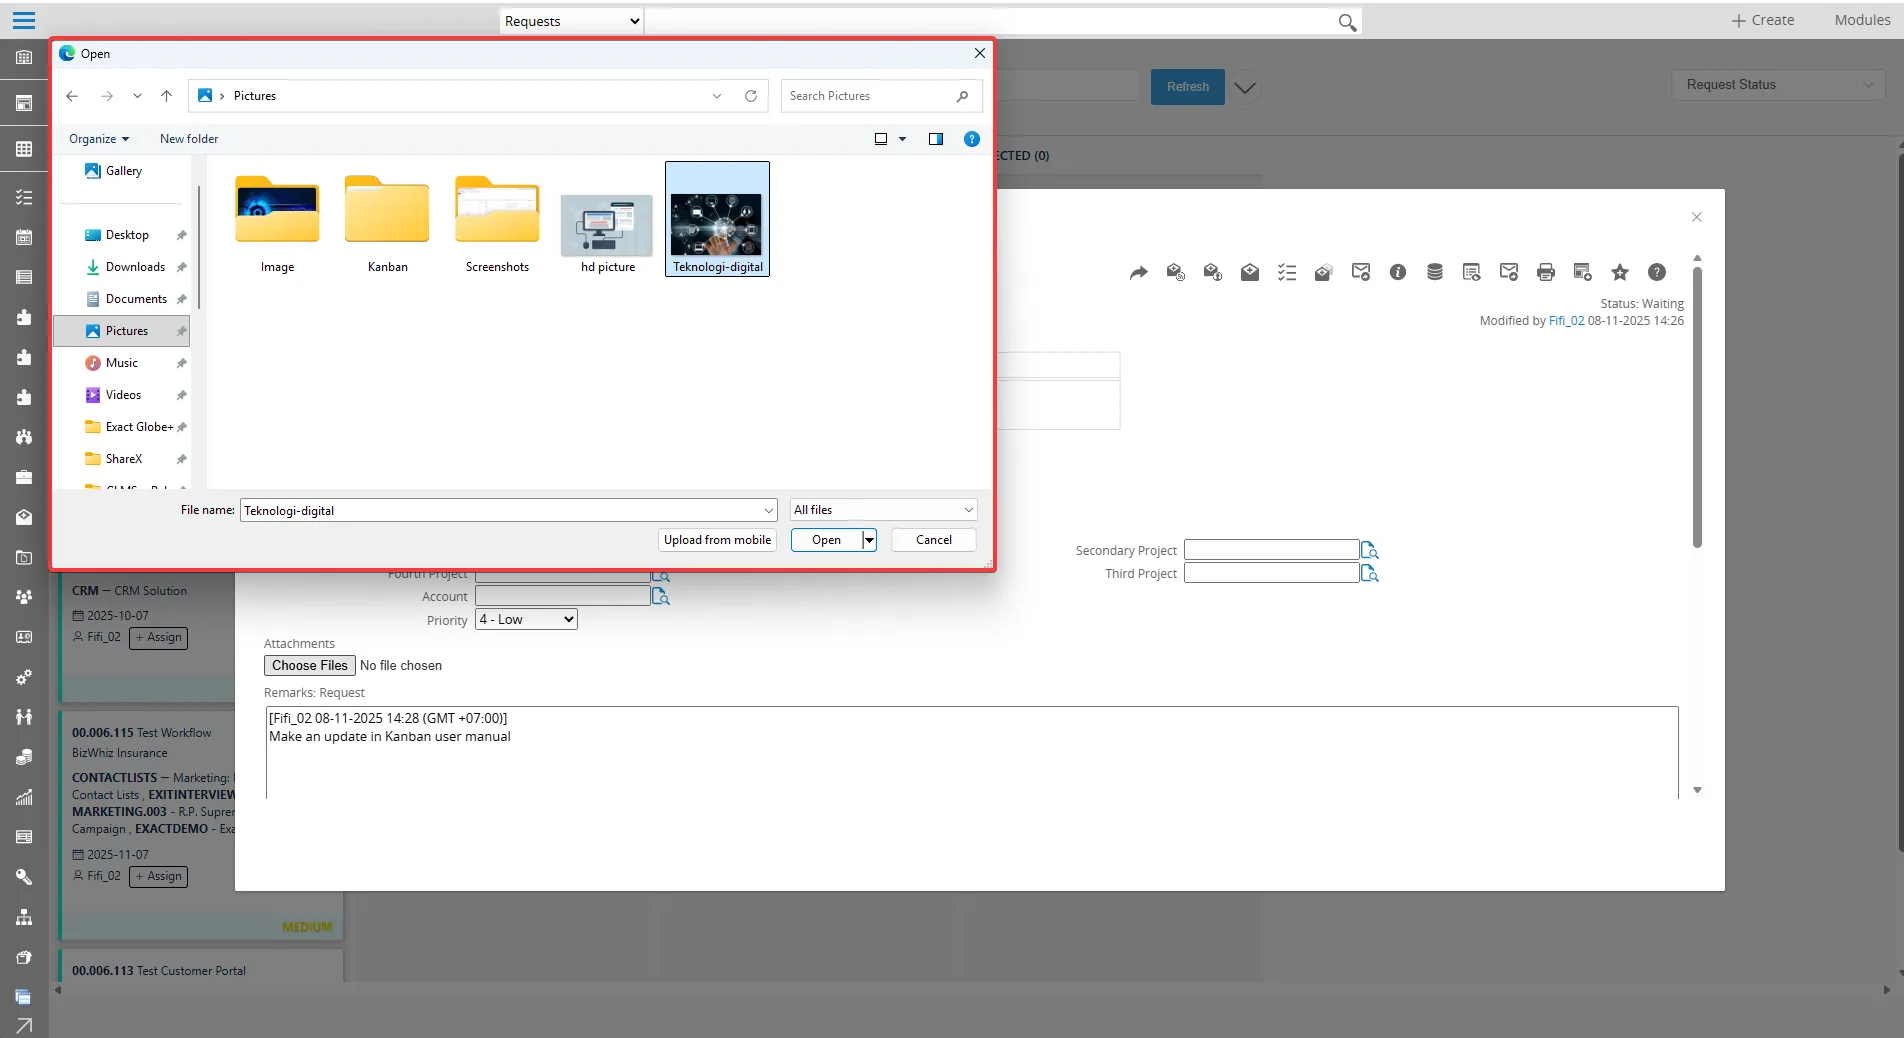
- The image will appear in the attachment files; Click Save to confirm and upload the attachment.
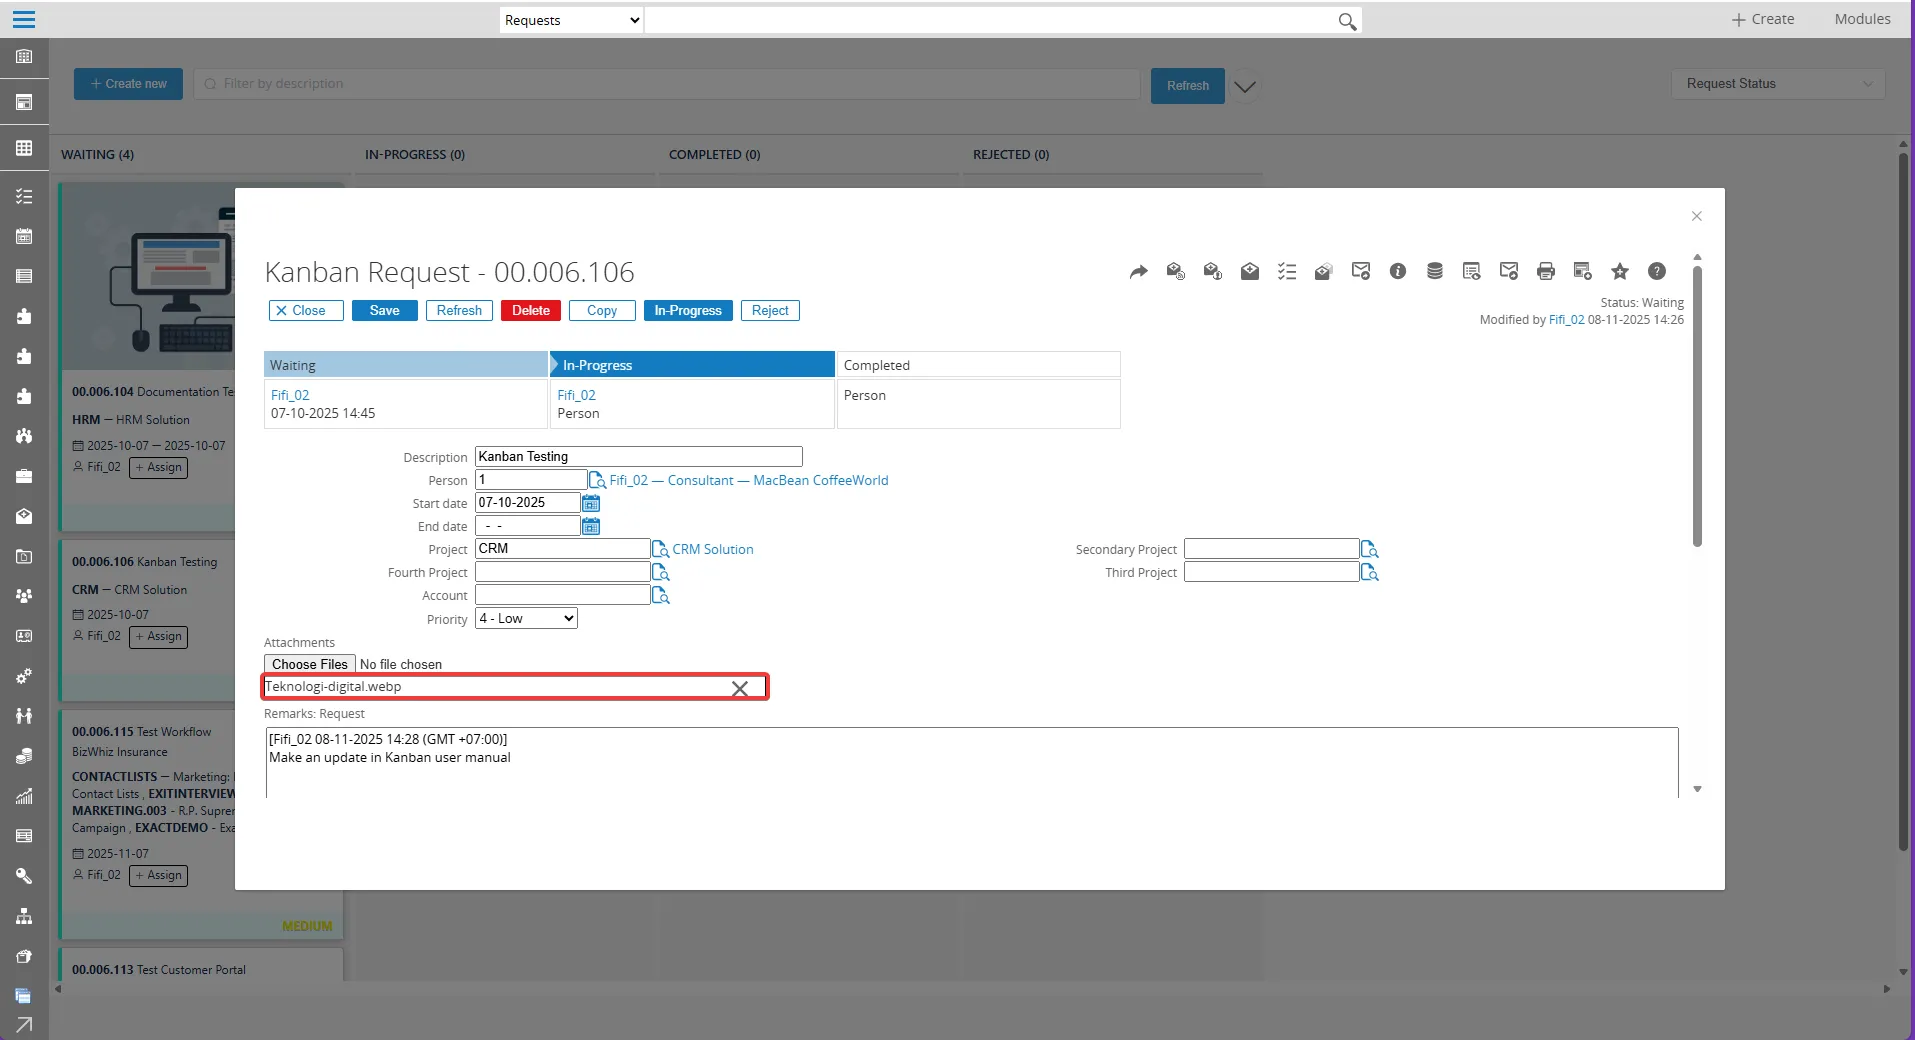
- The uploaded image will be immediately visible on the Kanban Request board.
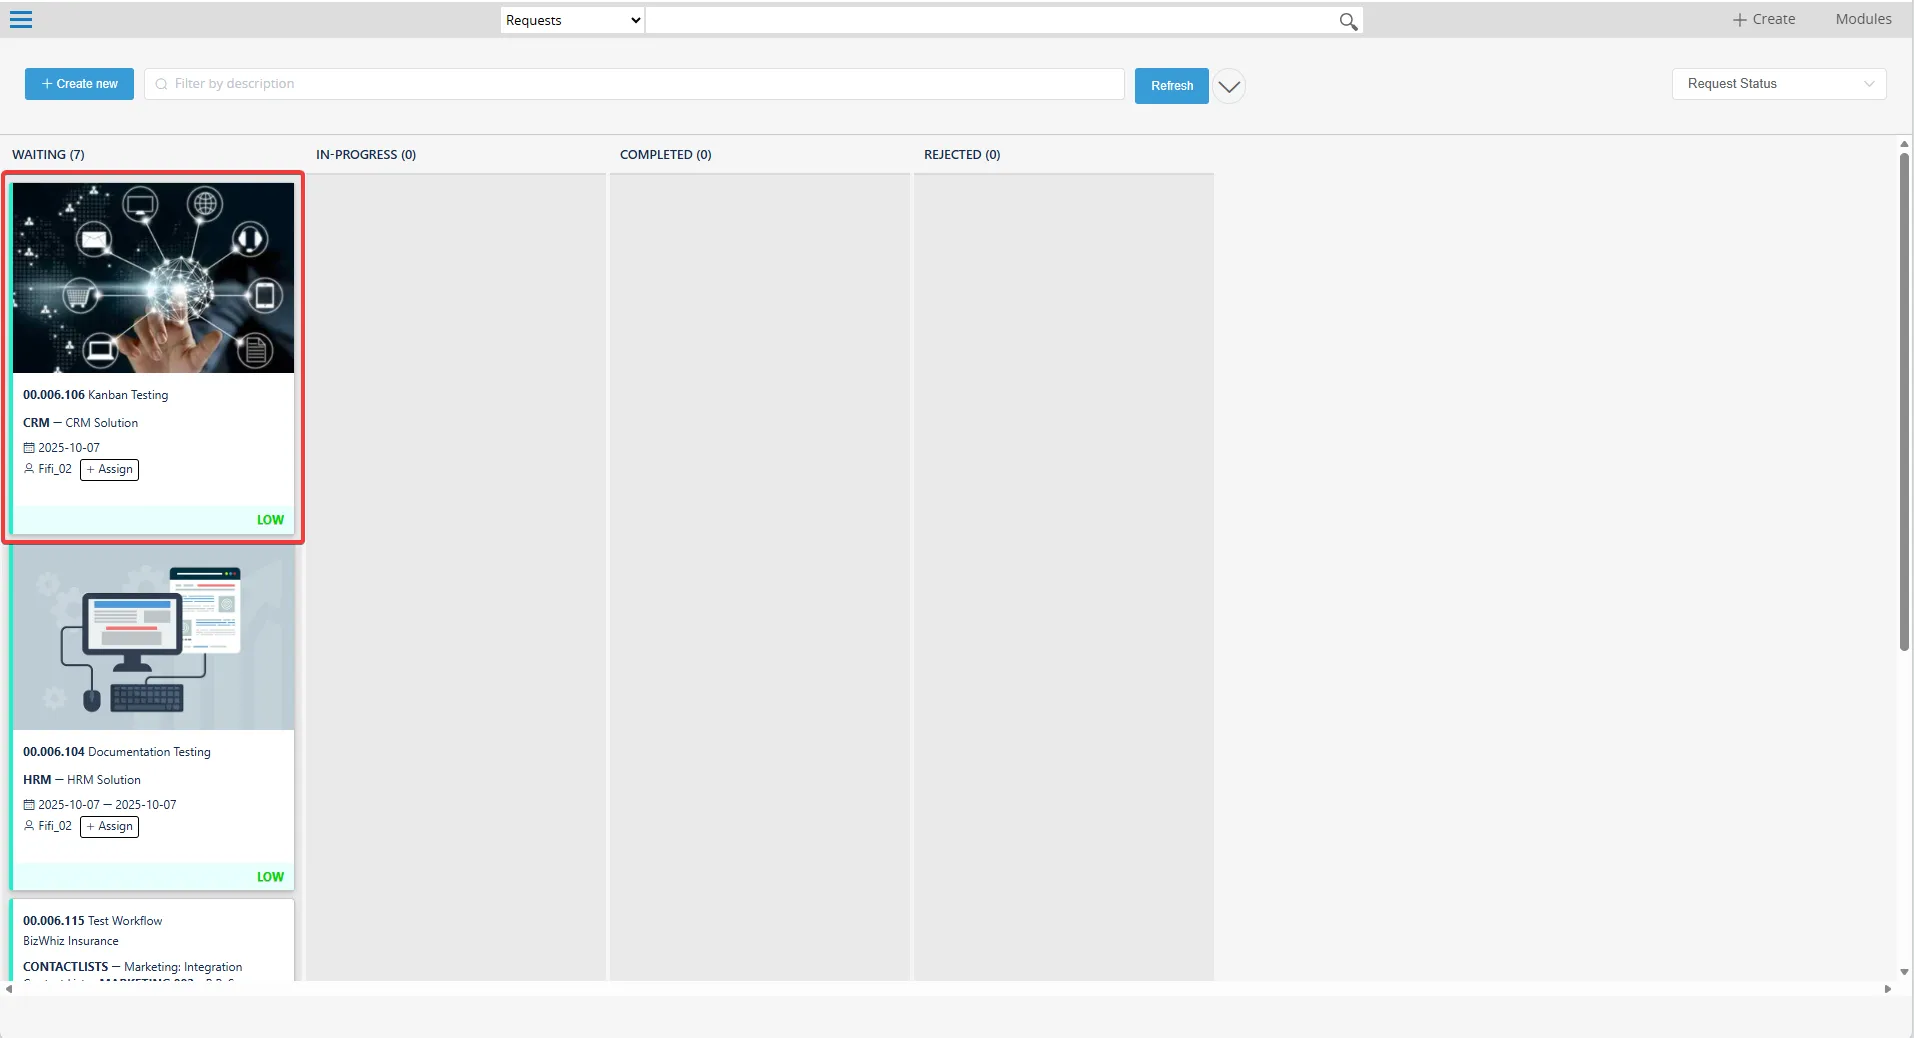
Email Notifications
Section titled “Email Notifications”When a task is assigned to a person, an email notification is sent to the assigned person’s registered email address. The email contains details about the task, including the description, project, and any relevant information entered in the request.This ensures that the assigned person is informed quickly about their responsibilities and can take the necessary actions on the task.
Kanban Email Notification automatically sends email updates to assigned users so they can quickly open and follow up on their Kanban requests.
Configuring the Email Base URL
Section titled “Configuring the Email Base URL”The Email Base URL is used to build the Request Detail in the email notification so users can open the request directly from their inbox. To configure the Email Base URL, follow these steps:
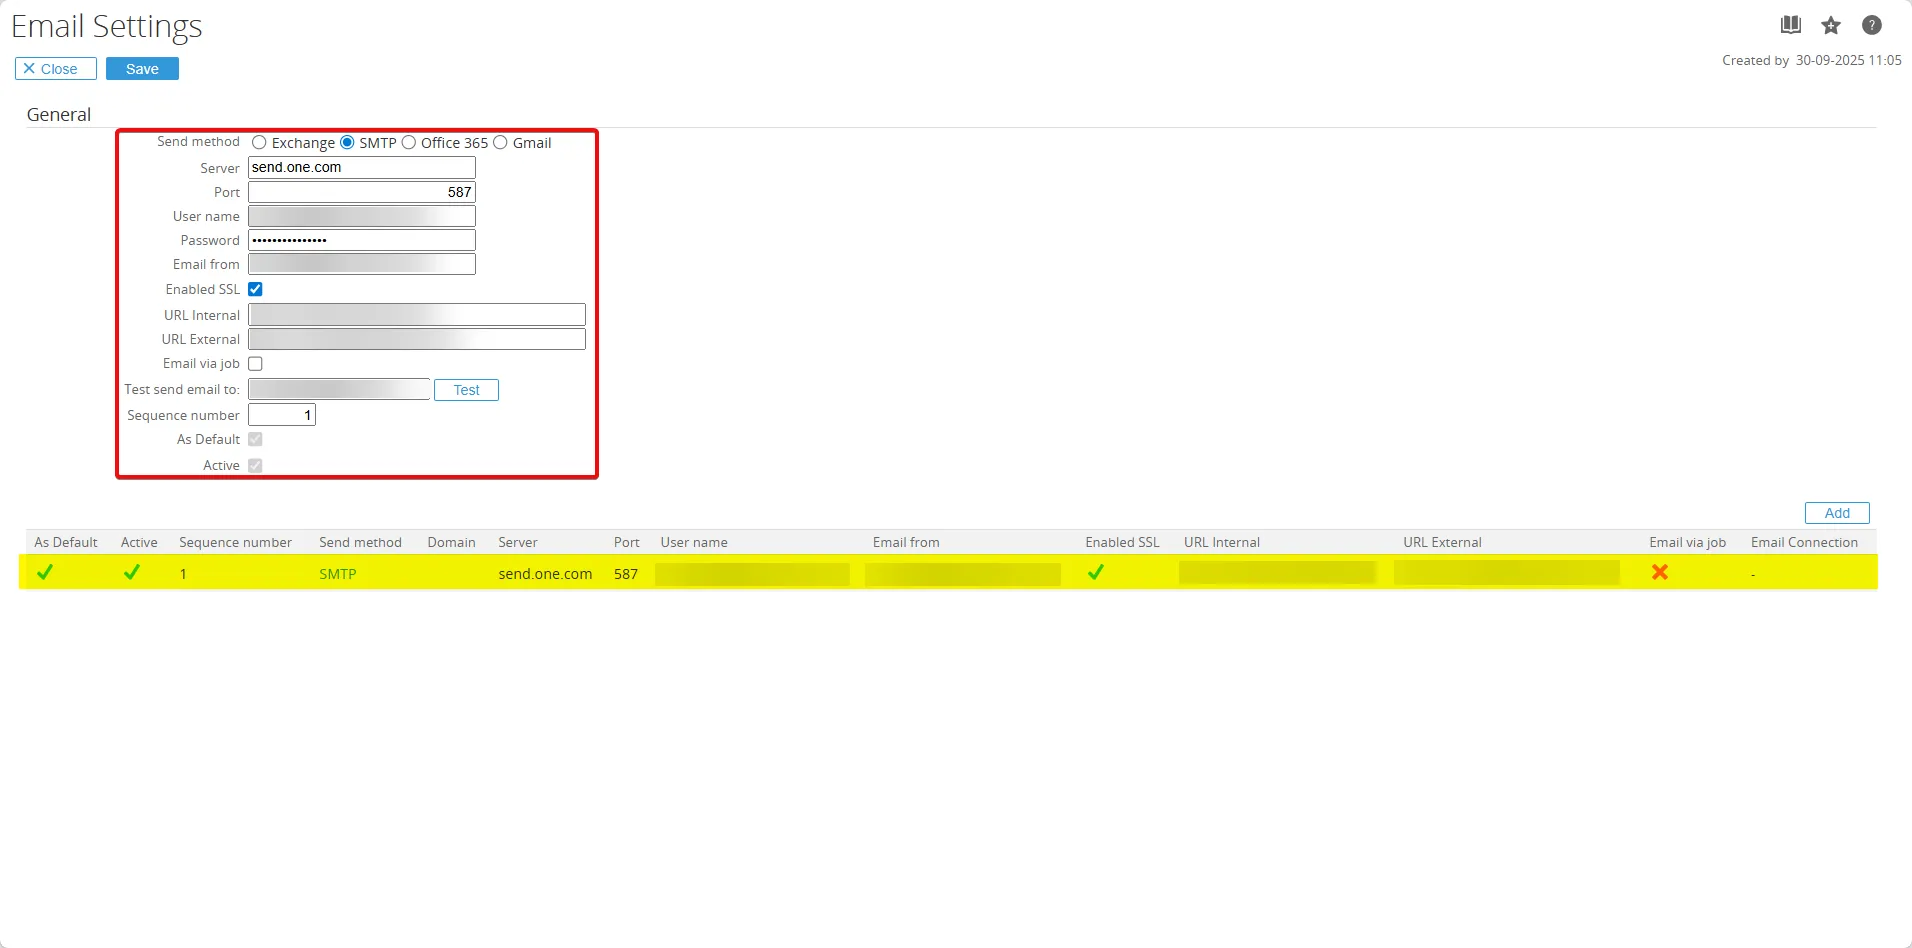
- To configure the Email Base URL, open the Email Settings page in the system setup by going to Kanban > Setup > General > Email.
- On this page, each row in the list at the bottom represents one email configuration record, identify and open the default active email setting.
- In the General section, you define how emails are sent (send method, server, port, user name, password, and email from address), as well as the internal and external base URLs.
- Enter a full URL in at least one of these fields:
- Email Base URL for Internal Network: used when recipients access the system from inside the internal network (for example, http://synergy.internal.company.com).
- Email Base URL for External Network: used when recipients access the system from outside the internal network (for example, https://synergy.company.com).
- Email Base URL for Internal Network: used when recipients access the system from inside the internal network (for example, http://synergy.internal.company.com).
-
The internal and external URLs ensure that the Request Detail link in the email points to the correct environment for each type of user.
- The Enabled SSL option and the server fields control how the system connects to the mail server, but do not change how the Request Detail link is constructed.
- After entering the appropriate URLs, save the changes so that all future email notifications use the updated Email Base URL configuration.
What users will receive in the email
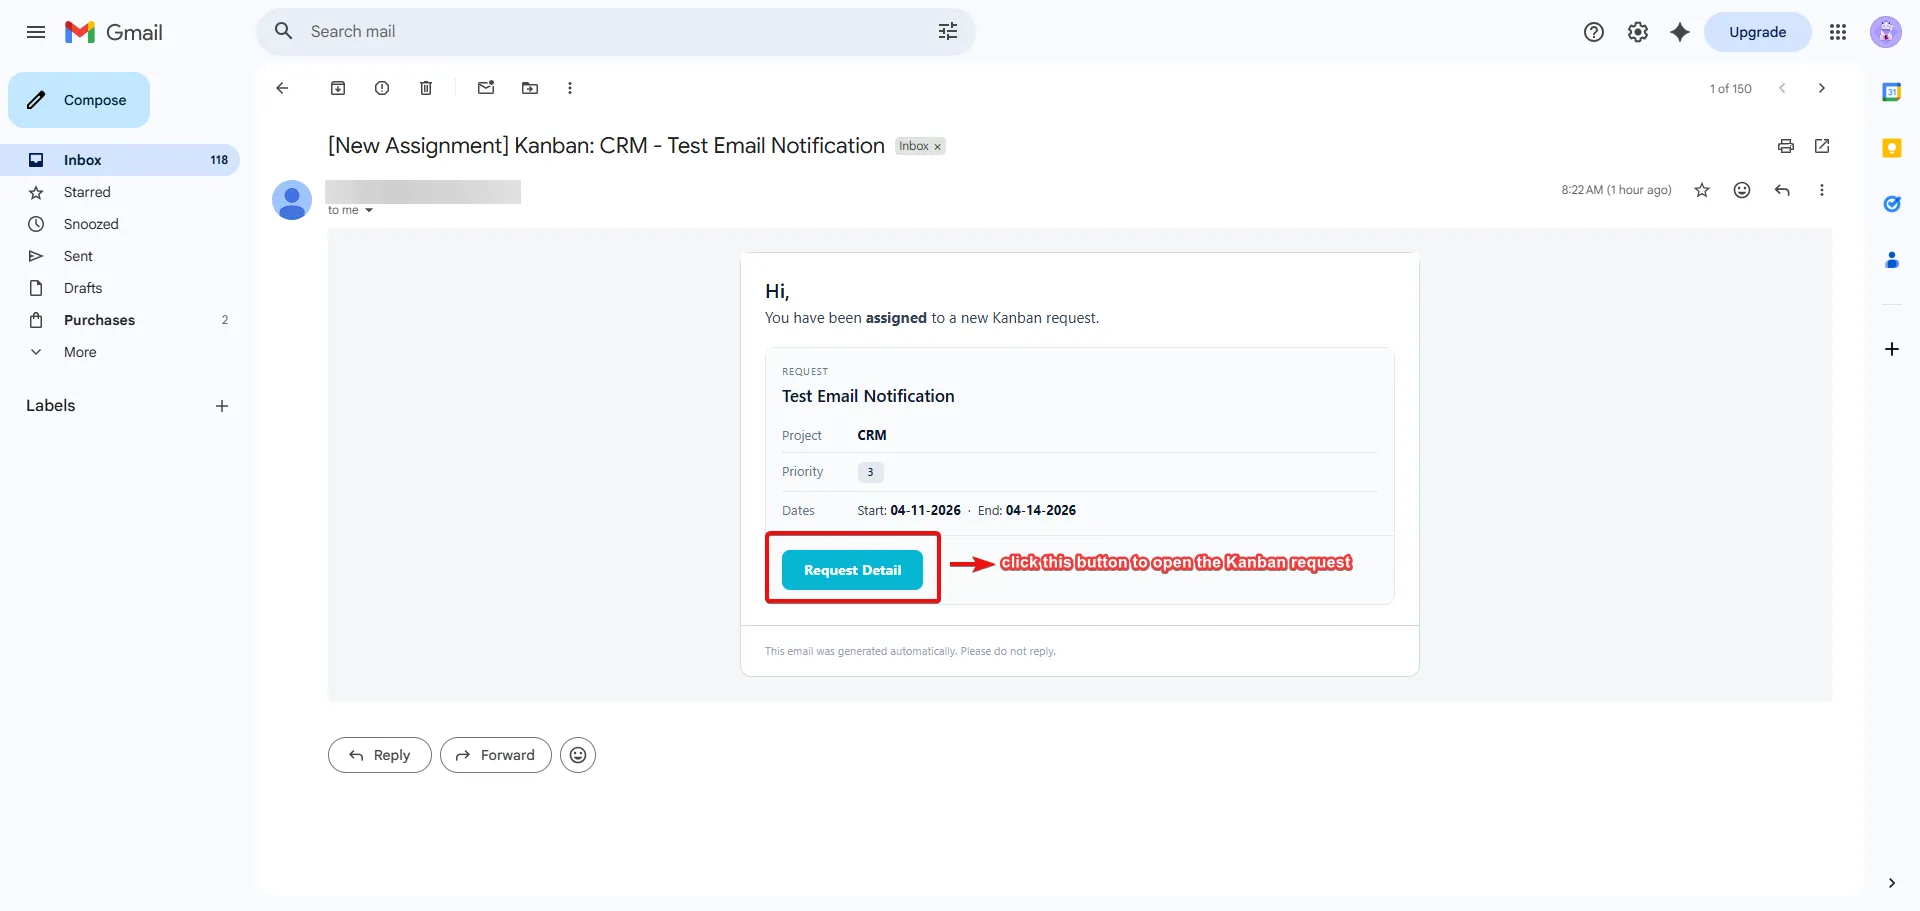
Section titled “What users will receive in the email”When a task is assigned to a person, they will receive an email notification with the following details:
- Request title.
- Project.
- Priority.
- Start and end dates.
- Request Detail button. (Click this button to open the Kanban request).
Email Job Scheduling
Section titled “Email Job Scheduling”The system uses a scheduled job to send email notifications for Kanban tasks. This job runs at regular interval via the Windows Task Scheduler to check for any new or updated tasks that require email notifications to be sent to the assigned users. To ensure that email notifications are sent in a timely manner, make sure that the email job is properly scheduled and running in your system. You can check the status of the email job in the system’s scheduled jobs or task scheduler section, and adjust the frequency of the job as needed to meet your notification requirements.
-
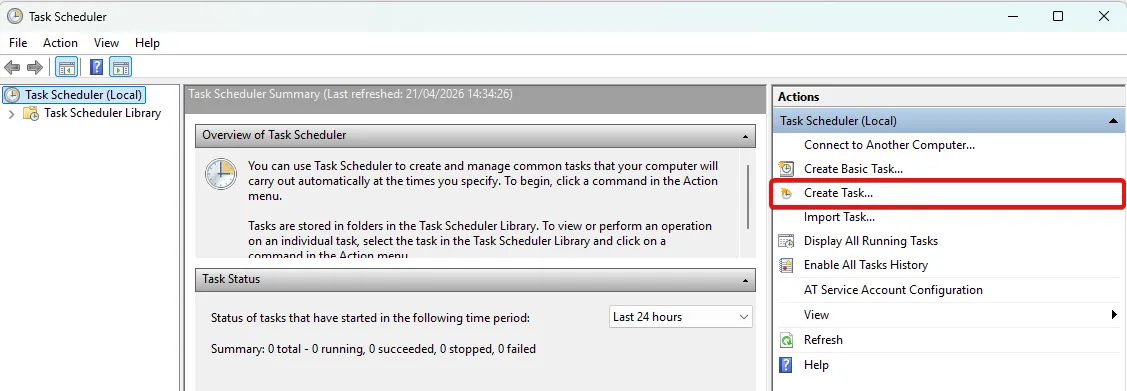
Click the Start Menu and type “Task Scheduler” in the search bar.
-
Click the Create Task button to create a new scheduled task.
-
Fill in the required fields to create a new task including:
-
General section:
- Name: Enter a name for the task (e.g., “GLMSys Kanban Email Reminder”).
- Security options: Choose “Run whether user is logged on or not” and check “Run with highest privileges.”
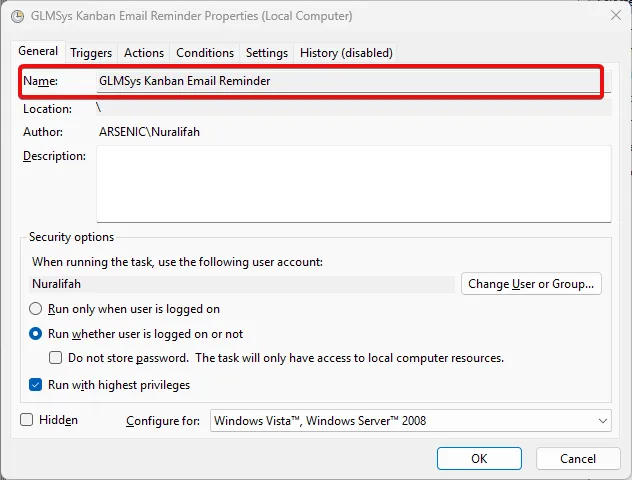
-
Triggers section:
- Click “New” to create a new trigger.
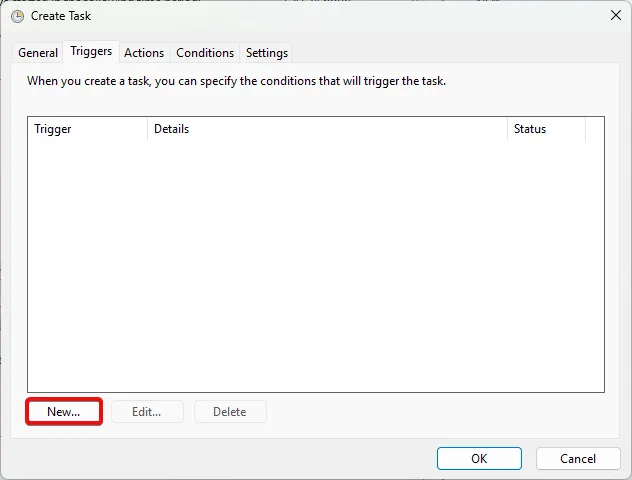
- Set the trigger to Daily, specify the start time and recurrence (Recur every 1 day), and enable Synchronize across time zones. In Advanced settings, select Repeat task every 8 hours for a duration of 1 day, check Enabled, and click OK.
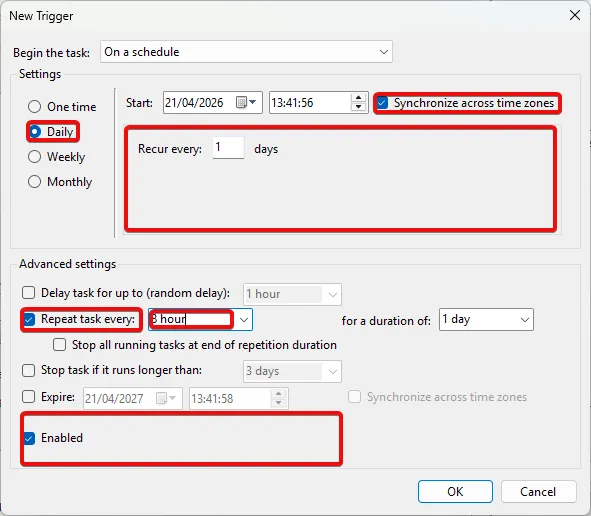
- Click “New” to create a new trigger.
-
Actions section:
- Click “New” to create a new action.
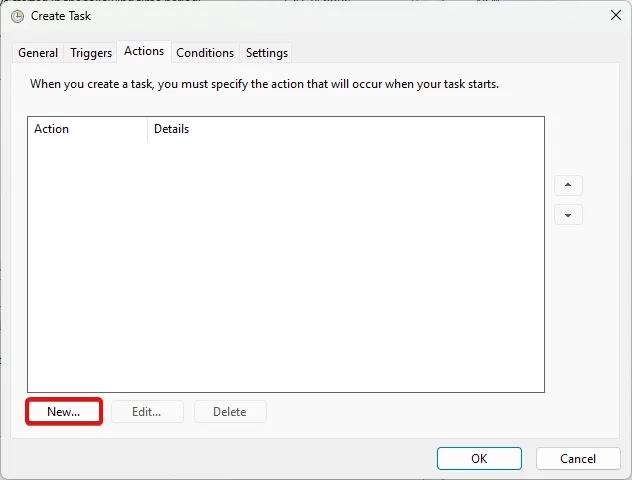
- Click “New” to create a new action.
-
Set Action to Start a program. In Program/script, enter:
C:\Exact Synergy Enterprise 504\bin\Exact.Process.exe -
In Add arguments (optional), enter:
/DBCONFIG:Synergy_504 /ASSEMBLY:GLMSys.Kanban.Jobs /CLASS:EmailReminder /RuleName:"001 SendUnreadReminder"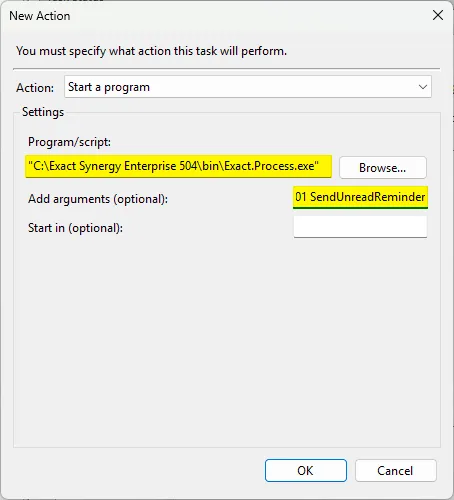
-
Conditions section:
- In the Power section. Check “Start the task only if the computer is on AC power” and check “Stop if the computer switches to battery power.”
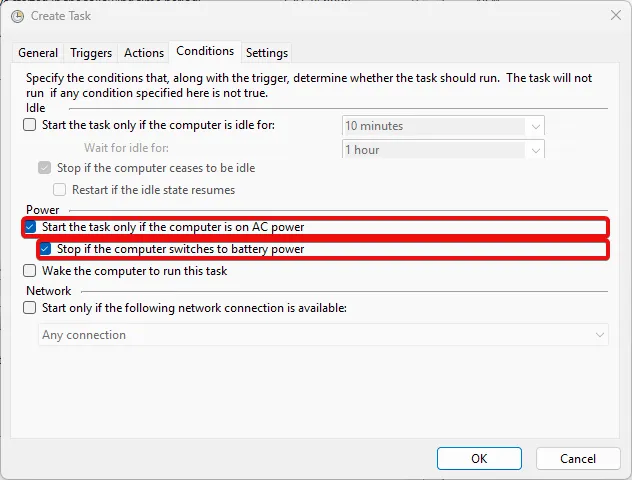
- In the Power section. Check “Start the task only if the computer is on AC power” and check “Stop if the computer switches to battery power.”
-
Settings section
- Check “Run task as soon as possible after a scheduled start is missed” then click OK to save the task.
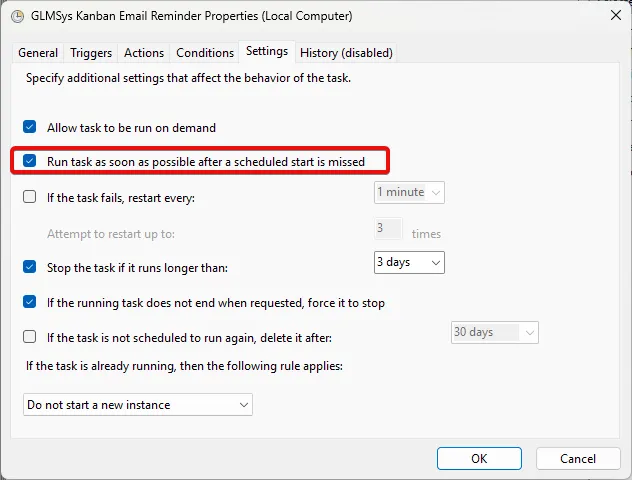
- Check “Run task as soon as possible after a scheduled start is missed” then click OK to save the task.
-
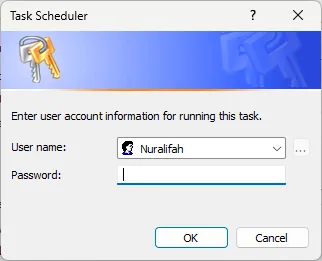
If the account information is appearing when you click OK, enter the username and password for an account that has permission to run the task, then click OK to confirm. The task will now be scheduled to run according to the triggers you set up.
-
If the task is created successfully, you will see it in the Task Scheduler Library. You can right-click on the task and select “Run” to test it immediately, or wait for the scheduled time for it to run automatically. Make sure that your system is configured to allow the task to run and that the email settings in your Kanban application are correctly set up to send notifications.
Linking Kanban Task to Multiple Projects (Advanced Options)
Section titled “Linking Kanban Task to Multiple Projects (Advanced Options)”This section refers to the configuration of additional or advanced options that extend the standard functionality of an application. This section allows users to customize workflows, add extra data fields, or adjust system behaviour according to specific business requirements.
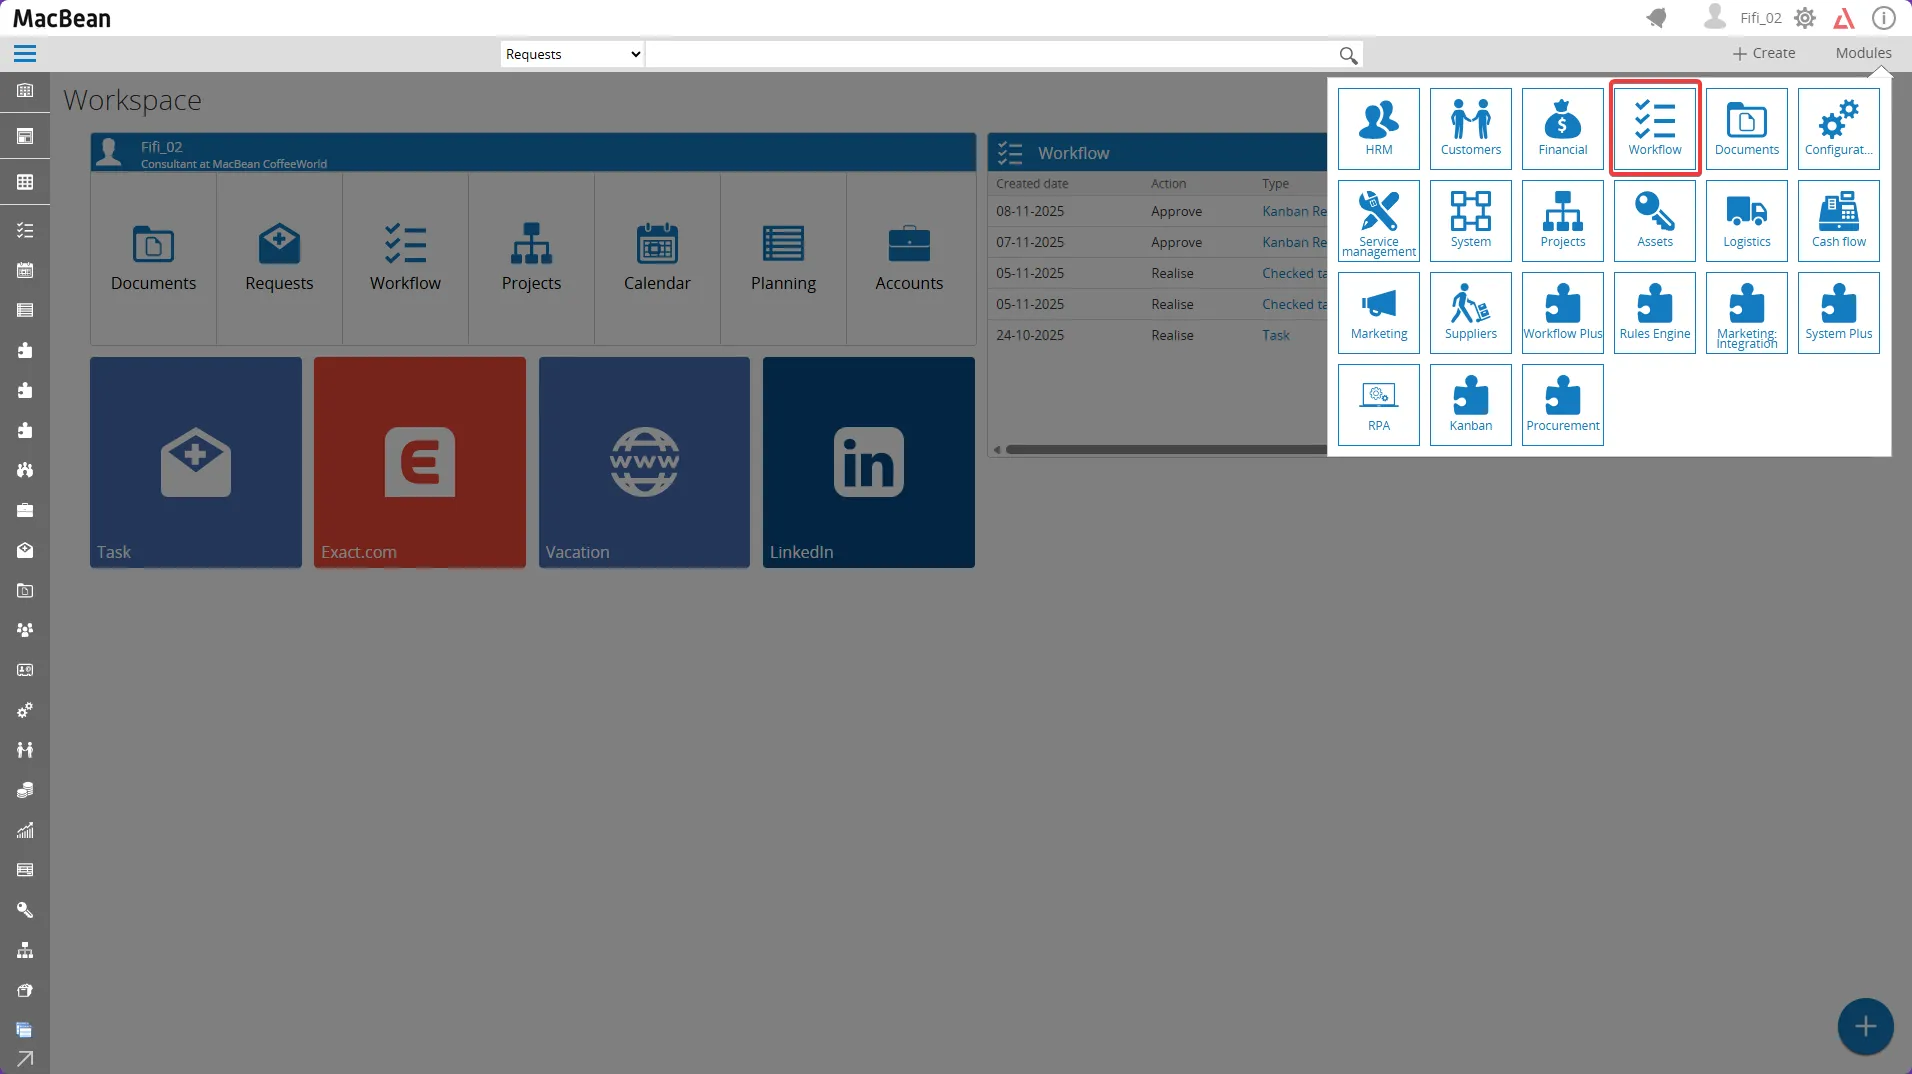
Expand task versatility with advanced configuration, allowing tasks to link to multiple projects and adapt to unique business requirements:- Go to Modules > Workflow.
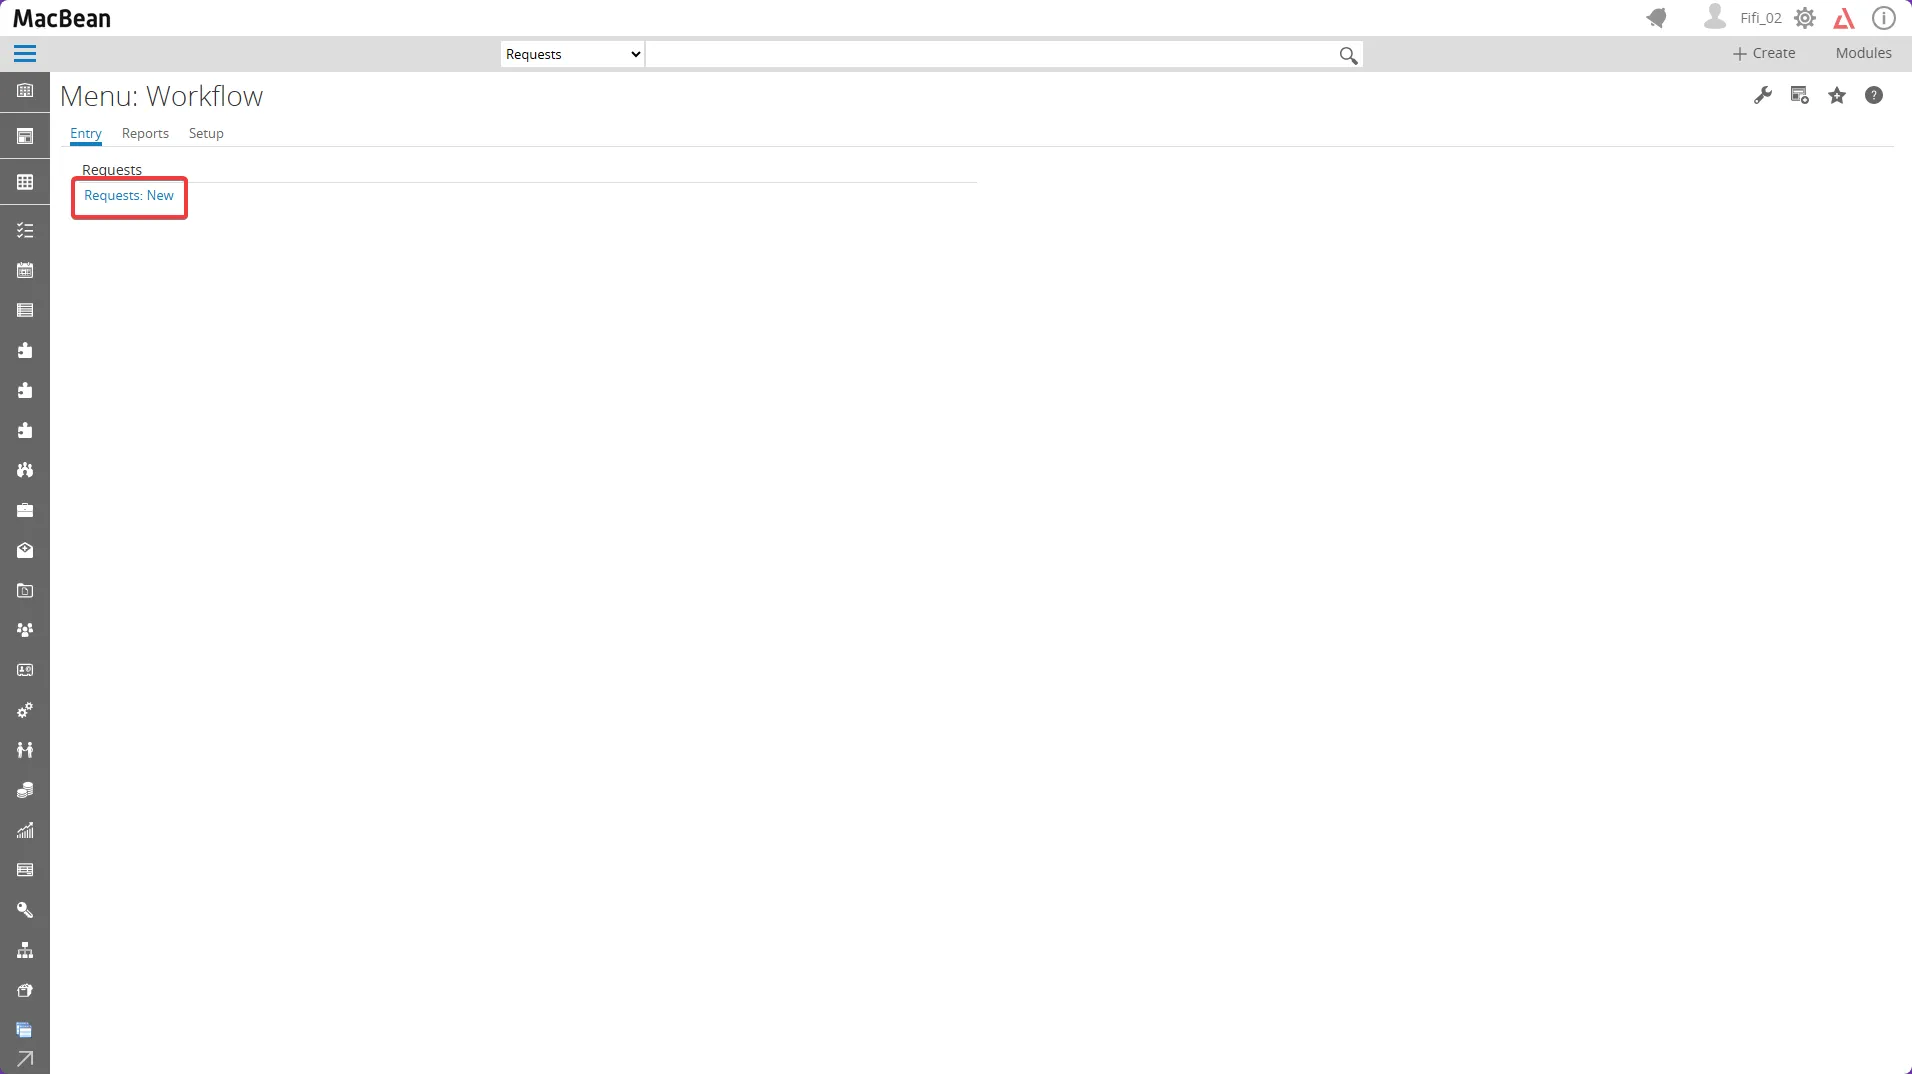
- Select Entry > Requests > Requests: New.
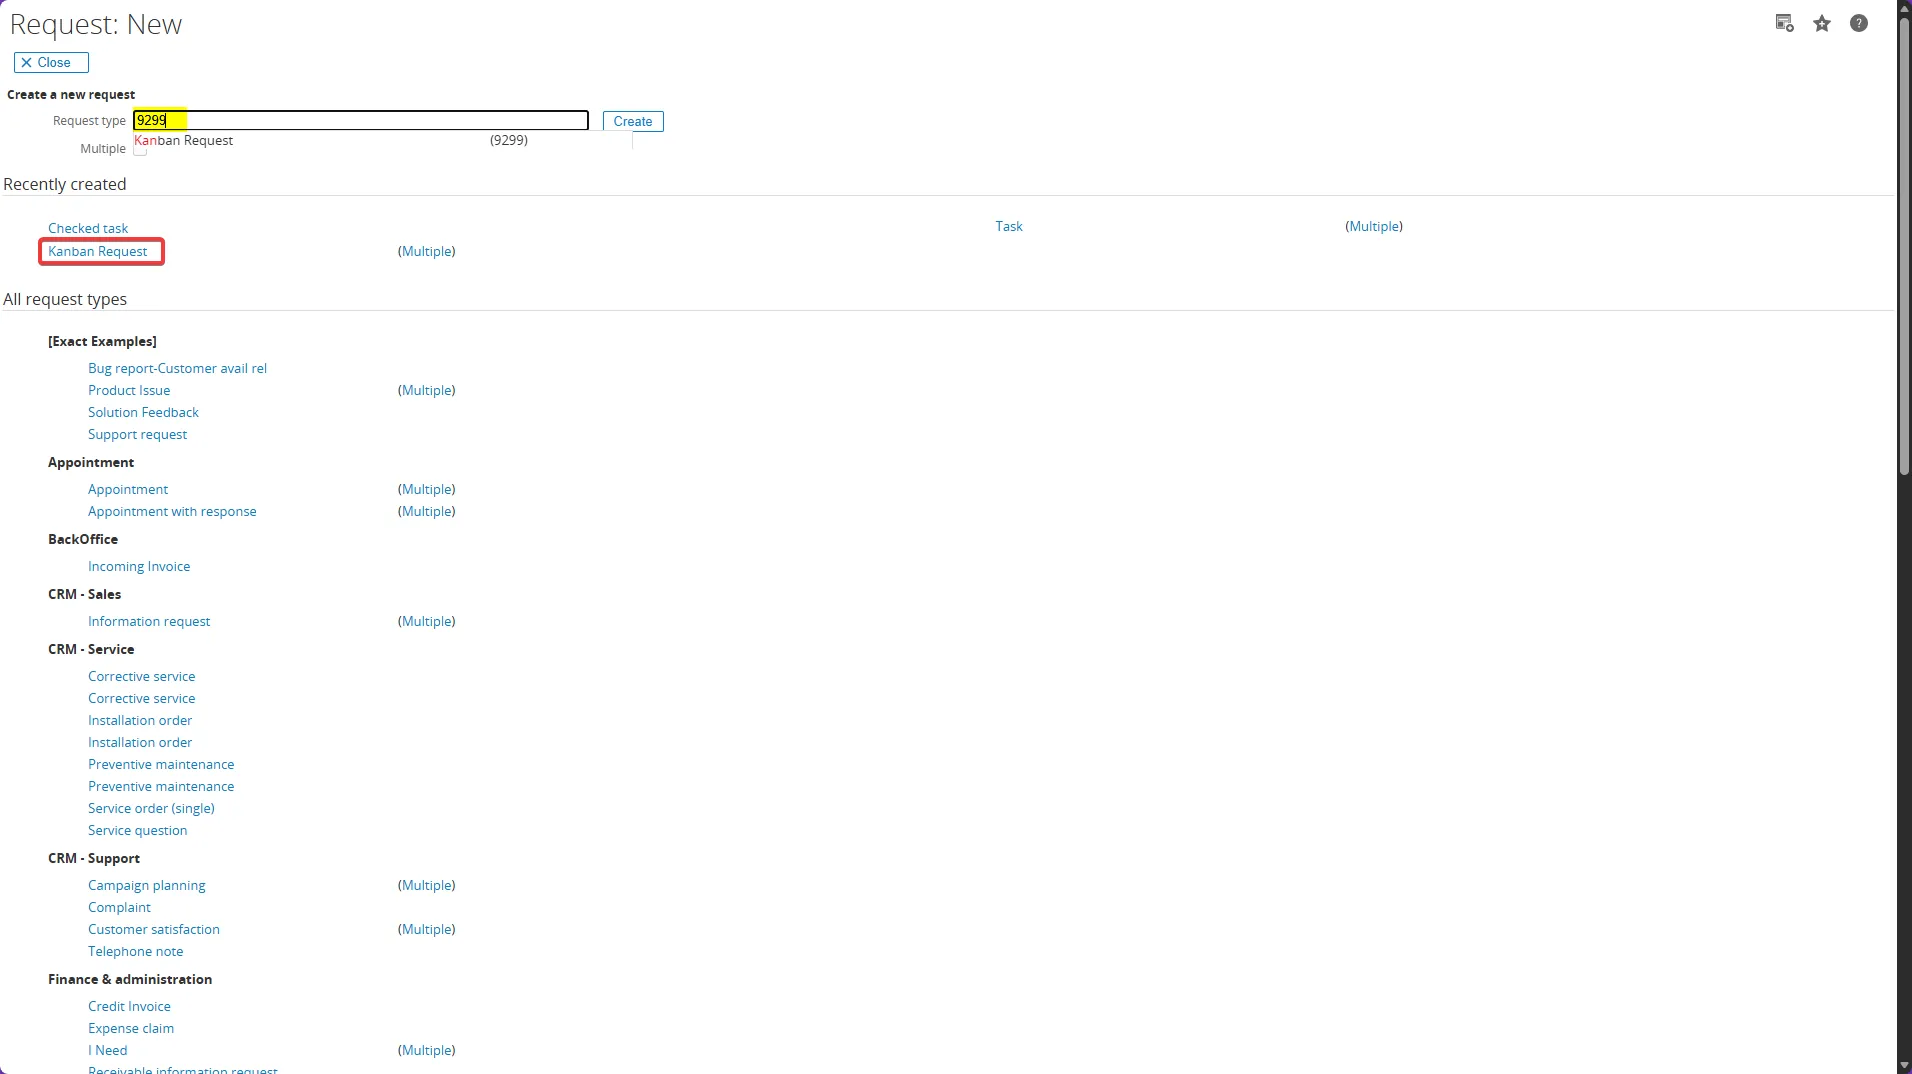
- In the Request type field, type “Kanban” or the Kanban ID (‘9299’), then select Kanban.
- At the top-right, click the “ALT I - Definition” icon to access the free field configuration.
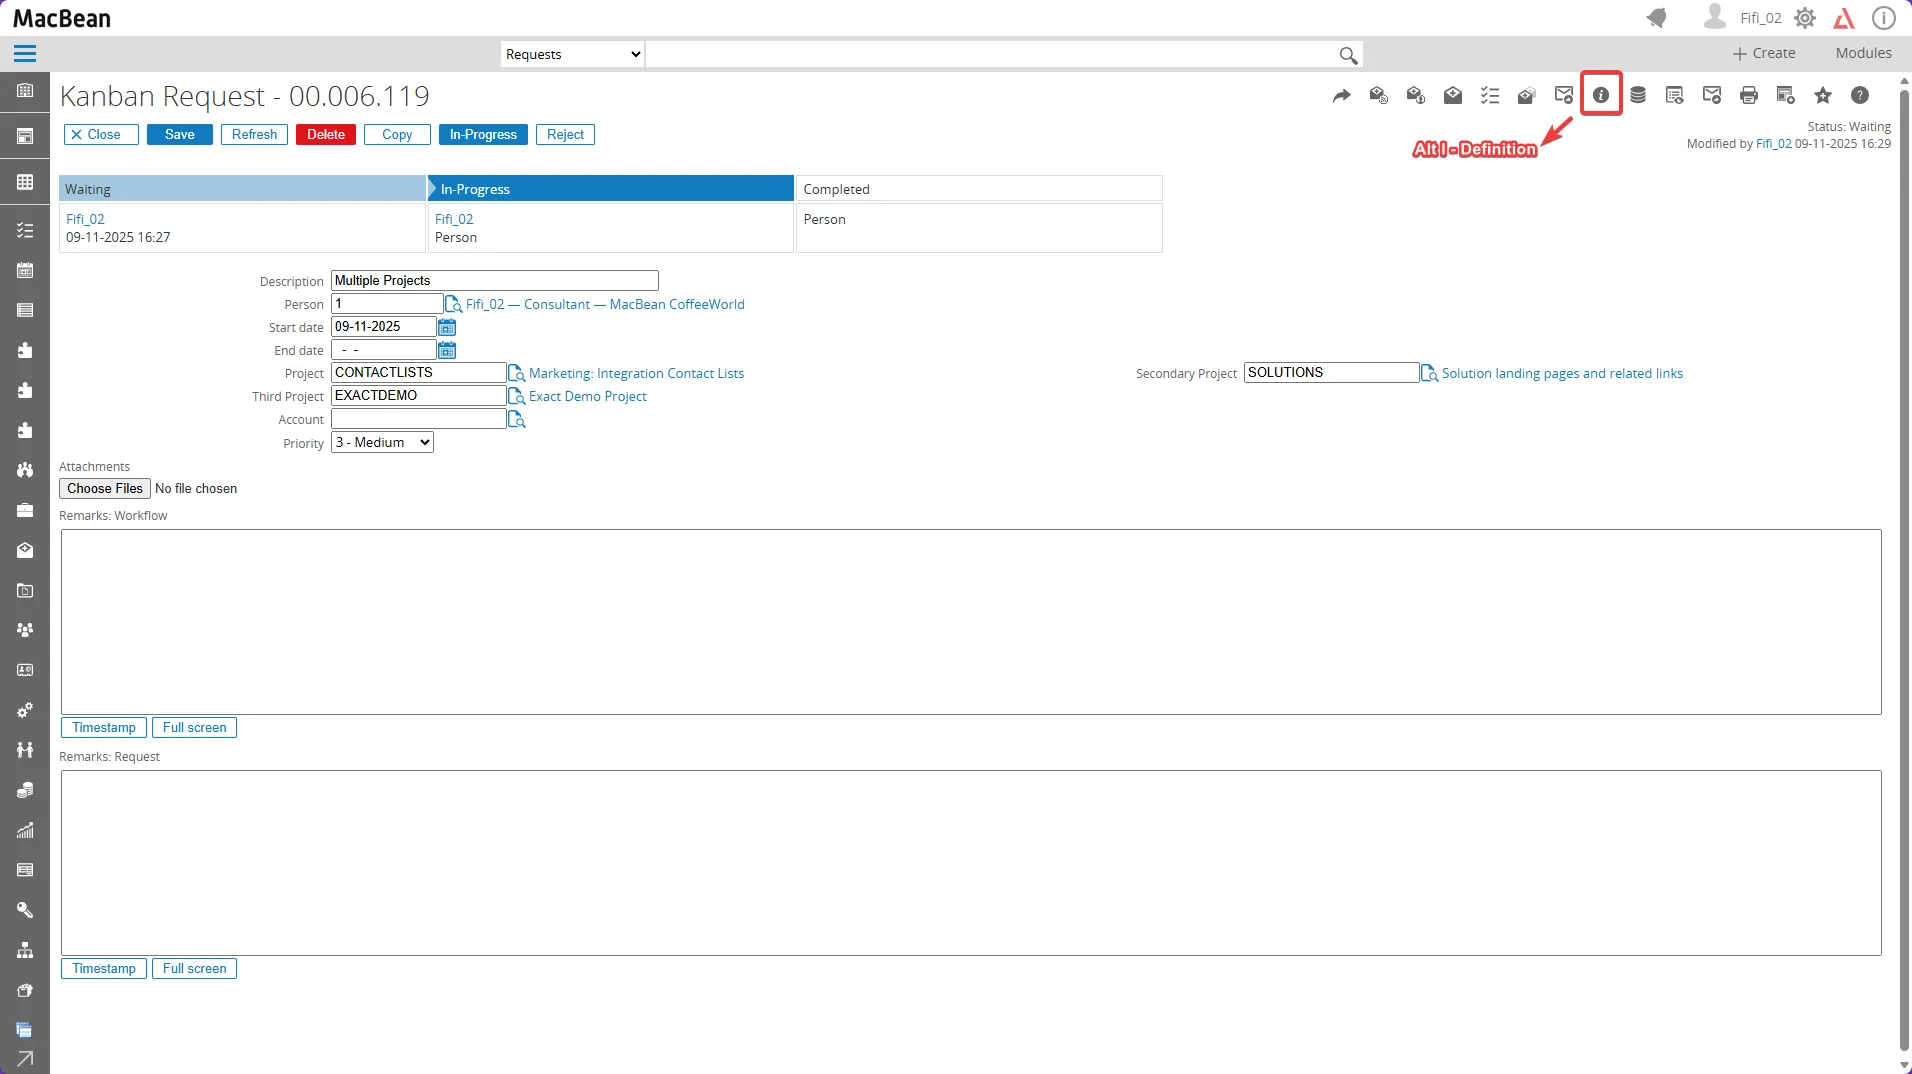
- Click the “Add” button to create a new free field.
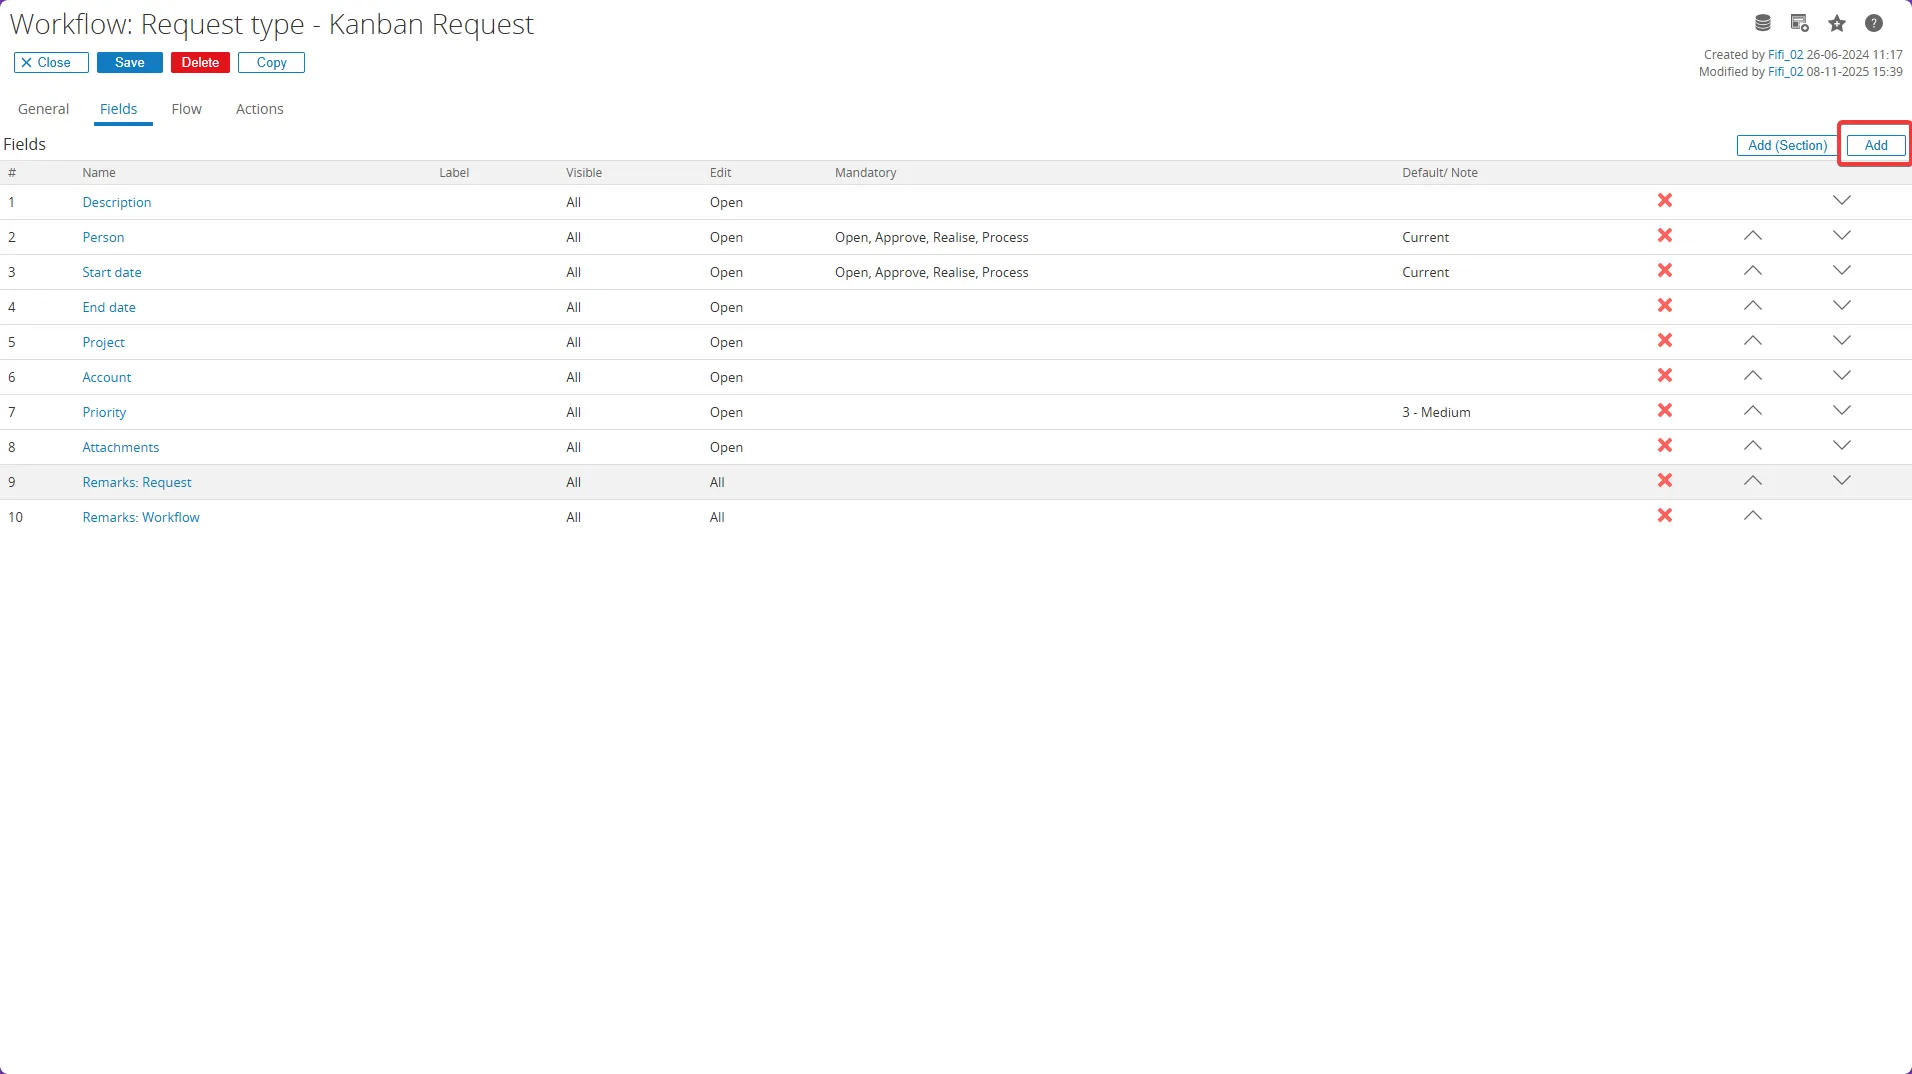
- In the Name field, type “Free” to display available free text field types. You can select any free text number, as long as the type is “Free text.”
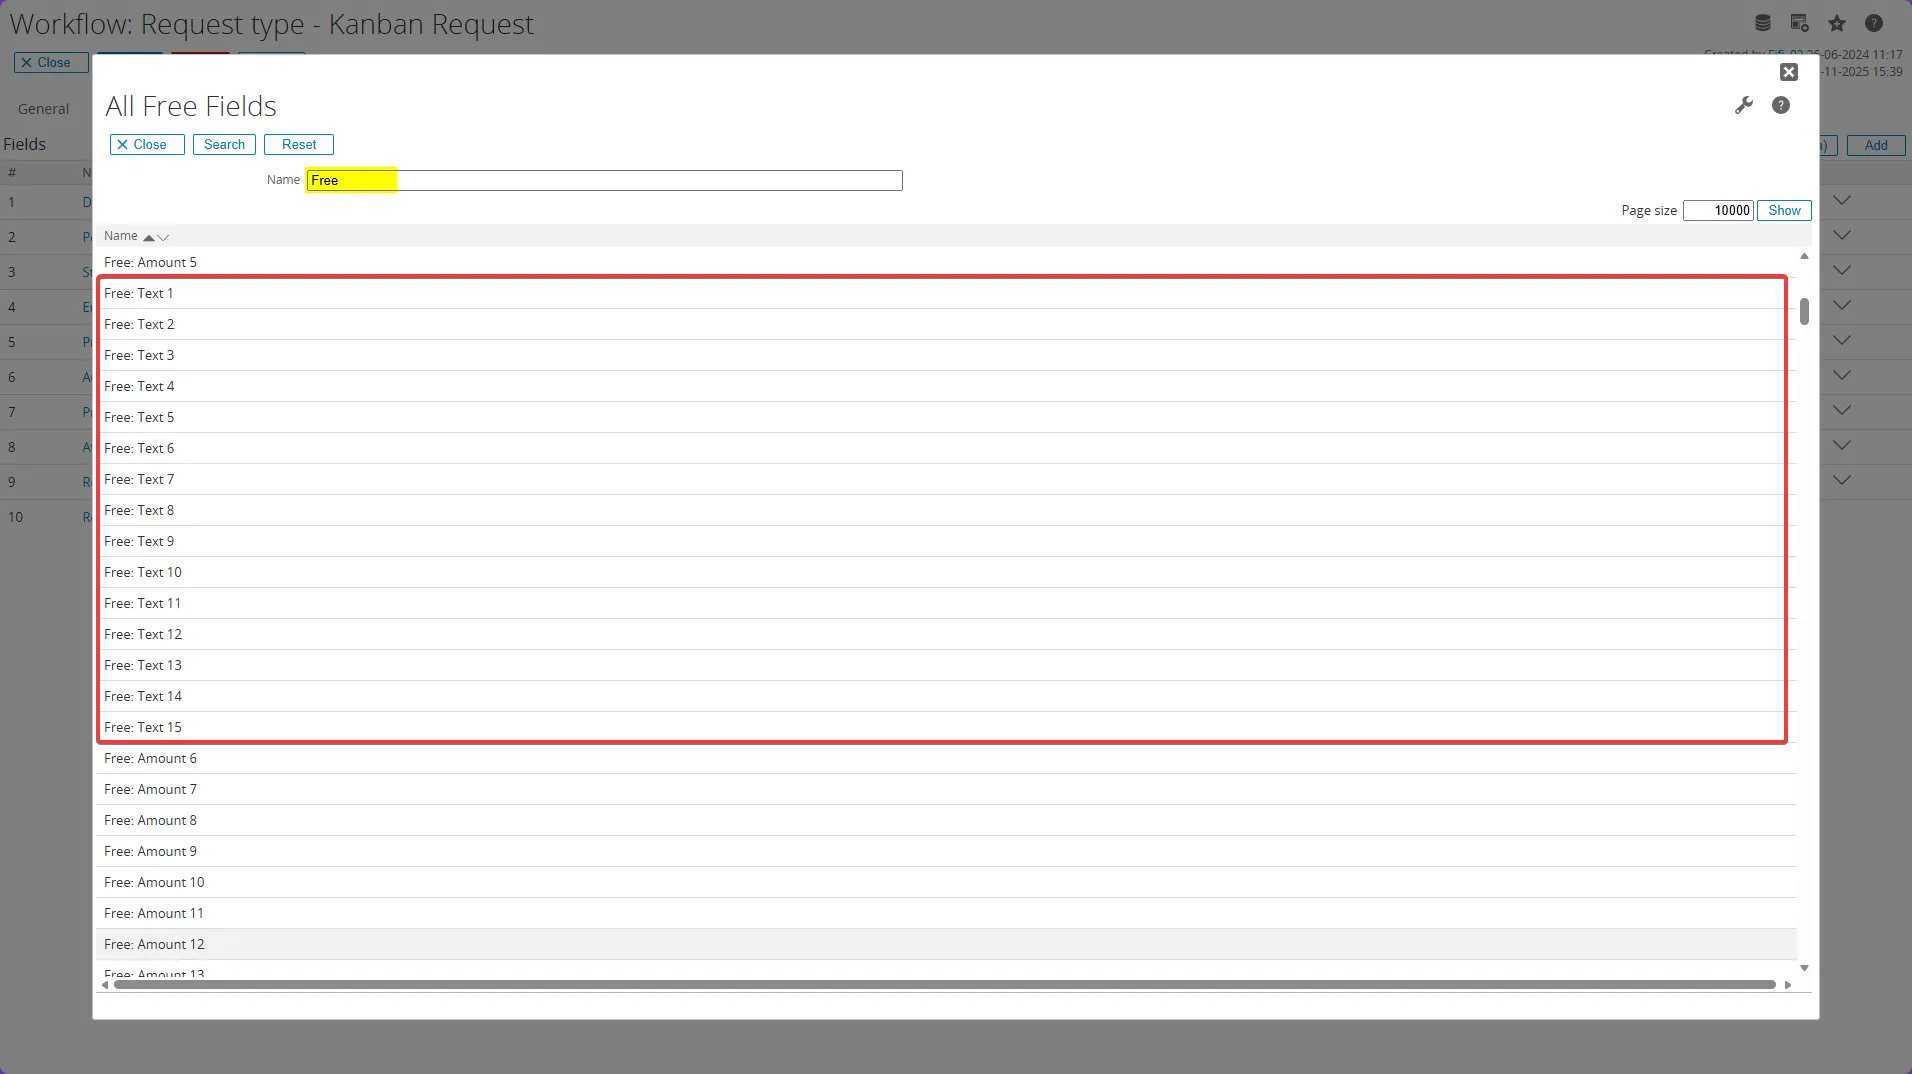
- For example, if you select “Free: Text 2” scroll down to the Selection section, open the dropdown, and choose “Projects” (since the free text field is intended for project names).
Click Save button to save the field configuration.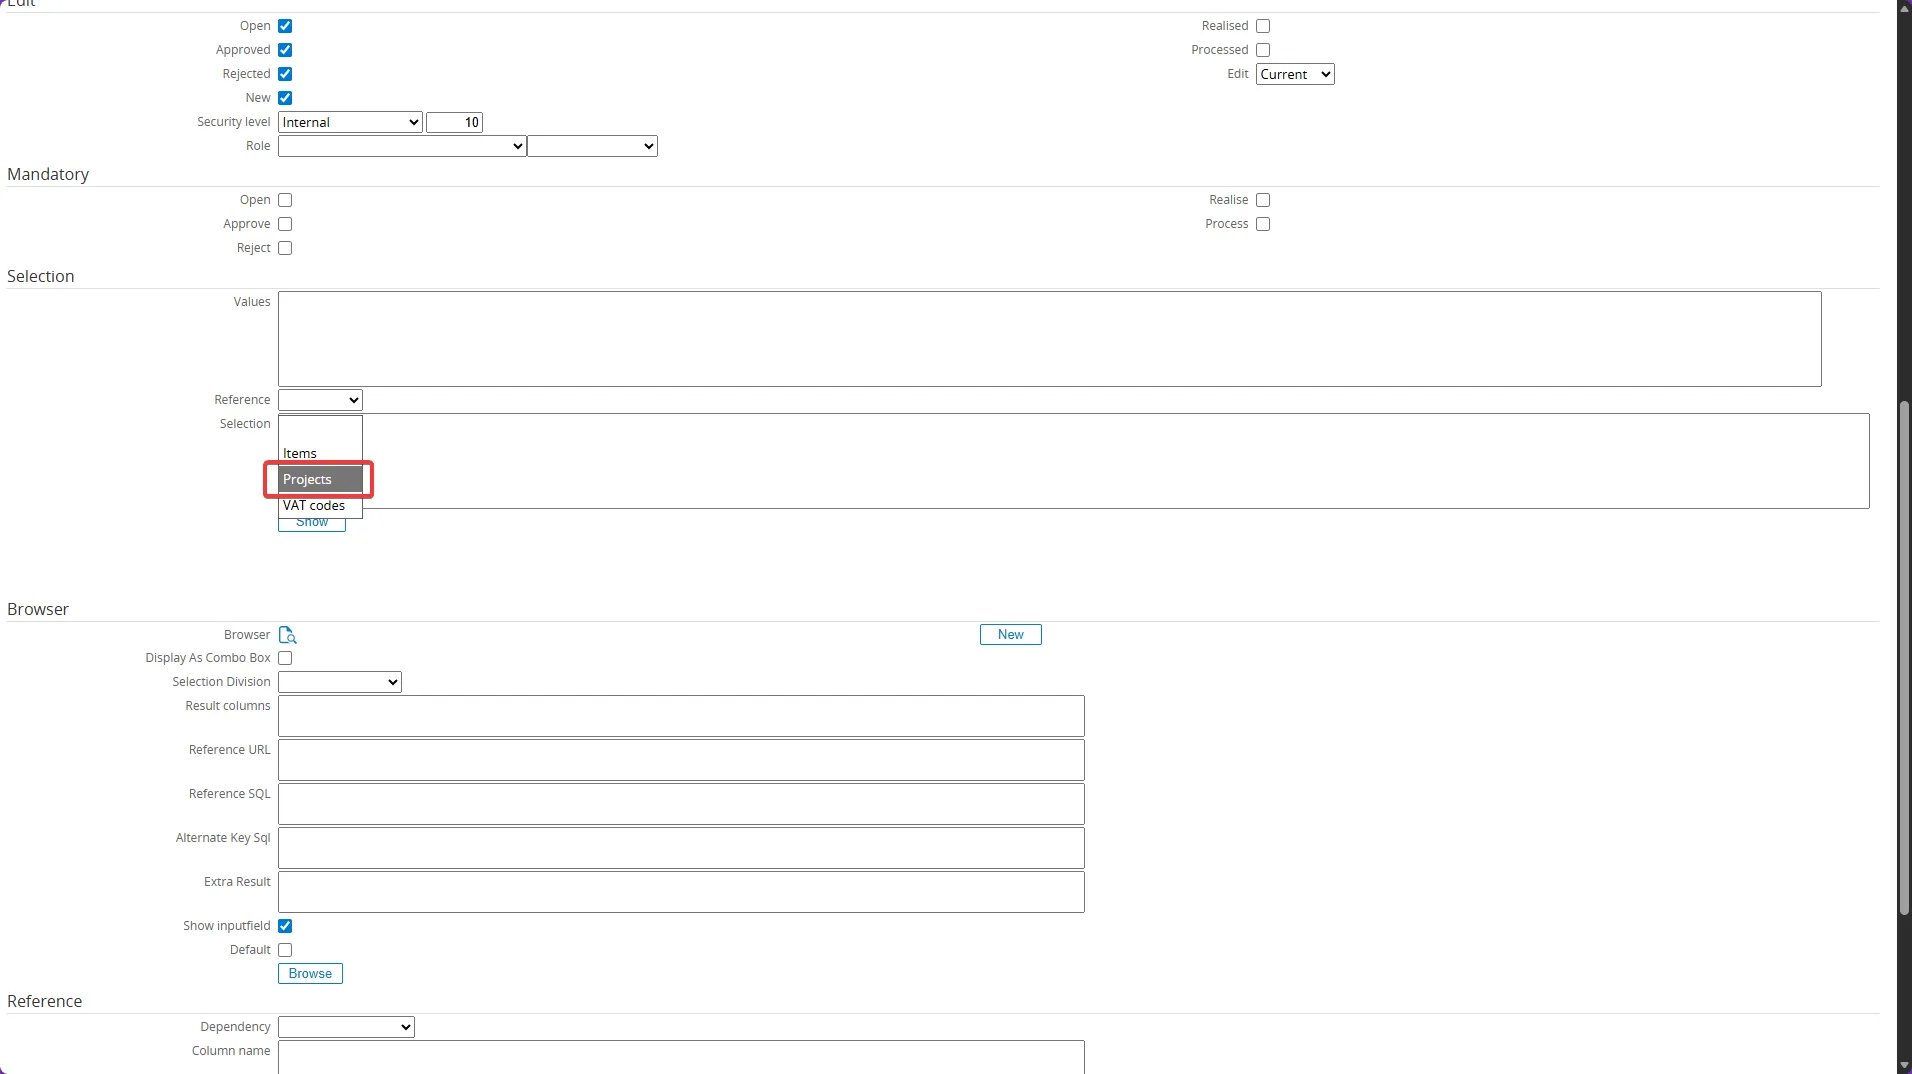
- The new free field is added and will appear at the bottom of the list. The label must be empty.
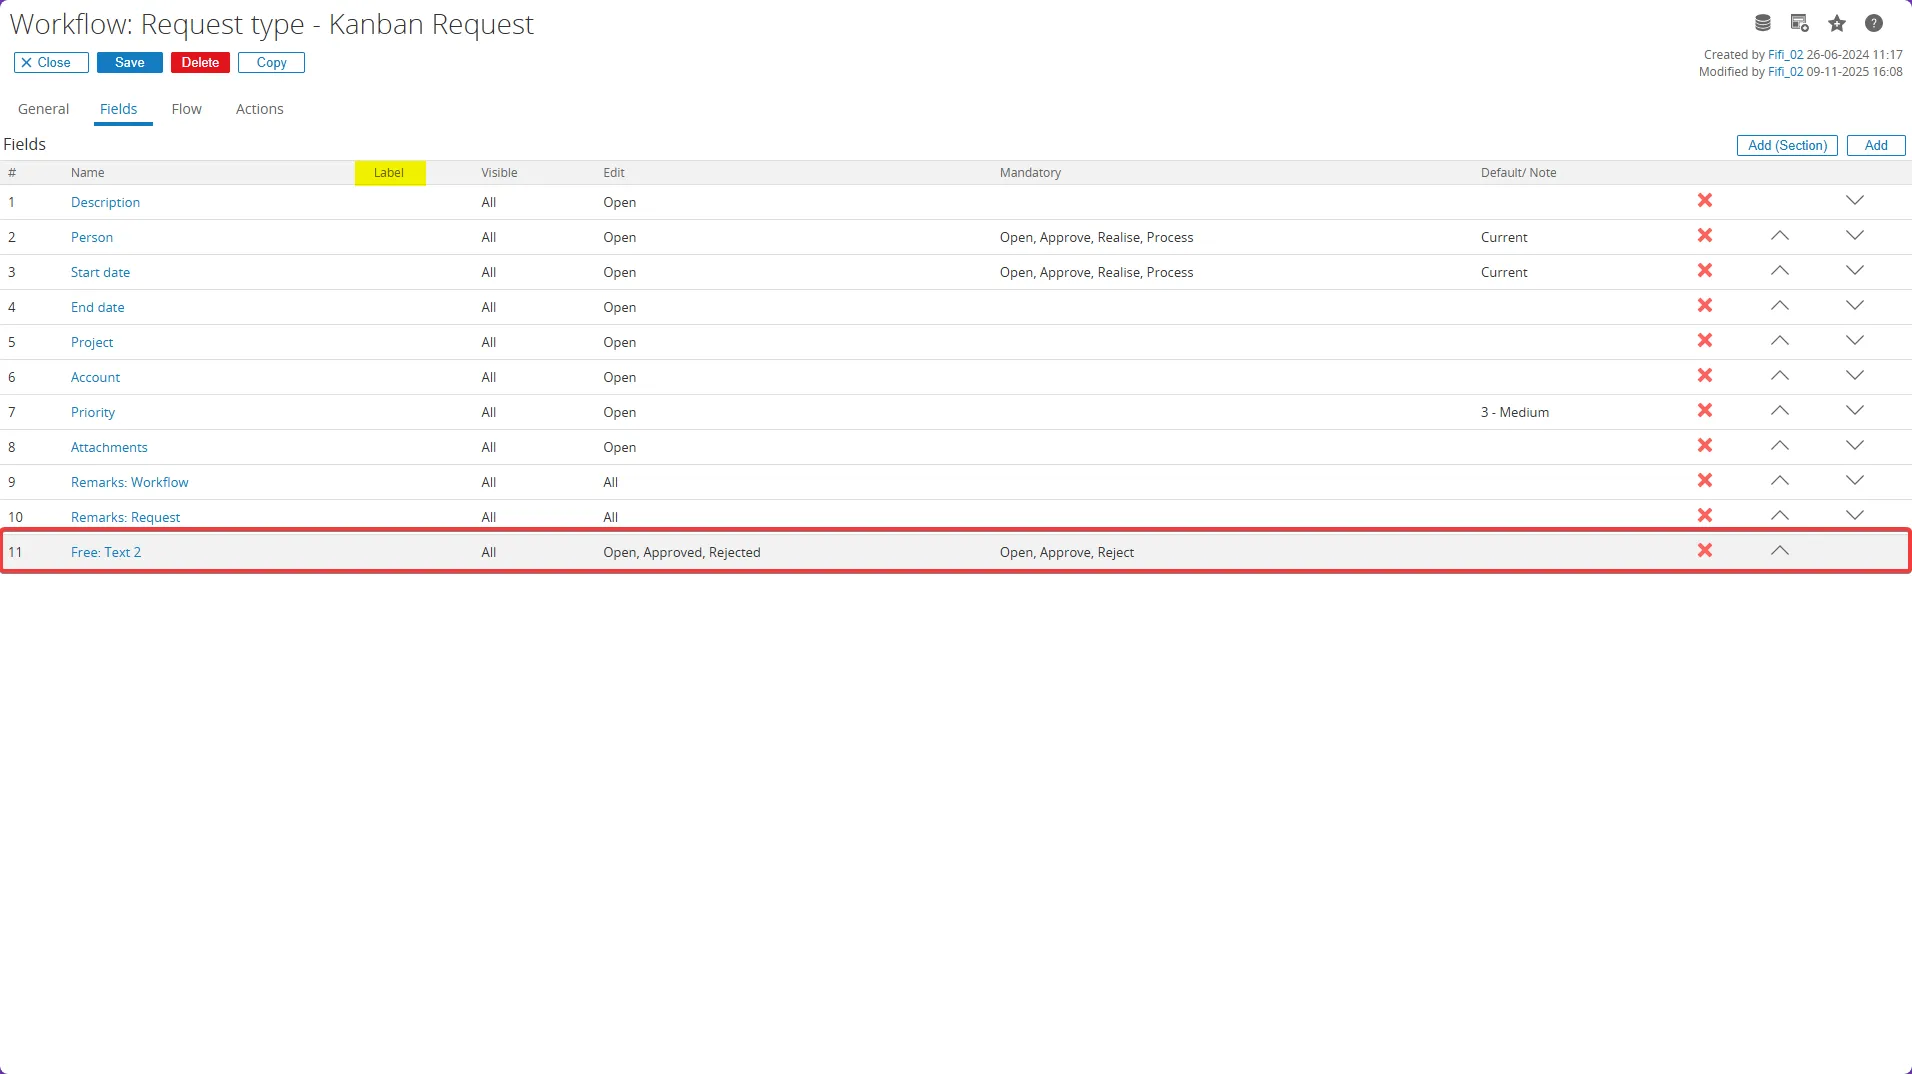
- To rename the field label and translate it, click the button Edit the label for this field icon. Mark each field as Mandatory by selecting all available checkboxes.
Click Save button.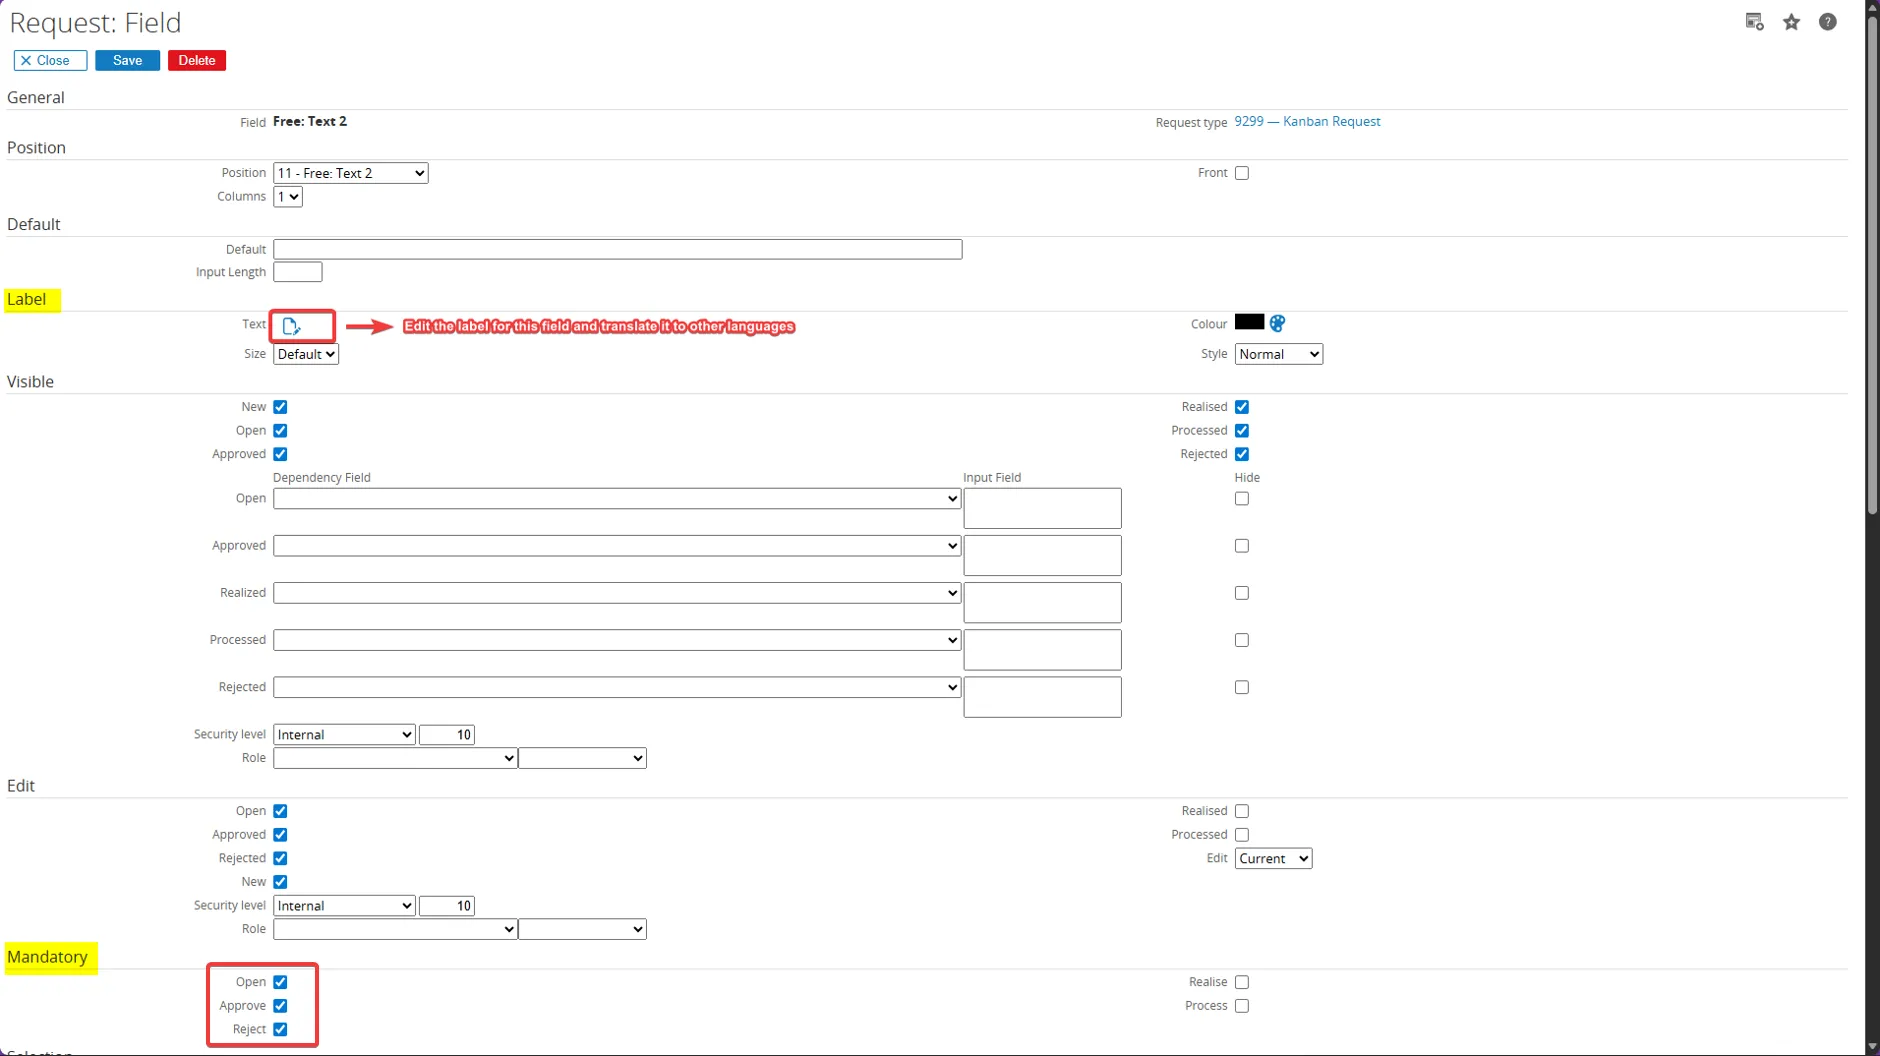
- After this page appear, enter the desired name for your free text field such as “Secondary Project” for a second project field. It’s best to use a sequential naming convention for clarity.
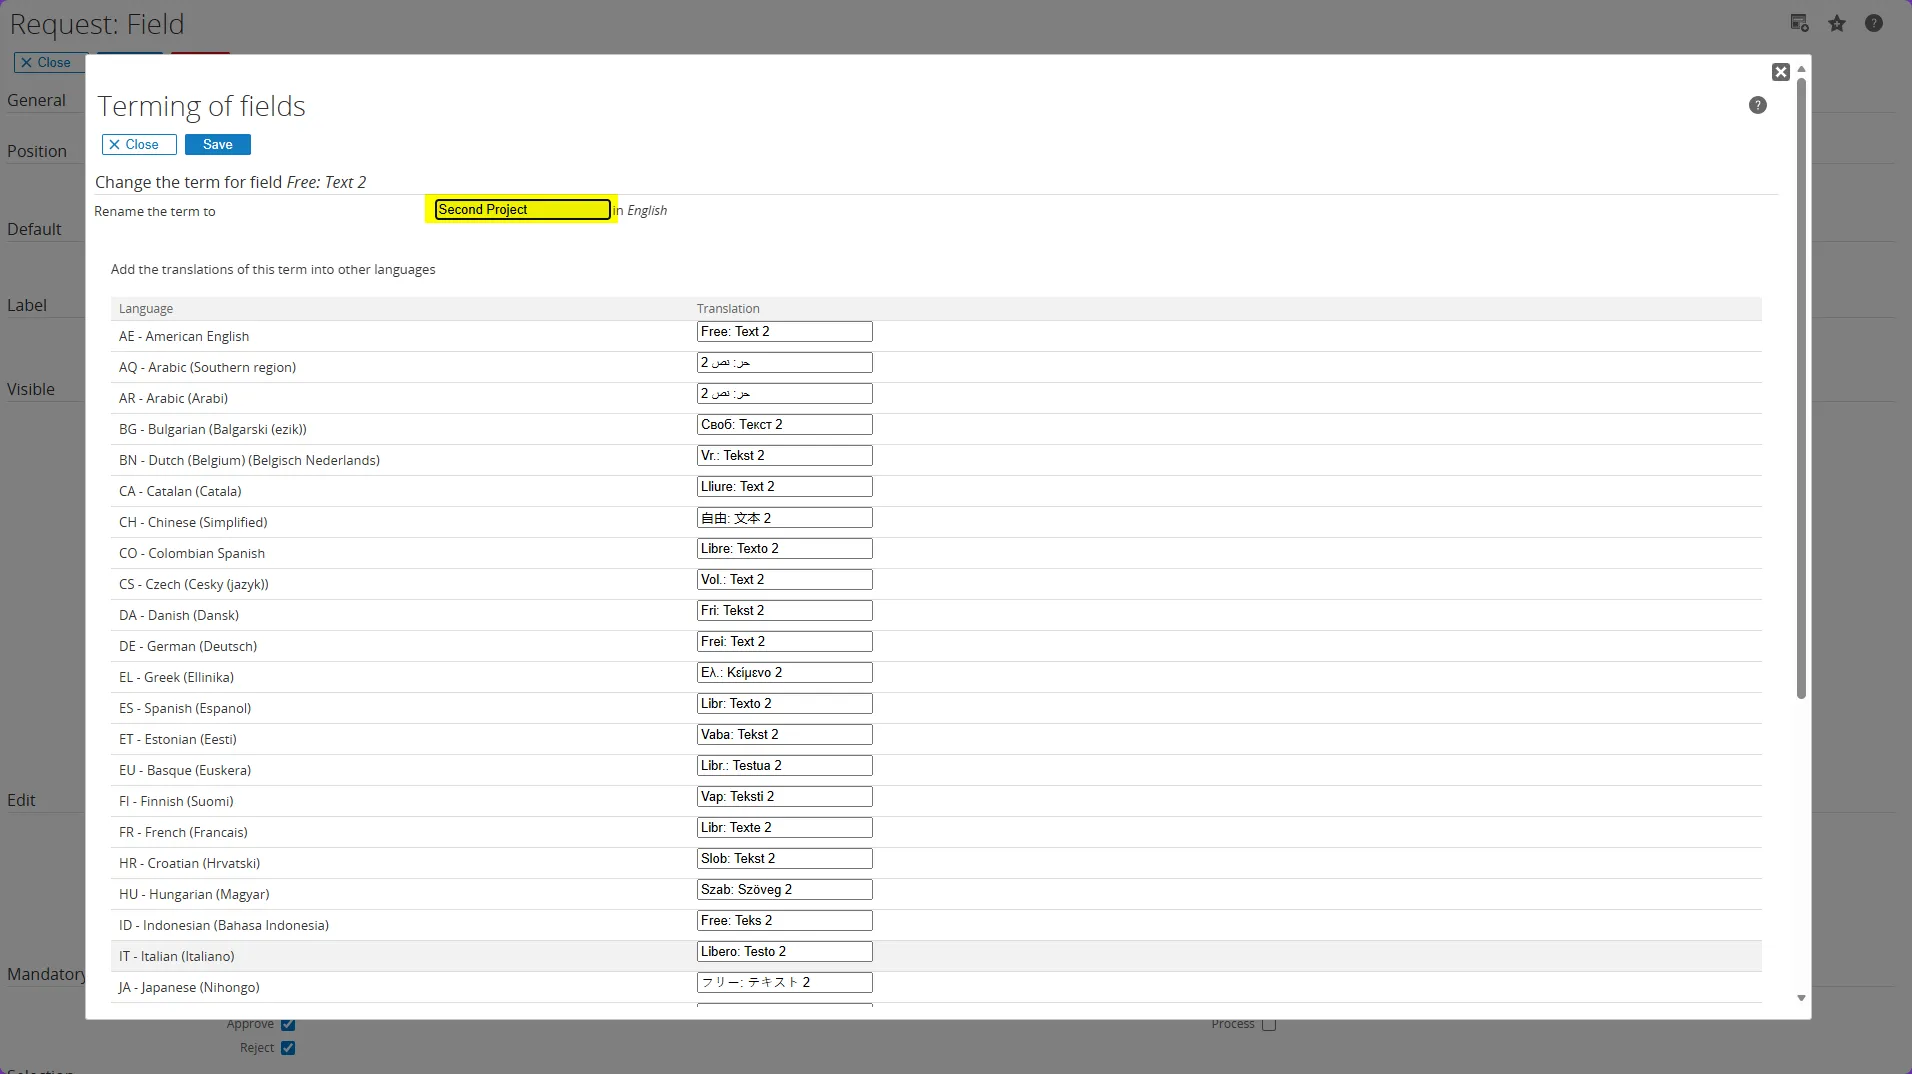
- The label now updated to Secondary Project
- After you update the label and translation (if needed), click Save to save your changes.
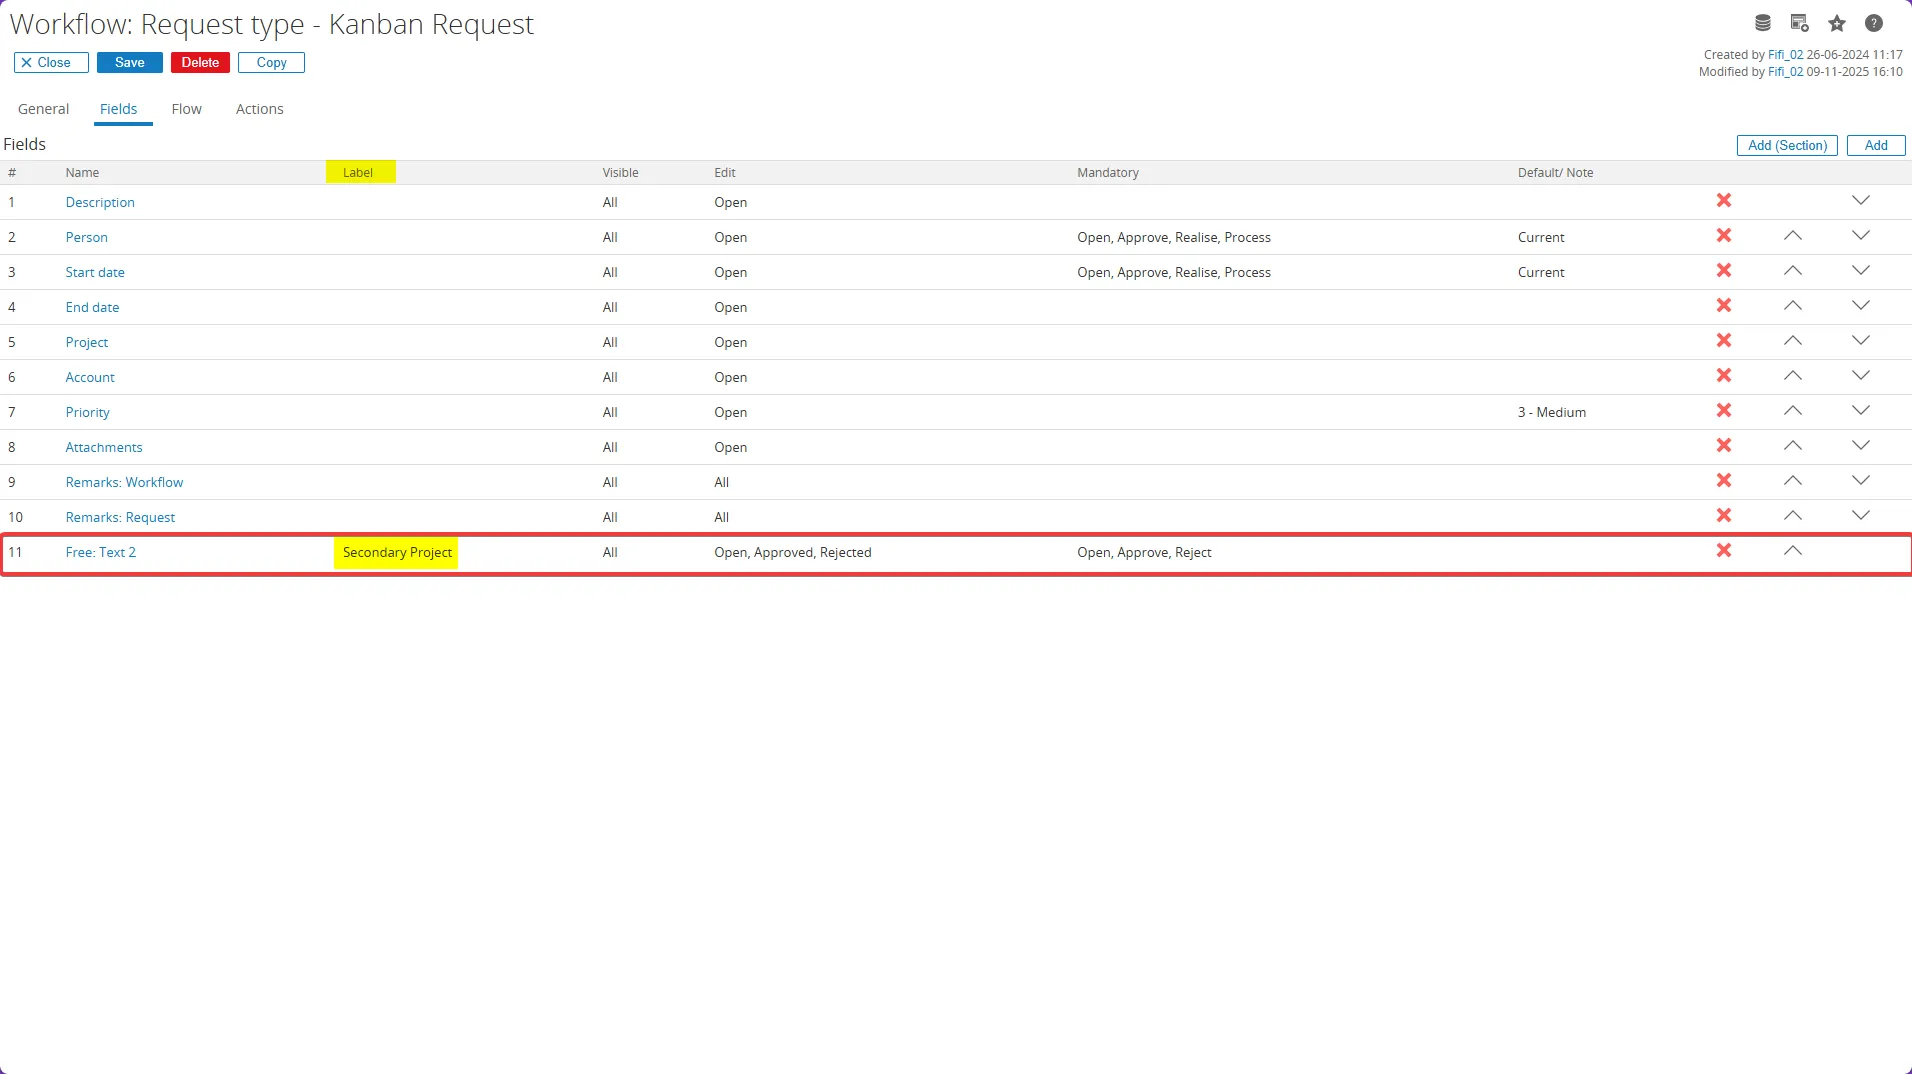
- Repeat these steps to add additional project fields (e.g., “Third Project”) as needed.
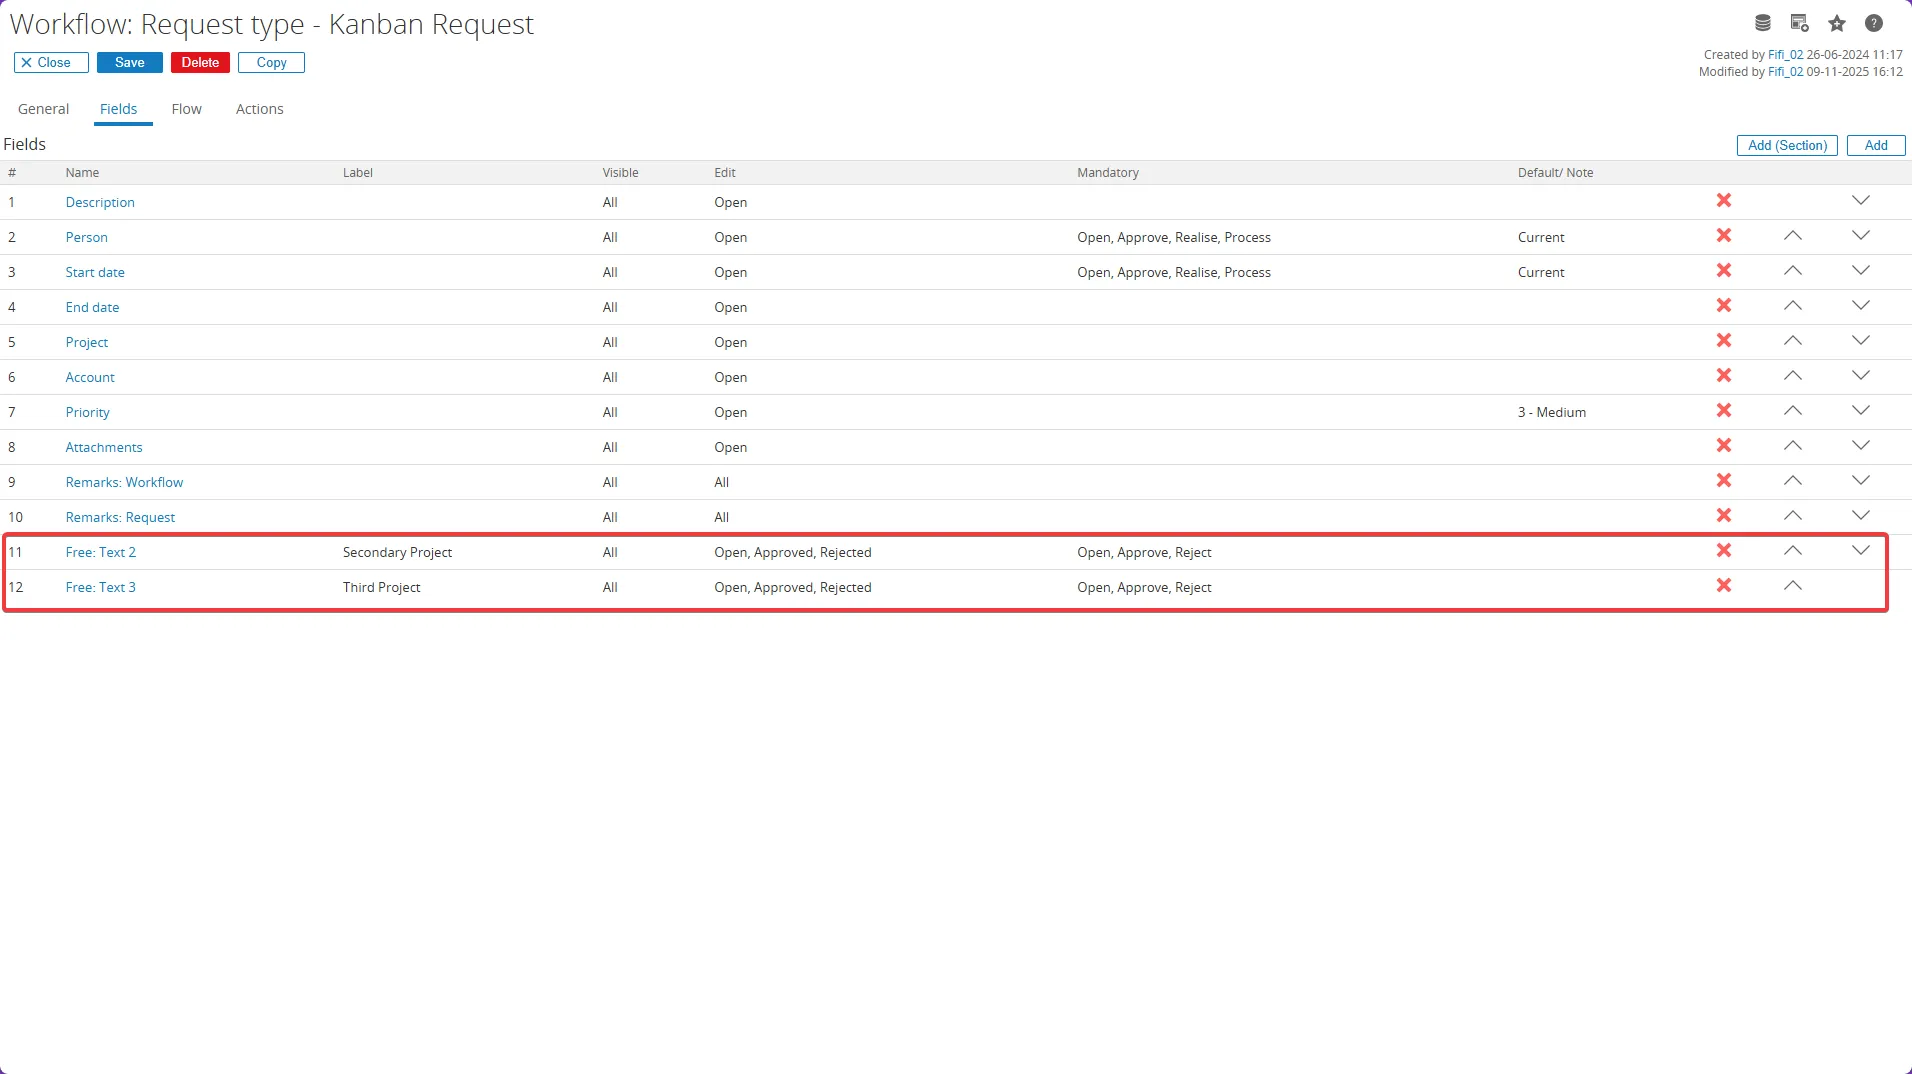
- Once configuration of the new free text fields is complete, return to the Kanban Request to view the fields at the bottom of the form.
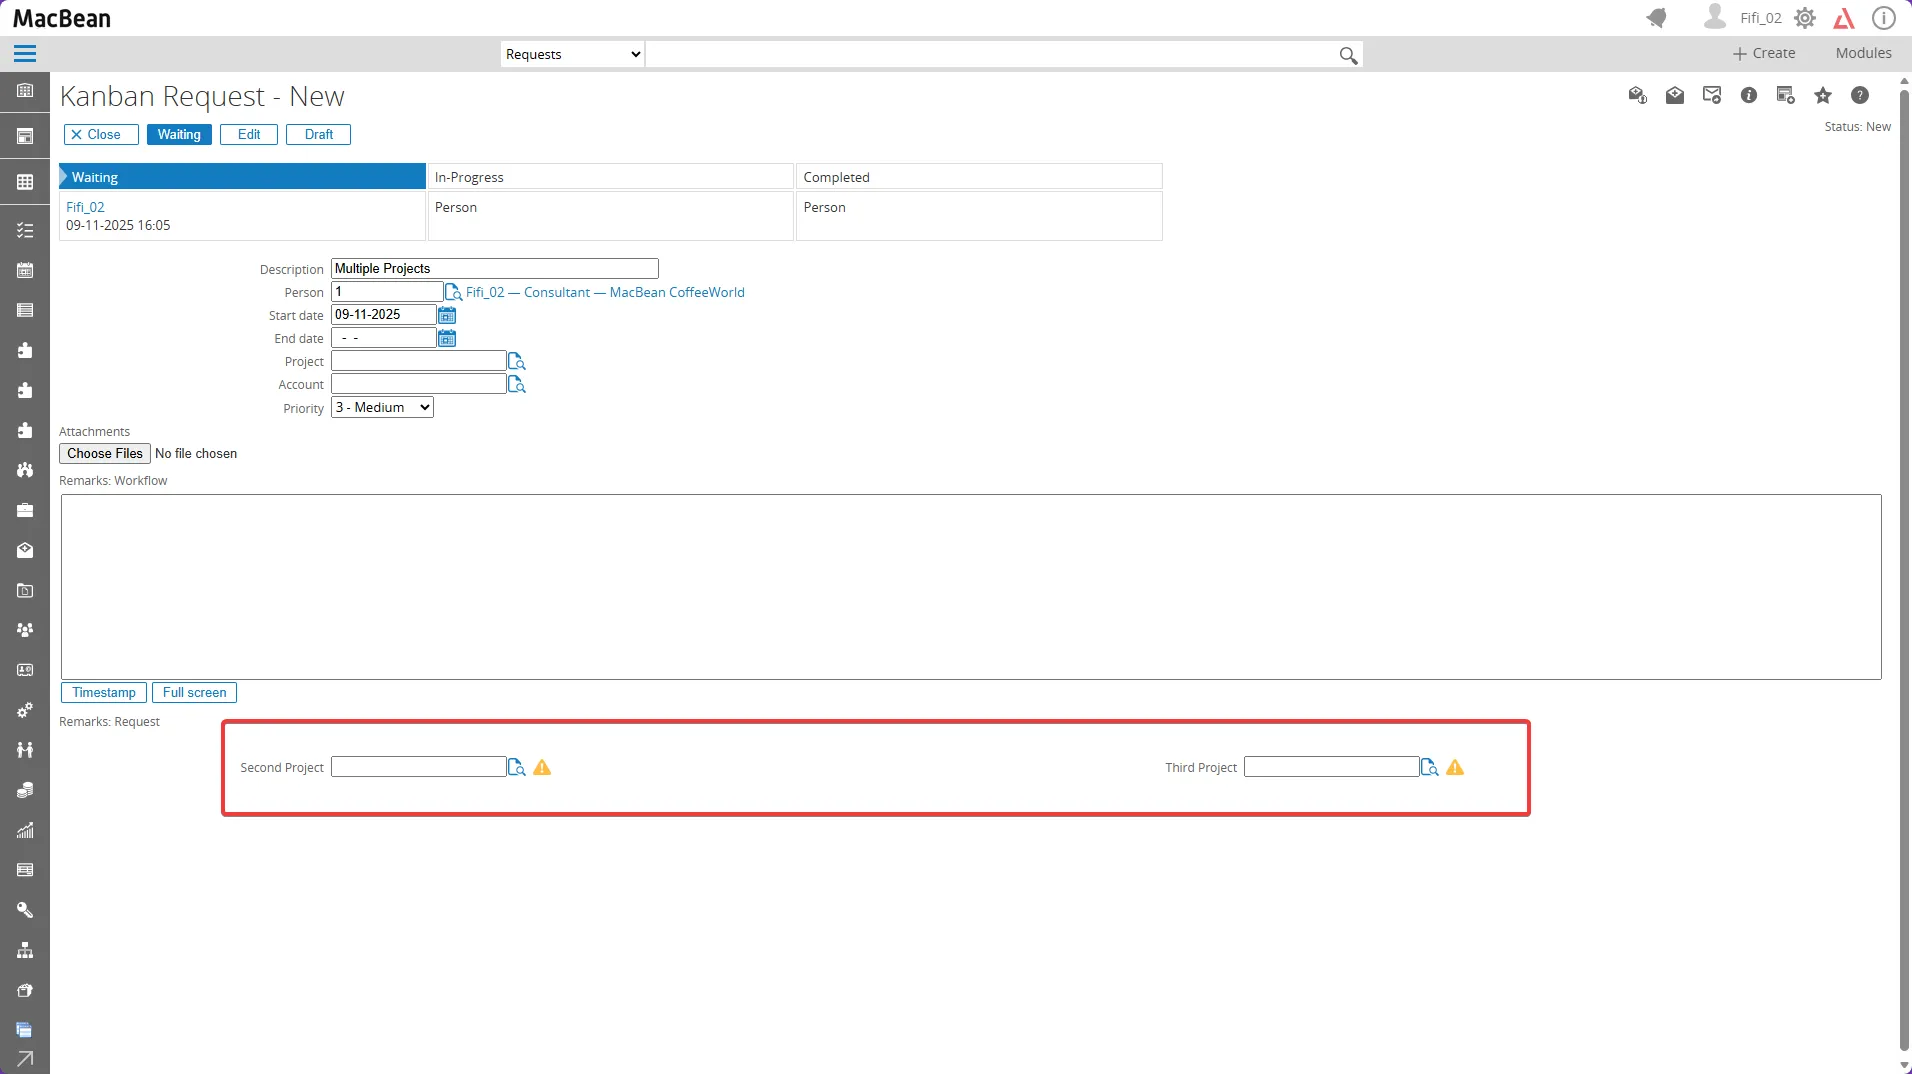
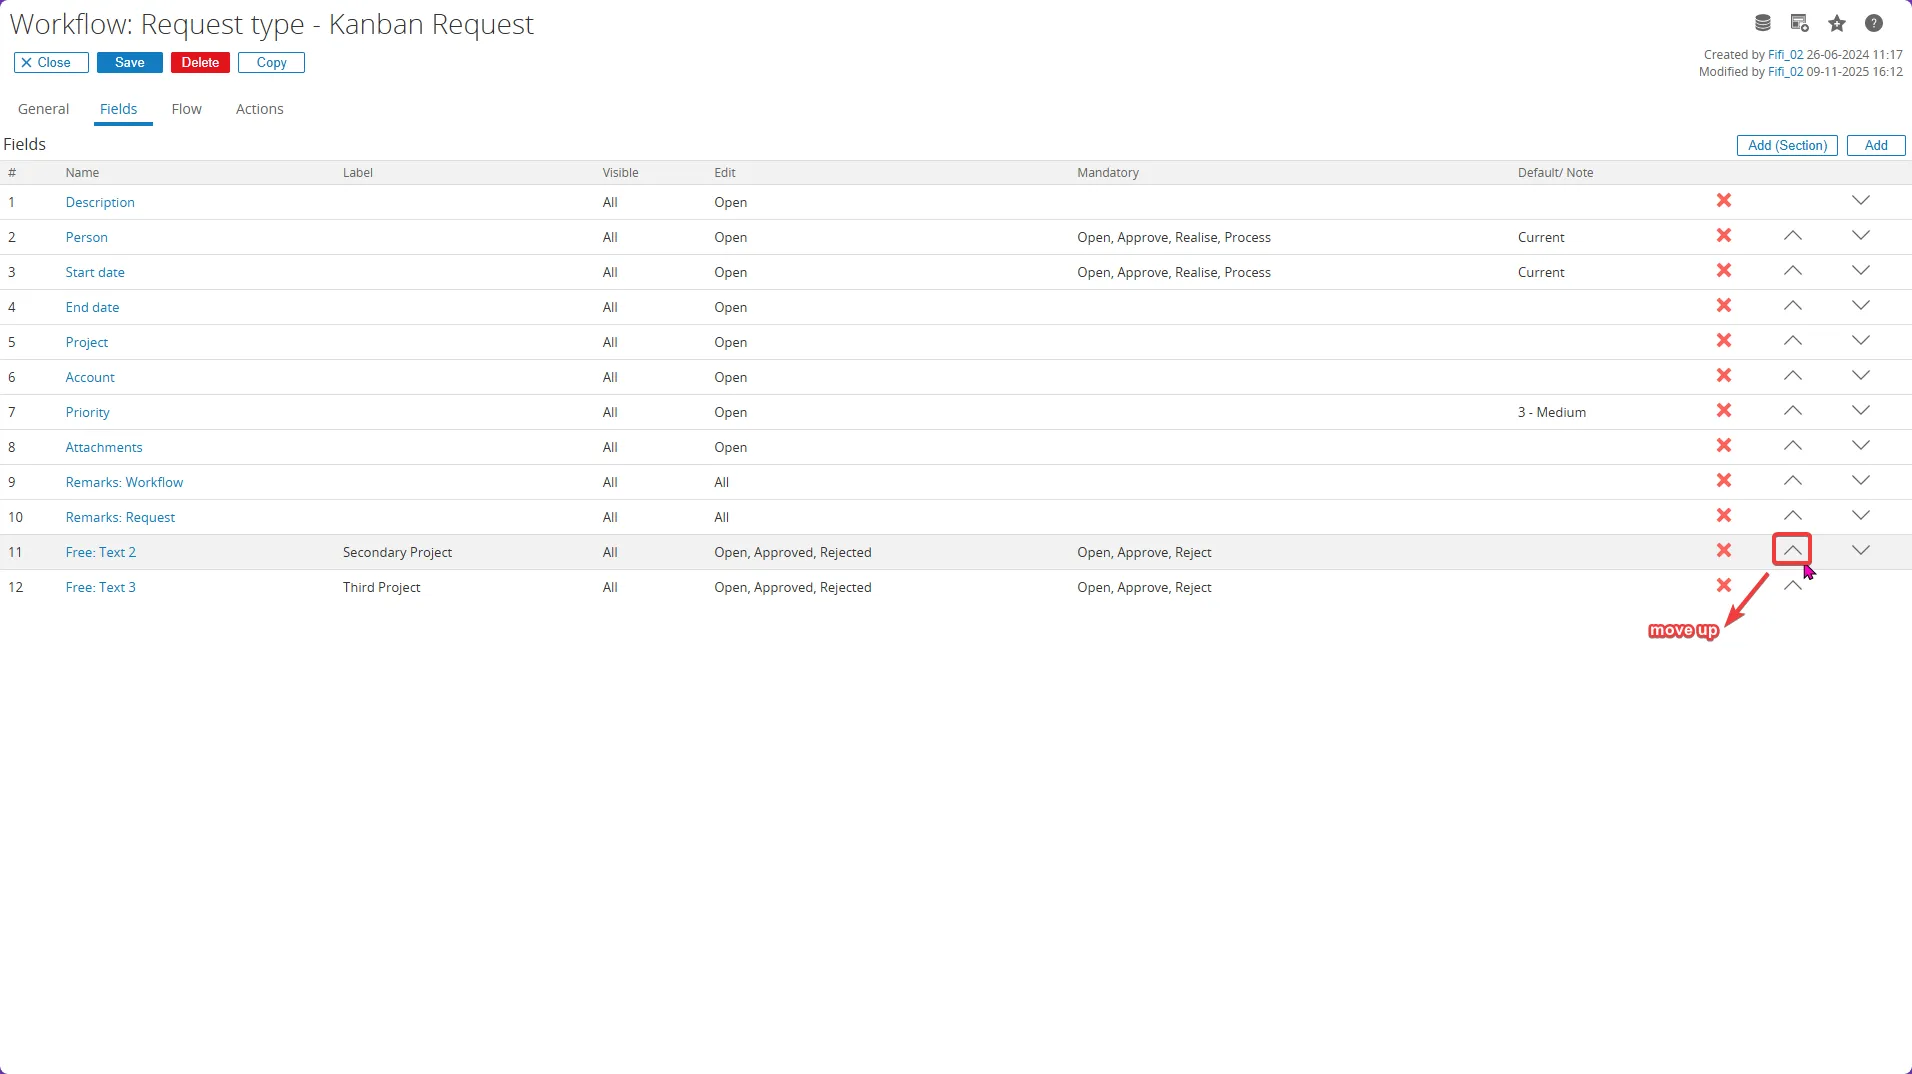
- To arrange the project fields in the correct order, return to the Fields menu. Use the Move Up icon to shift each field beneath “Project 1,” repeating for all additional project fields.
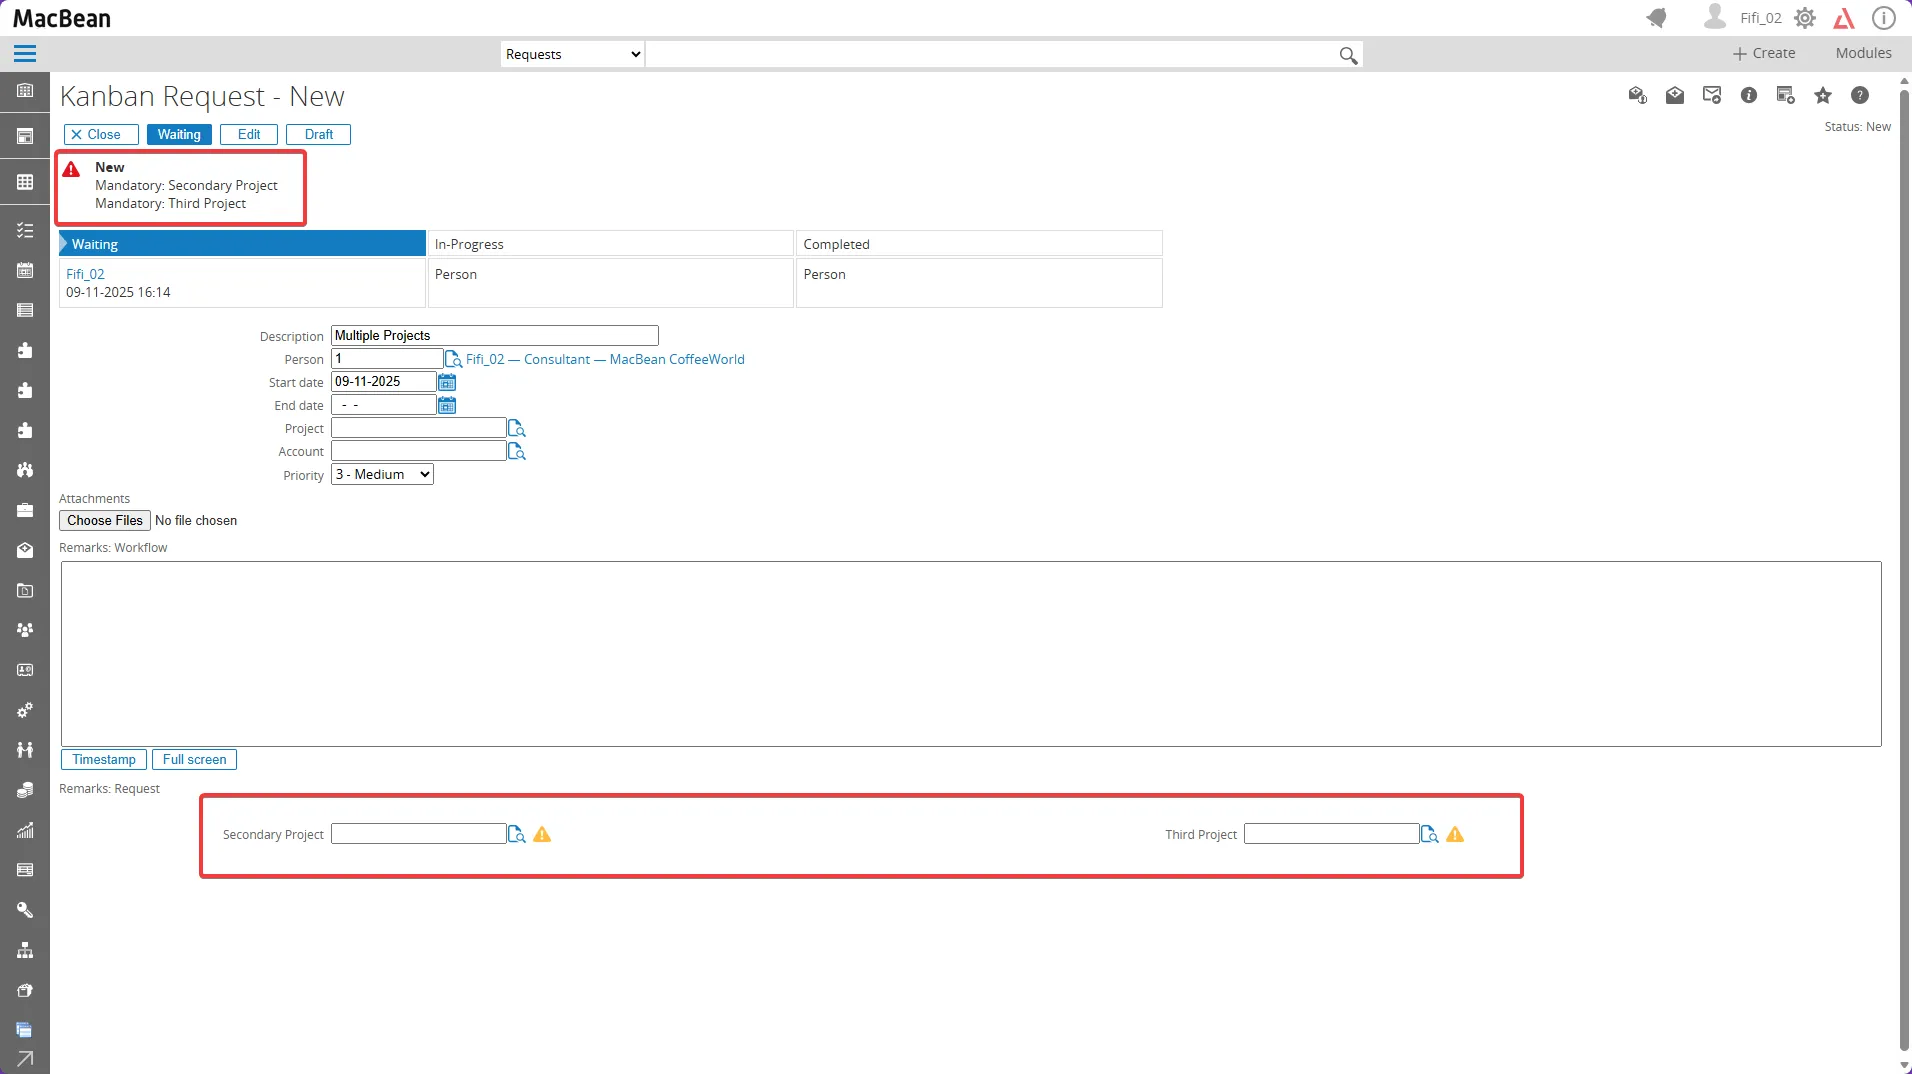
- Use the Move Up icon to shift each field beneath “Project” repeating for all additional project fields.
- The project fields are now properly ordered.
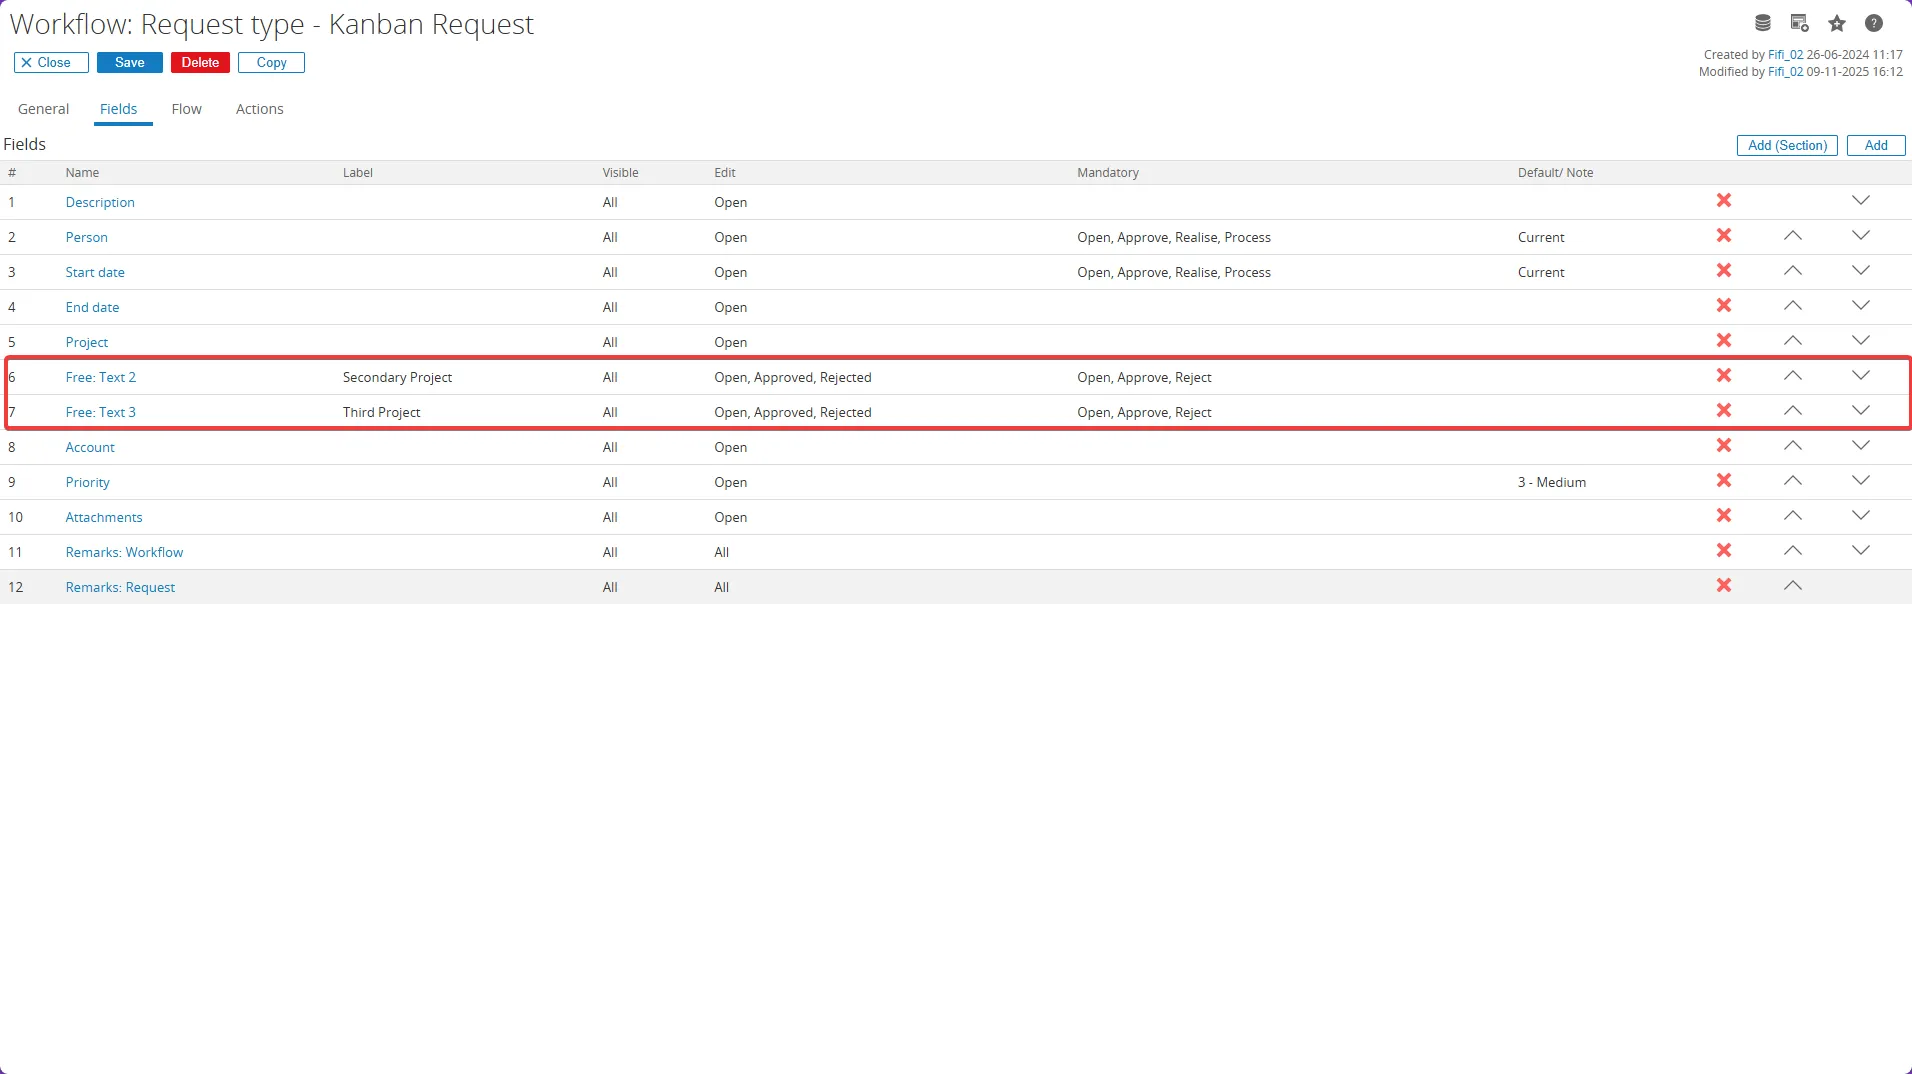
- Next, review the fields in the Kanban Request and complete them with the newly added fields.
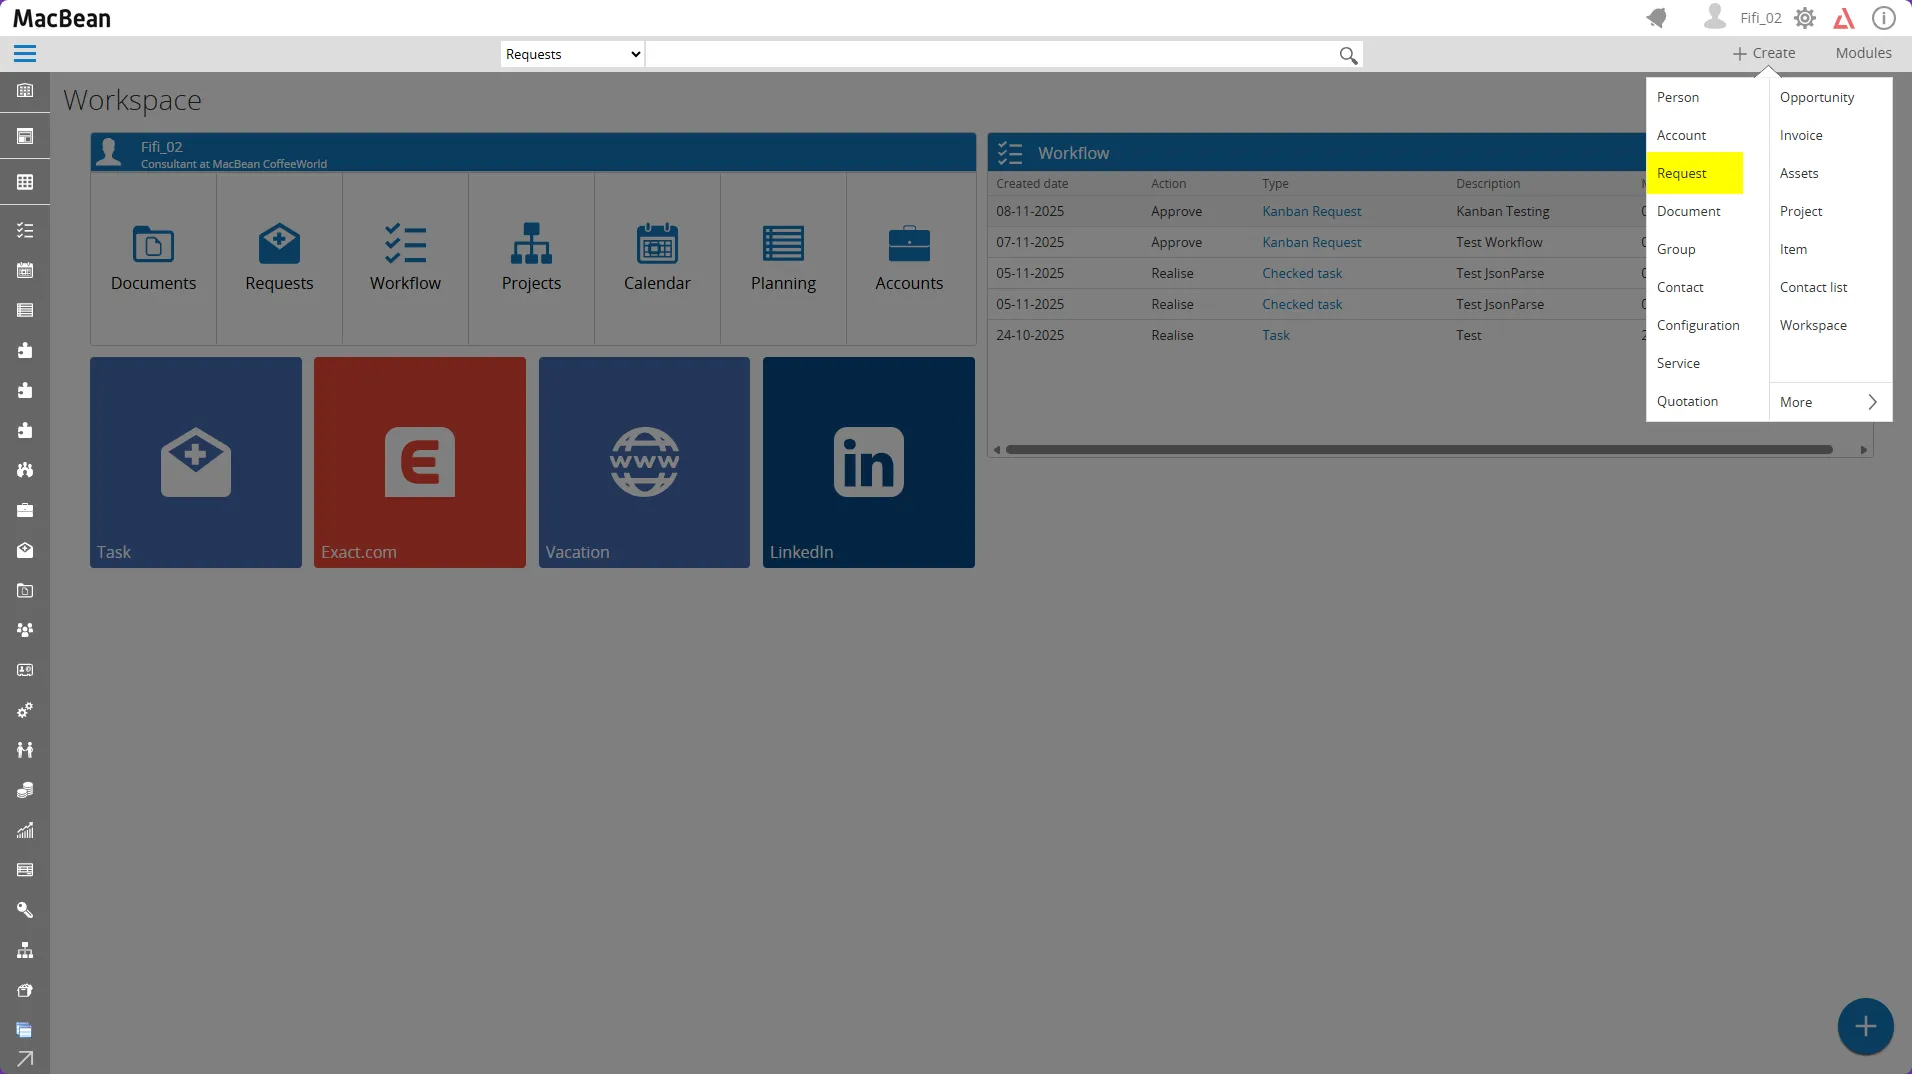
- Go to Create > Request.
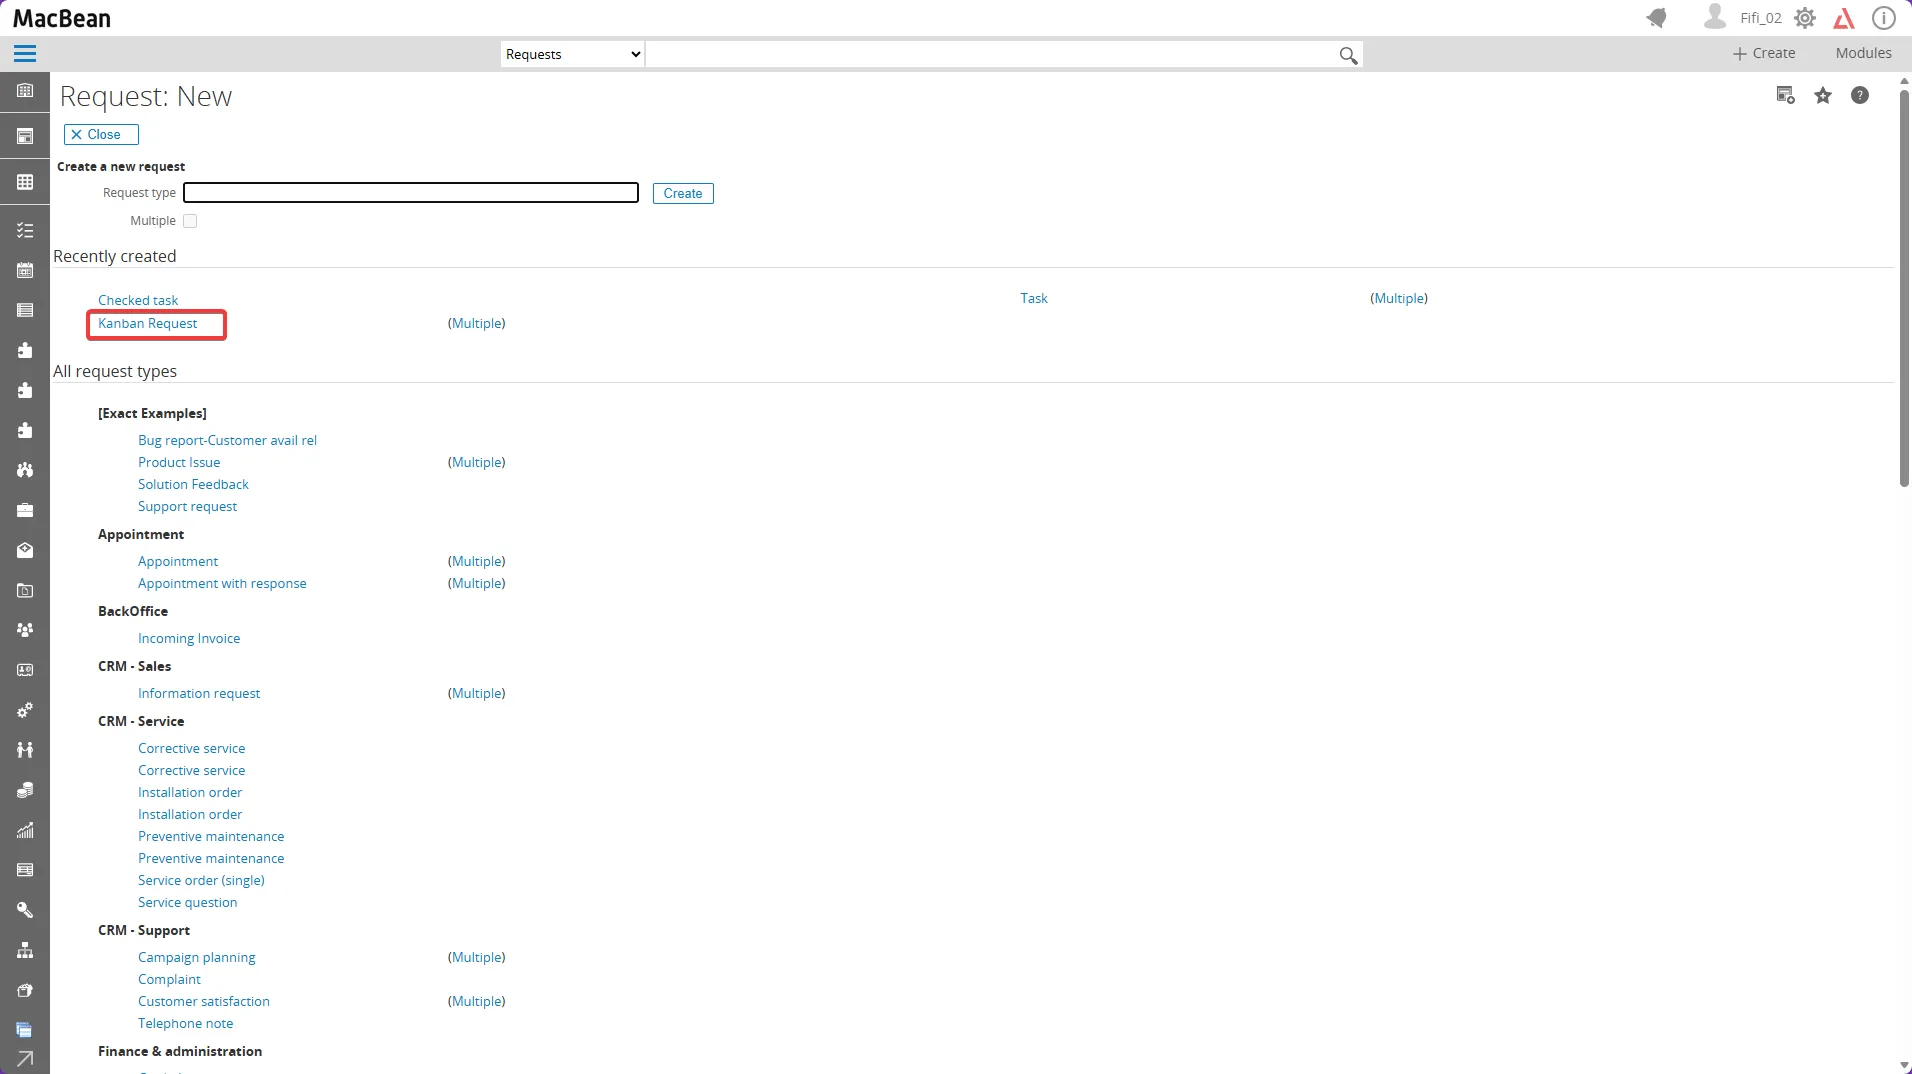
- Select Recently created > Kanban Request.
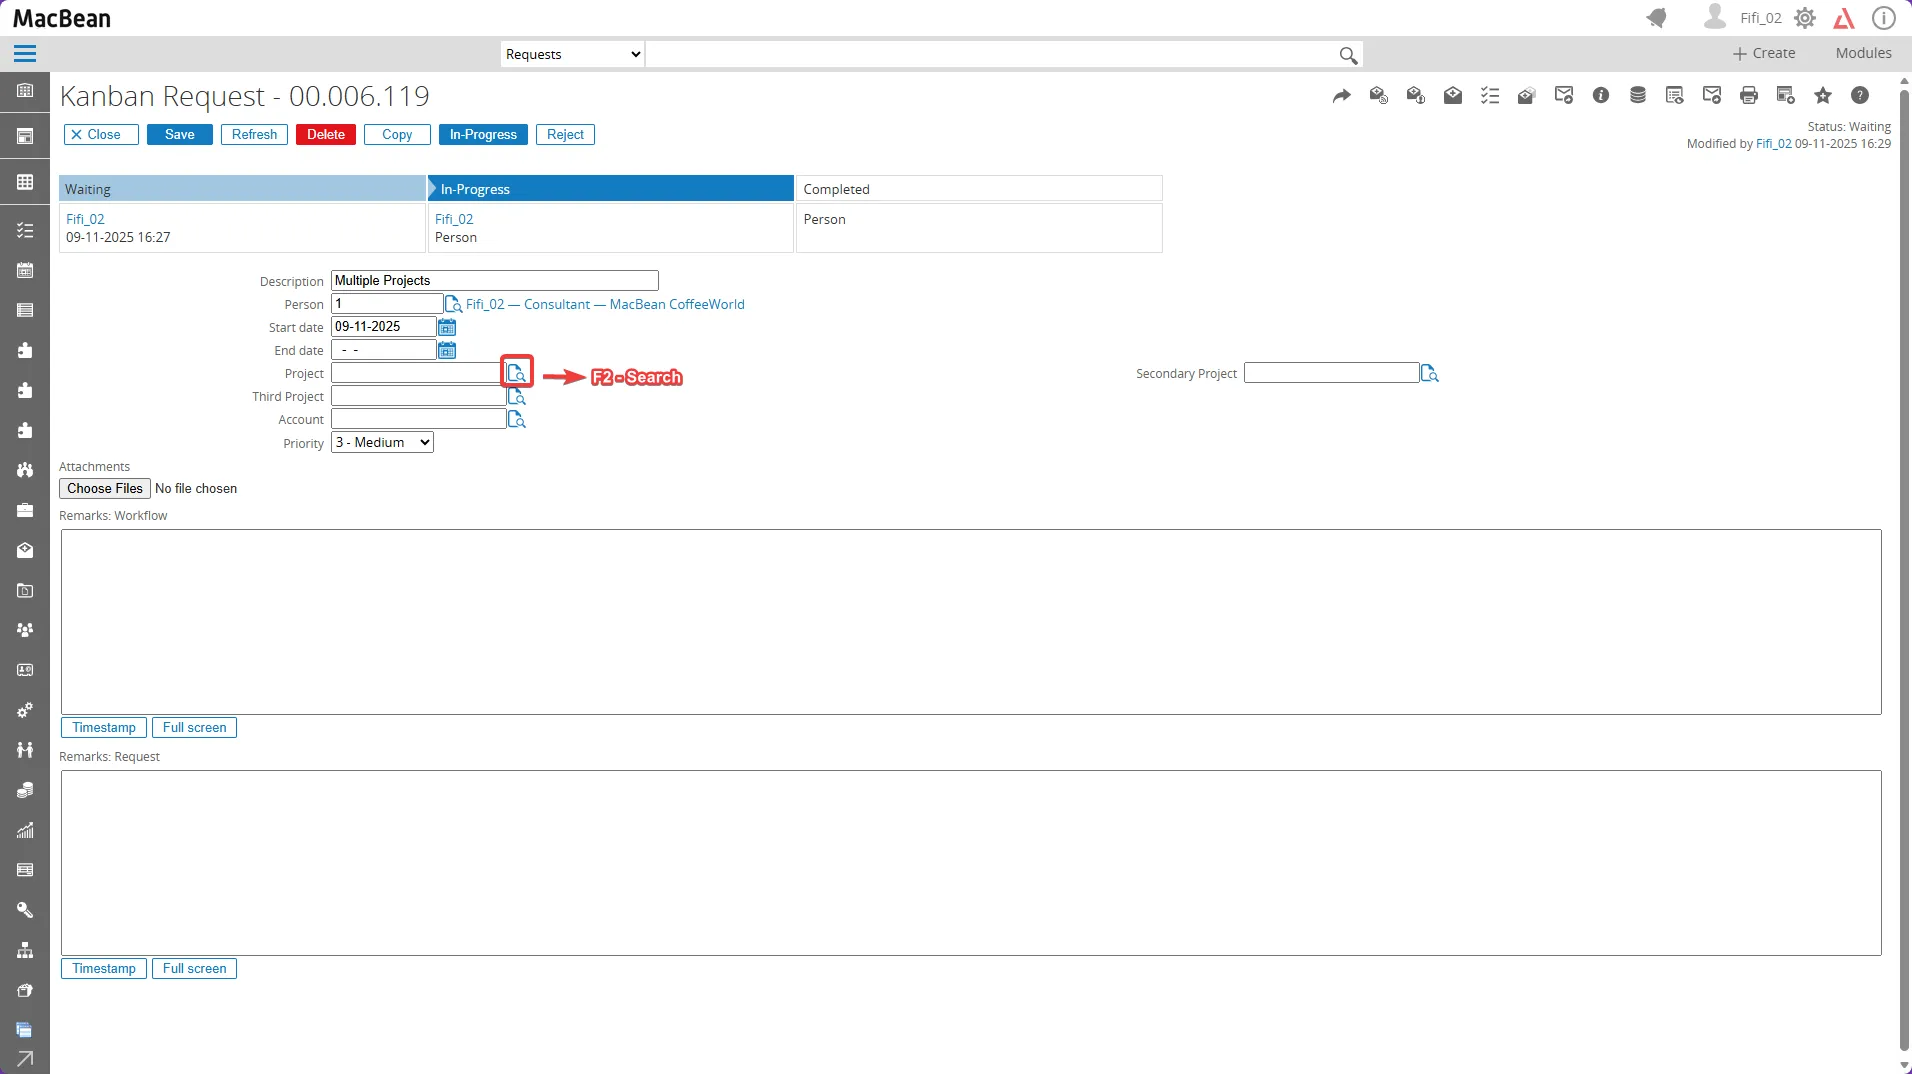
- Click the F2 - Search icon to select the desired project.
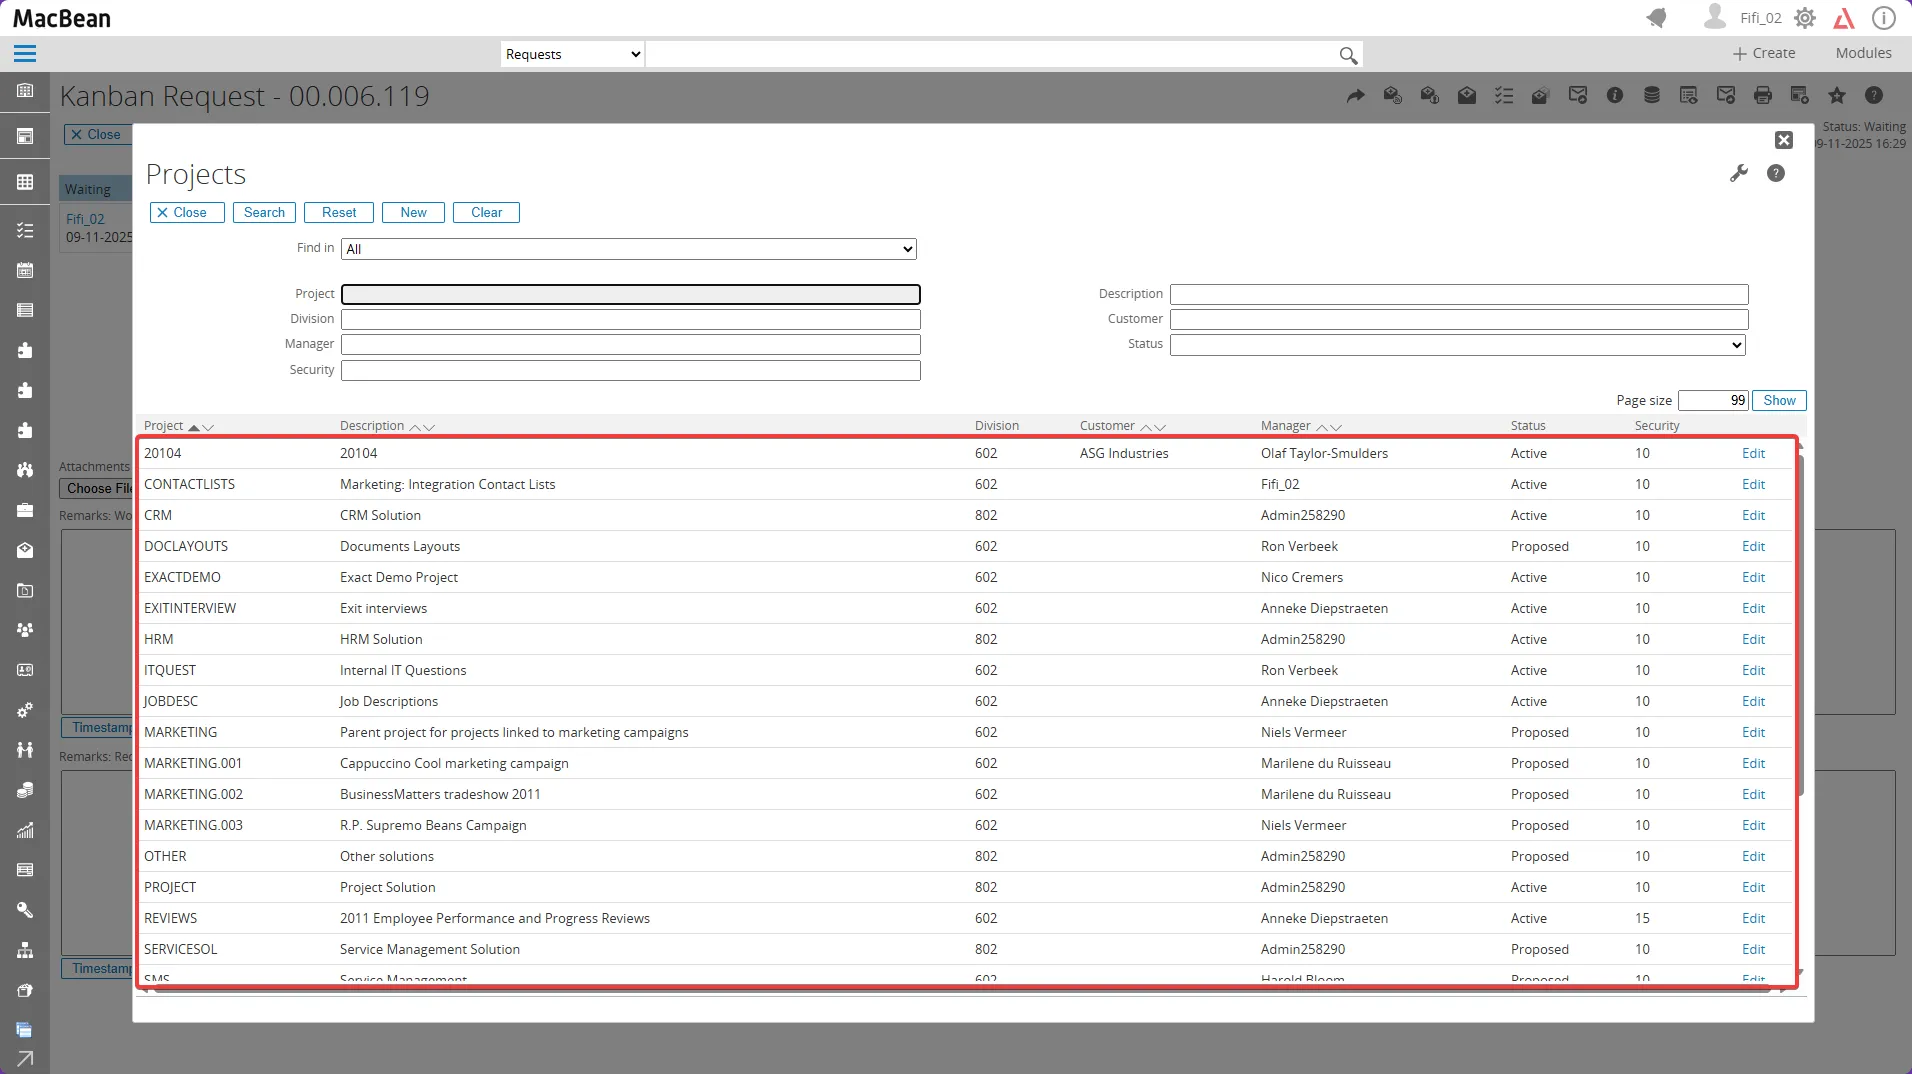
- A list of registered projects will appear. Select the row of the desired project to add. Repeat this process for all fields, such as third projects.
- Make sure all project fields are filled as intended.
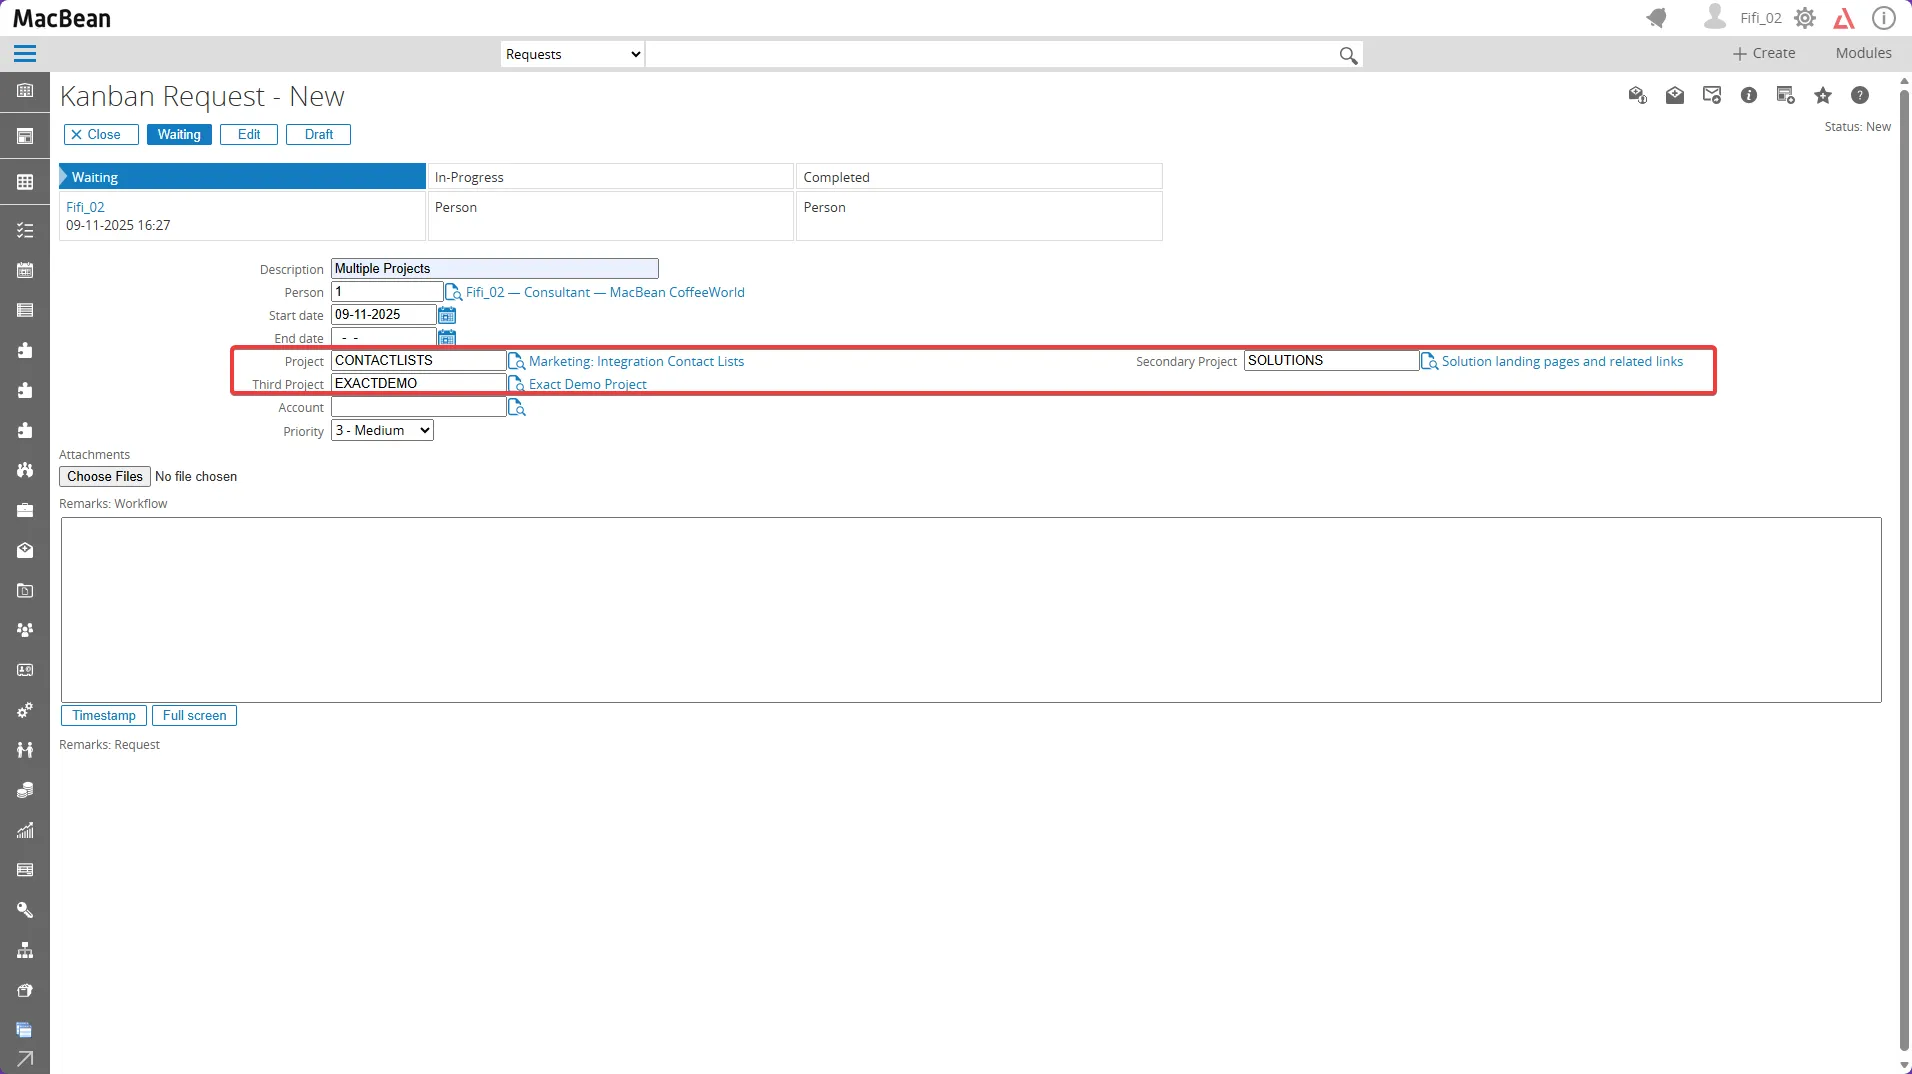
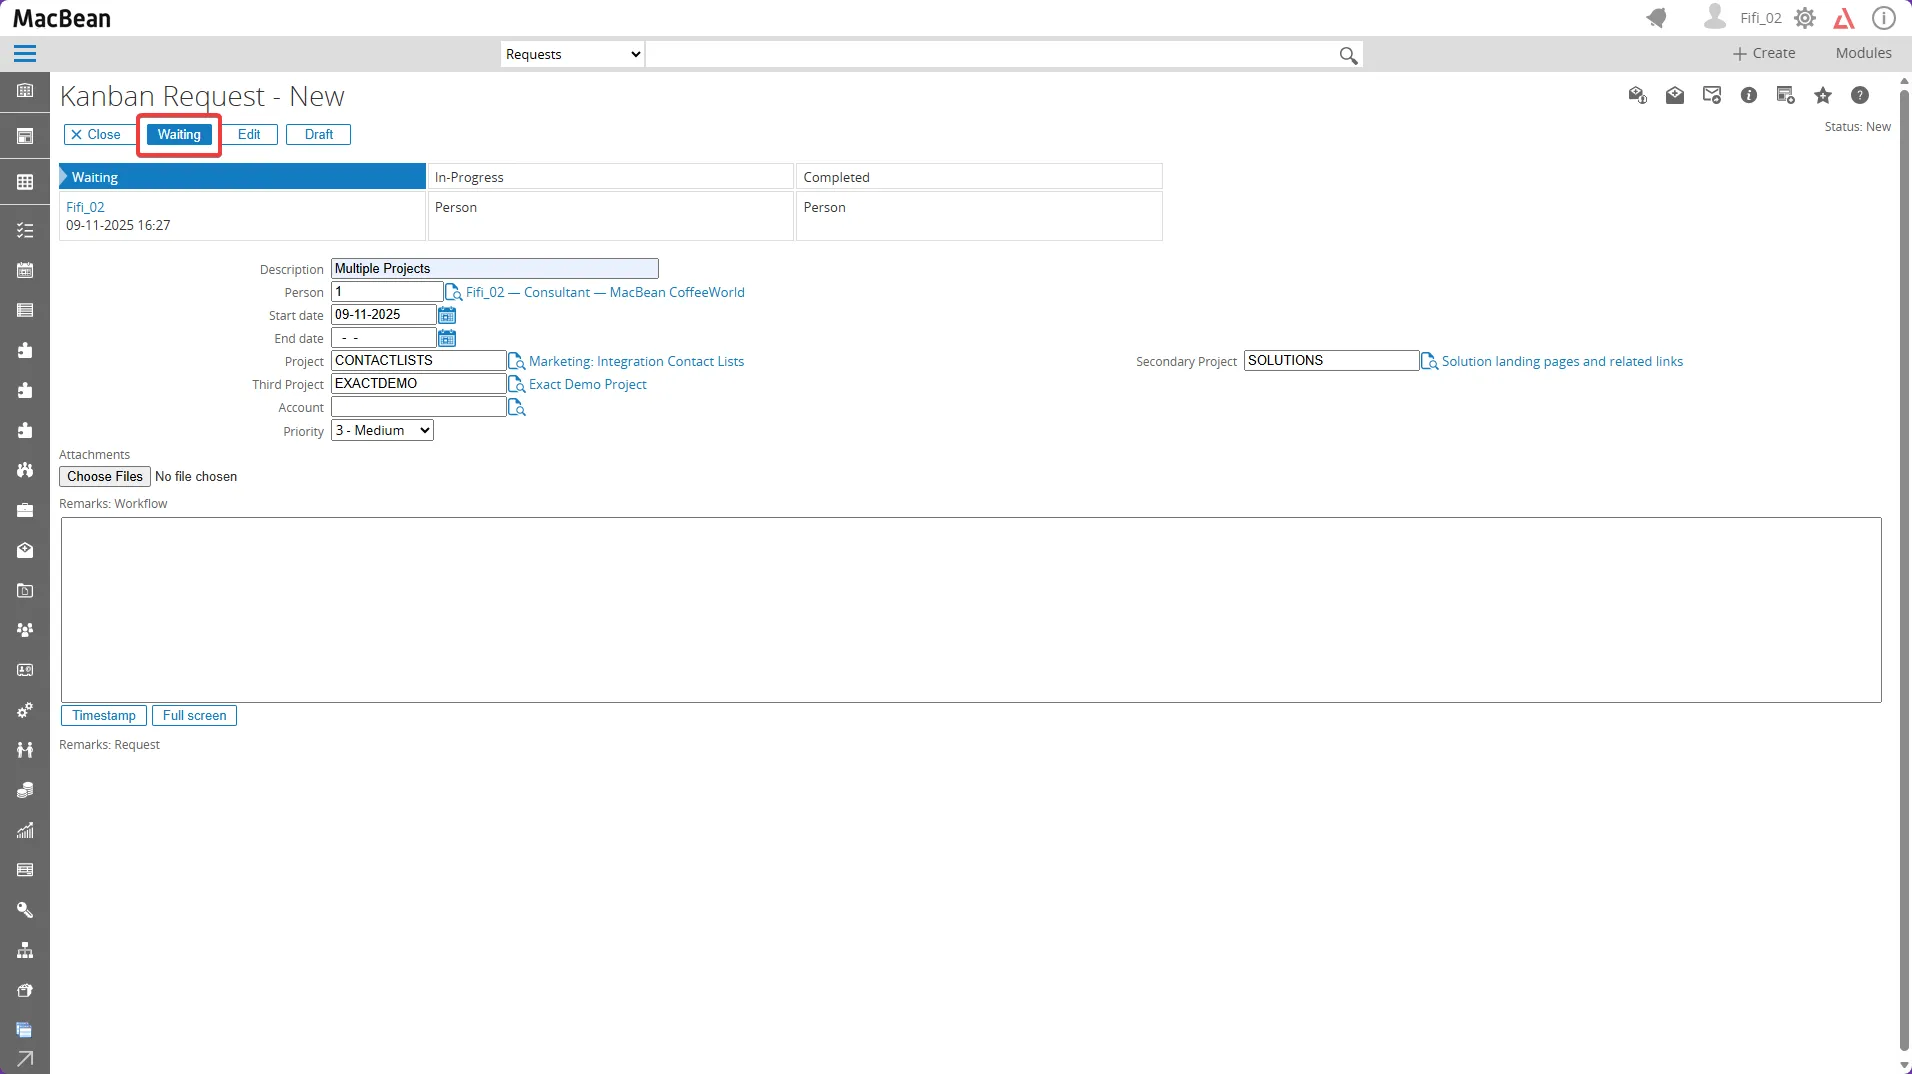
- Click the “Waiting” button to save the Kanban Request configuration.
- The new Kanban Request task will appear on the Kanban board and be placed in the “Waiting” section automatically.
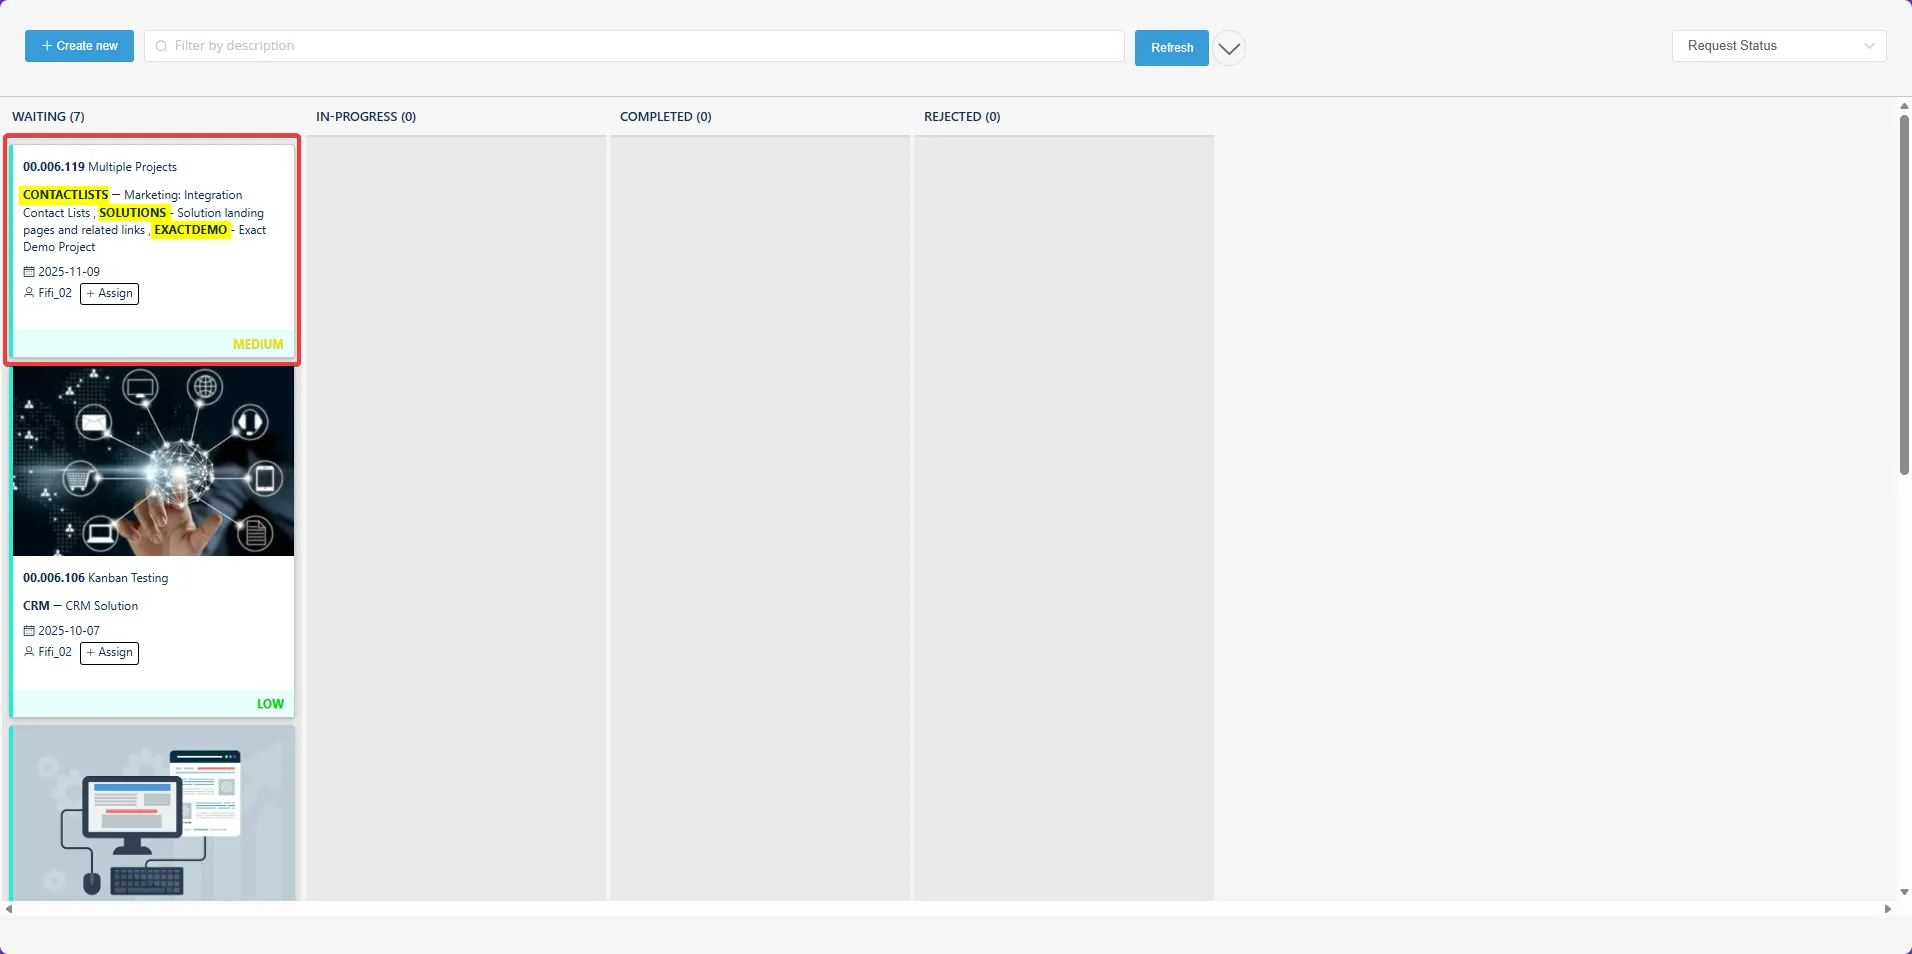
- All added project fields will now be visible in your Kanban Request and board.
- Go to Modules > Workflow.
Kanban - Troubleshooting
Section titled “Kanban - Troubleshooting”Update SQL Server Database Compatibility Level
Section titled “Update SQL Server Database Compatibility Level”If you got an error like this:
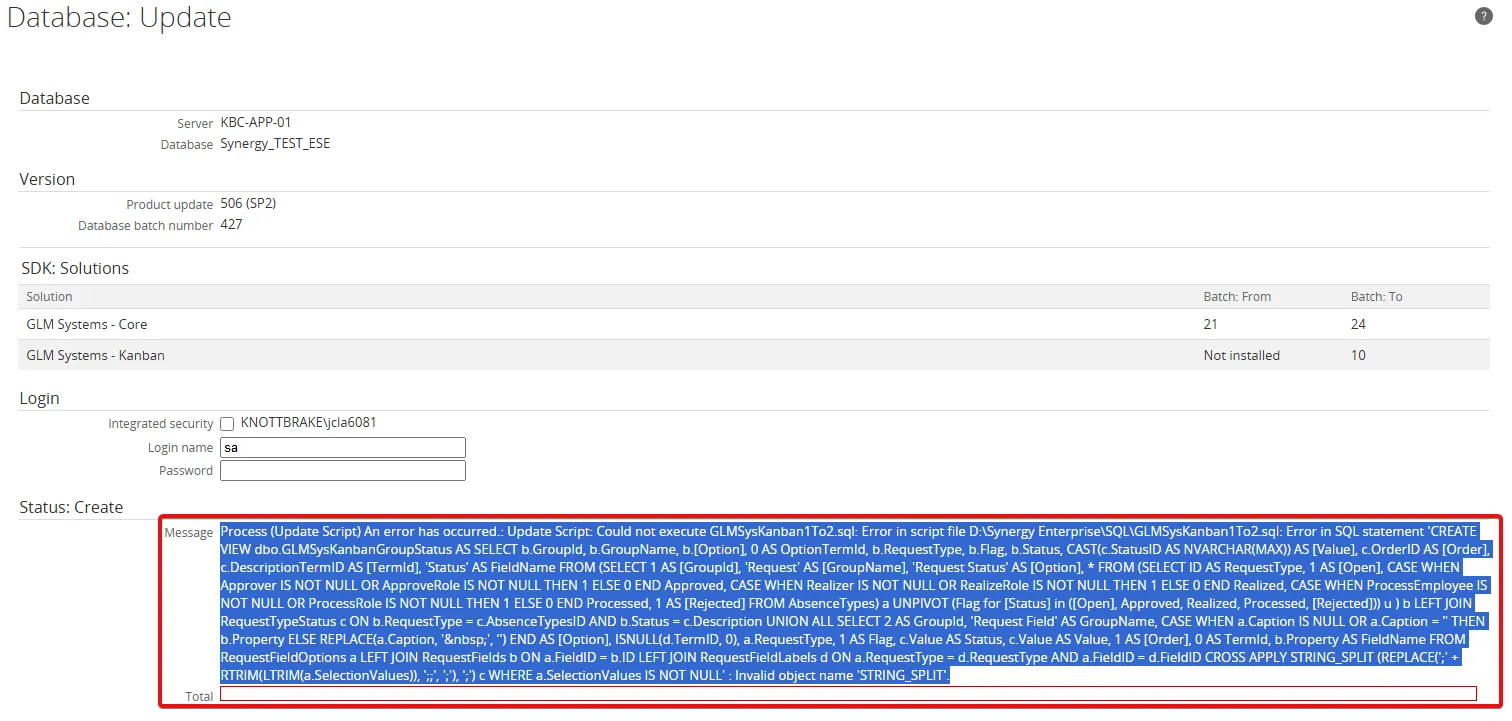
Step to resolve: Check the current compatibility level of your database by running this SQL query:
SELECT name, compatibility_levelFROM sys.databasesWHERE name = 'YourDatabaseName';Set it to 130 or higher using this SQL command:
ALTER DATABASE YourDatabaseNameSET COMPATIBILITY_LEVEL = 130;Return to the update script and run it again. The CREATE VIEW statement should now execute successfully without the STRING_SPLIT error.
If upgrading is not possible, use a supported string-splitting method compatible with your current database version, such as a custom split function, and modify the update script accordingly before running it again.