Procurement - User Manual
Introduction
Section titled “Introduction”The Procurement Module consists of 2 flows:
1. Purchase Requisition flowWhere a request to purchase is made and is evaluated2. Request for Quote flowwhere a request to purchase is made and evaluated and is followed up by sending out quotes to suppliers.To give a basic understanding of the Purchase Requesition flow, please refer to the flow diagram below. The boxes show the satus of the Purchase Request, the blue text shows the action taken in Synergy to move the Purchase Request to the next step / status.
1.1 Purchase Requisition Flow
Section titled “1.1 Purchase Requisition Flow”
Below is a brief explanation of the statuses and the flow for Purchase Requesition.
The Purchase Request is entered and saved by the requestor. The purchase request is still in the requestor’s workflow to be edited.
The requestor will click the Submit button to submit the request.
Check/Review
Section titled “Check/Review”The Purchase Request has been submitted and is waiting to be checked and approved by the manager.
- The manager will click the Reject button when the request is not correct.
- The manager will click the Approve button when the request is correct.
Cancelled
Section titled “Cancelled”The cancelled Purchase Request is back in the requestor’s workflow and can be both edited and resubmitted or can be closed.
Approved
Section titled “Approved”The approved Purchase Request is sent to the Purchase Officer to be verified. The purchase officer will decide on which action to take and click the Realize button.
Closed
Section titled “Closed”After the realization by the purchase officer, the flow is finished and the request is closed.
Having defined the flow for the Purchase Requisition, now the Request for Quote flow is explained in more detail.
1.2 Request for Quote flow
Section titled “1.2 Request for Quote flow”
The Request for Quote is entered and saved by the requestor. The request is still in the requestor’s workflow to be edited.
The requestor will click the Submit button to submit the request.
Created
Section titled “Created”The Request for Quote has been submitted and is waiting to be checked and approved by the manager.
- The manager will click the Reject button when the request is not correct.
- The manager will click the Send button when the request is correct.
Rejected
Section titled “Rejected”The rejected Request for Quote is back in the requestor’s workflow and can be either edited and resubmitted or can be closed.
The sent Request for Quote is sent to the Purchase Officer to be verified.
The purchase officer will decide on which action to take and click the Quote button.
Quoted
Section titled “Quoted”The purchase officer has requested the suppliers for a quote. After receiving back the information from the supplier, the purchase officer will update the Request for Quote with this information.
The purchase officer will make a recommendation and click the Recommend button.
Recommended
Section titled “Recommended”The recommended request is sent back to the requestor manager to be checked.
The requestor’s manager will check the request and click the Approve button.
Approved
Section titled “Approved”The approved request is sent again to the purchase officer, who will verify the request.
- The purchase officer will click the Not Accept button when the request is not correct.
- The purchase officer will click the Accept button when the request is correct.
Not Accepted
Section titled “Not Accepted”The not accepted request is sent to the manager, who can either edit and resubmit the request or close it.
Accepted
Section titled “Accepted”The accepted request is ready for further action by the purchase officer.
The purchase officer will click the Generate PO button to create a Purchase Order.
Created
Section titled “Created”The request is finalized in a created purchase order.
2. Installation
Section titled “2. Installation”2.1 Introduction
Section titled “2.1 Introduction”- Installation of Procurement Exact Synergy Enterprise (installation on server)
- Installation of Procurement Exact Globe (installation on server)
- Installation of Procurement Word Add-In (installation on user PC)
- Installation of Procurement Windows Service (installation on server)
2.2 Exact Globe
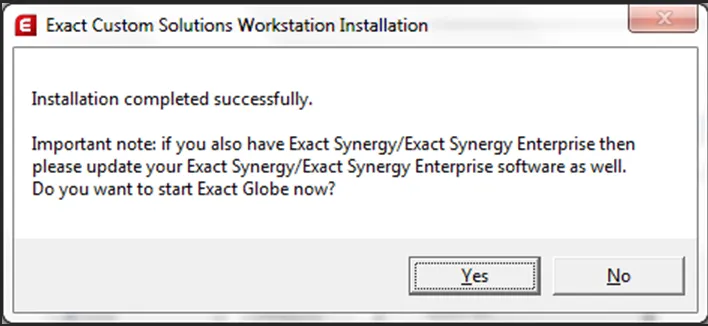
Section titled “2.2 Exact Globe”In the installation stup their is Globe folder which contains the executable CSSetup_AE.exe.
Run the CSSetup_AE.exe as administrator to start the Globe installation for the procurment module.

For the install mode there are two options:
- CD workstation installation, use this option to only install on the PC from where you are running the installer.
The local installation directory is the local installation of Exact Globe. All the files in the installer will be copied and the files will be automatically registered.
- CD network installation, use this option to install as a network installation. This option will trigger an update at all the workstation which have Exact Globe installed as a network installation. Use this option when deploying to the solution needs to be deployed to all user PCs.
The local installation directory is the network installation folder where the standard of installation of Exact Globe is installed. This folder is the folder where the user PCs will be pointing to when installing from a network installation.
Once the installation directory is given click ok an the installation will start.
When the installation is finished succesfully the following mesage will be shown.
2.3 Word add-in
Section titled “2.3 Word add-in”The procurement word add-in will be installed on the user PC. The user needing this add-in will be the user who will creator or modify the request for quote templates. Copy the Word folder in the installation set to the user PC. After the word folder is copied run the setup.exe as administrator.
The following screen will be shown click install
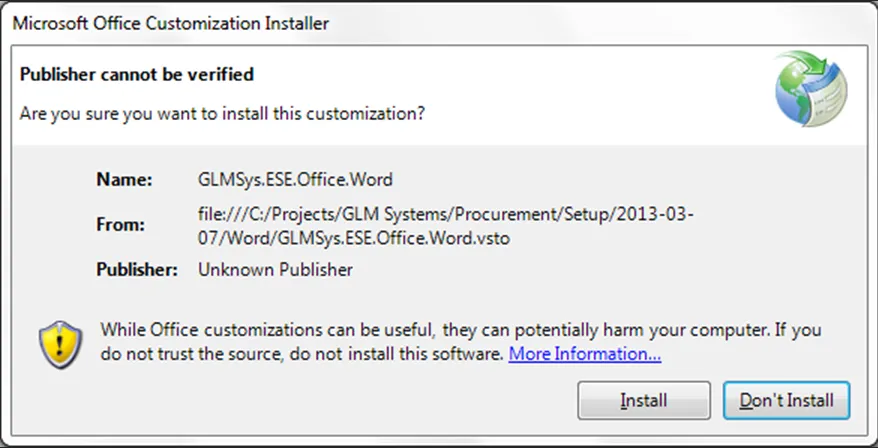
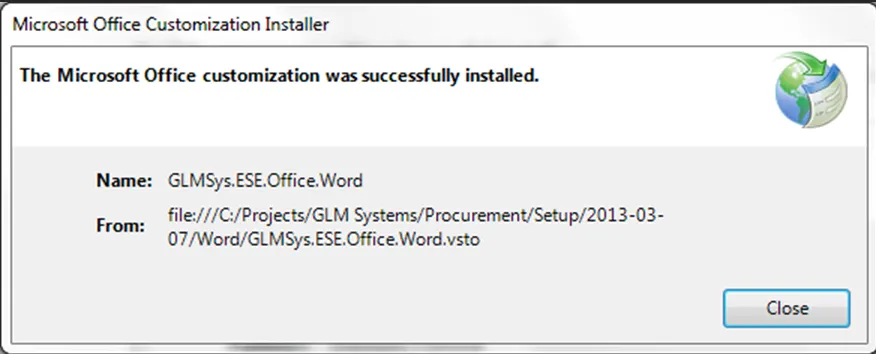
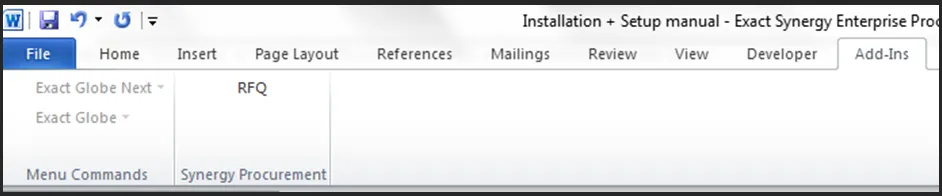
After installation your word will have a new application RFQ in the Add-Ins menu.
2.4 Windows Service setup
Section titled “2.4 Windows Service setup”The procurement module also contains a windows service which will handle the following processes:
For Exact Globe
- Print / Process purchase order.
- Generate purchase order workflow request for purchase order directly created in Exact Globe.
For Exact Macola ES
- Create purchase order when purchase order is generated from the purchase requisition or request for quote.
- Release or Un-release when related purchase order request in Synergy is approved / rejected.
- Generate purchase order workflow request for purchase order directly created in Exact Macola ES.
The setup contains of two steps:
- In the root of the installation folder there is a GLMSys.Proc.WinService.exe.config, this file will need to be modified to add the back office administrations which should be monitored.
The file contains a section for the connectionStrings this need to be modified to add the backoffice connections.
<connectionStrings>  <!-- Exact Globe format -->  <!--  <add name="[Company name]"       providerName="Exact Globe"       connectionString="-r[ServerName] -D[DatabaseName] -u -~"/>  -->
  <!-- Exact Globe example -->  <!--  <add name="ExactGlobe 200"       providerName="Exact Globe"       connectionString="-rSERVER1\SQL2008R2 -D200 -u -~"/>  -->
  <!-- Exact Macola ES format -->  <!--  <add name="[Company name]"       providerName="Exact Macola ES"       connectionString="-r[ServerName] -D[DatabaseName] -u -~"/>  -->
  <!-- Exact Macola ES example -->  <!--  <add name="Exact Macola Demo 300"       providerName="Exact Macola ES"       connectionString="-rSERVER1\SQL2008R2 -D300 -u -~"/>  --></connectionStrings>
When for example we have two companies for which the service should be running:
Name: Company 1 Backoffice: Exact Globe SQL Server: SERVER1 Database: 100
Name: Company 2 Backoffice: Exact Globe SQL Server: SERVER1 Database: 200
The following two connections strings should be added between the <connectionStrings> and </connectionStrings>:
<add name="Company 1" providerName="Exact Globe" connectionString="-rSERVER1 -D100 -u -~"/><add name="Company 2" providerName="Exact Globe" connectionString="-rSERVER1 -D200 -u -~"/>In case the two addminstrations are for Exact Macola ES the providerName=“Exact Globe” should be providerName=“Exact Macola ES”
- Now the service can be installed, on the location where your Exact Globe or Exact Macola ES is installed there is a services folder. In the services folder there is InstallGLMSysProcWinSerivce.bat file. Run this file as administrator to install the service.
During the install a prompt will be given which will ask for a user and password. This will be the user under which the service will be running. For the procurement service this user has to be a valid Exact Globe or Exact Macola ES user.
After the installation is done open the services and there will be a new service ‘GLM Systems – Exact Back Office Procurement Service’. When the service is not started yet start the service.
Any problems with the service will be logged under the application event manger. For possible problems see the ‘troubleshout’ section.
3. Procurement Basics
Section titled “3. Procurement Basics”3.1 Introduction
Section titled “3.1 Introduction”This setup chapter will describe the basics of the Procurement Template. It will give an introduction to the template itself, the sections and fields. This chapter gives a brief explanation only; the next chapter will go in more detail on how to configure the Procurement Template.
3.2 Procurement Template; a first introduction
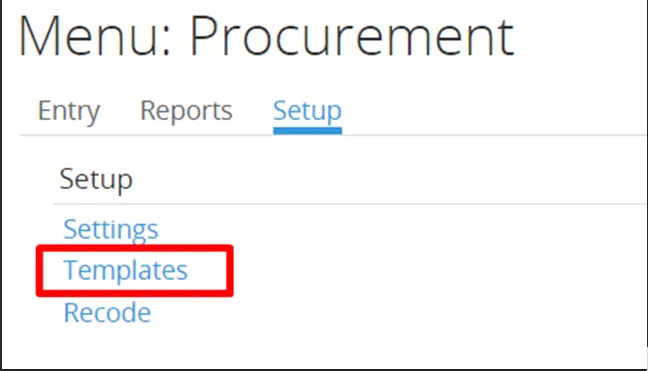
Section titled “3.2 Procurement Template; a first introduction”The Procurement Template can be setup in Synergy via the menu path:
Procurement > Setup > Procurement Template > New
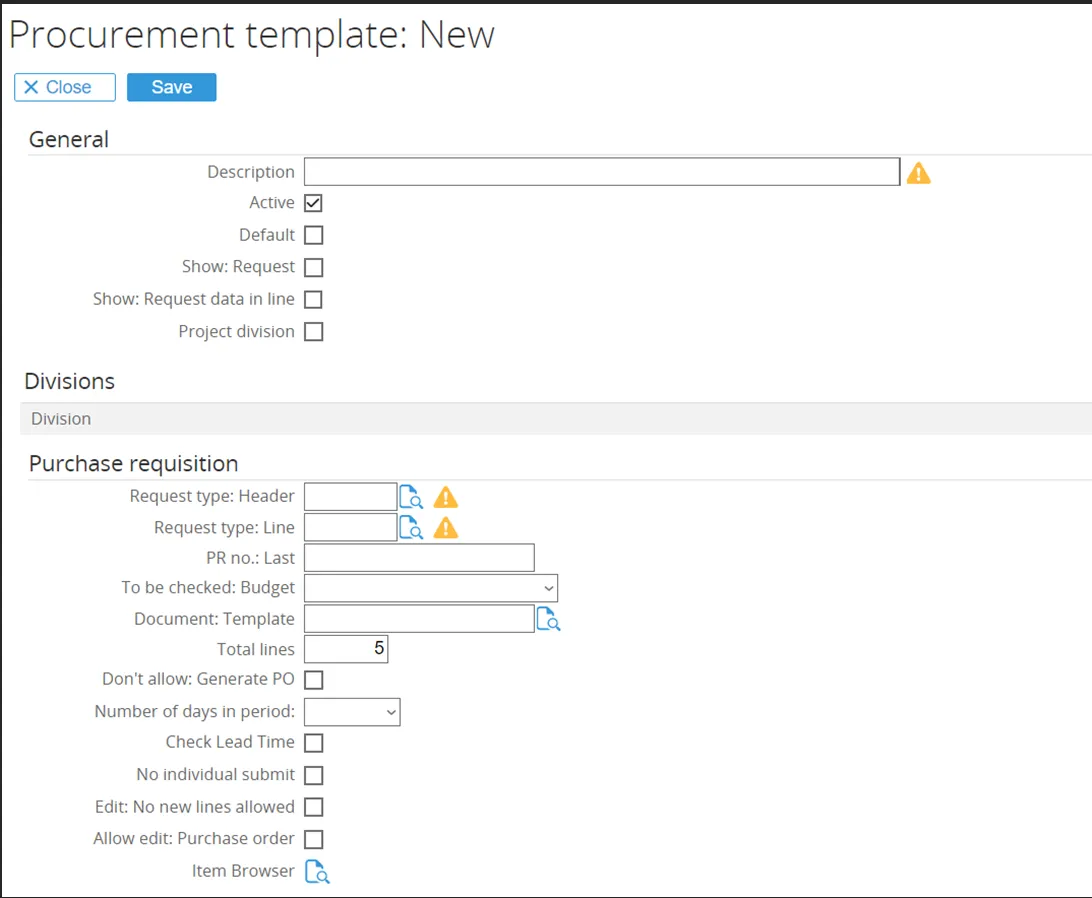
The screenshot below shows how the Procurement Template looks like:
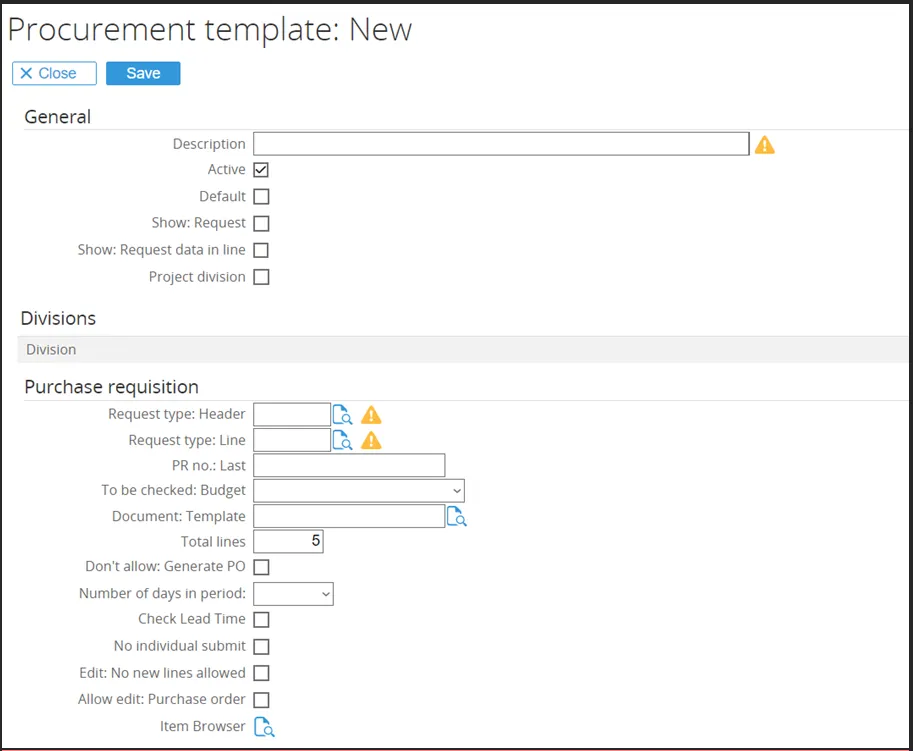
The Procurement Template is divided 6 sections, which will be described in more detail.
3.2.1 General
Section titled “3.2.1 General”
-
Description
This is the name of the template. It is a mandatory field. -
Active
Ticking this box will determine whether the template will be available for use. -
Default
This check box determines whether this template will be the default template used. -
Show Request
By default, when opening a request from your workflow, it will redirect to your PR, RFQ, Evaluation, or PO screen.
When ticking this box, it will open the request instead of redirecting.
This option is mostly used for debugging purposes, allowing you to test the standard workflow setup. -
Show Request Data in line
It will display the request at the PR line. -
Project Division
This check box determines whether the Project will be available only within a specific division.
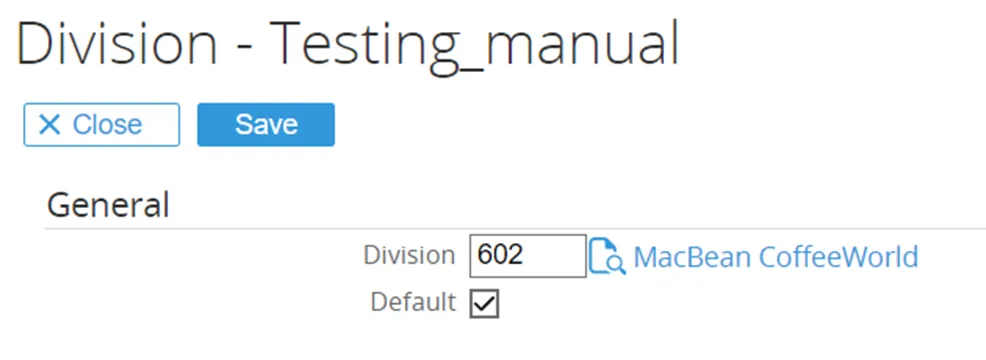
3.2.2 Division
Section titled “3.2.2 Division”
At this place it is possible to link the division that will be used in the Procurement Template. To add a new division, click the ‘Add’ button.
To change an existing, click on the existing division.
A new screen will open where another division can be selected.
3.2.3 Purchase Requisition
Section titled “3.2.3 Purchase Requisition”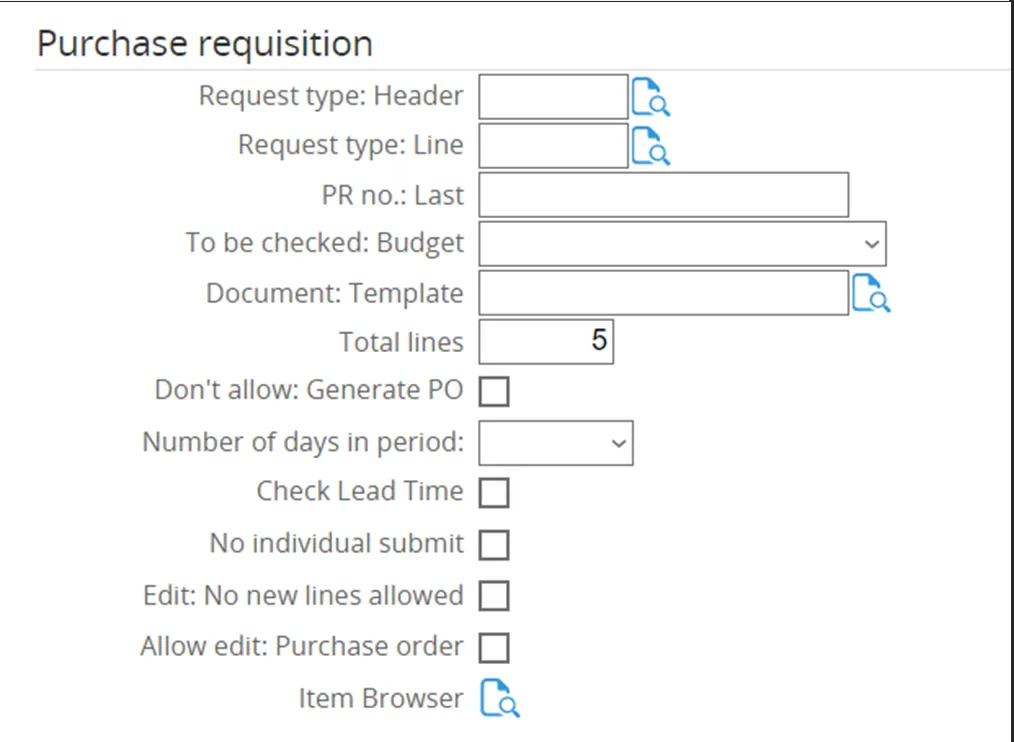
-
Request Type Header
The request type for the Header is determined here. It is a mandatory field.
The Request Type Header will be described in more detail below. -
Request Type Line
The request type for the Lines is determined here. It is a mandatory field.
The Request Type Line will be described in more detail below. -
PR No Last
This is where the Purchase Request Number sequence is determined. -
To Be Checked Budget
The moment when the amount of Purchase Request is checked against the budget is determined here.
The Purchase Request can be checked against budget upon creation, submitting, approving, or a combination of the above. -
Total Lines
The number of lines in the Procurement Template can be set here.
In the Purchase Request, additional lines can be added at any time by using the Tab button. -
Don’t Allow Generate PO
This is where the Generate PO checkbox is determined.
If this checkbox is ticked, the Generate PO option will be invisible on the PR Page during the Process stage. -
Number of Days in Period
Day of inventory to calculate the budget. -
Check Lead Time
This setting prevents the request date from being earlier than the defined lead time. -
No Individual Submit
This is where the Submit button will be hidden when creating the PR. -
Edit – No New Lines Allowed
Adding new lines is not permitted while editing the PR Line. -
Allow Edit Purchase Order
Allows editing or upgrading of the Purchase Order after it has been created from the PR. -
Item Browser
This is where the item browser will be set from the RPA view.
Request Type Header (Purchase Requisition)
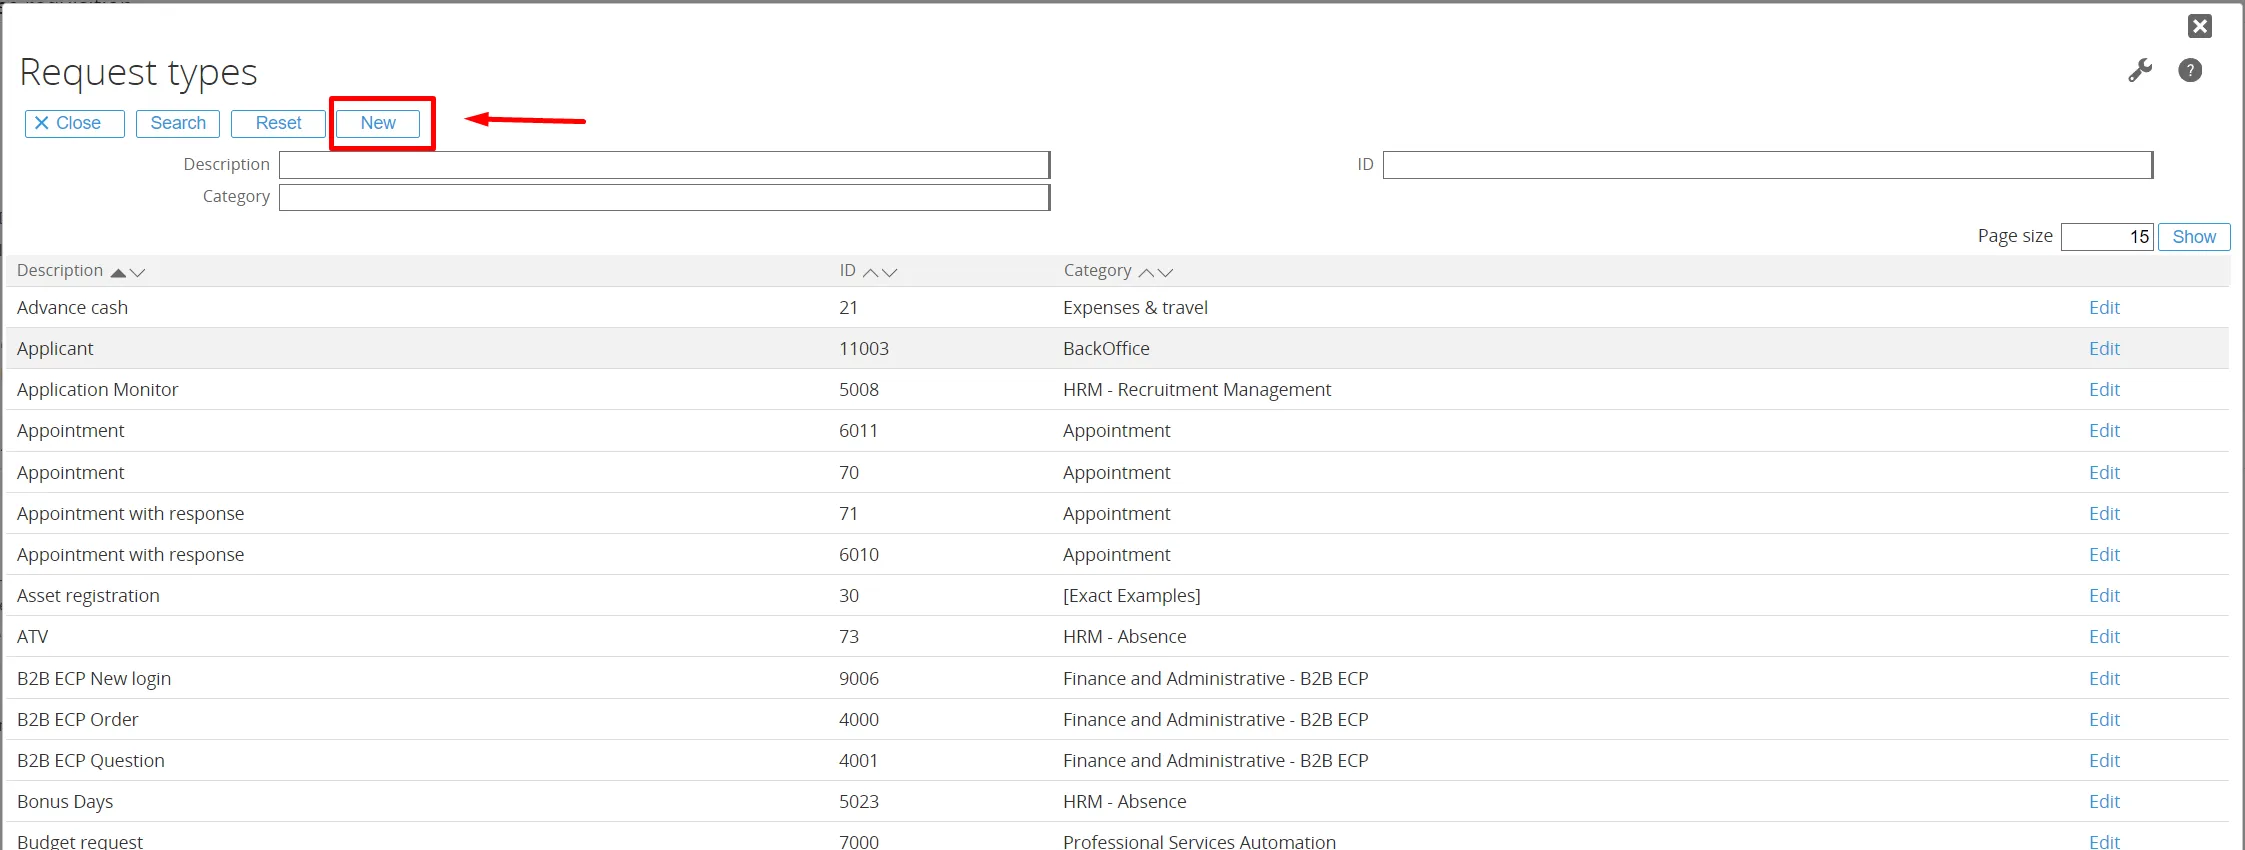
Section titled “Request Type Header (Purchase Requisition)”When clicking the Magnifying Glass Symbol at the end of the field Request Type Header, the Request Type can be selected from the available list or can be searched for by description, ID or category.

Tab General:
-
Field ‘Description’
The Request Type name is determined here. -
Field ‘Category’
The category of the Request Type is set here. -
Field ‘Active’
Determines whether the Request Type should be Active, Hidden, or Back Office.
More information about the tab ‘General’ can be found in the Synergy document:
15.031.027 Creating and modifying request types - General tab
Tab Fields:

When clicking on the underlined field name, the settings for the fields can be determined. The ‘Fields’ tab is divided in 12 sections. The most relevant sections will be shortly discussed below. Later in the manual, a case study will go into more detail on how to configure the ‘Fields’ tab.

-
Section ‘General’
States the field name and Request Type.- Entity: Select either Header or Lines.
- Property: Select the type of field to be added.
This links the field to the back office system.
-
Section ‘Position’
The sequence of the fields is set here. -
Section ‘Visible’
Defines for which Request Statuses the field will be visible, and for which security level. -
Section ‘Edit’
Defines for which Request Statuses the field will be editable. -
Section ‘Mandatory’
Defines for which Request Statuses the field is mandatory. -
Section ‘Browser’
Defines for which Request (Free fields) a predefined browser or a newly created browser can be used.
This browser can browse data in Synergy, Exact Globe, Exact Macola ES, or Max.⚠️ Currently, free fields are limited in the data that can be browsed, and back office data cannot be browsed.
-
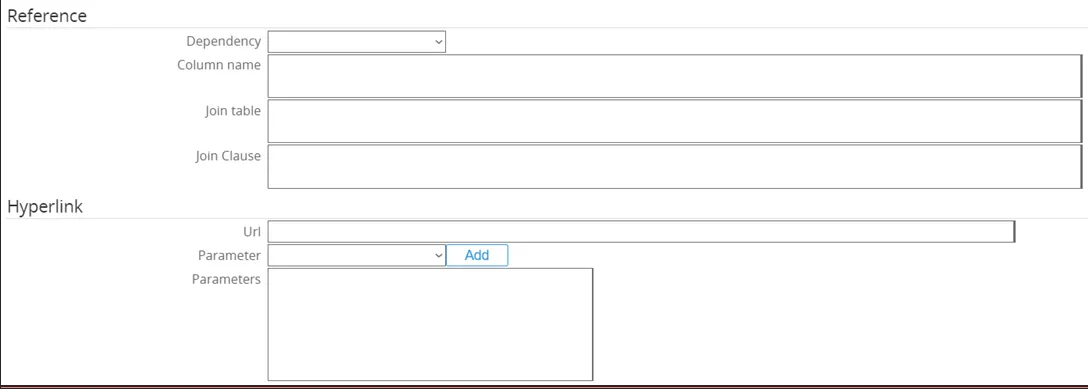
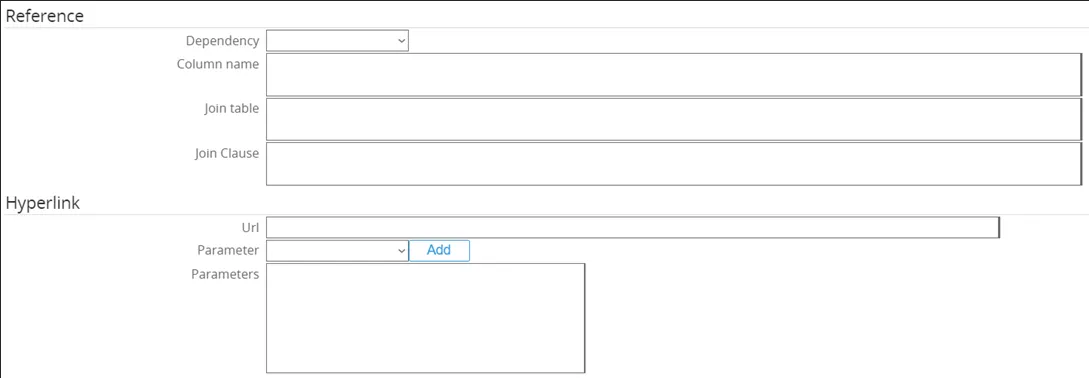
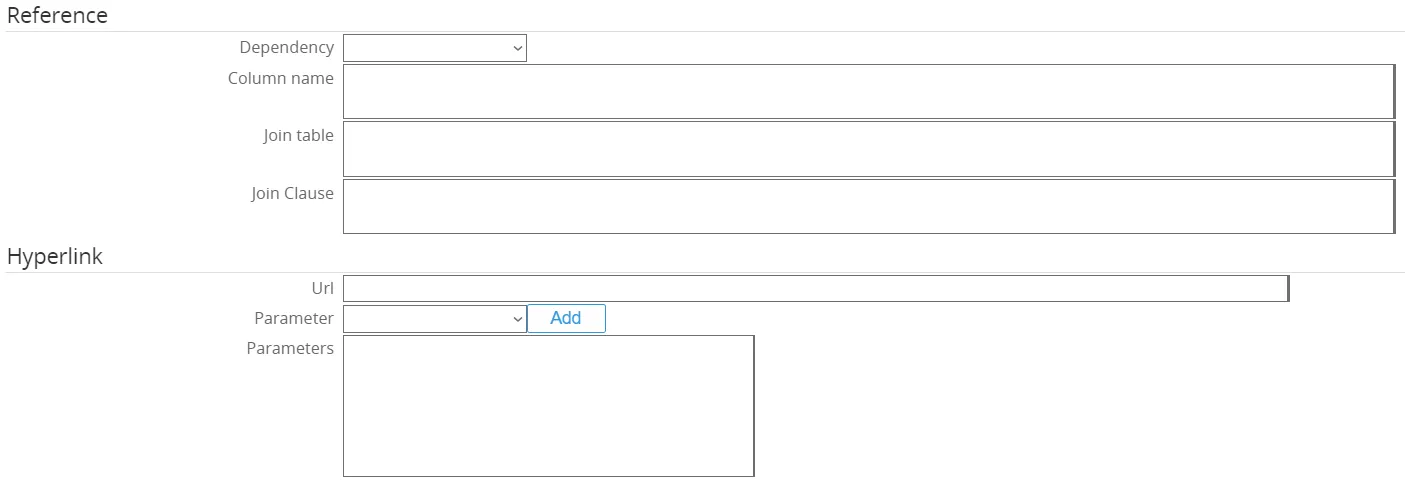
Section ‘Reference’
The reference field feature shows additional data based on other fields in the Request. -
Section ‘Hyperlink’
Defines for which Request (Free text field) will be a hyperlink/URL.
More information about the tab ‘Fields’ can be found in the Synergy document:
15.031.027 Creating and modifying request types - General tab
Tab Flow:
Here the flow for a request type can be defined, which is useful for directing the people in handling the sequence or the flow of a request from the start of the request till the request is completed. The tab ‘Flow’ is divided in 8 sections.

More information about the tab ‘Flow’ can be found in the Synergy document:
15.496.244 Creating and modifying request types - Flow tab
Tab Actions:
Here the actions information for a request type can be defined, which is useful for directing the users in taking actions upon the request type. The ‘Actions’ tab consists of 6 sections.
More information about the tab ‘Actions’ can be found in the Synergy document:
15.496.248 Creating and Modifying Request Types - Actions Tab
Request Type Lines (Purchase Requisition)
Section titled “Request Type Lines (Purchase Requisition)”When clicking the Magnifying Glass Symbol at the end of the field ‘Request Type Line’, the Request Type can be selected from the available list or can be searched for by description, ID or category.

When no Purchase Requisition Request Line type is available yet (in case of a new installation), the Purchase Requisition Request Line type needs to be created by clicking the ‘New’ button. This opens the New Request Type screen.
Please refer to the documentation in Purchase Request under ‘Request Type header’ for an explanation of the tabs and fields.
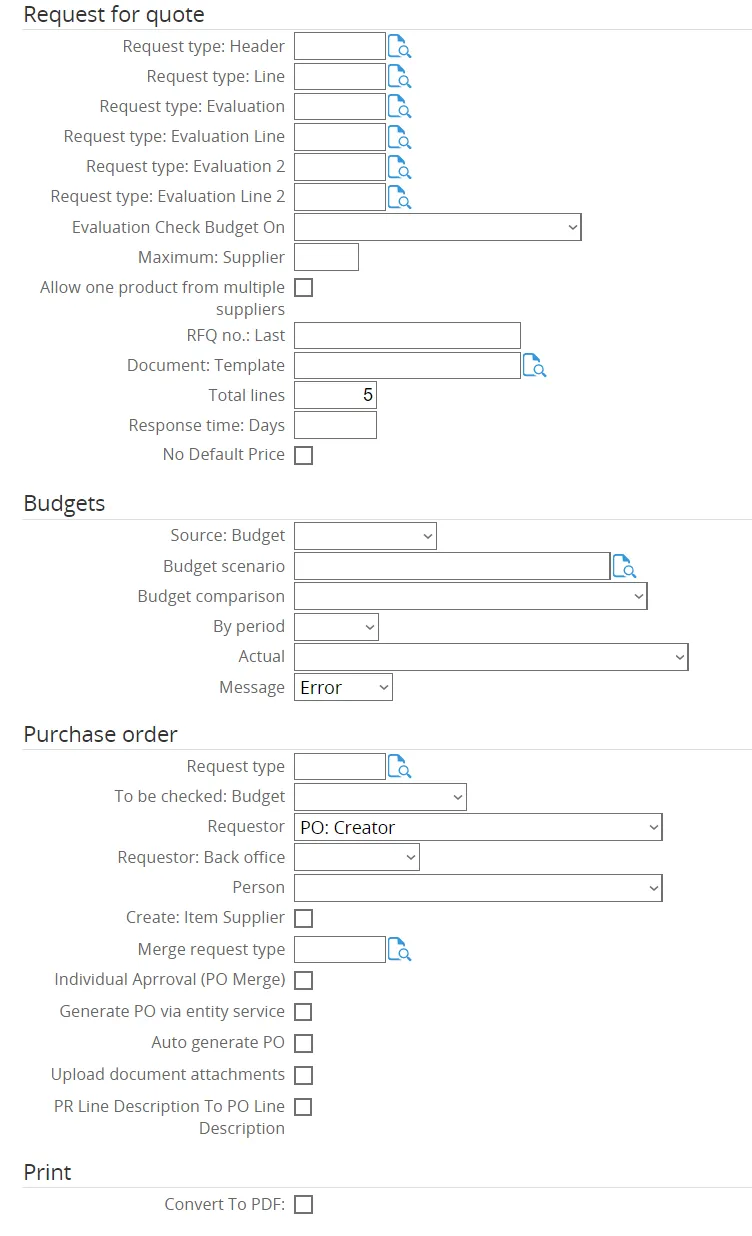
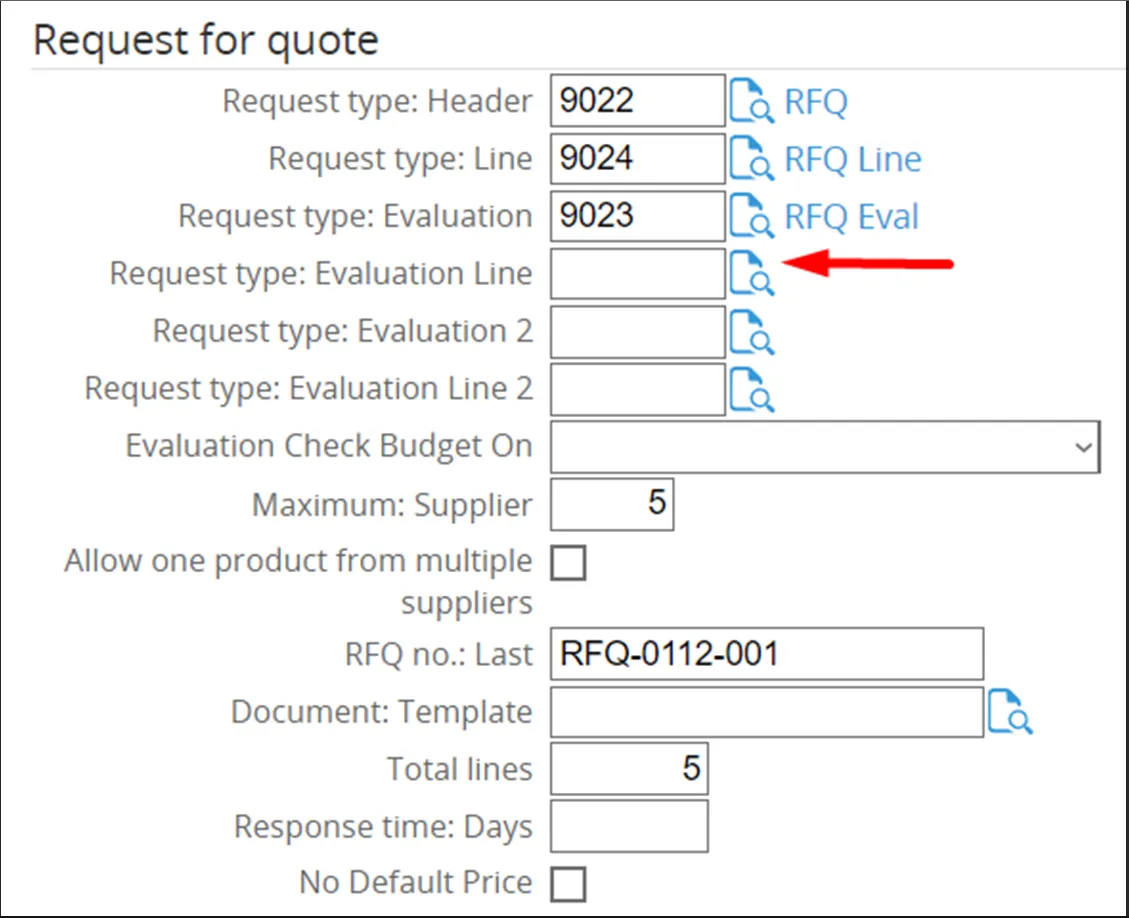
3.2.4 Section Request for Quote
Section titled “3.2.4 Section Request for Quote”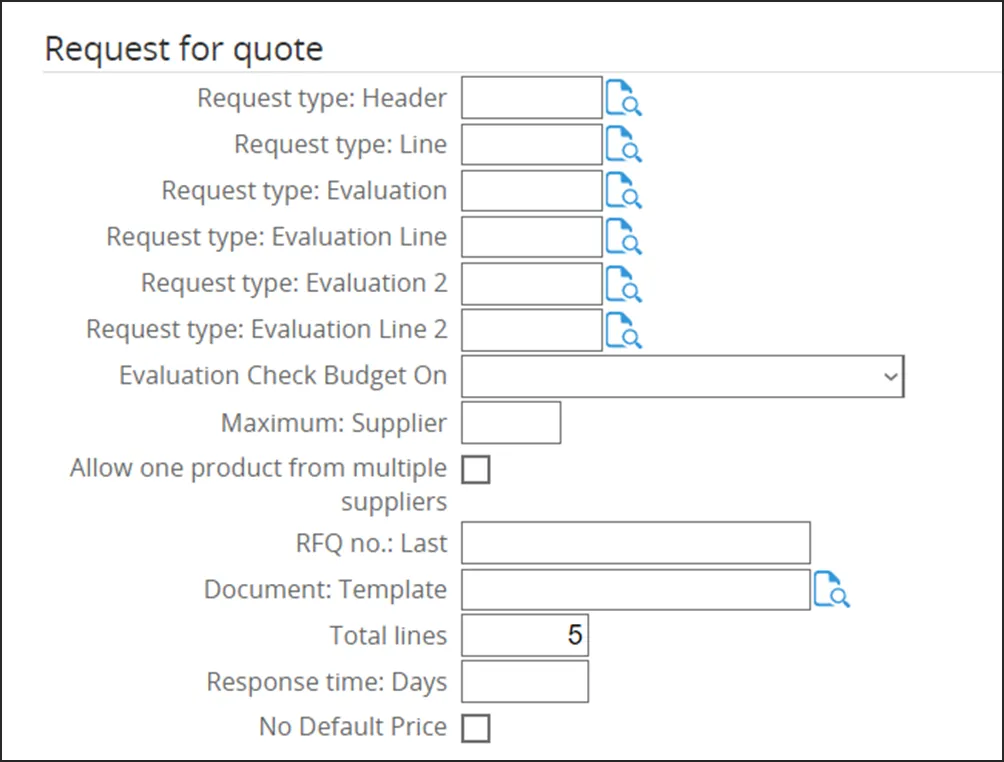
-
Request Type Header
The request type for the Header is determined here.
The Request Type Header will be described in more detail below. -
Request Type Line
The request type for the Lines is determined here.
The Request Type Line will be described in more detail below. -
Request Type Evaluation
The request type for Evaluation is determined here.
Evaluation is described in more detail below. -
Request Type Evaluation Line
The request type for the Lines is determined here.
The Request Type Line will be described in more detail below. -
Request Type Evaluation 2
Additional configuration for the request type Evaluation. -
Request Type Evaluation Line 2
Additional configuration for the request type Evaluation Line. -
Evaluation Check Budget On
Displays a budget warning based on the selected evaluation action.
Evaluation actions include: Recommend, Verify, Approve, Recommend + Verify, and others. -
Maximum Supplier
Defines the maximum number of suppliers.
This is the maximum number of suppliers to which the quotation can be sent. -
Allow One Product From Multiple Suppliers
When ticked, it allows one product to be offered by multiple suppliers in the RFQ. -
RFQ No Last
Defines the Request for Quotation number sequence. -
Document Template
Links the quotation document template used to send the RFQ.
The Document Template will be described in more detail below. -
Total Lines
Defines the number of lines in the Procurement Template.
In the RFQ, additional lines can be added at any time by using the Tab button. -
Response Time (Days)
Sets the number of days for the RFQ response due date. -
No Default Price
When ticked, it allows inputting the price manually in the RFQ instead of using a default price.
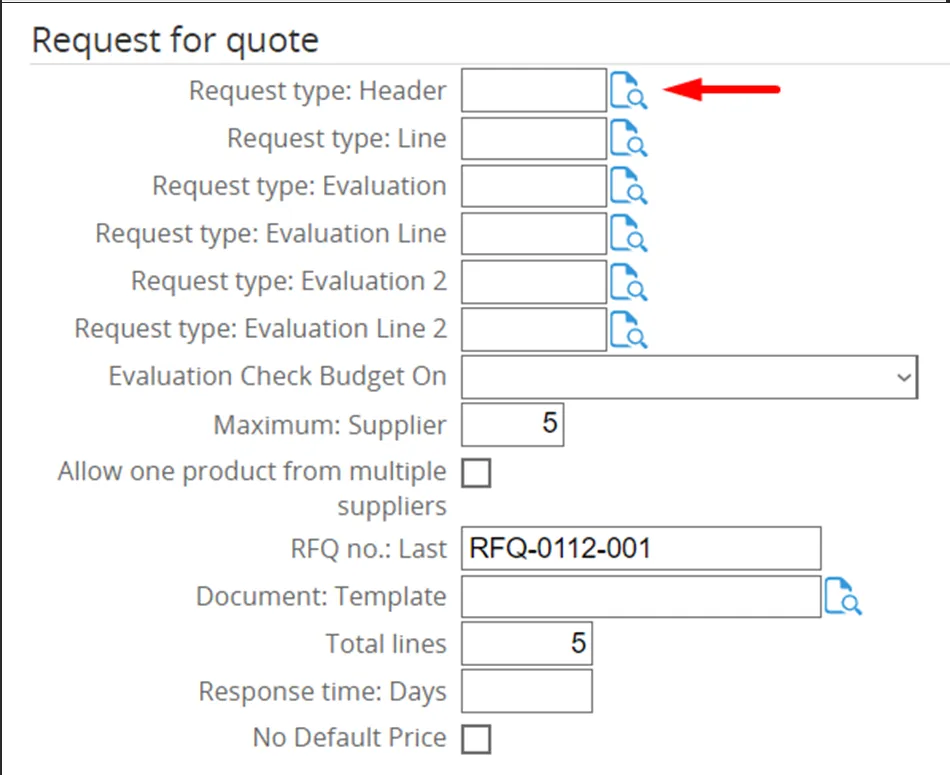
Request Type Header (Request for Quote)
Section titled “Request Type Header (Request for Quote)”When clicking the Magnifying Glass Symbol at the end of the field ‘Request Type Header’, the Request Type can be selected from the available list or can be searched for by description, ID or category.
A more description on the Document Template for the Request for Quote and how to configure will be provided in Request for Quote under ‘Request Type Header’.
Request Type Lines (Request for Quote)
Section titled “Request Type Lines (Request for Quote)”When clicking the Magnifying Glass Symbol at the end of the field ‘Request Type Line’, the Request Type can be selected from the available list or can be searched for by description, ID or category.
A more description on the Document Template for the Request for Quote and how to configure will be provided in Request for Quote under ‘Request Type Line’’.
Request Type Evaluation (Request for Quote)
Section titled “Request Type Evaluation (Request for Quote)”When clicking the Magnifying Glass Symbol at the end of the field ‘Request Type Evaluation’, the Request Type can be selected from the available list or can be searched for by description, ID or category.
A more description on the Document Template for the Request for Quote and how to configure will be provided in Request for Quote under ‘Request Type Evaluation’.
Request Type Evaluation Line (Request for Quote)
Section titled “Request Type Evaluation Line (Request for Quote)”When clicking the Magnifying Glass Symbol at the end of the field ‘Request Type Evaluation Line’, the Request Type can be selected from the available list or can be searched for by description, ID or category.
A more description on the Document Template for the Request for Quote and how to configure will be provided in Request for Quote under ‘Request Type Evaluation Line’.
Document Template
Section titled “Document Template”When clicking the Magnifying Glass Symbol at the end of the field ‘Document Template’, the document template can be selected from the available list or can be searched for by document number.
A more description on the Document Template for the Request for Quote and how to configure will be provided in Request for Quote under ‘Document Template’.
3.2.5 Budgets
Section titled “3.2.5 Budgets”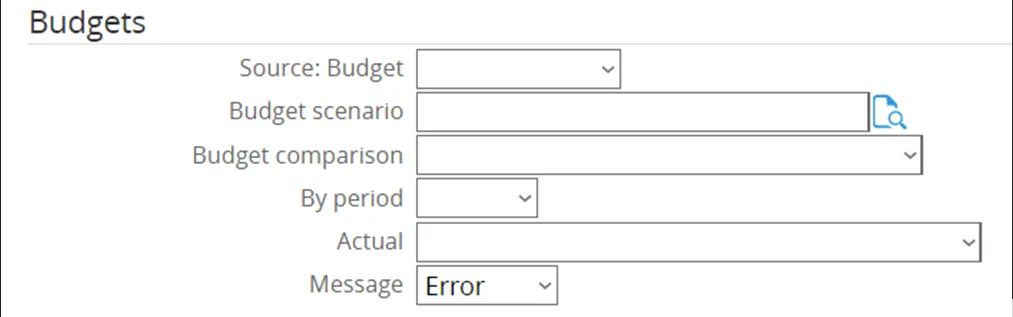
-
Source: Budget
Select the source from which the budget will be taken. -
Budget Scenario
Defines the budget scenario based on Exact Globe. -
Budget Comparison
Selects the entity level at which the budget should be compared.
Examples: Group, Division, Cost Center, etc. -
By Period
Defines the period to be used: Month or Year. -
Actual
Determines how the budget will be checked. There are 3 options:- Actual → Budget is checked against orders that have already been delivered.
- Actual + Ordered → Budget is checked against delivered orders plus requisitions that have been ordered but not yet received.
- Purchase Requisition → Budget is checked against outstanding Purchase Requisitions (not yet ordered), as well as actual and ordered requisitions.
-
Message
Defines which type of message will be displayed when processing the budget.
3.2.6 Purchase Order
Section titled “3.2.6 Purchase Order”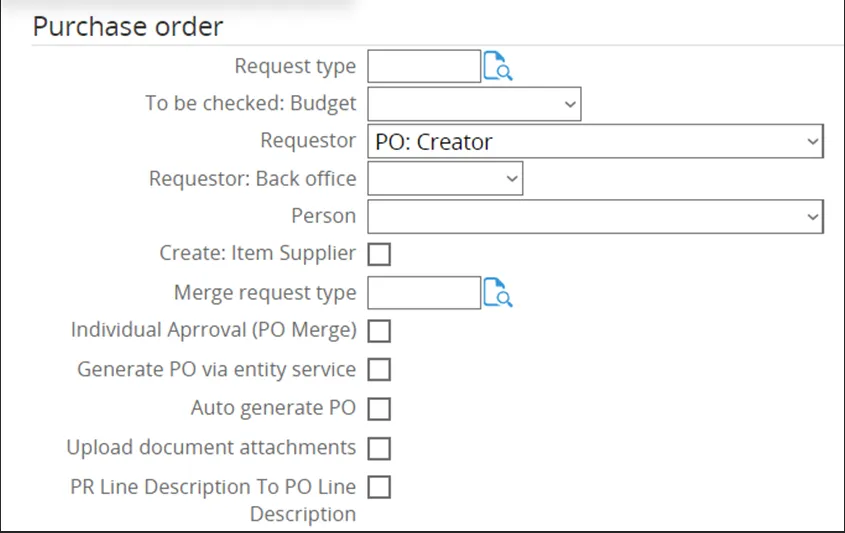
-
Request Type
Defines the request type for the Purchase Order. -
To Be Checked Budget
Select when budget checking should take place. -
Requestor
Defines who will be set as the requestor of the items. -
Requestor: Back Office
Defines who will be set as the requestor of the items in the back office program. -
Person
Defines who will be set as the person in the back office program who creates the order. -
Create Item Supplier
When ticked, the system will automatically create the Vendor/Item Supplier if it does not exist when processing the Generate PO. -
Merge Request Type
Defines which Request Type will be merged into the PO request. -
Individual Approval (PO Merge)
When ticked, enables individual approval flow requests when performing a PO Merge. -
Auto Generate PO
When ticked, automatically generates the Purchase Order during approval at PR after Realise. -
Upload Document Attachments
When ticked, uploads document attachments from PR/RFQ to the Exact Globe PO. -
PR Line Description to PO Line Description
When ticked, sets the long description in the PO Line from the PR Line description instead of using the item text description.
3.2.7 Print
Section titled “3.2.7 Print”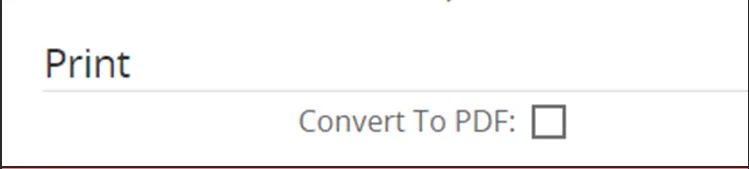
- Convert To PDF
it will be create document attachment as PDF when create a letter.
4. Procurement Configuration
Section titled “4. Procurement Configuration”4.1 Introduction
Section titled “4.1 Introduction”Having identified the basics of the Procurement Template in Chapter 2, this chapter will show how to configure the Procurement Template. This will be done by means of a case study of the company Ome Gijs Oliebollen.
Ome Gijs Oliebollen has been working with Synergy and Globe to manage their ERP processes and have recently acquired the new Procurement Requisition Module. The steps below will guide through the process how they have implemented the new module.
4.2 Setting up the Procurement Template
Section titled “4.2 Setting up the Procurement Template”The first step is to set up a new Procurement Template. To do this, click Procurement > Setup and click on ‘Procurement Template’.

4.2.1 Section General
Section titled “4.2.1 Section General”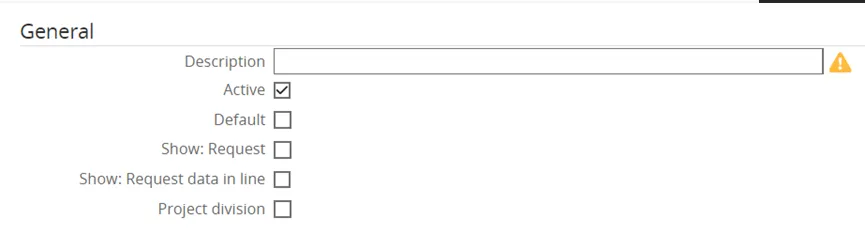
-
Description
The title is entered: PR Template. -
Active
The checkbox is ticked, making this an active template. -
Default
The checkbox is ticked, making this the default template to use. -
Show Request
Not ticked.
By default, when opening a request from your workflow it redirects to the Purchase Request, Request for Quote, Evaluation, or Purchase Order screen.
When ticked, it will open the request instead of redirecting.⚠️ This option is mostly used for debugging purposes, allowing you to test the standard workflow setup.
-
Show Request Data in Line
The checkbox is ticked, showing the request at the PR Line. -
Project Division
The checkbox is ticked, making the project available only within a specific division.
4.2.2 Section Purchase Requisition
Section titled “4.2.2 Section Purchase Requisition”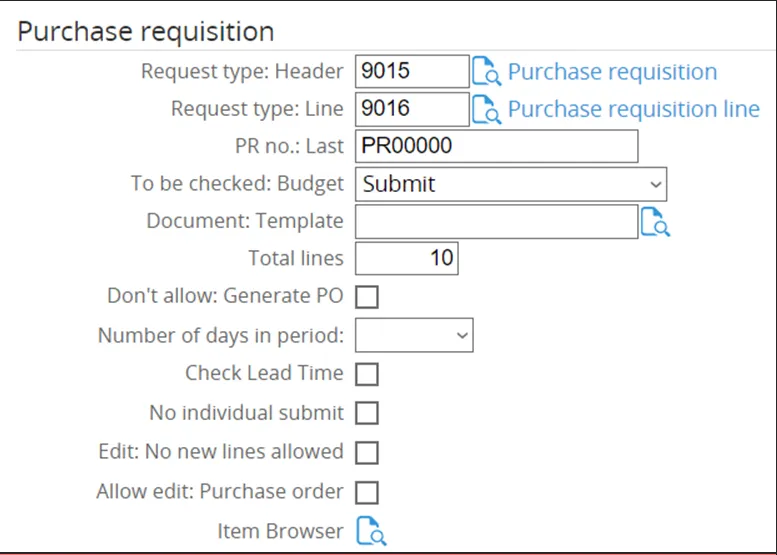
-
Request Type Header
The newly created Request Type Purchase Requisition as Header was selected.
Below will be shown in detail how this Request Type was created. -
Request Type Line
The newly created Request Type Purchase Requisition Line as Line was selected.
Below will be shown in detail how this Request Type was created. -
PR No: Last
The Purchase Requisition number was entered in this field.
Subsequent Purchase Requests will increment from this number. -
To Be Checked: Budget
Set to Submit.
This means that there will be a budget check upon submitting the Purchase Requests.💡 Alternatives: budget checks can be set to Creation, Approval, or a combination of these.
-
Total Lines
Set to 10.
The Purchase Request will initially have 10 lines. More lines can be added by pressing the Tab key on the last line.
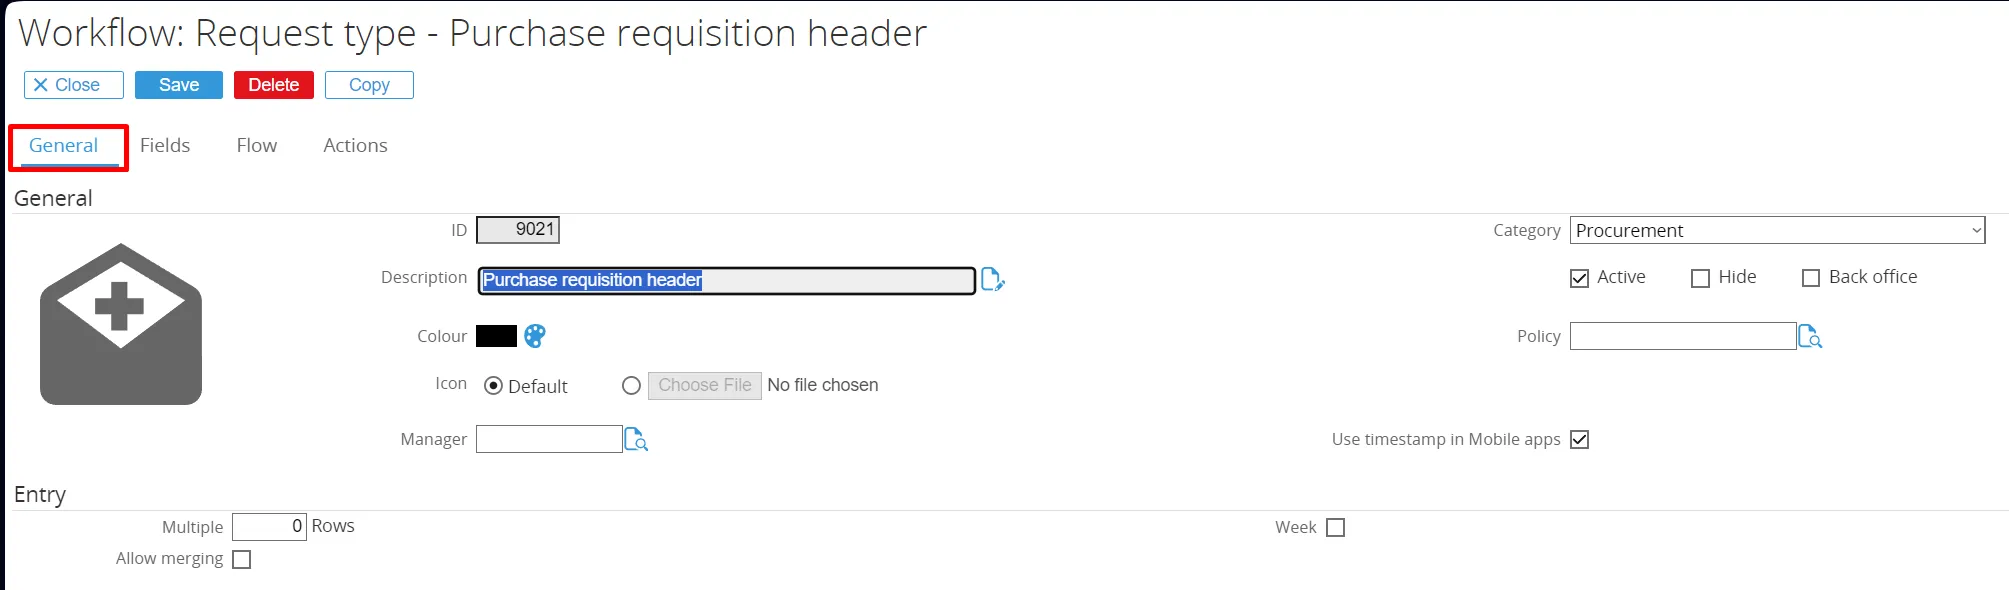
Request Type Header
Section titled “Request Type Header”Since there is no existing Request Type Header for Purchase Requisition available, a new one has to be created. To do this, first click the magnifying glass icon over the document.

Tab ‘General’
Section titled “Tab ‘General’”The new Request Type screen will open on the tab ‘General’.
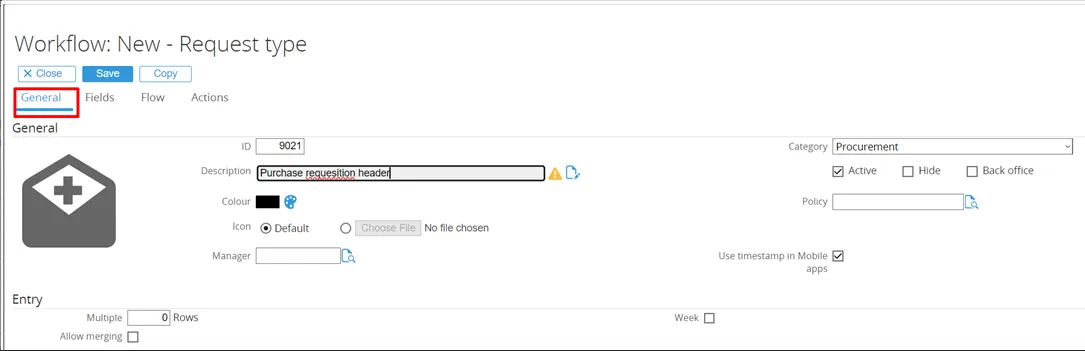
-
ID
Set to 9021201.
Any non-existing ID can be entered here. -
Description
The title of the Request Type is entered in this field. -
Category
Set to Purchase RequisitionProcurement. -
Active
The checkbox is ticked by default.
Since this will be an active Request Type, that setting remains unchanged.
Tab ‘Fields’
Section titled “Tab ‘Fields’”Next, click on the tab ‘Fields’. Here, the default fields are displayed.
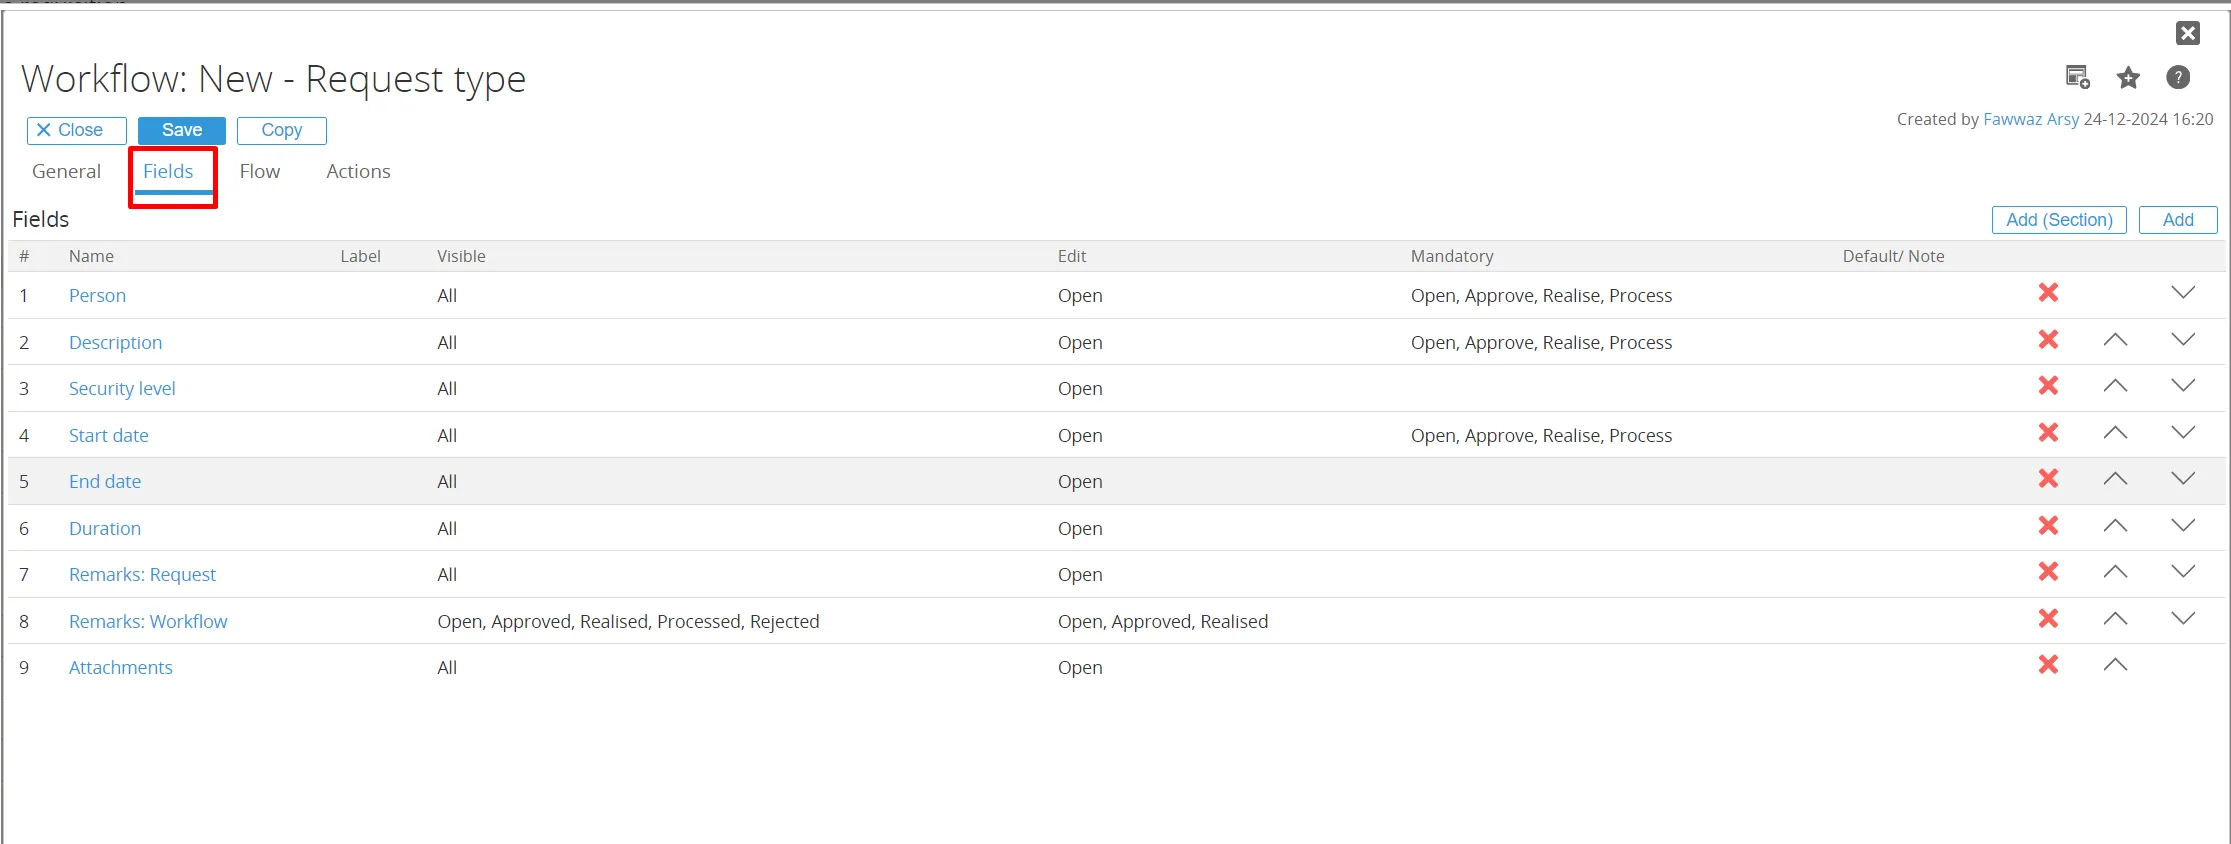
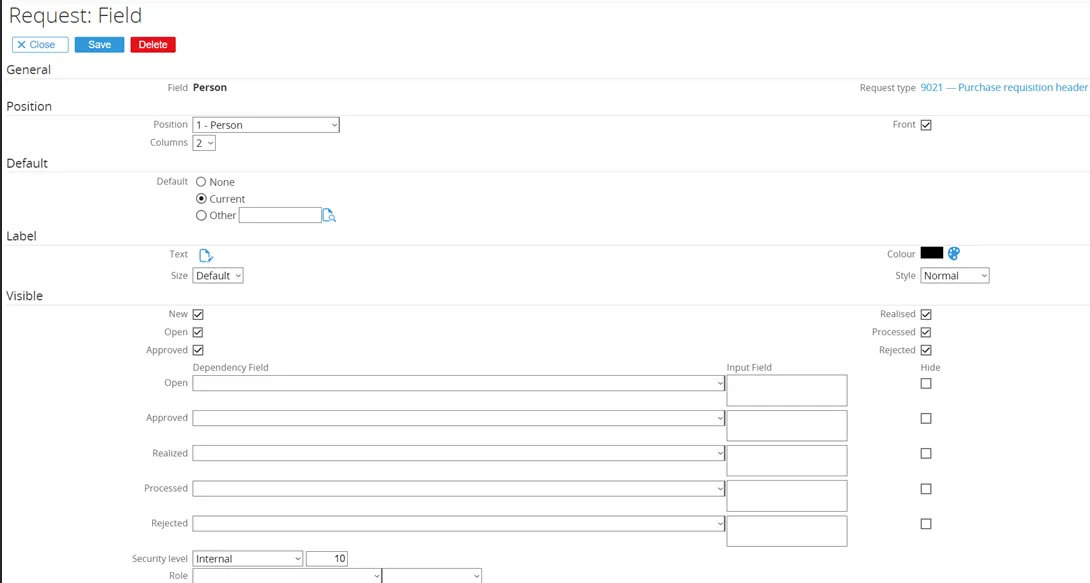
In the next screen can be chosen which fields to add. The first field to add will be ‘Account’.
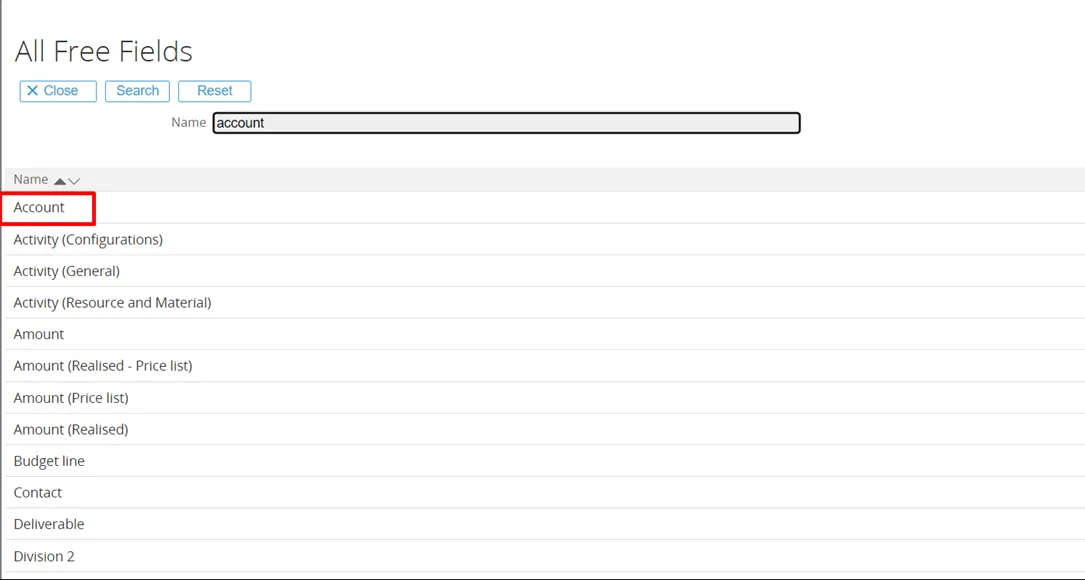
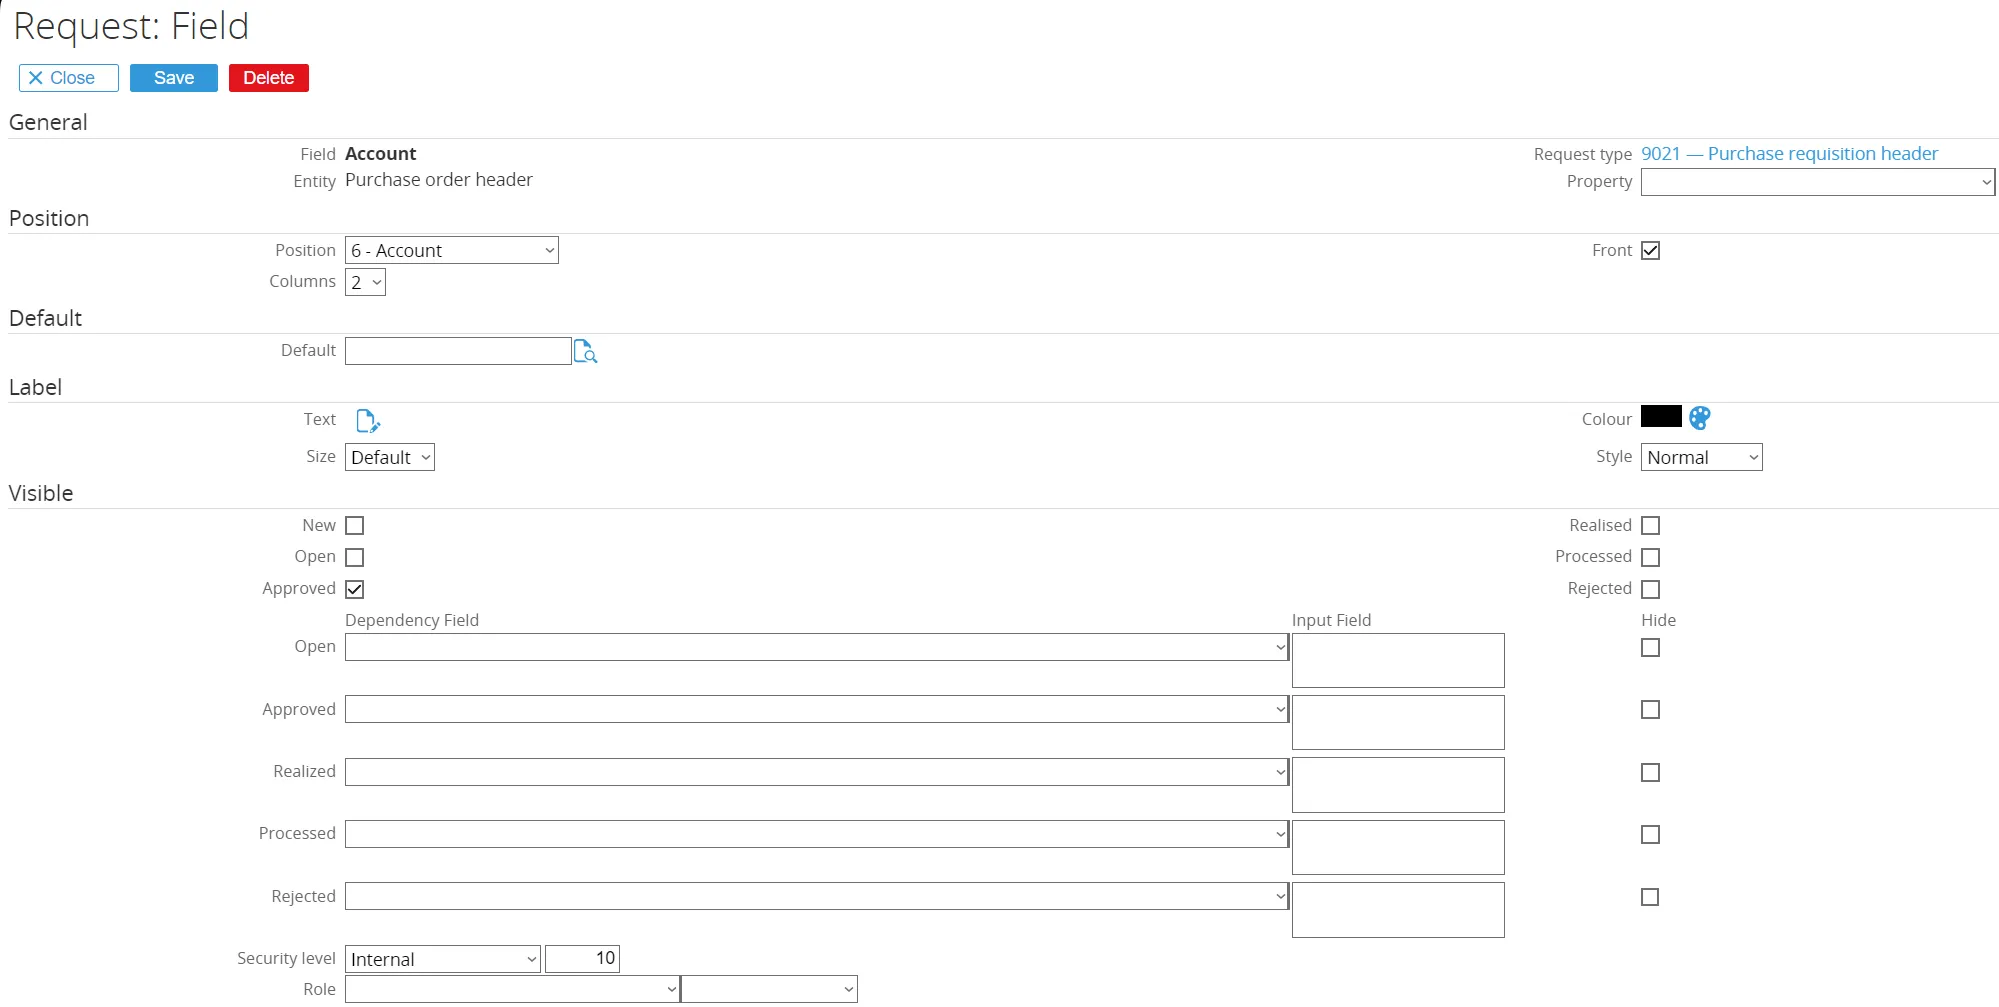
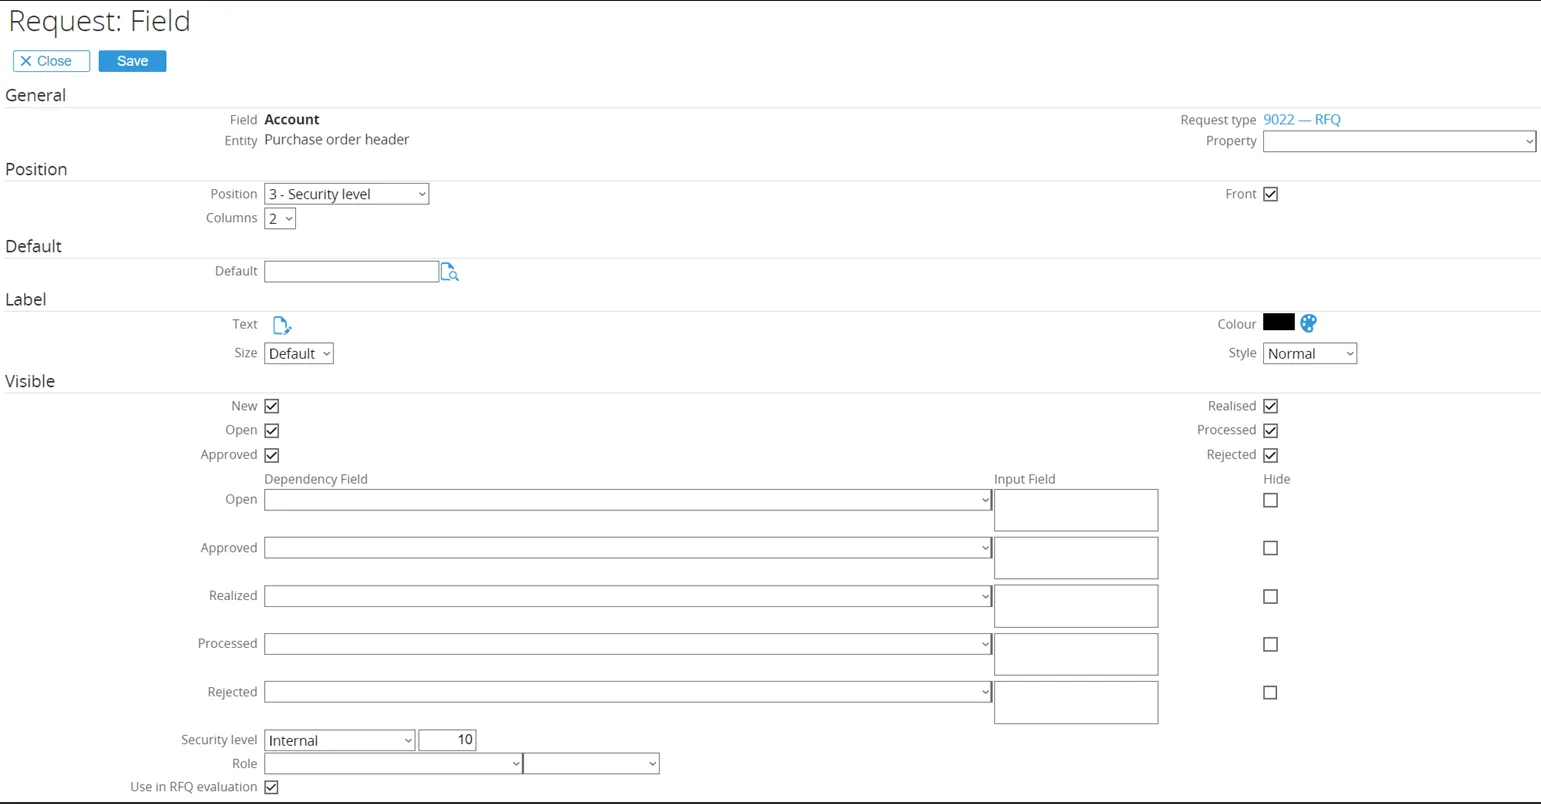
The ‘Account’ field will open for configuration.
-
General
The Fieldname and Request Type are already populated by default. -
Position
The position is changed from 10 to 6, moving the field up in the Purchase Requisition Header.
The columns remain set to 2, meaning another field (e.g., Account) can be placed next to it without consuming the entire line. -
Visible
Only the checkbox Approved is ticked.
The field Account will not be displayed in the Purchase Requisition Header for any other status than Approved.
The Security Level remains at 10 (the standard level for company use). -
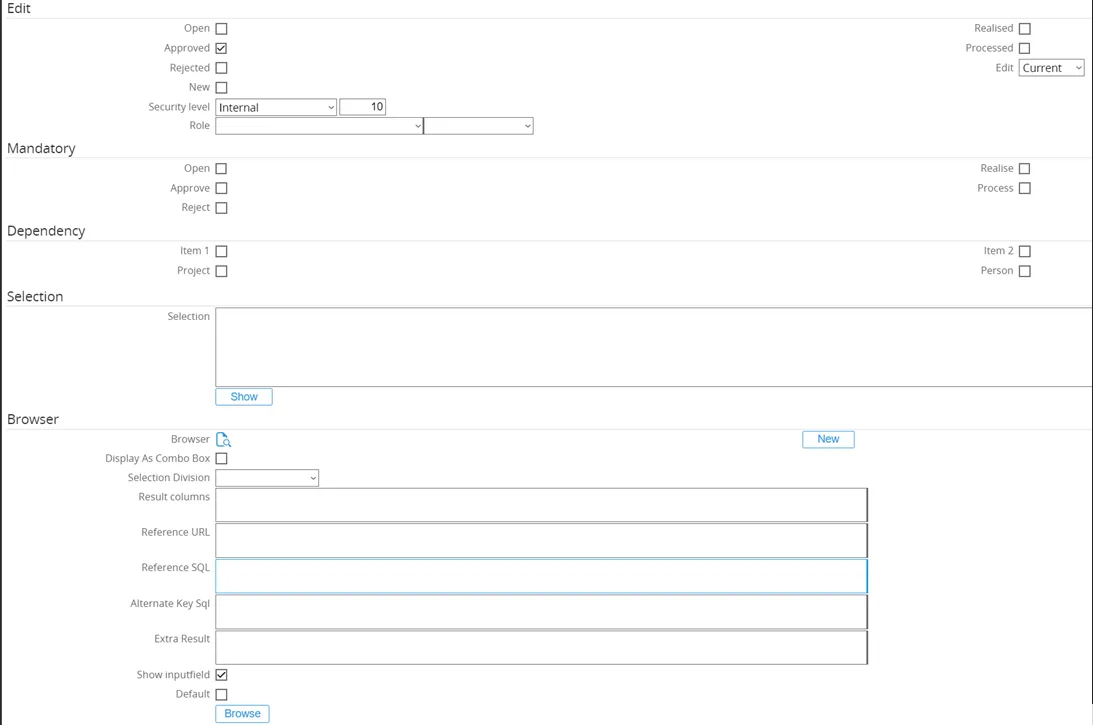
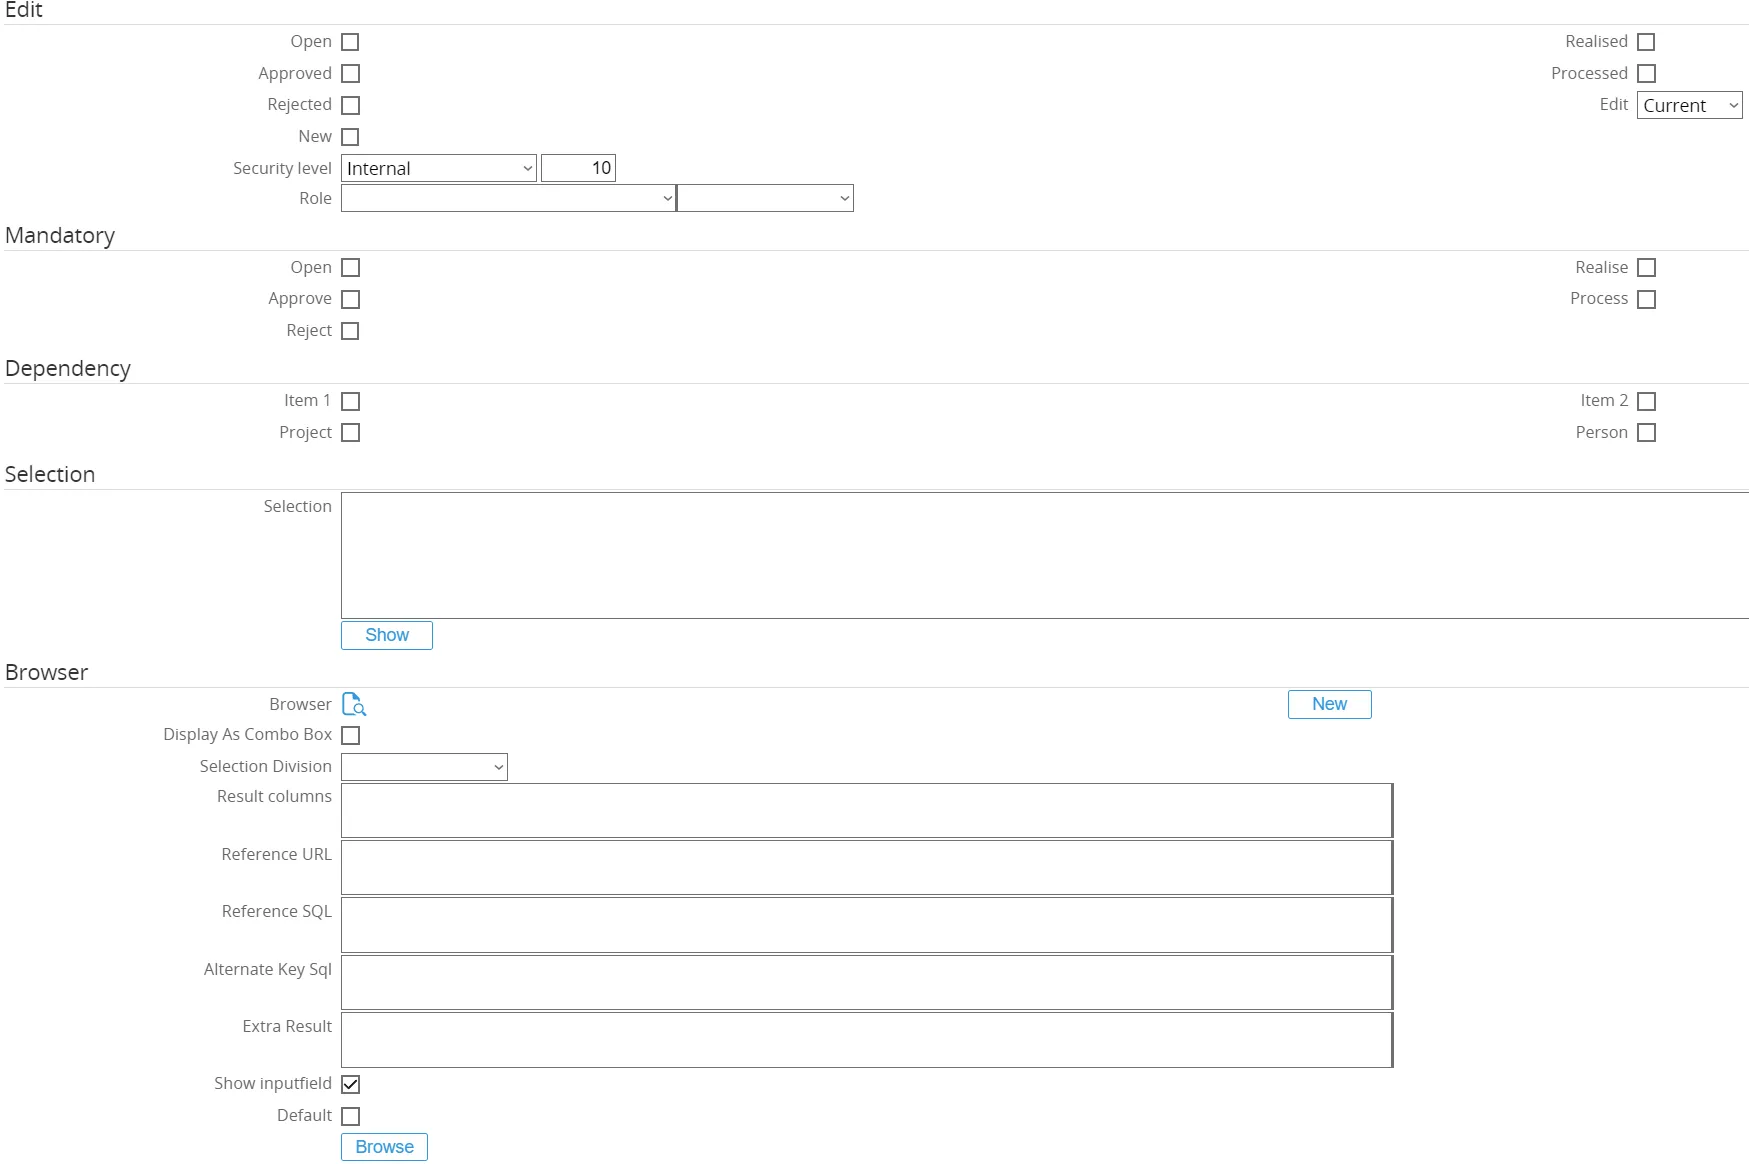
Edit
The checkbox Approved is ticked.
The field Account can be edited when the Purchase Requisition Header has the status Open or Approved. -
Mandatory
No checkboxes are ticked.
This means the field Account will not be mandatory for any of the statuses. -
Dependency
No checkboxes are ticked.
This means there will be no dependency on any item, person, or project linked.
Finally, click the ‘Save’ button to save the configuration for this field.
The end result for the field ‘Account’ will look like this:
Fields Added
- Project
- Division 2
- Procurement Cost Center
- Purchase Order Number
- Amount
- Procurement Delivery To
- Free Text 10
Fields Removed (Default)
- Duration
- Attachments
The end result for the fields used in the Purchase Requisition Header used by Ome Gijs Oliebollen looks like this:

15.566.353 Customizing request type fields (Main document)
Tab ‘Flow’
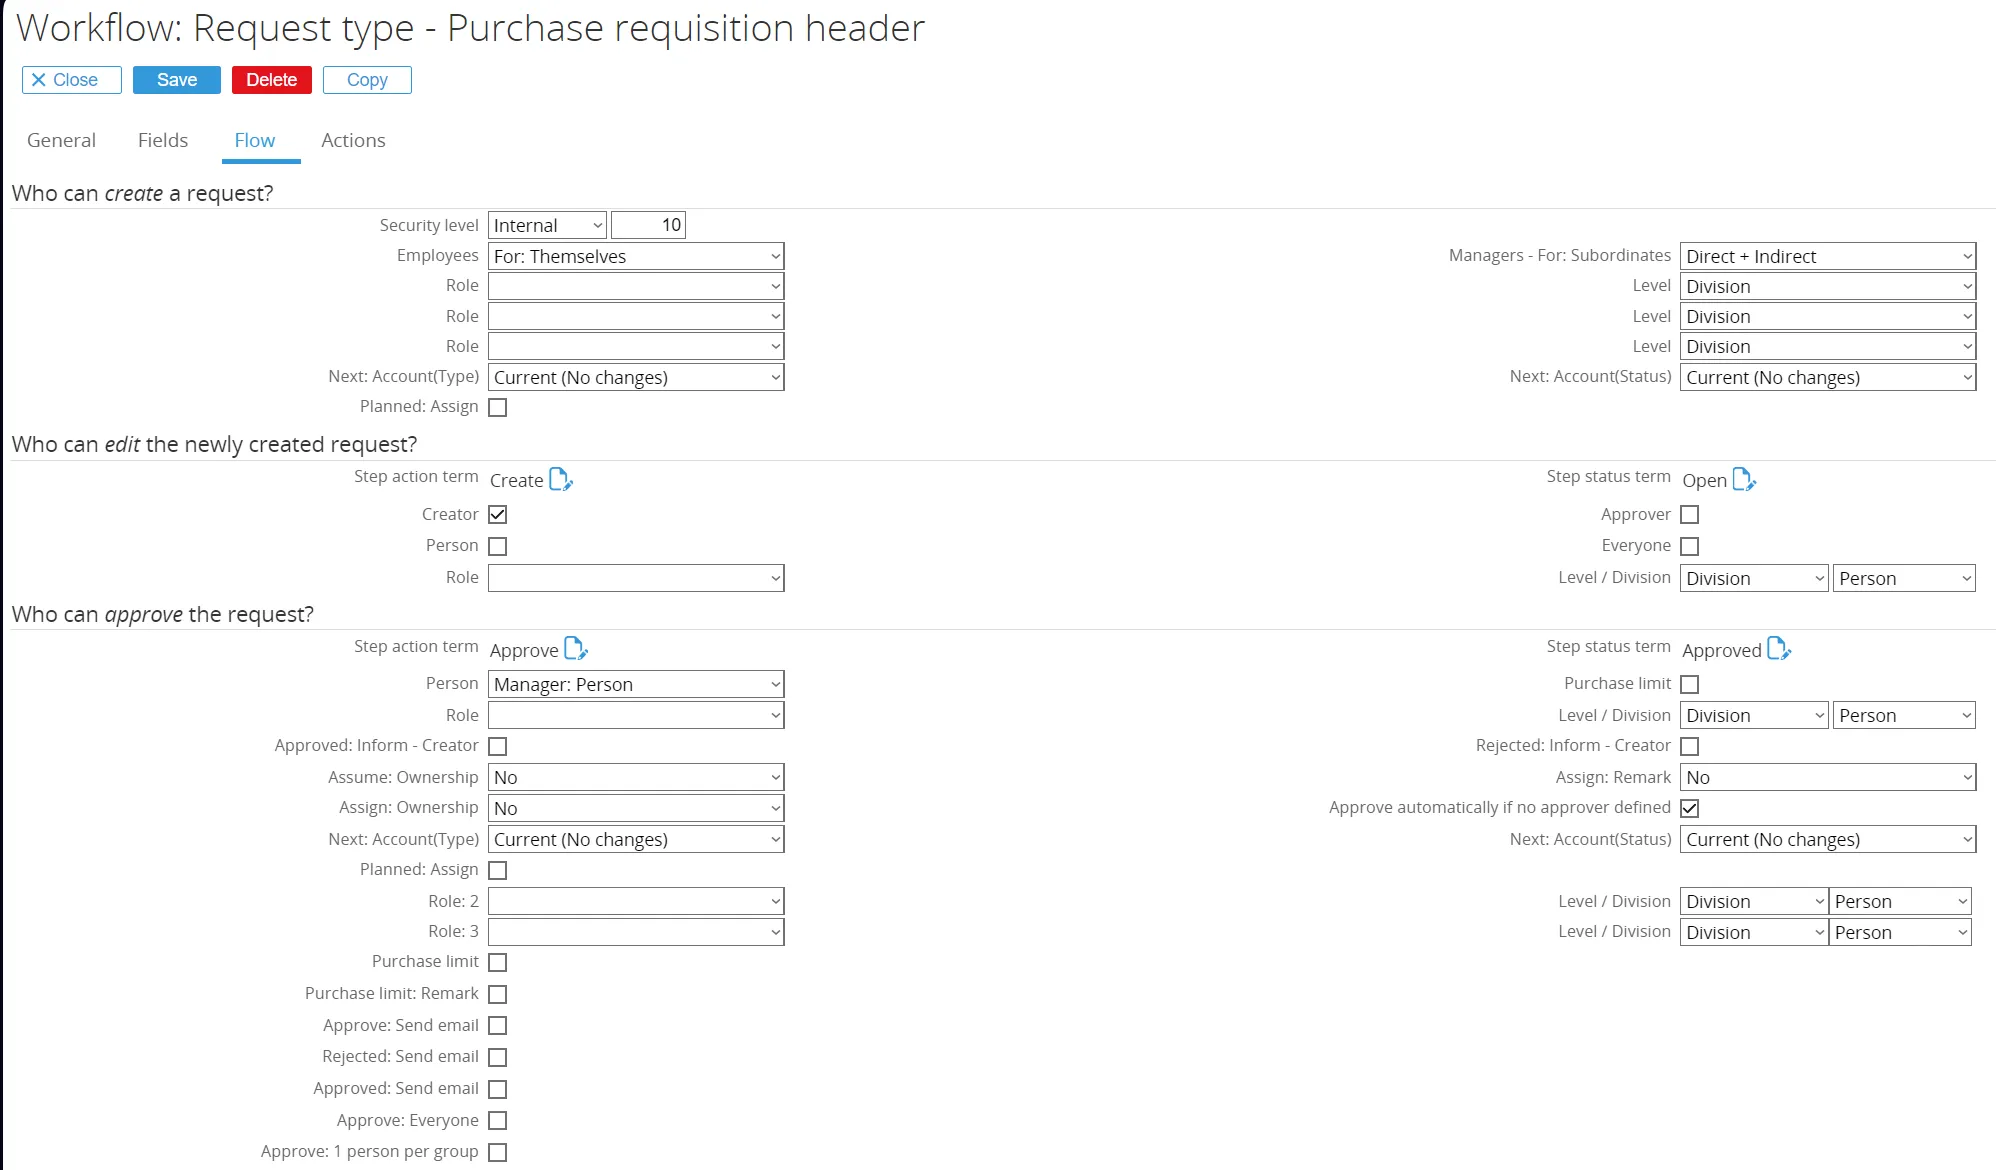
Section titled “Tab ‘Flow’”Next, click on the tab ‘Flow’. Here, the flow for a request type can be defined, which is useful for directing the people in handling the sequence or the flow of a request from the start of the request till the request is completed.
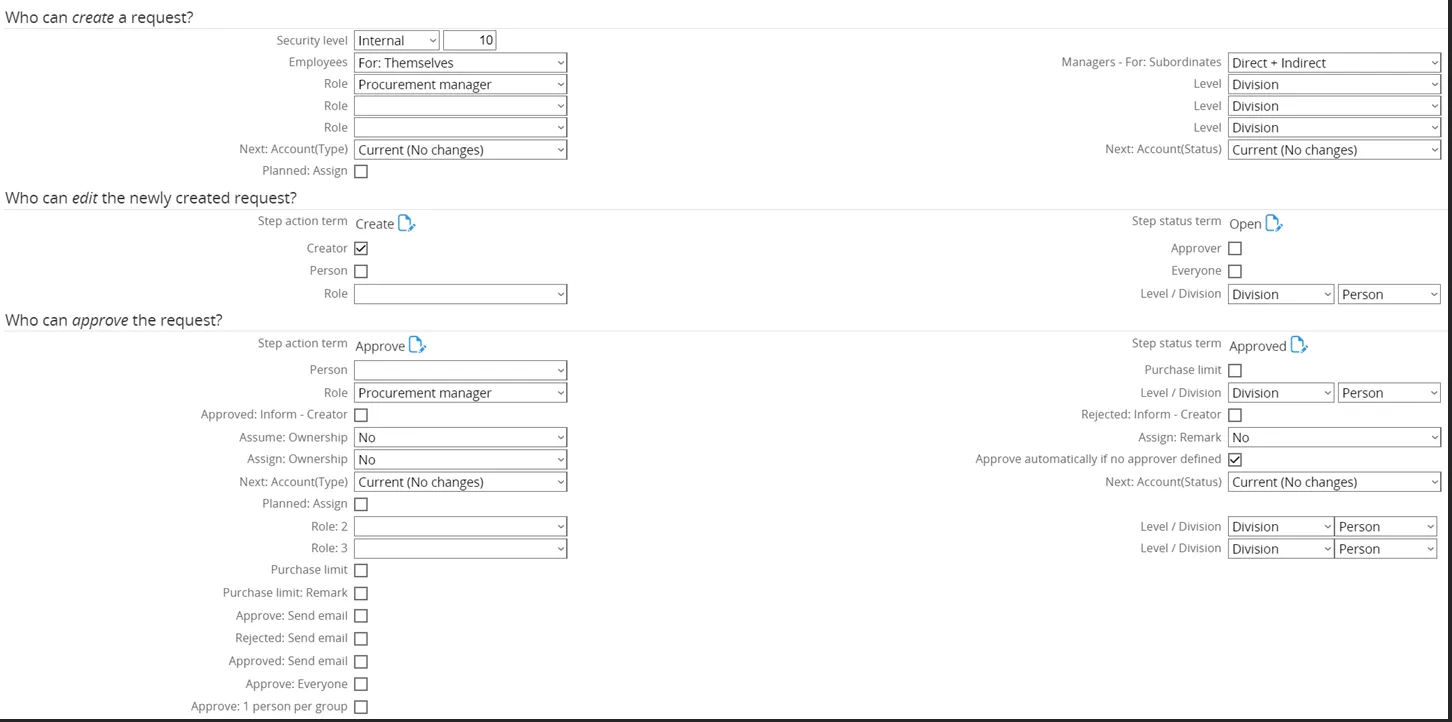
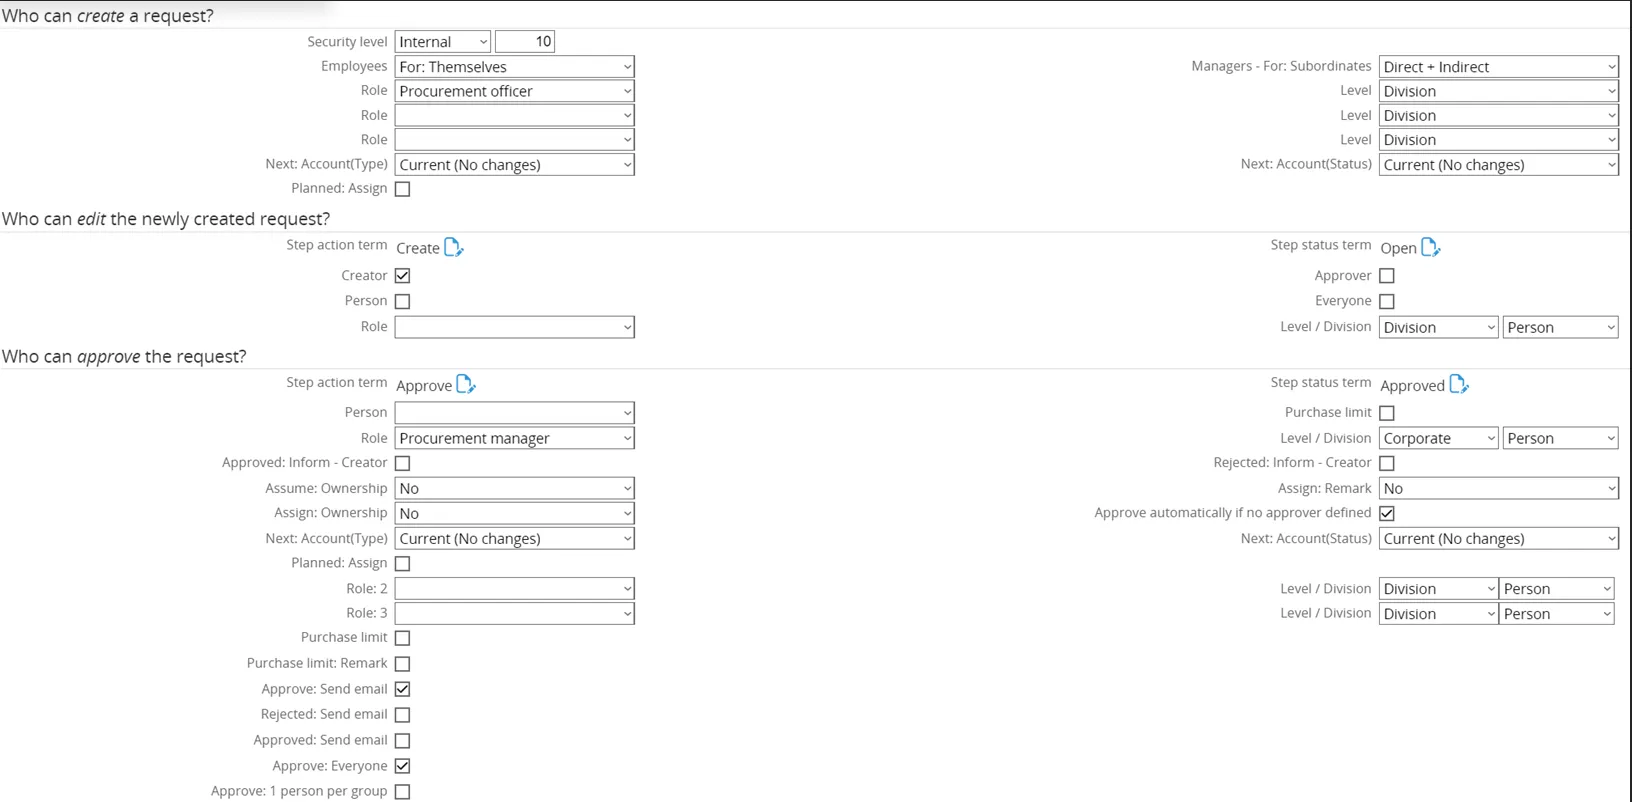
Ome Gijs Oliebollen configured the flow for the Purchase Requisition Header as follows:
Example – Workflow Roles & Permissions
Section titled “Example – Workflow Roles & Permissions”-
Who can create request
Set to the role Procurement Manager. -
Who can edit new request
- Step Action Term: Requested by
- Step Status Term: Requested
- Approver: Ticked → allows the approver to edit the request as well.
-
Who can approve the request
No changes required. -
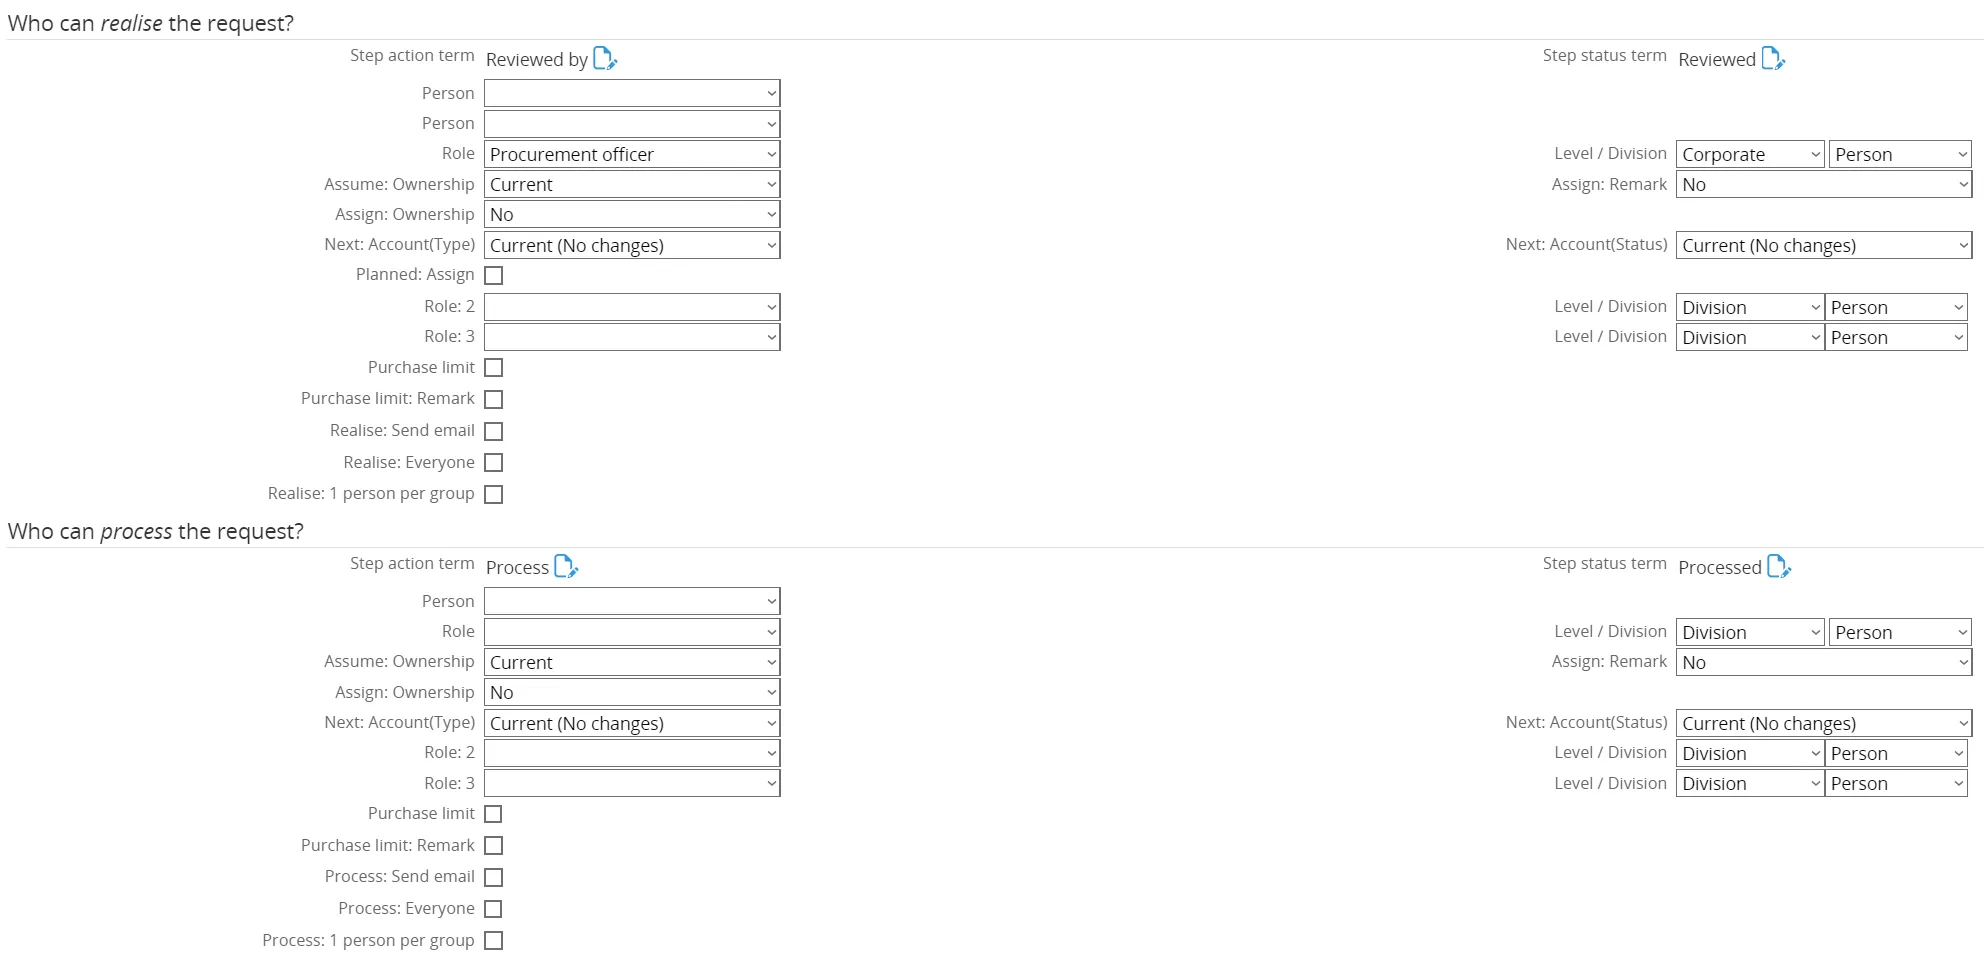
Who can realize the request
- Step Action Term: Reviewed by
- Step Status Term: Reviewer
- Role: Procurement Officers
- Level: Changed to Corporate (instead of Division).
This means the request will be realized when the reviewer has reviewed it at the corporate level.
-
Who can process the request
No changes required. -
Who can reopen the request
No changes required. -
Who can reject the request
No changes required. -
Who can delete the request
No changes required.
The end result for the flow used in the Purchase Requisition Header looks like this:

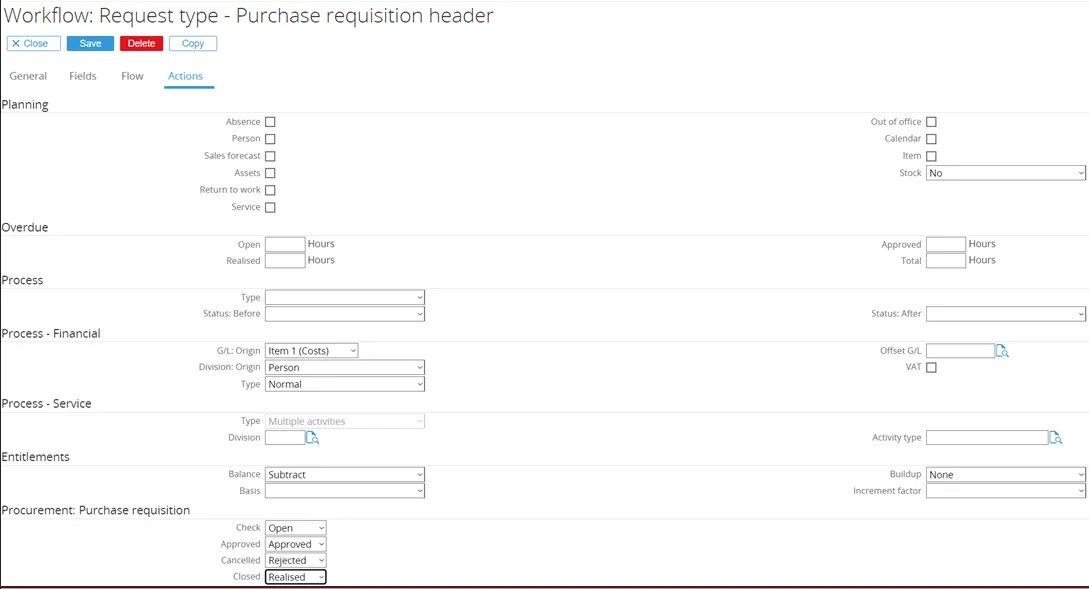
Tab ‘Action’
Section titled “Tab ‘Action’”Finally, click on the tab ‘Actions’. Here the actions information for a request type can be defined, which is useful for directing the users in taking actions upon the request type.
The actions tab does not require any changes. However, a new section is added by GLM Systems to be able to link the status of the Purchase Requisition Header to the workflow status.
The new section ‘Procurement Purchase Requisition’ consists of the following fields:
- Check
- Approved
- Cancelled
- Closed
These fields can be linked to workflow statuses, so that status will be updated according to the status of the Purchase Requisition Header.
The end result for the actions used in the Purchase Requisition Header looks like this:

Request Type Line
Section titled “Request Type Line”Since there is no existing Request Type Line for Request for Quote available, a new one has to be created. To do this, first click the magnifying glass icon over the document.
Tab General
Section titled “Tab General”The new Request Type screen will open on the tab ‘General’.
- ID: Set to
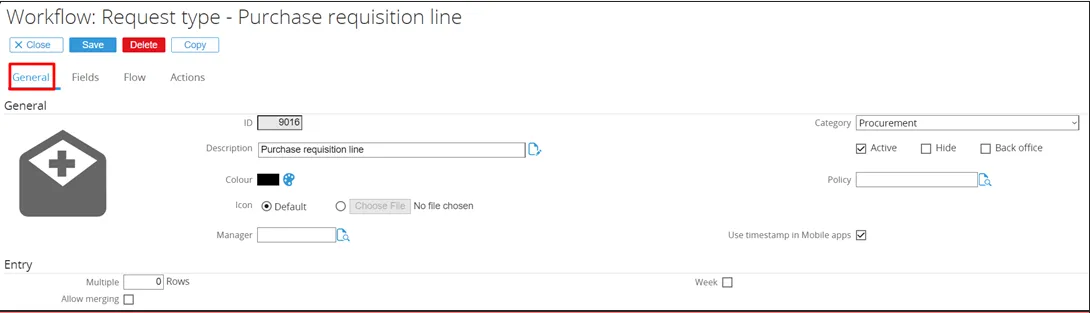
9016. Any non-existing ID can be entered here. - Description: The title of the Request Type is entered here.
- Category: Set to Purchase Requisition.
- Active: This checkbox is ticked by default. Since this will be an active Request Type, it remains unchanged.
Tab ‘Fields’
Section titled “Tab ‘Fields’”Next, click on the tab ‘Fields’. Here, the default fields are displayed.
In the next screen can be chosen which fields to add. The first field to add will be ‘Item 1’.
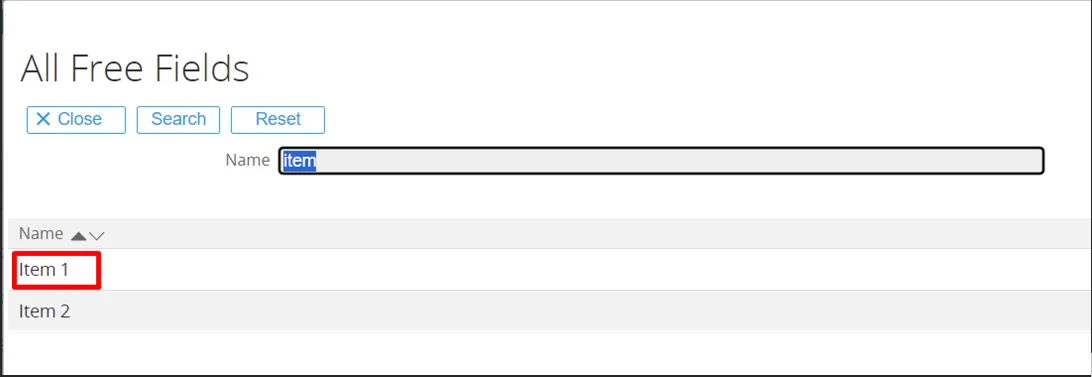
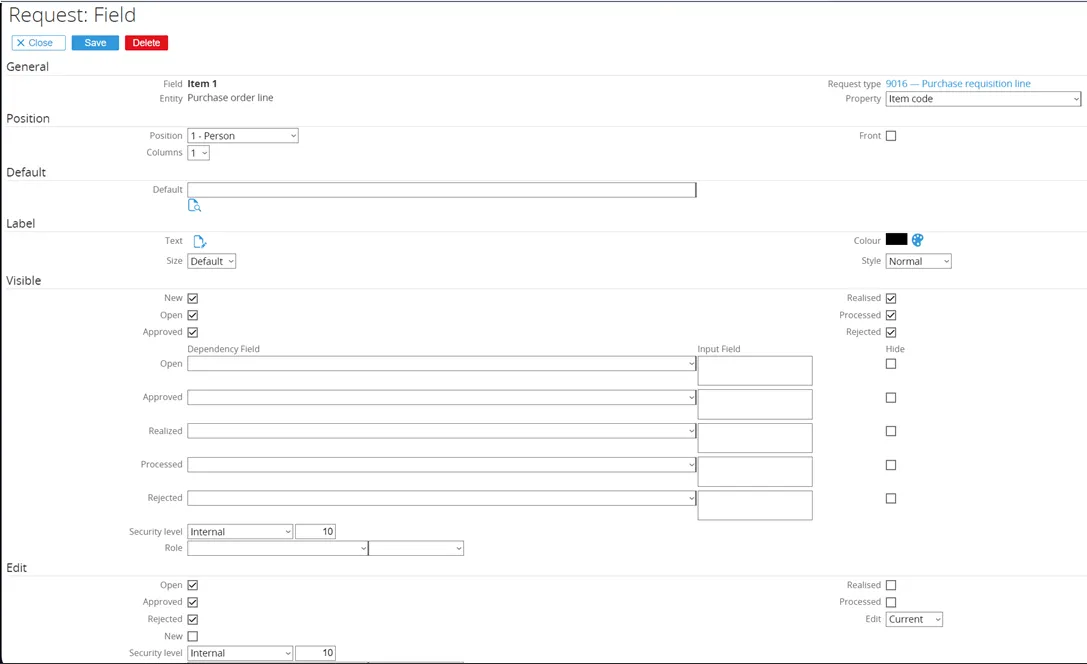
The ‘Item 1’ field will open for configuration.
- General: The Fieldname and Request Type are already populated by default.
- Position: Changed from
10to1. This moves the field up in the Purchase Requisition Line.- Columns are set to
1, meaning there cannot be another field next to Account; it will consume the entire line.
- Columns are set to
- Visible: All checkboxes remain ticked. The field Item 1 will be shown for every Request status.
- Security level remains
10(standard company level).
- Security level remains
- Edit: Checkboxes Open, Approved and Rejected are ticked.
- The field Item 1 can be edited when the Purchase Requisition Line has status Open, Approved or Rejected.
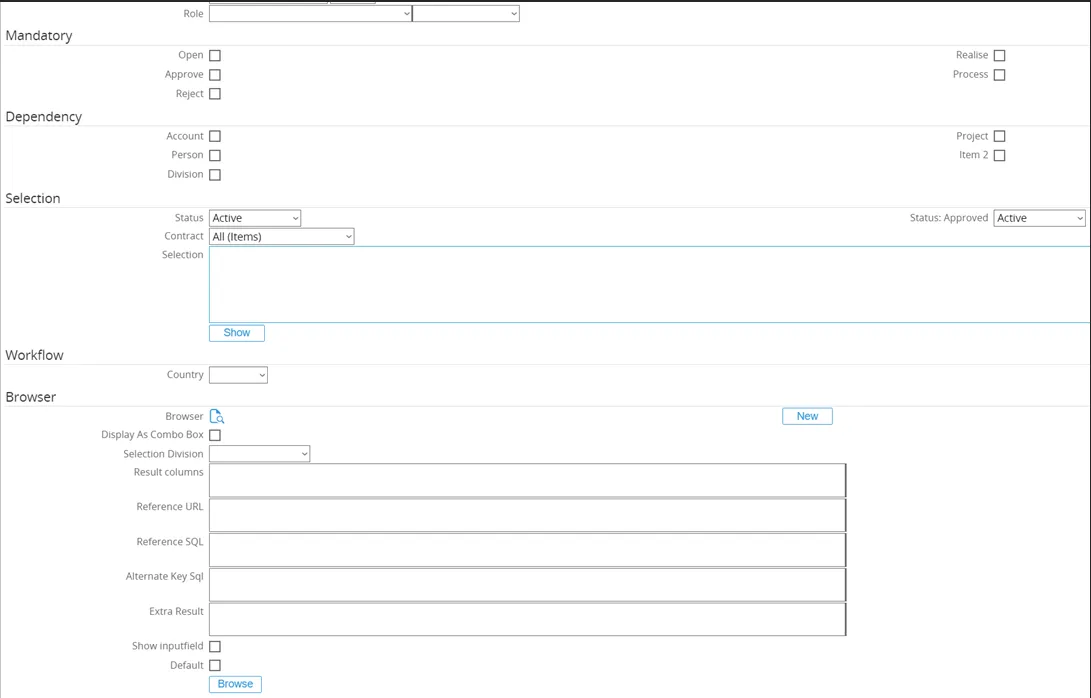
- Mandatory: No checkboxes ticked.
- The field Item 1 will not be mandatory for any status.
- Dependency: No checkboxes ticked.
- There will be no dependency on any account, person, project, or other linked item.
- Selection: No changes made.
- The configuration of the item selection page remains unchanged. Finally, click the ‘Save’ button to save the configuration for this field.
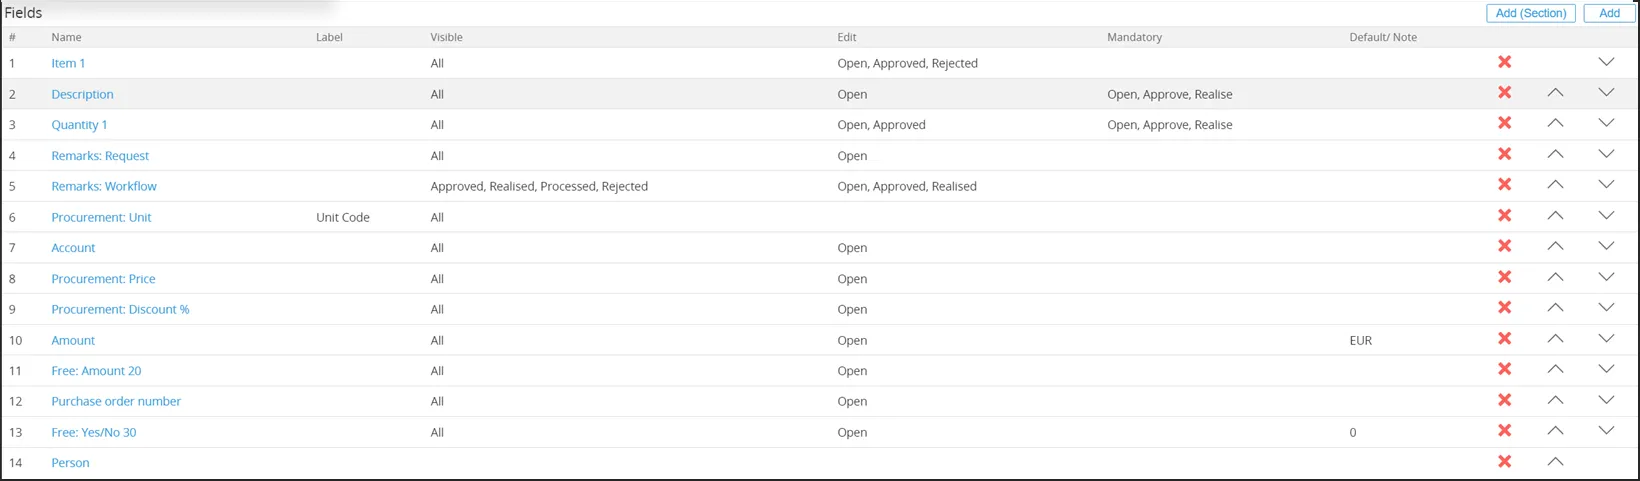
The end result for the field ‘Item 1’ will look like this:

Added fields:
- Quantity 1
- Procurement Unit
- Account
- Procurement Price
- Procurement Discount %
- Amount
- Free Amount 20
- Purchase Order Number
- Free Yes/No 30
Removed default fields:
- Duration
- Start Date
- End Date
- Attachments
Finally, the field ‘Person’ is moved down the list.
The end result for the fields used in the Purchase Requisition Line used by Ome Gijs Oliebollen looks like this:
15.566.353 Customizing request type fields (Main document)
Tab ‘Flow’
Section titled “Tab ‘Flow’”Next, click on the tab Flow.
Here, the flow for a request type can be defined. This determines how people handle the sequence or flow of a request from initiation to completion.
Configuration (by Ome Gijs Oliebollen):
- Who can create request → Role: Procurement Manager
- Who can edit new request → Step Action Term: Requested by | Step Status Term: Requested | Approver check box ticked
- Who can approve the request → No changes
- Who can realize the request → Step Action Term: Reviewed by | Step Status Term: Reviewer | Role: Procurement Officers | Level: Corporate
- Who can process the request → No changes
- Who can reopen the request → No changes
- Who can reject the request → No changes
- Who can delete the request → No changes
End Result:
This flow setup ensures that the Purchase Requisition Line follows the defined responsibilities from creation, through review, to realization at corporate level.

Tab ‘Actions’
Section titled “Tab ‘Actions’”Finally, click on the tab ‘Actions’. Here the actions information for a request type can be defined, which is useful for directing the users in taking actions upon the request type.
4.2.3 Request for Quote
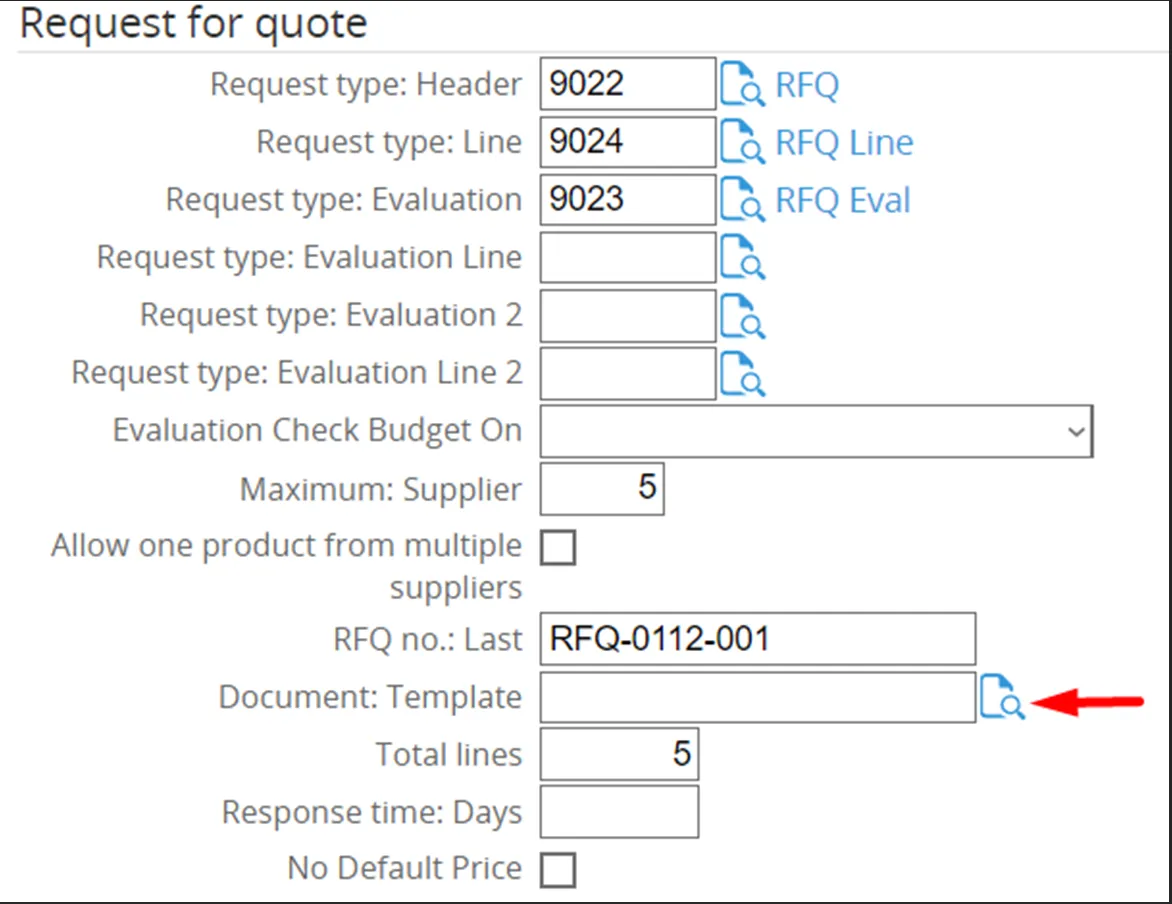
Section titled “4.2.3 Request for Quote”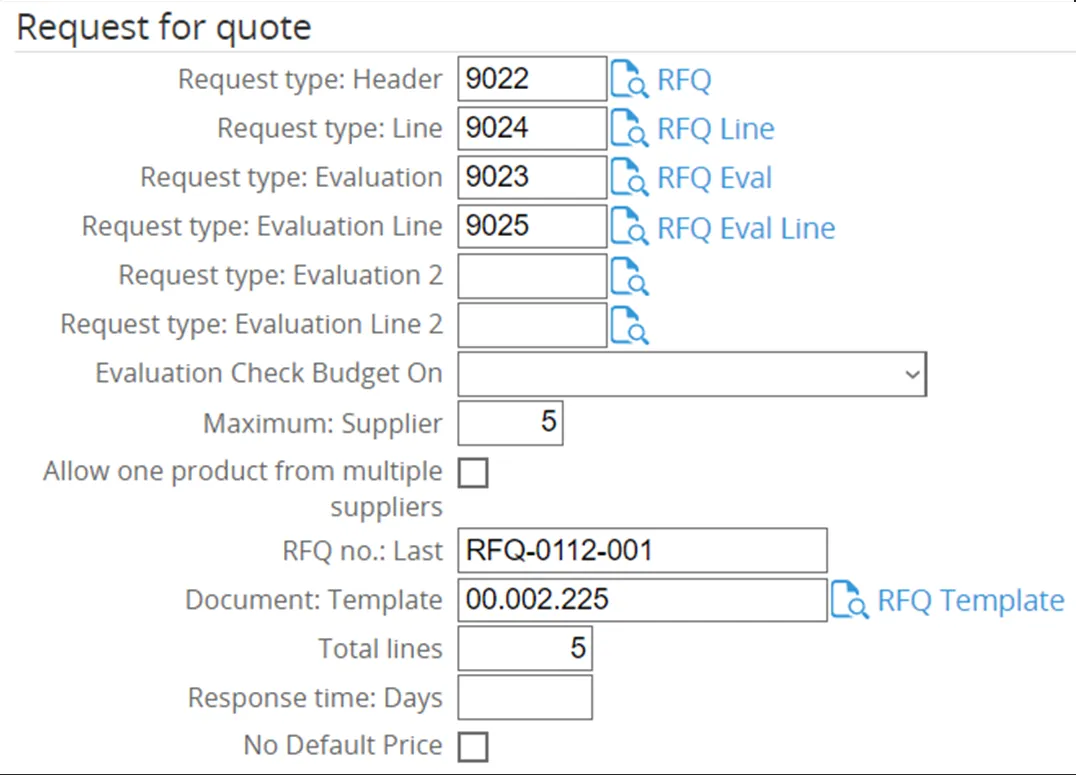
- Request Type Header → Newly created Request Type RFQ was selected.
- Request Type Line → Newly created Request Type RFQ Line was selected.
- Request Type Evaluation → Newly created Request Type RFQ Eval was selected.
- Request Type Evaluation Line → Newly created Request Type RFQ Eval Line was selected.
- Request Type Evaluation 2 & Request Type Evaluation Line 2 → Additional configurations for RFQ.
- Evaluation Check Budget On → Defines when the budget checking process will be triggered once this option is selected.
- Maximum Supplier → Set to 5. This is the maximum number of suppliers who will receive the RFQ and be evaluated.
- Allow One Product from Multiple Suppliers → Enabled, allowing one product to be sourced from multiple suppliers in the RFQ.
- RFQ Number (RFQ no: Last) → The initial RFQ number was entered here. Subsequent RFQs will increment automatically from this number.
- Document Template → Newly created template RFQ Template was selected.
- Total Lines → Set to 10. The RFQ will start with 10 lines, with the option to add more by pressing the Tab key in the last line.
- Response Time (days) → To be determined.
- No Default Price → If selected, the price must be entered manually in the RFQ.
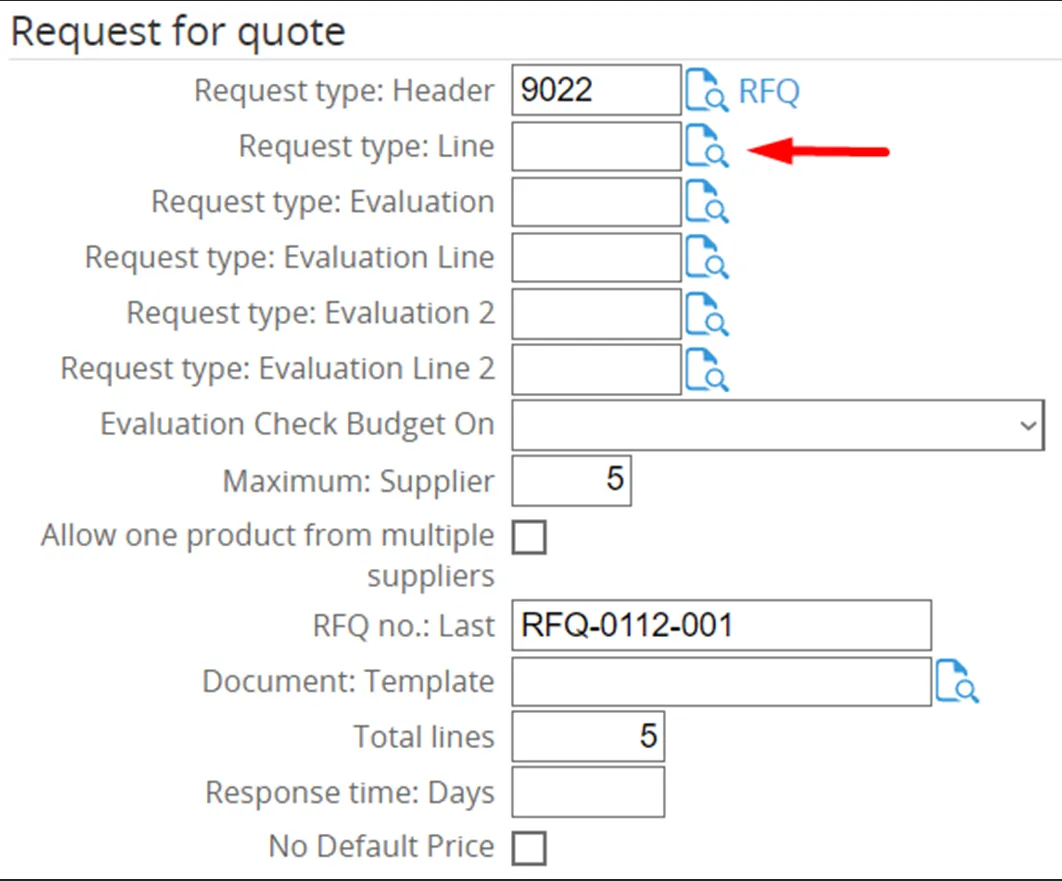
Request Type Header
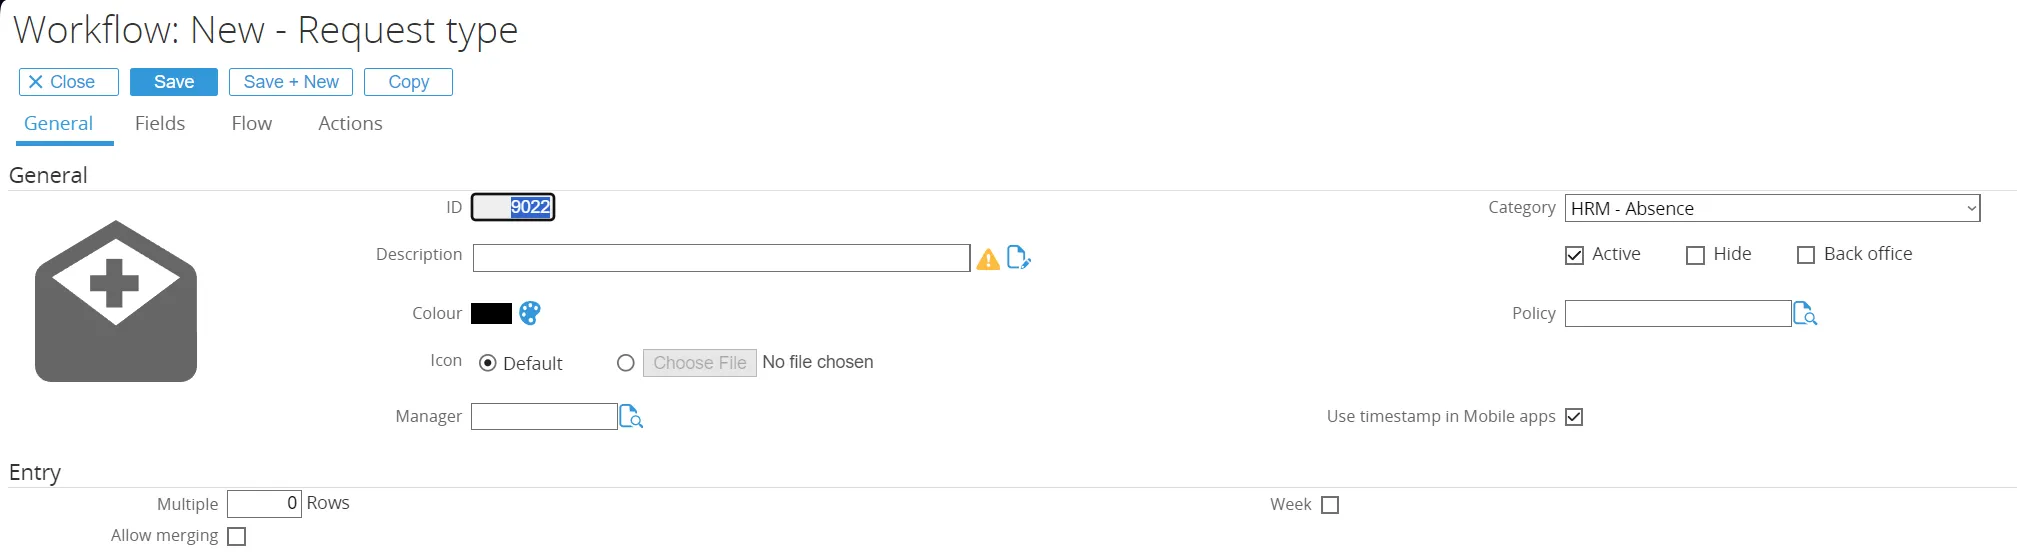
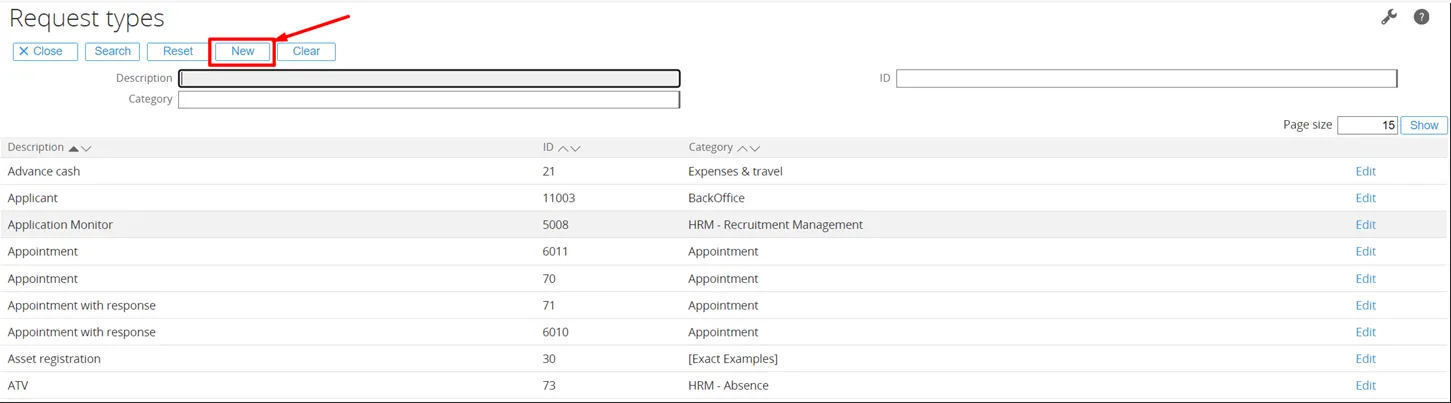
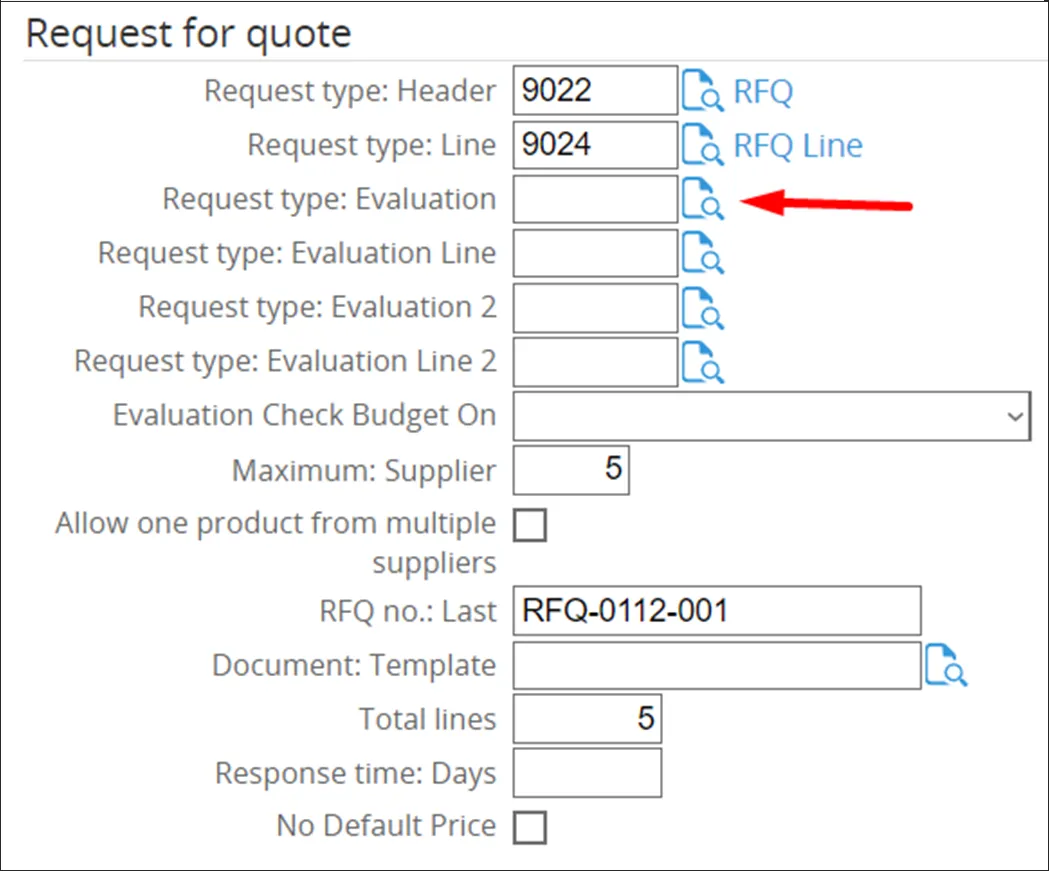
Section titled “Request Type Header”Since there is no existing Request Type Header for Request for Quote available, a new one has to be created. To do this, first click the magnifying glass icon over the document.
Please note that once the Request for Quote Header has been created, it can be selected in this screen when making another Procurement Template.
Tab ‘General’
Section titled “Tab ‘General’”The new Request Type screen will open on the tab ‘General’.
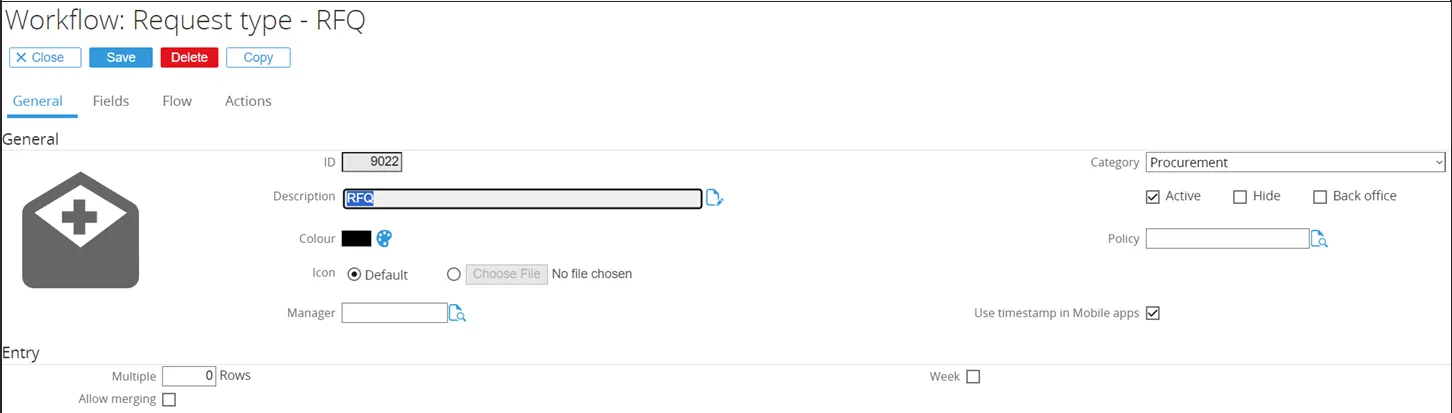
- ID → Set to 9022 (any non-existing ID can be entered).
- Description → Title of the Request Type.
- Category → Set to Procurement.
- Active → Checkbox ticked by default.
- Since this is an active Request Type, the setting remains unchanged.
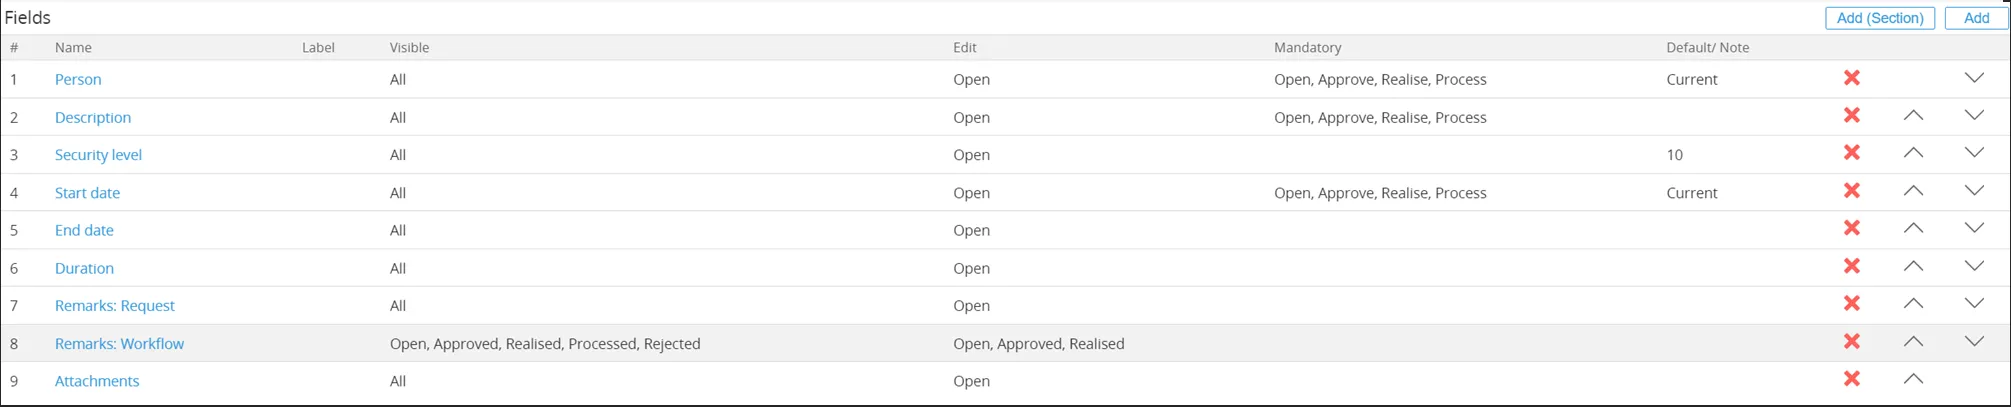
Tab ‘Fields’
Section titled “Tab ‘Fields’”
A number of fields need to be added to the default fields. This is done by clicking the ‘Add’ button in the top right screen.
In the next screen can be chosen which fields to add. The first field to add will be ‘Account’.
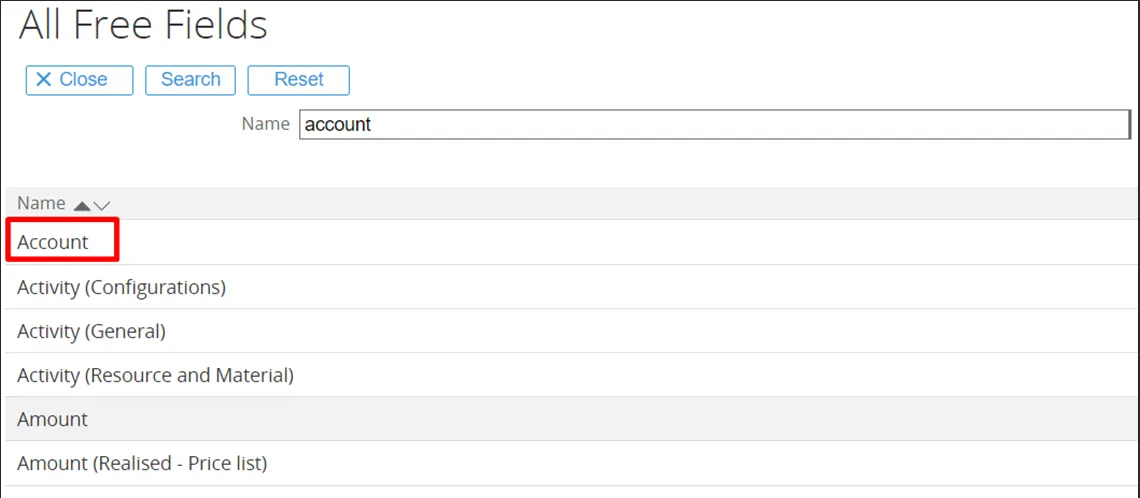
Type ‘Account’ in the description and click the ‘Search’ button.
The ‘Account’ field will open for configuration.
- General → The Fieldname and Request Type are populated by default.
- Position → Changed from 10 to 3, moving the field up in the RFQ Header.
- Columns remain set to 2, meaning another field can appear next to Account (it will not take the full row).
- Visible → All checkboxes remain ticked, so the field Account will be visible for all Request statuses.
- Security level stays at 10 (standard company level).
- Use in RFQ Evaluation is ticked. (Note: this checkbox only appears after the Request Type is saved and re-opened when linked to the Procurement Template).
- Edit → The Open checkbox is unticked. None of the checkboxes are ticked, meaning the field Account cannot be edited in an RFQ.
- Mandatory → None ticked, so the field Account is not mandatory for any status.
- Dependency → None ticked, meaning no dependency on items, persons, or projects.
Finally, click the ‘Save’ button to save the configuration for this field.
The end result for the field ‘Account’ will look like this:
Similarly to Account, additional fields added to the Request for Quote Header are:
- Division 2
- Procurement Cost Center
- Procurement Delivery To
- Free Text 10
- Free Date 10
- Free Yes/No 1
A number of default fields from the Request Type are removed:
- Security Level
- Start Date
- End Date
- Duration
End Result
The fields used in the RFQ Header (configured by Ome Gijs Oliebollen) look like this:
Tab ‘Flow’
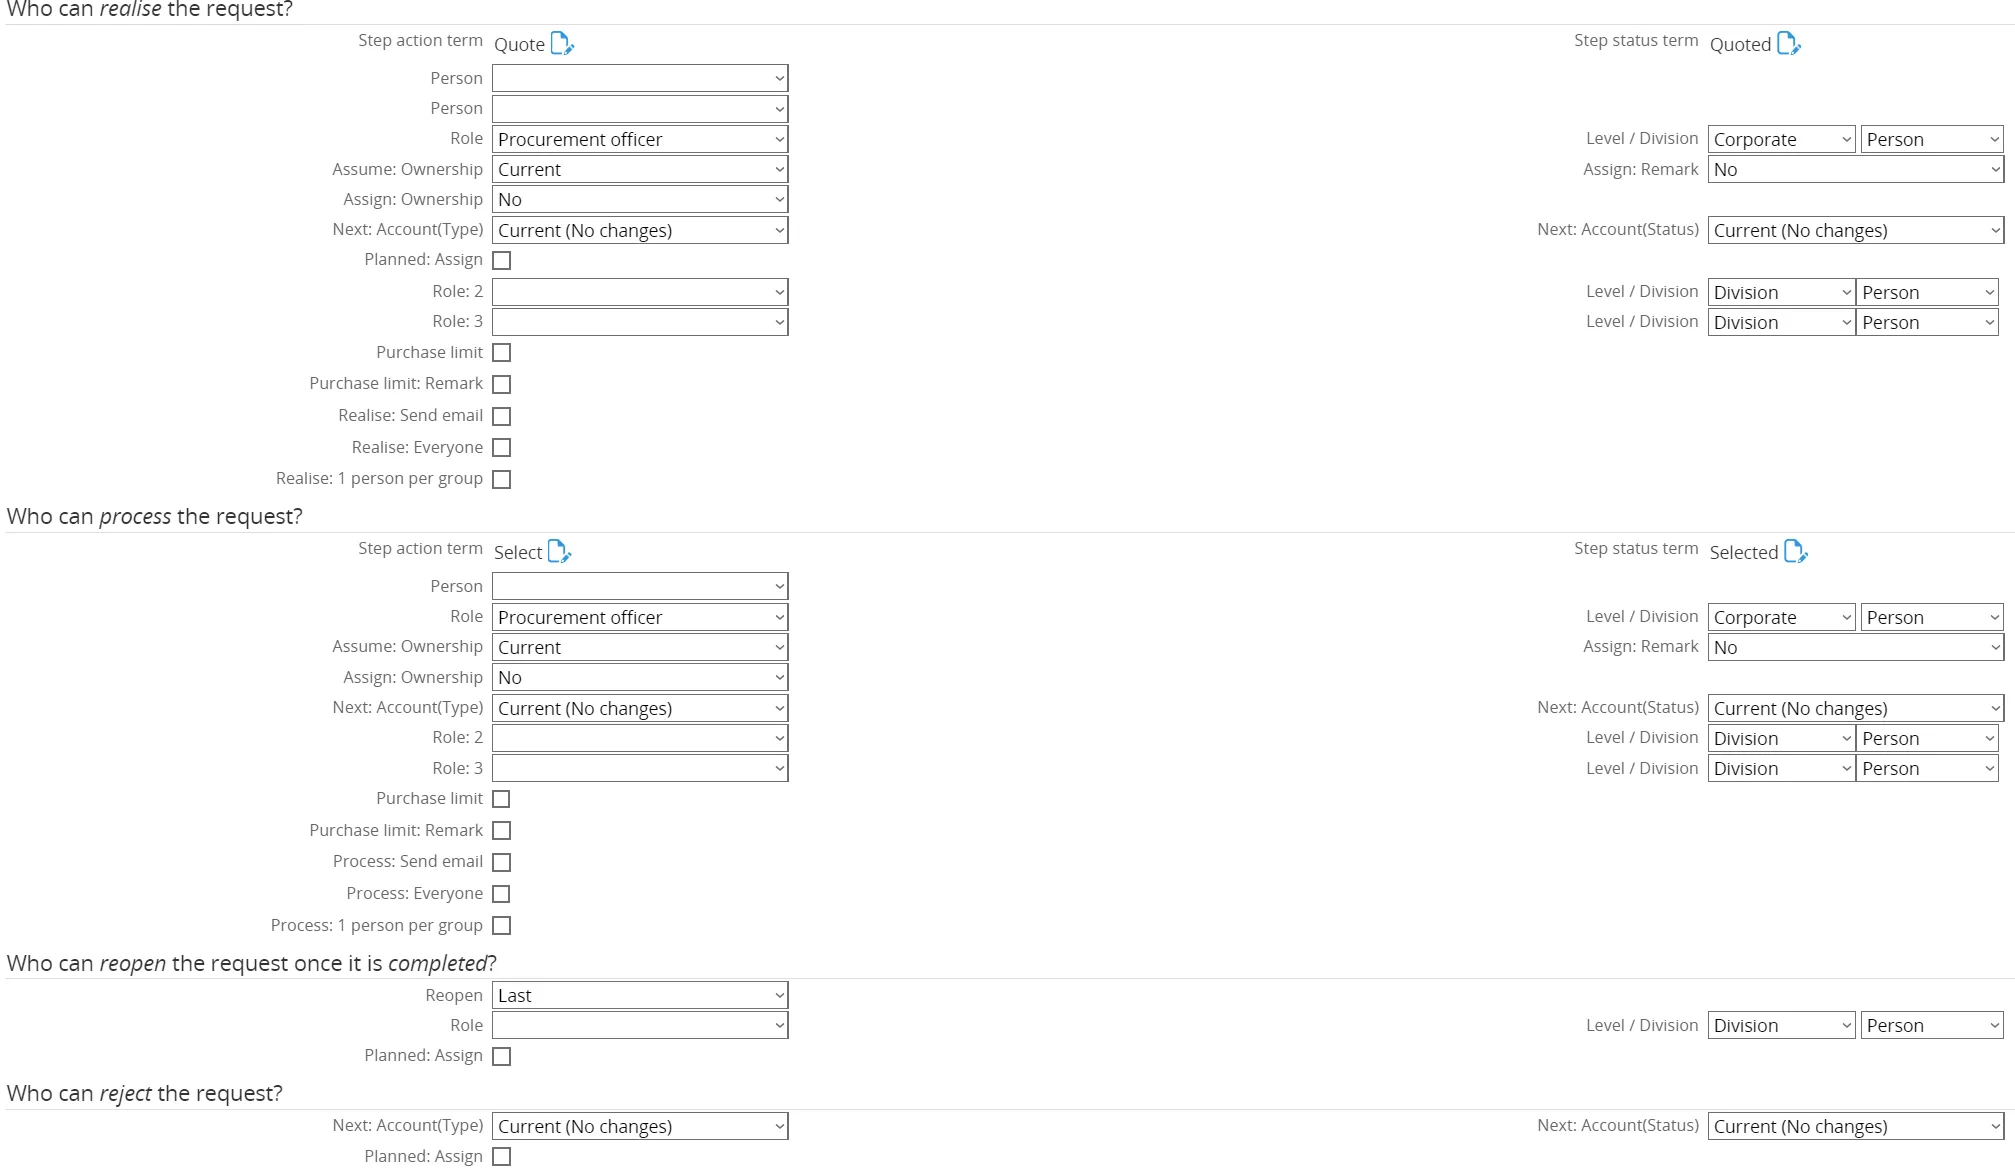
Section titled “Tab ‘Flow’”Next, click on the tab ‘Flow’. Here, the flow for a request type can be defined, which is useful for directing the people in handling the sequence or the flow of a request from the start of the request till the request is completed.
Ome Gijs Oliebollen configured the flow for the Request for Quote Header as follows:
- Who can create request → Role: Procurement Officers
- Who can edit new request → Level changed from Division to Corporate (editable by Corporate level roles)
- Who can approve the request → Step Action Term: Send | Step Status Term: Sent
- Approval occurs when Procurement Officers send out the RFQ.
- Person Manager Person removed.
- Role set to Procurement Officers.
- Level: Corporate.
- Who can realize the request → Step Action Term: Quote | Step Status Term: Quote
- Request realized once the reviewer has received and updated the Quote.
- Role: Procurement Officers.
- Level: Corporate.
- Who can process the request → Role: Procurement Officers | Level: Corporate
- Who can reopen the request → No changes
- Who can reject the request → No changes
- Who can delete the request → No changes
The end result for the flow used in the Request for Quote Header looks like this:

Tab ‘Actions’
Section titled “Tab ‘Actions’”Finally, click on the tab ‘Actions’. Here the actions information for a request type can be defined, which is useful for directing the users in taking actions upon the request type.
The actions tab does not require any changes. However, a new section is added by GLM Systems to be able to link the status of the Purchase Requisition Header to the workflow status. The new section ‘Procurement Purchase Requisition’ consists of the following fields:
- Sent
- Quoted
- Accepted
- Rejected
These fields can be linked to workflow statuses, so that status will be updated according to the status of the Request Quotation Header.
The end result for the actions used in the Request Quotation Header looks like this:
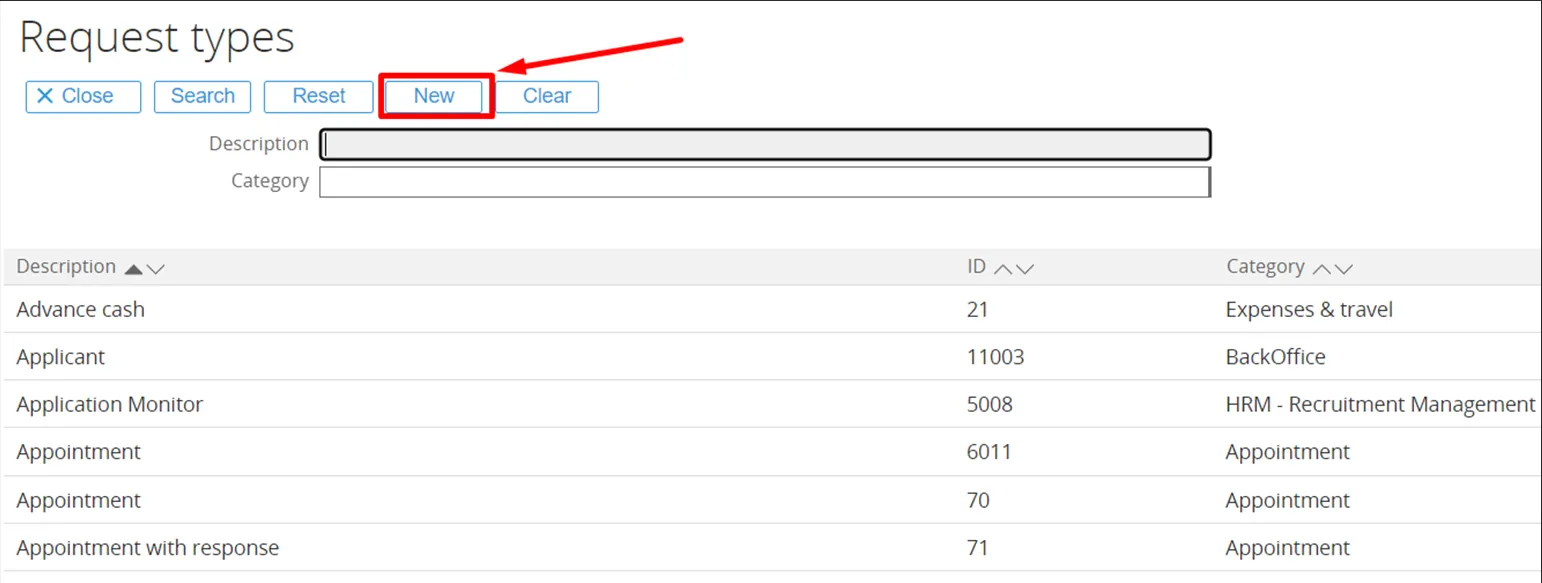
Request Type Line
Section titled “Request Type Line”Since there is no existing Request Type Line for the Request for Quote available, a new one has to be created. To do this, first click the magnifying glass icon over the document.
Tab ‘General’
Section titled “Tab ‘General’”The new Request Type screen will open on the tab ‘General’.
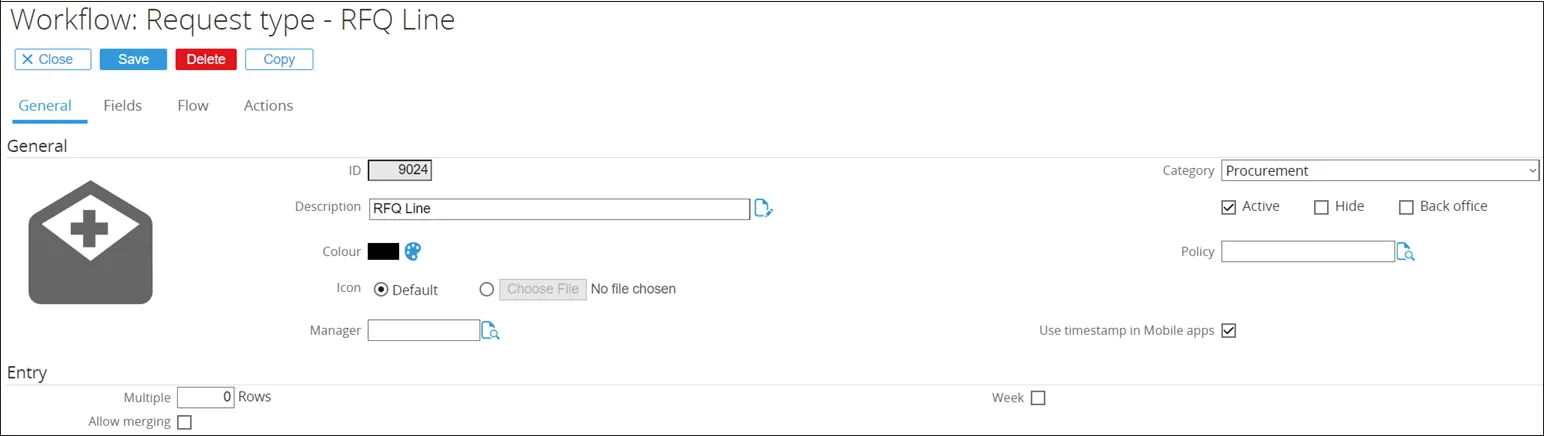
- ID → Set to
9024. (Any non-existing ID can be entered here) - Description → Title of the Request Type
- Category →
Procurement - Active → Check box ticked by default (remains unchanged since this will be an active Request Type)
Tab ‘Fields’
Section titled “Tab ‘Fields’”Next, click on the tab ‘Fields’. Here, the default fields are displayed.

A number of fields need to be added to the default fields. This is done by clicking the ‘Add’ button in the top right screen.
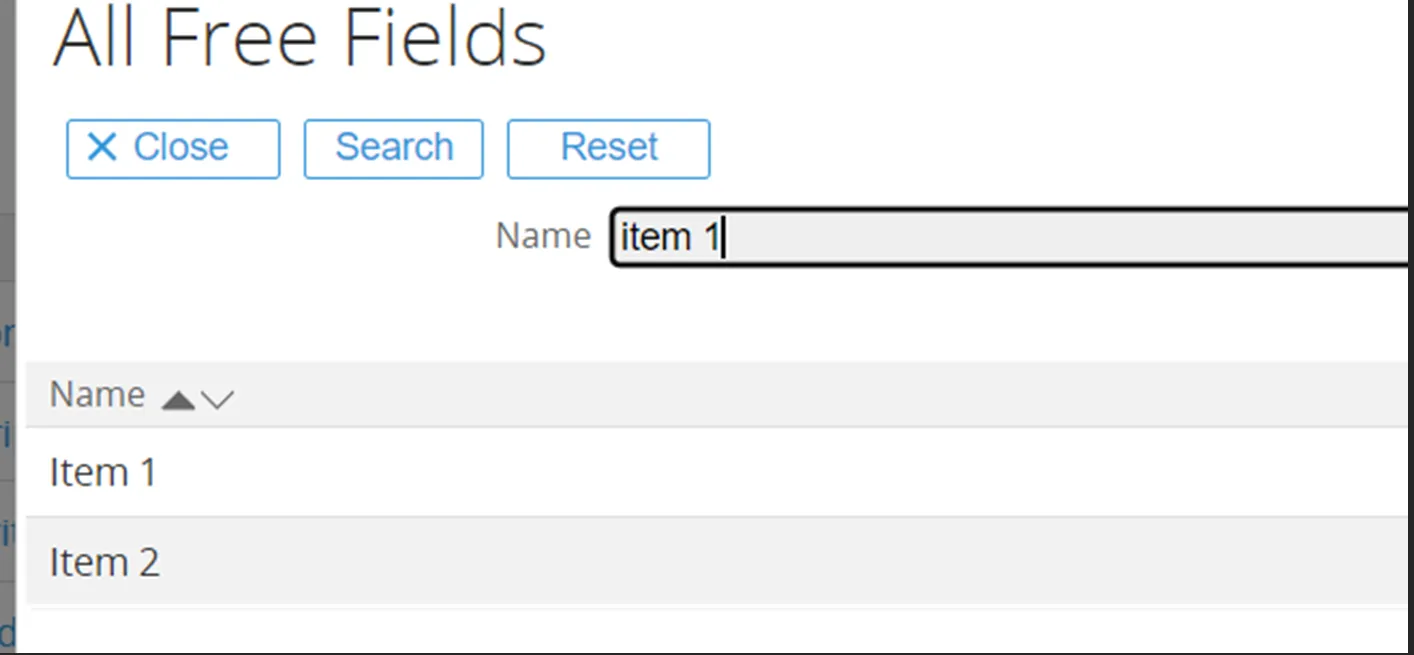
In the next screen can be chosen which fields to add. The first field to add will be ‘Item 1’.
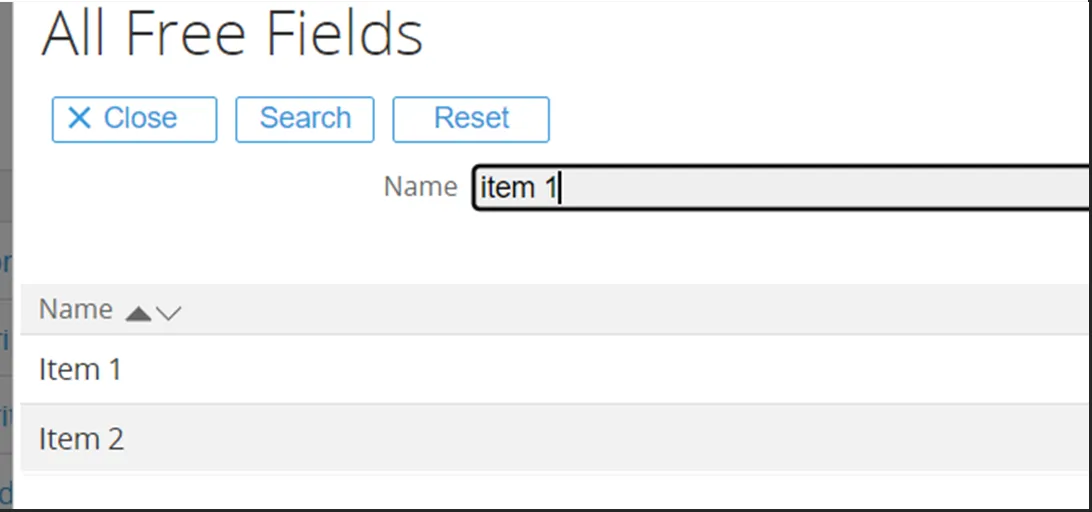
Type ‘Item 1’ in the description and click the ‘Search’ button.
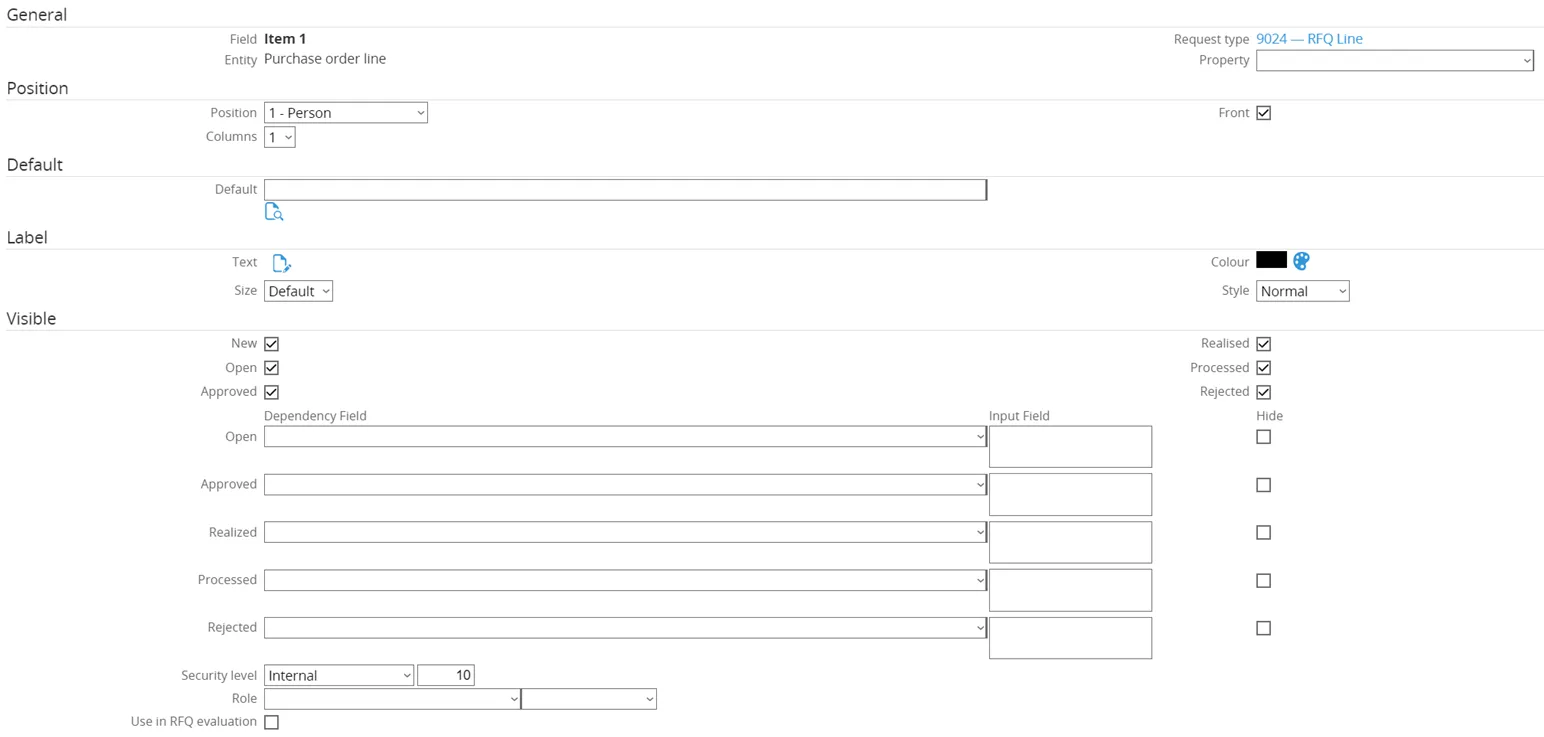
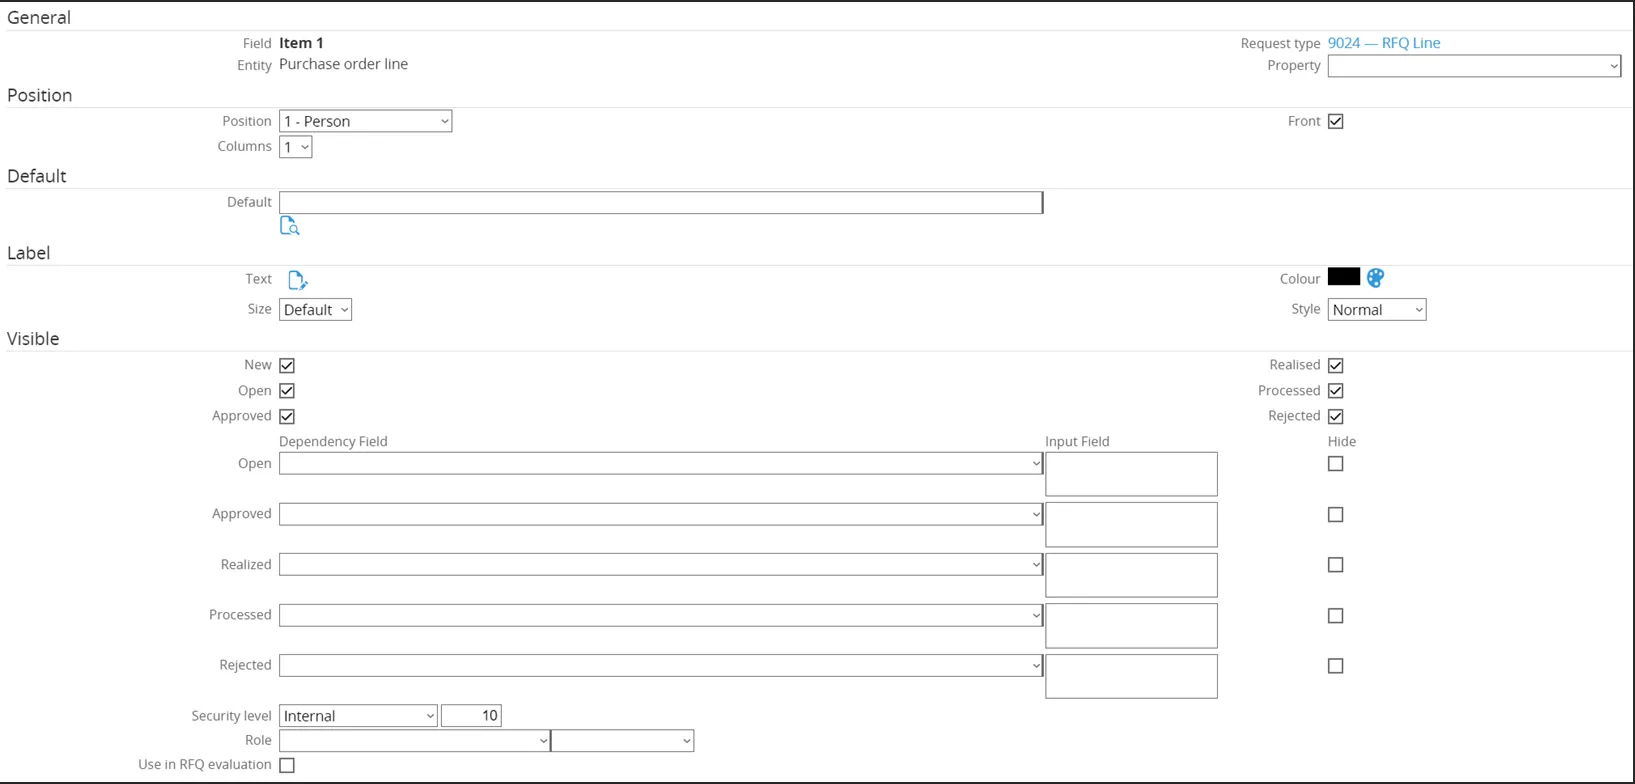
The ‘Item 1’ field will open for configuration.
- General → Fieldname and Request Type are already populated by default.
- Position → Changed from
10to1.- Moves the field up in the RFQ Line.
- Columns set to
1, meaning no other field can be next to Account (it consumes the entire line).
- Visible → All check boxes remain ticked.
- Field Item 1 will show for every Request status.
- Security level remains at
10(standard level for company use).
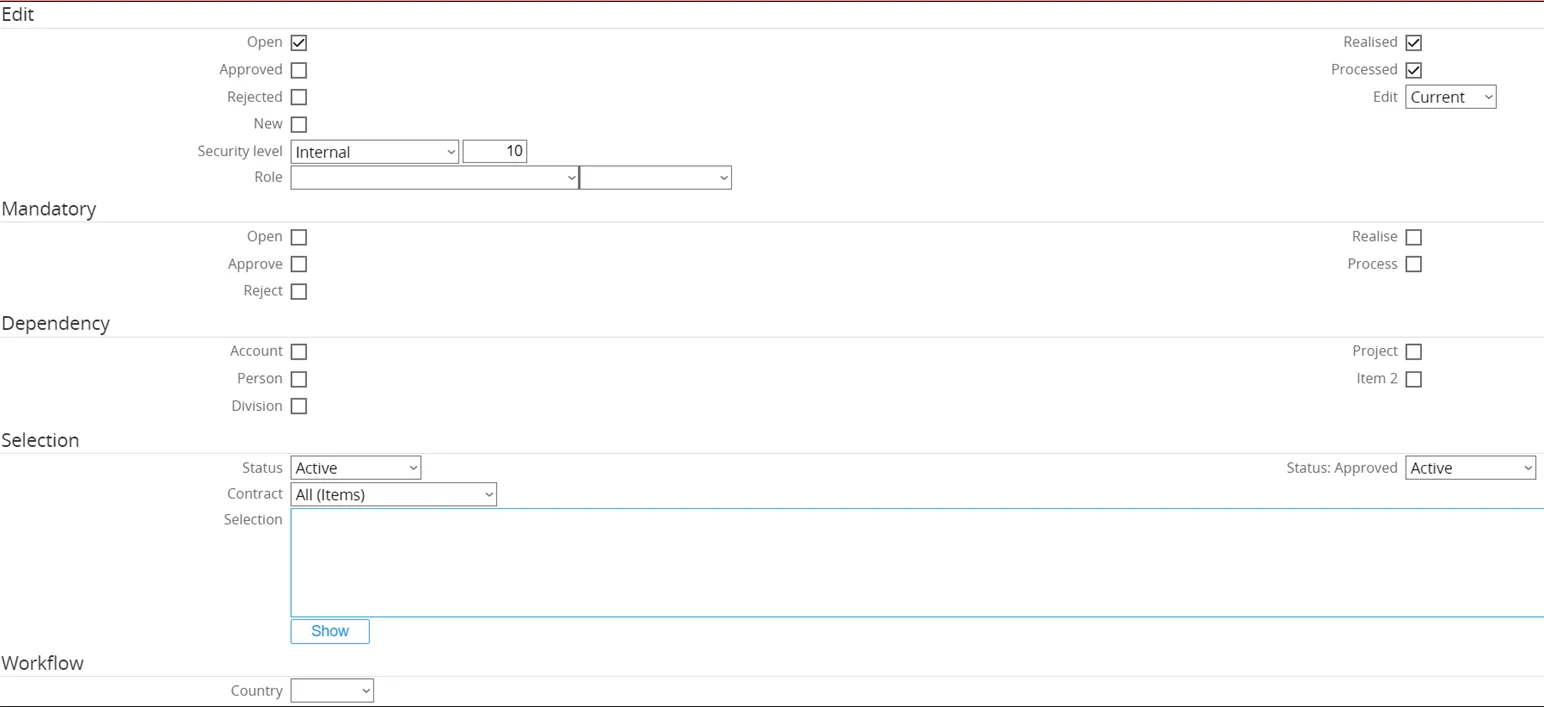
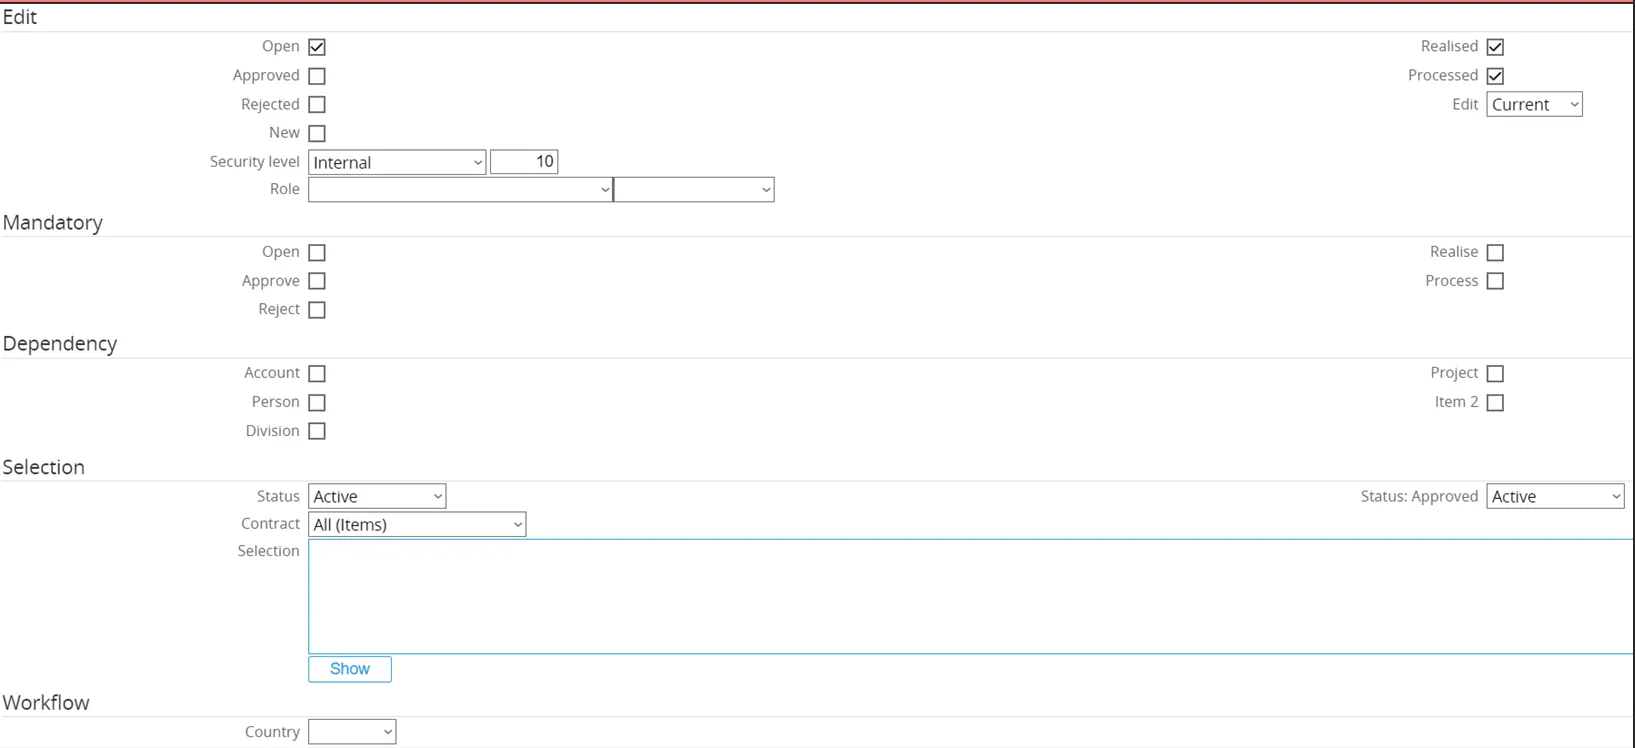
- Edit → Check boxes
Open,Realized, andProcessedticked.- Field Item 1 can be edited when the RFQ Line has these statuses.
- Mandatory → None of the check boxes ticked.
- Field Item 1 is not mandatory for any status.
- Dependency → None of the check boxes ticked.
- No dependency on any account, person, project, or other linked item.
- Selection → No changes made.
- No configuration changes for the item selection page when linking an item to this field.
Finally, click the ‘Save’ button to save the configuration for this field.
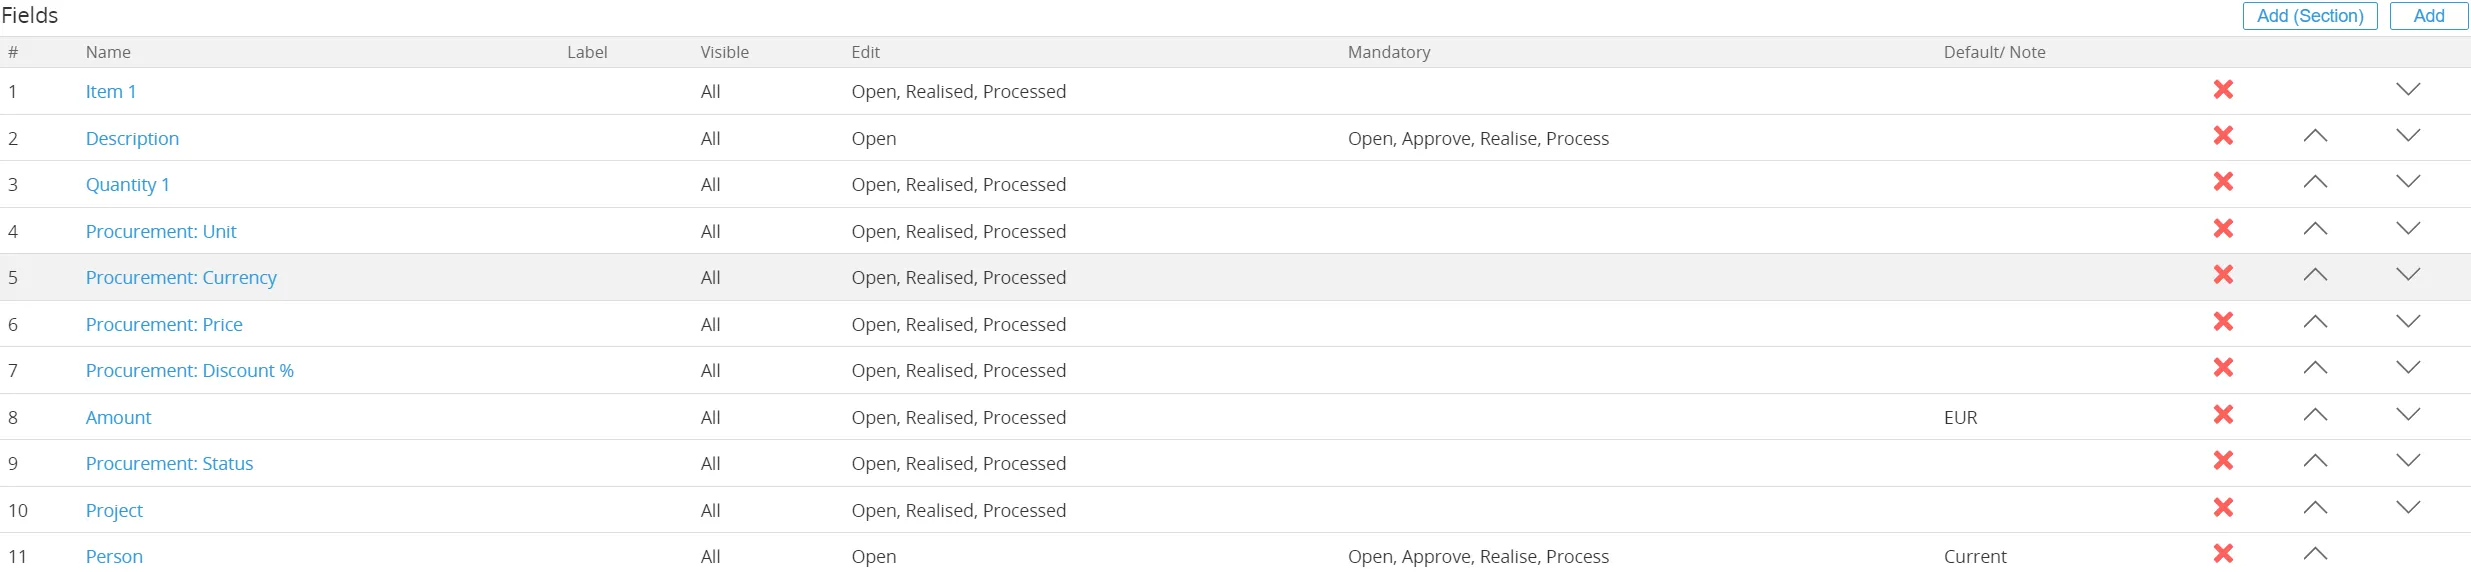
The end result for the field ‘Item 1’ will look like this:

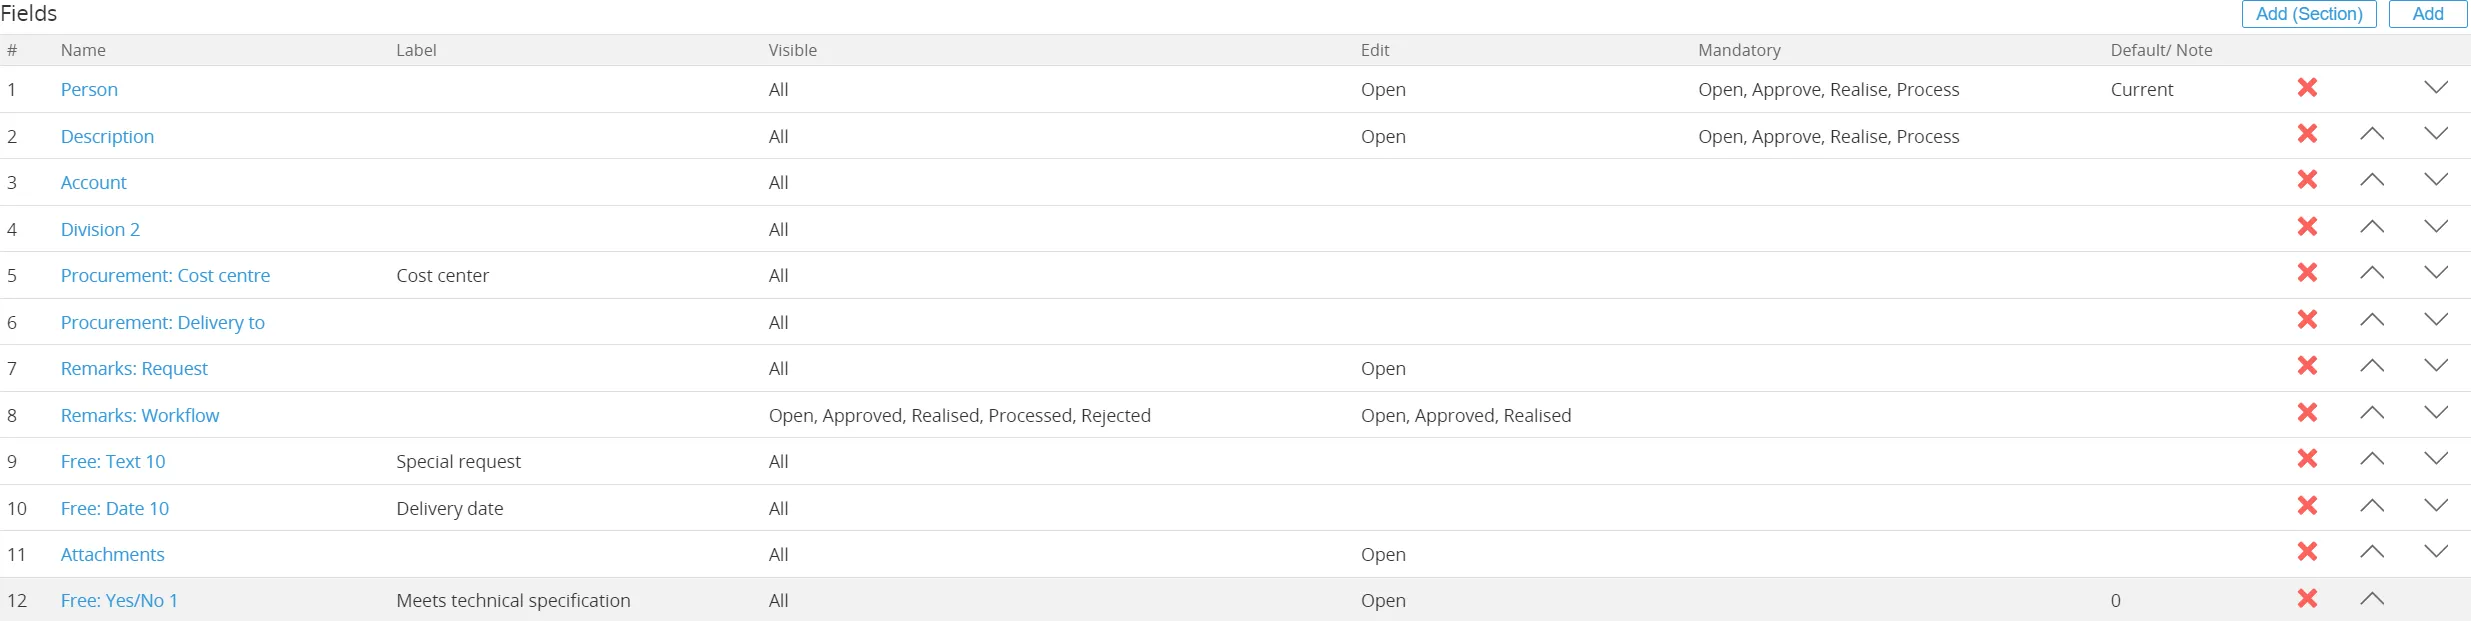
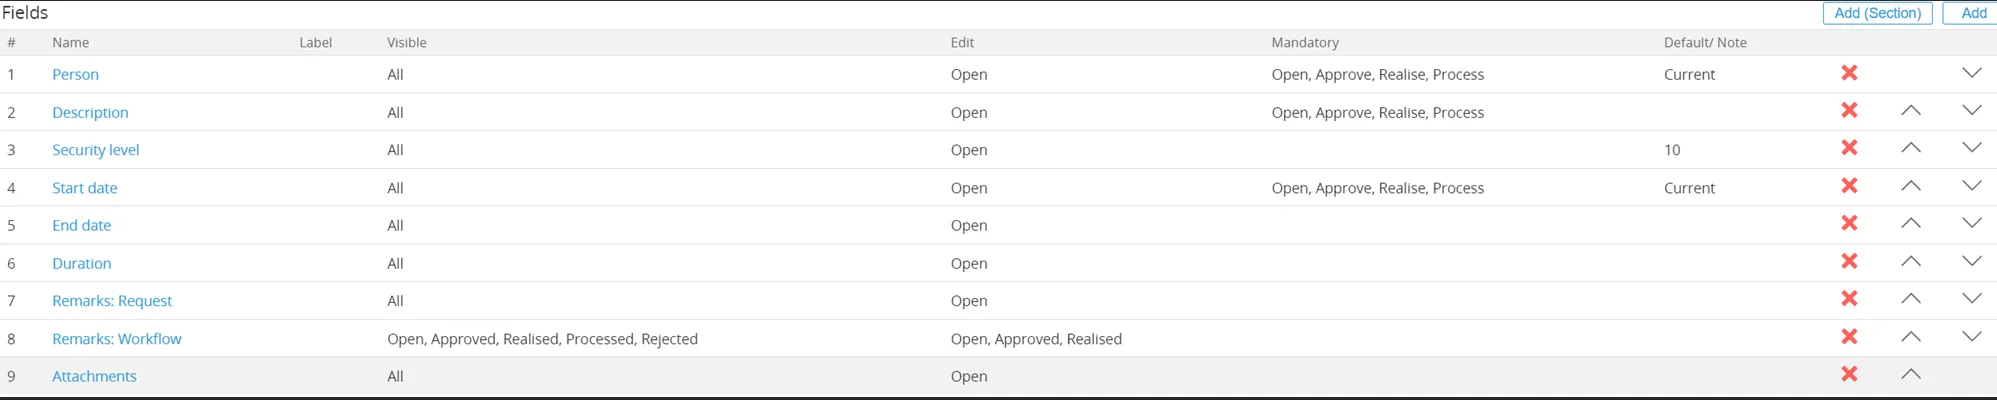
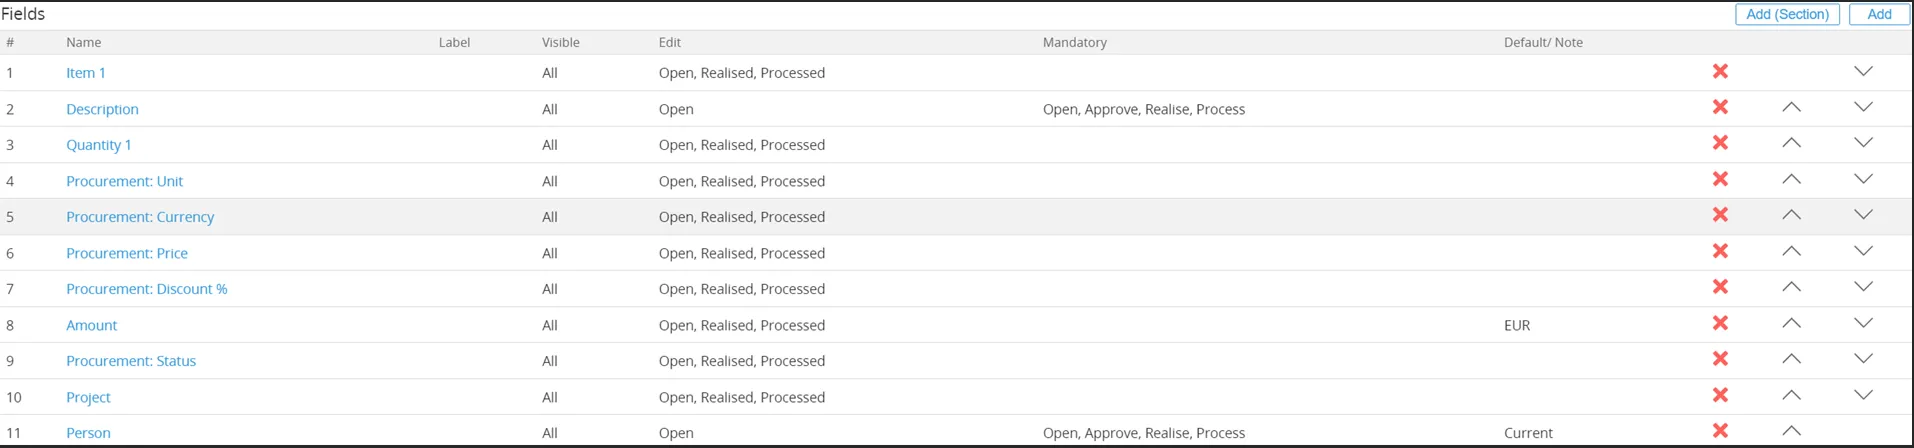
Similarly to Item 1, additional fields added to the Request for Quote Line are:
- Quantity 1
- Procurement Unit
- Procurement Currency
- Procurement Price
- Procurement Discount %
- Amount
- Procurement Status
- Project
A number of default fields from the Request Type are removed:
- Security Level
- Duration
- Start Date
- End Date
- Remarks Request
- Remarks Workflow
- Attachments
Adjustment
- The field Person is moved down the list.
The end result for the fields used in the Request for Quote Line used by Ome Gijs Oliebollen looks like this:
For more information about field configuration, please refer to Synergy document 15.566.353 Customizing request type fields (Main document)
Tab ‘Flow’
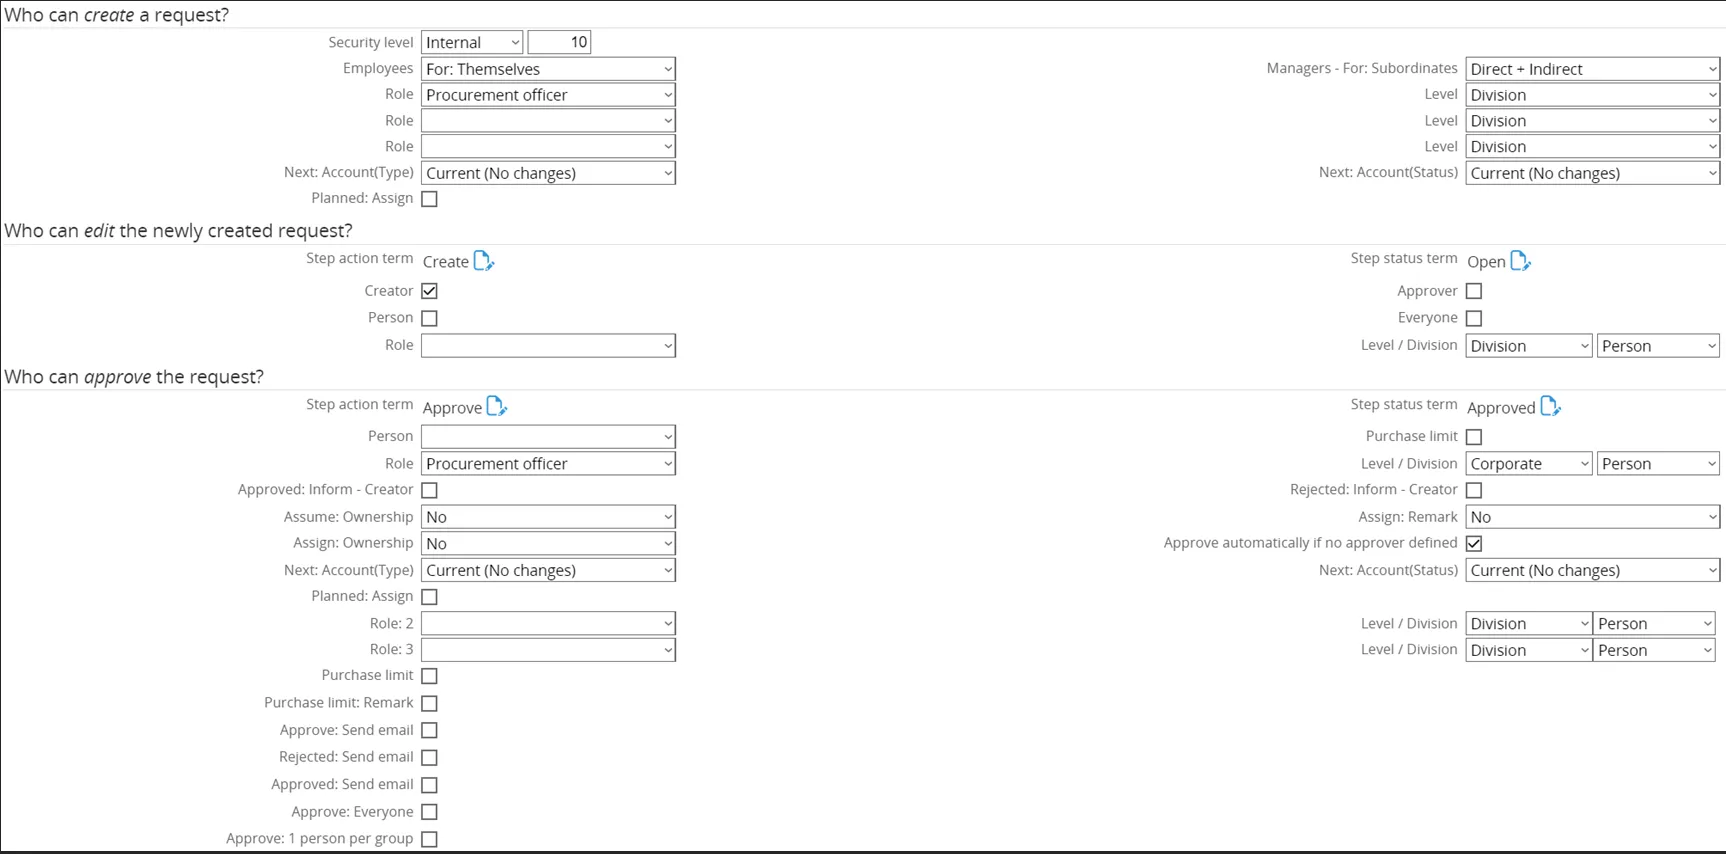
Section titled “Tab ‘Flow’”Next, click on the tab ‘Flow’. Here, the flow for a request type can be defined, which is useful for directing the people in handling the sequence or the flow of a request from the start of the request till the request is completed.
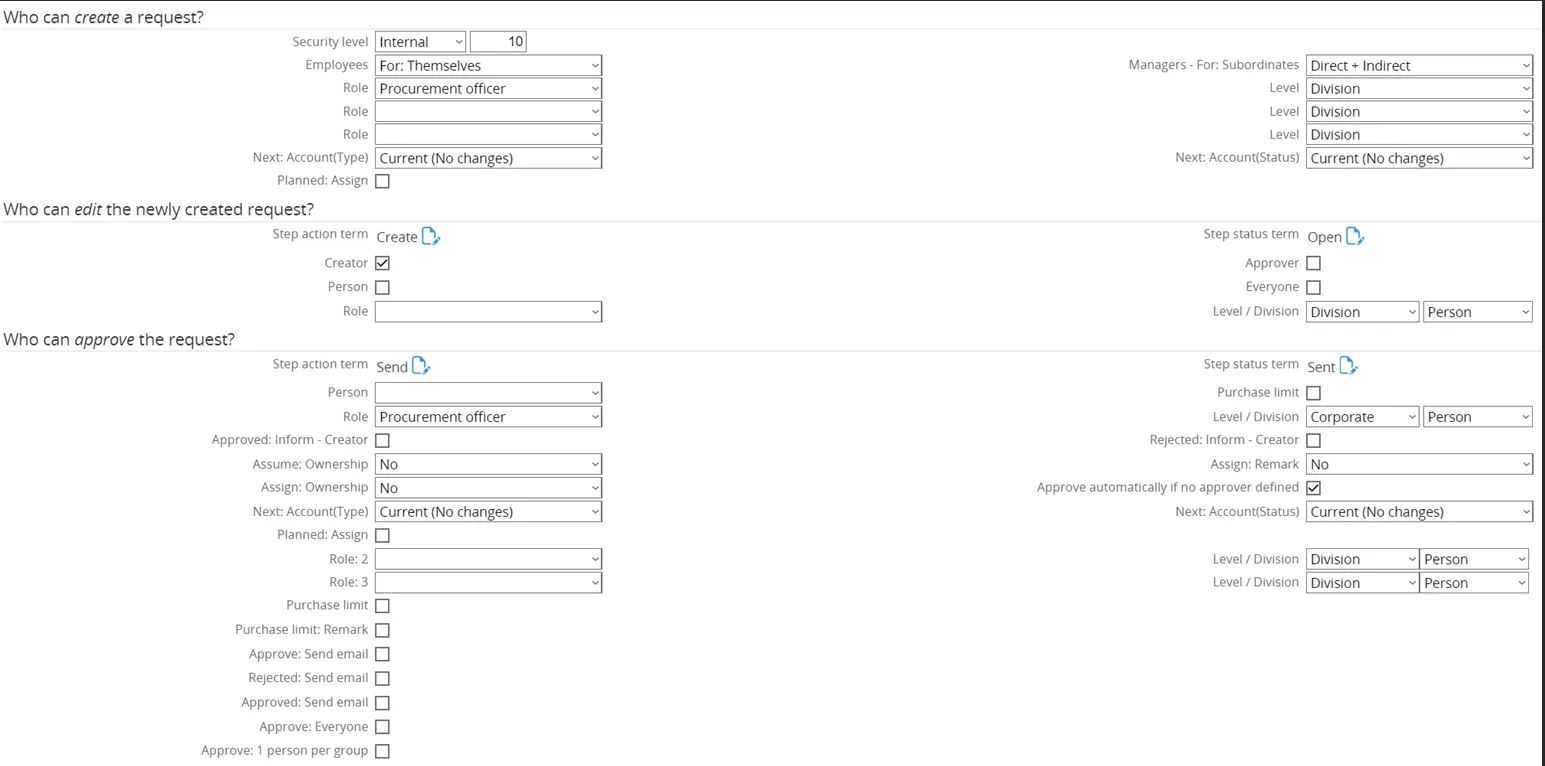
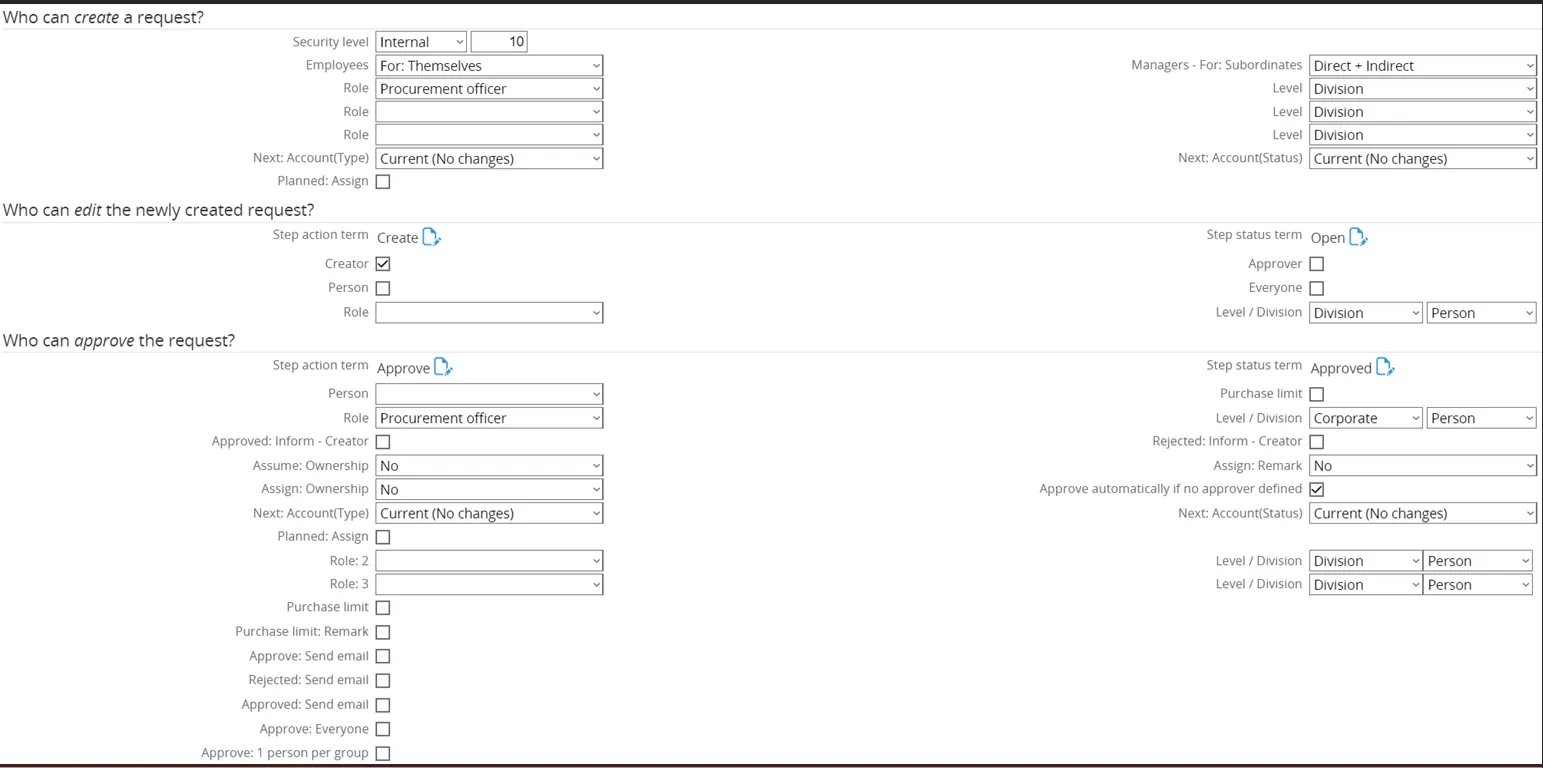
- Who can create request → Role: Procurement Officers
- Who can edit new request → Level changed from Division to Corporate
- Editable by Corporate-level roles.
- Who can approve the request →
- Person Manager Person removed.
- Role: Procurement Officers.
- Level changed from Division to Corporate.
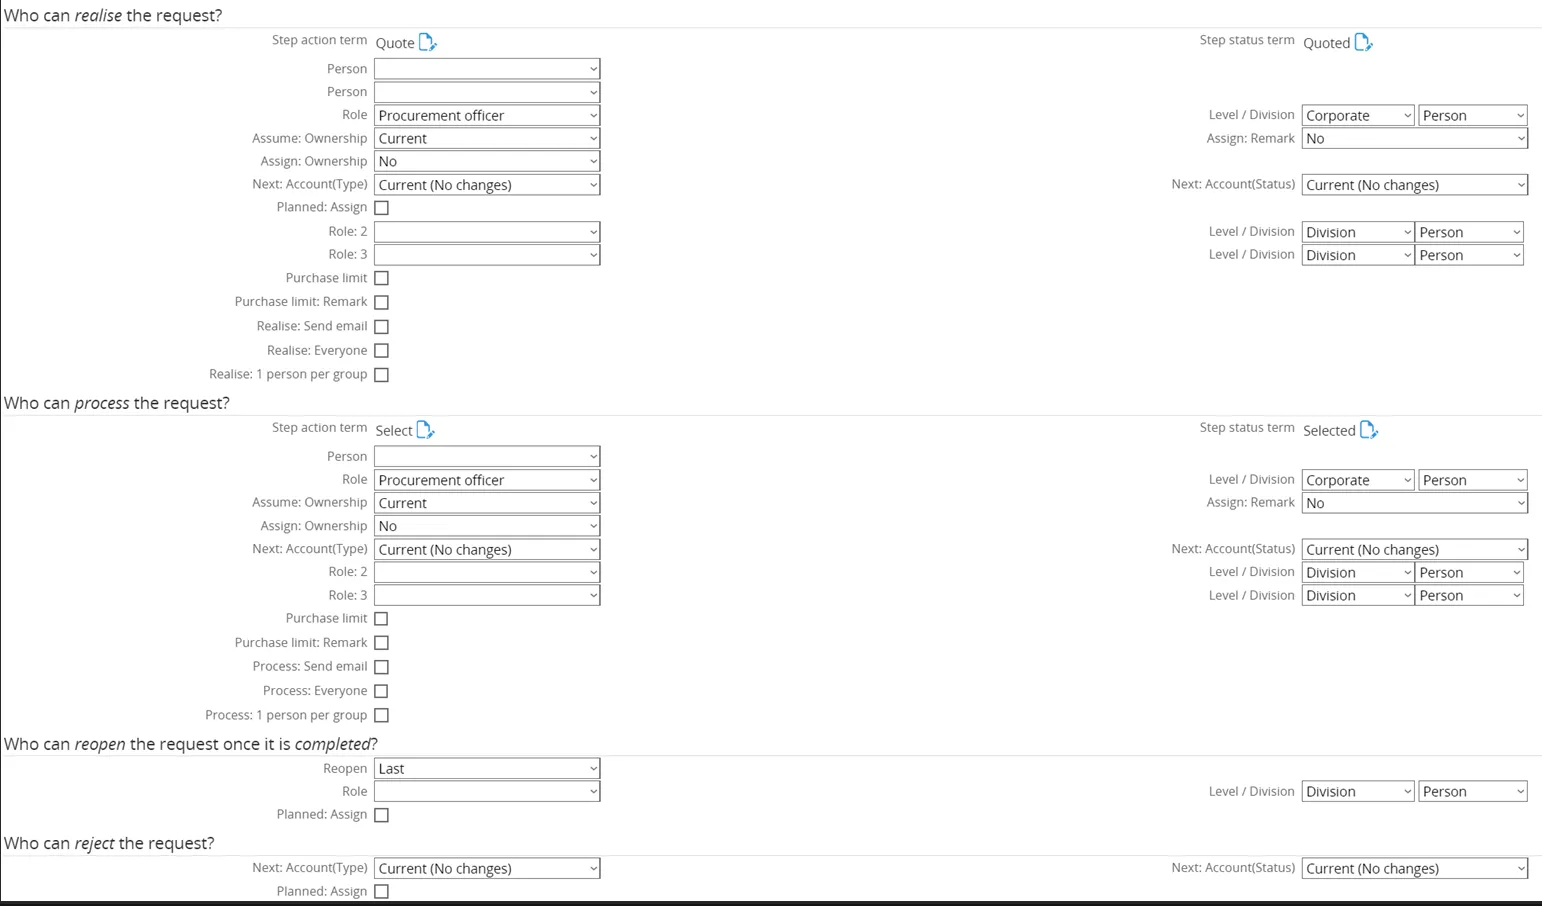
- Who can realize the request → Step Action Term: Quote | Step Status Term: Quoted
- Realized when reviewer has received and updated the Quote.
- Role: Procurement Officers.
- Level: Corporate.
- Who can process the request → Role: Procurement Officers | Level: Corporate
- Who can reopen the request → No changes
- Who can reject the request → No changes
- Who can delete the request → No changes
The end result for the flow used in the Purchase Requisition Line looks like this:

Tab ‘Actions’
Section titled “Tab ‘Actions’”Finally, click on the tab ‘Actions’. Here the actions information for a request type can be defined, which is useful for directing the users in taking actions upon the request type.
The ‘Actions’ tab does not require any changes.
Request Type Evaluation
Section titled “Request Type Evaluation”Since there is no existing Request Type Evaluation for Request for Quote available, a new one has to be created. To do this, first click the magnifying glass icon over the document.
In the next screen, click the button ‘New’ to create the new Request Type Evaluation for Request for Quote.

Please note that once the Request for Quote Evaluation has been created, it can be selected in this screen when making another Procurement Template.
Tab ‘General’
Section titled “Tab ‘General’”The new Request Type screen will open on the tab ‘General’.

- ID → Set to 9023 (any non-existing ID can be entered).
- Description → Title of the Request Type.
- Category → Set to Purchase Requisition.
- Active → Checkbox ticked by default.
- Since this is an active Request Type, the setting remains unchanged.
Tab ‘Fields’
Section titled “Tab ‘Fields’”Next, click on the tab ‘Fields’. Here, the default fields are displayed.
A number of fields need to be added to the default fields. This is done by clicking the ‘Add’ button in the top right screen.
In the next screen can be chosen which fields to add. The only field to add in Request for Quote Evaluation will be ‘Procurement Document’.
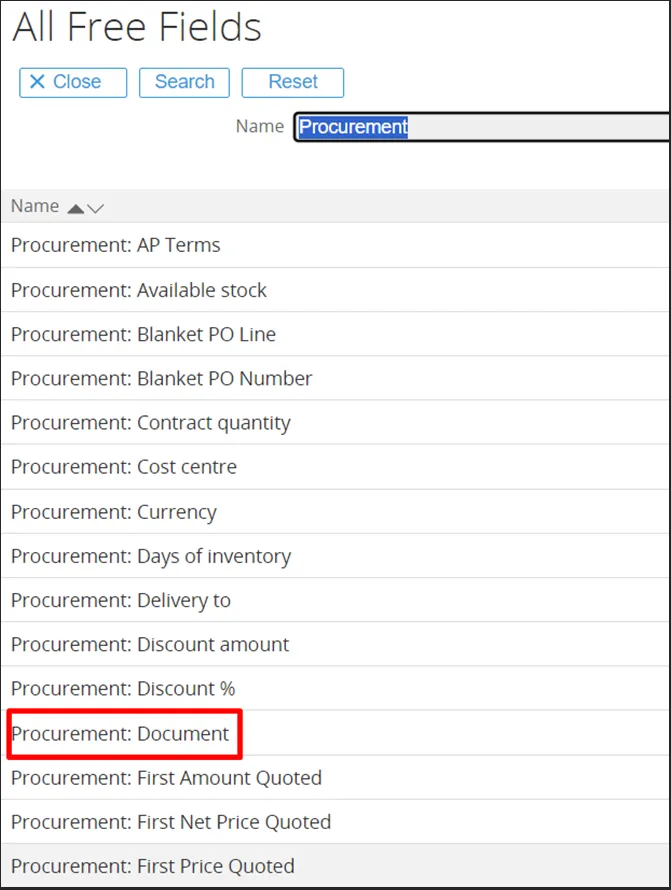
The ‘Procurement Document’ field will open for configuration.
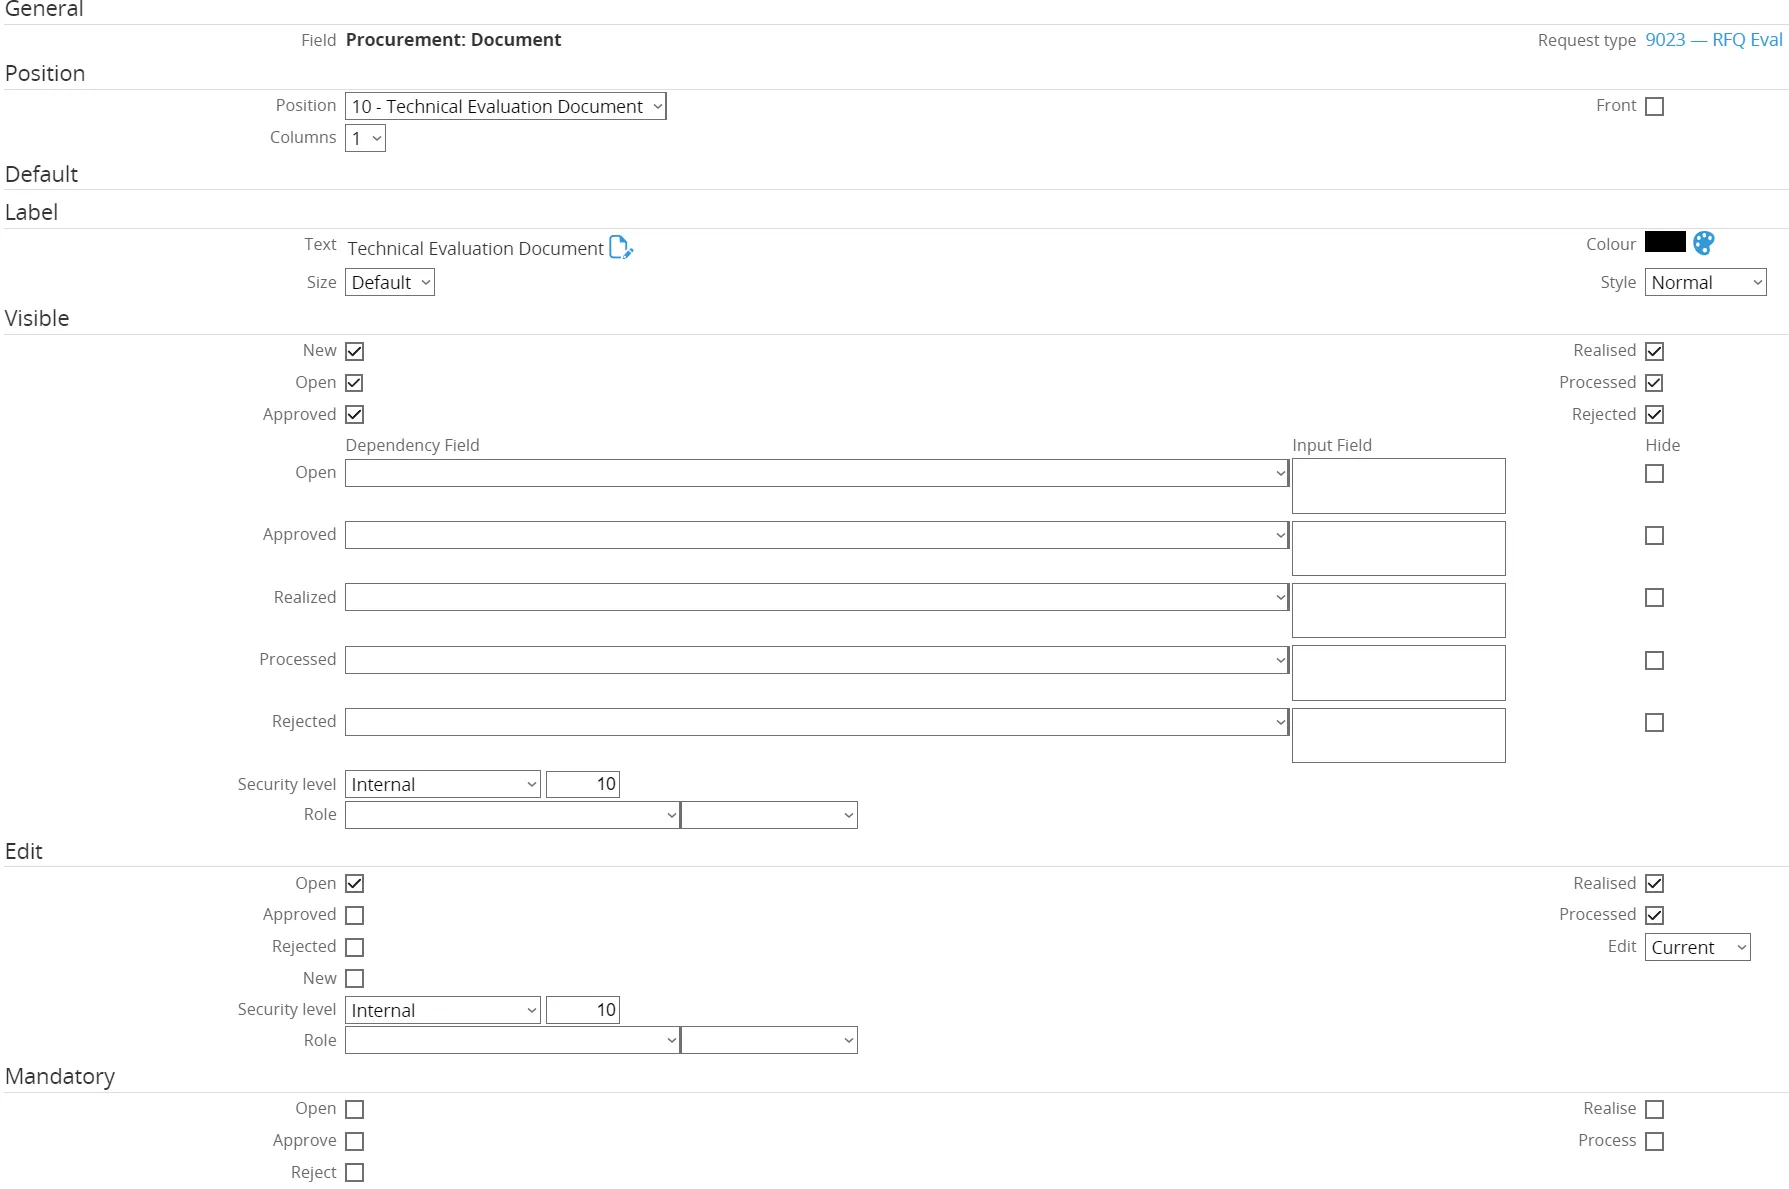
-
General
- Field name and Request Type are already populated by default.
-
Position
- Position changed from 10 → 9.
- This moves the field up in the Request for Quote Line.
- Columns set to 1 → the field consumes the entire line (no other field can be next to it).
-
Label
- Document name entered as “Technical Evaluation Document”.
- Different names can be entered for other languages if needed.
-
Visible
- All checkboxes remain ticked → field Procurement Document is visible for every Request status.
- Security level remains 10 (standard company level).
-
Edit
- Checkboxes Open, Realized, and Processed ticked.
- Field Procurement Document can be edited when the Purchase Requisition Line has these statuses.
-
Mandatory
- No checkboxes ticked → field is not mandatory for any status.
Finally, click the ‘Save’ button to save the configuration for this field.
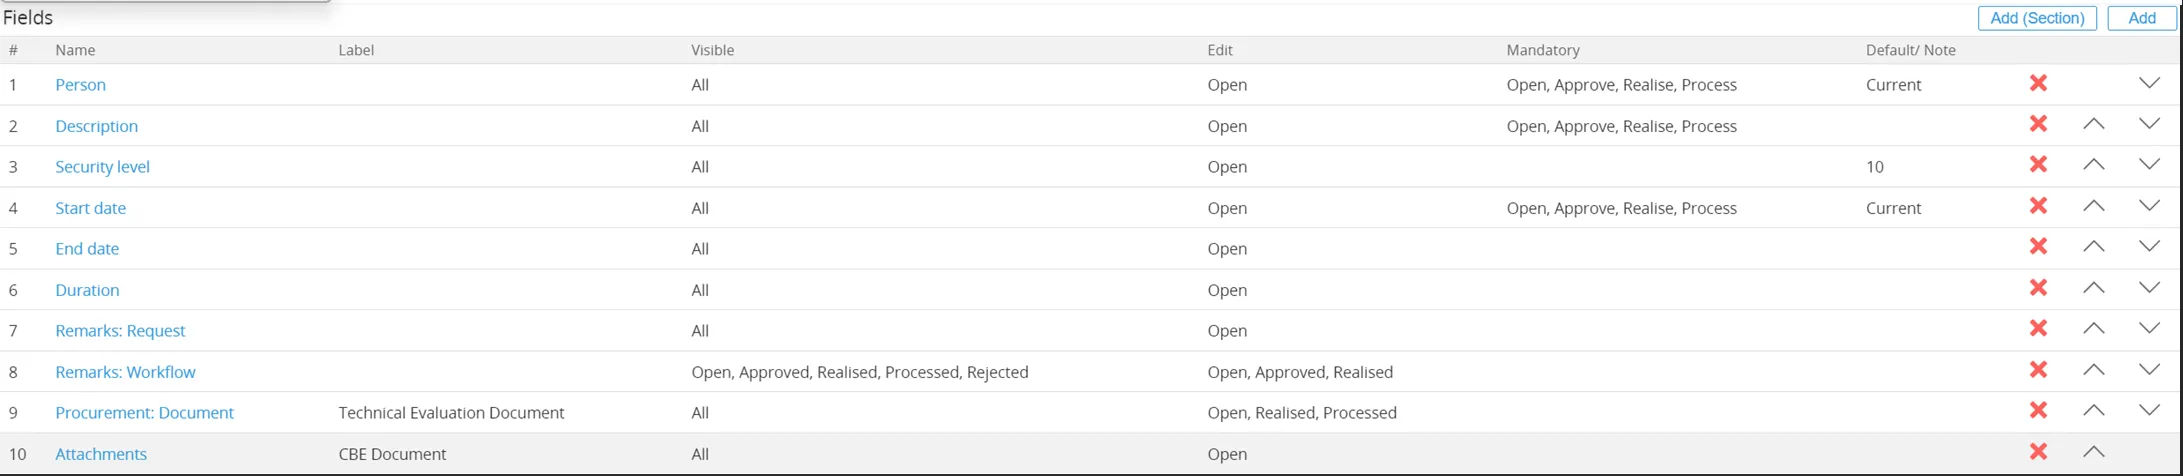
The end result for the field ‘Procurement Document’ will look like this:
Similarly to ‘Procurement Document’, additional fields can be added to the Request for Quote Evaluation, or can be removed from the field list.
The end result for the fields used in the Request for Quote Line used by Ome Gijs Oliebollen looks like this:
15.566.353 Customizing request type fields (Main document)
Tab ‘Flow’
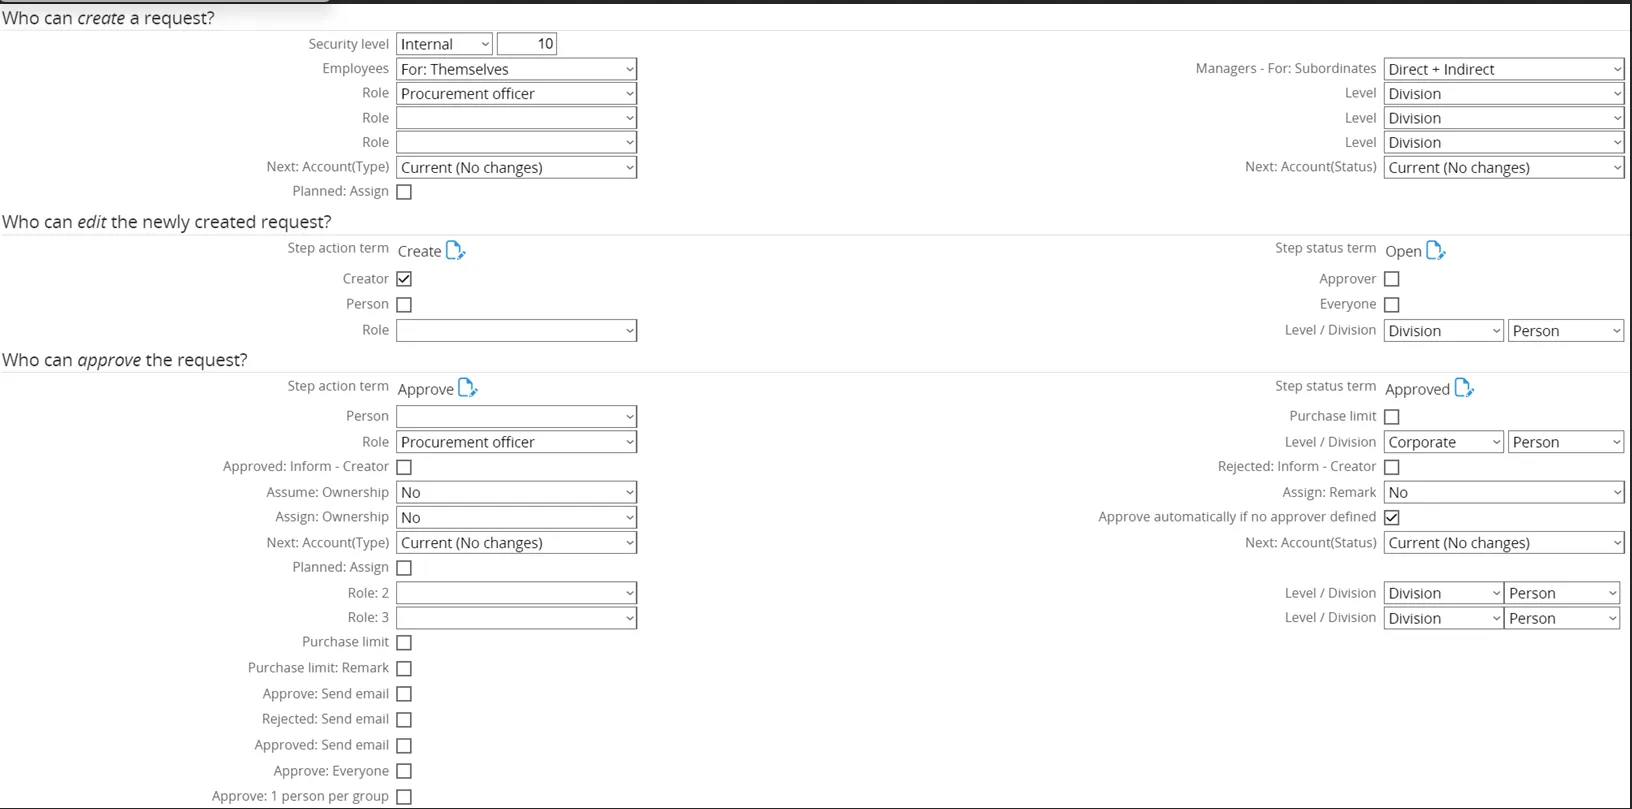
Section titled “Tab ‘Flow’”Next, click on the tab ‘Flow’. Here, the flow for a request type can be defined, which is useful for directing the people in handling the sequence or the flow of a request from the start of the request till the request is completed.
-
Who can create request
- Role: Procurement Officers
- Level: Corporate
-
Who can edit new request
- Level changed from Division → Corporate
- Editable by Corporate-level roles
-
Who can approve
- Manager Person removed
- Role: Procurement Manager
- Level changed from Division → Corporate
- Checkbox Approve automatically if no approver defined → unticked
-
Who can realize the request
- Step Action Term: Approve
- Step Status Term: Approved
- Realization occurs once the request is approved
- Level: Corporate
-
Who can process the request
- No changes
-
Who can reopen the request
- No changes
-
Who can reject the request
- No changes
-
Who can delete the request
- No changes
Ome Gijs Oliebollen configured the flow for the Request for Quote Evaluation as follows:
The end result for the flow used in the Purchase Requisition Evaluation looks like this:

Tab ‘Actions’
Section titled “Tab ‘Actions’”Finally, click on the tab ‘Actions’. Here the actions information for a request type can be defined, which is useful for directing the users in taking actions upon the request type.
Request Type Evaluation Line
Section titled “Request Type Evaluation Line”Since there is no existing Request Type Evaluation Line for the Request for Quote available, a new one has to be created. To do this, first click the magnifying glass icon over the document.
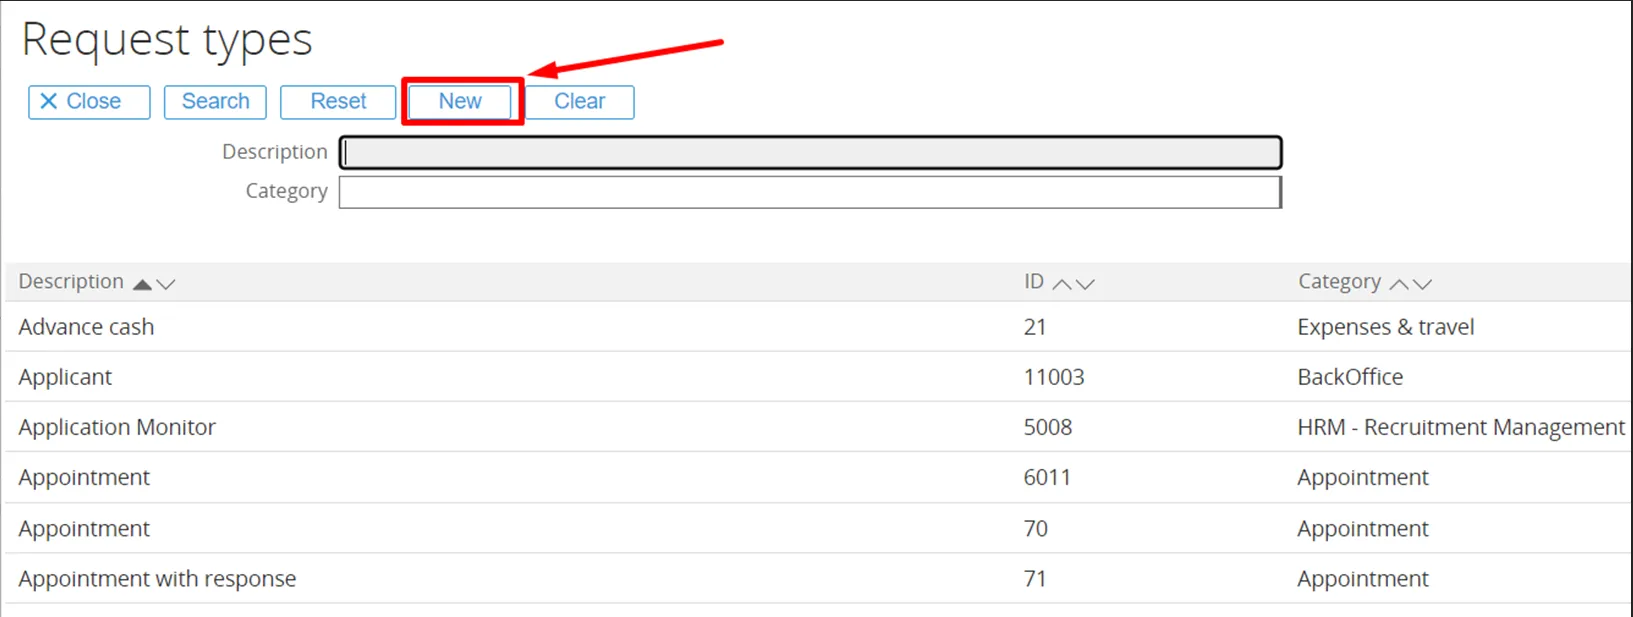
Tab ‘General’
Section titled “Tab ‘General’”The new Request Type screen will open on the tab ‘General’.
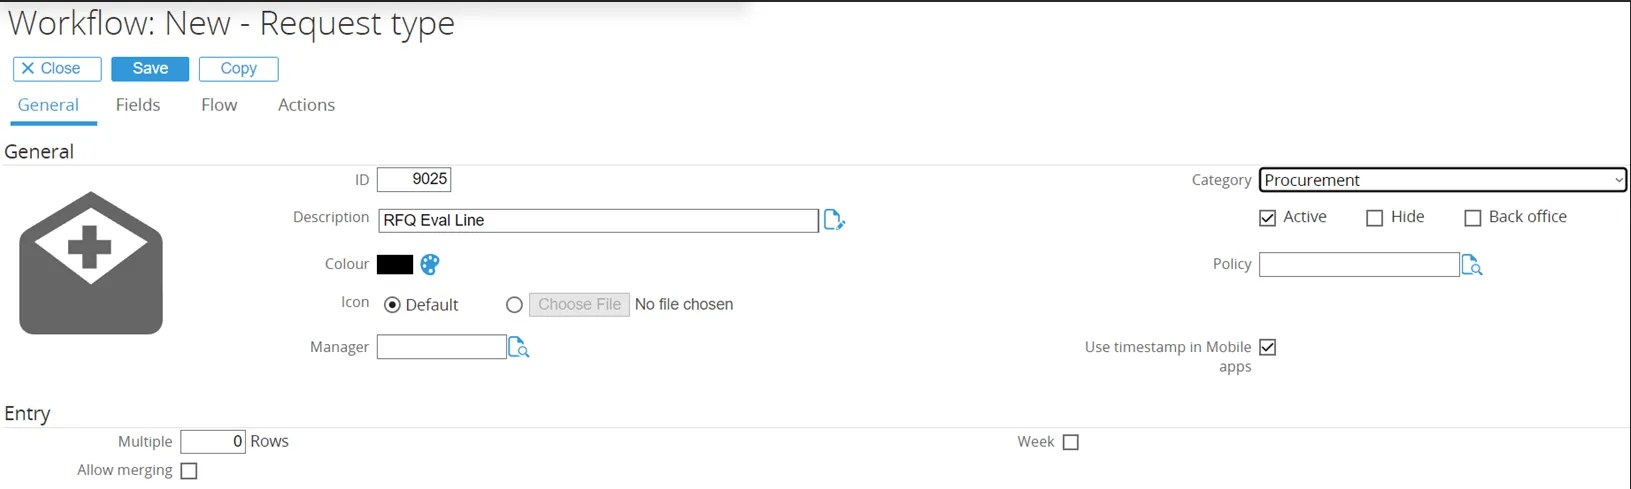
-
ID: set to 9025
- Any non-existing ID can be entered here.
-
Description:
- The title of the Request Type is entered in this field.
-
Category:
- Set to Procurement.
-
Active:
- Checkbox is ticked by default.
- Since this will be an active Request Type, the setting remains unchanged.
Tab ‘Fields’
Section titled “Tab ‘Fields’”Next, click on the tab ‘Fields’. Here, the default fields are displayed.
In the next screen can be chosen which fields to add. The first field to add will be ‘Item 1’.
The ‘Item 1’ field will open for configuration.
-
General
- Fieldname and Request Type are already populated by default.
-
Position
- Position is changed from 10 to 1.
- This moves the field up in the Request for Quote Line.
- Columns are set to 1 → the field consumes the entire line (no other field can be placed next to it).
-
Visible
- All checkboxes remain ticked.
- The field Item 1 will be visible for every Request status.
- Security level remains at 10 (standard level for company use).
-
Edit
- Checkboxes Open, Realized, and Processed are ticked.
- The field Item 1 can be edited when the Request for Quote Line is in these statuses.
-
Mandatory
- No checkboxes are ticked.
- The field Item 1 will not be mandatory for any status.
In the ‘Dependency’ section, none of the check boxes will be ticked. This means that there will be no dependency on any account, person, project or other item linked. In the ‘Selection’ section, no changes are made. There is no need for a change in configuration of the item selection page displayed when a user is selecting an item for this field to link to the request.Finally, click the ‘Save’ button to save the configuration for this field.
The end result for the field ‘Item 1’ will look like this:
- Quantity 1
- Procurement Unit
- Procurement Currency
- Procurement Price
- Procurement Discount %
- Amount
- Procurement Status
- Project
Removed Default Fields – Request for Quote Line
Section titled “Removed Default Fields – Request for Quote Line”A number of default fields from the Request Type are removed:
- Security Level
- Duration
- Start Date
- End Date
- Duration (duplicate)
- Remarks Request
- Remarks Workflow
- Attachments
Finally, the field ‘Person’ is moved down the list.
The end result for the fields used in the Request for Quote Line used by Ome Gijs Oliebollen looks like this:
Ome Gijs Oliebollen configured the flow for the Request for Quote Line as follows:
- Who can create request is set to the role ‘Procurement Officers.
- Who can edit new request, the Level is changed from ‘Division’ to ‘Corporate’. The request can be edited by role Corporate level.
- Who can approve, the ‘Manager Person’ is removed. Instead the role ‘Procurement Officers’ is added. Also the Level is changed from ‘Division’ to ‘Corporate’.
- Who can realize the request, the Step Action Term is set to ‘Quote’ and the Step Status Term is set to ‘Quoted’. This means that the request will be realized when the reviewer has received and updated the Quote. The role is set to ‘Procurement Officers’. Finally, the level is changed to ‘Corporate’, as this will be done at corporate level instead of division level.
- Who can process the request, the role is set to ‘Procurement Officers’ and the level is changed to ‘Corporate’.
- Who can reopen the request does not require any changes.
- Who can reject the request does not require any changes.
- Who can delete the request does not require any changes.
The end result for the flow used in the Purchase Requisition Line looks like this:

Tab ‘Actions’
Section titled “Tab ‘Actions’”Finally, click on the tab ‘Actions’. Here the actions information for a request type can be defined, which is useful for directing the users in taking actions upon the request type.

Document: Template
Section titled “Document: Template”Since there is no existing Document Template for Request for Quote available, a new one has to be created. To do this, first click the magnifying glass icon over the document.

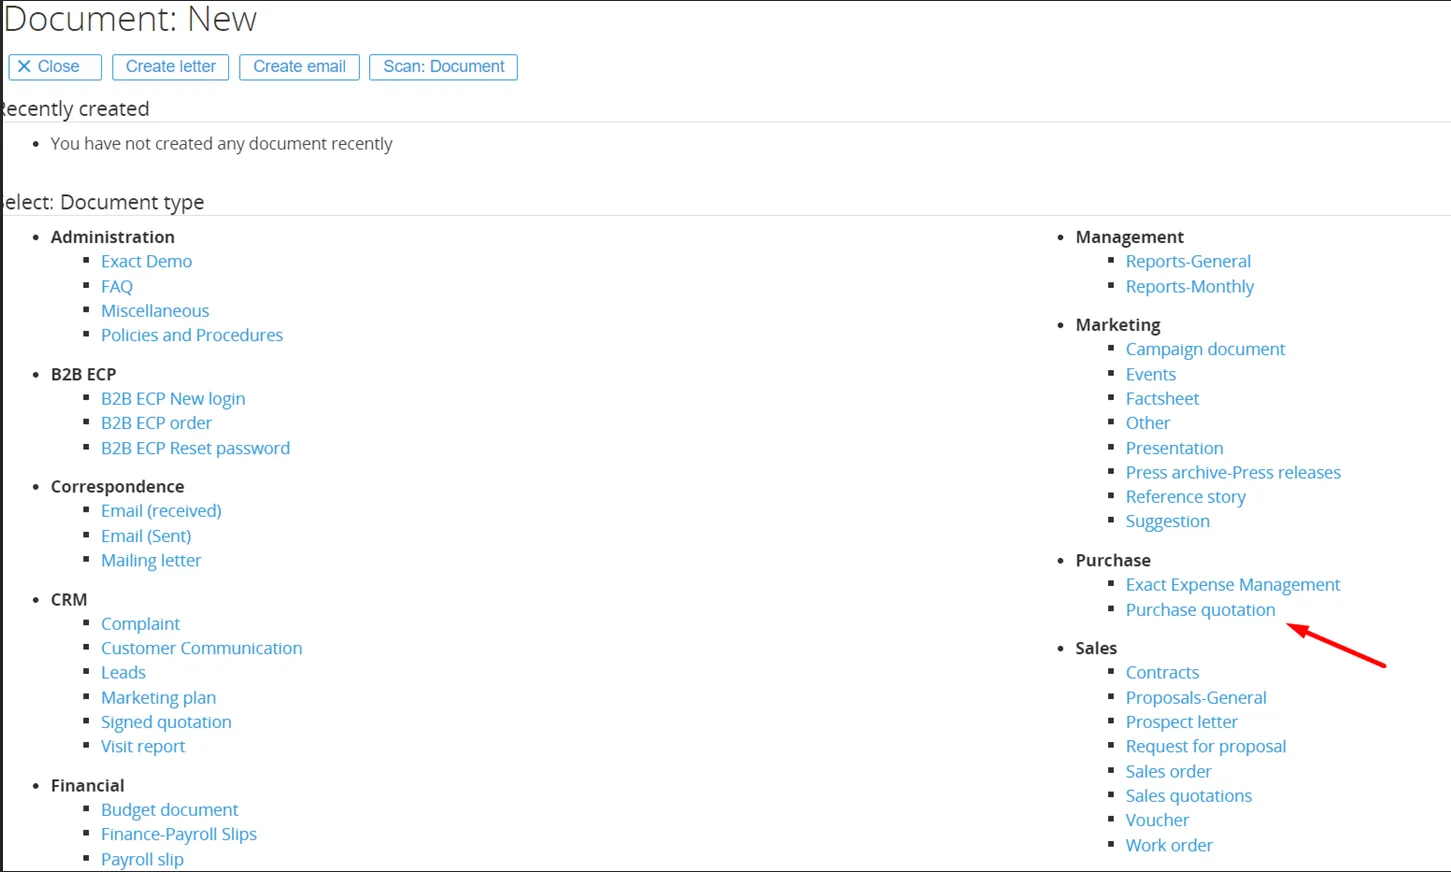
The ‘Document Template’ will be open for configuration.
-
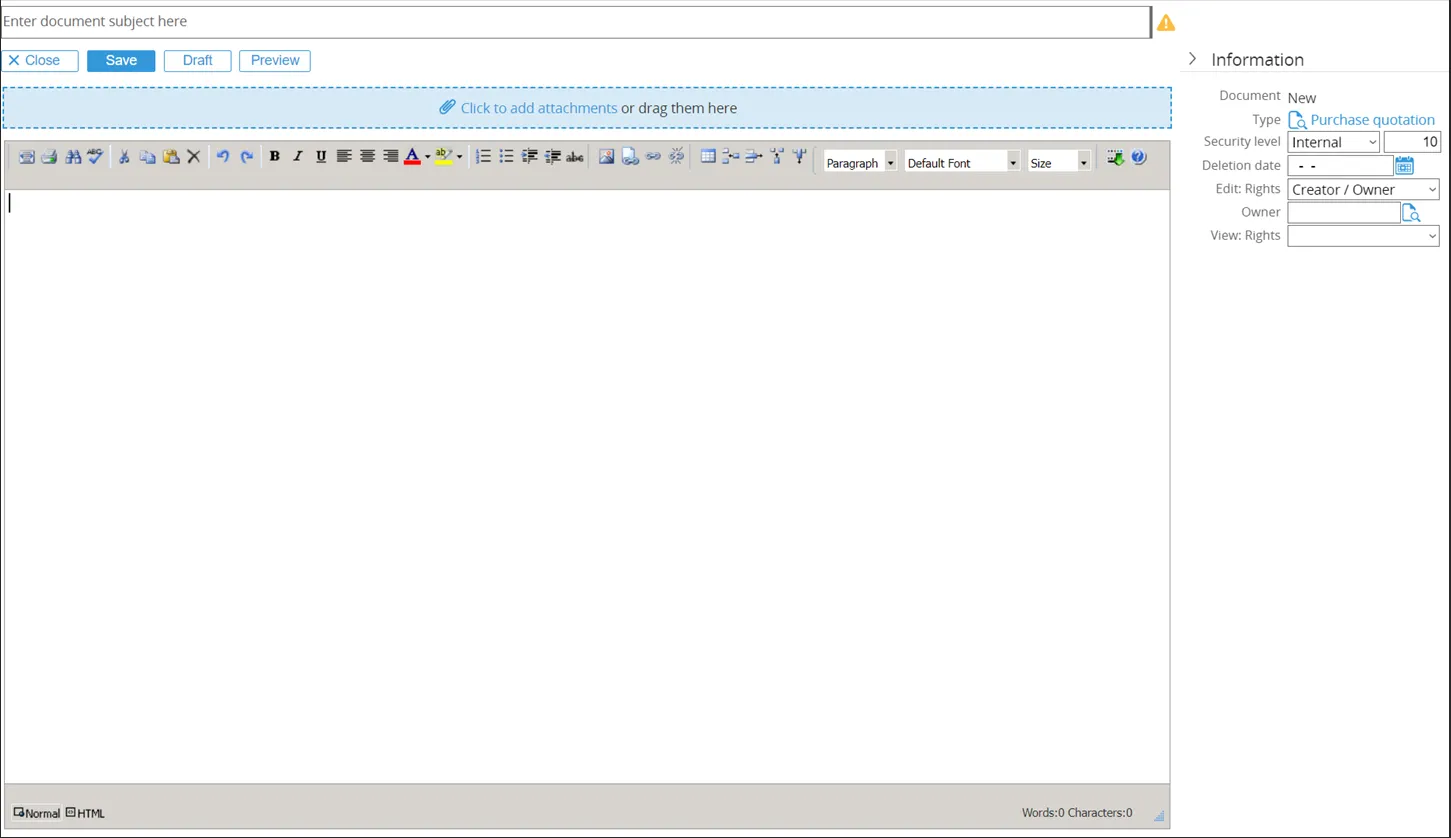
The document name is entered in the field ‘Subject’; this is a mandatory field.
-
An attachment can be added to the template. A short explanation on how to create the mail merge template is provided below.
-
The text in the document can be entered in the text editor on the top of the page.
When the Document Template is finished, click save button.
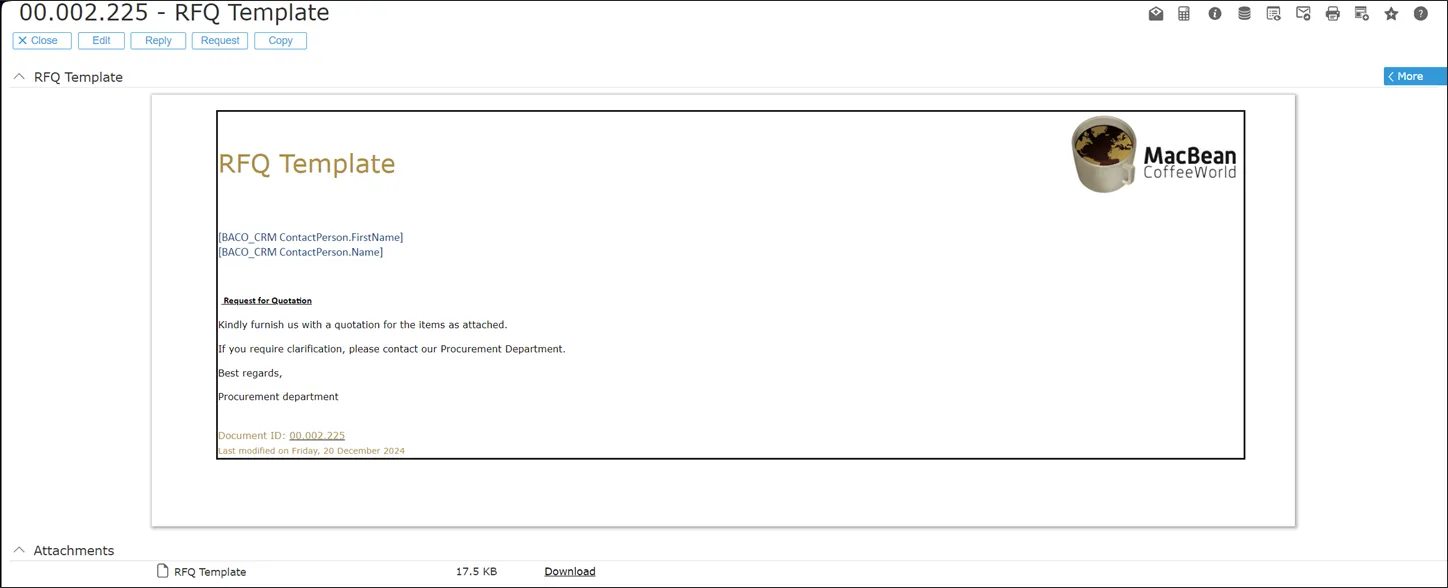
The end result for the Document Template looks like this:
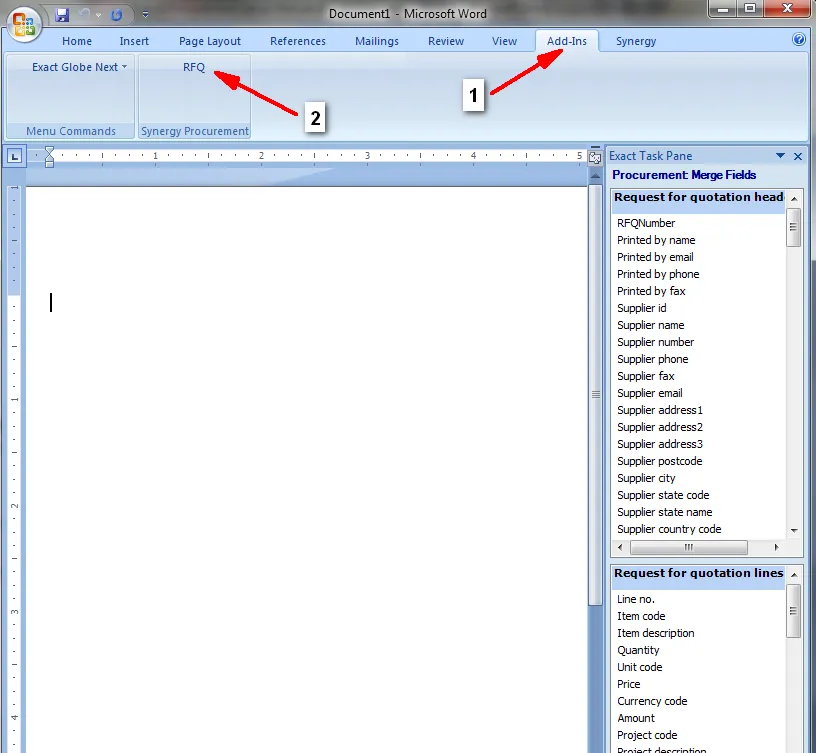
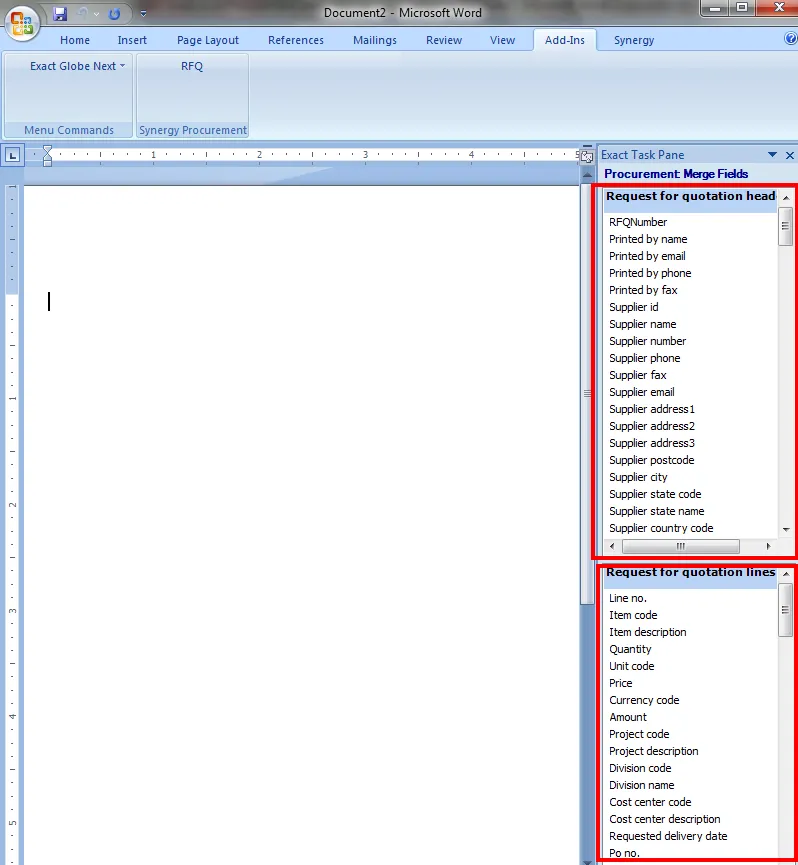
Mail Merge Attachment
Section titled “Mail Merge Attachment”To create the mail merge attachment, open MS Word and click the tab ‘Add-Ins’. Next, click on the add-in ‘RFQ’. This will open the Procurement Merge Fields that can be used in the mail merge document.
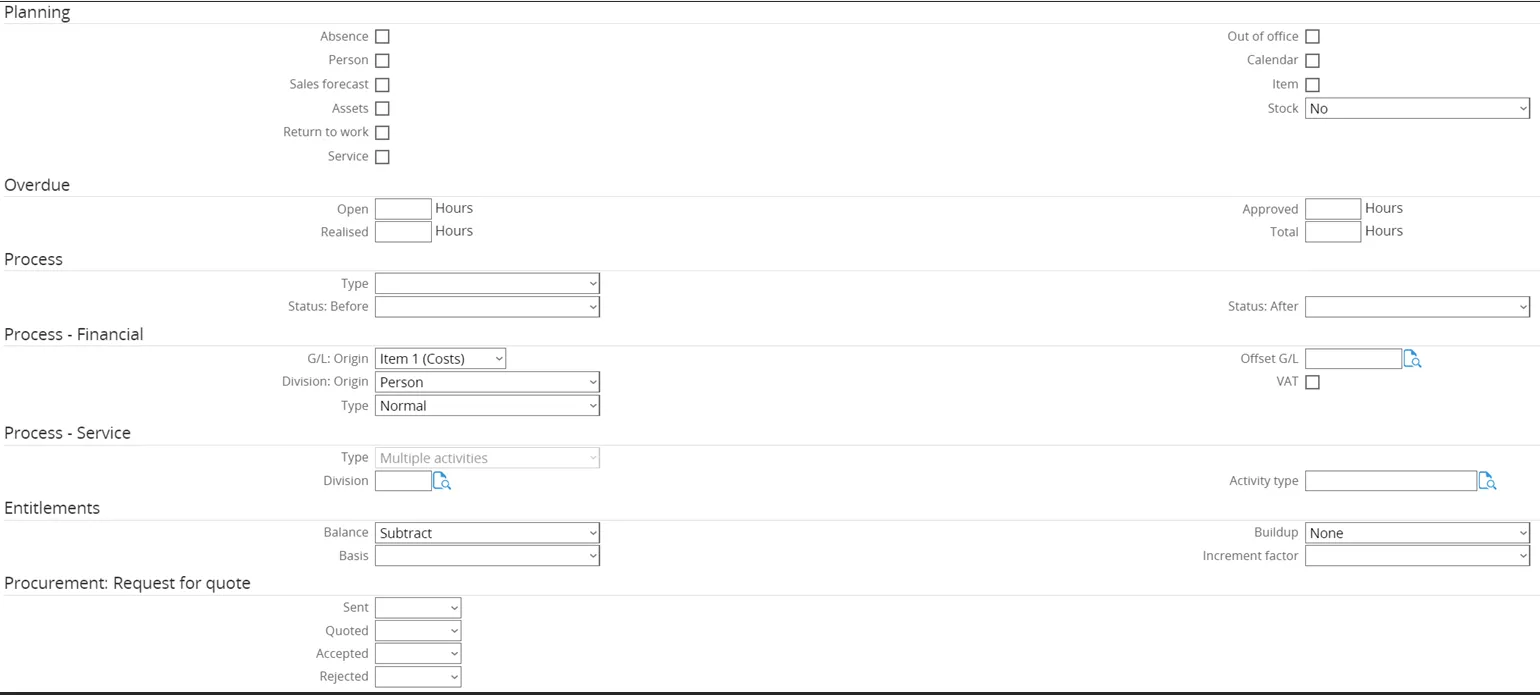
4.2.4 Budgets
Section titled “4.2.4 Budgets”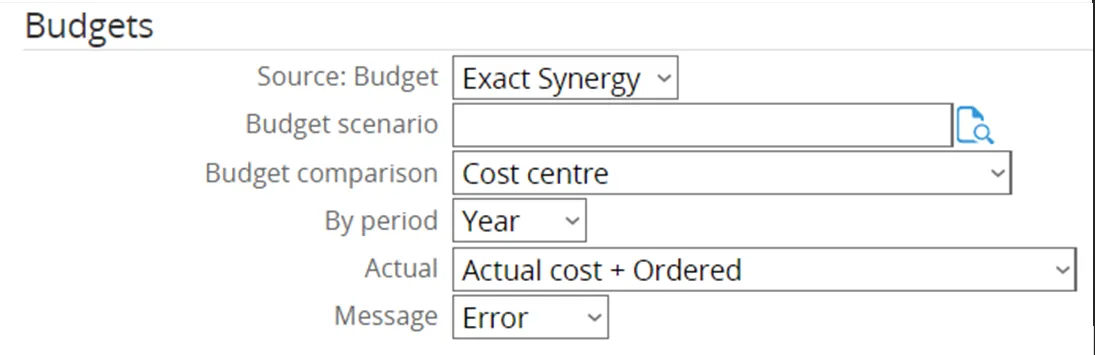
- The source of the budget is set to Exact Globe.
- Budget comparison will be done by cost center.
- The period is set to year.
- Actual is set to ‘Actual cost + ordered’. This means that the budget will be checked against the orders that have been delivered in the past (actual) + the orders that have been ordered but not yet received (ordered).
Note: Another option ‘Purchase Requisition’ exists to also check the budget for Purchase Requisitions that are outstanding, but have not yet been ordered. This option was not chosen to be implemented by Ome Gijs Oliebollen however.
4.2.5 Purchase Order
Section titled “4.2.5 Purchase Order”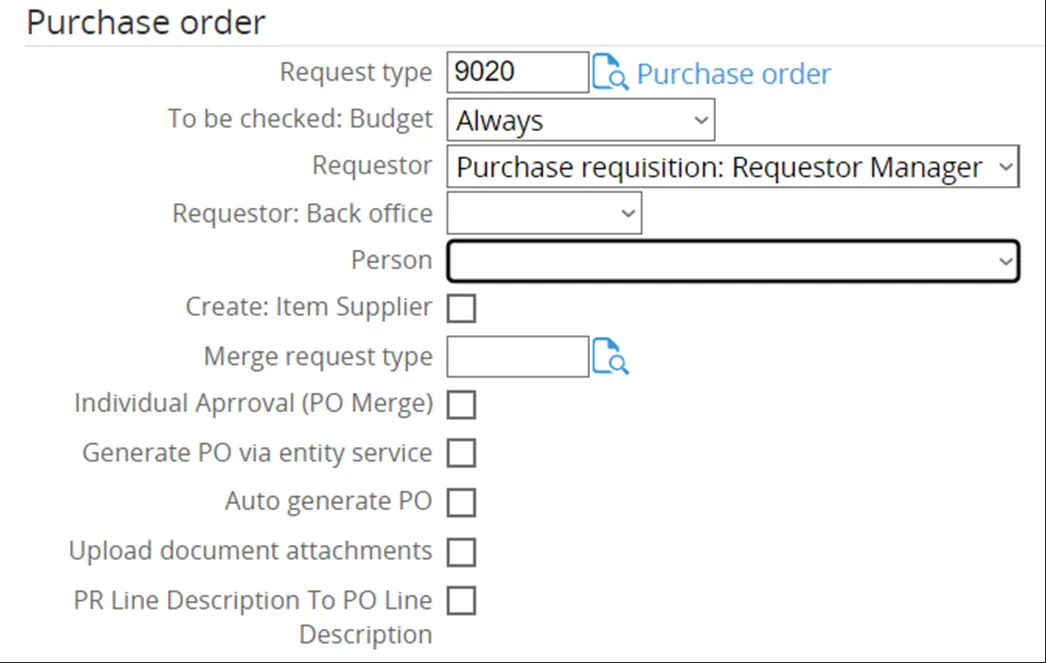
- For the Request Type, the newly created Request Type ‘Purchase Order’ was selected. Below will be shown in detail how this Request Type was created.
- The Budget Check is set to ‘always’, not only on creation or approval.
- The requestor of the resulting purchase order is set to: ‘Requestor Manager’. This means it will be the Manager of the creator of the purchase request who will be set as the requestor of the items.
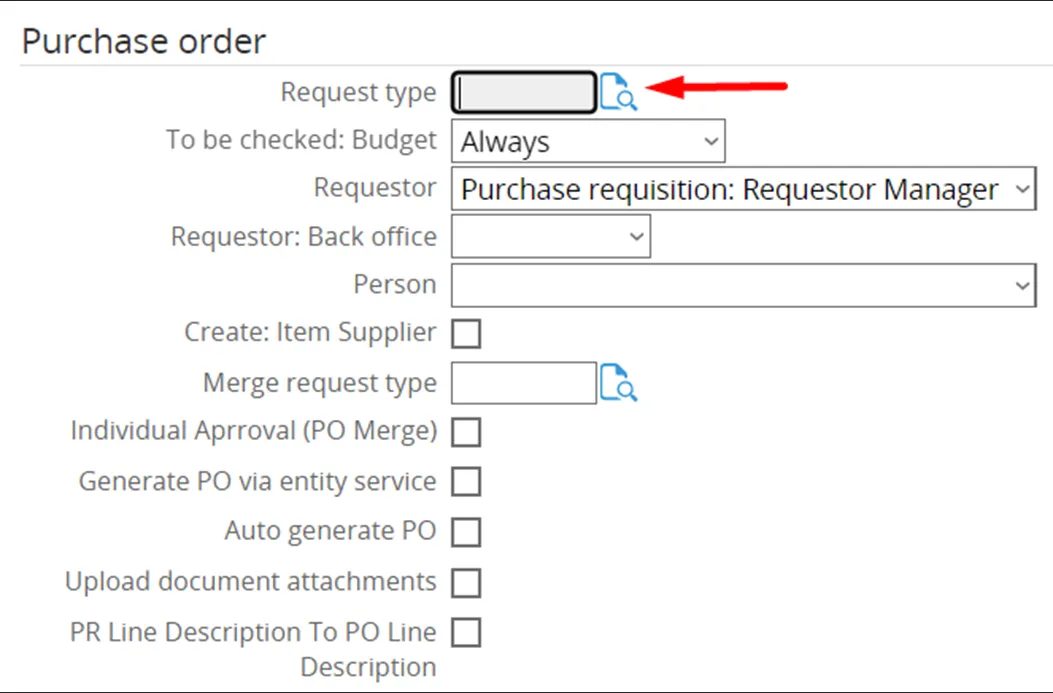
Request Type: Purchase Order
Section titled “Request Type: Purchase Order”Since there is no existing Request Type for the Purchase Order available, a new one has to be created. To do this, first click the magnifying glass icon over the document.
Tab ‘General’
Section titled “Tab ‘General’”The new Request Type screen will open on the tab ‘General’.
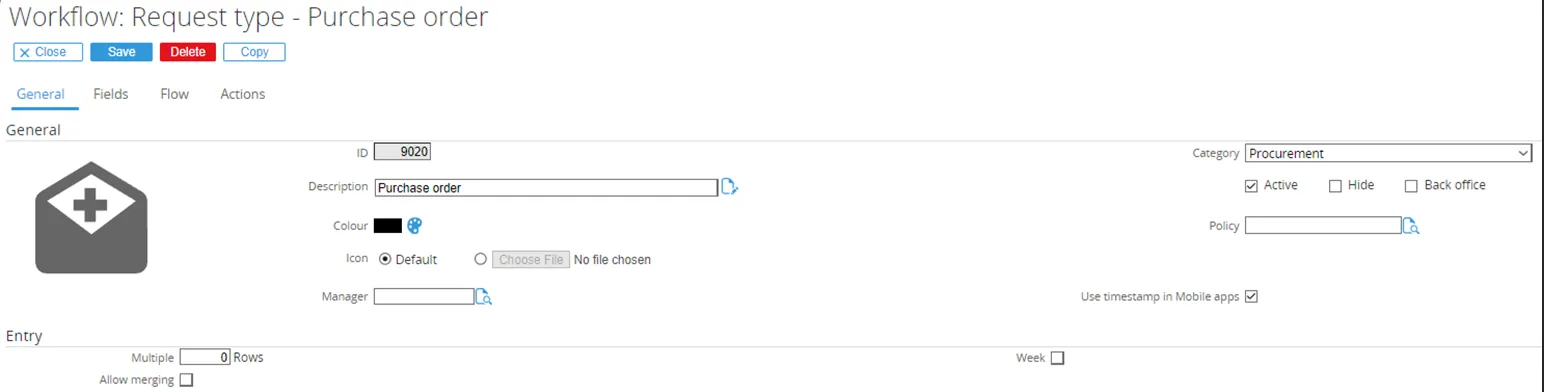
- The field ‘ID’ is set to 9020. Any non-existing ID can be entered here.
- The title of the Request Type is entered in the field ‘Description’.
- The field ‘Category’ is set to ’Procurement Purchase Requisition’.
- The check box ‘Active’ is ticked by default. Since this will be an active Request Type, that remains unchanged.
Tab ‘Fields’
Section titled “Tab ‘Fields’”Next, click on the tab ‘Fields’. Here, the default fields are displayed.
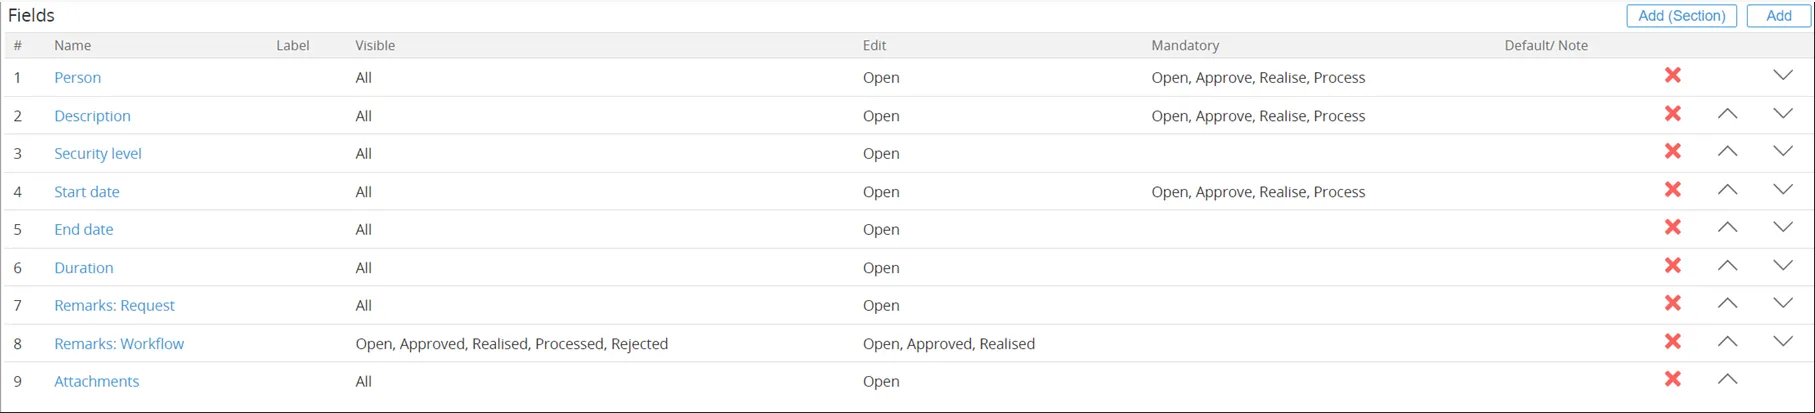
In the next screen can be chosen which fields to add. The first field to add will be ‘Account’.
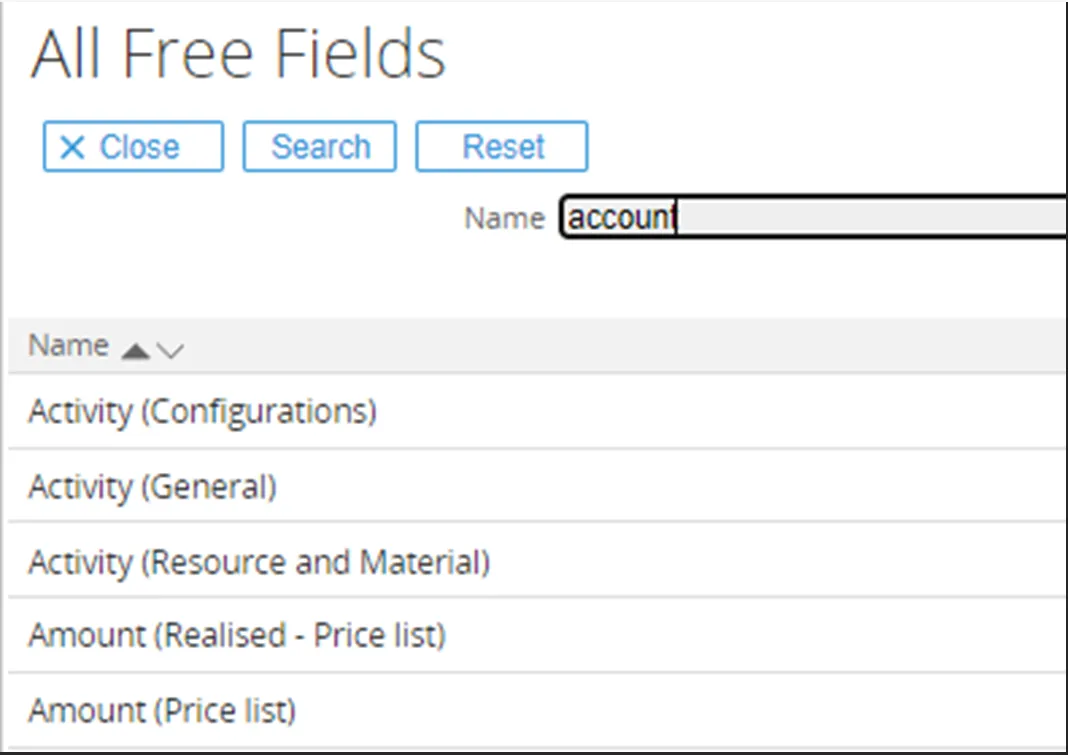
The ‘Account’ field will open for configuration.
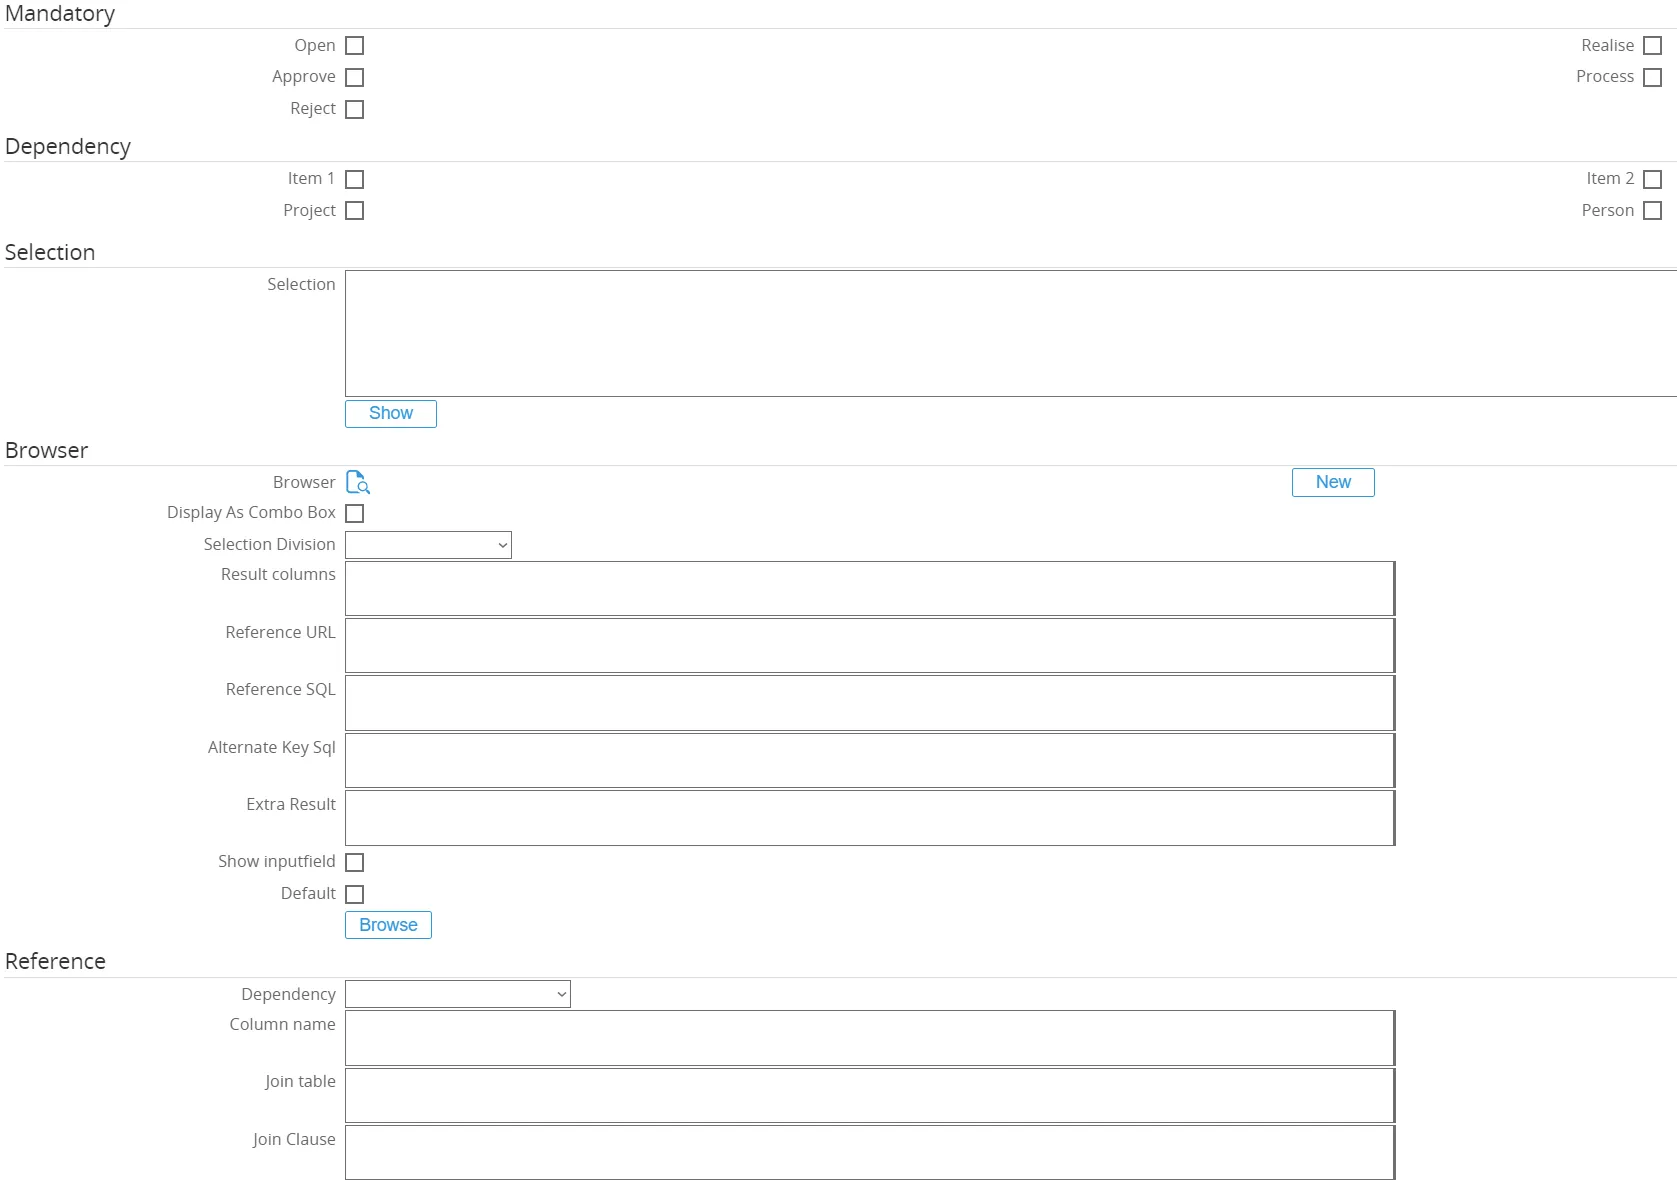
- In the ‘General’ section, the Fieldname and Request Type are already populated by default.
- In the ‘Position’ section, the position is remained at 103. This field position in the Purchase Order will remain the same. The columns remain set to 2. This means there can be another field next to ‘Account’; it will not consume the entire line.
- In the ‘Visible’ section, all the check boxes remain ticked. This will show the field ‘Account’ for every Request status. The security level remains at 10; the standard level for company use.
- In the ‘Edit’ section, the check box ‘Open’ will be ticked. The field ‘Account’ should only be able to be edited when the Purchase Order has the status ‘Open’.
- In the ‘Mandatory’ section, none of the check boxes will be ticked. This means that the field ‘Procurement Document’ will not be mandatory for any of the statuses.
- In the ‘Dependency’ section, none of the check boxes will be ticked. This means that there will be no dependency on any item, person or project linked.
Finally, click the ‘Save’ button to save the configuration for this field.
The end result for the field ‘Account’ will look like this:


Tab ‘Flow’
Section titled “Tab ‘Flow’”Next, click on the tab ‘Flow’. Here, the flow for a request type can be defined, which is useful for directing the people in handling the sequence or the flow of a request from the start of the request till the request is completed.
Ome Gijs Oliebollen configured the flow for the Purchase Order as follows:
- Who can create request is set to the role ‘Procurement Officers’ and the corresponding level are set to ‘Corporate’.
- Who can edit new request, the Level is changed from ‘Division’ to ‘Corporate’. The request can be edited by role Corporate level.
- Who can approve, the ‘Manager Person’ is removed. Instead the role ‘Procurement manager’ is added. Also the Level is changed from ‘Division’ to ‘Corporate’. The check box ‘Approve Send Email’ is ticked. This means there will be send an email after the request has been approved. Finally, the check box ‘Approve everyone’ is ticked. This means that the request is only approved once every approver has approved the request.
- Who can realize the request, the check box ‘Purchase limit’ is ticked. This means there will be a check on the purchase limit when the request is realized. The person is set to ‘Manager: Person’.
- Who can process the request, the role is set to ‘Procurement Officers’. The level is changed to ‘Corporate’.
- Who can reopen the request does not require any changes.
- Who can reject the request does not require any changes.
- Who can delete the request does not require any changes.
The end result for the flow used in the Purchase Order looks like this:

Tab ‘Actions’
Section titled “Tab ‘Actions’”Finally, click on the tab ‘Actions’. Here the actions information for a request type can be defined, which is useful for directing the users in taking actions upon the request type.
The actions tab does not require any changes. However, a new section is added by GLM Systems to be able to link the status of the Purchase Requisition Header to the workflow status. The new section ‘Procurement Purchase Order’ consists of the following fields:
- Approved
- Print/Process
These fields can be linked to workflow statuses, so that status will be updated according to the status of the Purchase Requisition Header.
The end result for the actions used in the Purchase Order looks like this:
5. Roles and Rights
Section titled “5. Roles and Rights”This section focusses on the Procurement roles and rights. The chapter is divided in 2 sections.
- Section 4.1 will show how to configure the roles of the employees who will use the Procurement Module when currently procurement roles do no exist in the company.
- Section 4.2 will show how to configure the function rights of the employees who will use the Procurement Module when currently procurement roles already exists in the company.
5.1 Roles
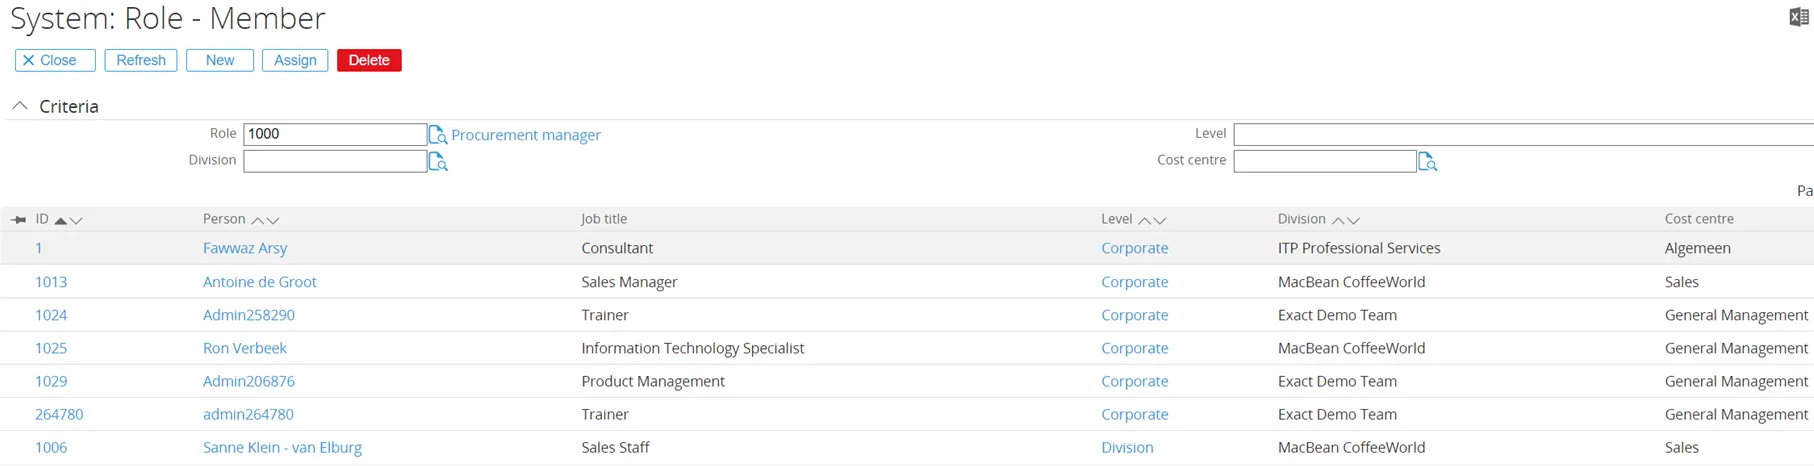
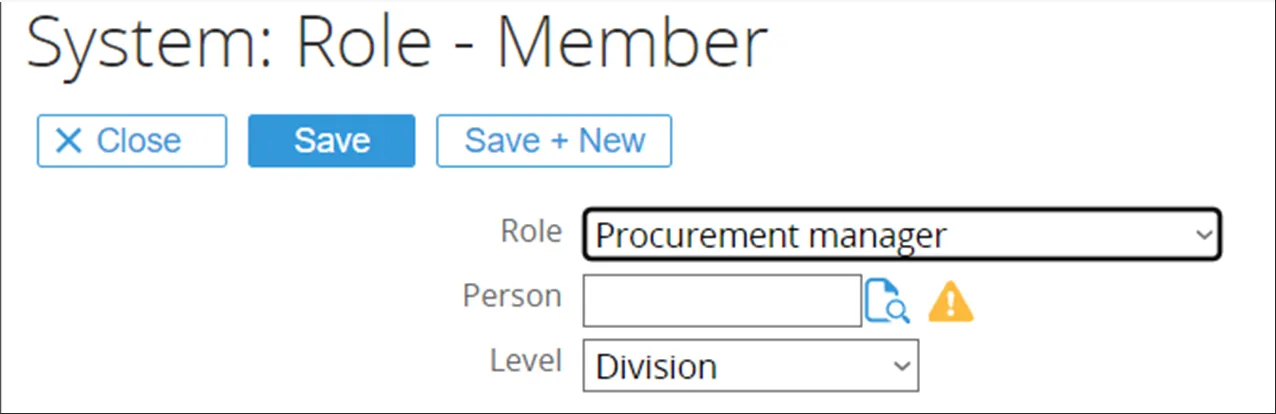
Section titled “5.1 Roles”Section 4.1 is to be used when choosing to use the default roles for Procurement that have been provided by GLM. This section will show how to add the existing persons in the organization to the default Procurement roles. Please note that in case the company already has roles for purchasing and procurement defined, these roles will not be used. In that case, the existing roles will need to have Function Rights added. For more information about that process, please refer to 4.2 Function Rights.
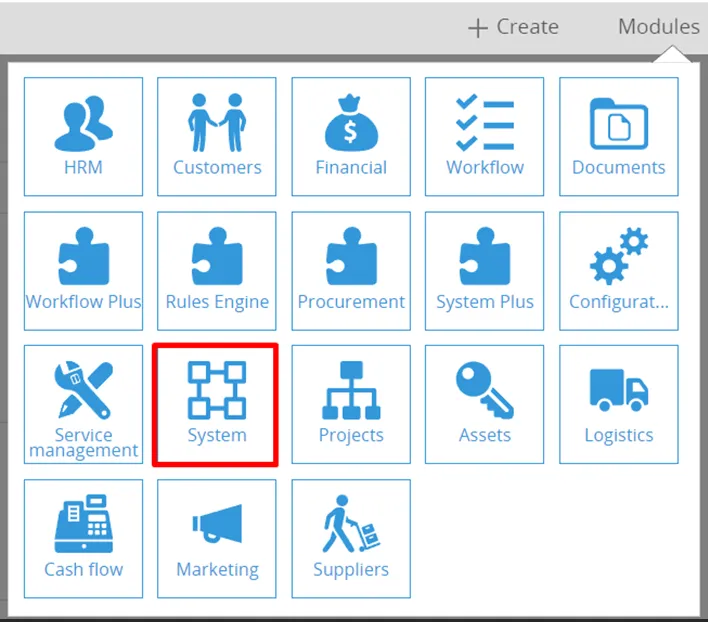
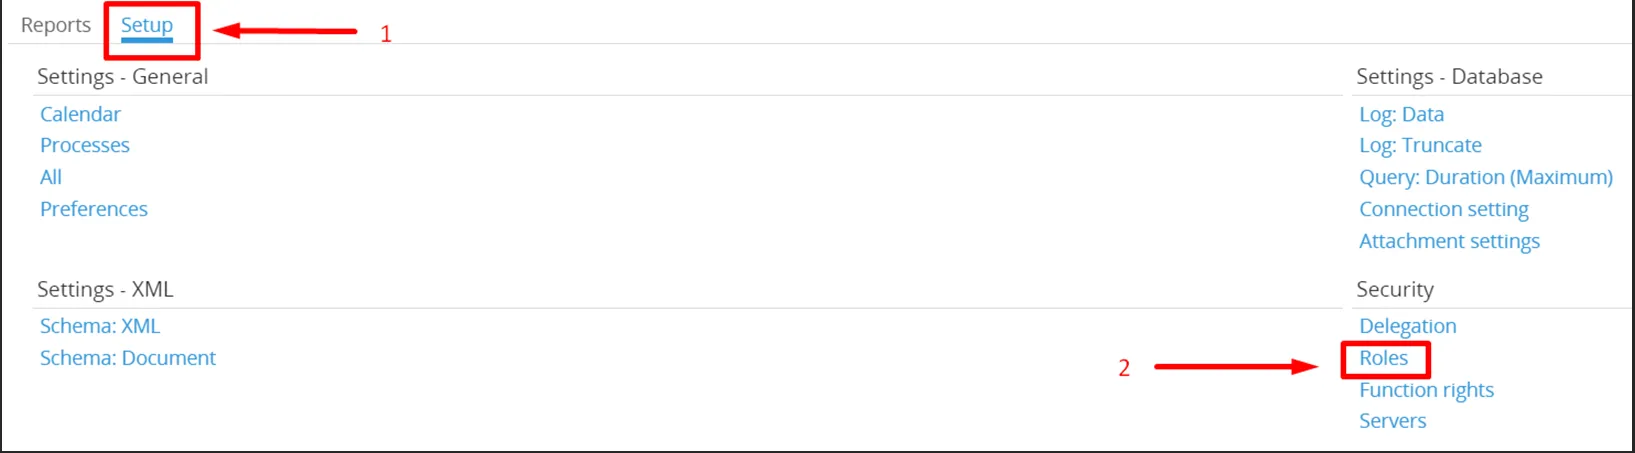
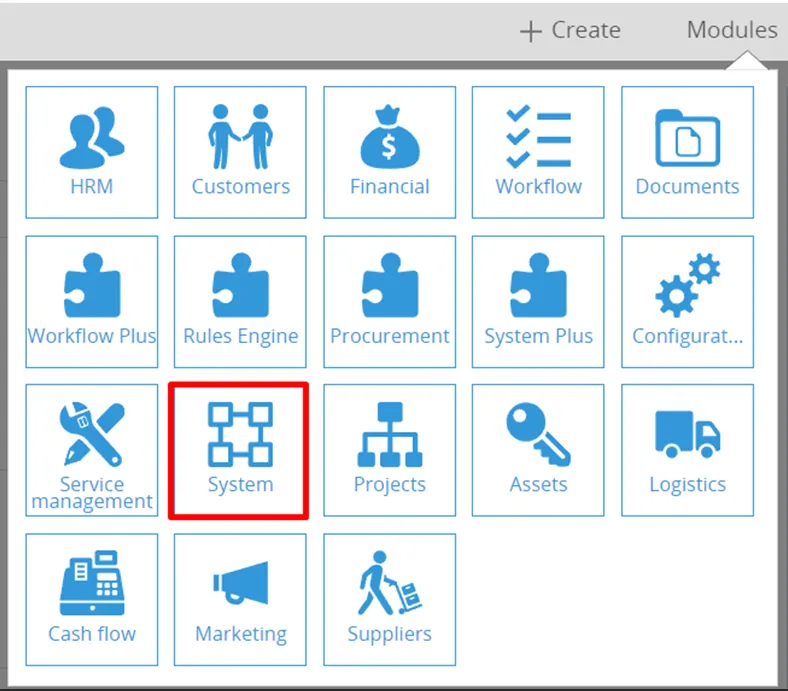
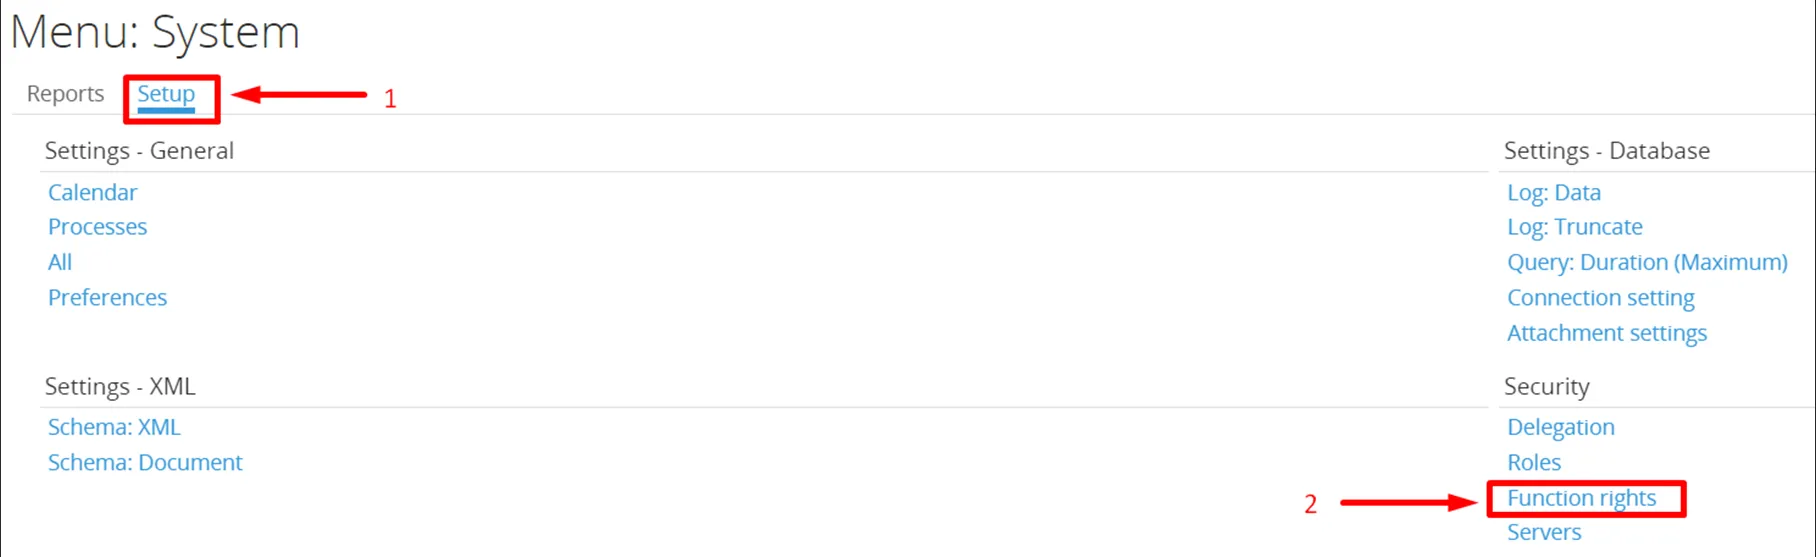
To open the ‘Roles’ section, first click the tab ‘System’. On the ‘System’ tab, select the tab ‘Setup’ and in section ‘Security’ click on ‘Roles’. This will open the roles screen.
5.2 Rights
Section titled “5.2 Rights”Section 4.2 is to be used when choosing to use the company’s existing roles for Procurement that are currently used. This section will show how to add the function rights to the existing Procurement roles. Please note that in case the company does not yet have roles for purchasing and procurement defined, the default roles for Procurement as designed by GLM can be used instead. In that case, only the persons in the organisation need to be linked to the default Procurement roles. For more information about that process, please refer to 4.1 Roles.
To open the ‘Function Rights’ section, first click the tab ‘System’. On the ‘System’ tab, select the tab ‘Setup’ and in section ‘Security’ click on ‘Function Rights’. This will open the function rights screen.

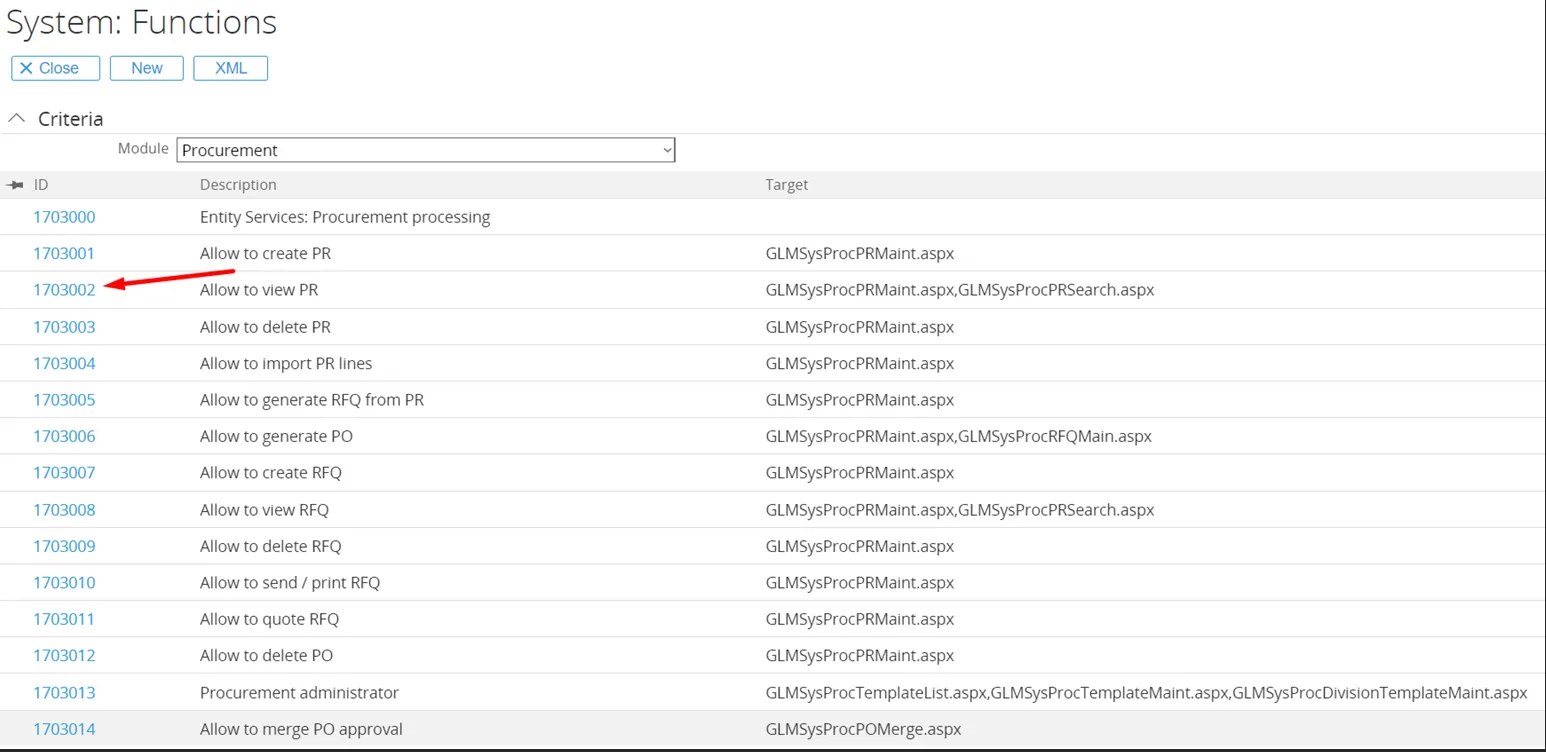
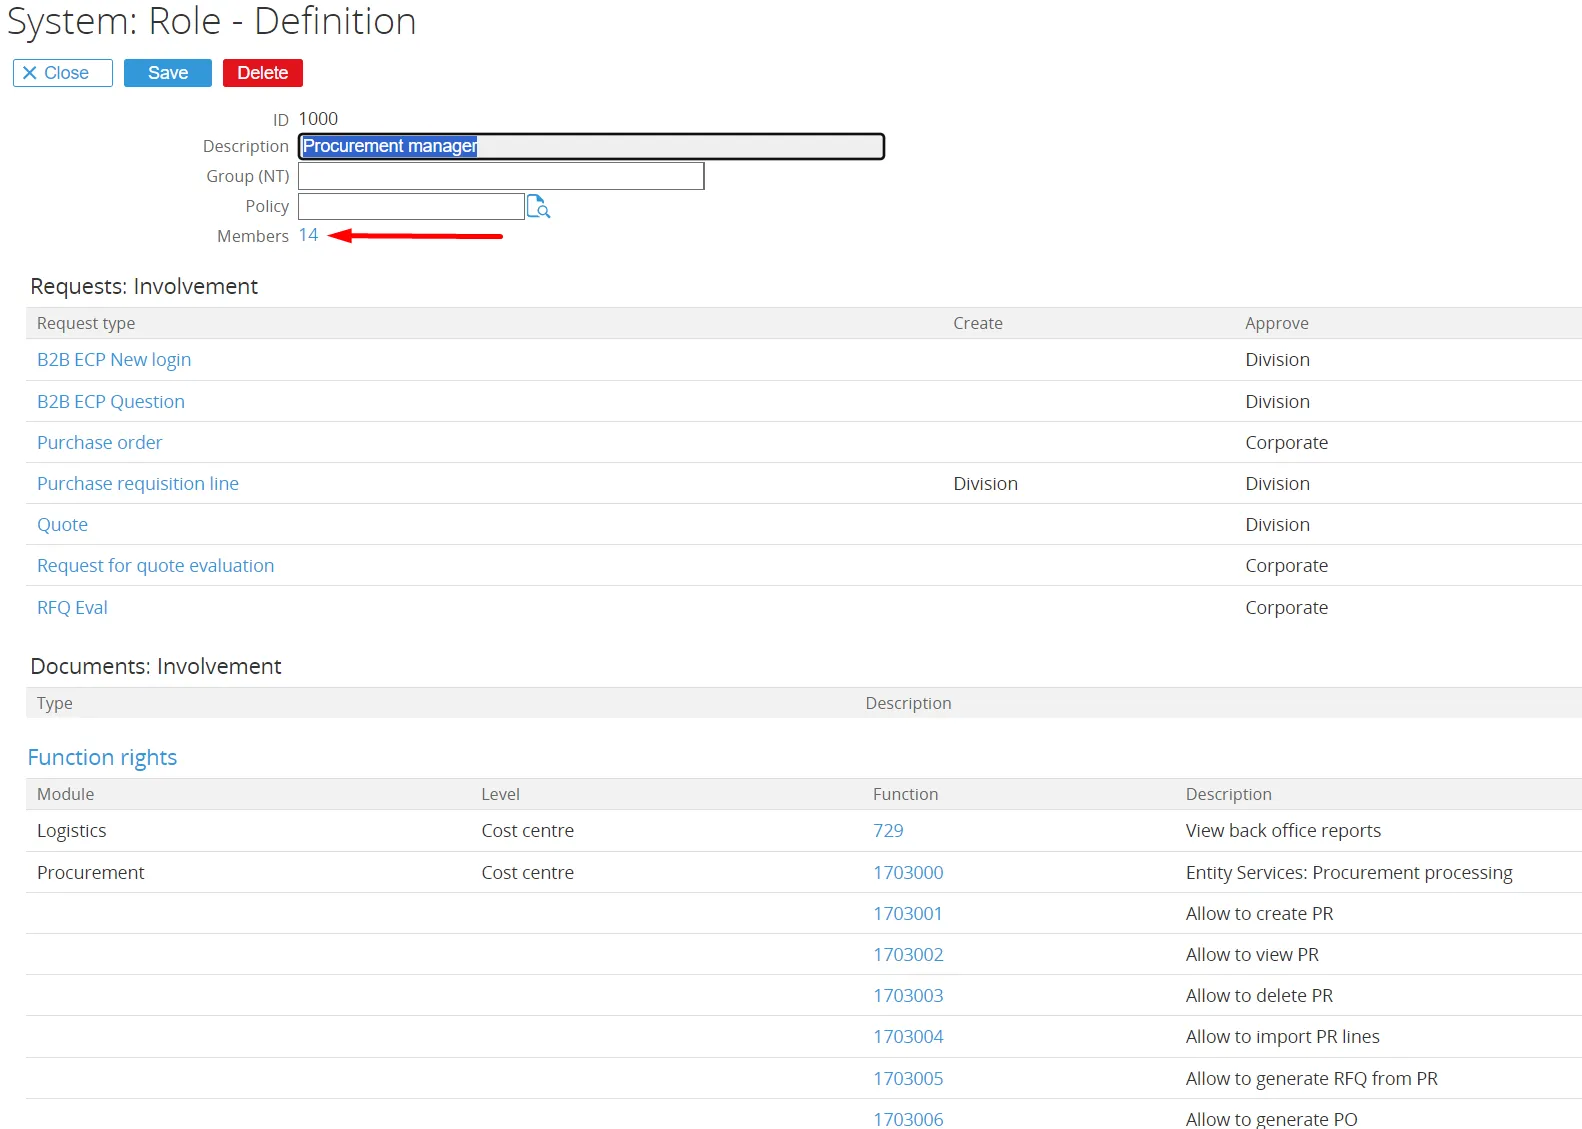
To see which roles are currently linked to ‘Allow to view PR’, click on the function rights number on the left side.
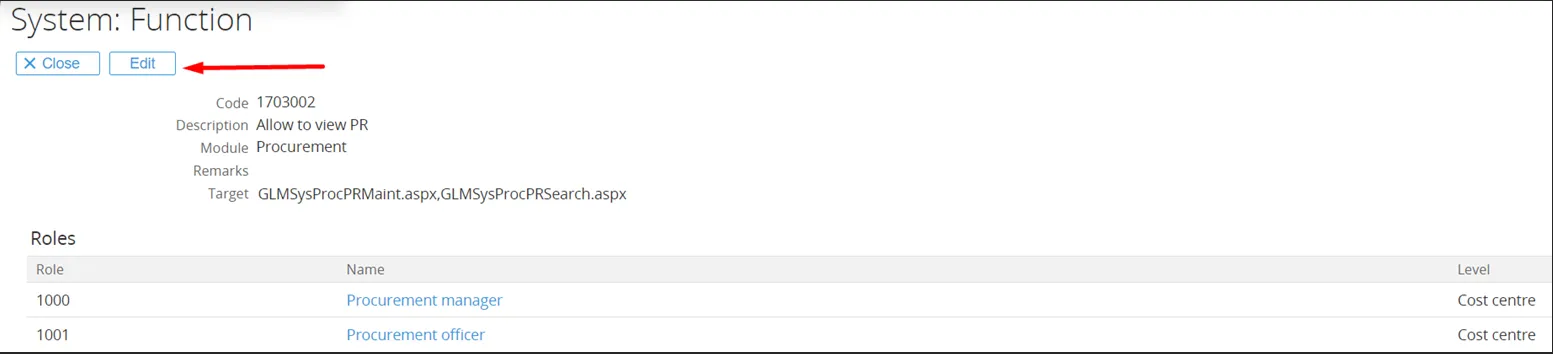
This opens the function overview screen.
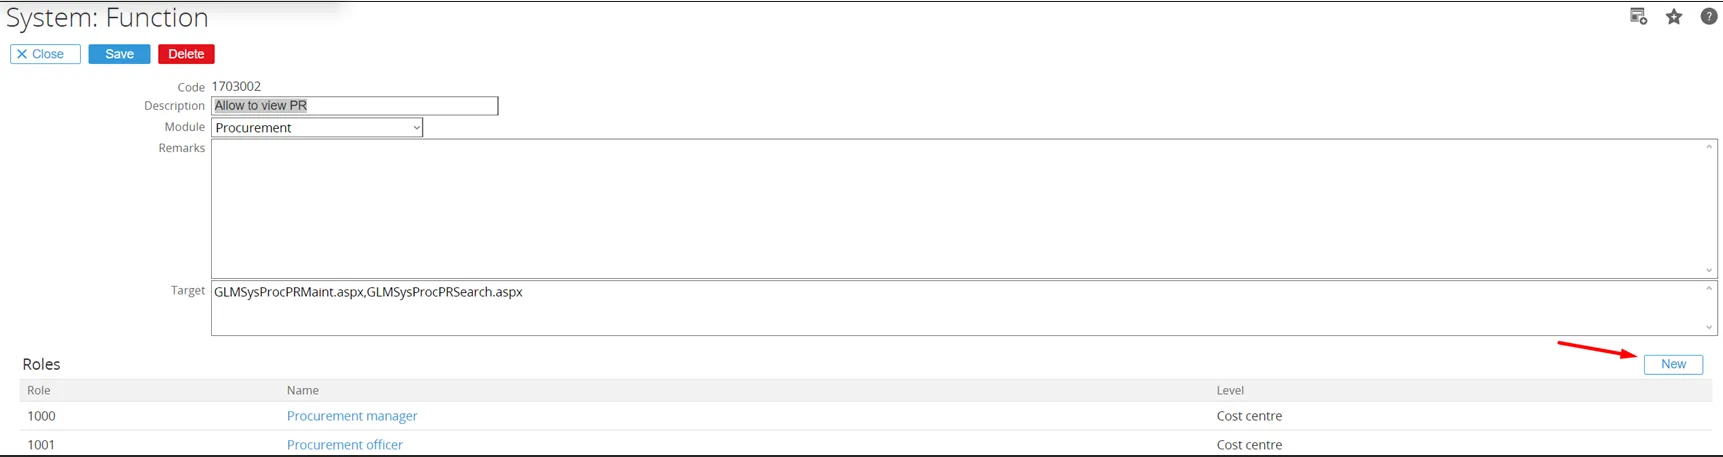
This opens the function edit screen.
The screen where the function right can be linked to the role and level is opened.
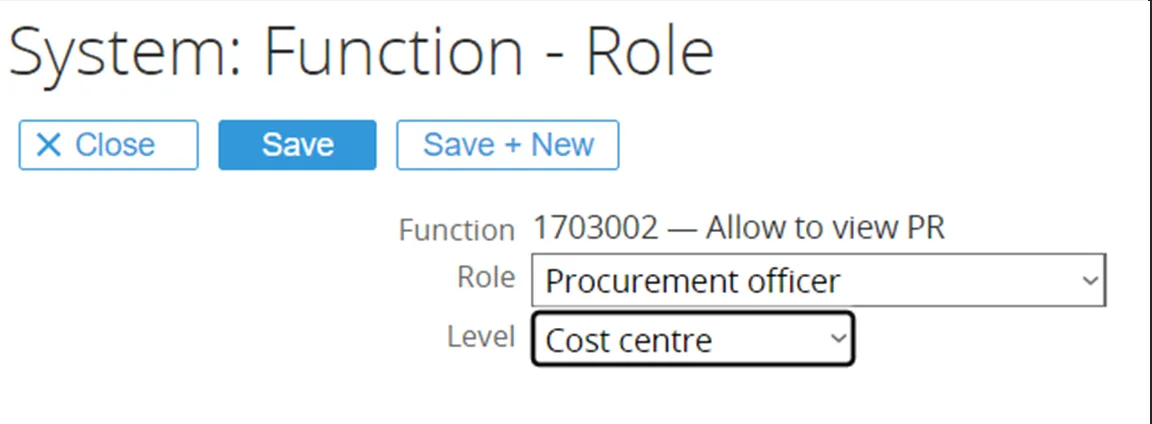
In this example, the function right is linked to the role ‘Procurement Officers’, on ‘Cost Center’ level.
When finished, click the ‘Save’ button to save and close this screen, or the button ‘Save + New’ to add another role to this function.
6. Troubleshooting
Section titled “6. Troubleshooting”Step-by-step instructions for solving specific issues
6.1 Database update – Could not load file or assembly ‘Exact.Metadata, version 5.0.0.9, Culture=neutral,Publictoken=null’ or one of its dependencies. Access is denied
Section titled “6.1 Database update – Could not load file or assembly ‘Exact.Metadata, version 5.0.0.9, Culture=neutral,Publictoken=null’ or one of its dependencies. Access is denied”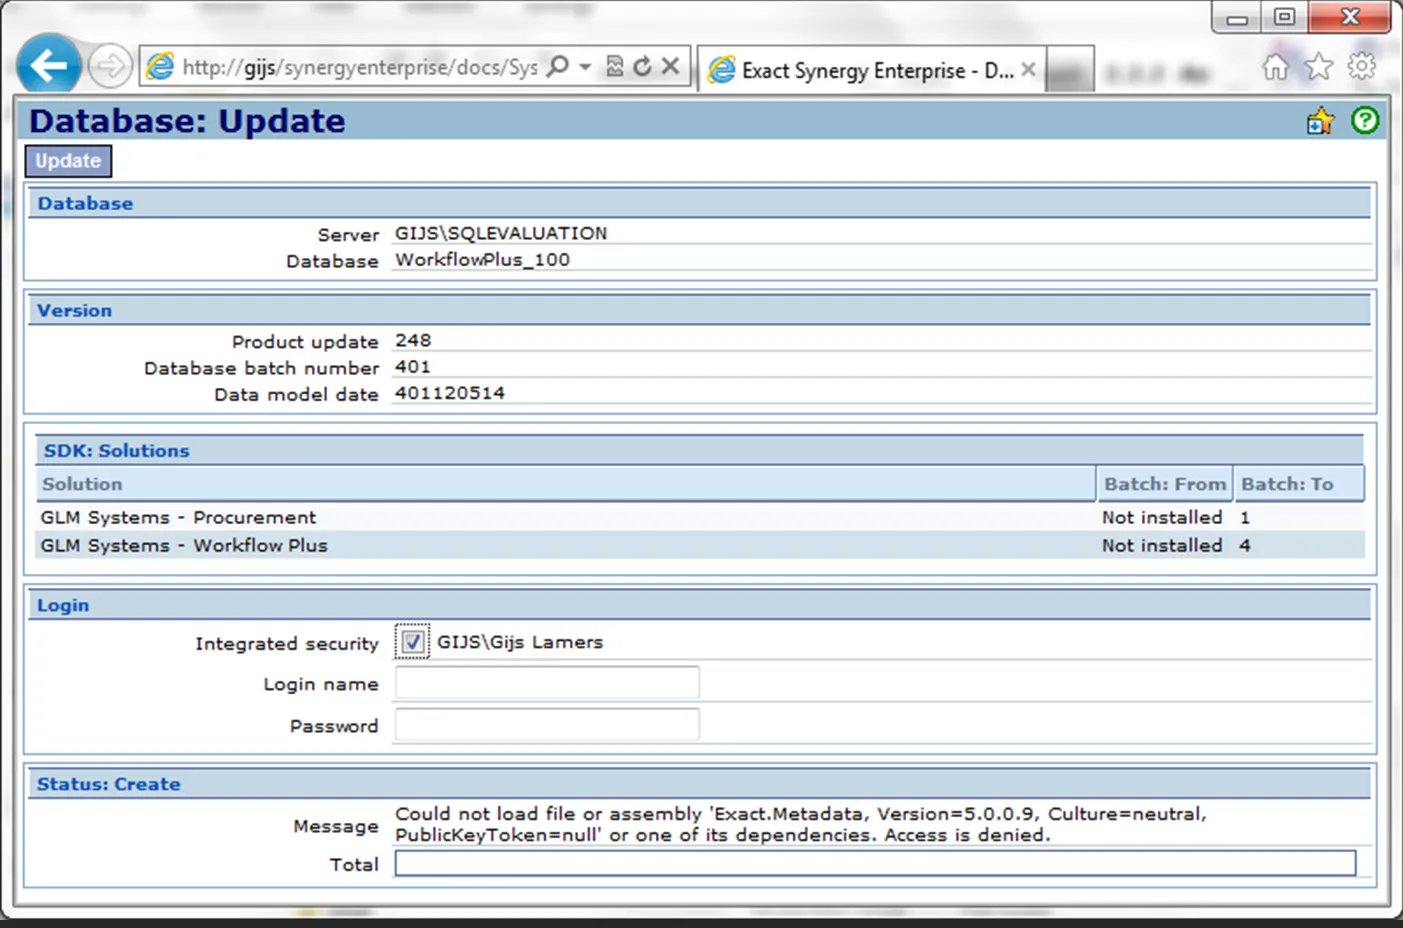
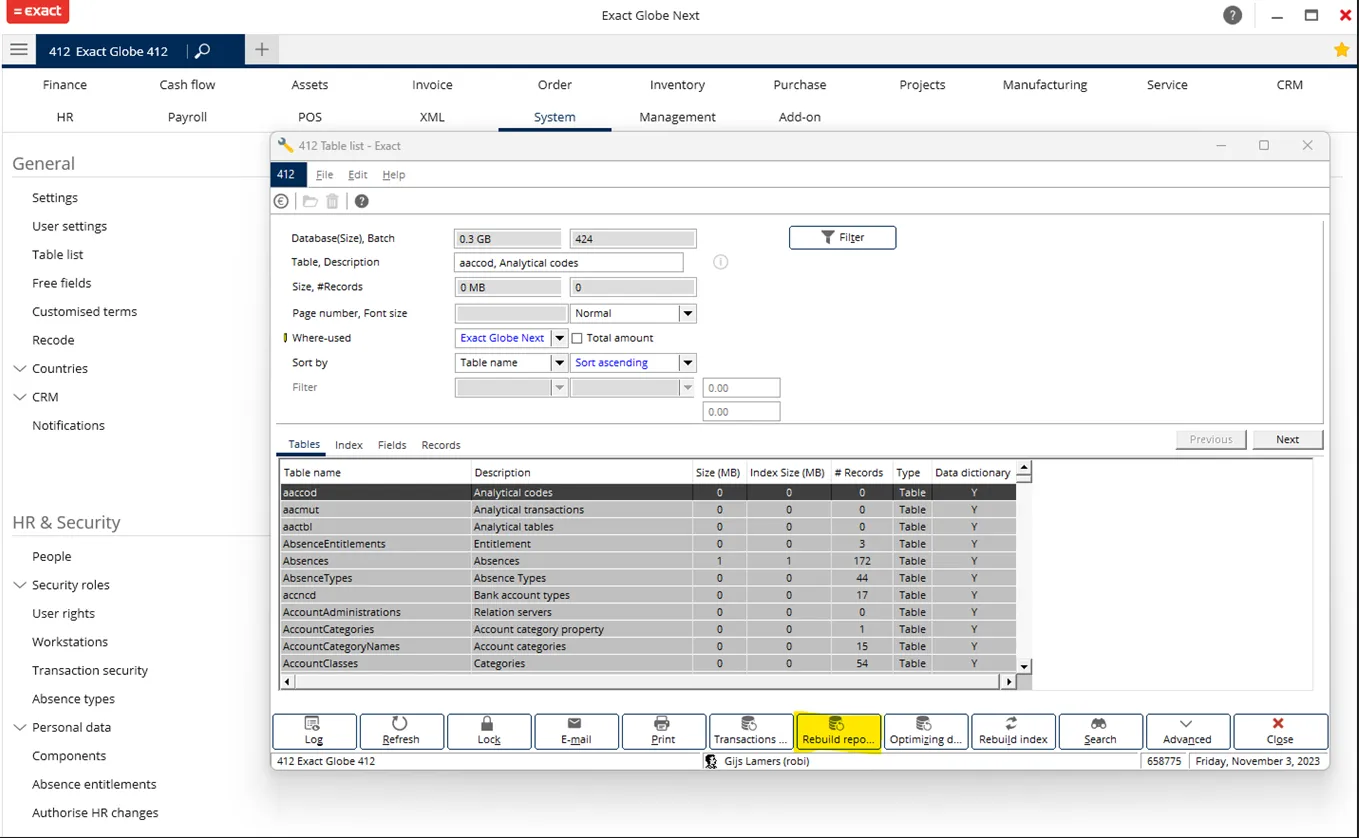
6.2 Error : Rebuild Repository When Generate PO from PR or RFQ
Section titled “6.2 Error : Rebuild Repository When Generate PO from PR or RFQ”First you can try Rebuild Repository on the Exact Globe, You can go there from :
• Go to Menu Systems > General > Table list.
• From here you will see a button “Rebuild repository”, click and confirm to rebuild repository.
If not installed, you will need to installed the services.
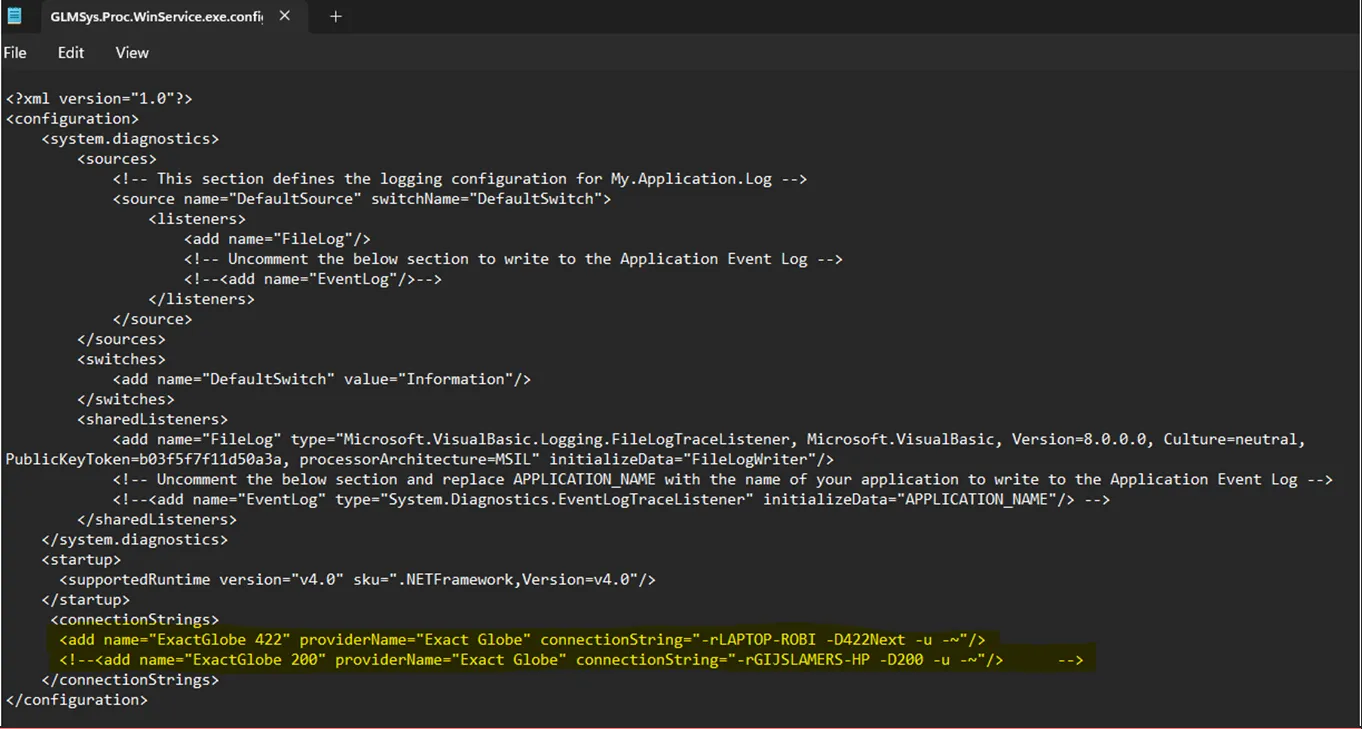
The installer file “InstallGLMSysProcWinSerivce.bat” is on the globe installer inside the services folder.
you also need to set the connection in the file “GLMSys.Proc.WinService.exe.config” for the procurement service.
6.2 Below is the example line of the connection setting :
At connectionString -r refers to servername and -D refers to databasename
6.3 Word Office Add-in installation – Customized functionality in this application will not work
Section titled “6.3 Word Office Add-in installation – Customized functionality in this application will not work”System.Security.SecurityException:Customized functionality in this application will not work because the certificate usedto sign the deployment manifest for <name of the document> or its location is not trusted.(http://msdn.microsoft.com/en-us/library/bb772070.aspx)
-
Open the registry editor:
- Click Start, and then click Run.
- In the Open box, type
regedt32.exe, and then click OK.
-
Find the following registry key:
\HKEY_LOCAL_MACHINE\SOFTWARE\MICROSOFT.NETFramework\Security\TrustManager\PromptingLevel
If the key does not exist, create it.
- Add the following subkeys as String Value, if they do not already exist, with the associated values:
| String Value subkey | Value |
|---|---|
| Internet | AuthenticodeRequired |
| UntrustedSites | Disabled |
| MyComputer | Enabled |
| LocalIntranet | Enabled |
| TrustedSites | Enabled |
- By default, Internet has the value AuthenticodeRequired and UntrustedSites has the value Disabled.
Install from internet instead of install from local
6.4 Word Office Add-in installation – Unable to install this application
Section titled “6.4 Word Office Add-in installation – Unable to install this application”Unable to install this application because an application with the same identity is already installed. To install this application, either modify the manifest version for this application or uninstall the preexisting application.
Another option is to uninstall the application and unfortunately, this probably has to be done manually. You have to find the ClickOnce deployment folder:
C:\Users\username\AppData\Local\Apps\2.0
and manually delete all folder contents.
This can also be done by invoking the command:
rundll32 dfshim CleanOnlineAppCache
6.5 Failed to login to Globe: User not found
Section titled “6.5 Failed to login to Globe: User not found”Enable <identity impersonate="true"> in the web.config6.6 Failed to login to Globe: Invalid : MAC Address2
Section titled “6.6 Failed to login to Globe: Invalid : MAC Address2”When generating PO the following message can be given. This can be solved by inserting the MAC Address 2 in Exact Globe. This happens when there is no internet connection and you are working on the server without a fixed MAC Address.
Run the following queries:
Check the MAC Address2: SELECT TOP 1 net_address FROM master.dbo.sysprocesses WHERE spid = @@spid
Insert the MAC Address2: INSERT INTO BacoAccessServers (CheckIPAddress, MachineName, MacAddress2, MachineName2) VALUES (0,‘[Your server name]’,‘[MAC address from query]’,‘Your server name’)

6.7 Error in update: Error accessing entity service: The given key was not present in the dictionary
Section titled “6.7 Error in update: Error accessing entity service: The given key was not present in the dictionary”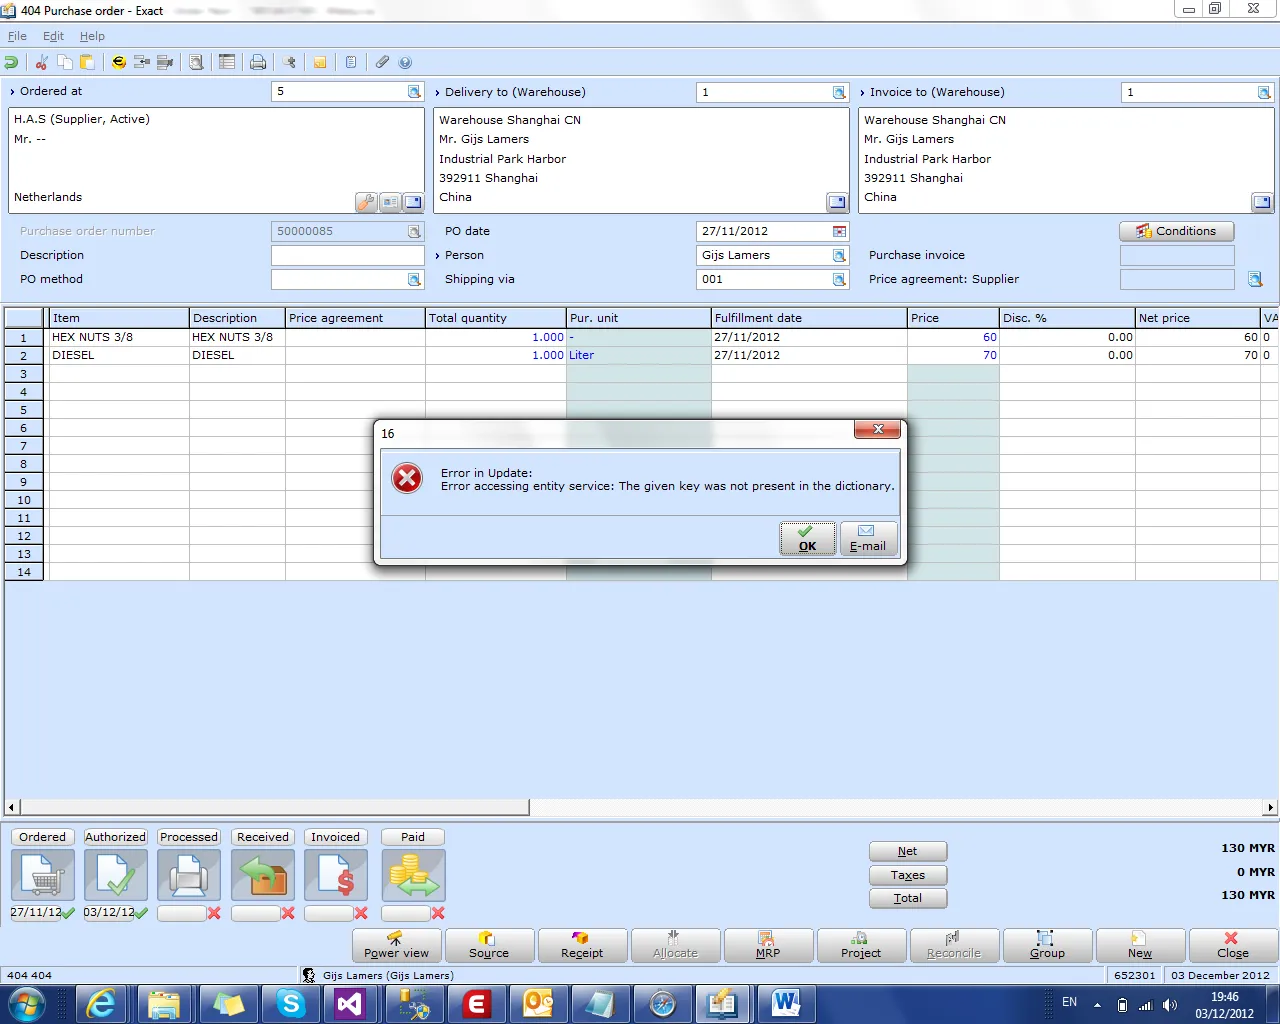
-
Add the following line to the
Exact.ServiceLocation.Config:<service name="GLMSysProcProcess" path="xmd\Exact.Metadata.GLMSysProcProcess.xml" bcname="GLMSysProcProcess" description="GLMSysProcProcess" operationsprovidername="Exact.EntityOperations.ESE" entitiesoperationprovidername="Exact.EntitiesOperations.ESE" fixedcriteriapath="" />
6.8 Generate failed metadata: Unexpected error
Section titled “6.8 Generate failed metadata: Unexpected error”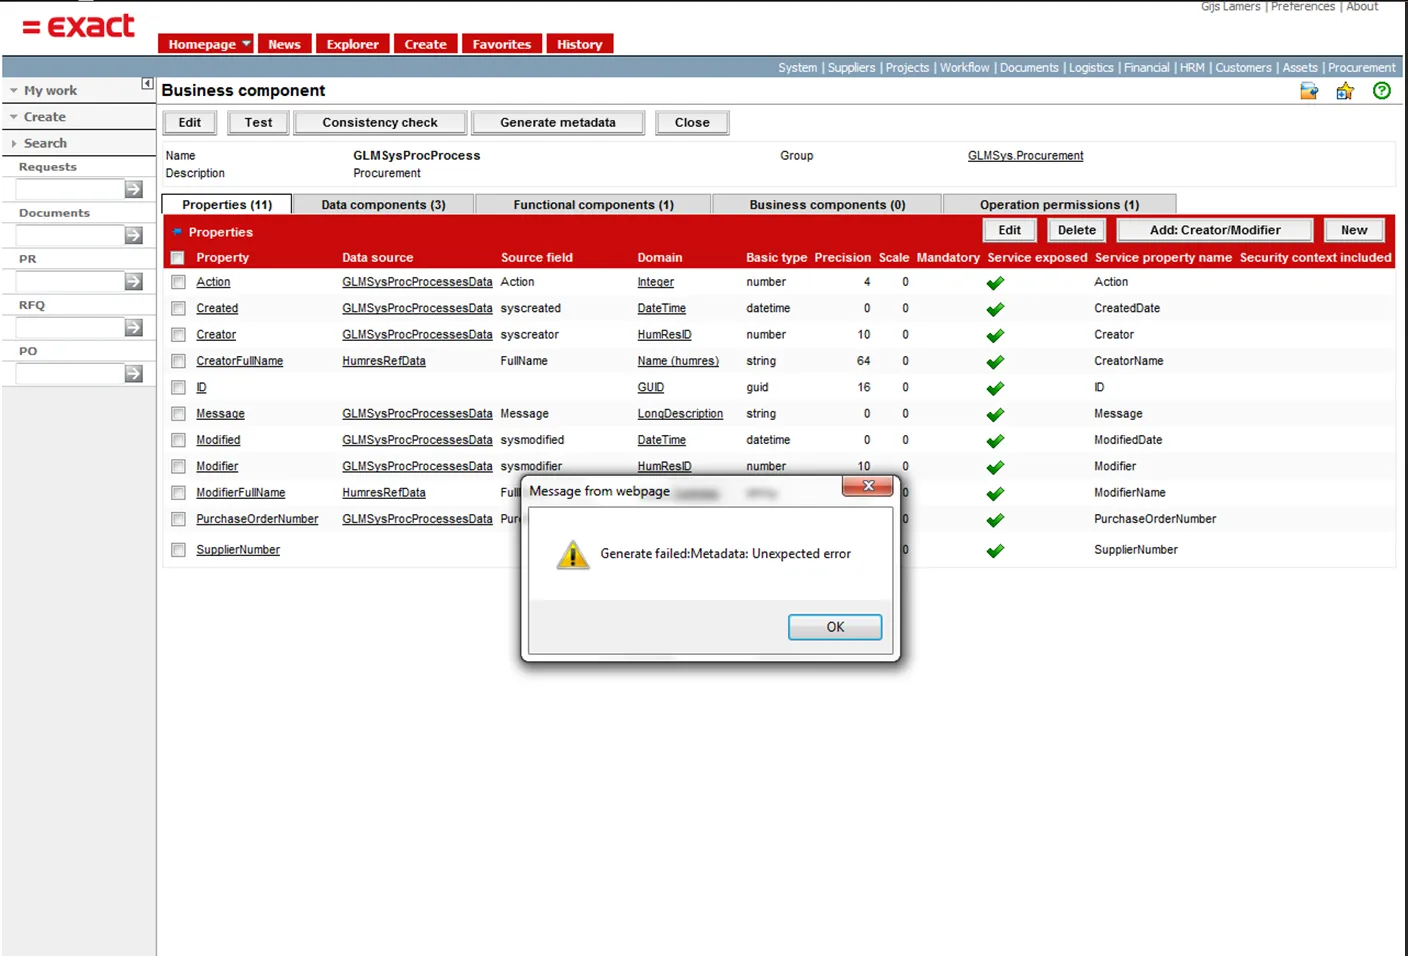
- Add the following line to the Exact.ServiceLocation.Config
<service name="GLMSysProcProcess" path="xmd\Exact.Metadata.GLMSysProcProcess.xml" bcname="GLMSysProcProcess" description="GLMSysProcProcess" operationsprovidername="Exact.EntityOperations.ESE" entitiesoperationprovidername="Exact.EntitiesOperations.ESE" fixedcriteriapath="" />6.9 Security: Unexpected error
Section titled “6.9 Security: Unexpected error”This message will happen when security context name in the Exact.Authroziation.Config file is not correct or missing. Add the following entry:
<context name="GLMSysProcProcess.Create" defaultprovider="DefaultAccess"> <providers /></context>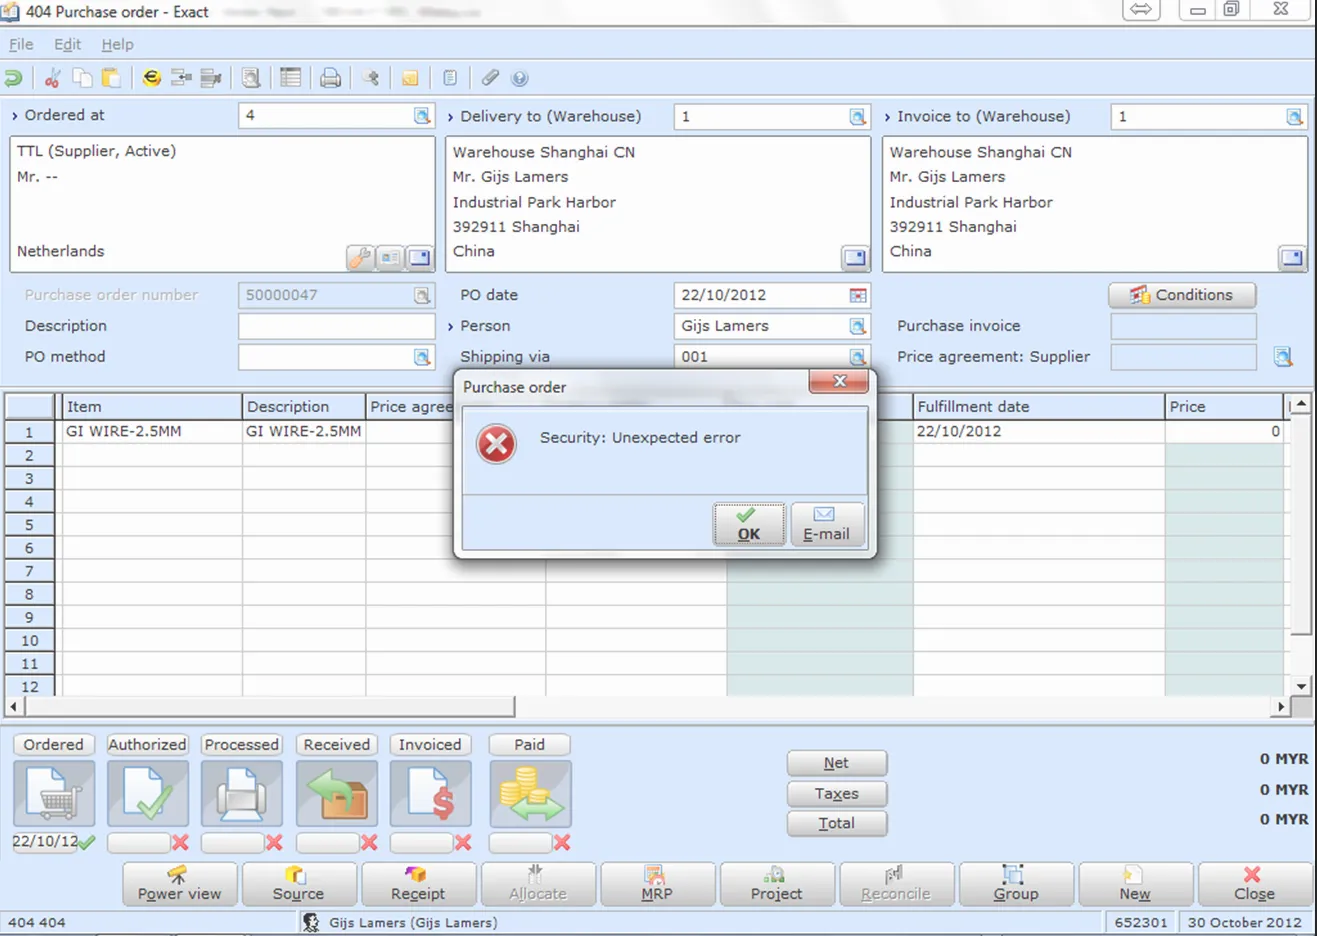
6.10 Back office connection test – Invalid path
Section titled “6.10 Back office connection test – Invalid path”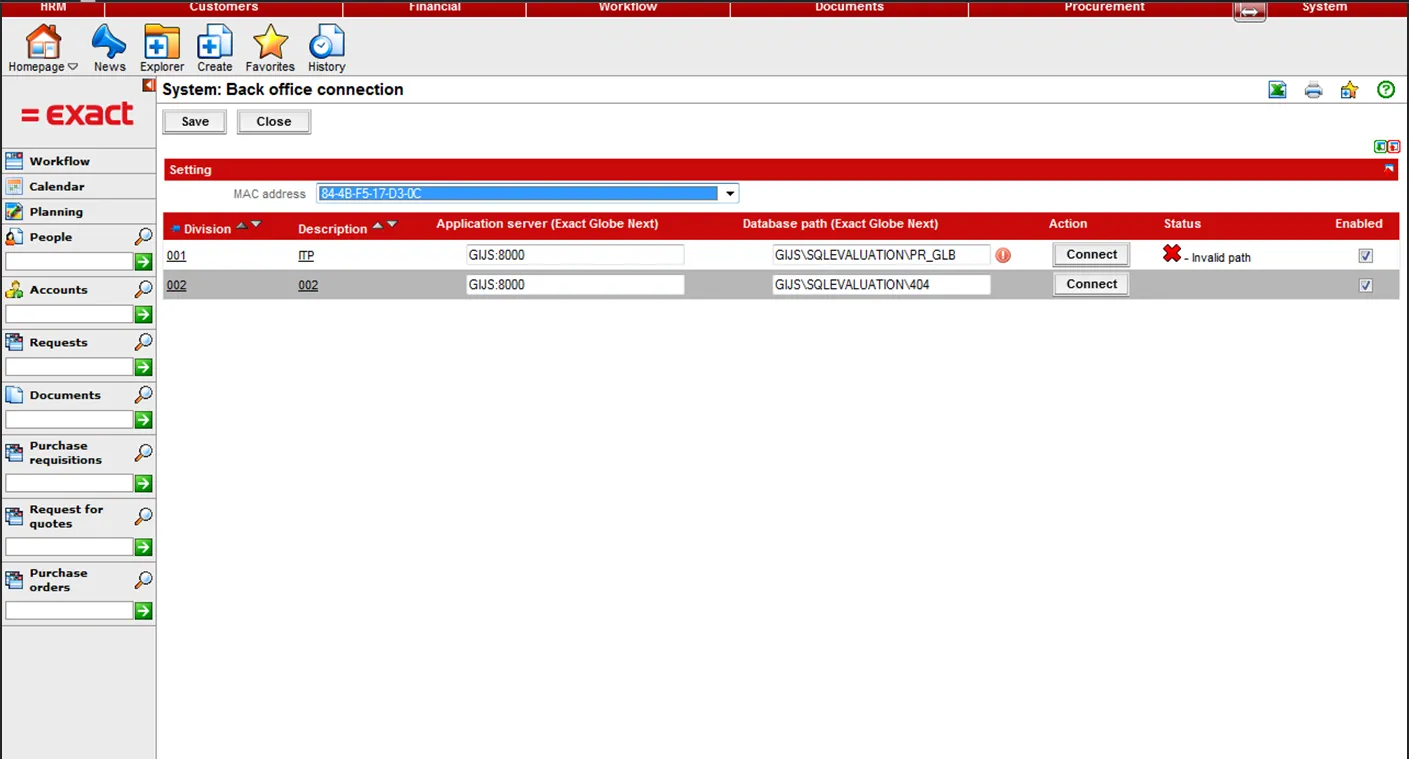
6.11 Failed to login to Globe: Attempted to read or write protected memory. This is often an indication that other memory is corrupt
Section titled “6.11 Failed to login to Globe: Attempted to read or write protected memory. This is often an indication that other memory is corrupt”This message will be given when the Synergy url is not added to the trusted sites. Add your Synergy url to your trusted sites and the error will not show anymore.

6.12 Error accessing entity service. An error occurred while receiving HTTP response to…
Section titled “6.12 Error accessing entity service. An error occurred while receiving HTTP response to…”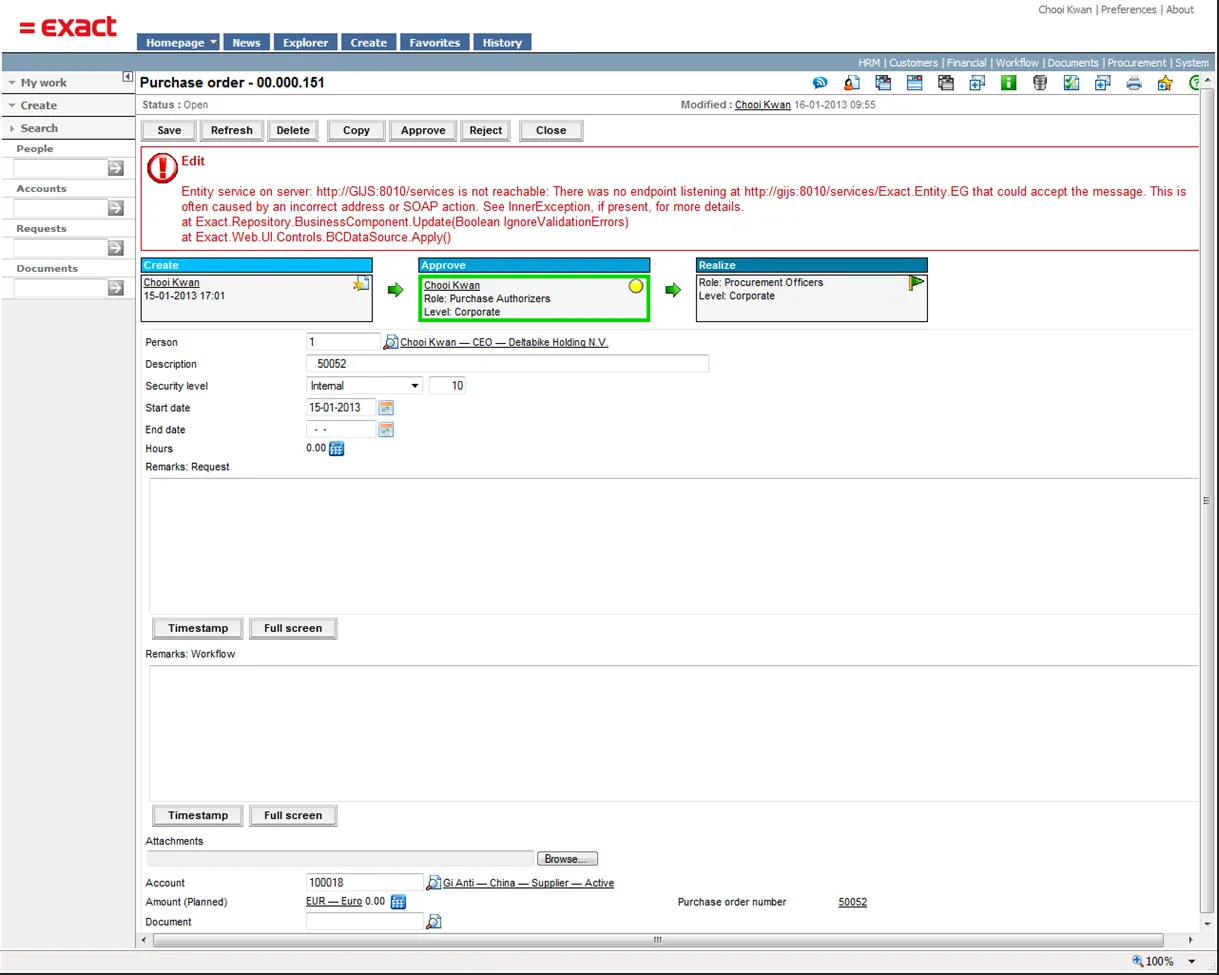
6.13 Entity service on server: http://servername:port/services is not reachable
Section titled “6.13 Entity service on server: http://servername:port/services is not reachable”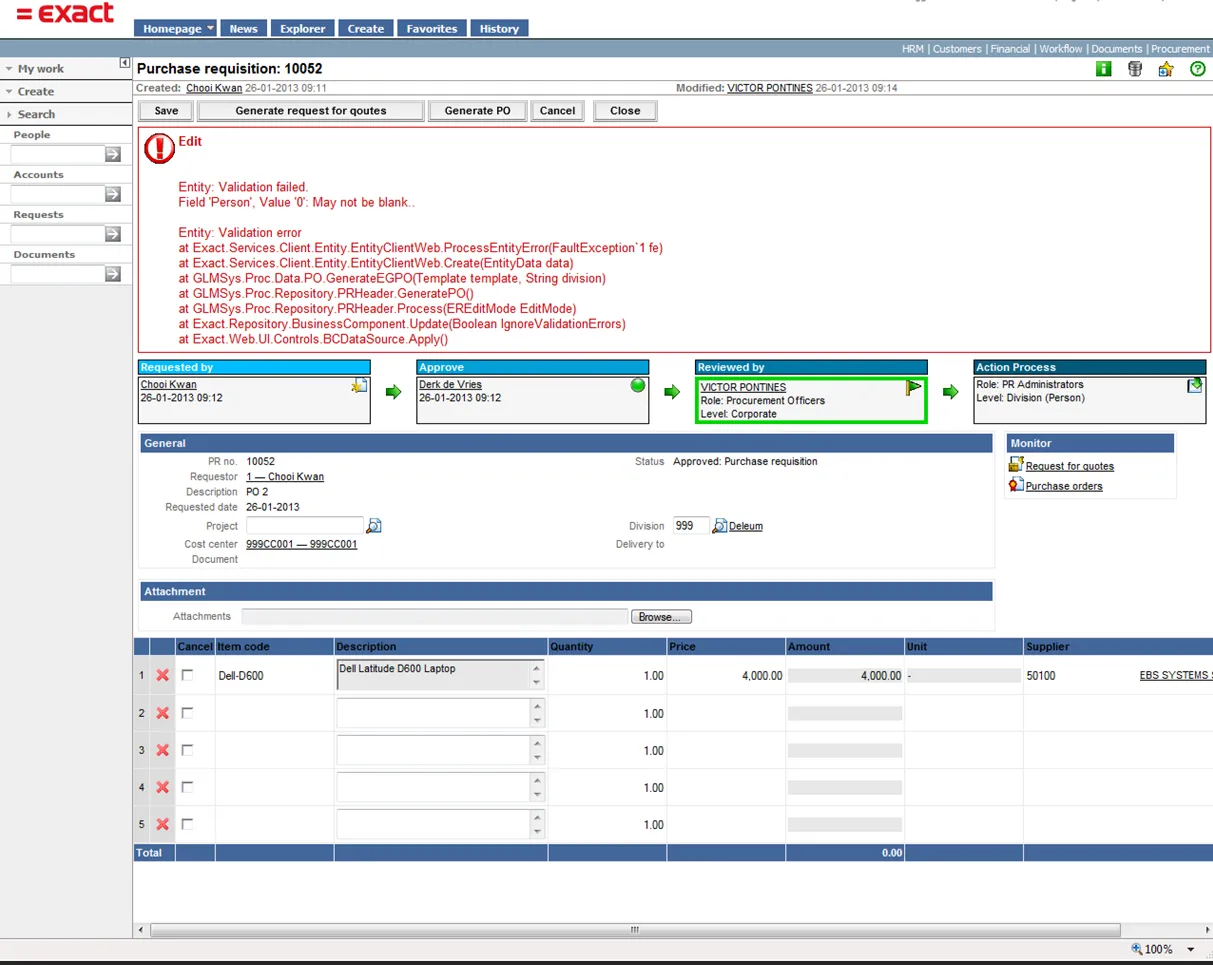
6.14 Person value ‘0’ may not be blank
Section titled “6.14 Person value ‘0’ may not be blank”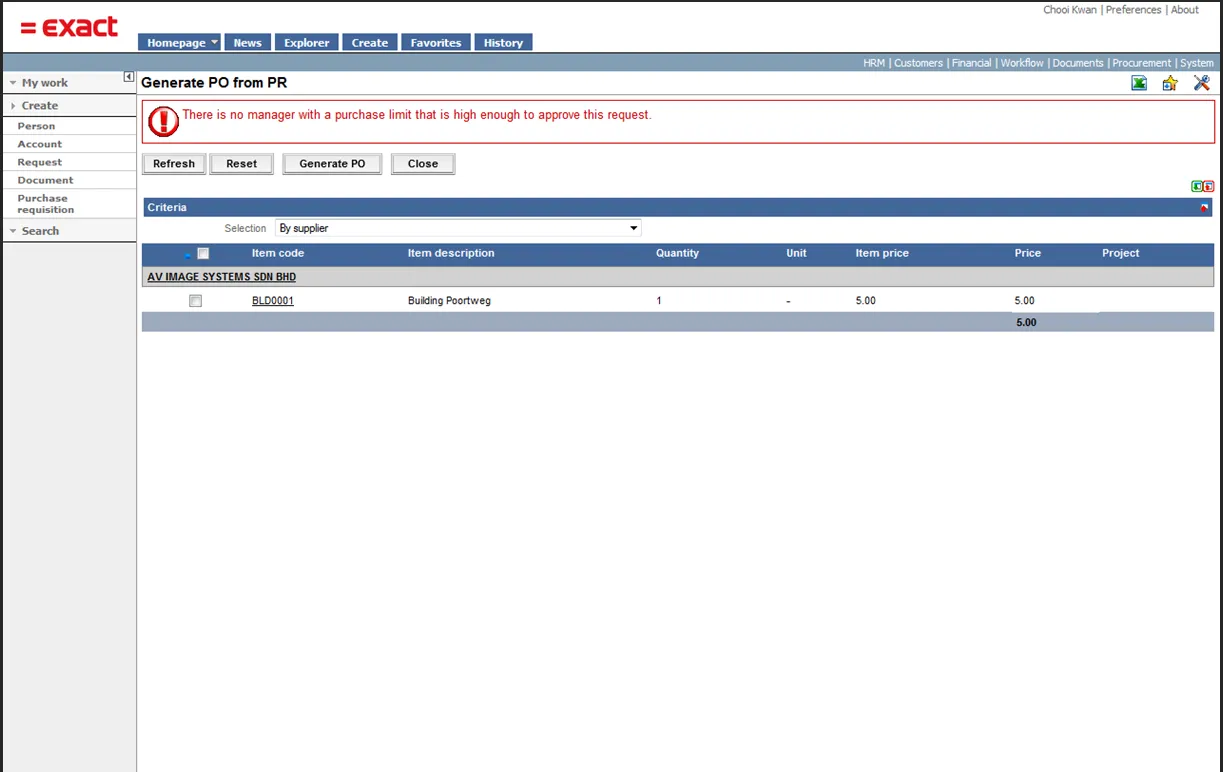
6.15 There is no manager with a purchase limit that is high enough to approve this request
Section titled “6.15 There is no manager with a purchase limit that is high enough to approve this request”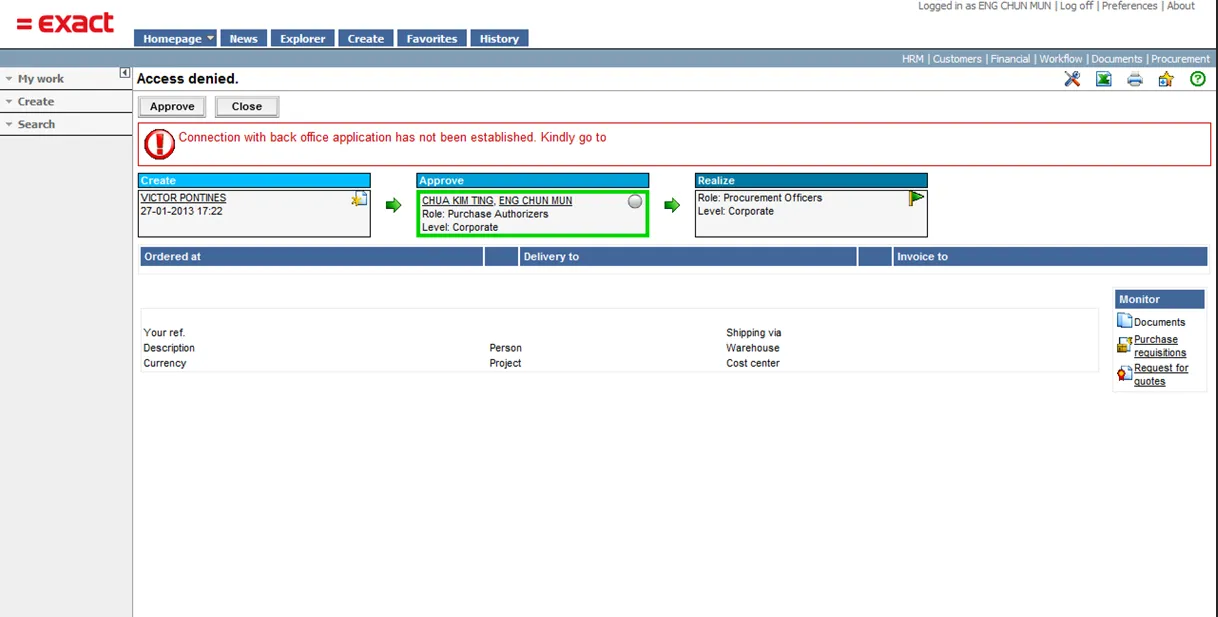
6.16 Connection with back office application has not been established
Section titled “6.16 Connection with back office application has not been established”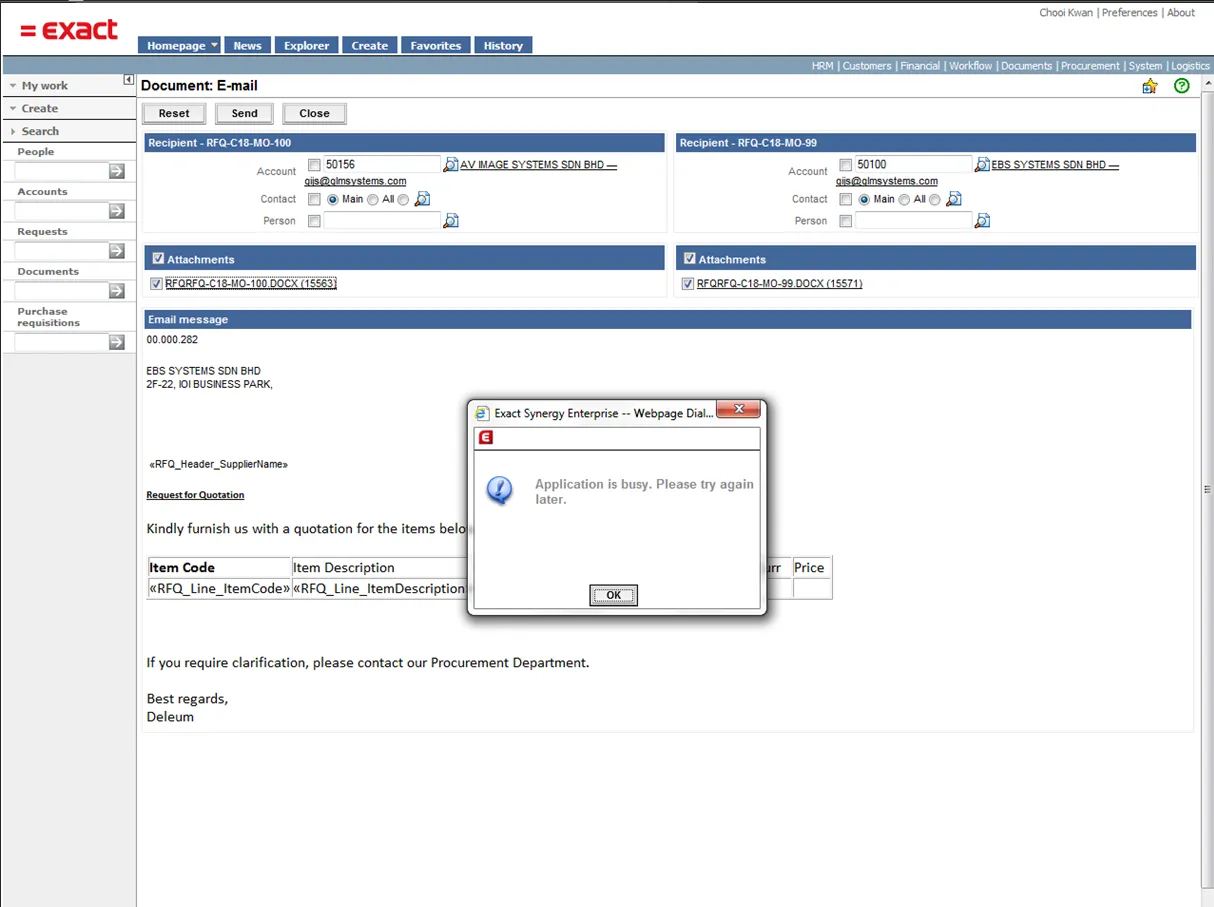
6.17 Application is busy, please try again later
Section titled “6.17 Application is busy, please try again later”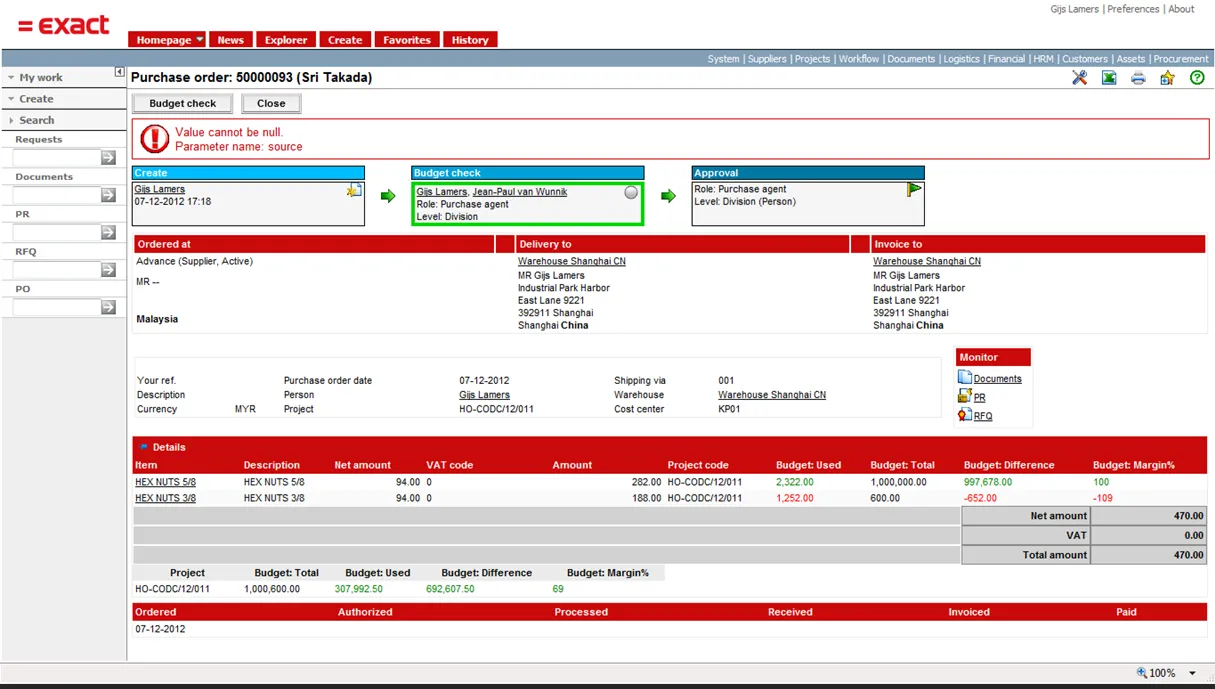
6.18 Value cannot be null Parameter name: source
Section titled “6.18 Value cannot be null Parameter name: source”
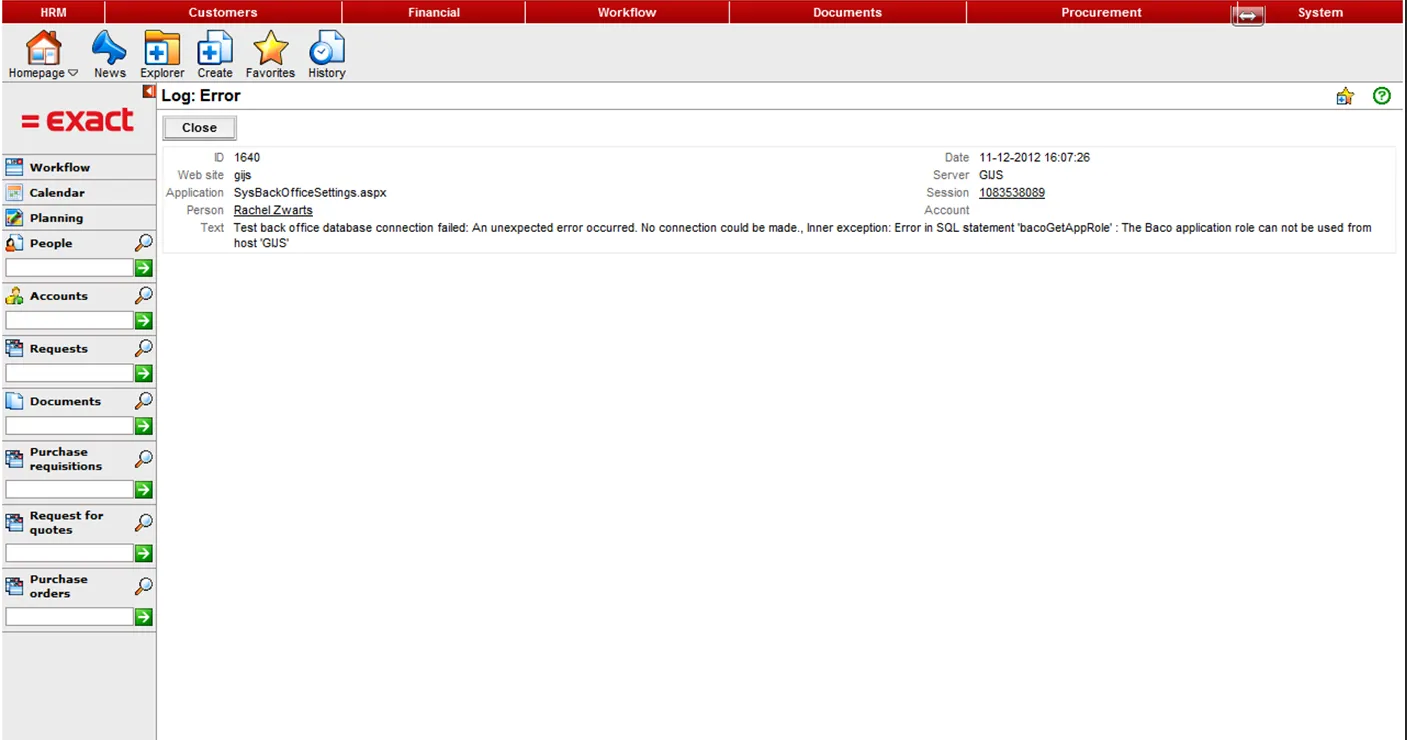
6.19 Messages in error log explained
Section titled “6.19 Messages in error log explained”When you get the message ‘Please contact your system administrator for more information’ the detailed error message can be viewed in the error log (System / Reports / Log / Errors), below a list of possible known error messages and the solutions for the error messages.

6.19.1 Opening workflow plus settings: Failed to initialize Repository Business Component ‘GLMSysWflEmailNotification’……
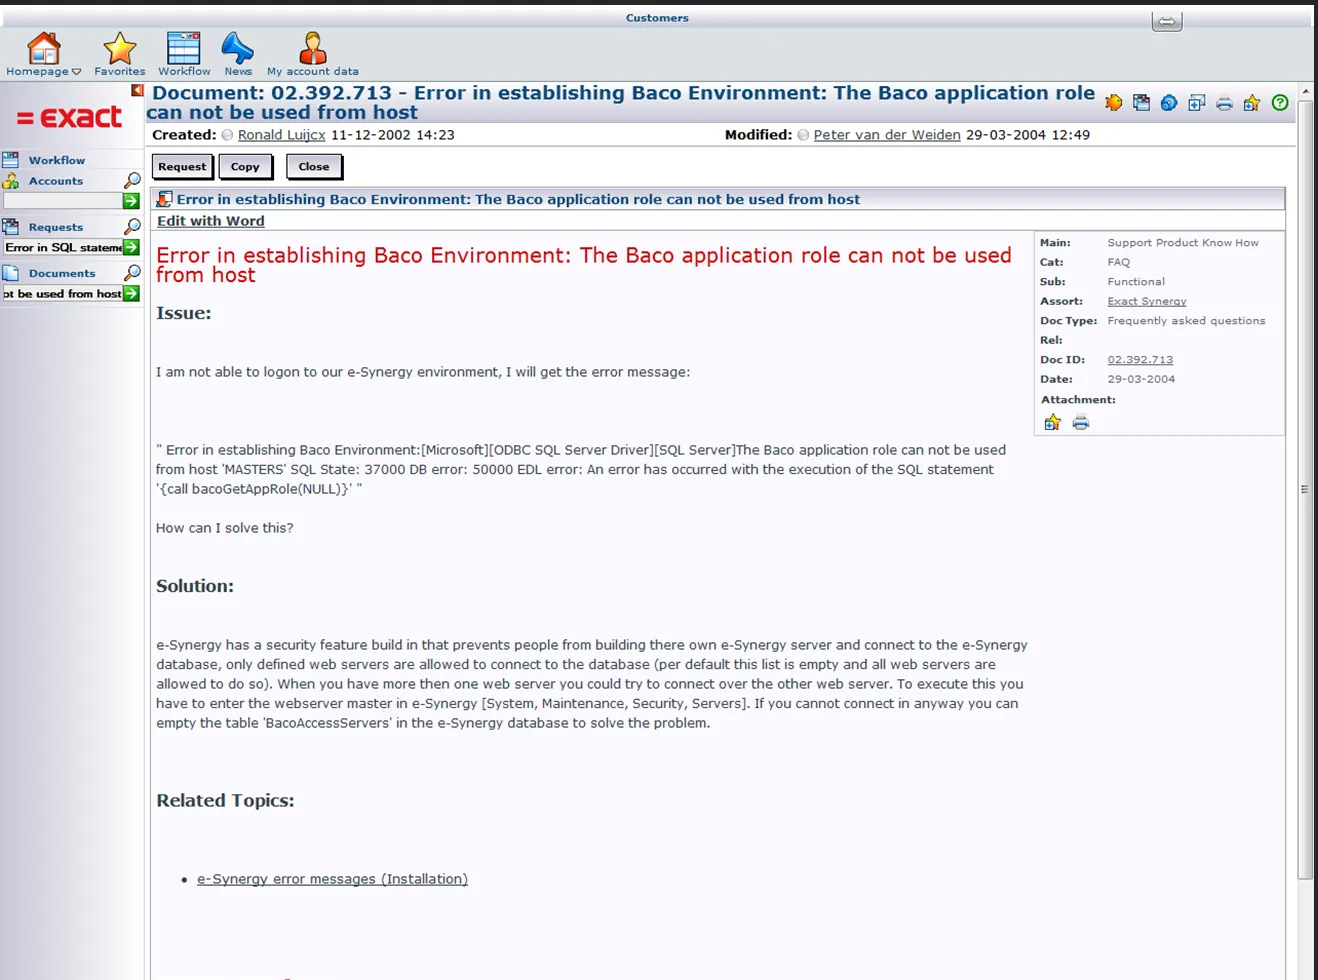
Section titled “6.19.1 Opening workflow plus settings: Failed to initialize Repository Business Component ‘GLMSysWflEmailNotification’……”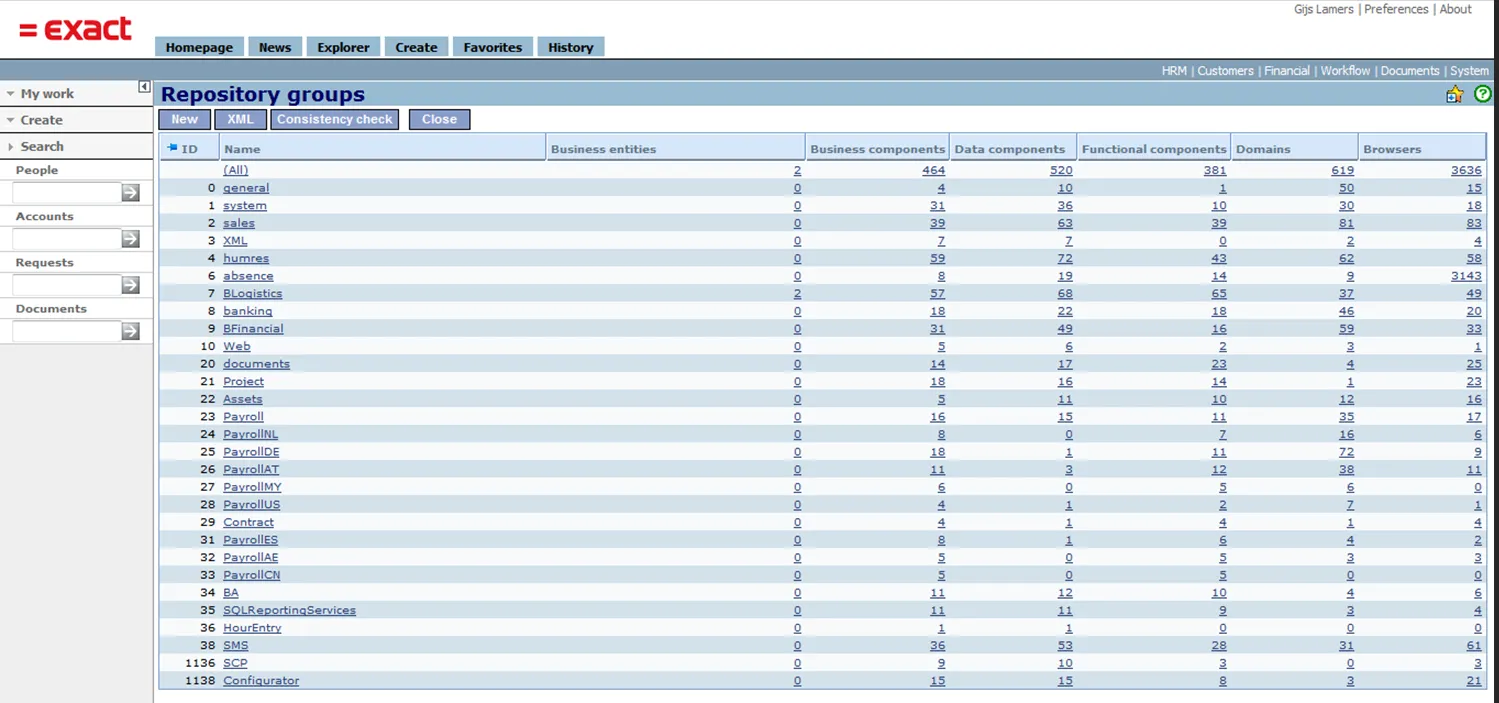

Check the Synergy installation folder and see if the files Repository.GLMSys.WorkflowPlus.xml and Repository.zGLMSys.WorkflowPlus.xml are available in your Synergy installation xml folder.
When the two files are available the repository need to be rebuild. Rebuilding the reposiory is done via System / Setup / Repository / Rebuild.
After the rebuild the group GLMSys.WorkflowPlus and zGLMSys.WorkflowPlus should be visible in the repository explorer, System / Setup / Repository / Explorer
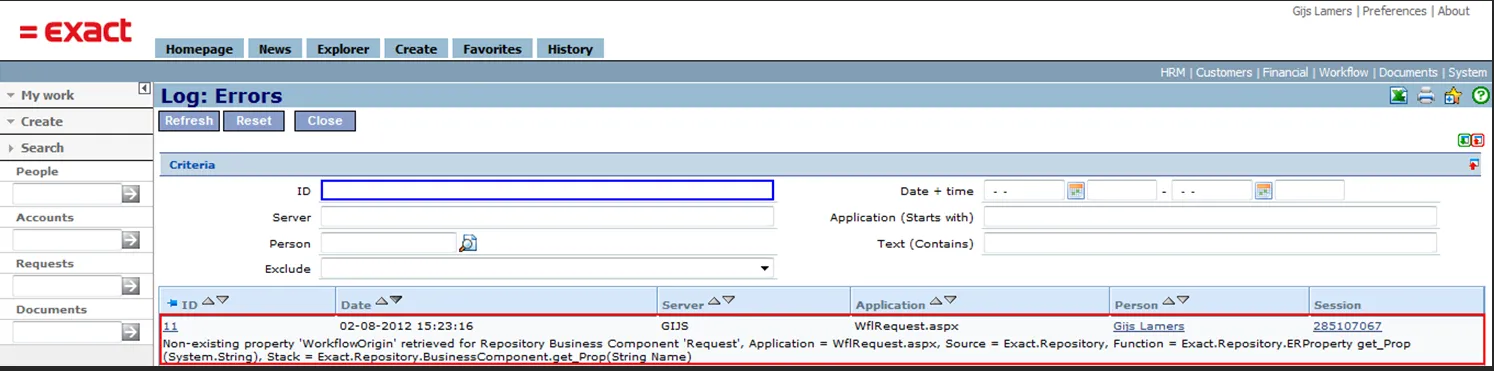
6.19.2 Opening a request: Non-existing property ‘WorkflowOrigin’ retrieved for Repository business Component
Section titled “6.19.2 Opening a request: Non-existing property ‘WorkflowOrigin’ retrieved for Repository business Component”
6.19.3 Repository failed to create class “GLMSys.WorkflowPlus.Repository.RequestExtension’ from assembly
Section titled “6.19.3 Repository failed to create class “GLMSys.WorkflowPlus.Repository.RequestExtension’ from assembly”When opening a request and you get the message ‘Repository failed to create class “GlmSys.WorkflowPlus.Repository.RequestExtension” from assembly “GlmSys.WorkflowPlus.Repository”: could not load file or assembly “GlmSys.WorkflowPlus.Repository.dll” or one of its dependencies. The system cannot find the file specified’ this is most likely after you have uninstalled the workflow plus add-on. To remove this message a repository rebuild need to be done. After rebuild of the repository this message will not be shown anymore.
6.19.4 Workflow email notification: Failure sending email. The remote name could not be resolved ‘[your email server]’
Section titled “6.19.4 Workflow email notification: Failure sending email. The remote name could not be resolved ‘[your email server]’”This message is given when there is no internet connection. Make sure you have a connection.
6.19.5 Workflow email notification: Value cannot be null. Parameter name address
Section titled “6.19.5 Workflow email notification: Value cannot be null. Parameter name address”This message is given when the email address is not set for the person who should receive the email. Check the persons who are supposed to get the email and confirm the email field is set.