RPA (ConnectIt) – User Manual
Introduction
Section titled “Introduction”RPA gives businesses the option to use Exact Synergy in combination with other software solutions, which previously would be out of reach. RPA is white labelled by Exact as Exact RPA and both are using the same software and have the same features.
These three parts of RPA will help bringing Exact Synergy closer to your ERP or other productive software applications used in your organization, giving you the ability to share, interact and automate on your data.
Supported applications
Section titled “Supported applications”Integrator
Section titled “Integrator”The first part of Share in RPA is the Integrator allowing master data to sync between Synergy and other ERP, CRM, Marketing automation, e-Commerce sites and other type of business software which could be supported by RPA integration framework. With the RPA Integrator, we eliminate the problems associated with syncing multiple “islands of automation” in your business. The RPA Integrator enables you to fully utilize the power of Exact Synergy in combination with other software investments that you have made for your business. For software solutions that are supported RPA comes with an out of the box integration to key master files. However, the integration framework is built up in such a way it is fully configurable and controllable within Exact Synergy by the Synergy administrator. The integration has the option to define your entities you want to integrate. These entities can be mapped to the corresponding Exact Synergy entities. Once the entities are mapped, fields and values can be mapped. The direction of the sync is also flexible and can be determined by entity and even on field level. Exact Synergy also can be used as a integration tool where data is sent directly from one software solution to another where data is not stored in Exact Synergy.
View builder
Section titled “View builder”The second part of the RPA share component is the View builder. The View Builder allows businesses to show data from the other software applications in Exact Synergy via lists and interact on those lists. Exact Synergy lists can be shown and used in workspaces, on master data maintenance pages (i.e. customers, suppliers, items, etc.), in a new section or via the monitor section of a maintenance page, in a workflow request and can even be used in search browser/lookups for selection of data. For the supported software applications in RPA, each software comes which some basic views that can immediately be used upon deployment. Additional views can be built by consultants, power users or the IT department to get the specific data from ERP and other business applications to show in your Exact Synergy. With basic SQL syntax knowledge, you will be able to create your own view and configure how the view will look like in Exact Synergy. The SQL syntax can be used for on-premises applications as well as cloud software applications using OData via respective REST APIs (i.e. Exact Globe, Exact Online, MYOB Advanced and Salesforce). With RPA views, you will be able to share your ERP data with the rest of the organization and supply chain (i.e., customers, suppliers and resellers) who typically do not have direct access to your ERP application.
Rules Engine
Section titled “Rules Engine”In order to automate traditional ERP transactions, RPA enhances Exact Synergy with the Rules Engine. With various features to the engine, one nice feature includes the option to create, update and delete data in your ERP application directly from Exact Synergy based on actions in Exact Synergy or based on actions in your ERP solution. The rules can be configured by a consultant, a power user or IT administrator and do not need complicated coding
Next to the actions create, update and delete additional validation can be added in Exact Synergy to your workflow, account, project and other entities
There are infinite possibilities on how the rules engine could be used (and is already used by existing customers) but some examples are:
• A workflow in Exact Synergy is initiated to develop a new product; once the product is reviewed and approved, this product will automatically be created in the ERP once the workflow is approved
• A workflow in Exact Synergy is initiated for a purchase request. Once approved, this request automatically creates a purchase order in the ERP
• A workflow in Exact Synergy initiates a sales request which upon approval, creates a sales order in the ERP
• Once a sales order is created in the ERP, RPA automatically creates a request for follow-up in Exact Synergy
• A purchase order is created in your ERP where an approval request is created in Exact Synergy. An approval request is capable of handling more complicated business rules to decide who should approve the purchase order. Once the workflow request is approved, RPA automatically approves the purchase order in the ERP
With the Rules Engine, it will allow businesses to use the power of the Exact Synergy workflow in and around the creation of transactions in your ERP
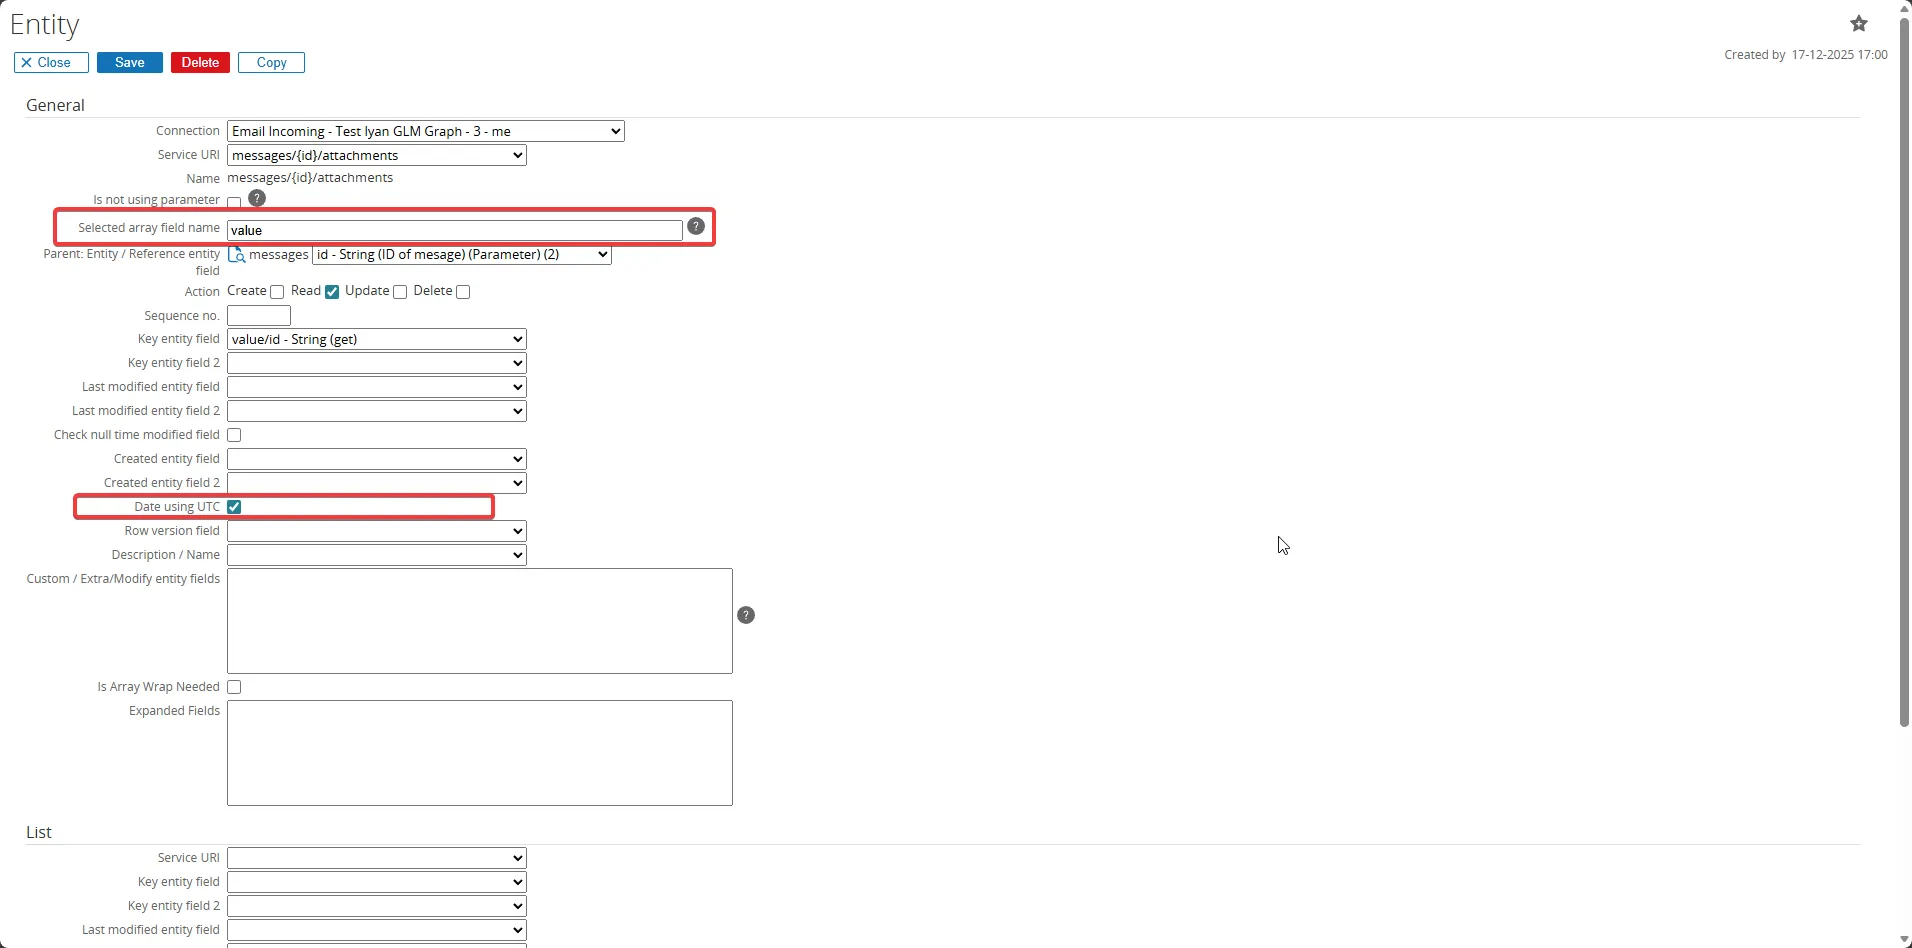
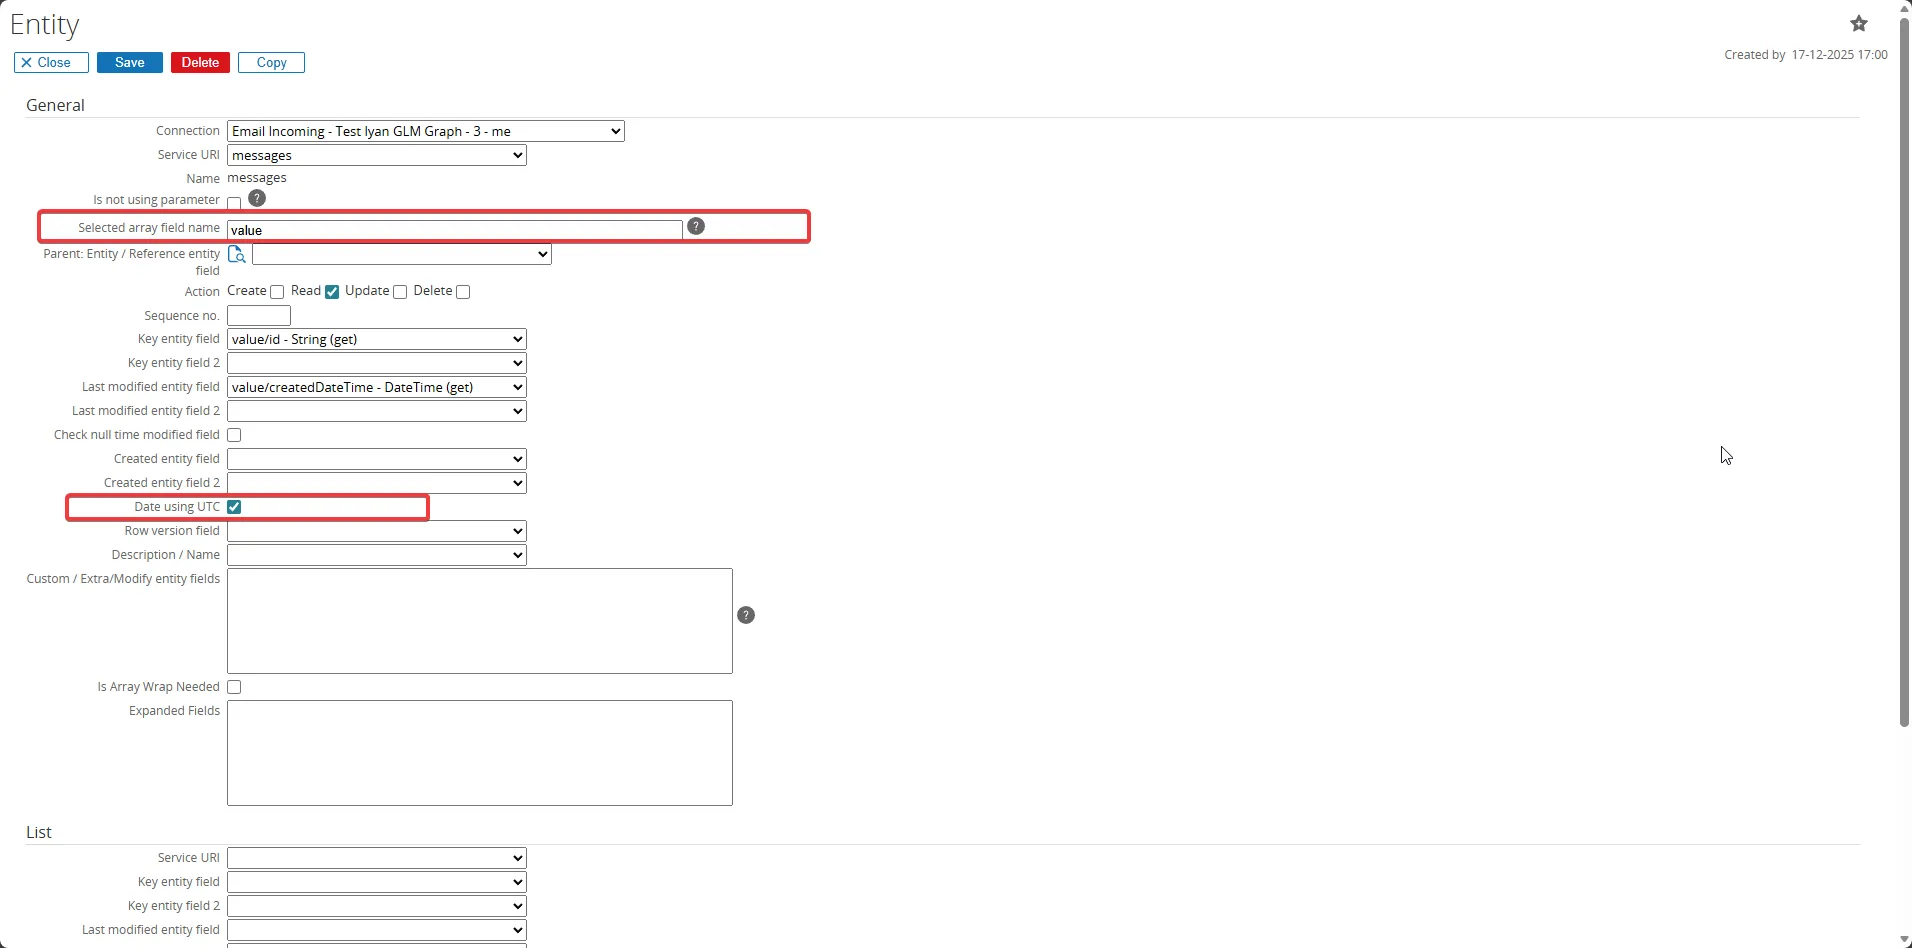
JsonParser function in view columns
Section titled “JsonParser function in view columns”This section explains how to use the JsonParser function in RPA View Builder to parse JSON data within your views. Here is a refined and clear version of your instructions, with improved structure and flow suitable for documentation or user guidance:
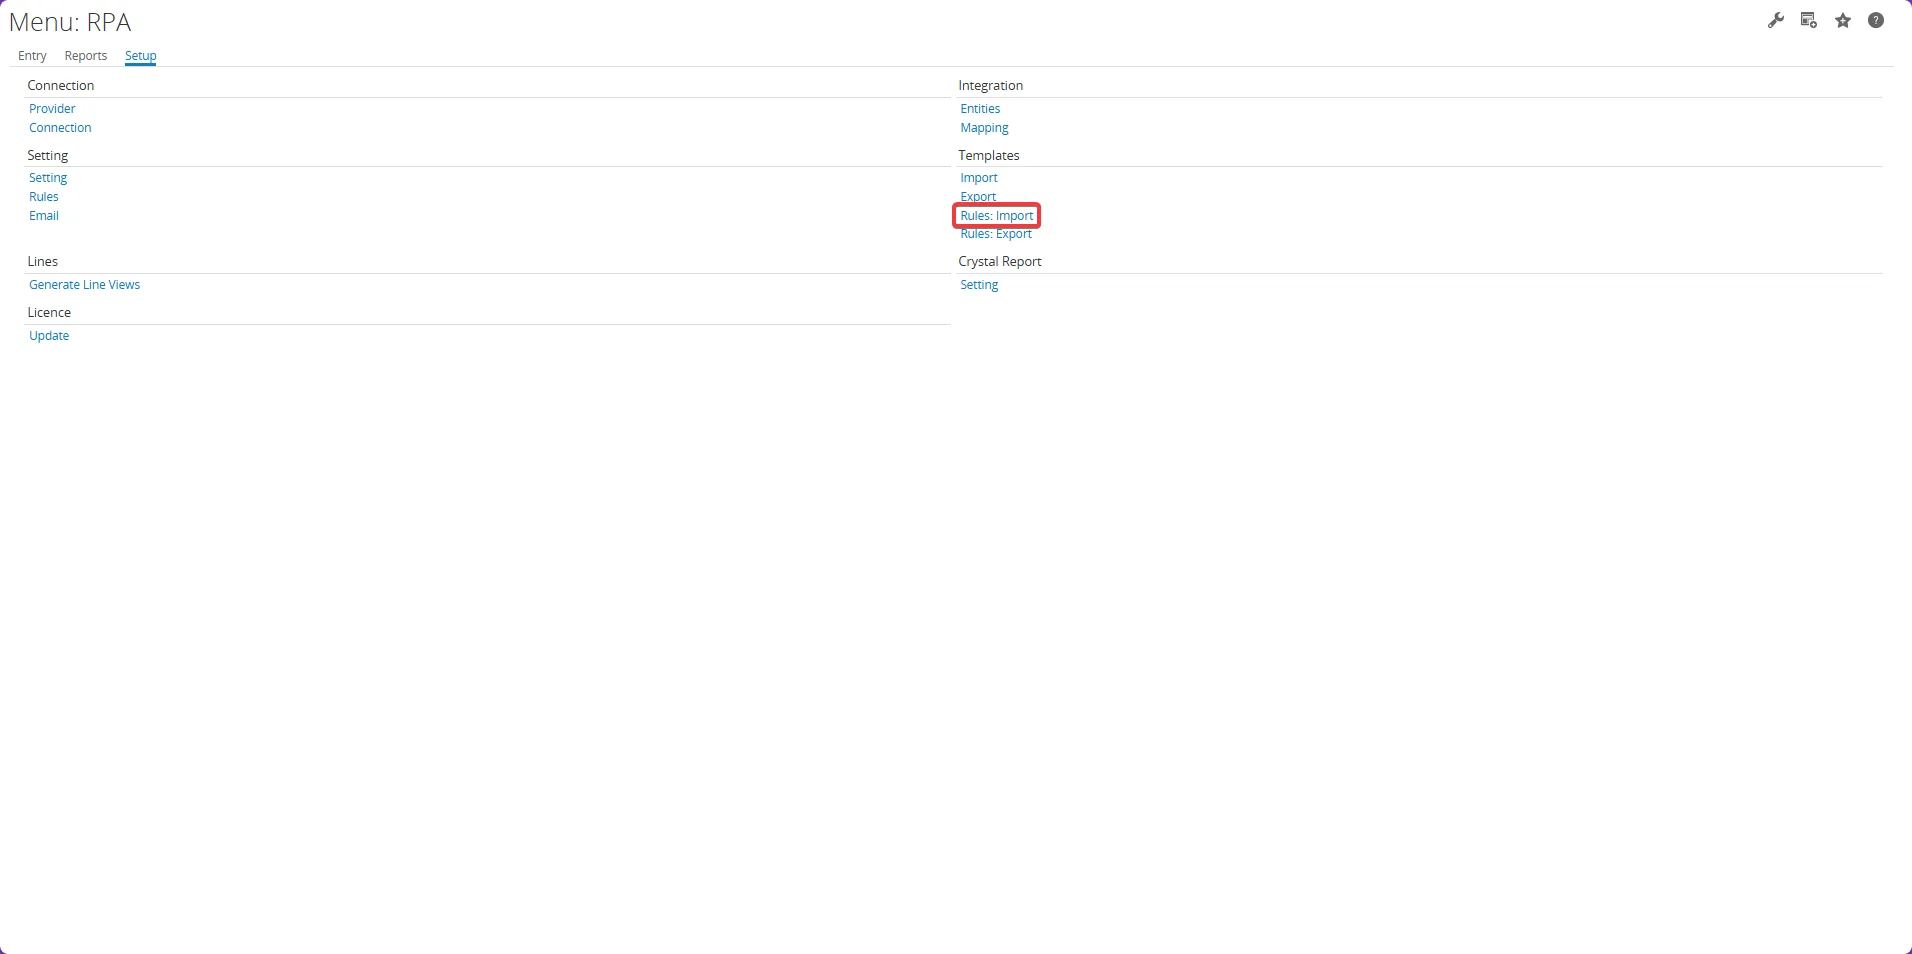
- Go to: RPA > Setup > Templates > Rules: Import
- Select Setup > Templates > Rules: Import
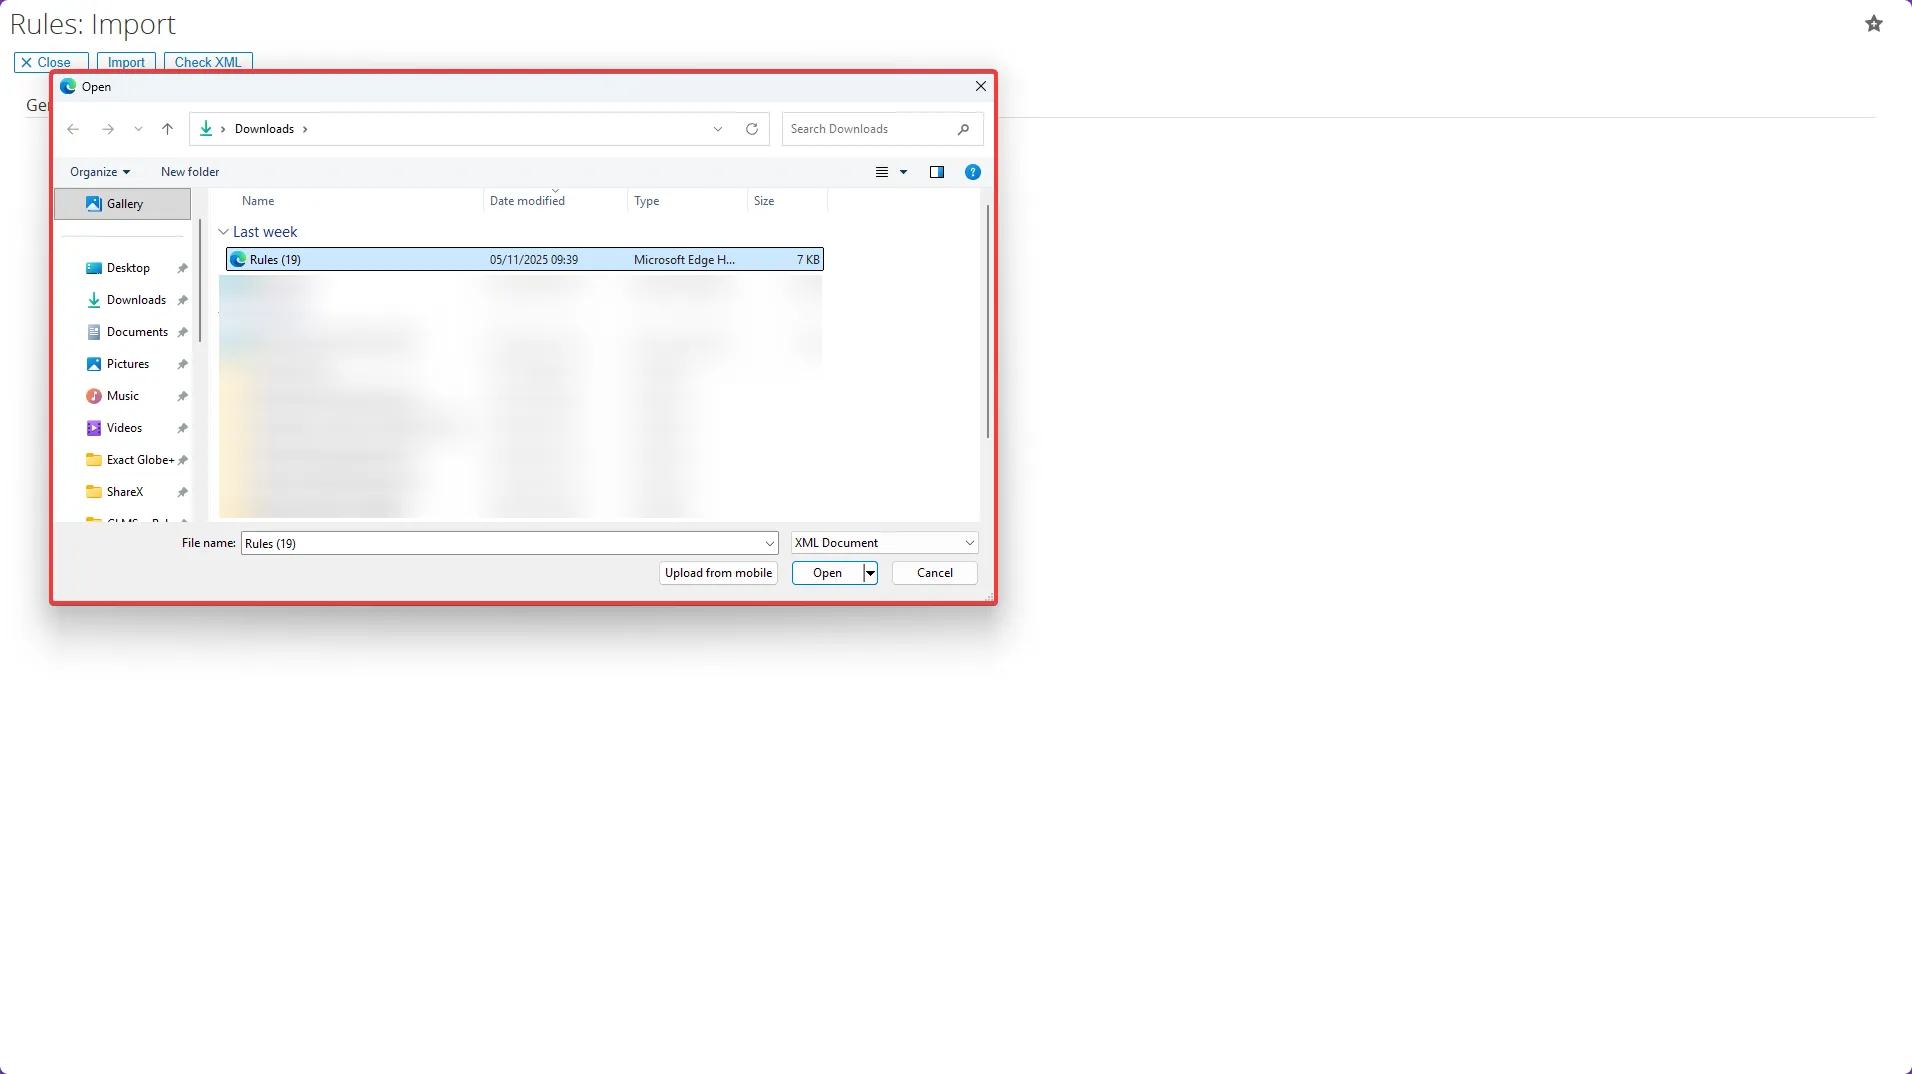
- Choose the file you want to import
- Click Open to add the file for import
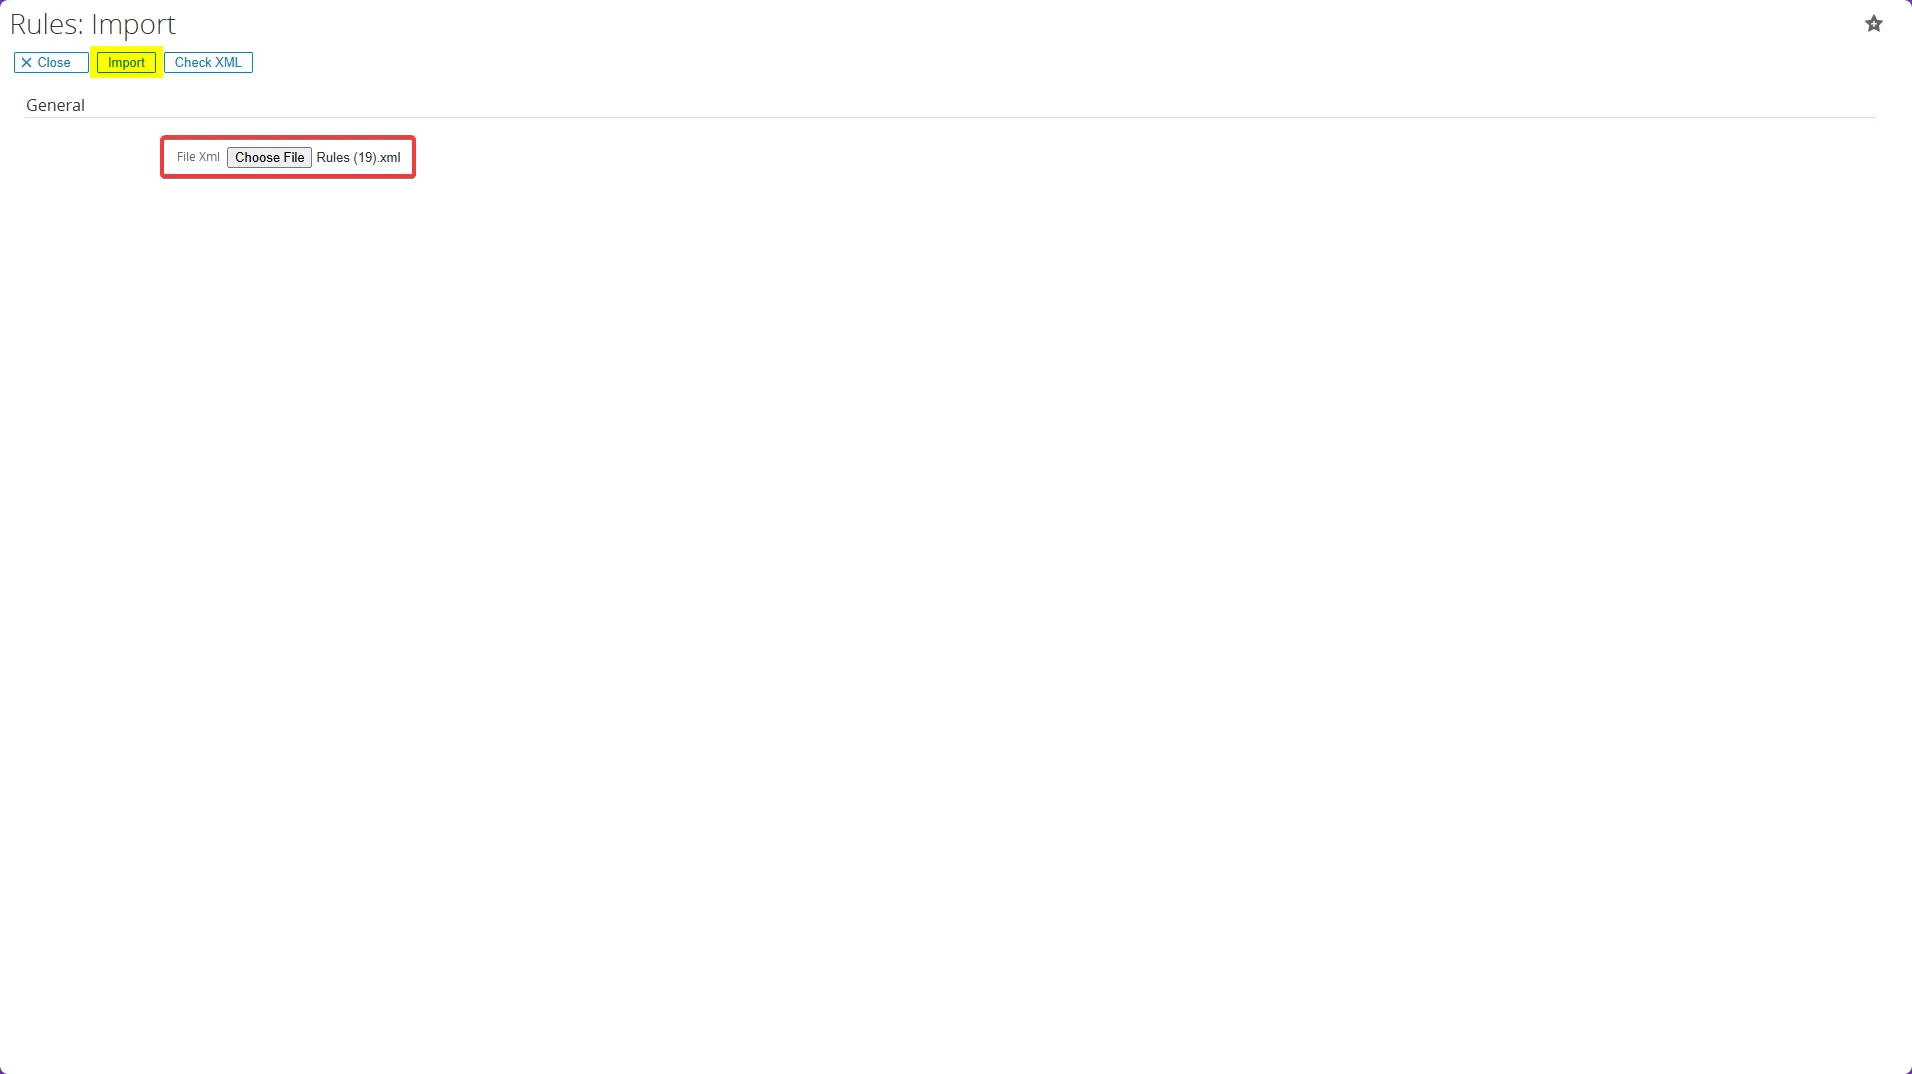
- Click the Import button to upload the file
- The file will now appear on the Import Result list
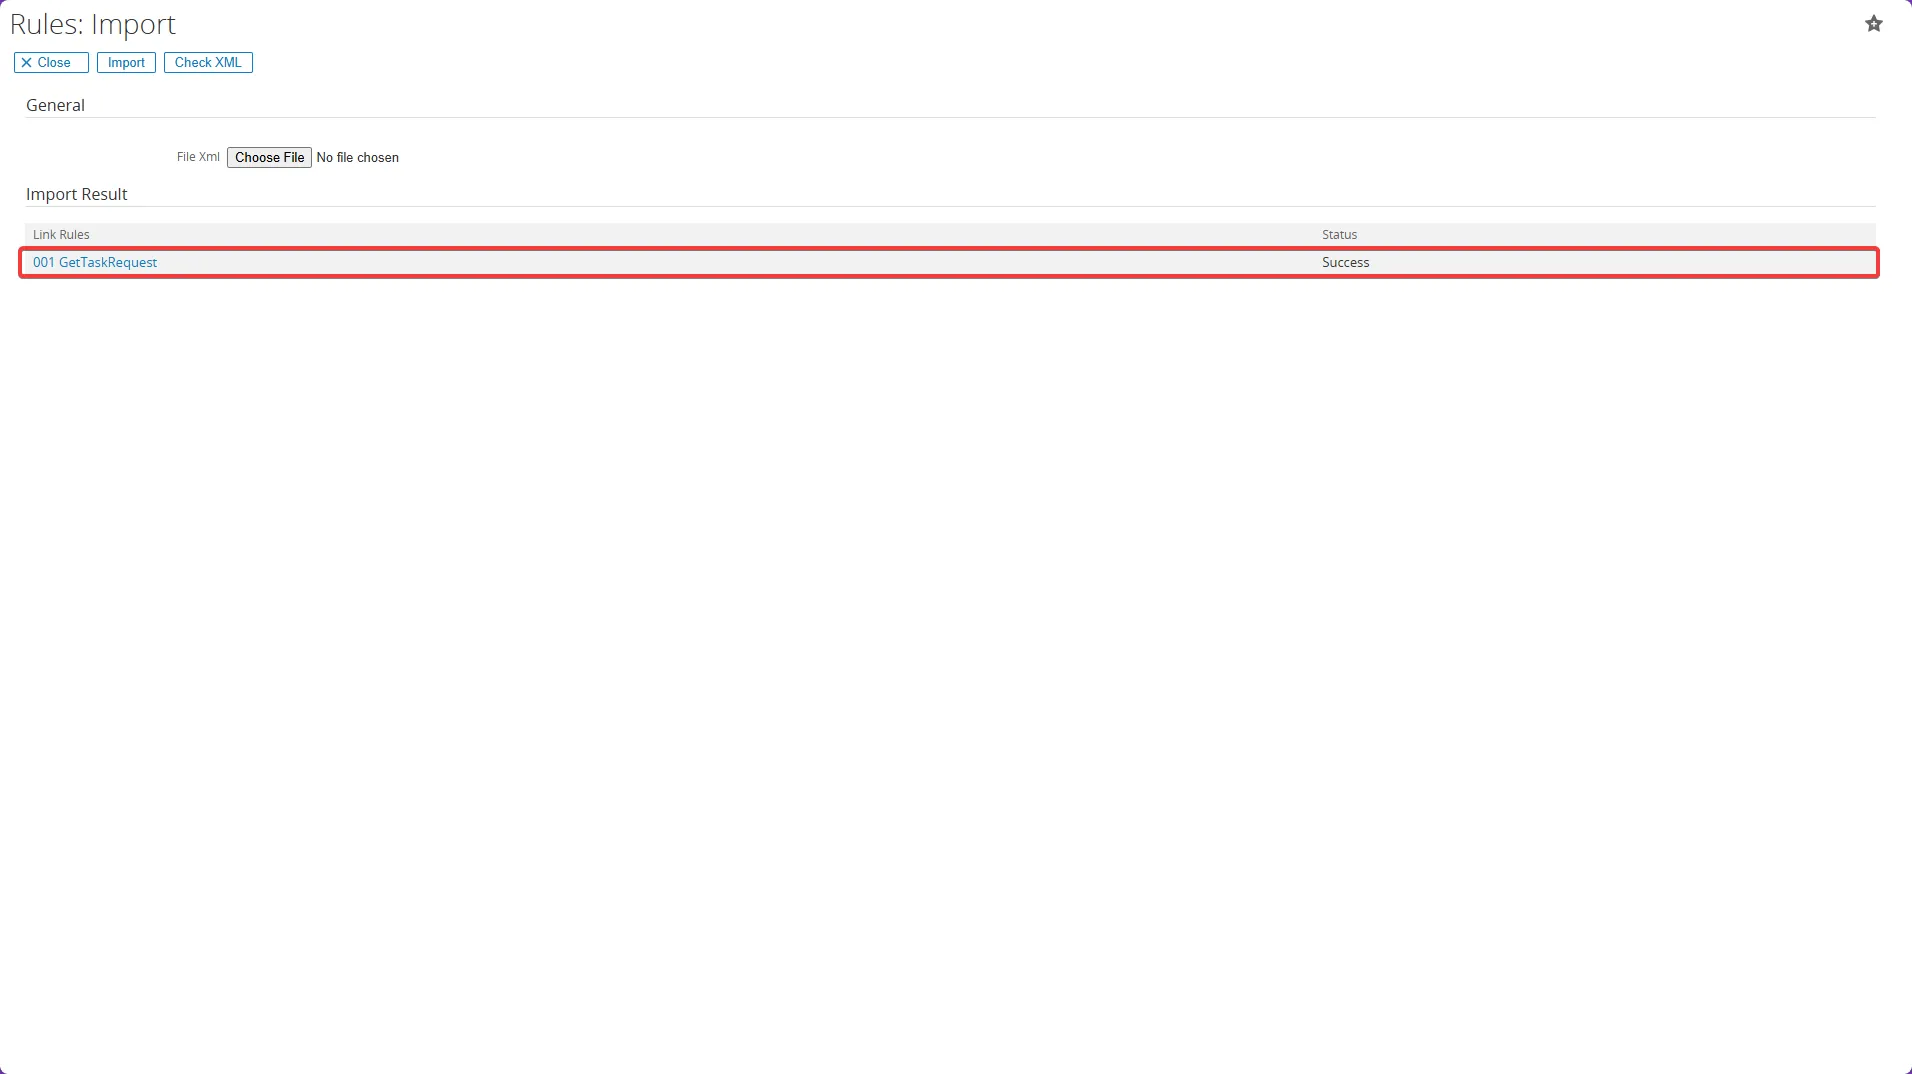
- Click the link for your imported rules file

- When the rule form opens, click the description of the file
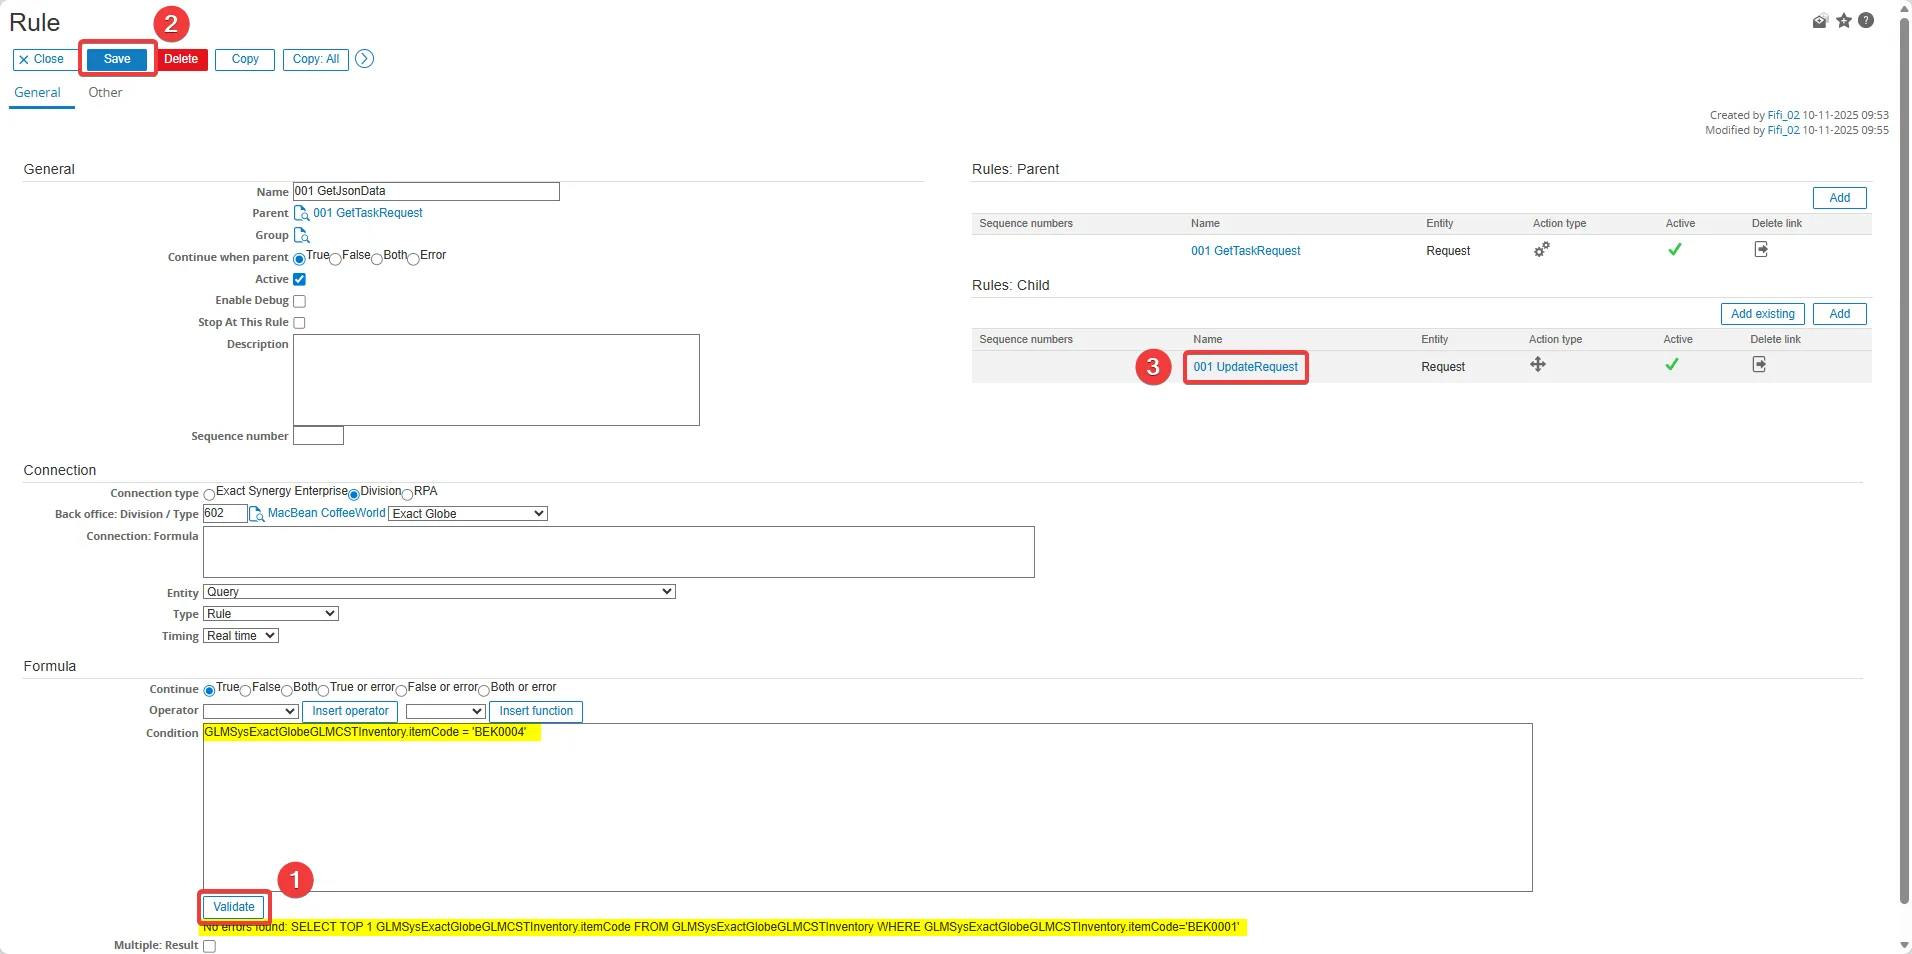
On 001 GetTaskRequest:
Make sure the condition label is correct, then follow these steps:
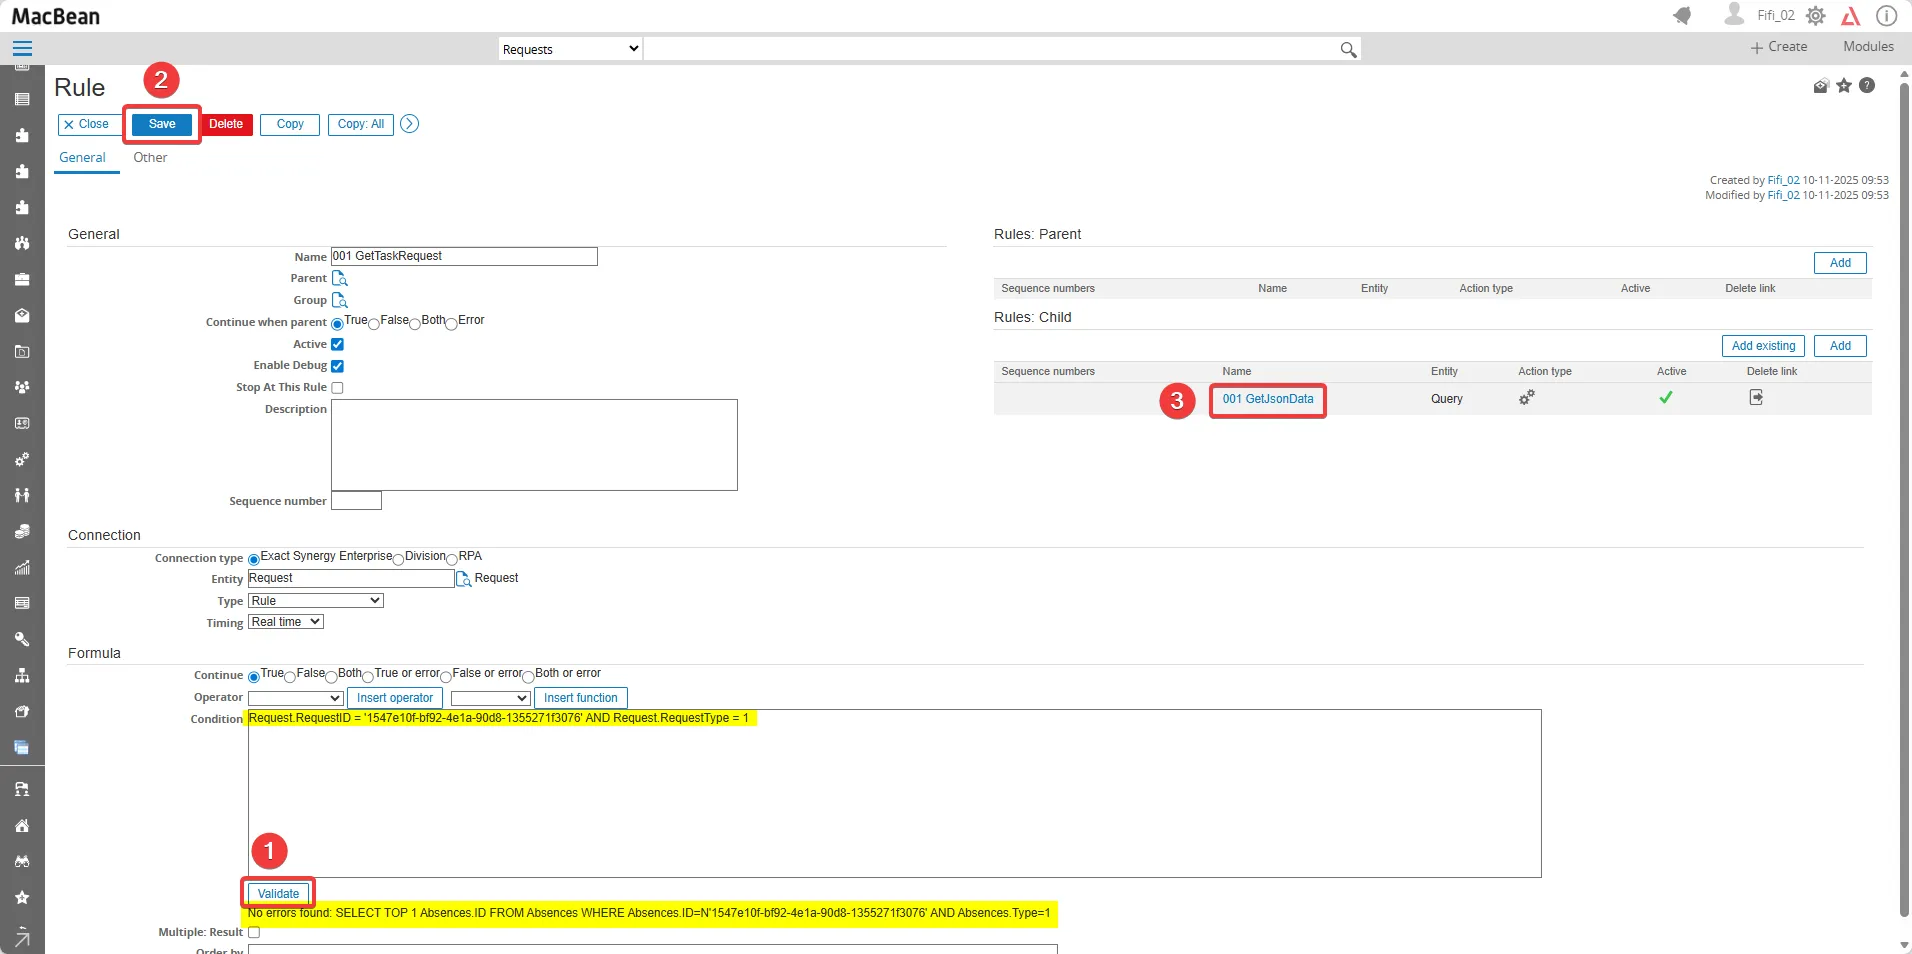
- Type the desired condition. For example : This condition matches a request to its ultimate parent record.
Click the Validate button until the message “No errors found” appears - Click the Save button
- Click on the file 001 GetJsonData to expand the data
On 001 GetJsonData:
Ensure the condition label is also correct, then follow these steps:
- Type the desired condition. For example, match the requestID to the request you want to update and retrieve the request whose requestType equals 1 (Checked Task)
Click the Validate button until the message “No errors found” appears - Click the Save button
- Make sure the request formula is already filled with the correct condition
On 001 UpdateRequest:
Ensure the condition label is also correct, then follow these steps:
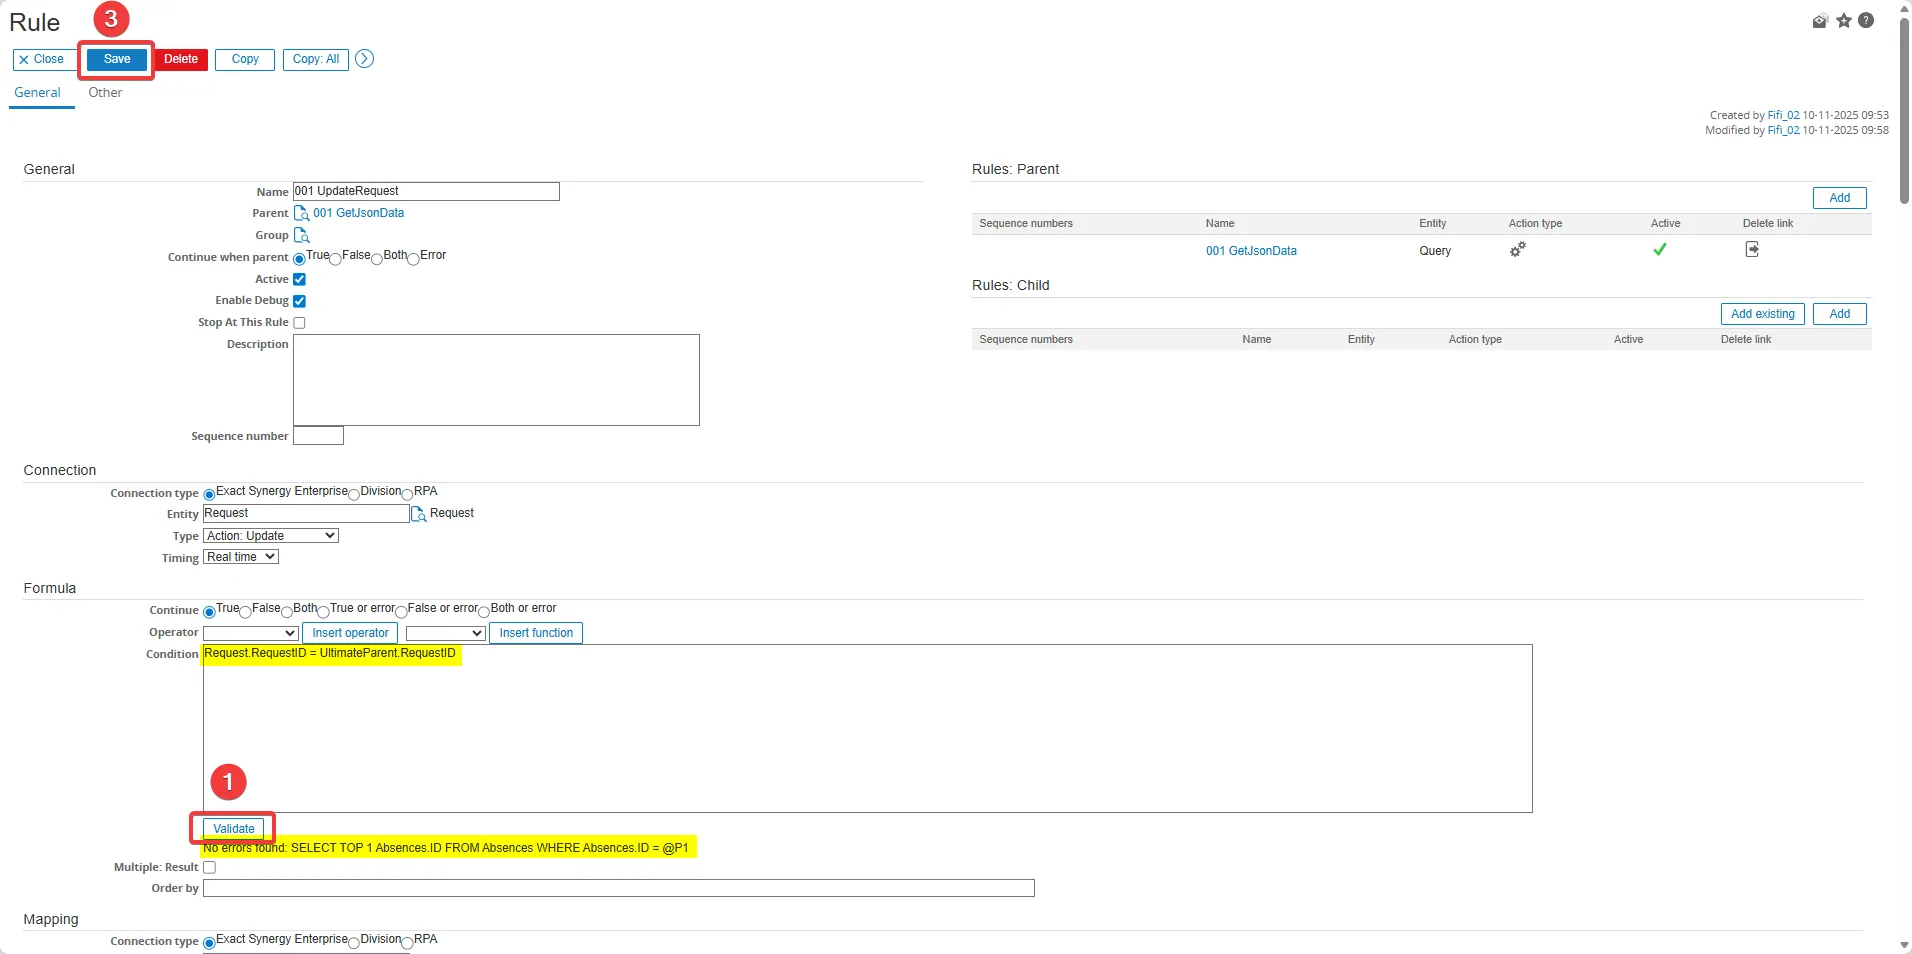
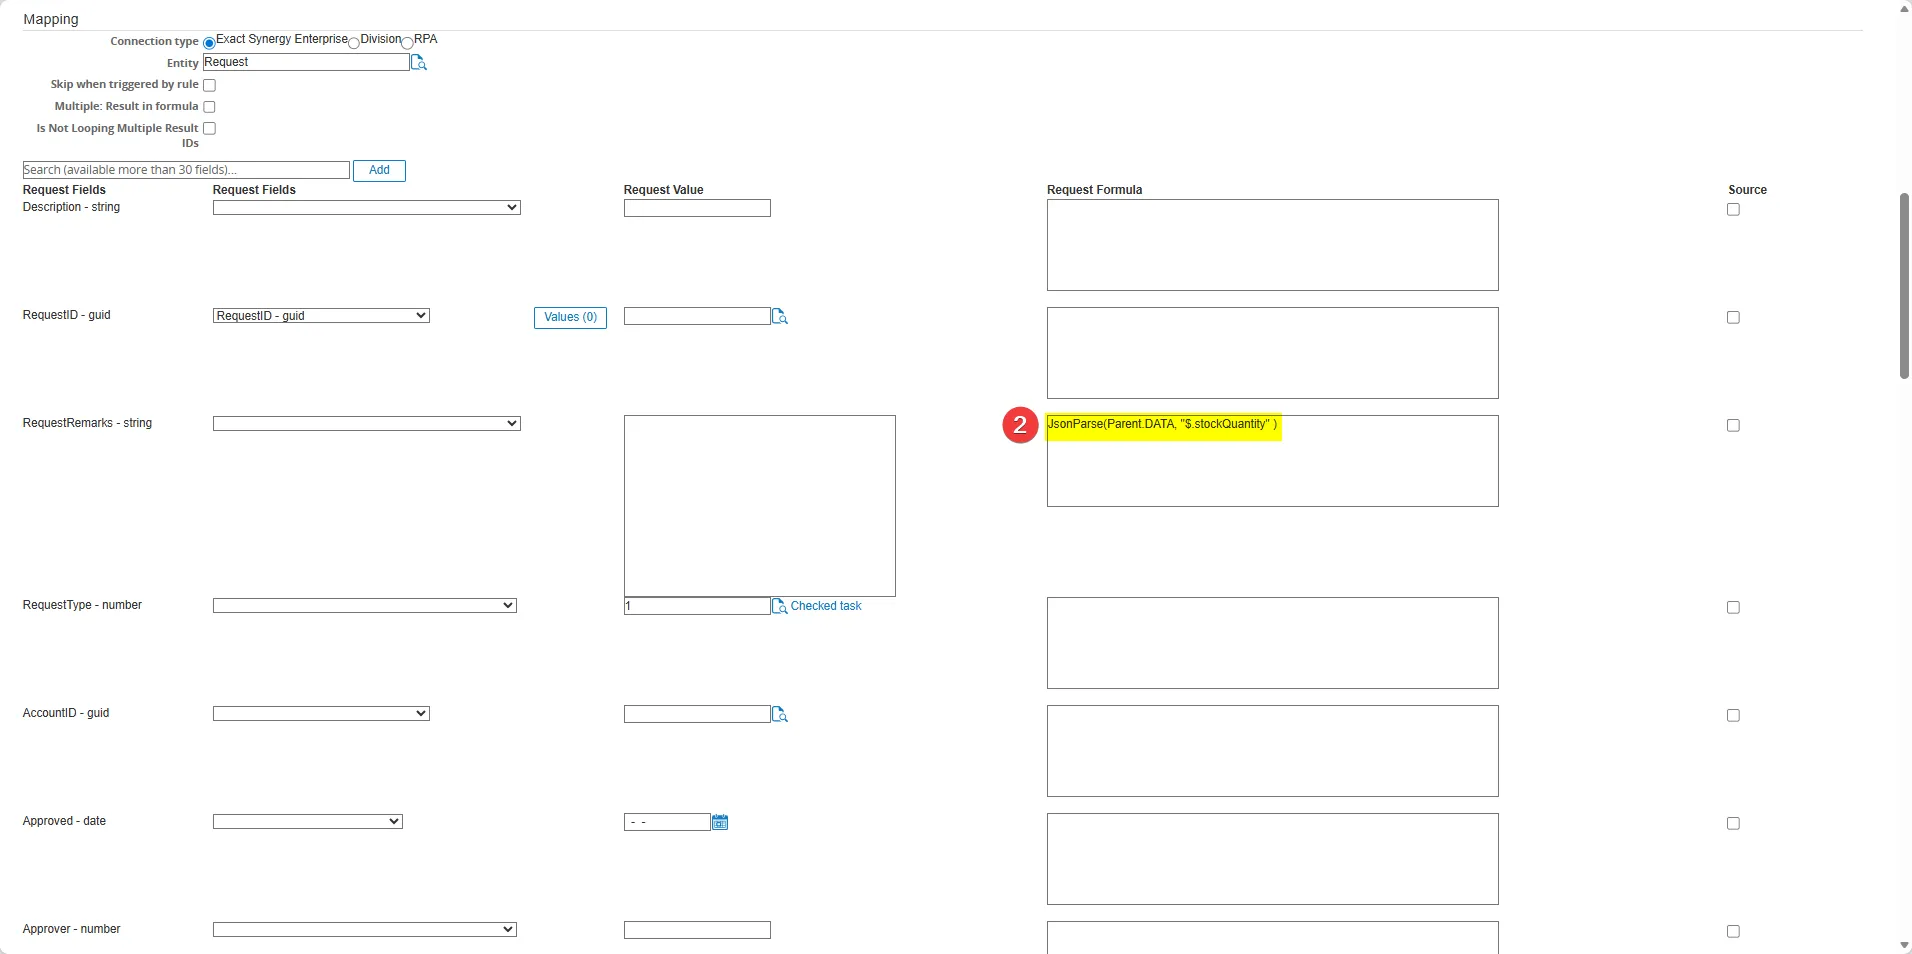
- Type the desired condition. For example, we want to get the Parent.DATA and stock quantity from Click the Validate button until the message “No errors found” appears
- Make sure the request formula is already filled with the correct condition
- Click the Save button
- When all configurations are complete:
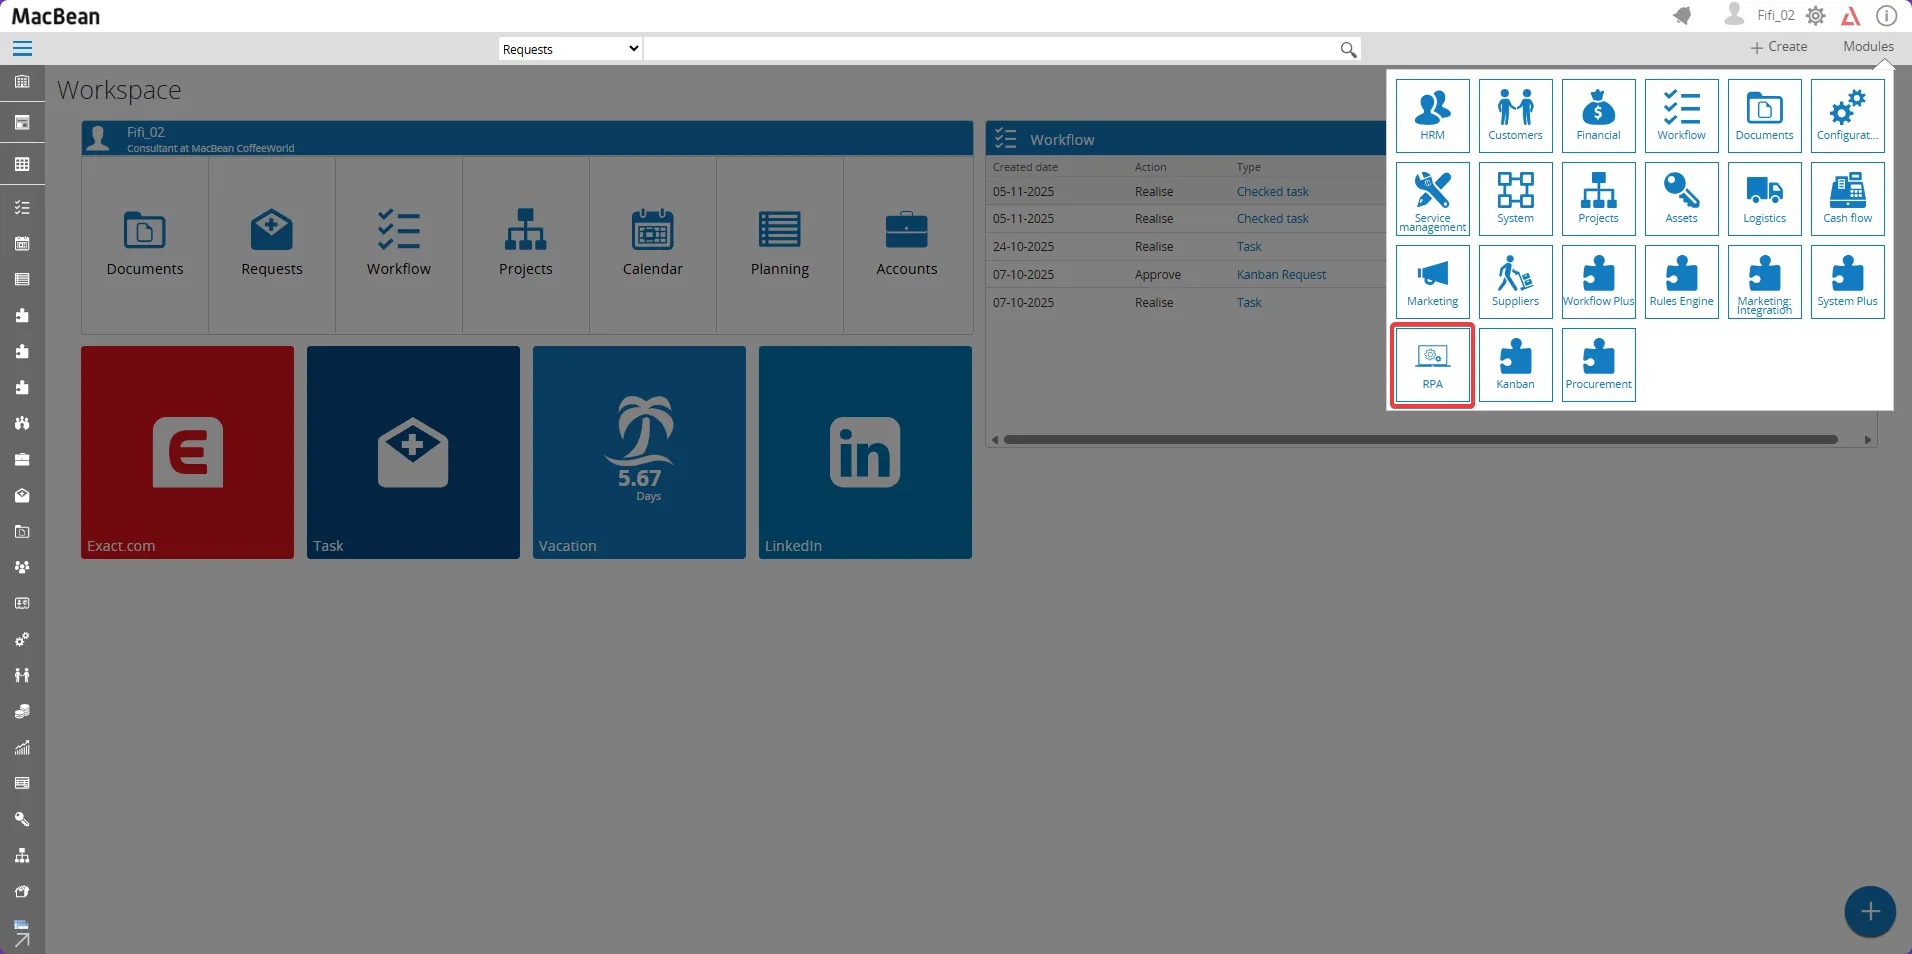
- Return to the RPA Modules
- Go To Modules > Workflow
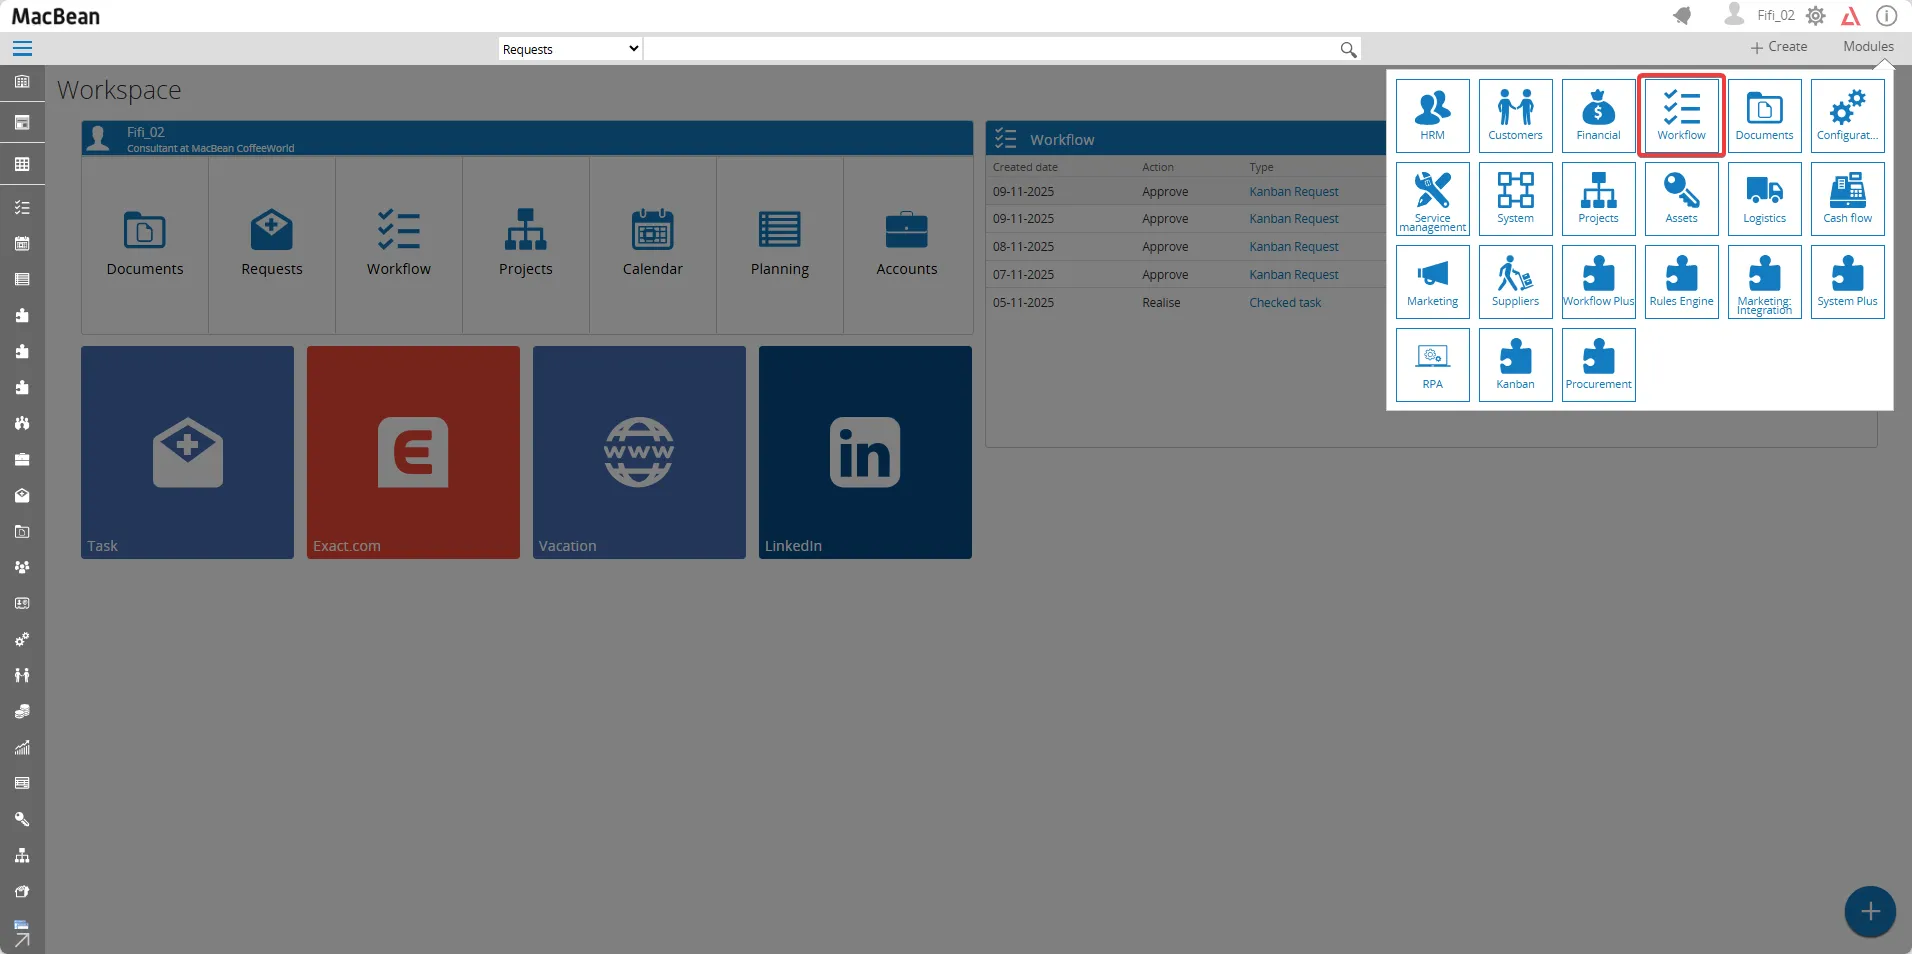
- Report > Search
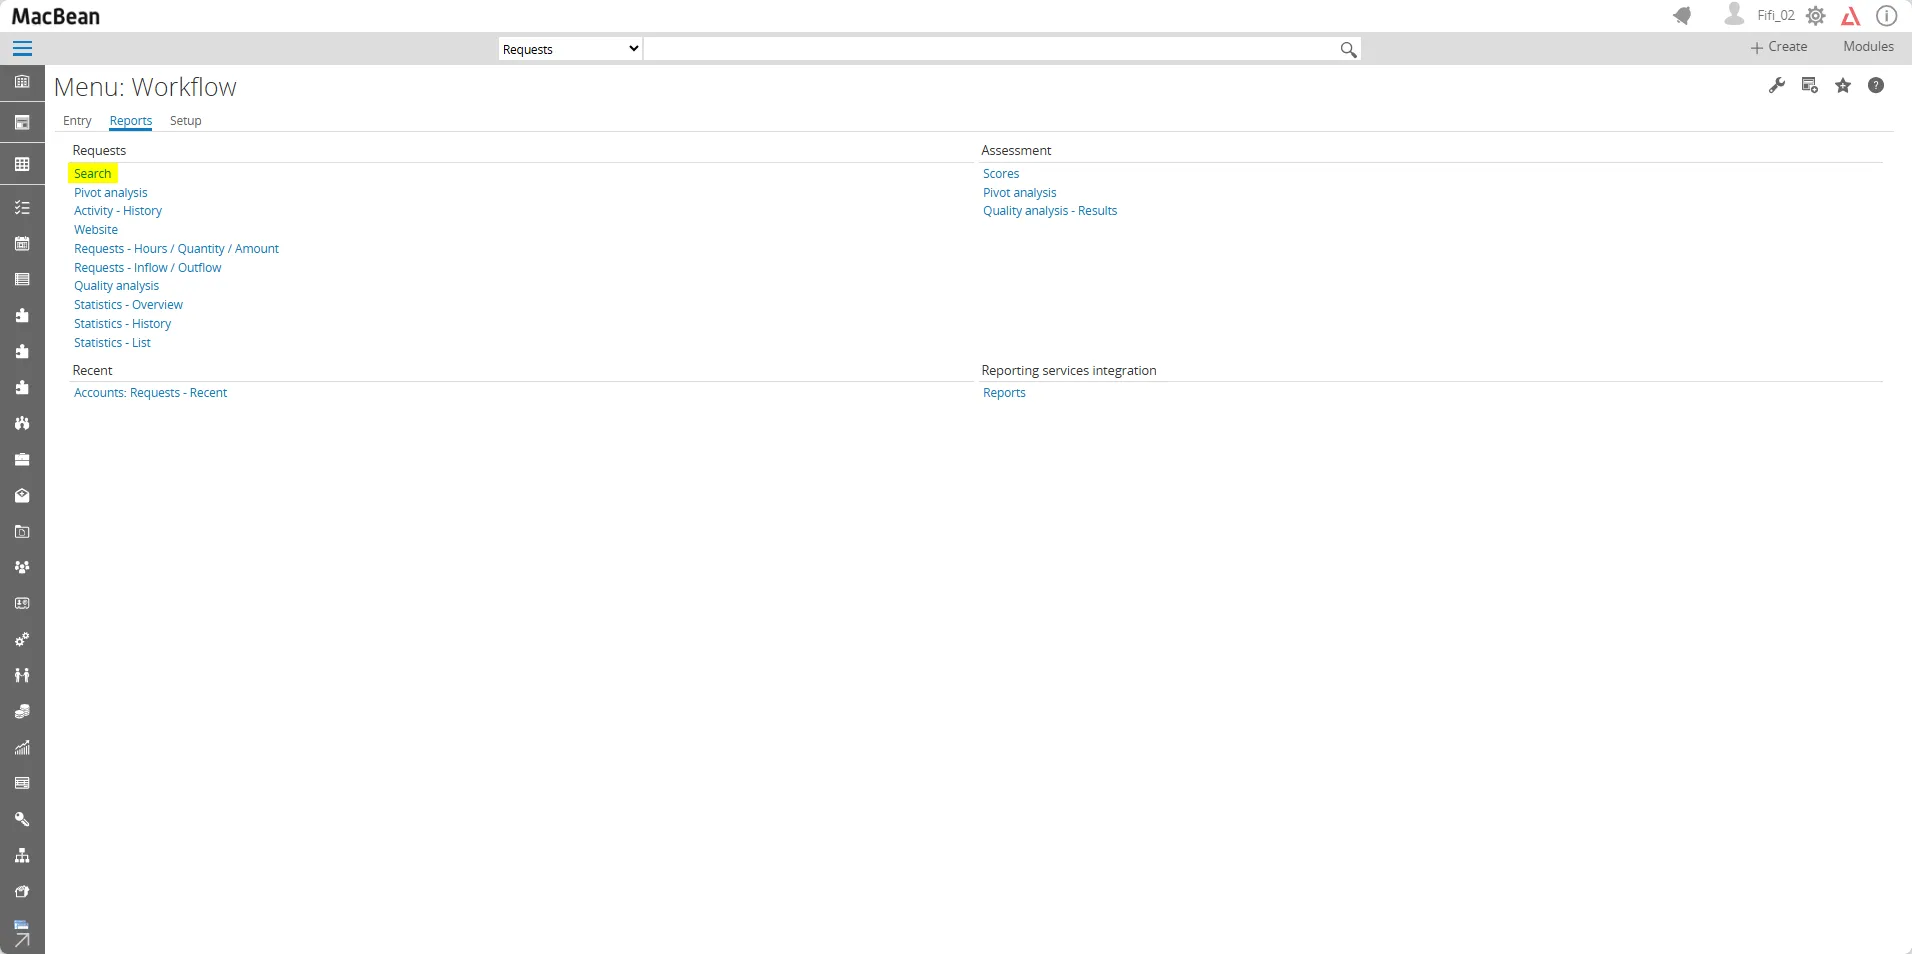
- Click the Show button
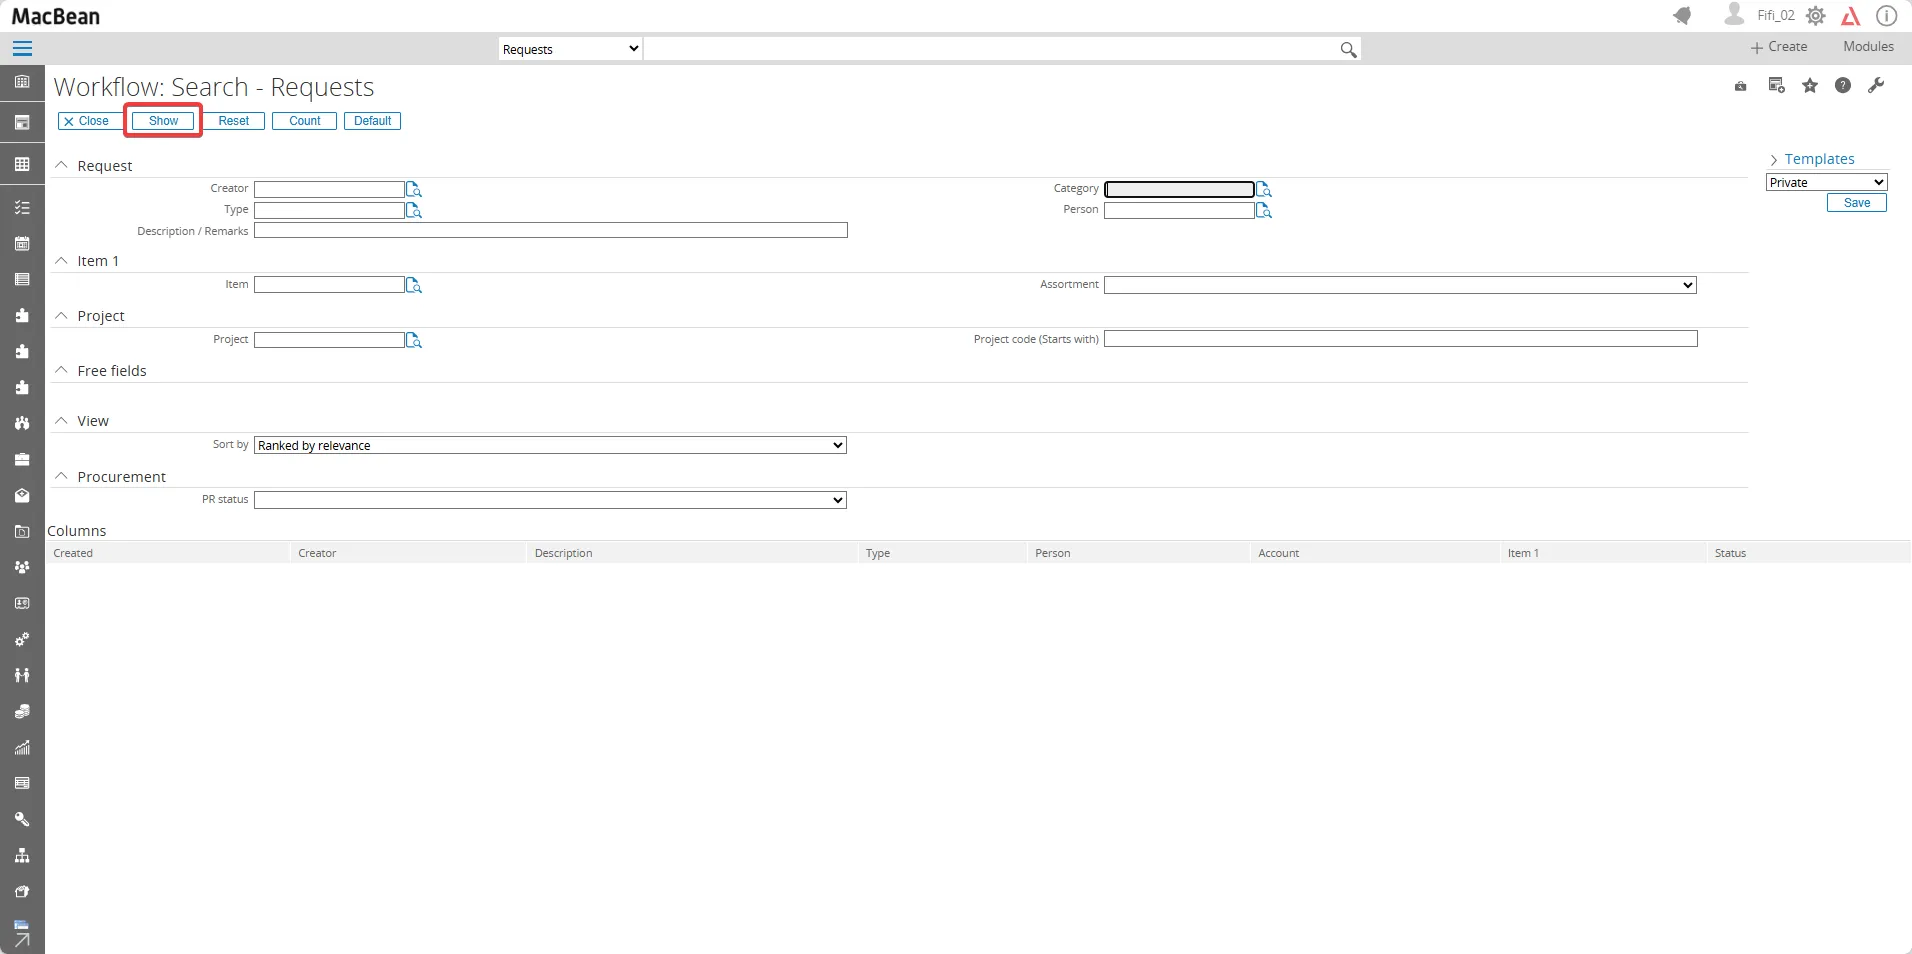
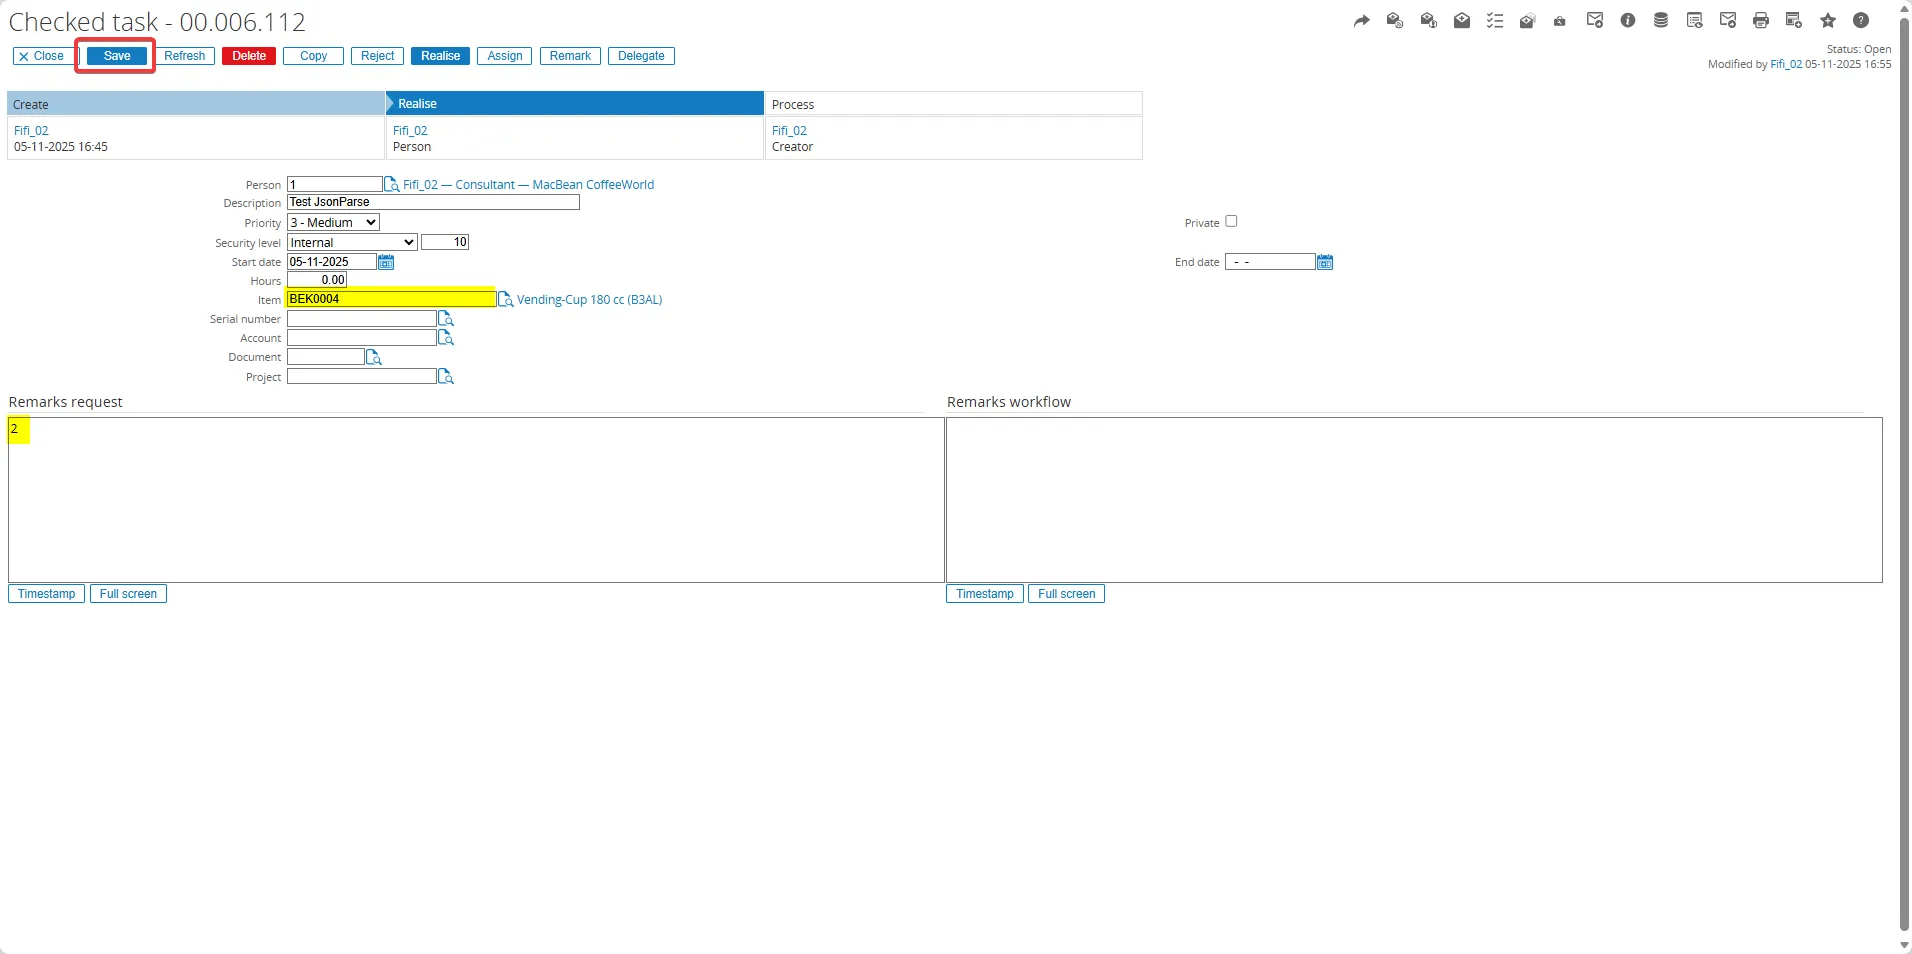
- Click the Request that you made

- Now, it is already filled with the remark you requested
- Next, Go to Reports > Rules > Log
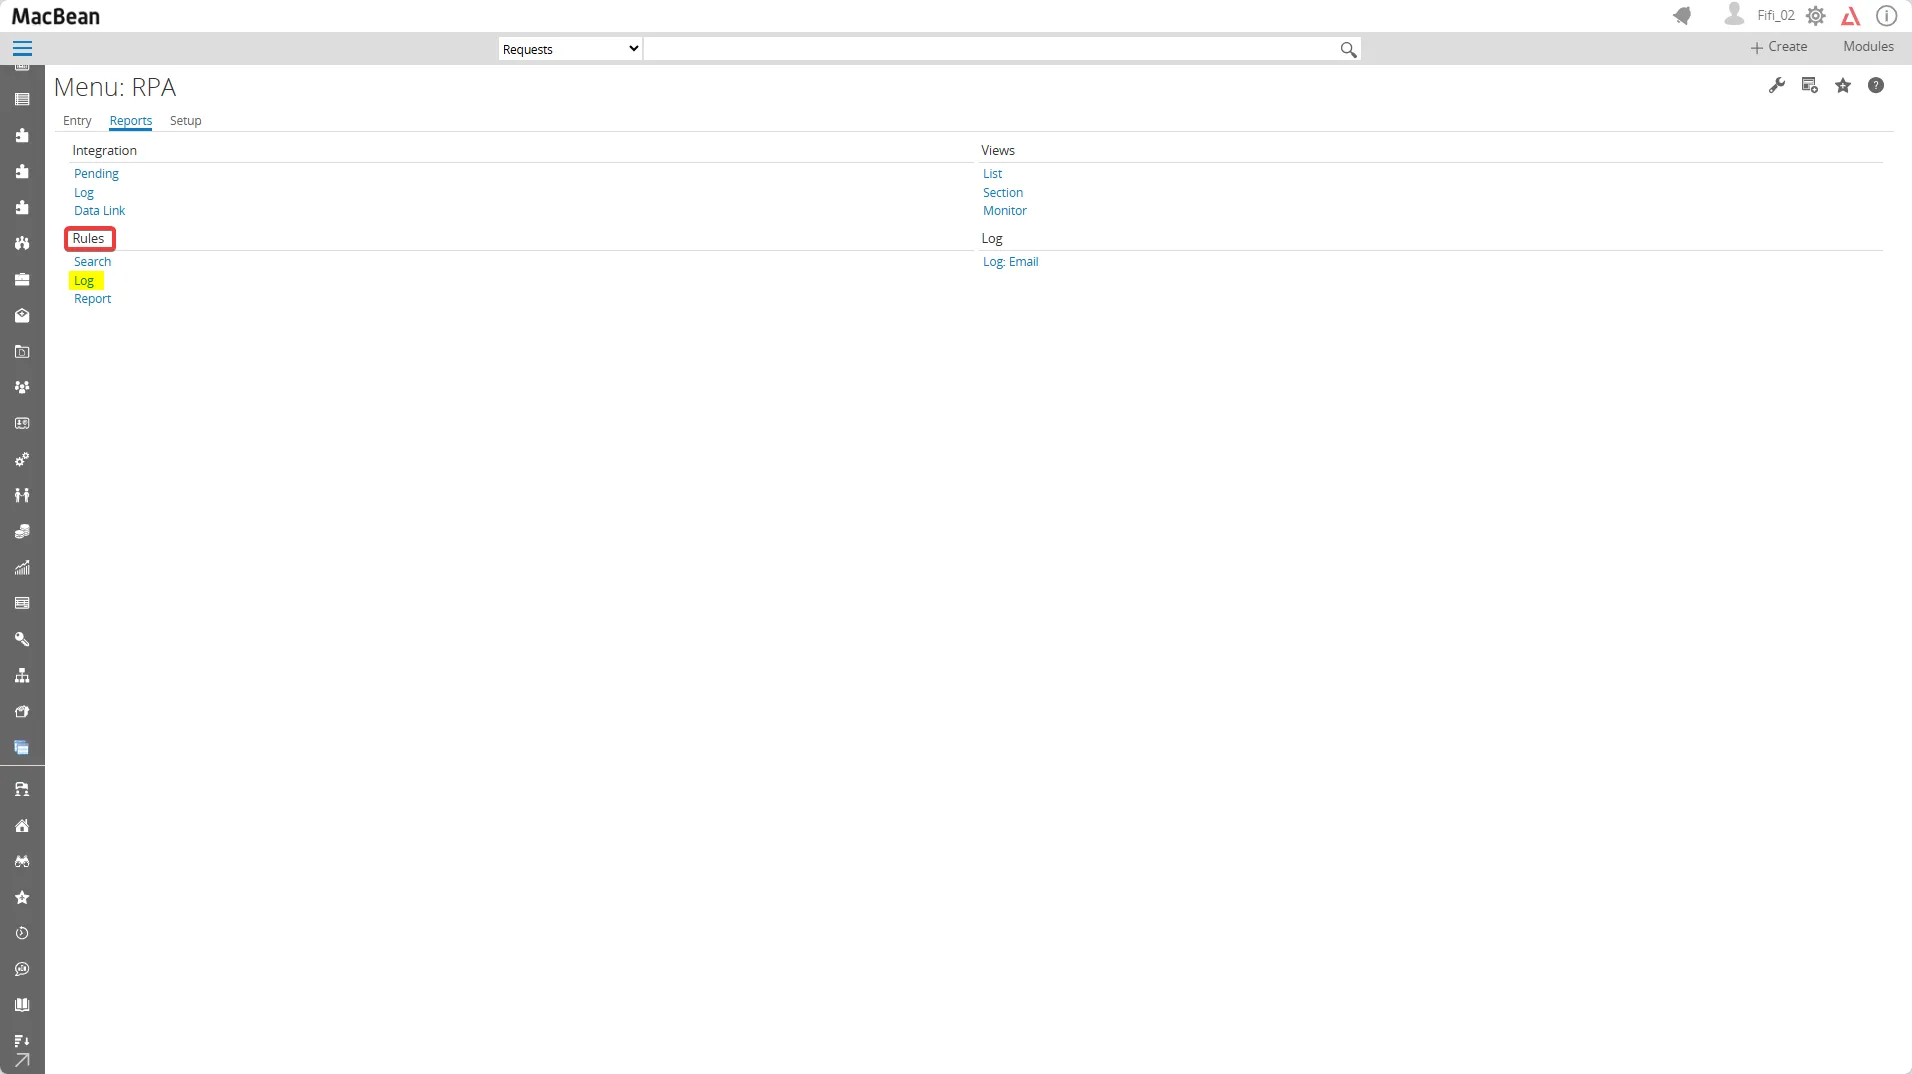
- Click the Show button to display the list of columns
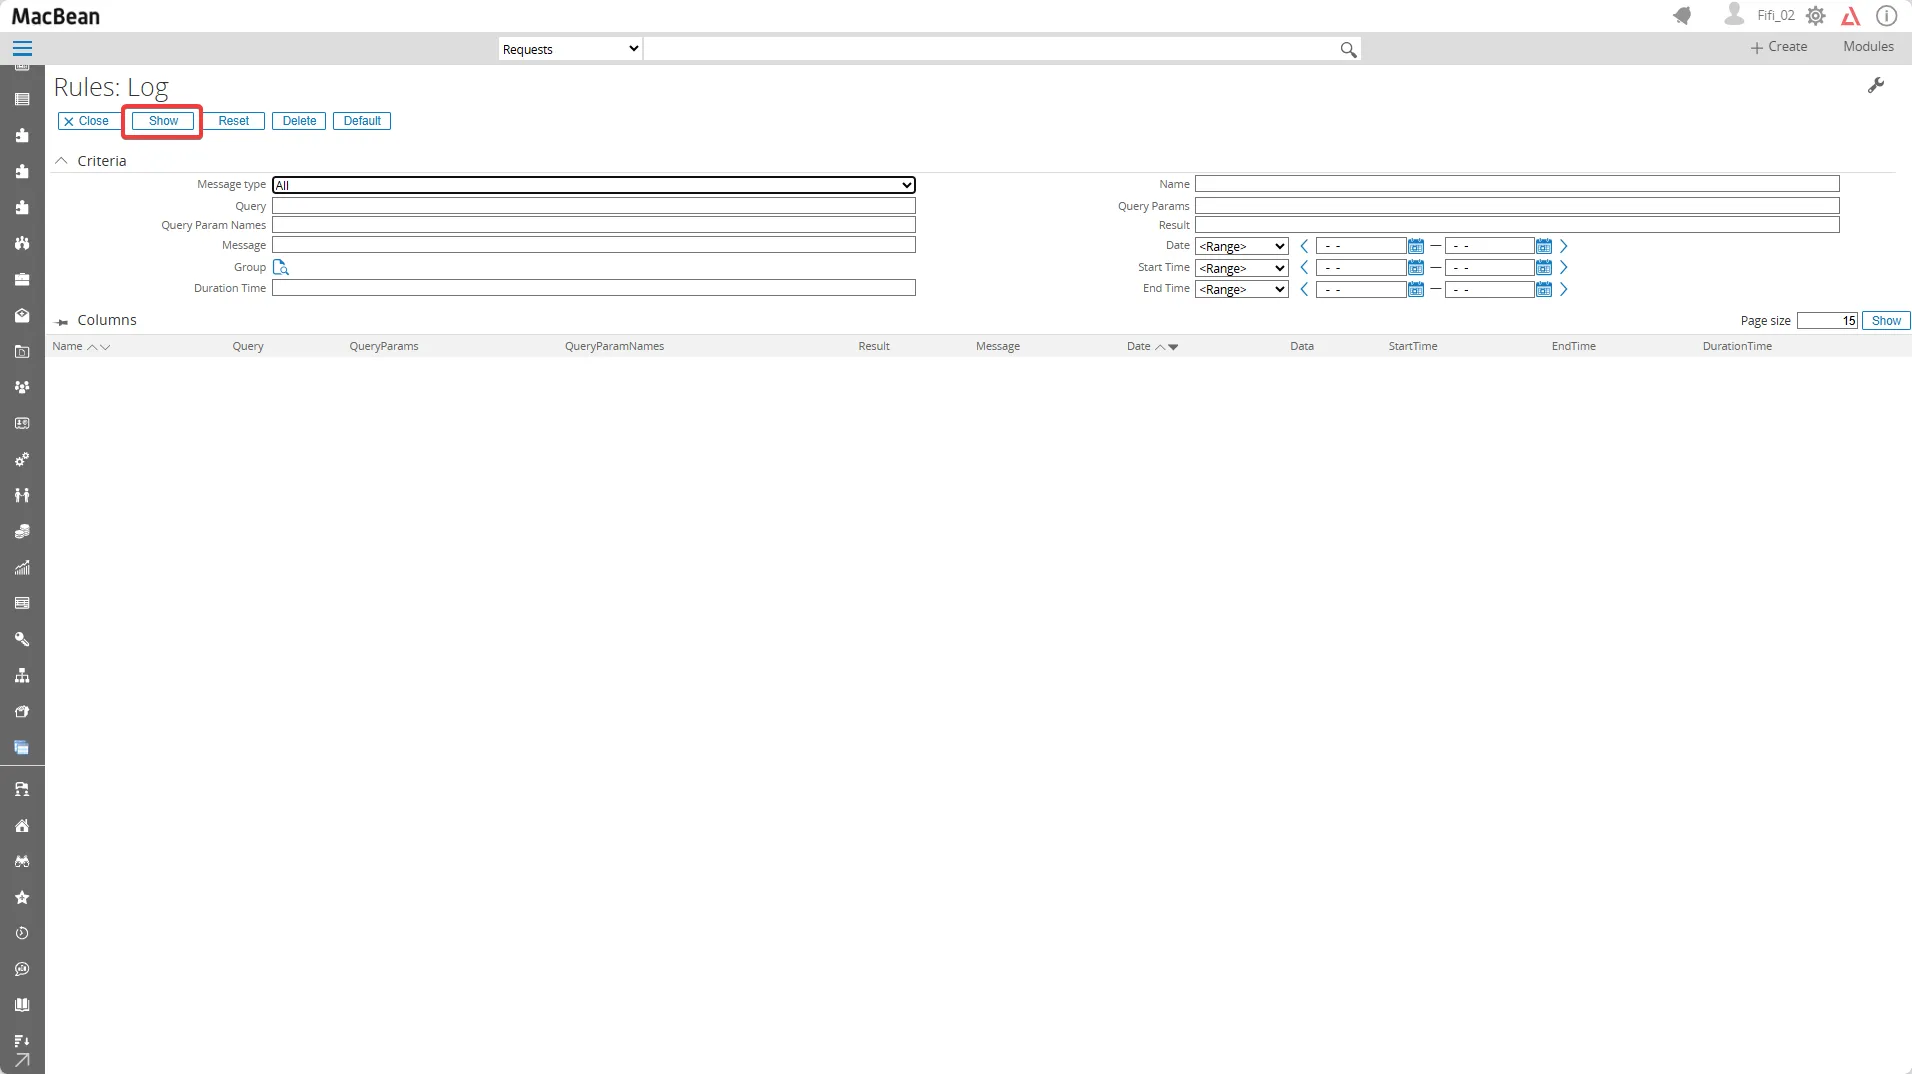
- Click the Search icon to expand the detailed data
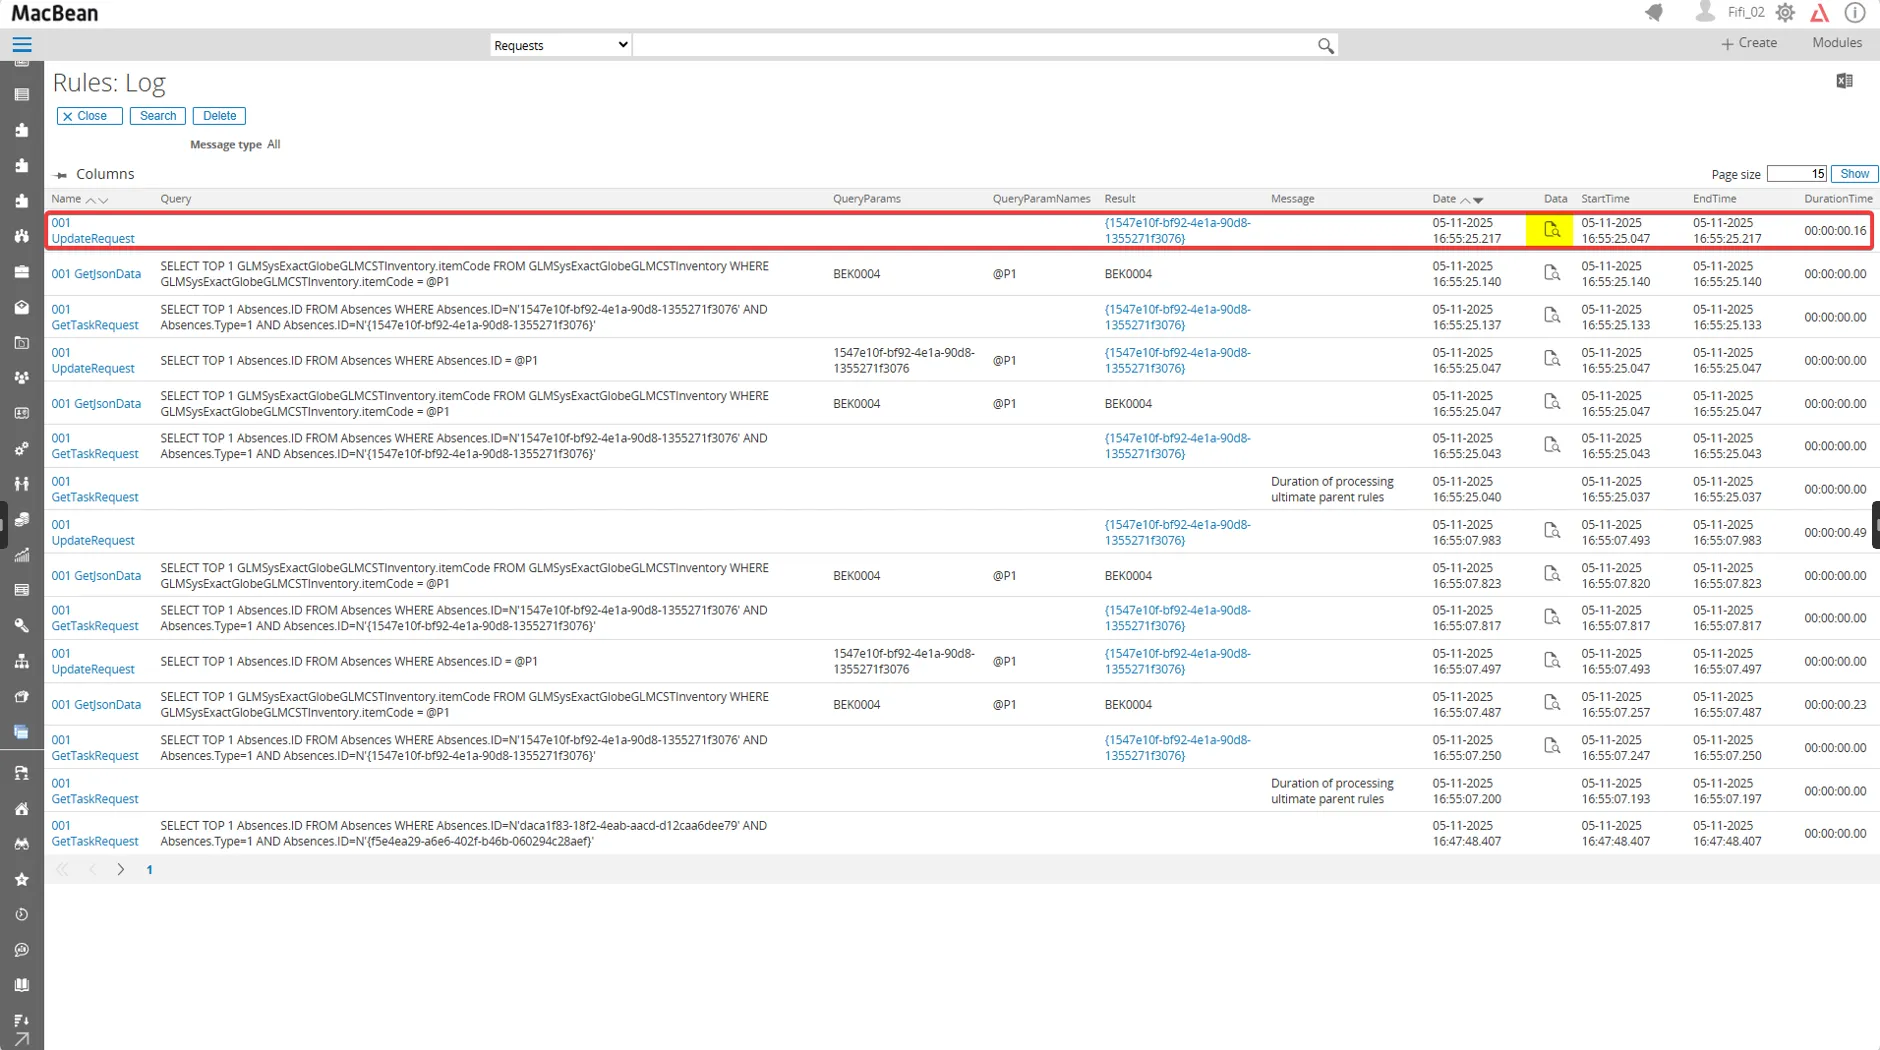
- The files in the Request Log will display the same values as those in the SQL database
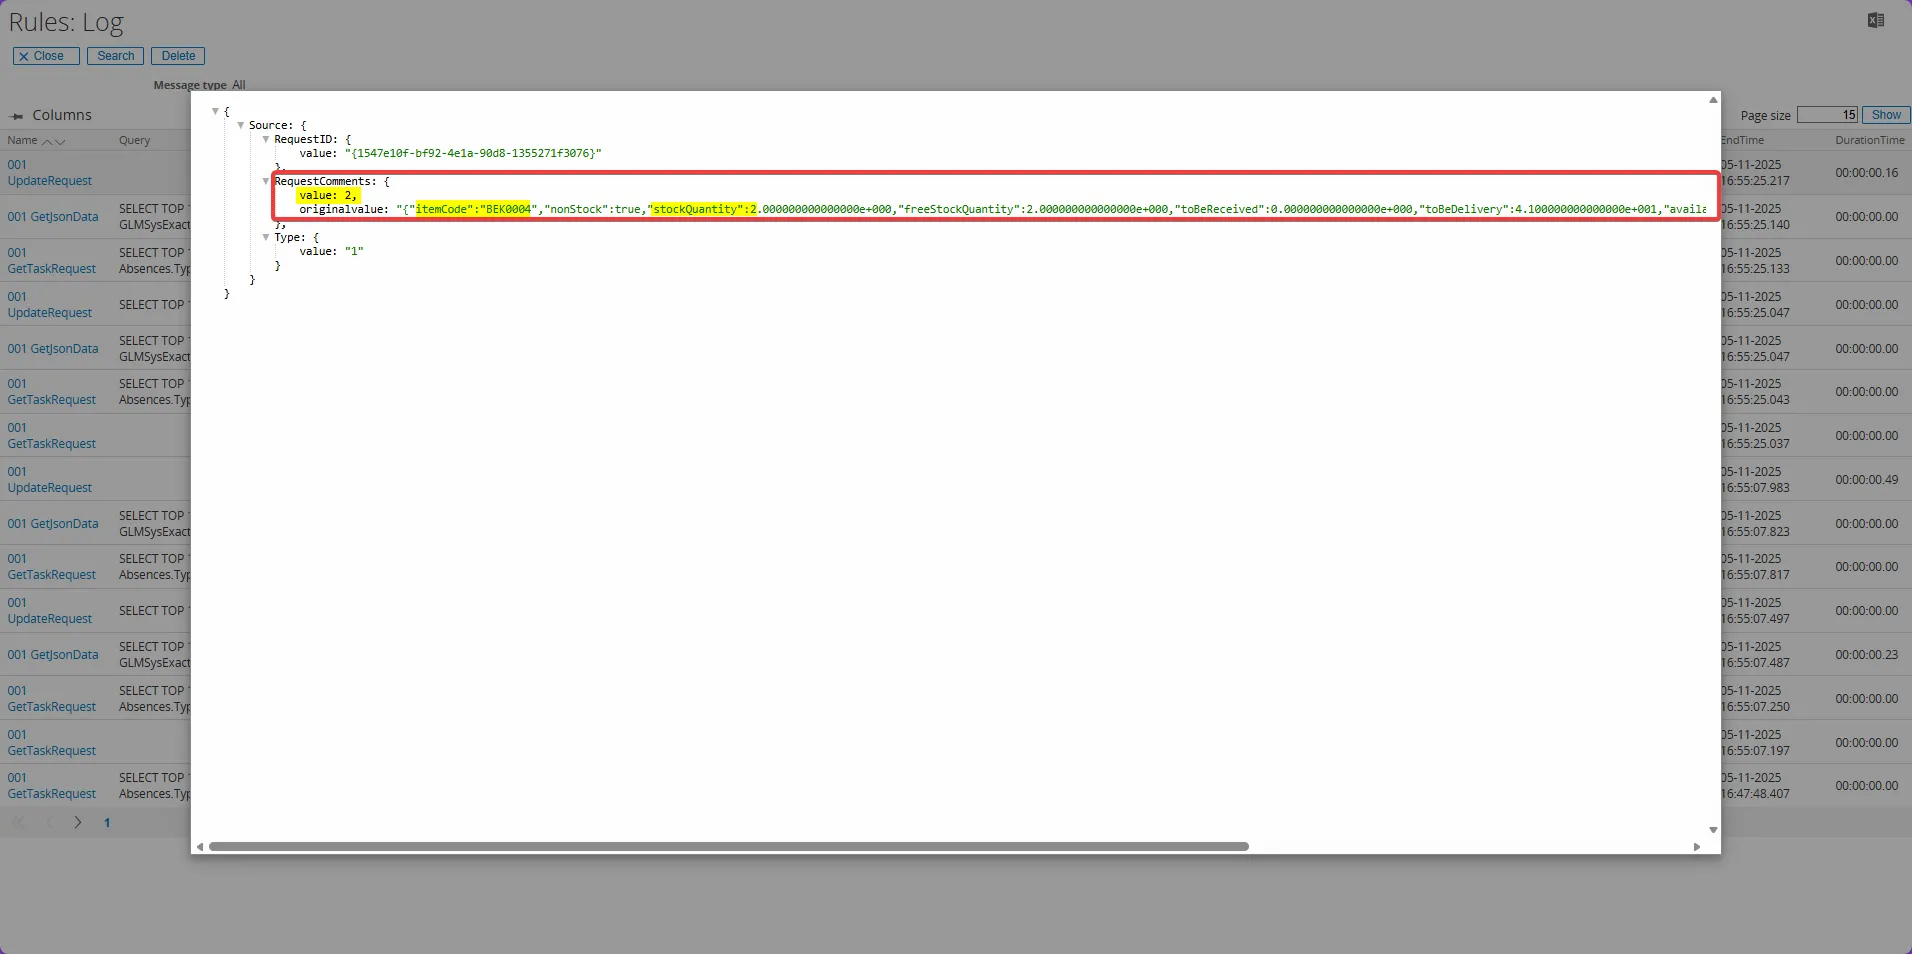
- You should now see that the values are correct and match the data in the SQL database as shown by
Value = 2,itemCode = "BEK0004", andstockQuantity = 2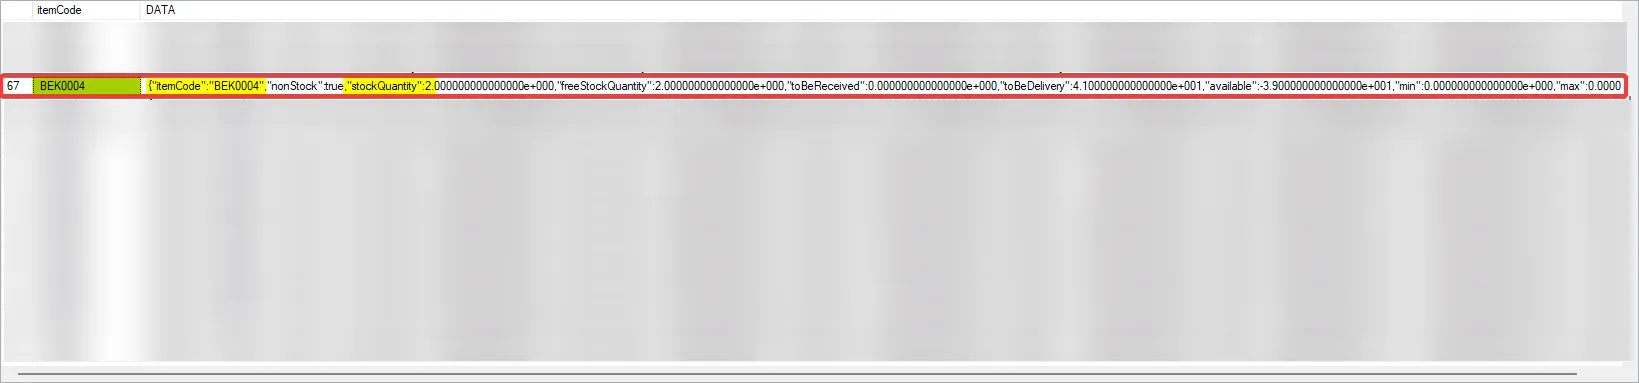
Setup general
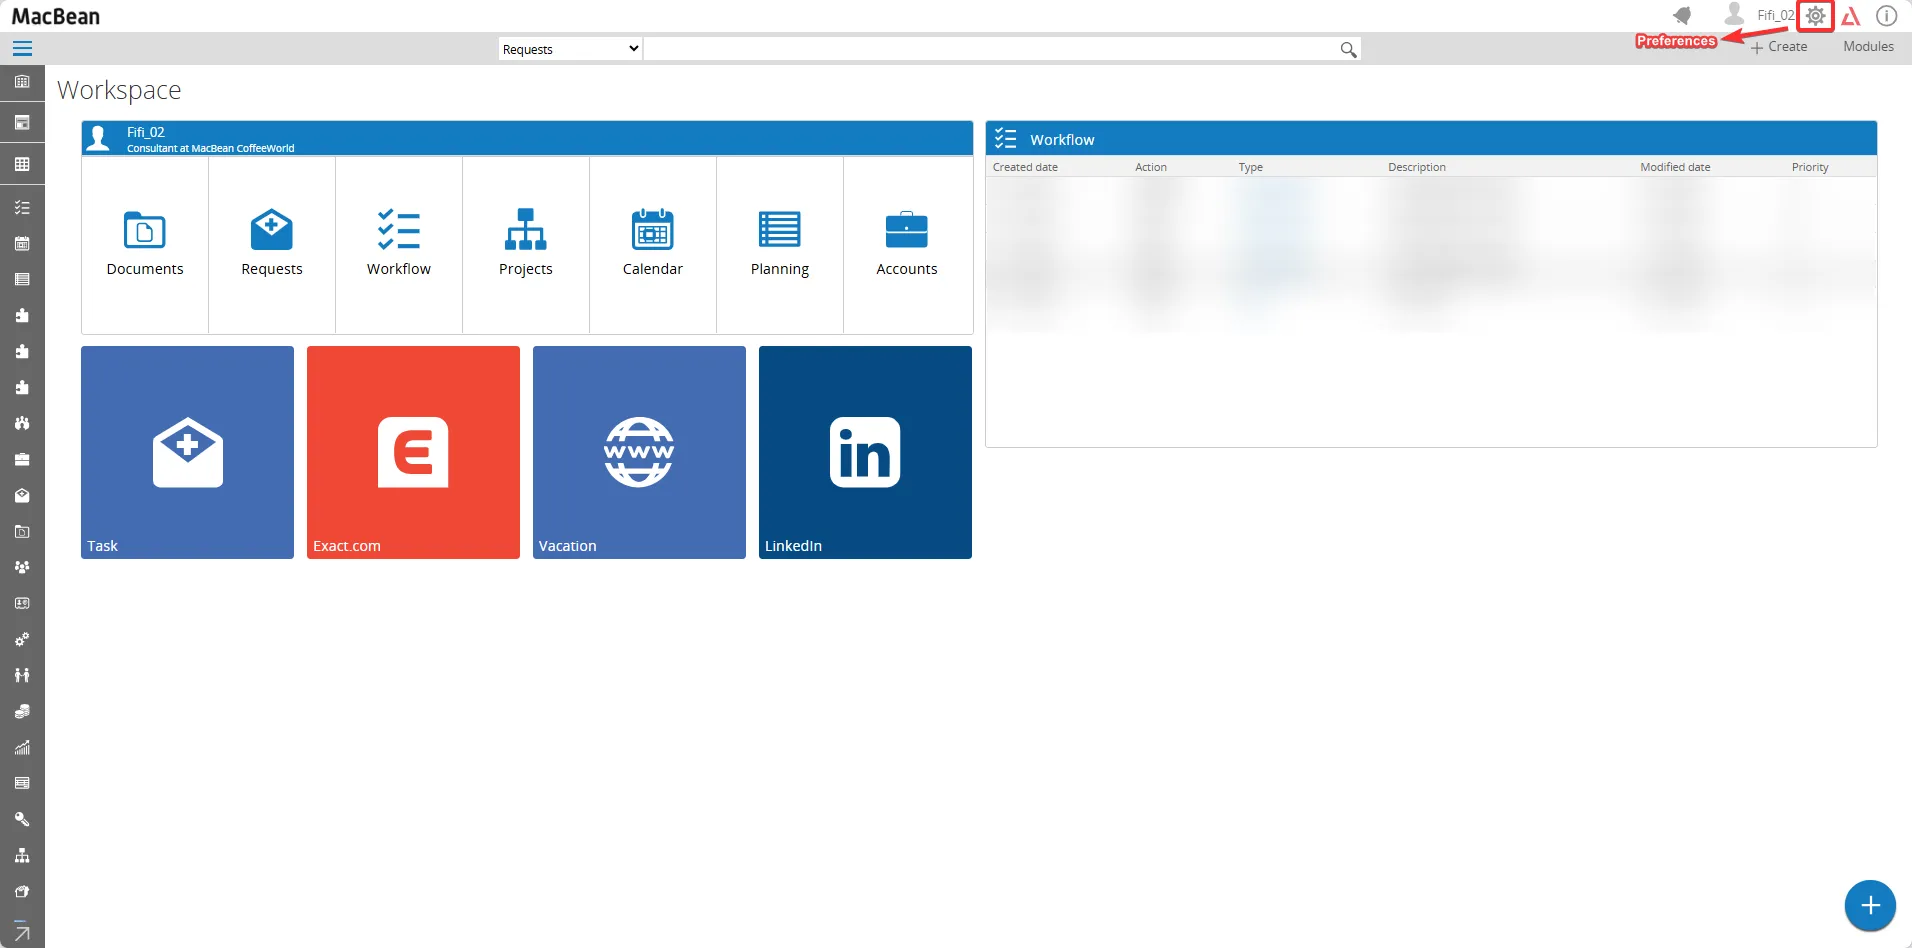
Section titled “Setup general”Click the Preferences icon

Setup connections
Section titled “Setup connections”Depending on the integration, view builder or rules engine work that need to be done look at the specific connection on how to setup the connection.
The connection is used in all three features.
For the integration after two connections are setup, we would link these two connections which will give us a ‘Connection: Link’.
The ‘main connection’ would be the connection we would link the other connection to which we would call the ‘linked connection’. Normally Exact Synergy would be used as the ‘linked connection’ and the other business software solution would be the ‘main connection’. Same would apply for the setup of the entities which is done after the connection, Exact Synergy would be ‘linked entity’ and the other business software solution would be the ‘main entity’ or just ‘entity’. There is no restriction on which connection can be linked to which connection. So, we can link Exact Globe to Exact Synergy, Exact Globe to Salesforce, Exact Online to Exact Synergy or Exact Online to Exact Globe, Incoming mail to Exact Synergy etc. This means that RPA integration also can be used as a pure integration framework to sync the data between two other software solutions supported by RPA, without storing any data in Exact Synergy (other than in the Data Link table and in the log and pending table).
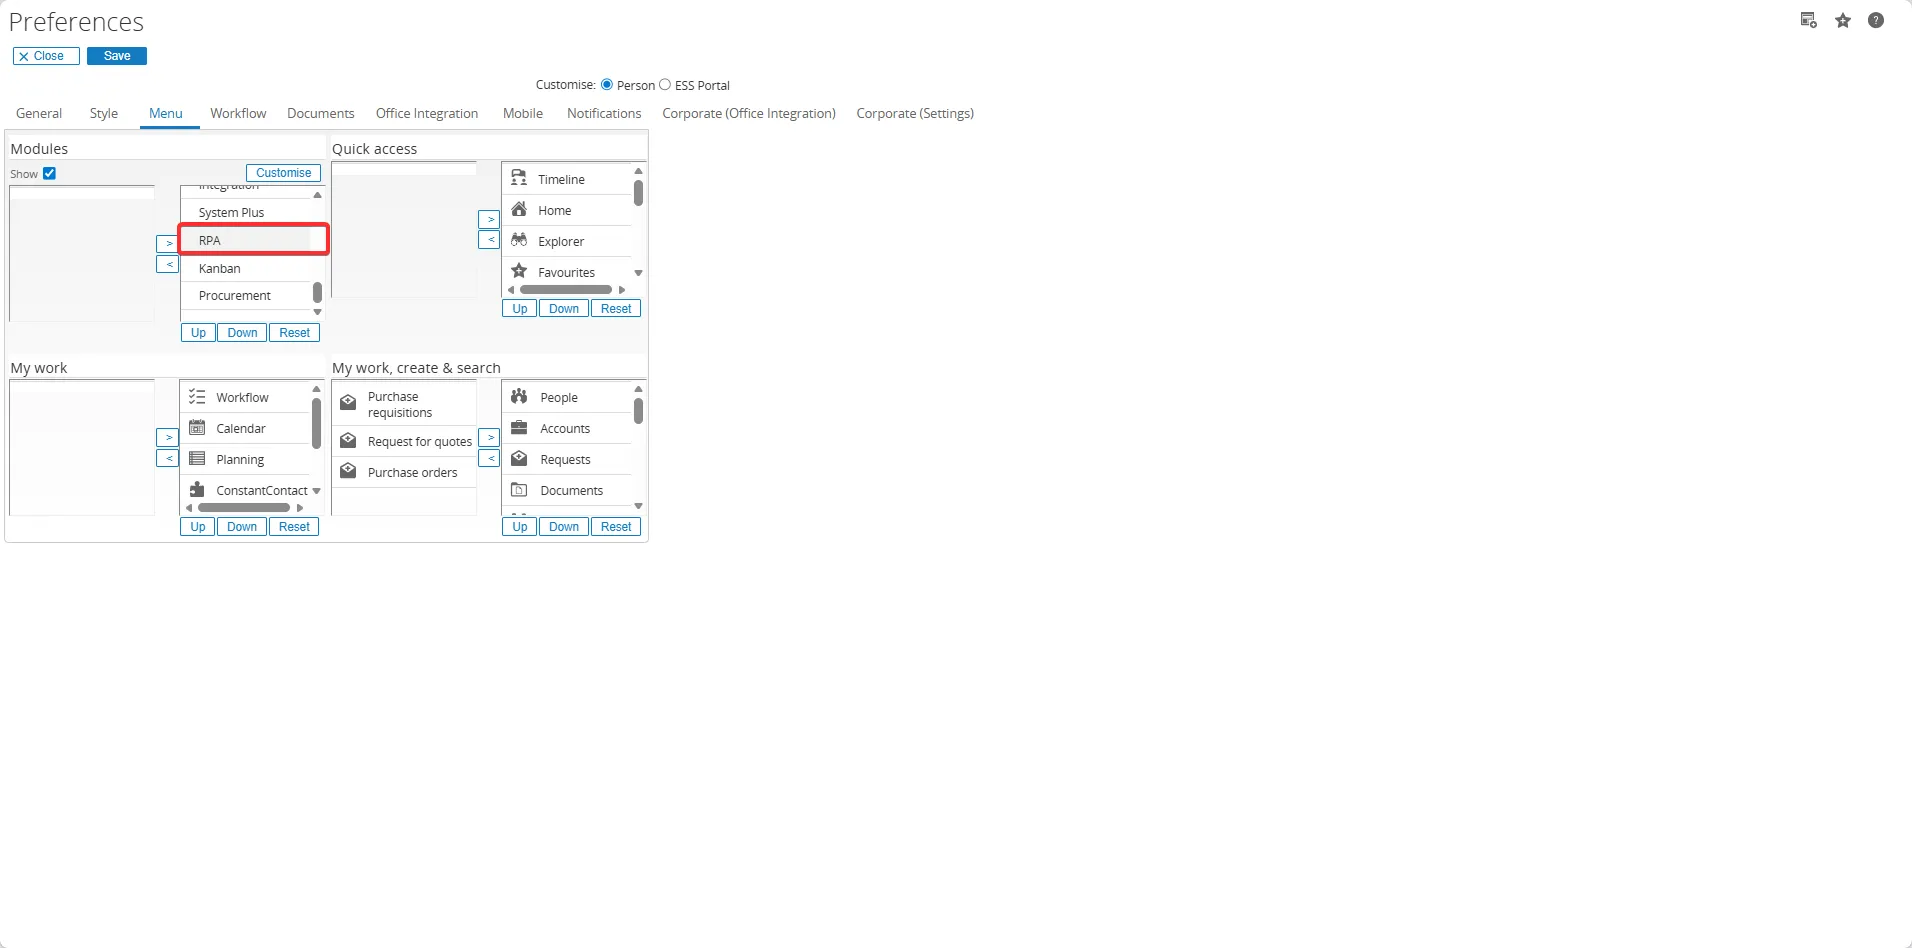
Activate the provider / software to use in the provider list
Section titled “Activate the provider / software to use in the provider list”Make sure the RPA module is added via the preferences.
Setup > Connection > Provider open the provider and check the active checkbox. For the provider list see ‘Suporter applications’
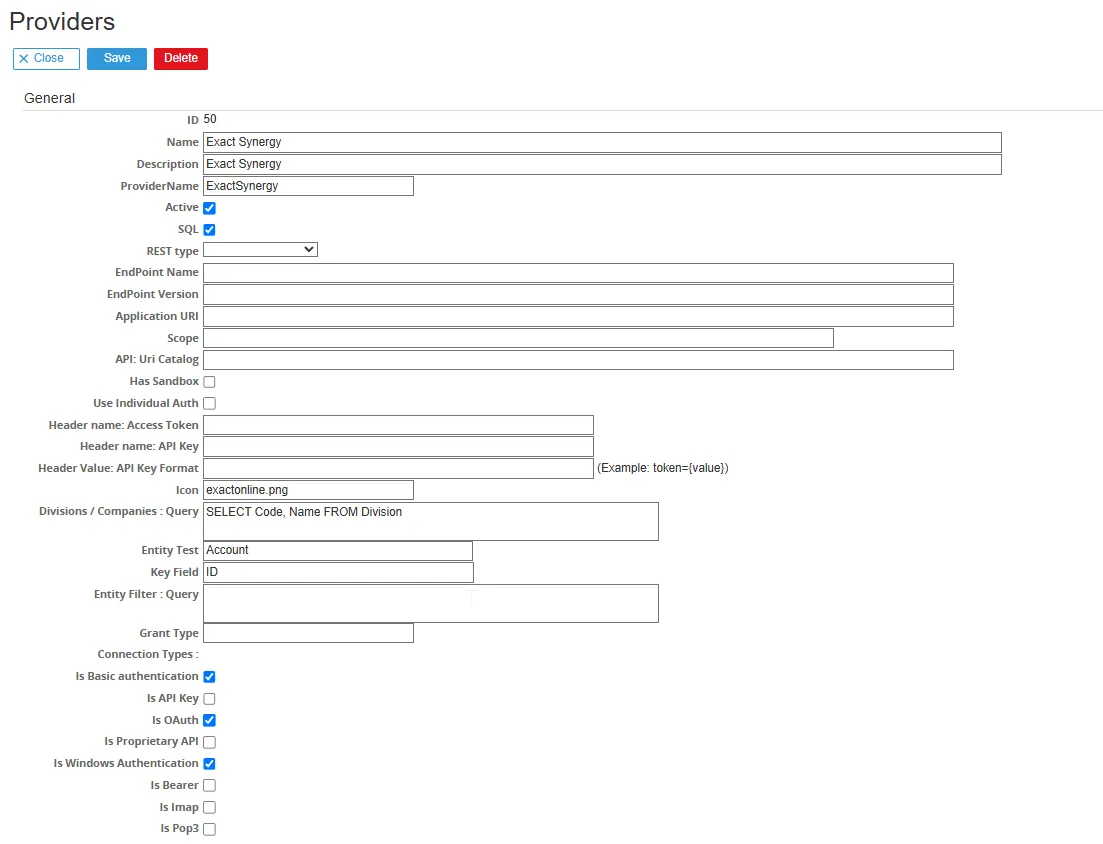
Provider connection fields
Here is a detailed explanation of each provider connection field that must be completed:
IDUnique ID for the provider (auto-generated).
NameThe name of the provider, e.g., Exact Synergy.
DescriptionA more detailed description of the provider.
ProviderNameThe technical name of the provider, often the same as the Name.
Active (checkbox)Indicates whether this provider is active or not.
SQL (checkbox)Specifies whether the connection also uses SQL in addition to the REST API.
REST typeThe type of REST service used (e.g., Odata, OpenAPI, OpenAPI + Odata, Standard).
EndPoint NameThe name of the API endpoint to be connected to.
EndPoint VersionThe version of the API endpoint.
Application URIThe URI of the application used for OAuth or API communication.
ScopeThe scope for OAuth (example: read write or api_scope).
API: Uri CatalogURI to the API catalog or documentation if available.
Has Sandbox (checkbox)Indicates if there is a sandbox/testing environment for this API.
Use Individual Auth (checkbox)If checked, authentication is done per user (instead of global authentication).
Header name: Access TokenThe header name used to send the access token (example: Authorization).
Header name: API KeyThe header name if using an API Key.
Header Value: API Key FormatThe format of the API Key header value.
IconThe icon file name shown for this provider.
Divisions / Companies: QueryThe query to fetch the list of divisions/companies.
Entity TestThe name of the entity used for testing.
Key FieldThe unique key field name.
Entity Filter: QueryAn additional query to filter specific entities.
Grant TypeThe OAuth grant method used (example: authorization_code, client_credentials).
Connection TypesTypes of connections supported
Is Basic authenticationUses username & password.
Is API KeyUses an API Key.
Is OAuthUses OAuth2.
Is Proprietary APICustom/internal API.
Is Windows AuthenticationUses Windows (Active Directory) authentication.
Is BearerUses a Bearer token in the header.
Is ImapIMAP (typically for email).
Is Pop3POP3 (typically for email).
Exact Synergy
Section titled “Exact Synergy”To write data to Synergy, the REST API for Synergy is used. The Exact Synergy connection will be linked to the related connection for the integration.
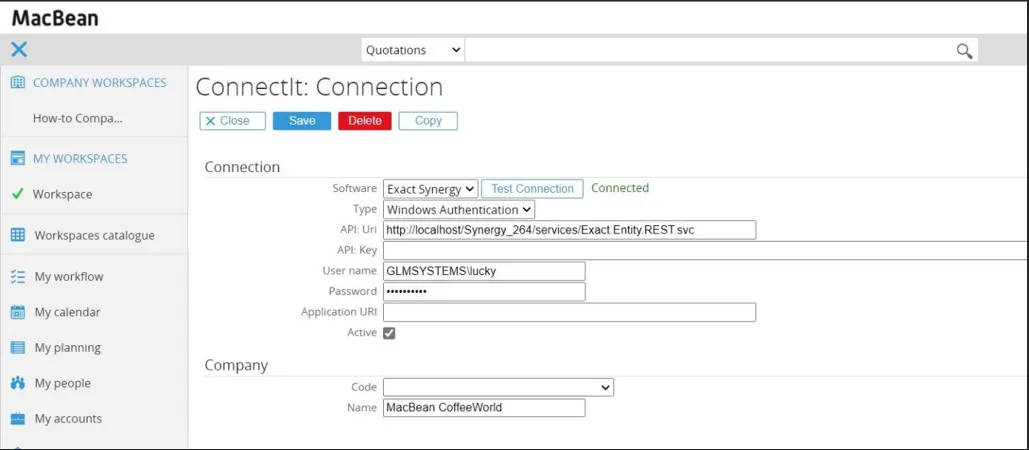
Exact Synergy Connection Fields
Here is a detailed explanation of each provider connection field that must be completed:
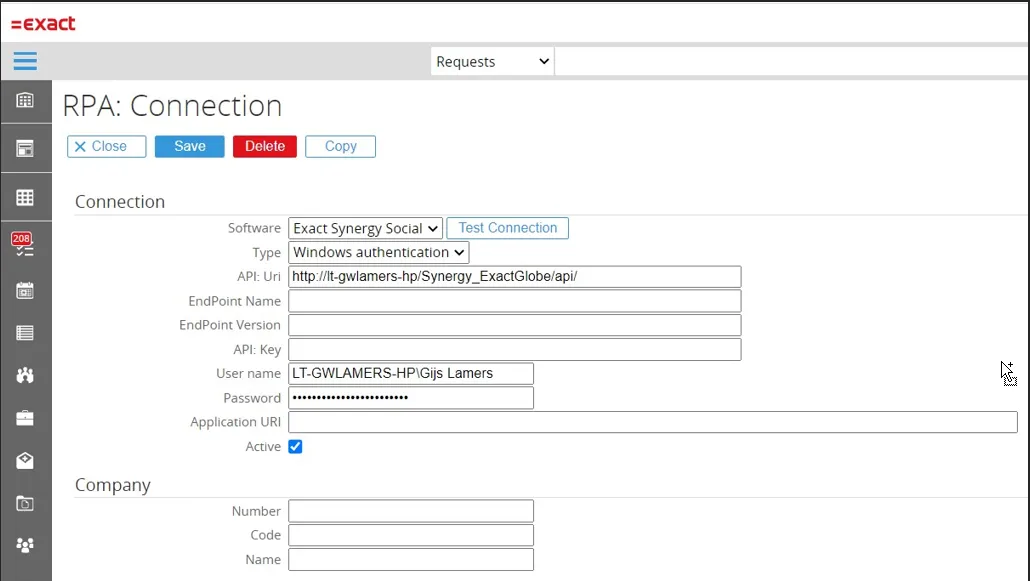
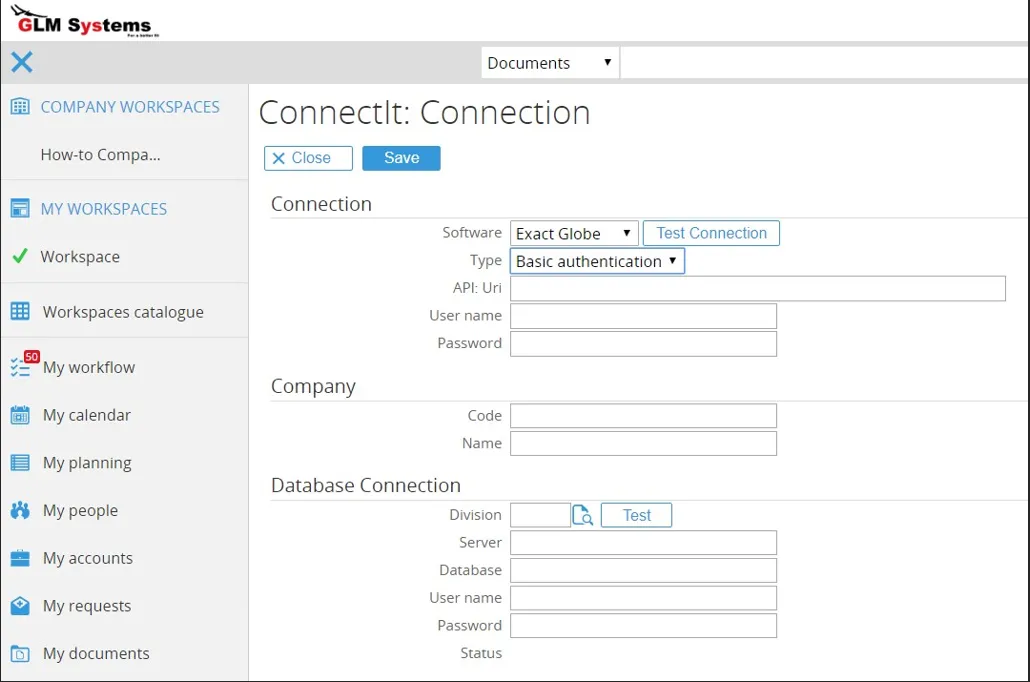
SoftwareChoose Exact Synergy as software
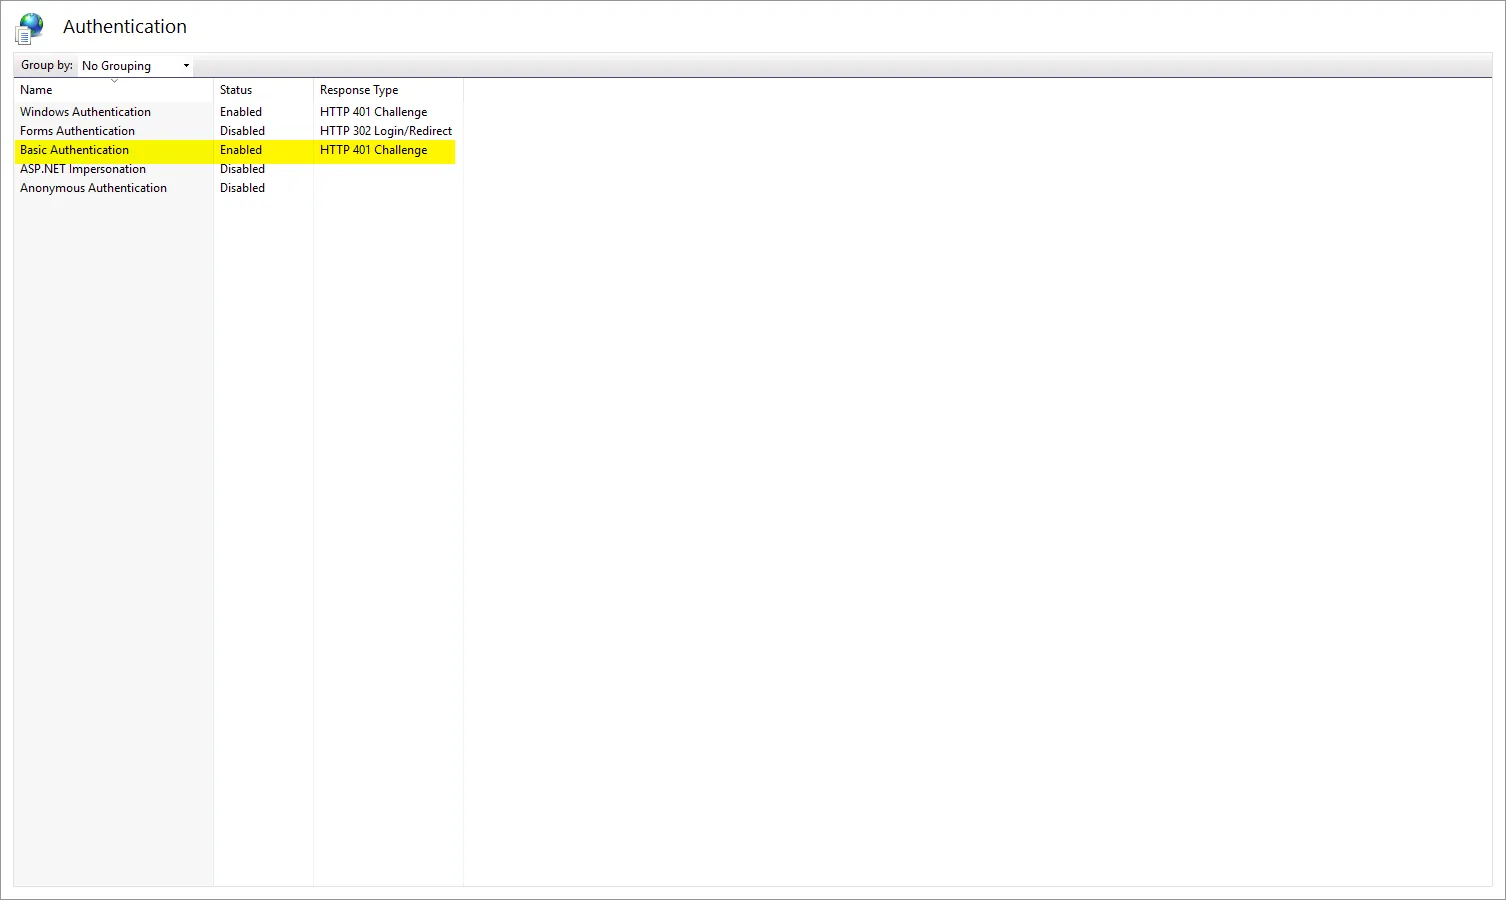
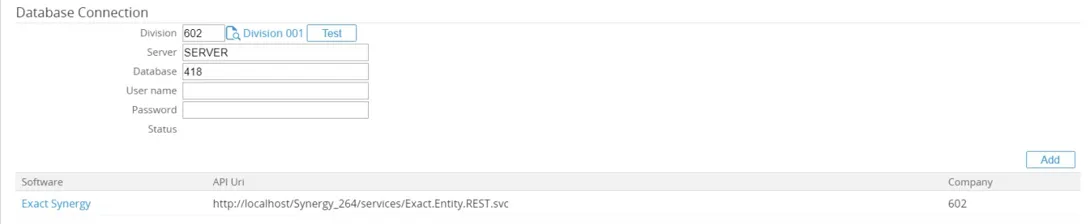
TypeWindows Authentication can be used to accessing the Exact Synergy REST API by entering the appropriate user credential. Basic authentication is used — make sure ‘Basic authentication’ is enabled in IIS; otherwise you may see HTTP Error 401.2 when testing the connection.
API UriFor the API Uri point to the Exact.Entity.Rest.svc, http://server/Synergy/services/Exact.Entity.Rest.svc. If the connection doesn’t work, try opening http://server/Synergy/service/Exact.Entity.Rest.svc in your browser.
User nameUser name who has access right to Synergy
PasswordPassword for the user
CodeAfter the connection succeeded, the division available in Exact Synergy will be shown in this combo box; select the division to be used for this connection.
NameType the name of the division — this will show in the integration and help to recognize the connection.
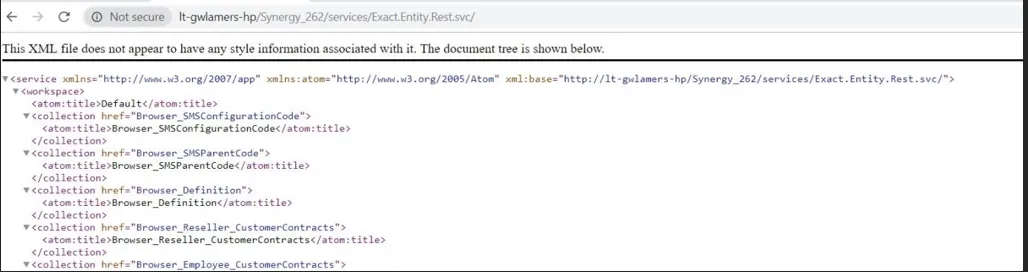
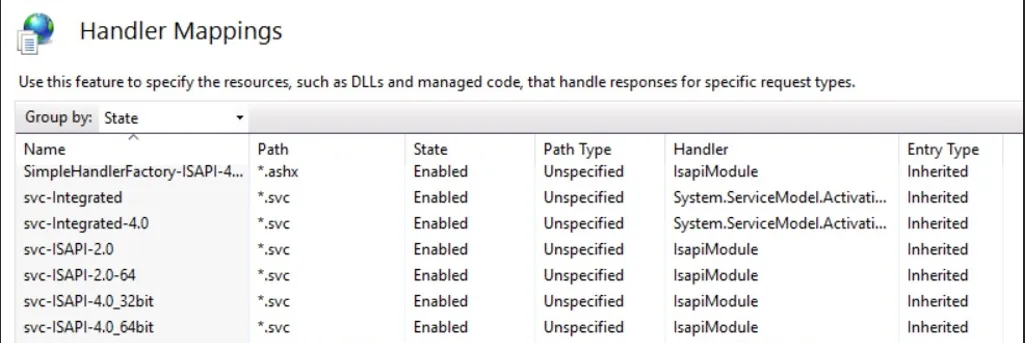
If the API page isn’t shown the mapping handler svc may not be available in IIS.
Exact Synergy Social
Section titled “Exact Synergy Social”The Exact Synergy Social provider is used to interact with Synergy Social Collaboration (timeline). In batch/version 75 (Installer after 1st December 2021) of RPA/RPA this is introduced and allows for using Social in RPA/RPA in views. Next release would also allow for creating/updating posts in the social time line and add comments.
RPA Connection Fields (Exact Synergy Social)
Here is a detailed explanation of each provider connection field that must be completed:
SoftwareChoose Exact Synergy Social as software
TypeType Windows Authentication can be used to accessing the Exact Synergy Social API by entering the appropriate user credential.
8API UriThe API Uri would be your Synergy url followed by ‘/api/’ http://localhost/Synergy_ExactGlobe/api/
ProviderNameThe technical name of the provider, often the same as the Name.
UsernameUser name for the user accessing the social timeline via the API
PasswordPassword for the user
CodeCode to identify the Exact Synergy Social connection, can be left empty.
NumberCode to identify the Exact Synergy Social connection, can be left empty.
NameName to identify the Exact Synergy Social connection, can be left empty.
Exact Globe
Section titled “Exact Globe”The Exact Globe connection will make use of the back office connection in System > Setup > Back office > Back office connection.
RPA Connection Fields (Exact Globe)
SoftwareChoose Exact Globe as software
TypeType of connection which is Basic authentication for Exact Globe
API:UriThe Uri used for the Exact Globe entity service is:http://servername Server name is the Exact Globe server name to which the connection should be made. The entity service will be called with the following Uri: http://servername:8010/services, when a different port is needed add the port in the API:Uri
User nameValid user with access to Exact Globe
PasswordPassword for the user
CodeThe company/administration code
NameThe name of the company/administration
DivisionDivision in Exact Synergy linked to the Exact Globe administration
ServerSQL Server where the Exact Globe database is located
DatabaseDatabase name for the Exact Globe administration
User name (fixed)Fixed user name, not mandatory only when fixed user is needed to connect
Password (fixed)Password for the fixed user
Test ConnectionTest the entity service connection. When connected it will show Connected if not an error will be shown with the reason why it couldn’t be connected.
Test (button)Test the back office SQL connection. The status will show Connected or Failed.


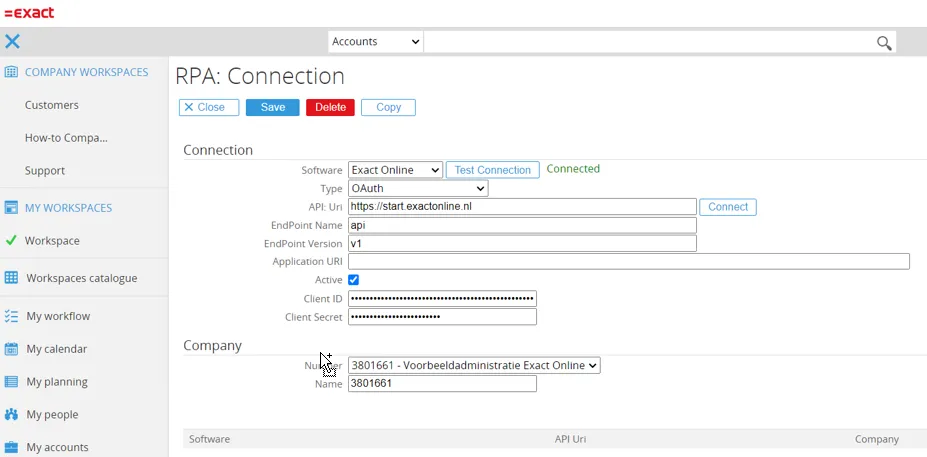
Exact Online
Section titled “Exact Online”Before setting up the connection with Exact Online create a new app on the app center for the Exact Online administration you want to make a connection to
Login to the Exact Online App Store with the credentials of the Exact Online administration you want to connect to.
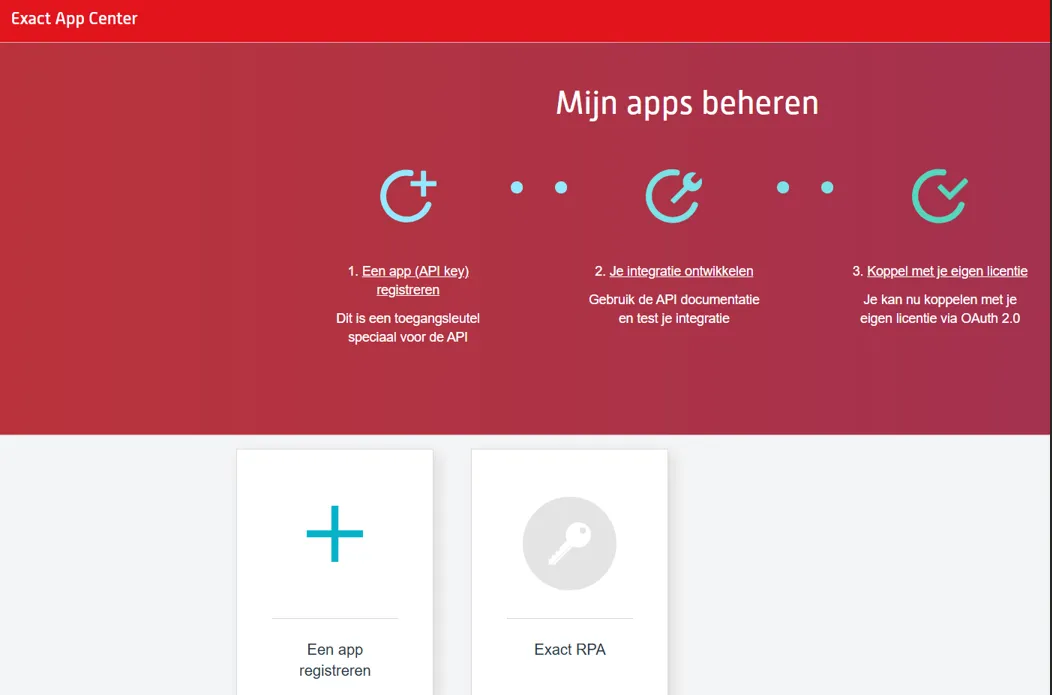
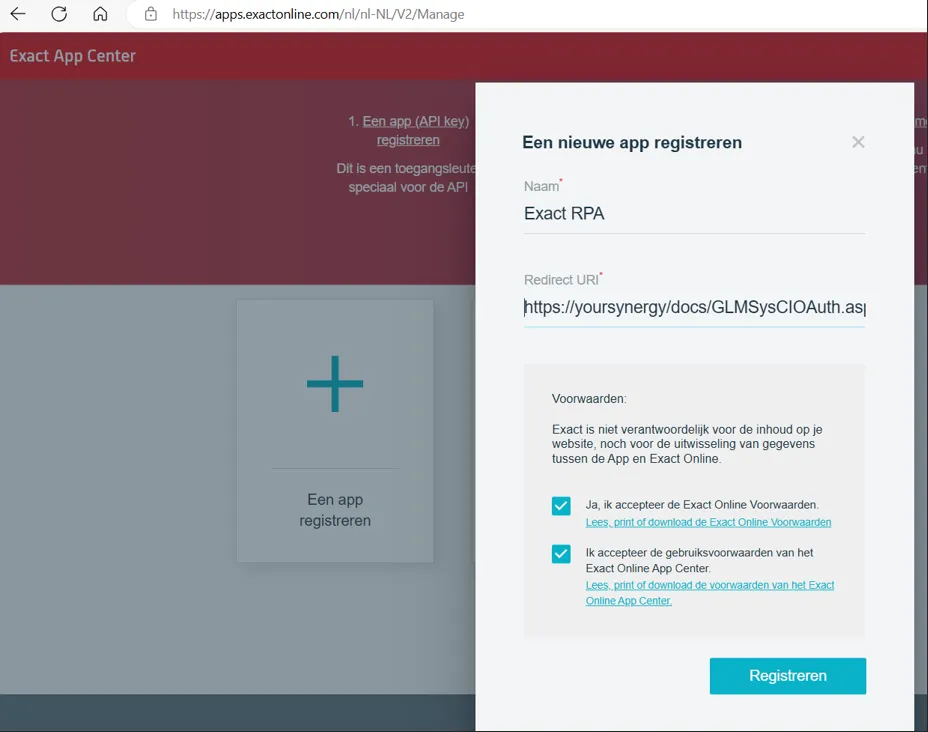
Click on ‘Register an app’ choose a name can be ‘Exact RPA’ and set the Redirect URI to your Synergy environment which must be https and pointing to the GLMSysCIOAuth.aspx for example: https://yoursynergy/docs/GLMSysCIOAuth.aspx
Exact Online Connection Fields
Here is a detailed explanation of each provider connection field that must be completed:
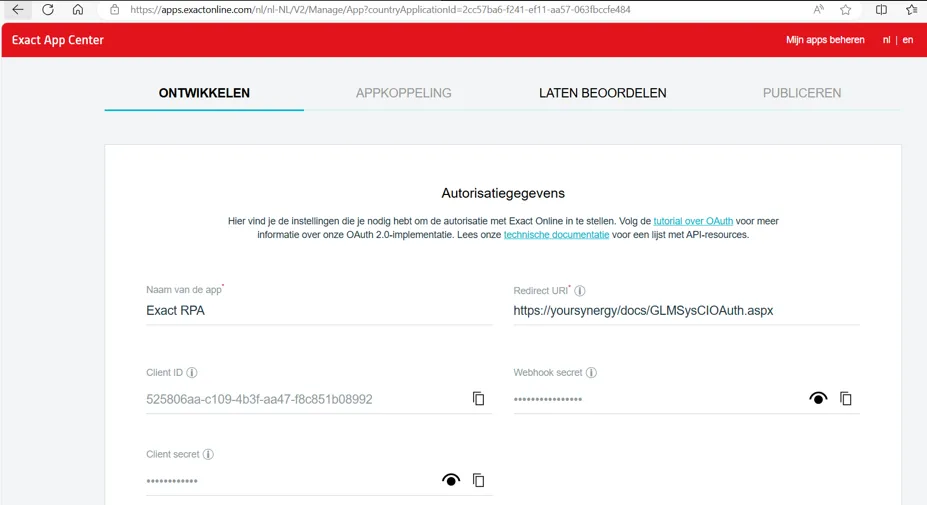
SoftwareChoose Exact Online as software
TypeFor type choose OAuth
API UriChoose the Exact Online site you are going to connect to https://start.exactonline.nl, https://start.exactonline.de, https://start.exactonline.es, https://start.exactonline.com
Connect (button) Click Connect which will retrieve the access token and makes the connection with Exact Online. A popup will show to enter your credentials for Exact Online.- https://docs.microsoft.com/en-us/iis/manage/configuring-security/how-to-set-up-ssl-on-iis 2. https://www.youtube.com/watch?v=MFikeLC-Ed4
EndpointnameAPI
Endpoint versionv1
Company numberAfter connection is successful you can select the company to be used for this connection
Company nameFill in the company name that is selected in here to recognize the connection.
Acumatica
Section titled “Acumatica”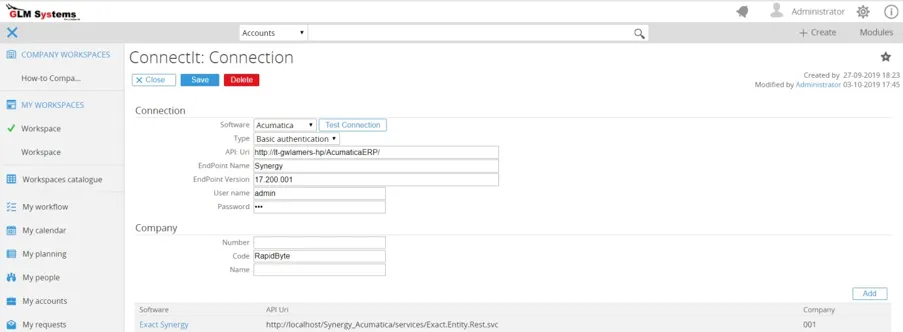
RPA Connection Fields (Acumatica)
SoftwareSelect Acumatica as software
TypeChoose type Basic authentication
API:UriThe Acumatica site which needs be connected to
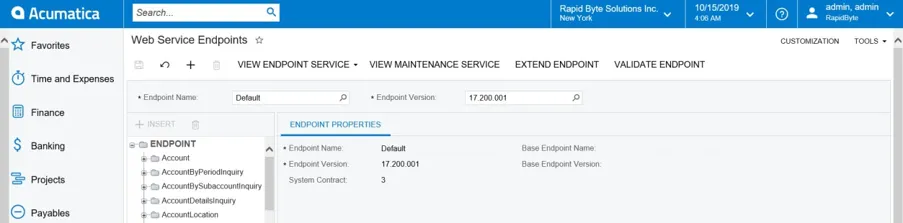
Endpoint NameIn Acumatica look for the Web Service Endpoints menu to choose the endpoint name and endpoint version to use. [your website]/Main?ScreenId=SM207060
EndPoint VersionThe default Endpoint name is ‘Default’. For the integration we will also set up our own Web Service Endpoint to expose the Cost center entity which is not exposed in the default Web Service Endpoints.
UsernameThe default Endpoint version is ‘17.200.001’
PasswordValid username to login into Acumatica
NumberWhen Acumatica is setup as multitenant this is the company id, otherwise leave empty
CodeWhen Acumatica is setup as multitenant this is the company code, otherwise leave empty
NameThe name of the company you want to connect to. This is to identify the connection.
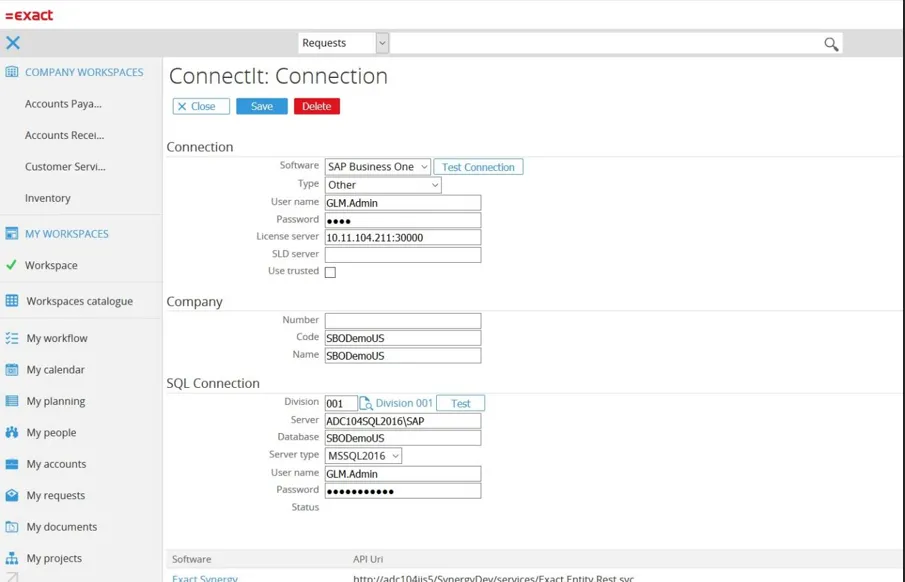
SAP B1
Section titled “SAP B1”The connection for SAP B1 and SAP B1 HANA is making use of the DI API. For the DI API to connect the following information is required
RPA Connection Fields (Business One)
SoftwareChoose SAP Business One as software
TypeChoose Proprietary API, DI API is used for SAP B1
UsernameThe user which has login right to the SAP B1 client application and enough rights.
PasswordPassword for the user
License Server For the License server and SLD server the information can be retrieved from the SAP B1 client installation by looking at the ‘C:\Program Files\sap\SAP Business One\Conf’ folder and look for the file b1-local-machine.xml
SLD ServerThe System Landscape Directory server SLD server
<leaf kind="single" name="LicenseServer" type="String"> <value>SERVER:30000</value></leaf><leaf kind="single" name="LogBO" type="String"> <value>N</value></leaf><leaf kind="single" name="LicenseServerProtocol" type="String"> <value>CORBA</value></leaf><leaf kind="single" name="SLDAddress" type="String"> <value>SERVER:40000</value></leaf>NumberNumber of the SAP B1 company
CodeCode of the SAP B1 company
NameName of the SAP B1 company
DivisionThe division in Synergy related to this SAP B1 connection
Server TypeType of server for the database connection for SAP B1, select the type of server where the database is located. Server Database server
DatabaseDatabase name
UsernameDatabase user name
PasswordDatabase user password
Use TrustedWhen checked the current user login is used to connect to the database server. Otherwise the User name and password are required.
Salesforce
Section titled “Salesforce”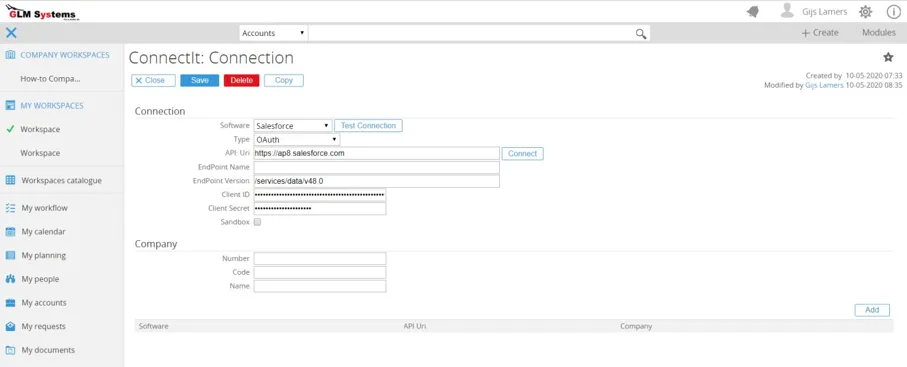
RPA Connection Fields (Salesforce)
SoftwareChoose Software as Salesforce
TypeType of connection which is Basic authentication for Exact Globe
API:UriChoose the site Uri which is used for your Salesforce environment.
Endpoint NameCan be left empty
Endpoint VersionWill be update automatically with the highest version when the ‘connect’ button is clicked and login is authorized.
Client IDClientID which can be retrieved from your Salesforce site.
Client SecretClientSecret which can be retrieved from your Salesforce site.
After all information is filled up click Connect, this will pop up the OAuth screen, to allow the Exact Synergy app to connect to Salesforce. Fill in your credentials. After you are connected you can test the connection via the ‘Test connection’ button. This will do a user query on Salesforce to make sure the Salesforce connection works.
Microsoft Graph
Section titled “Microsoft Graph”To create a connection with the Microsoft Graph provider :
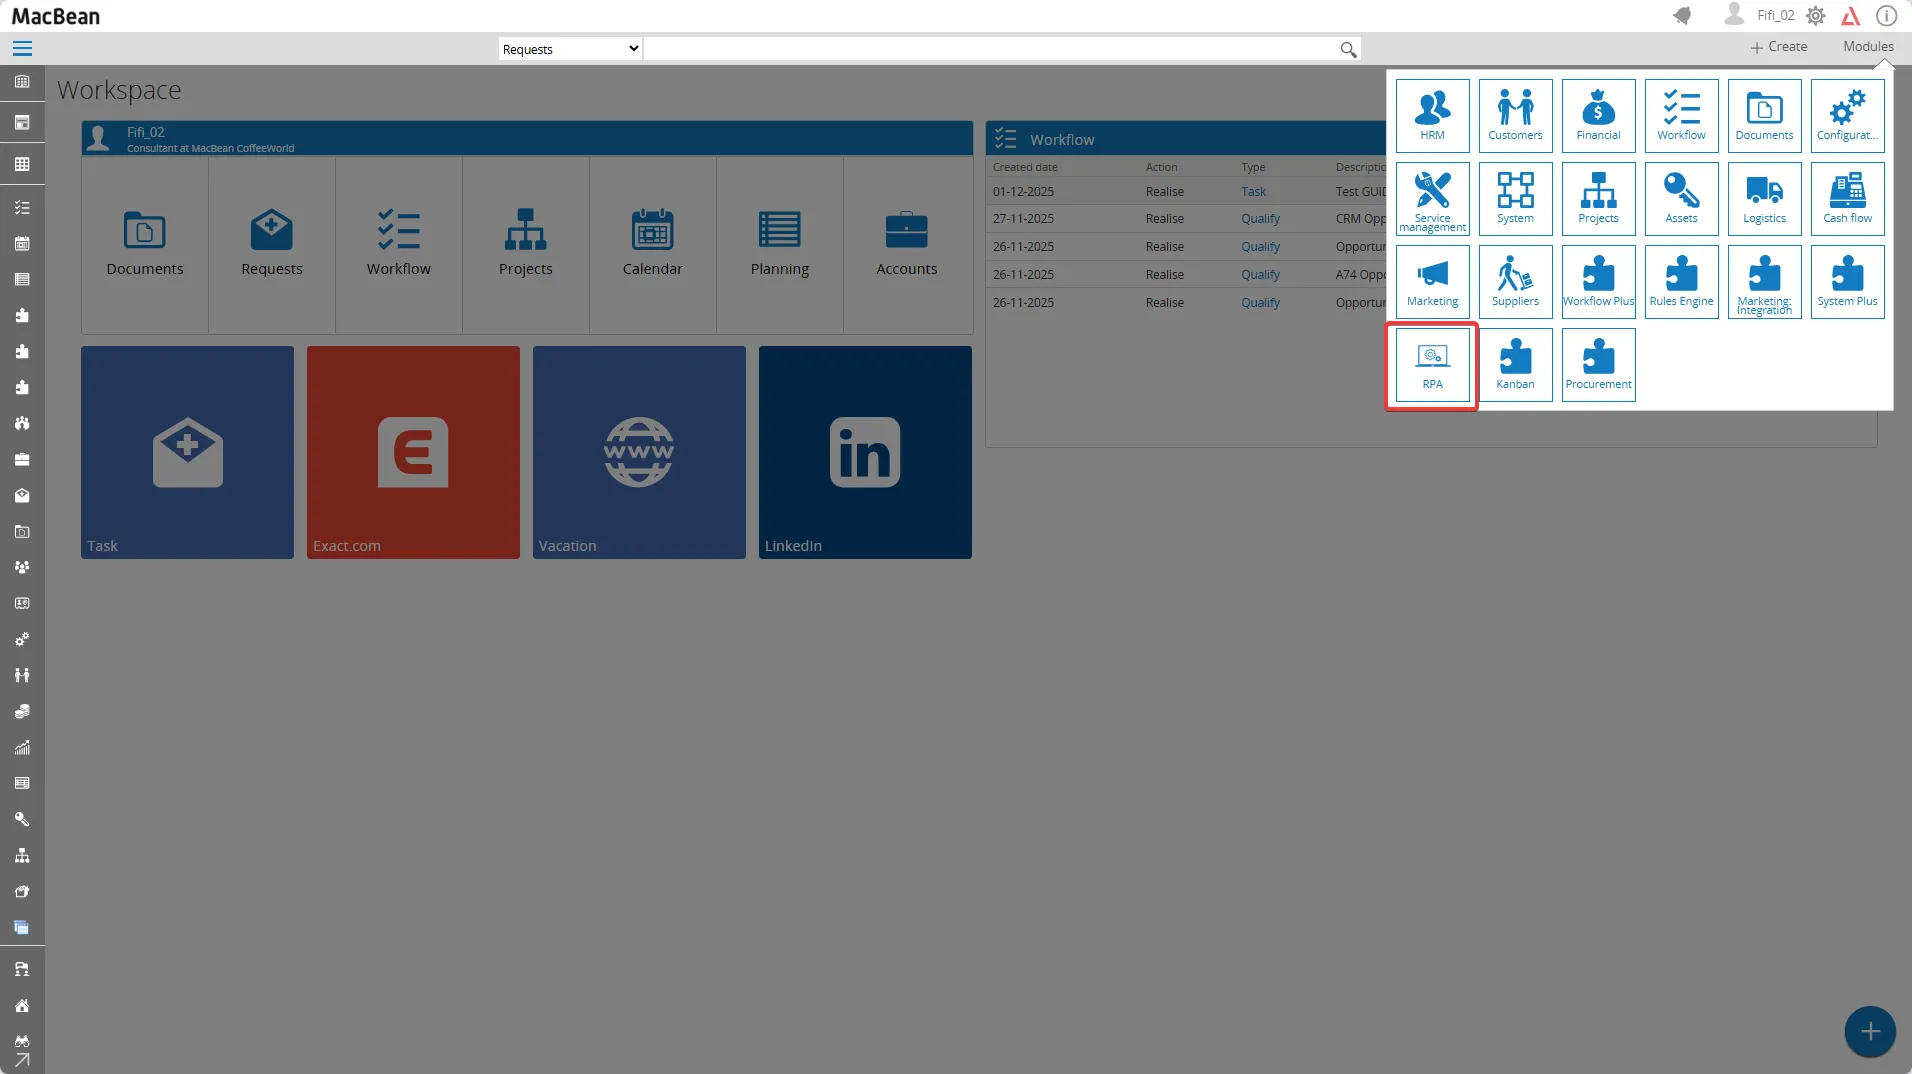
- First, add your provider to the RPA provider list and activate them
- Go to Modules > RPA
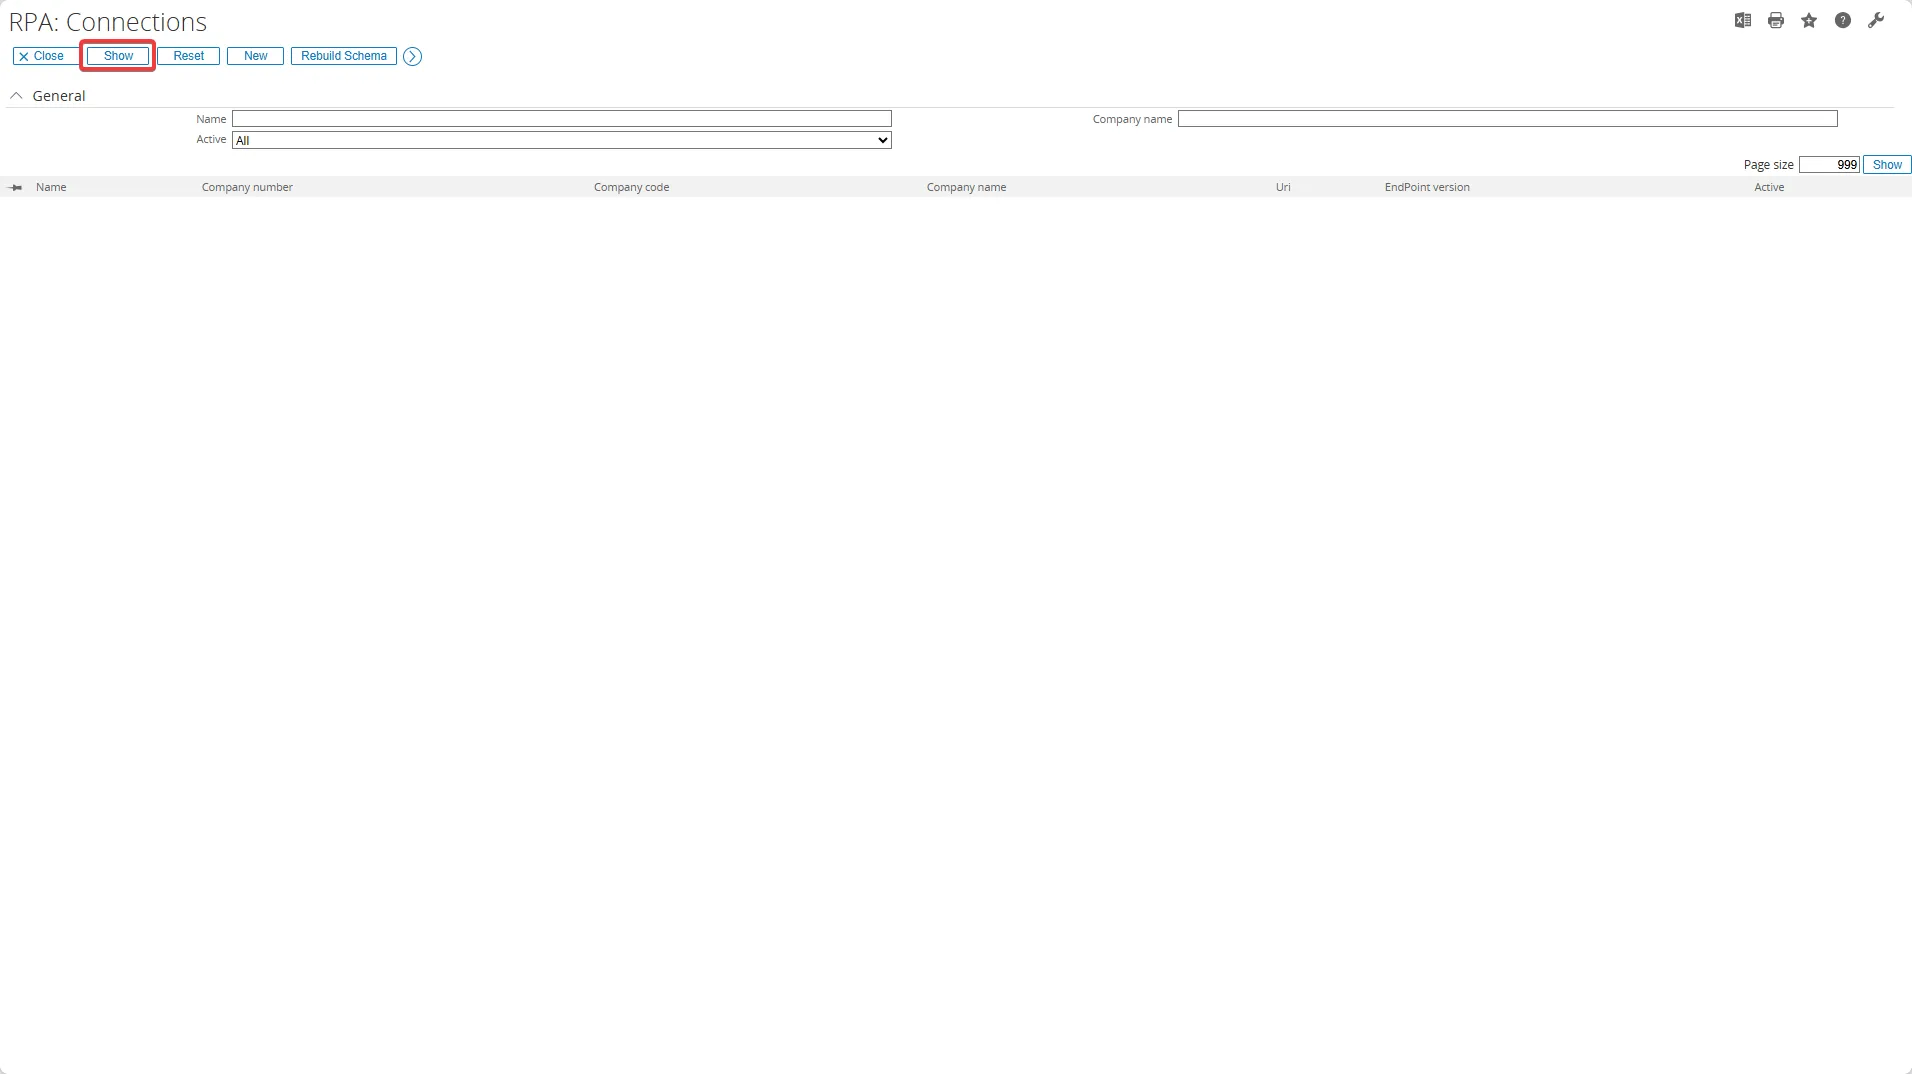
- Go to Setup > Connection > Provider
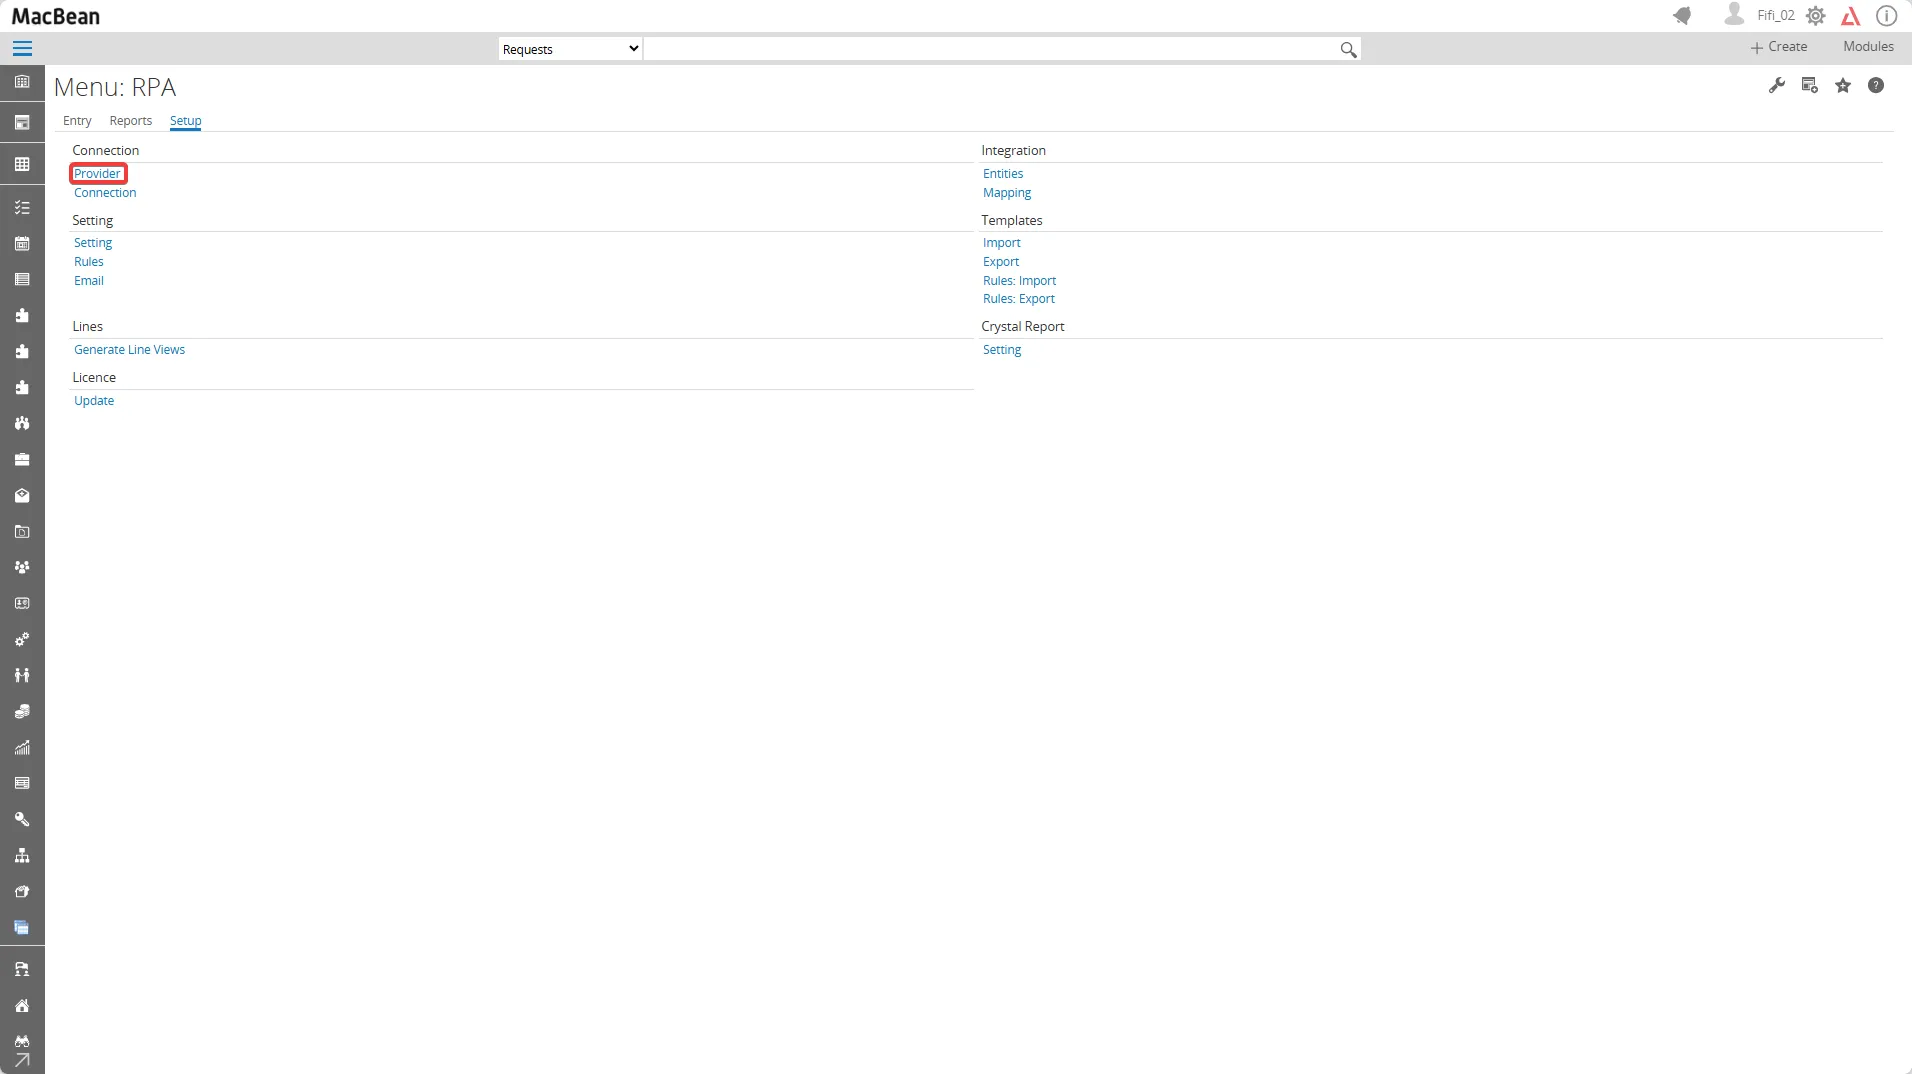
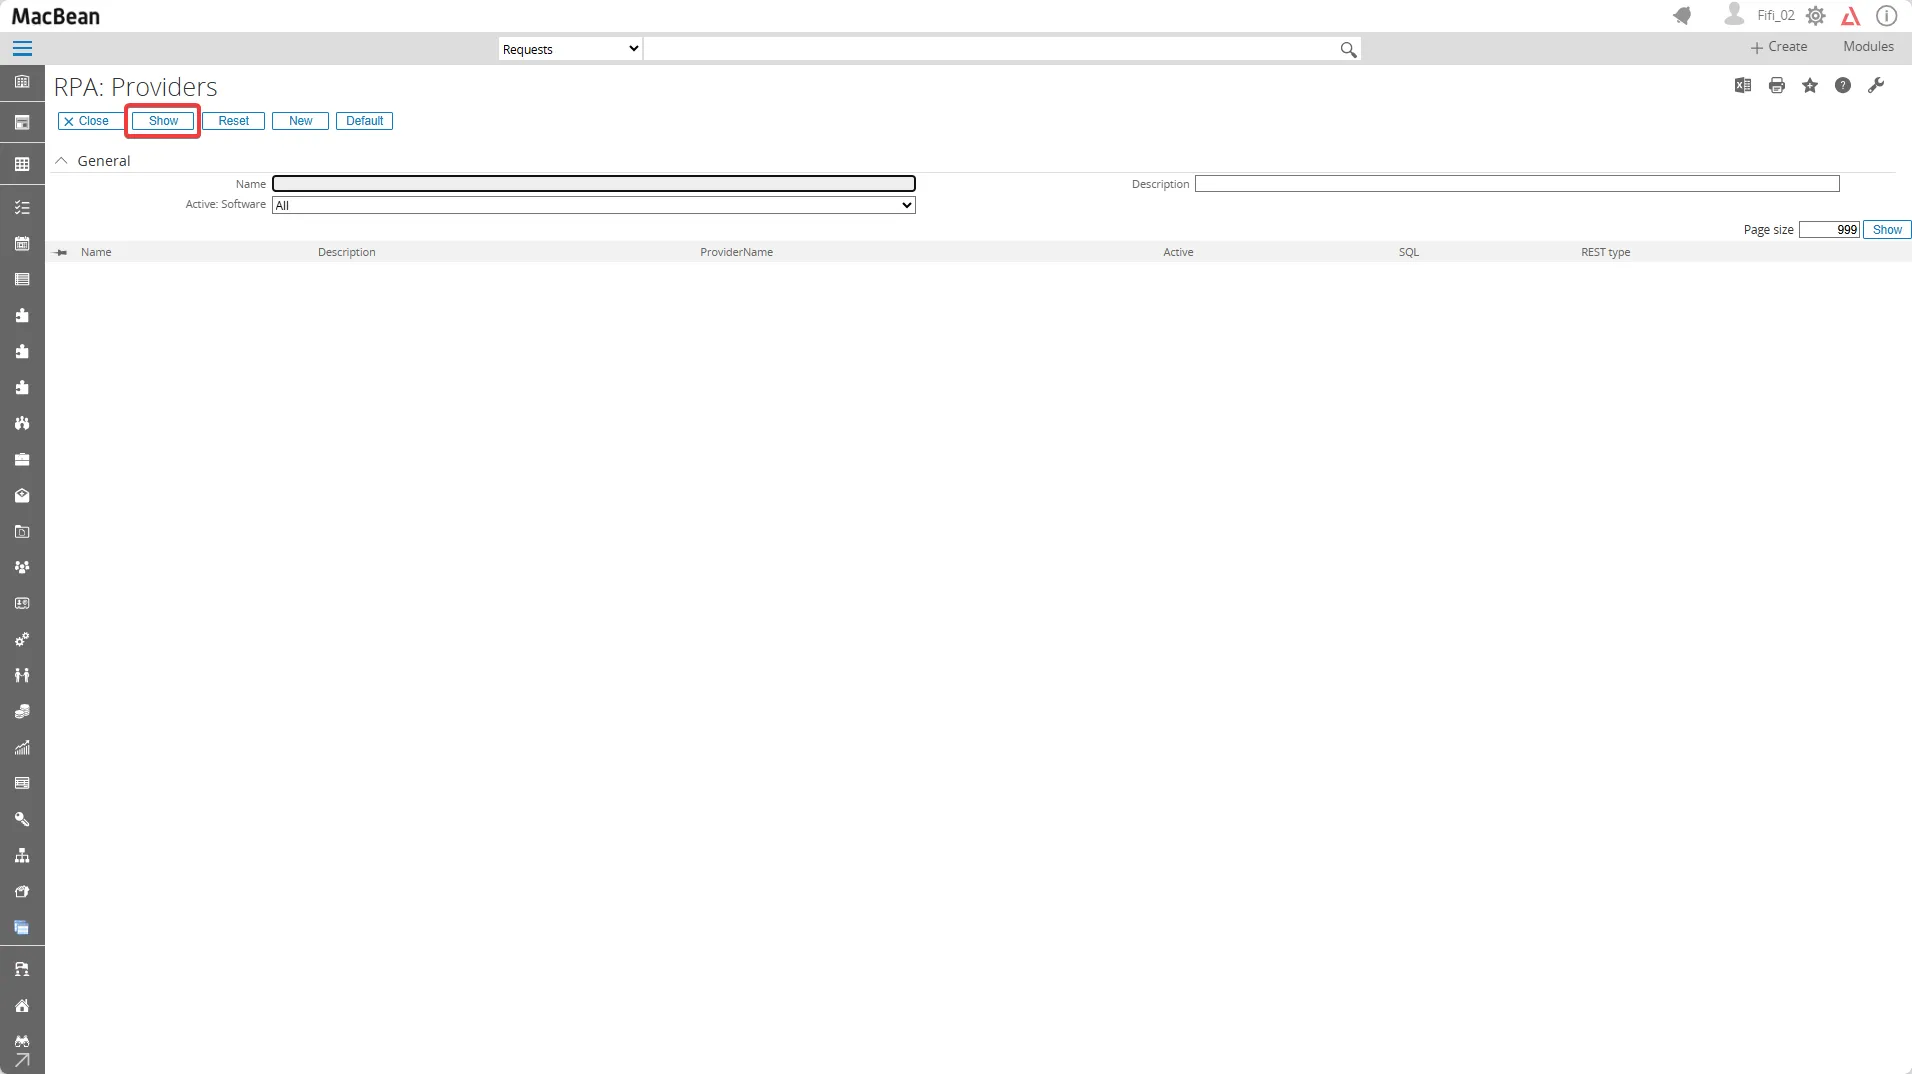
- Click the Show button
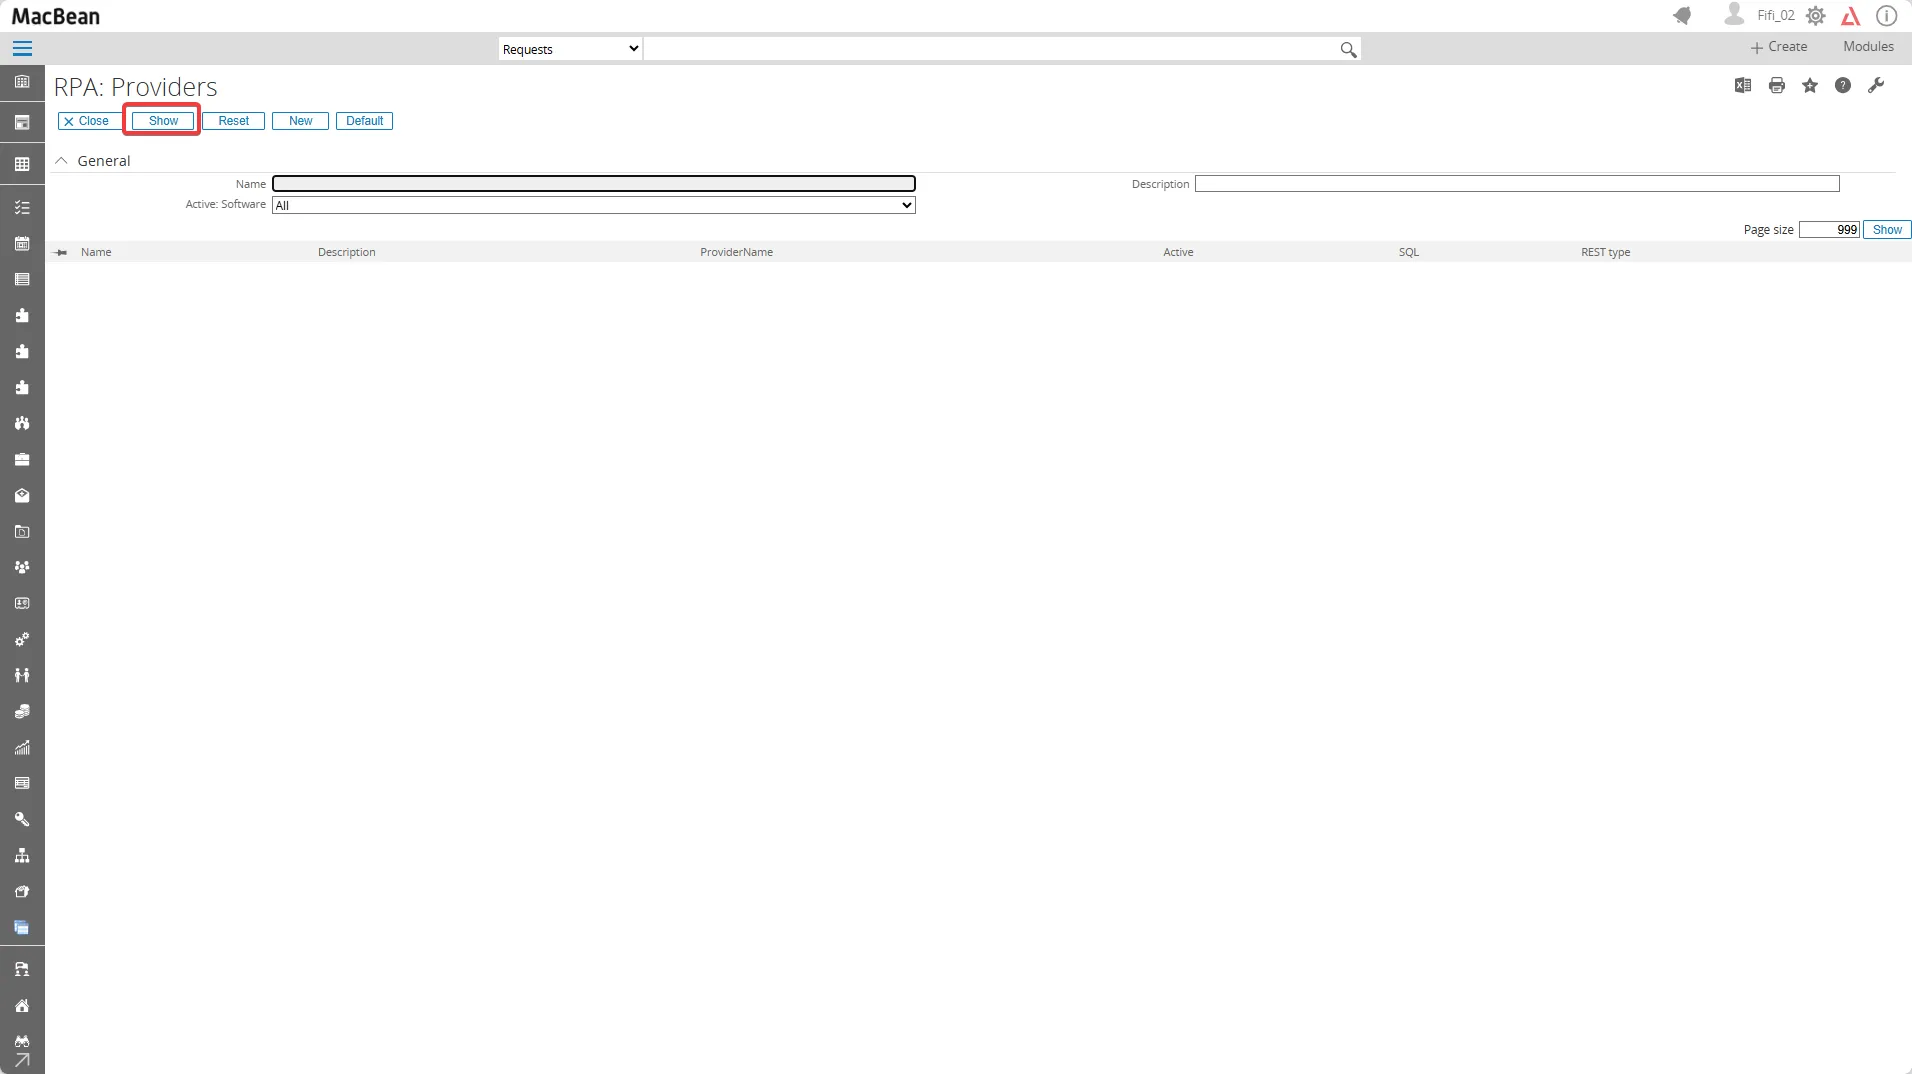
- Scroll down to Microsoft Graph and verify that it is still inactive (marked with an X)
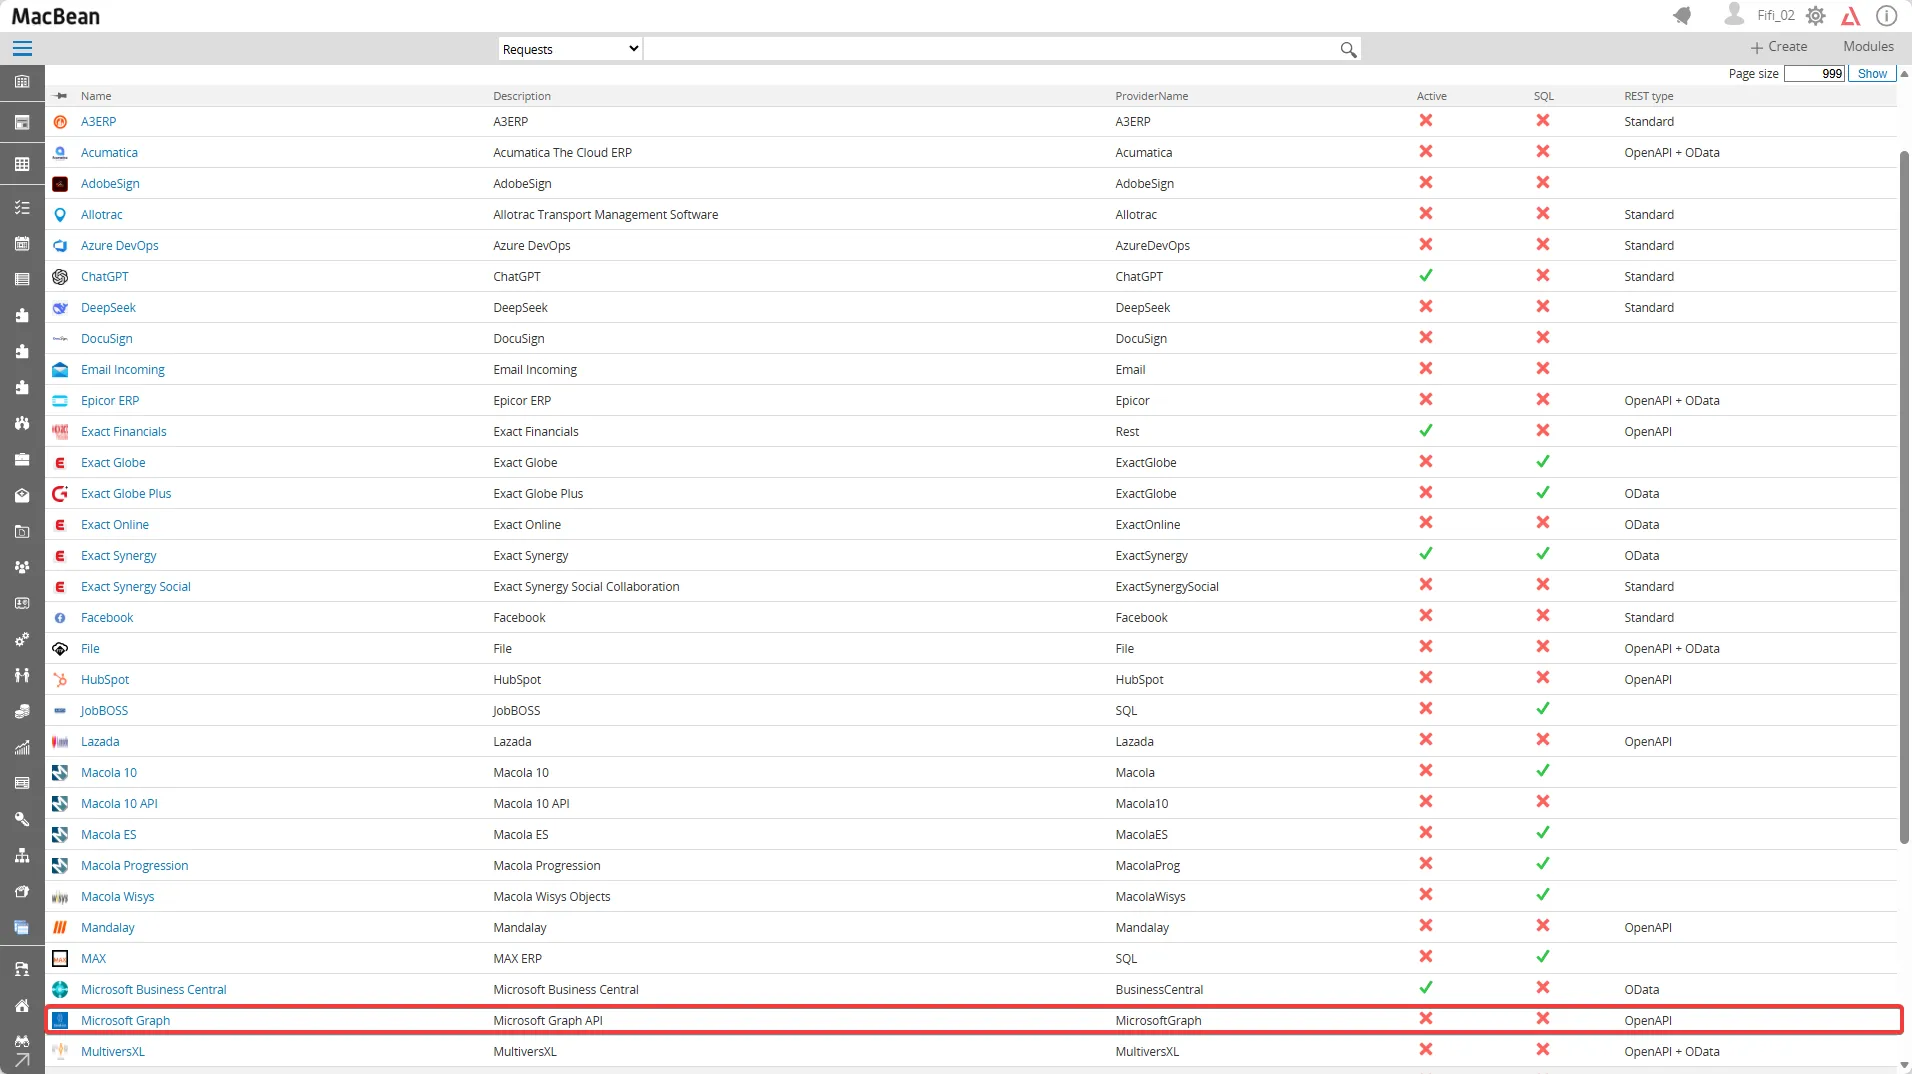
- Click the Microsoft Graph line to open the provider details. Check the Active and SQL checkbox to activate the provider
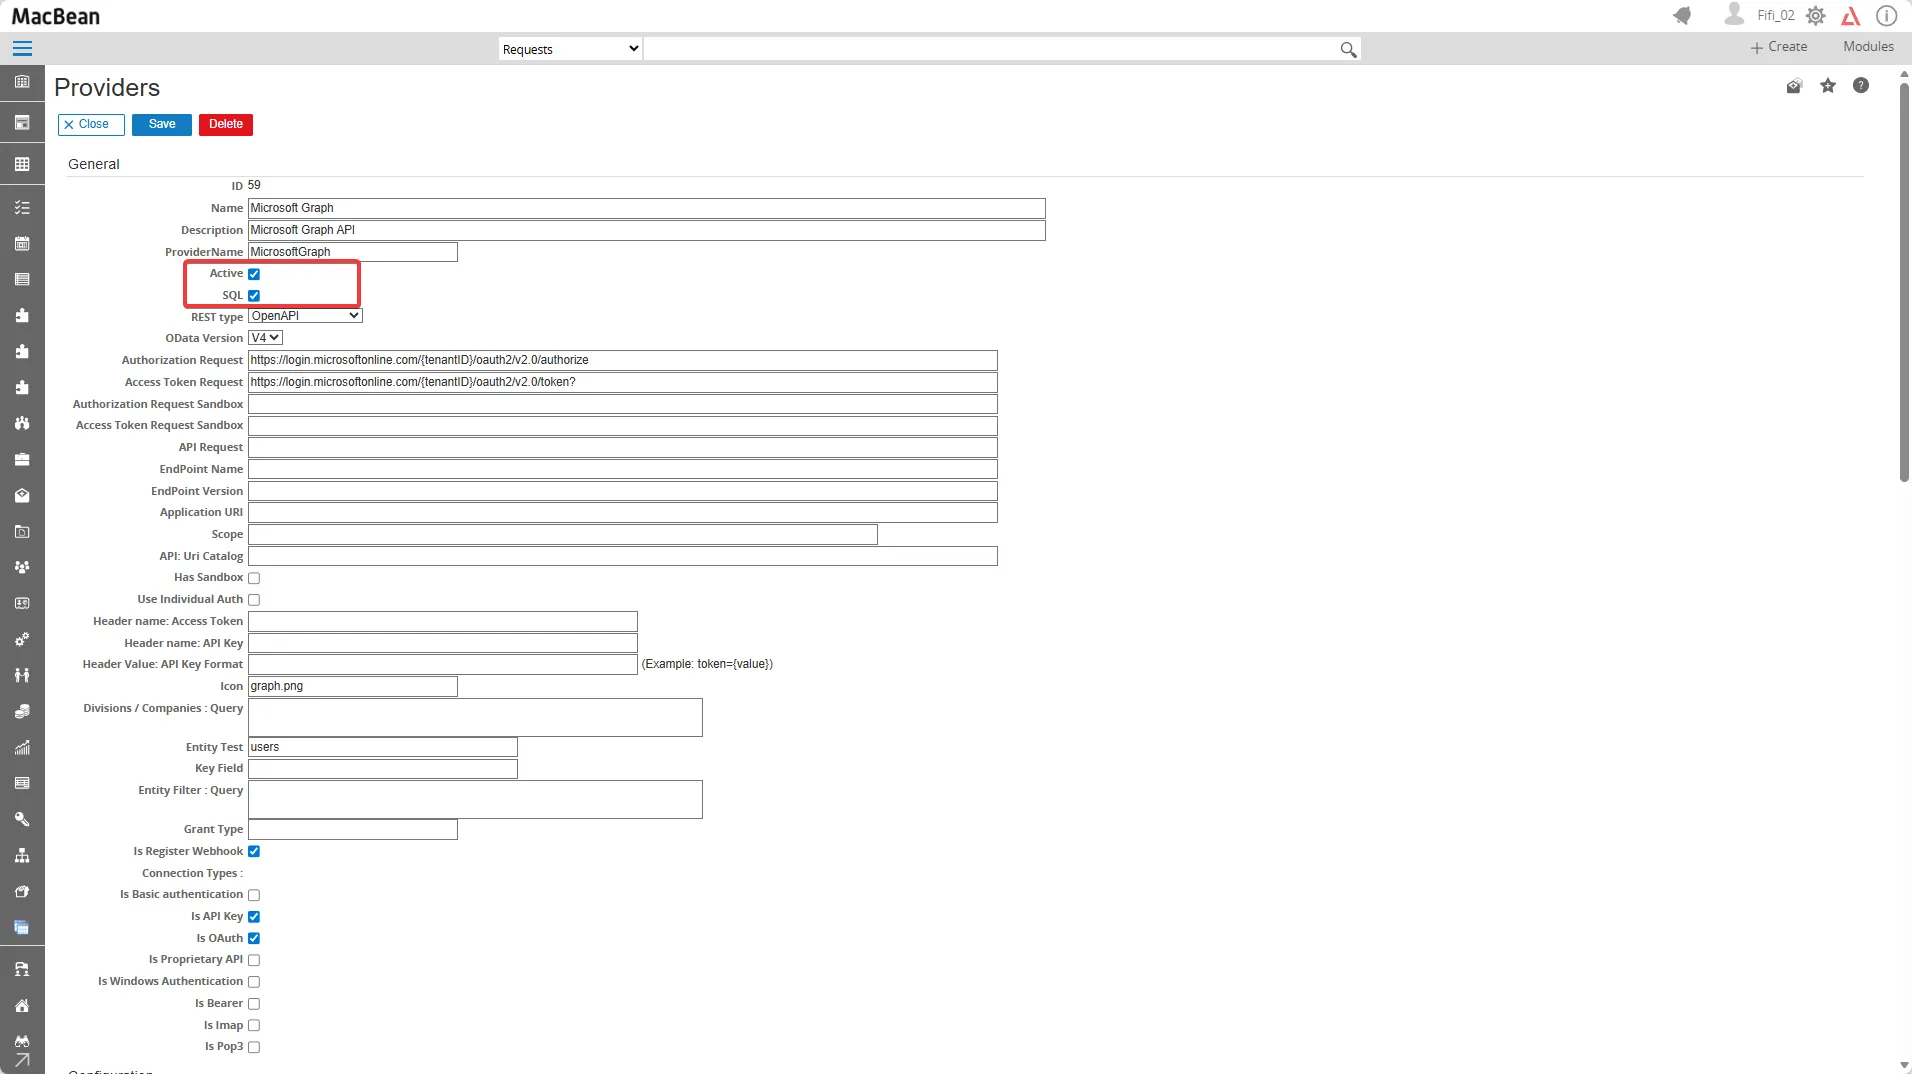
- Click the Save button
- Click Show again to confirm that the Microsoft Graph provider is now active (marked with a check mark)
- The Microsoft Graph provider is now activated and ready to be used in the RPA connection setup

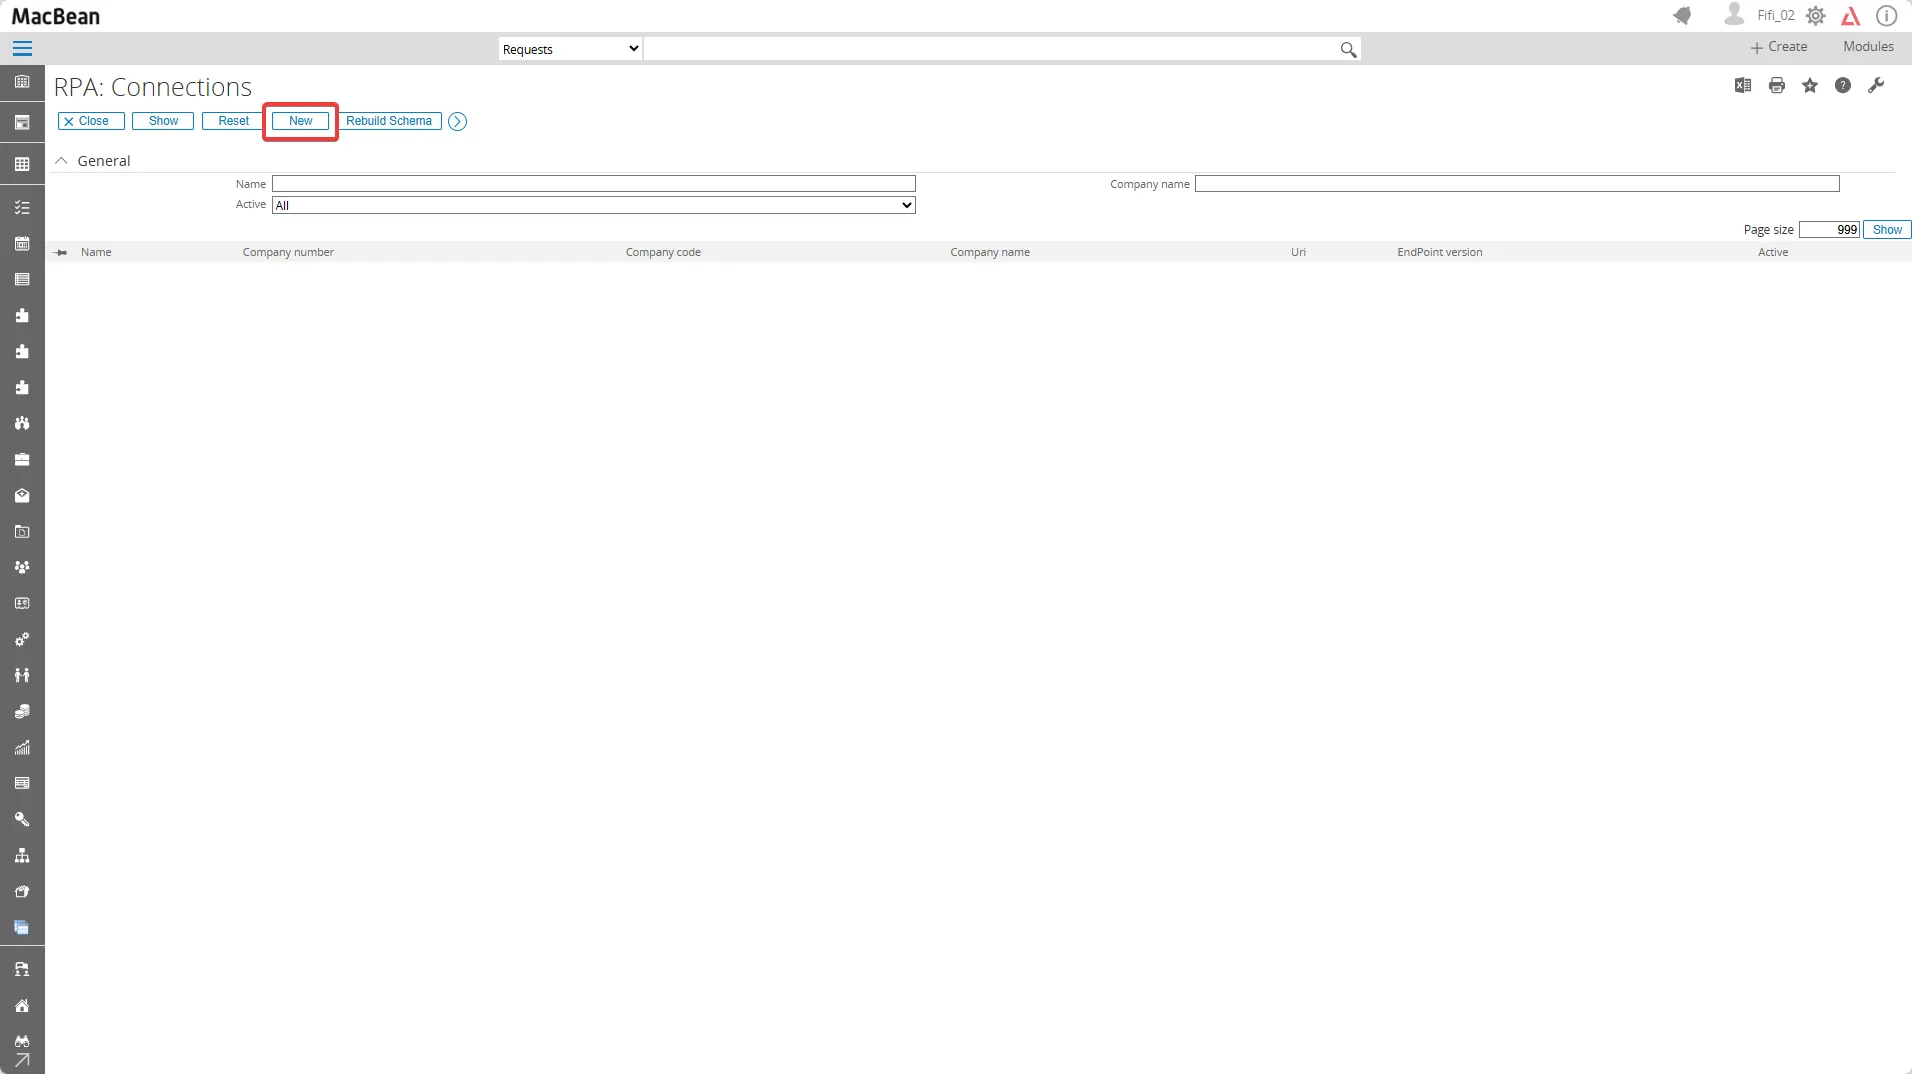
- After successfully add the provider, go to Setup > Connection > Connection
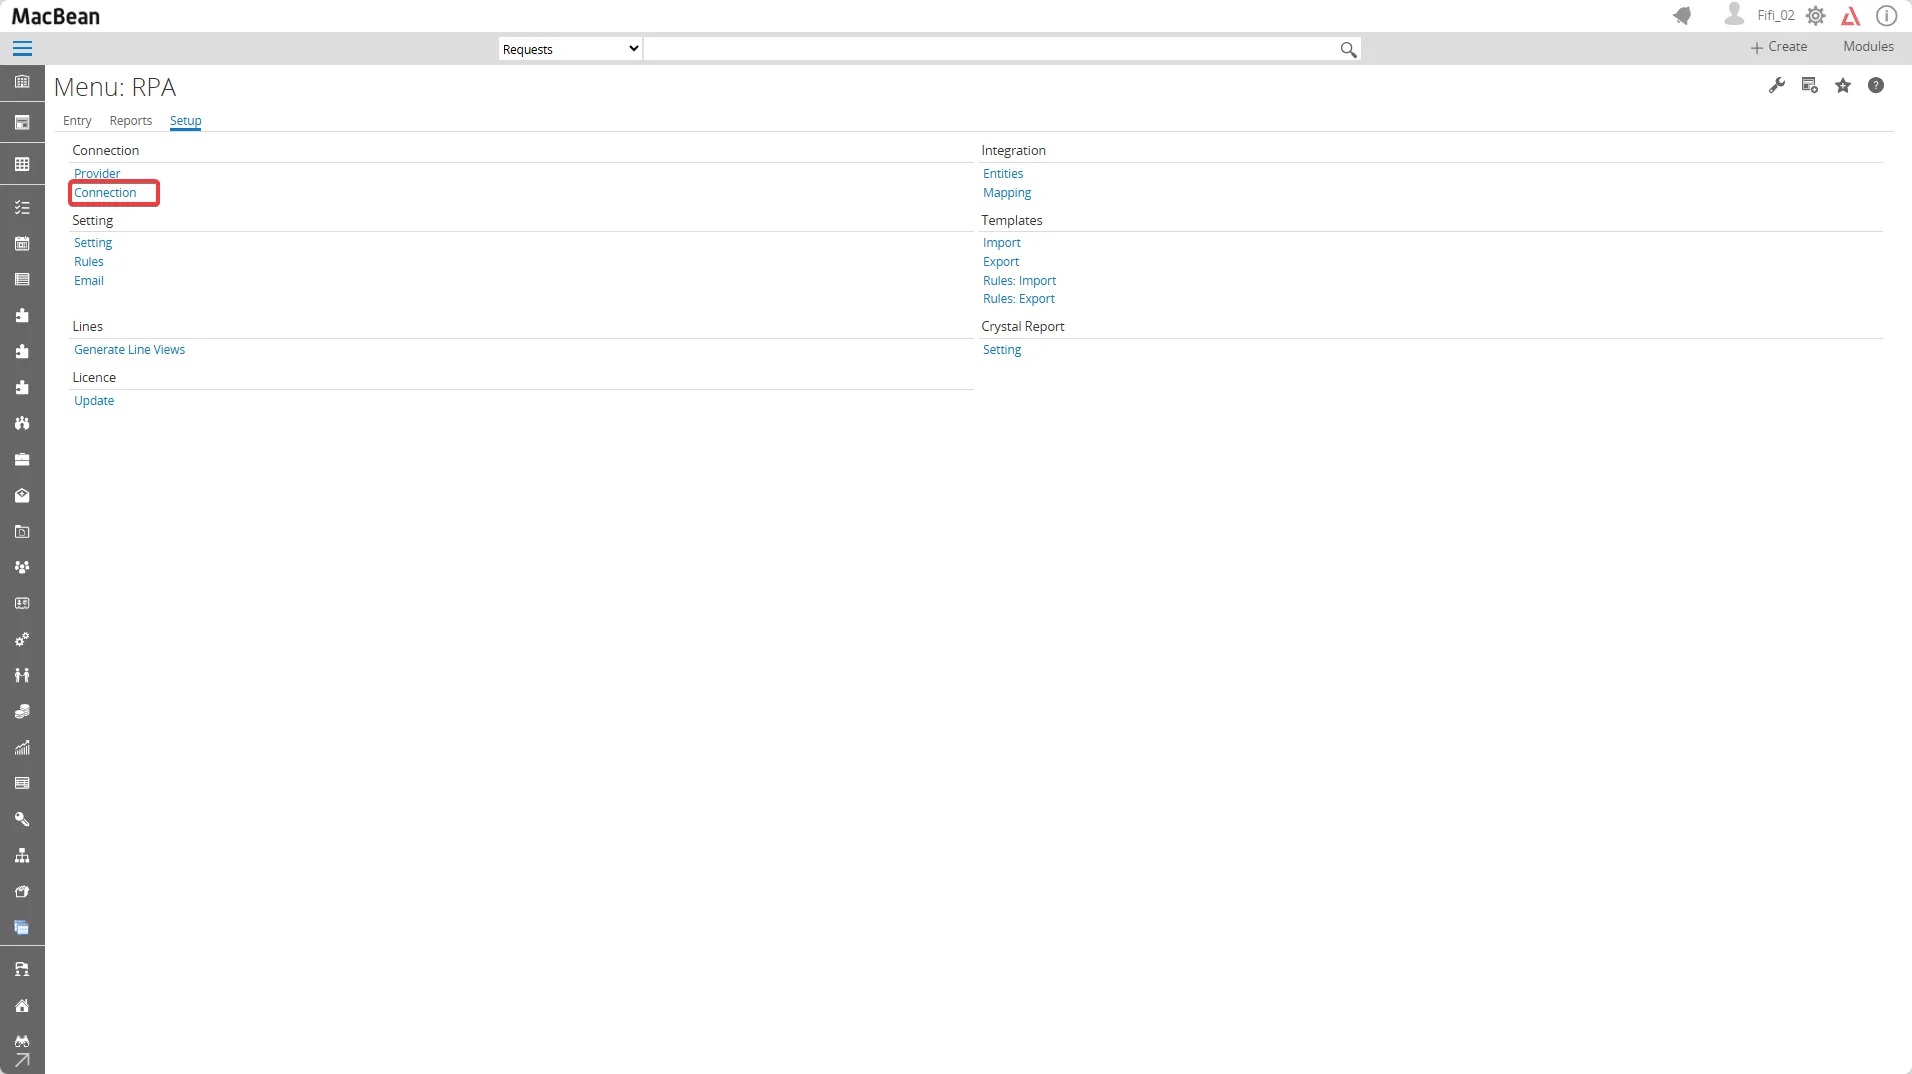
- Click the New button to create a new connection
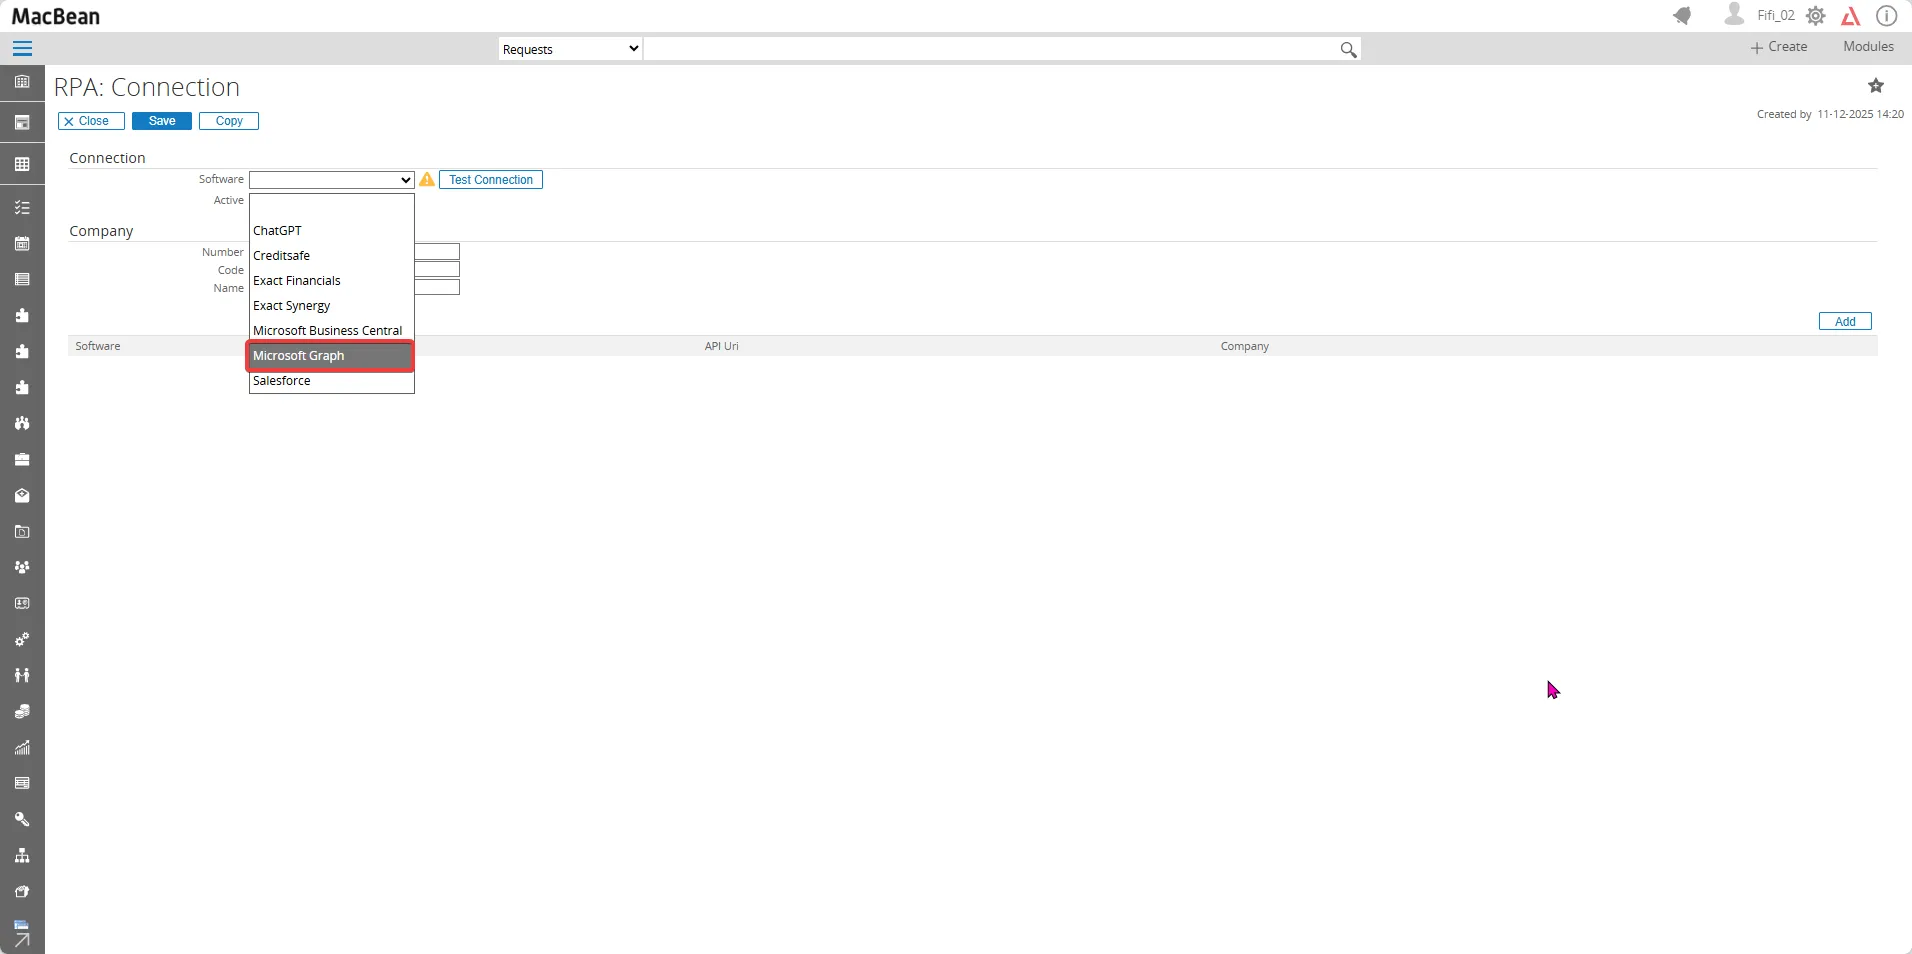
- Choose software as Microsoft Graph
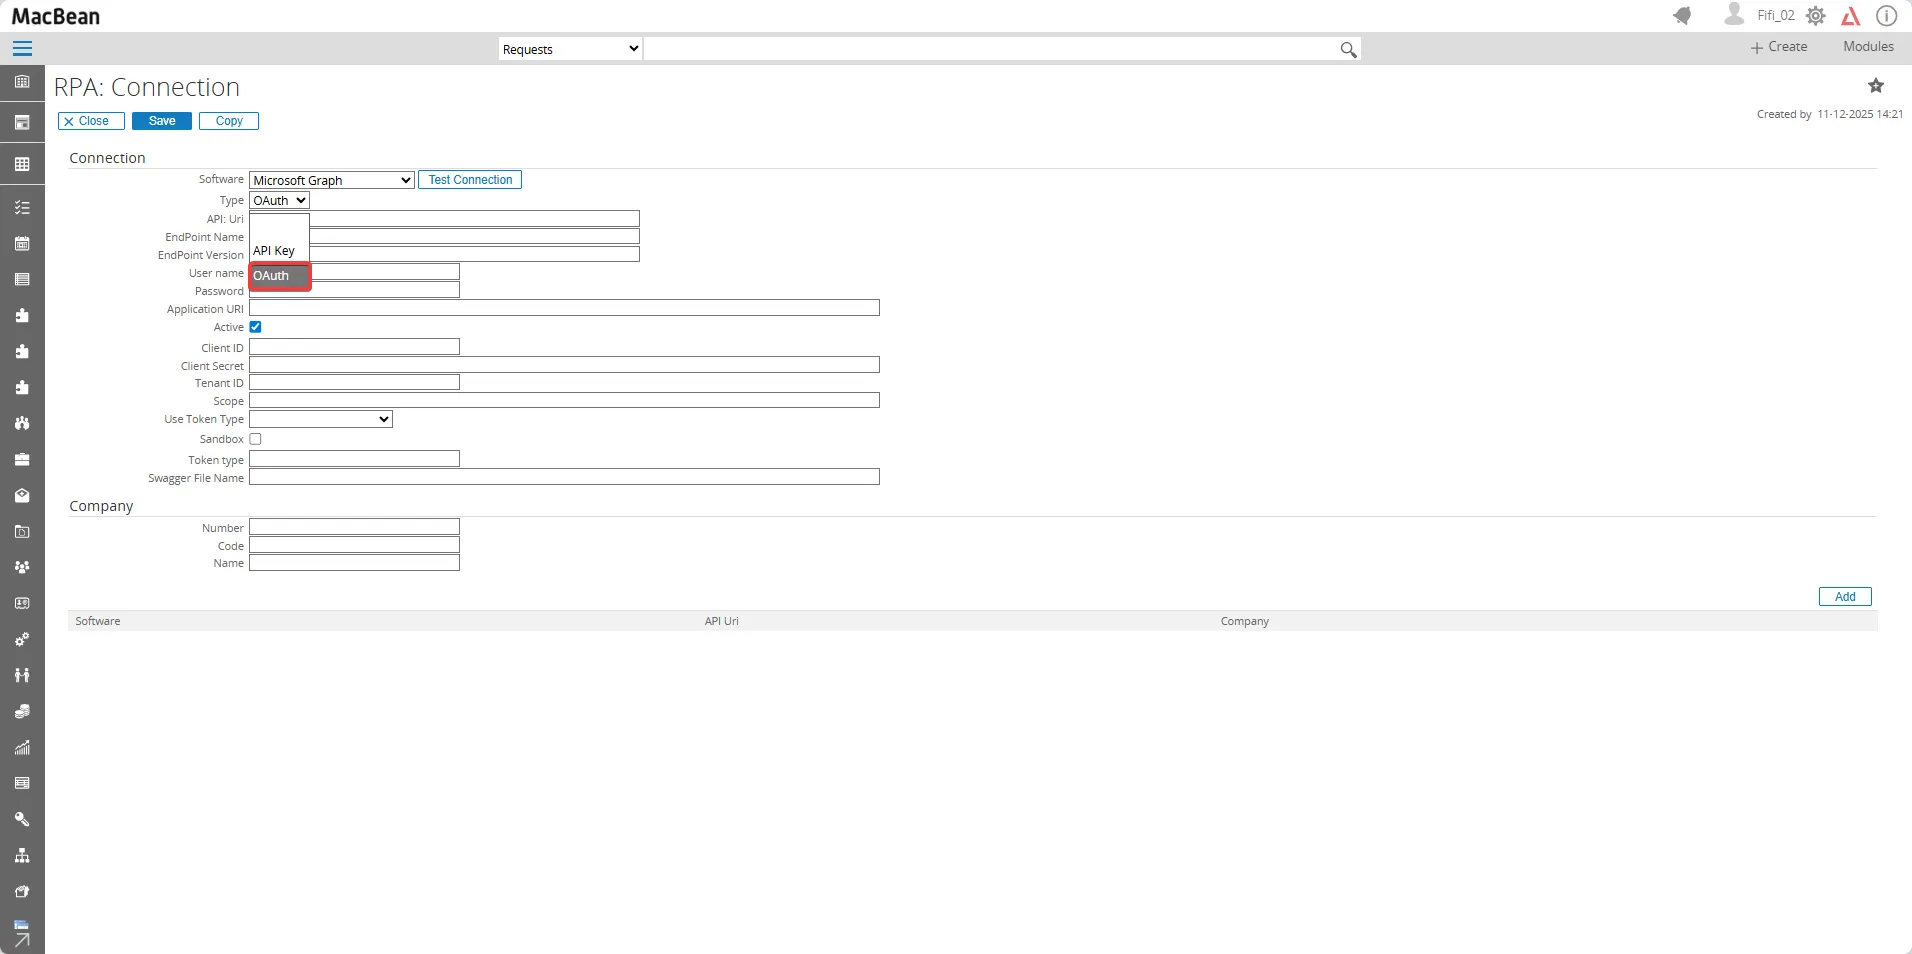
- Choose type OAuth
- Click the Save button first, to make the Connect button appear
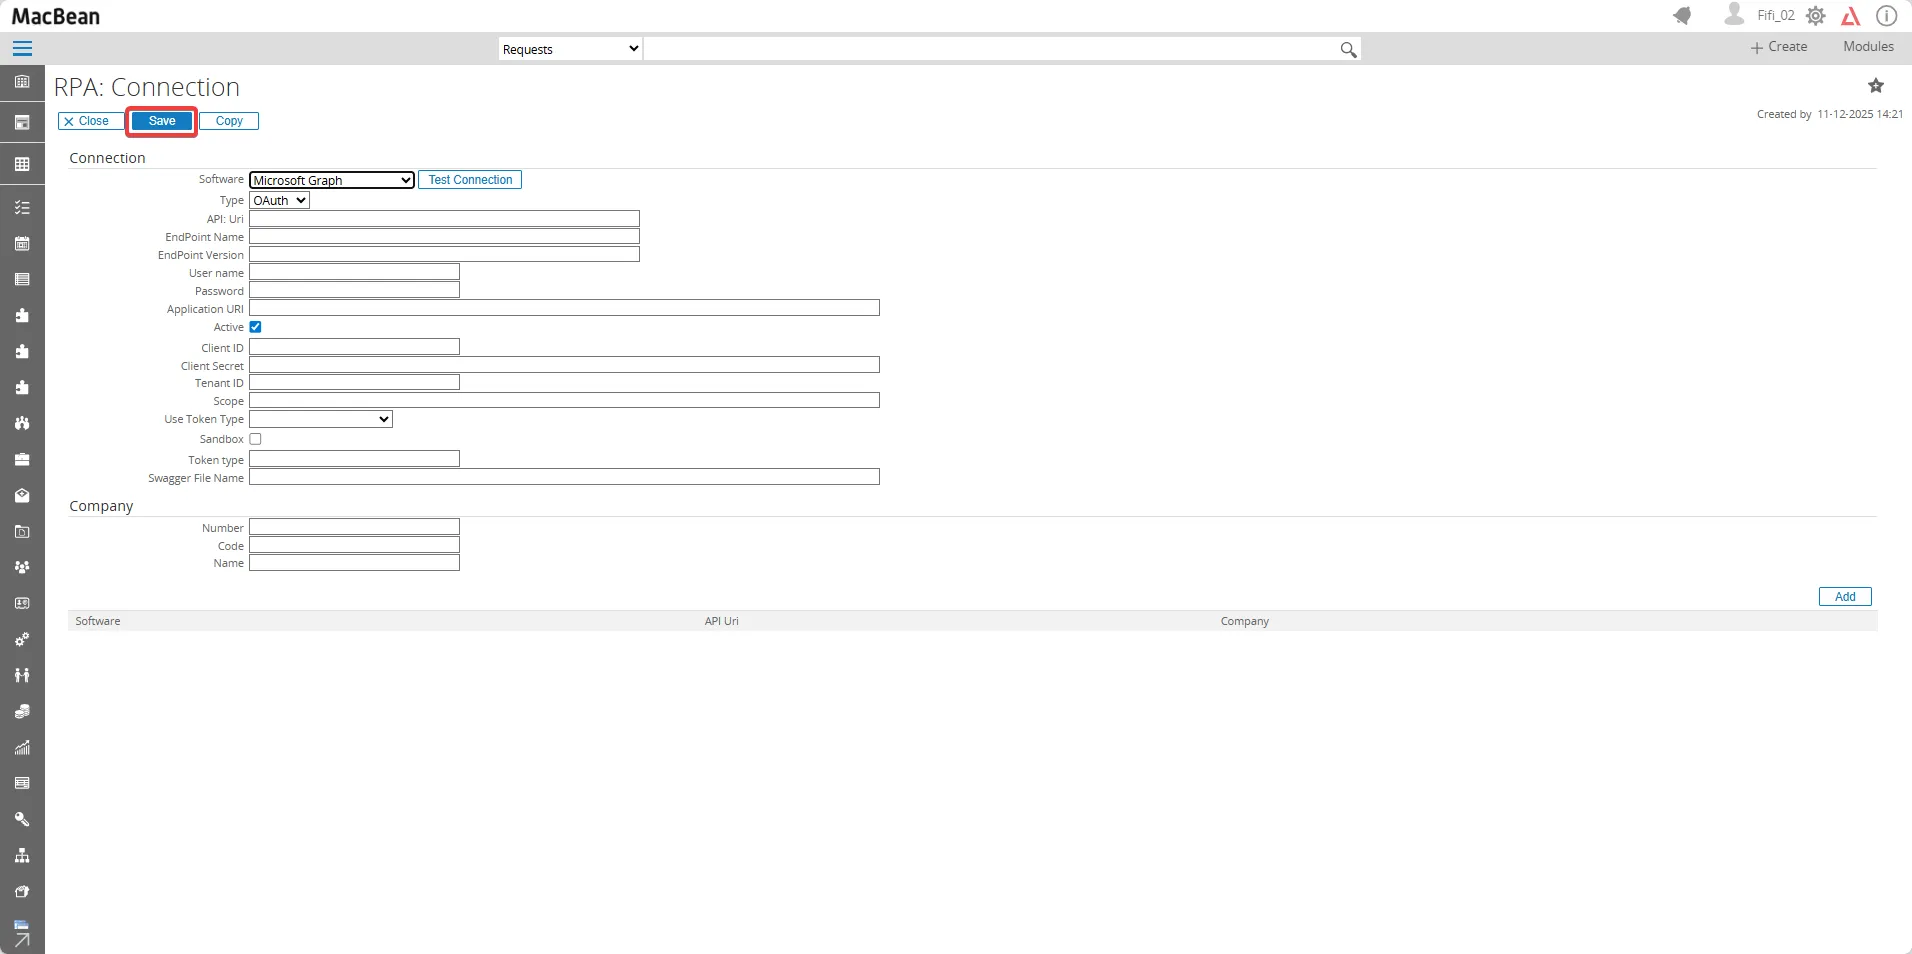
- Now the Connect button appear, fill in all required fields as explained below :
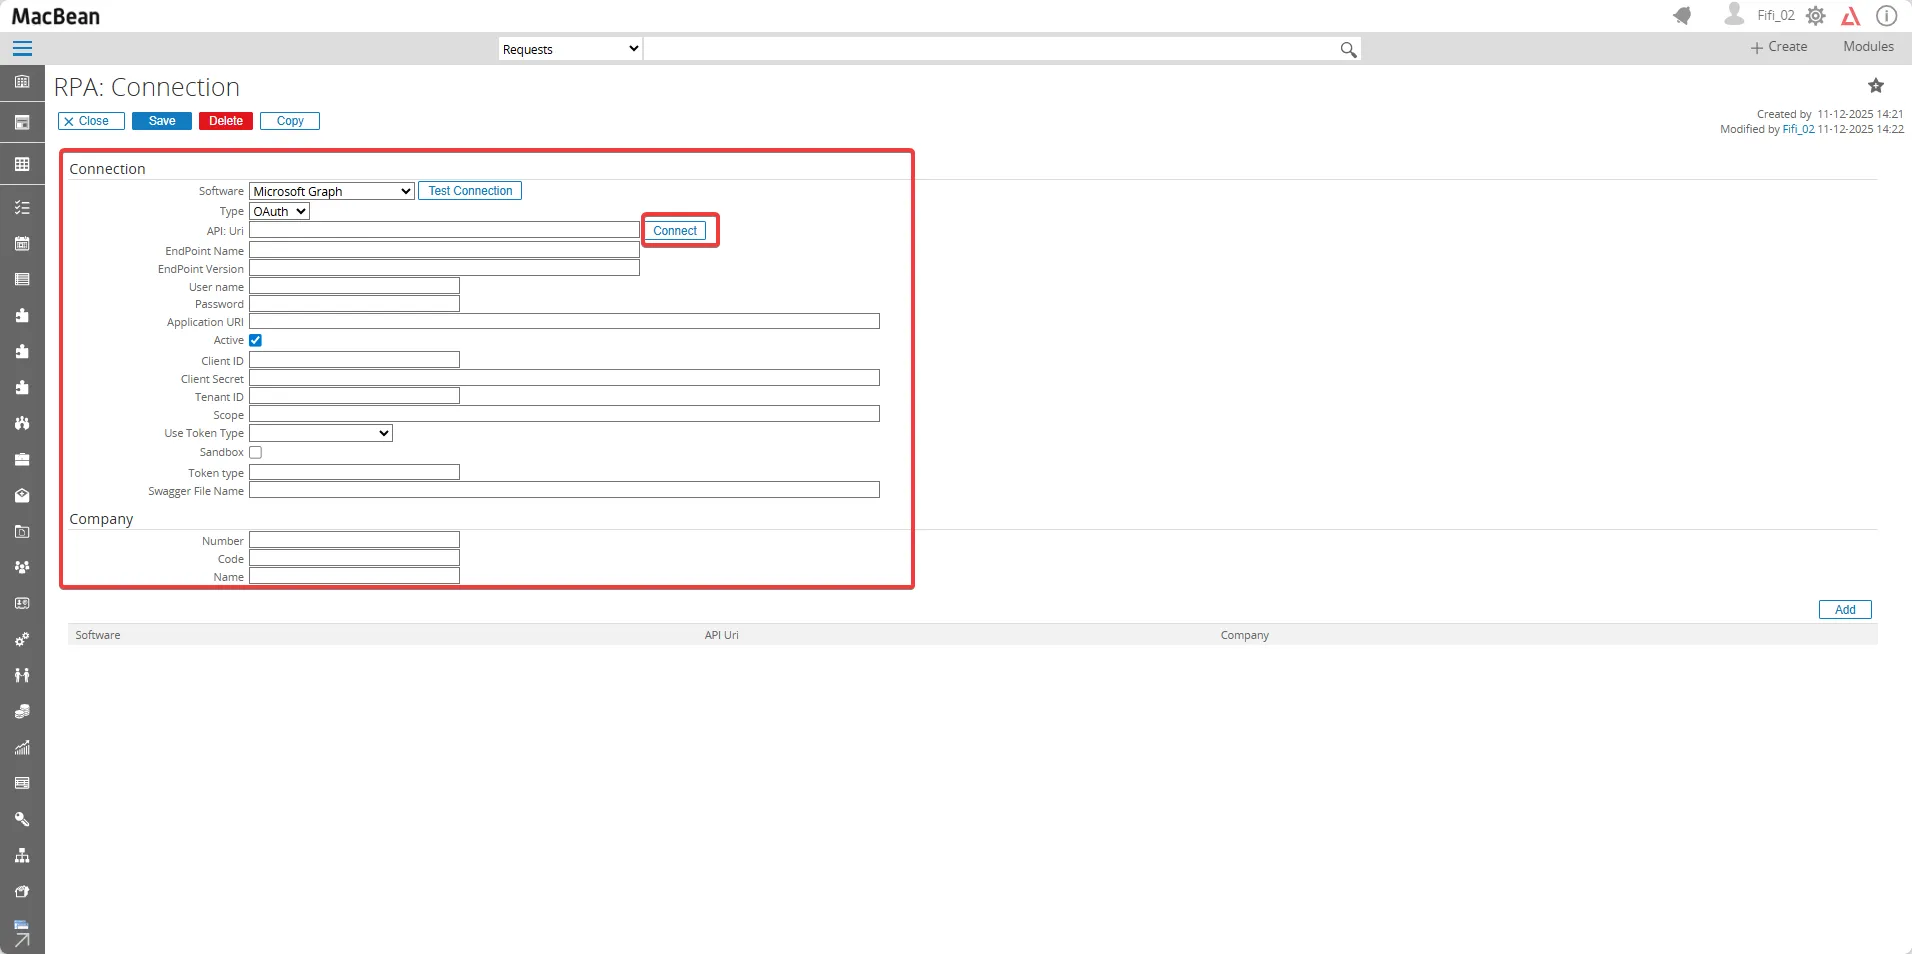
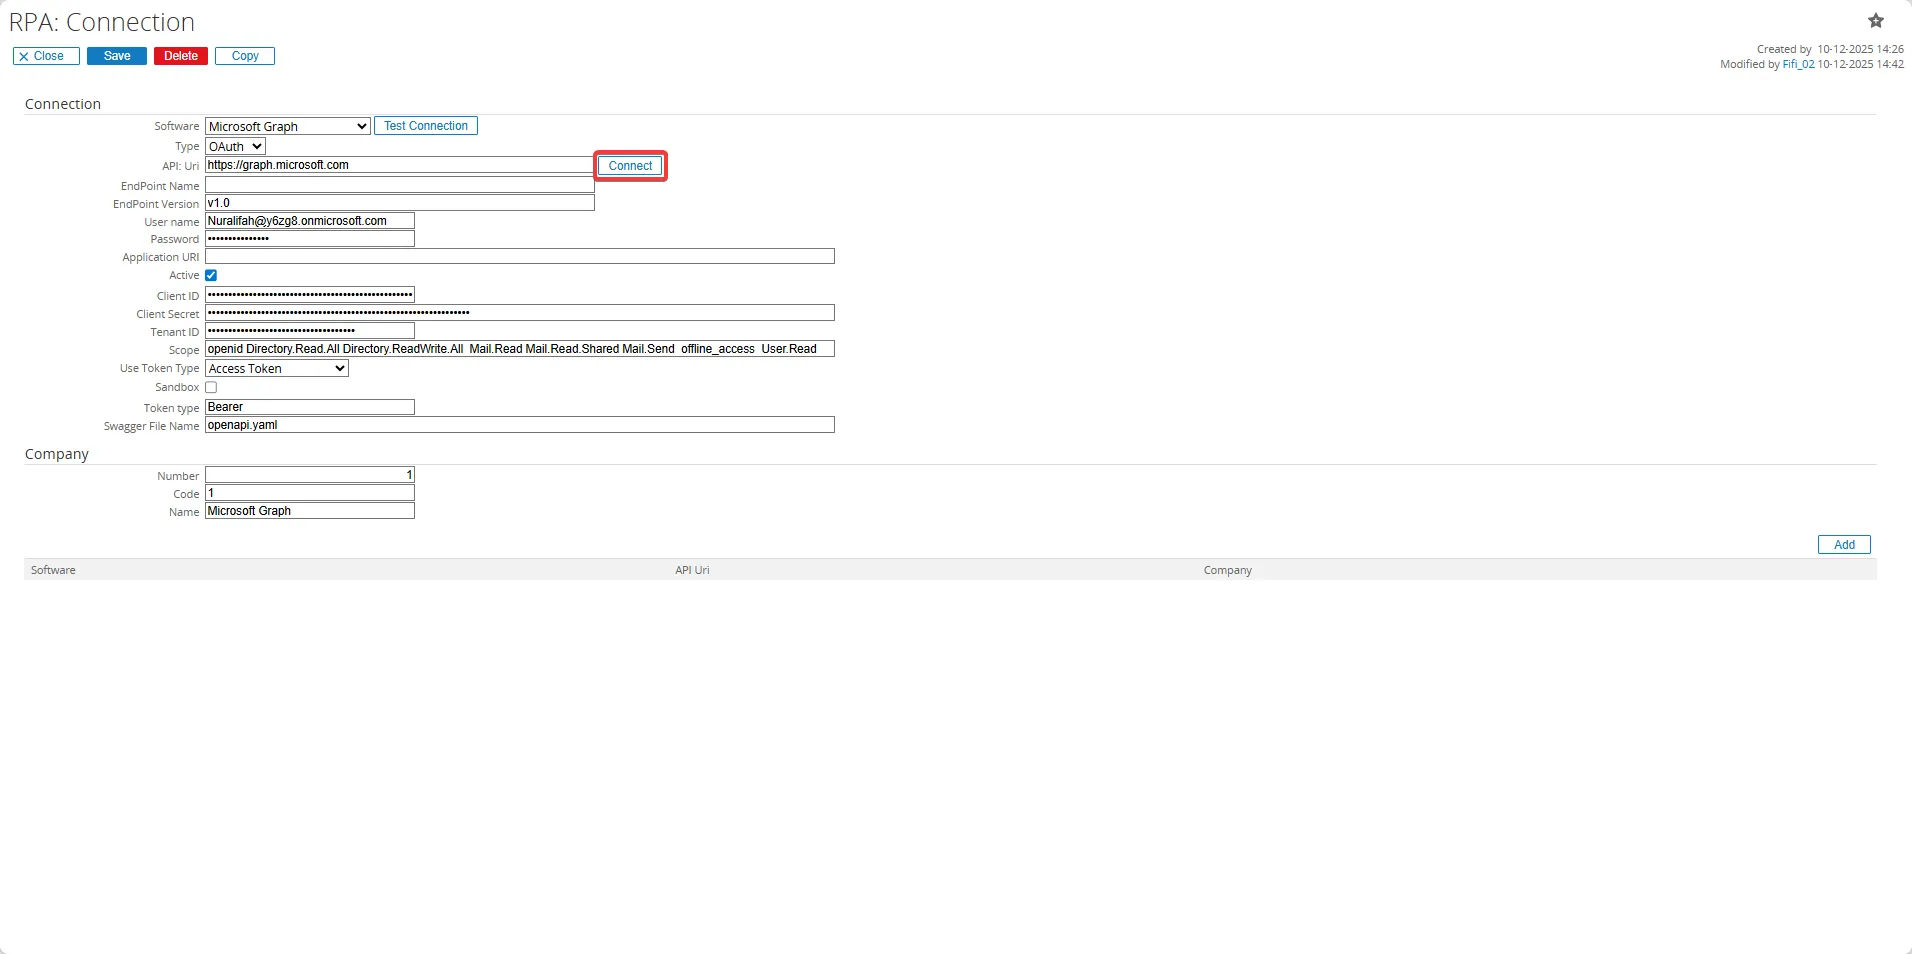
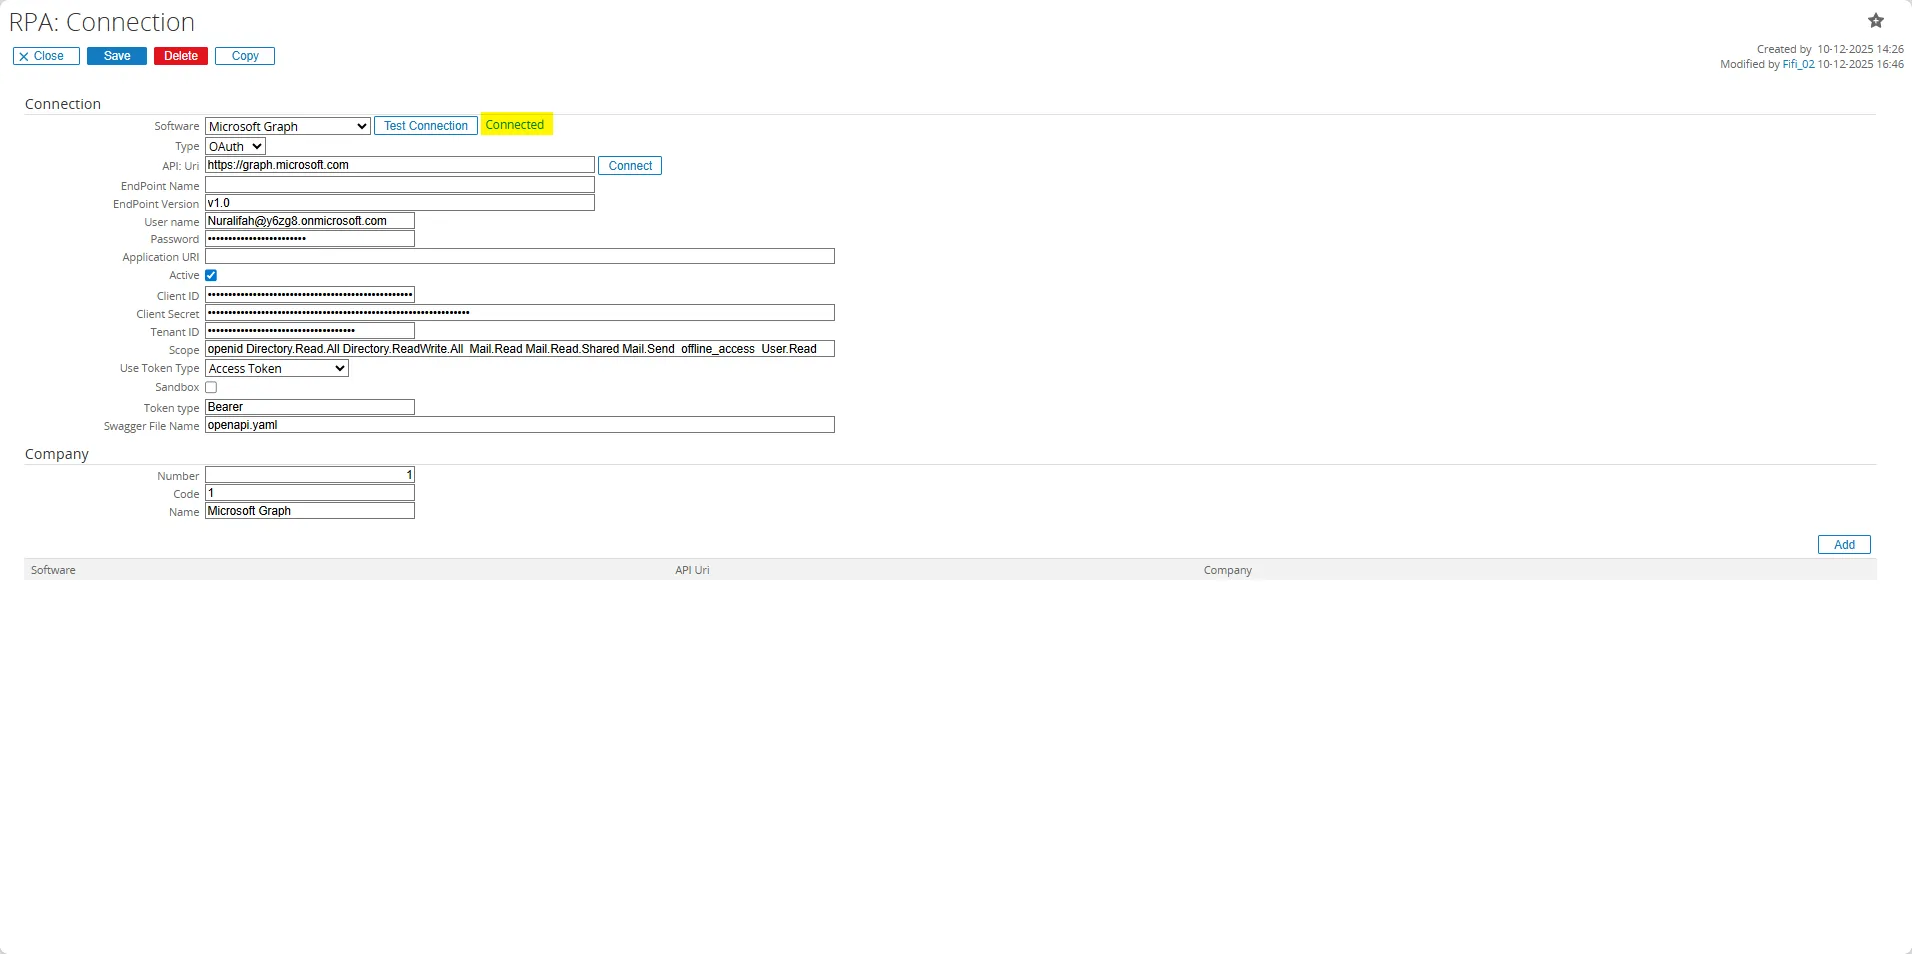
RPA Connection Fields (Microsoft Graph)
In the Connection section :
SoftwareChoose Software as Microsoft Graph
TypeType of connection which is OAuth for Microsoft Graph
API:Uri https://graph.microsoft.com/
Endpoint Namev1.0 or beta
Endpoint VersionCan be left empty
UsernameEmail address of the user to connect to Microsoft Graph
PasswordPassword for the user
Application URICan be left empty
ActiveCheck this fields to make the connection appear on the list
Client IDClient ID which can be retrieved from your Microsoft Entra app registration
Client SecretClient Secret which can be retrieved from your Microsoft Entra app registration.
Tenant IDTenant ID which can be retrieved from your Microsoft Entra app registration
Scopeopenid Directory.Read.All Directory.ReadWrite.All Mail.Read Mail.Read.Shared Mail.Send offline_access User.Read
Use Token TypeChoose Access Token
SandboxCan be left empty
Token typeBearer
Swagger File Nameopenapi.yaml
In the Company section :
NumberEnter a number to identify the connection, in case multiple connections are created
CodeEnter a code that can be used to identify the connection
NameEnter the name of your company connection that can be used to identify the connection when multiple connections are created
For the Client ID, Client Secret, and Tenant ID follow the steps below to create an app registration in Microsoft Entra ID:
- Log in to the [Microsoft Entra ID Admin Center] (https://entra.microsoft.com/)
- Input your credentials to log in
- Go to App registrations > Overview
- You can copy the Client ID and Tenant ID from here and paste it into the Client ID and Tenant ID field in the RPA connection

- For the Client Secret, you need to create a new client secret by going to App registrations > Certificates & secrets
- Click the New client secret

- Fill in the description and expiration date based on your needs, then click the Add button
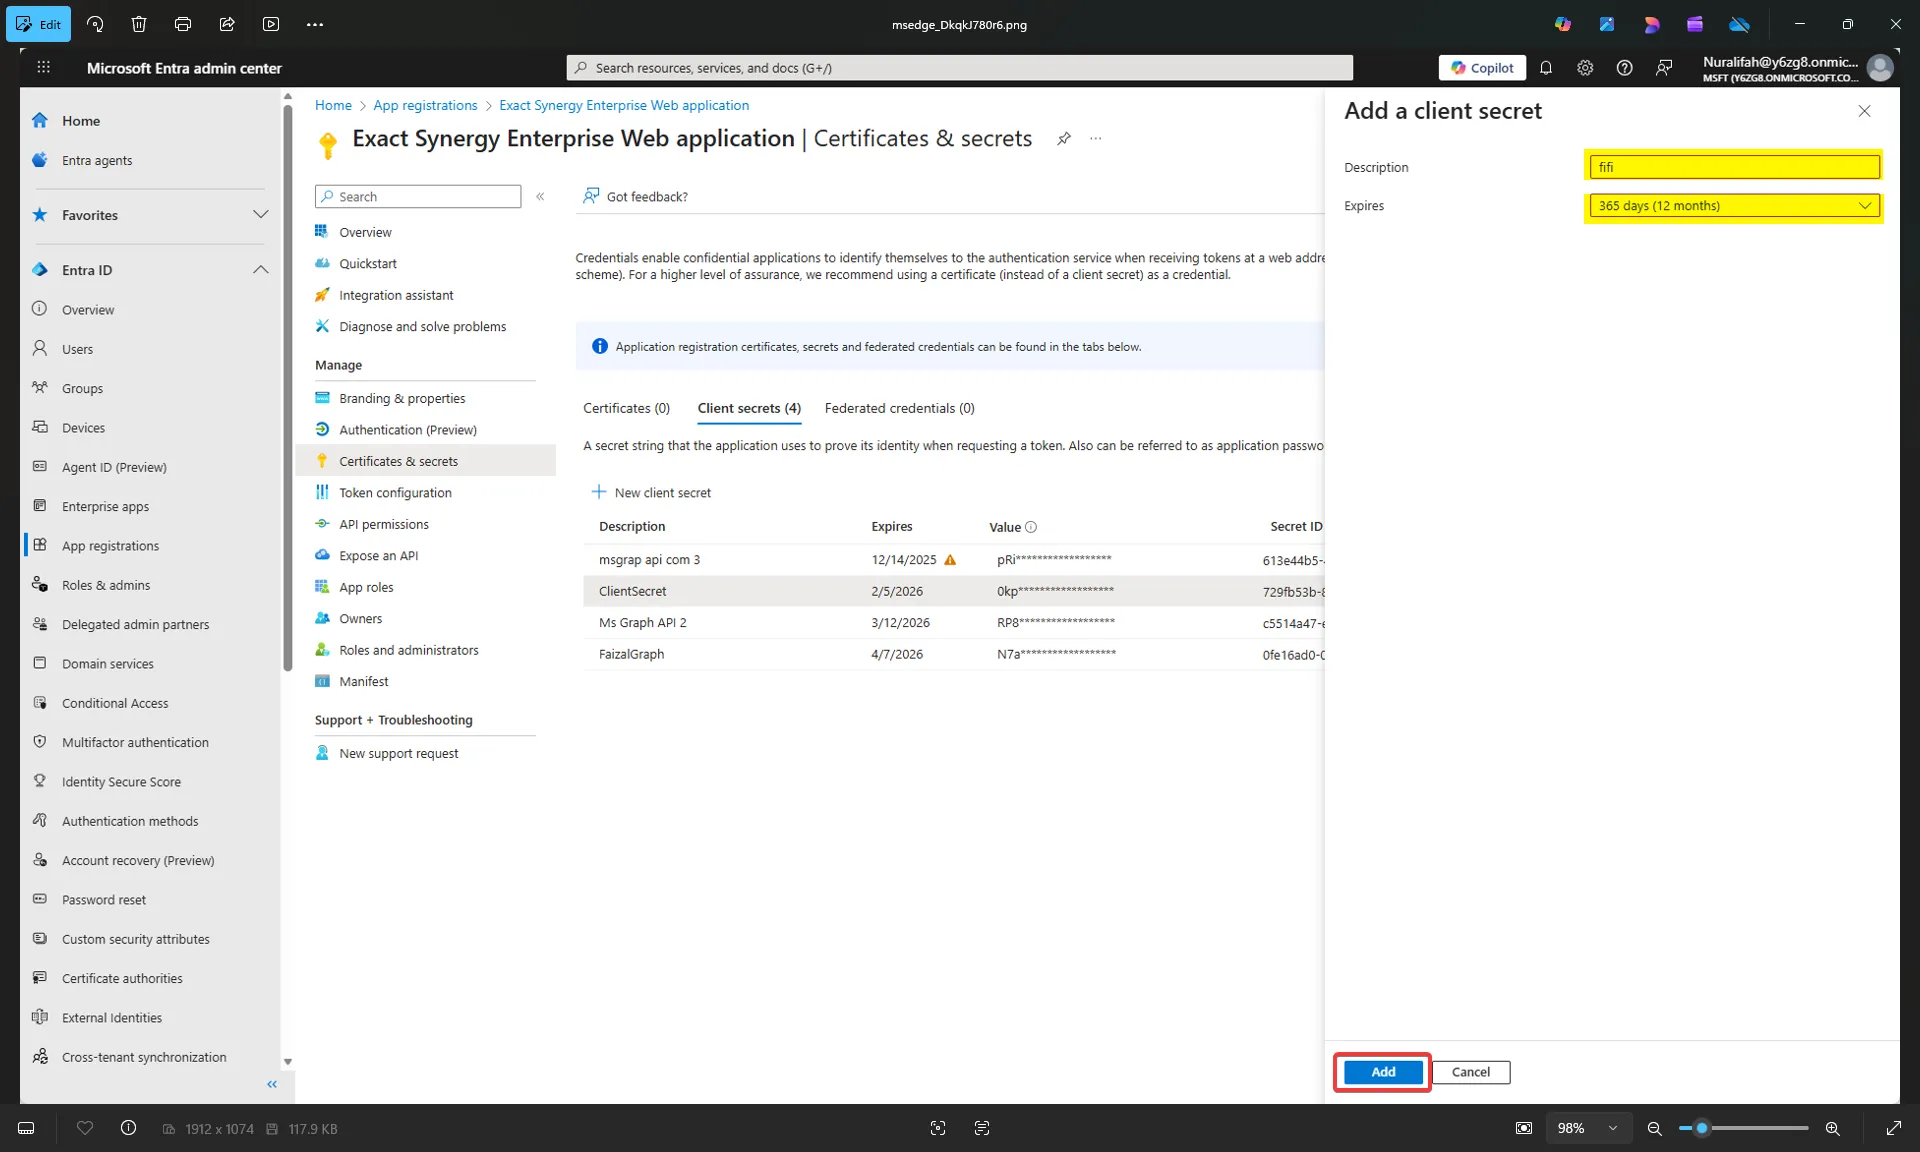
- Now your Client Secret is created
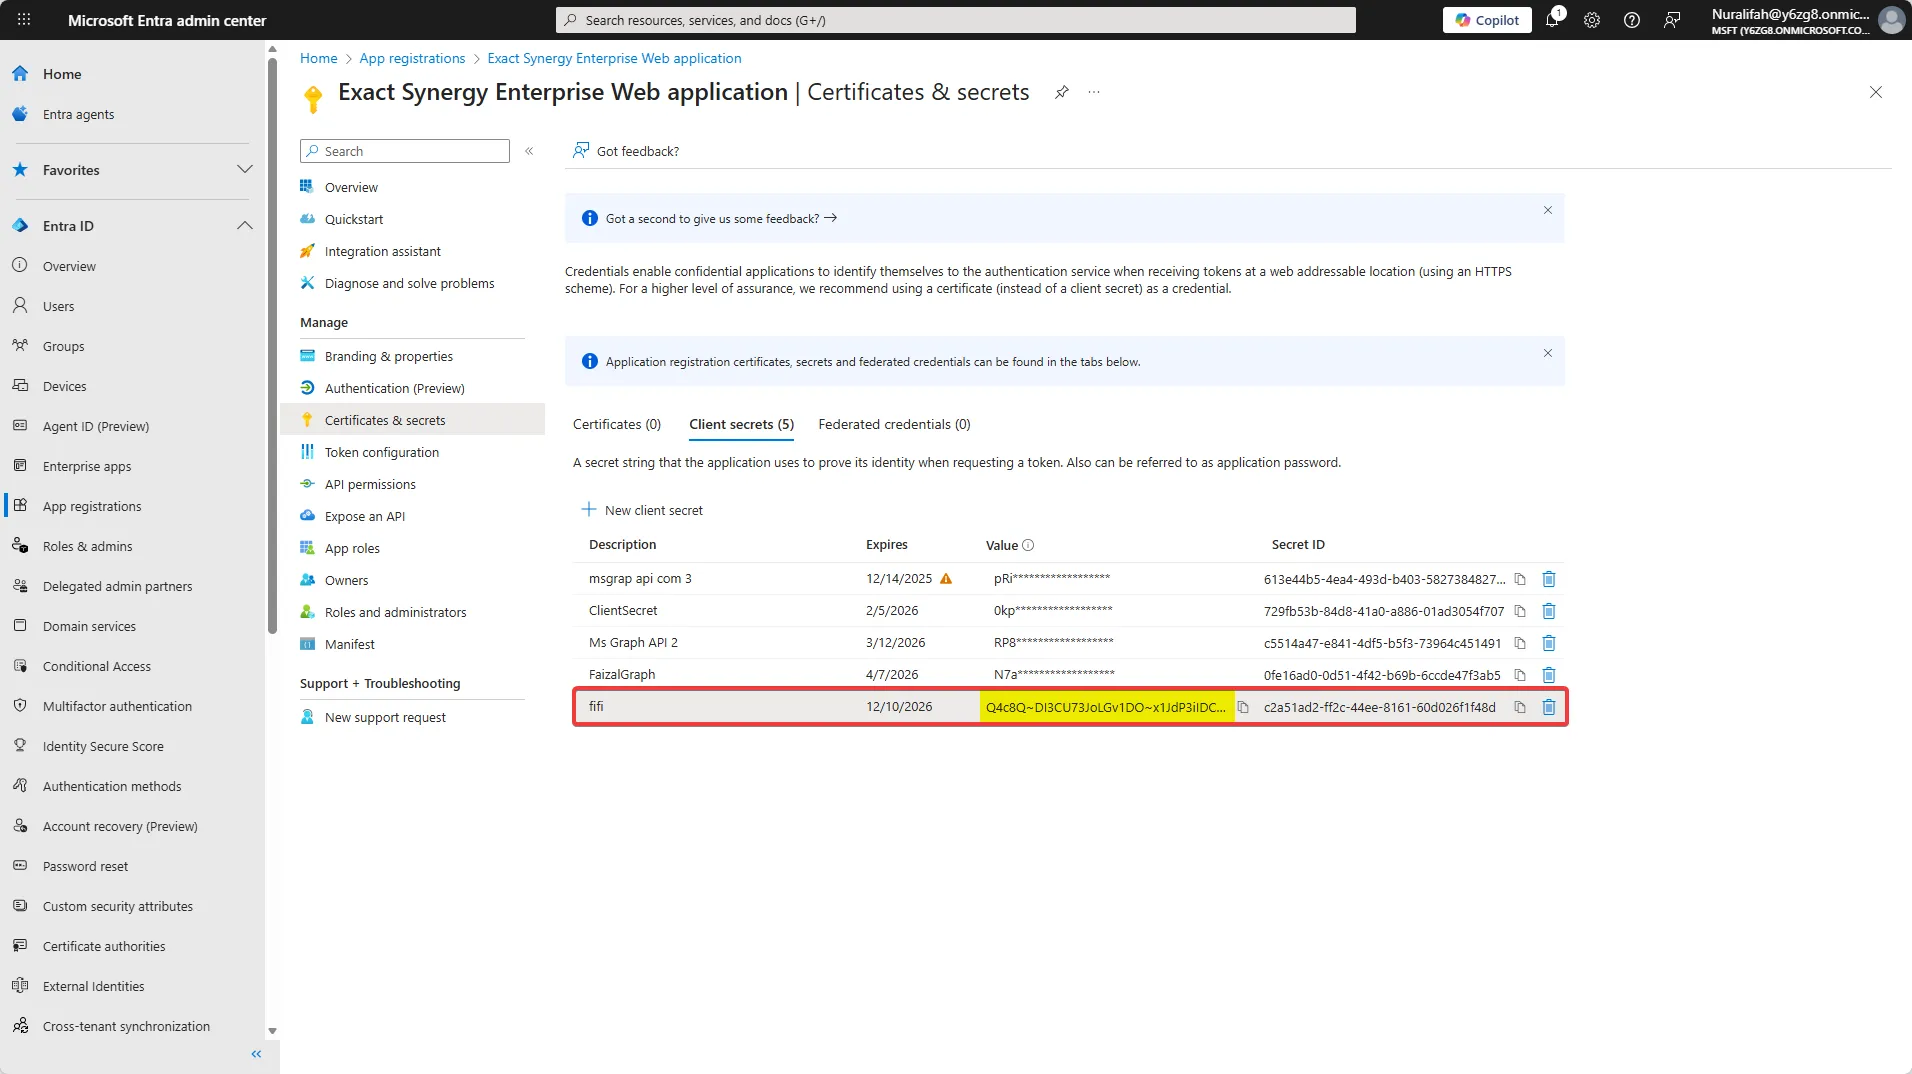
- You can copy the Client Secret value from here and paste it into the Client Secret field in the RPA connection
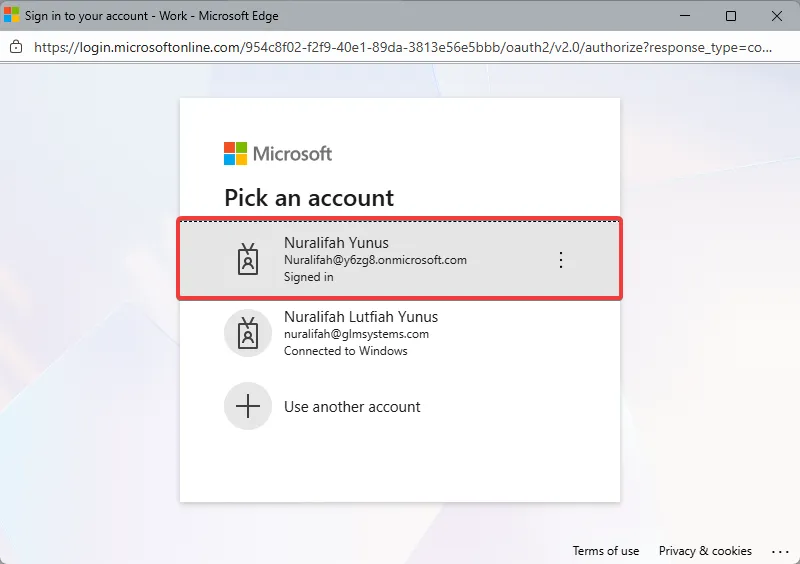
- After filling in all required fields, click the Save button
- Click the Connect button to test the connection. The Microsoft sign-in page will appear; select the account you want to use for the connection and enter the password
- You need to configure your Microsoft Entra app with Microsoft Authenticator application as an authentication method
- Download the Authenticator app to your mobile device
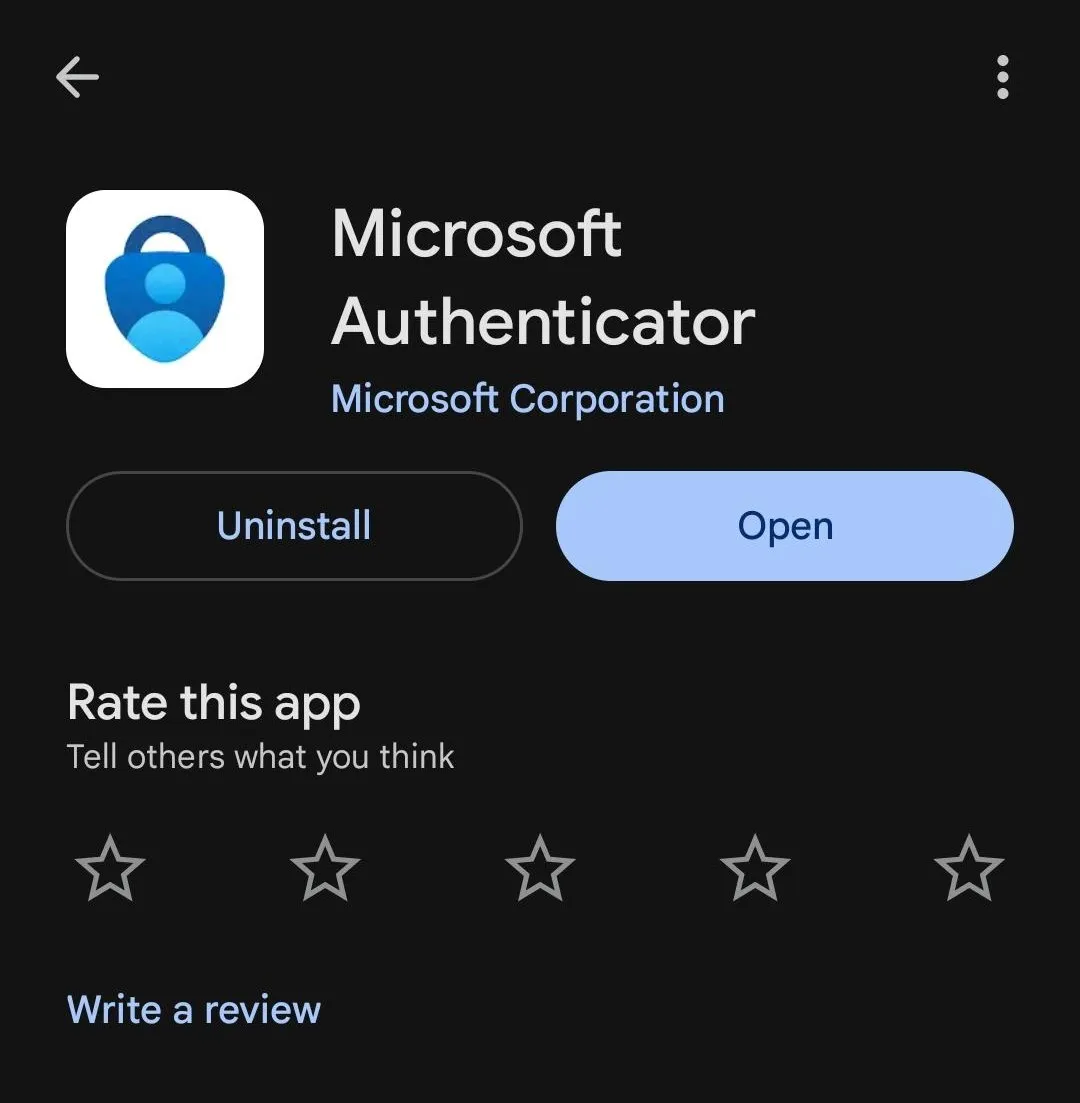
- Open the Microsoft Authenticator app, and add a new account by scanning the QR code shown on the sign-in page
- Syncrhonize the setup code from the Microsoft Authenticator app with your Microsoft Entra account
- After a succesful sync, your email will appear in the Authenticator list
- Next, return to your RPA connection
- Test the connection by clicking the Test Connection button
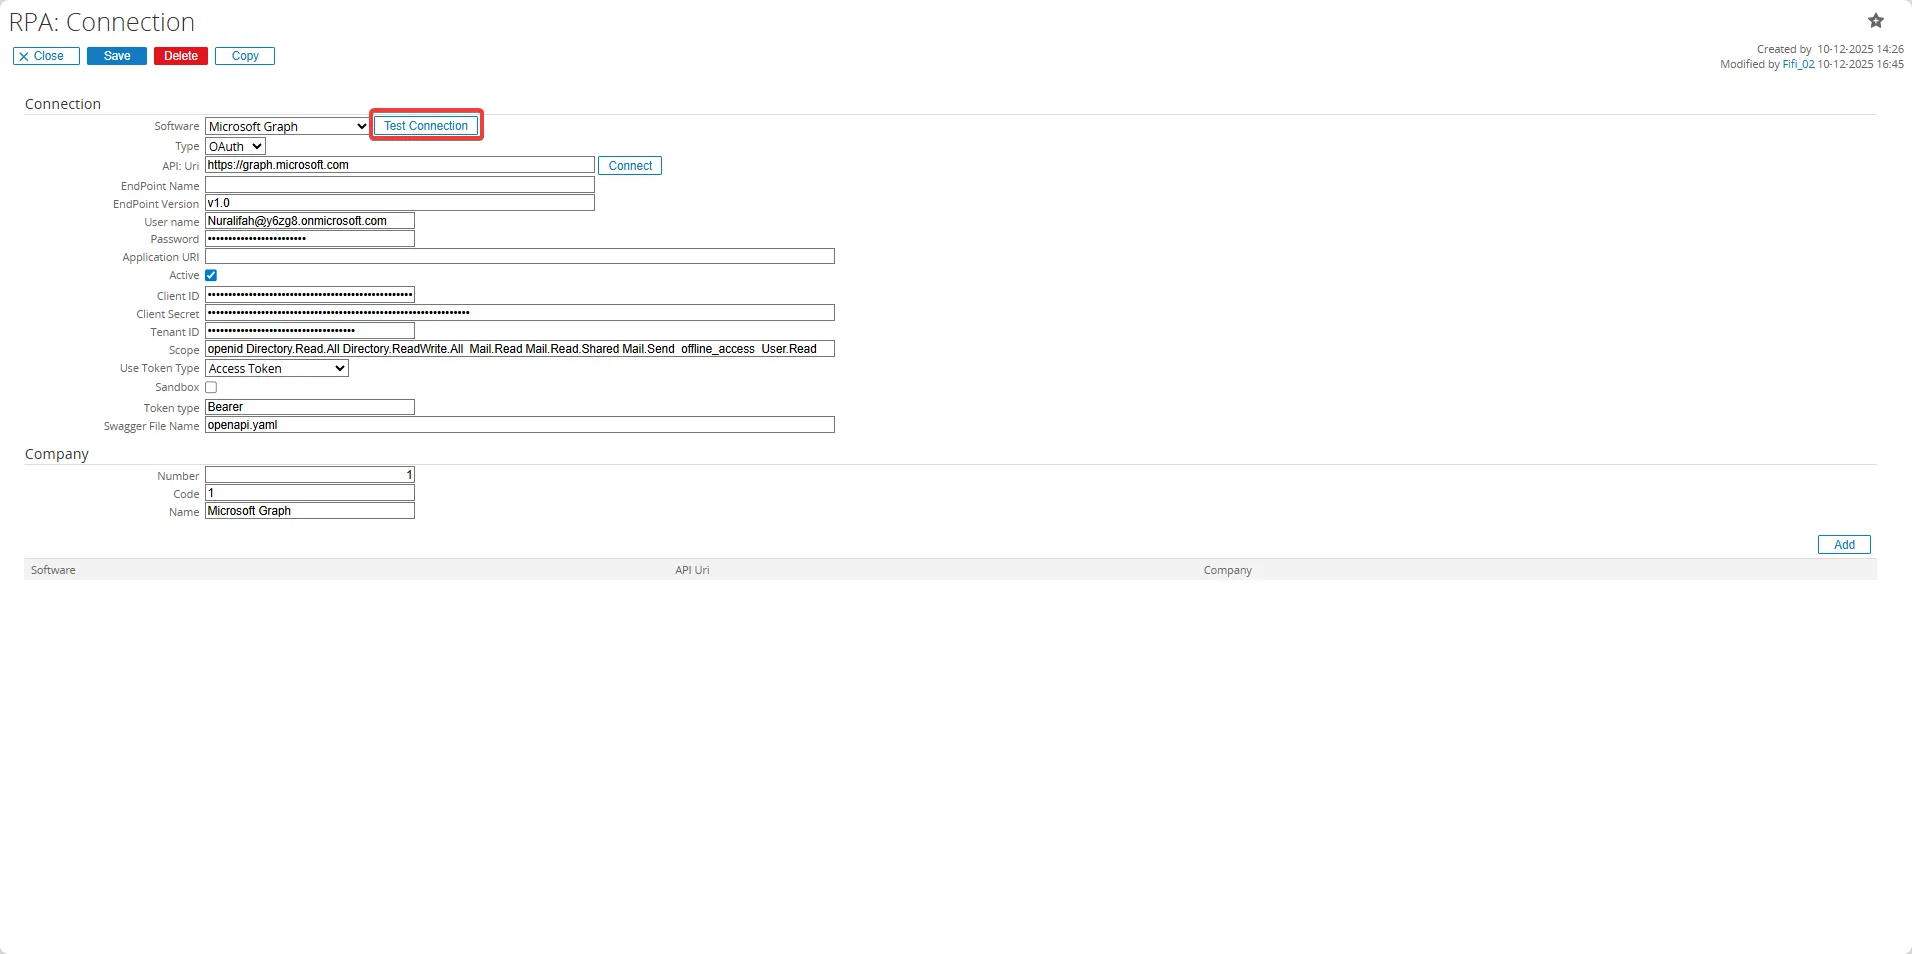
- If the connection is successful, a green Connected status will appear
Email Incoming
Section titled “Email Incoming”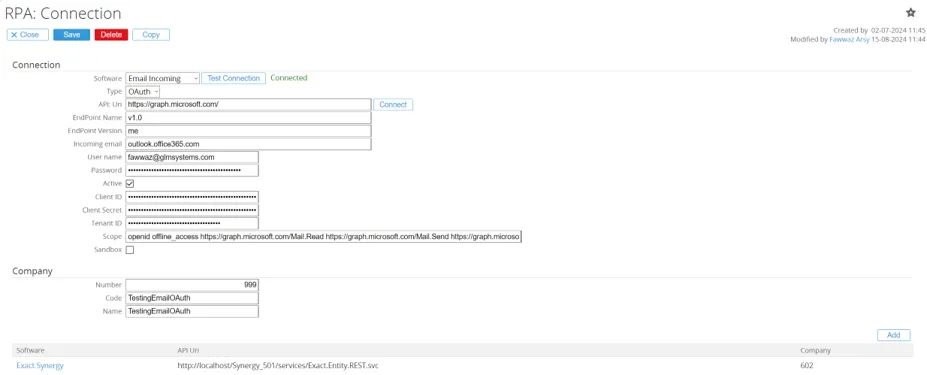
RPA Connection Fields (Email incoming)
SoftwareChoose Email Incoming as Software
Incoming emailThe Pop/OAuth/IMAP server to use to read the incoming email.
UsernameEmail for the inbox to monitor the email on.
PasswordPassword for the email box to monitor.
NumberCan be left empty or can be used to identify the email box by a number, in case multiple email boxes are monitored.
CodeCan be left empty or can be used to identify the email box by a code, in case multiple email boxes are monitored.
NameCan be left empty or can be used to identify the email box by a name/email, in case multiple email boxes are monitored.
Email Incoming - office365 (OAuth)
Section titled “Email Incoming - office365 (OAuth)”On October 1, 2022, Microsoft announced that the Basic Authentication has been disabled. To allow Email Incoming for Office 365 to use modern authentication (OAuth), we need to change the Email Incoming provider, follow the steps below:
Register application To use modern authentication (OAuth), the Email Incoming needs a Client ID, Client Secret and Tenant ID. To get that information, follow the steps below.
- Follow the instructions in Register an application with Microsoft identity platform to create a new application.
- When prompted to add a Redirect URI, enter:
http://{synergy_url}/docs/GLMSysCIOAuth.aspx(Non-Public URL). - Record the Client Secret value for use in the RPA connection.
Configure the Provider and the Connection of Email Incoming in the RPA
- Go to Modules > RPA > Setup > Connection > Provider
- Click the Email Incoming provider to change the property
- Update the following fields:
- REST Type: Select
OData. - OData Version: Select
V4. - Authorization Request: Enter
https://login.microsoftonline.com/{tenantID}/oauth2/v2.0/authorize. - Access Token Request: Enter
https://login.microsoftonline.com/{tenantID}/oauth2/v2.0/token. - Visible Field Connection Type: Select
Visible. - Visible Field Username: Select
Visible. - Visible Field Password: Select
Not Visible. - Visible Field API URI: Select
Visible. - Visible Field End Point Name: Select
Visible. - Visible Field End Point Version: Select
Visible. - Visible Field Port: Select
Not Visible. - Visible Field Client ID: Select
Visible. - Visible Field Client Secret: Select
Visible. - Visible Field Tenant ID: Select
Visible.
- Click Save.
Configure the Email Incoming Connection
- Navigate to Modules > RPA > Setup > Connection > Connection.
- If the connection doesn’t exist, click New. Otherwise, select the Email Incoming connection to edit.
- Update the following fields:
- Software: Select
Email Incoming. - Type: Select
OAuth. - API:Uri: Enter
https://graph.microsoft.com/. - EndPoint Name: Enter
v1.0. - EndPoint Version: Enter
me. - Incoming Email: Enter
outlook.office365.com. - Active: Tick the checkbox.
- Client ID: Enter the Client ID from the app registration.
- Client Secret: Enter the recorded Client Secret.
- Tenant ID: Enter the Tenant ID from the app registration.
- Scope: Enter
openid offline_access https://graph.microsoft.com/Mail.Read https://graph.microsoft.com/Mail.Send https://graph.microsoft.com/Mail.Read.Shared.
- Click Save.
- Select the Email Incoming connection.
- Click Connect.
- Sign in with your Office 365 account.
This configuration enables Email Incoming to use OAuth for secure authentication with Microsoft Graph API.
The SQL provider is using a direct SQL connection to the database to connect.
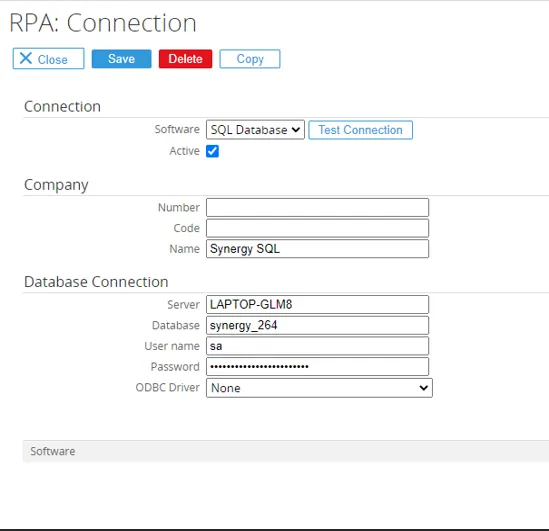
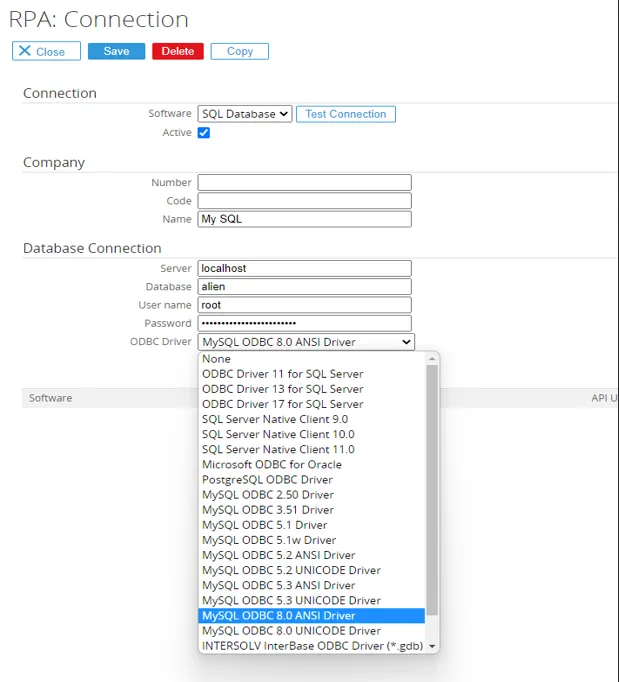
RPA Connection Fields (SQL)
SoftwareChoose SQL Database as Software
ActiveActivated the connection, by default this is active.
NumberDatabase number used for reference not used to connect.
CodeCode used for reference not used to connect.
NameDatabase name/description.
ServerDatabase server
Database8Database name
UsernameDatabase username.
Setup a user in SQL to make the connection and control what rights the SQL provider will have. When create / update / delete is not allowed or desired with the integration or rules engine, setup the user with only read rights. With the read rights the SQL connection can be used in the views.
DatabaseDatabase user password.
Macola 10 API
Section titled “Macola 10 API”The Macola 10 API provider is using the Macola 10 Rest web services (where Macola 10 provider is using the repository business components).
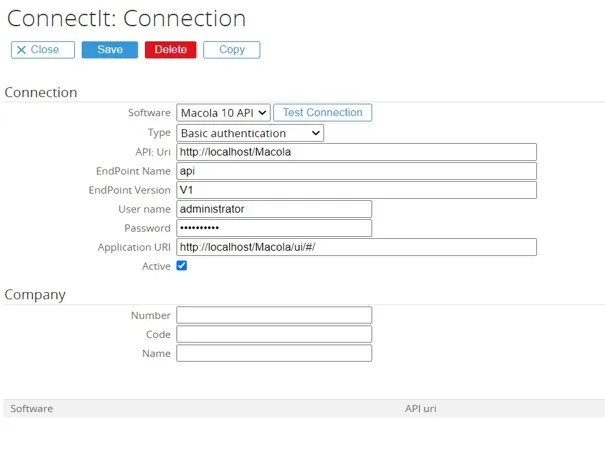
RPA Connection Fields (Macola 10 API)
SoftwareChoose Macola 10 API as software
TypeChoose type Basic authentication
API URIThe Macola 10 virtual directory,
http://localhost/Macola. The virtual directory will be available after the MacolaWorkspaces_64.exe are installed (see Macola installation folder and documentation)
Endpoint nameThe Endpoint name is API
Endpoint versionThe Endpoint version is V1
UsernameValid username to login into Macola
PasswordPassword to login into Macola
Application URIThe Uri to open Macola application in the new UI
NumberCompany number of your Macola company (used for reference only to recognize the connection).
Code Company code of your Macola company (used for reference only to recognize the connection).
NameCompany name of your Macola company (used for reference only to recognize the connection).
Proquro
Section titled “Proquro”For the Proquro API there are currently two versions v1 and v2 both can be used and will have a difference in setting up the connection. The mapping template in the folder Templates\Proquro has 1 mapping making use of v1 for creating the budgets in Proquro from Exact Globe and 1 mapping template making use of v2 for creating supplier from Proquro to Exact Globe.
Proquro V1
Section titled “Proquro V1”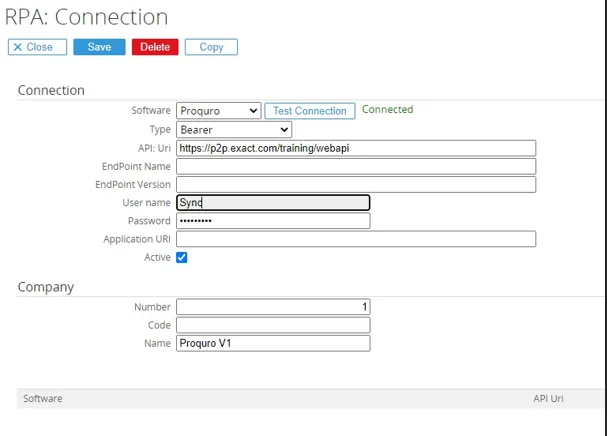
RPA Connection Fields (Proquro V1)
SoftwareSelect Proquro V1 as Software
TypeChoose type Bearer authentication
API UriThe API Uri used for Proquro, in screenshot it is using the training Uri. The API Uri would be [Uri]/webapi
Endpoint nameThe Endpoint name can be left empty not used for v1 of the API
Endpoint versionThe Endpoint version can be left empty not used for v1 of the API
User nameUser setup for API connection
PasswordPasword setup for API connection
Application UriThe Uri to open the Proquro application
NumberCompany number of your Proquro company (used for reference only to recognize the connection).
CodeCompany code of your Proquro company (used for reference only to recognize the connection).
NameCompany name of your Proquro company (used for reference only to recognize the connection).
Proquro V2
Section titled “Proquro V2”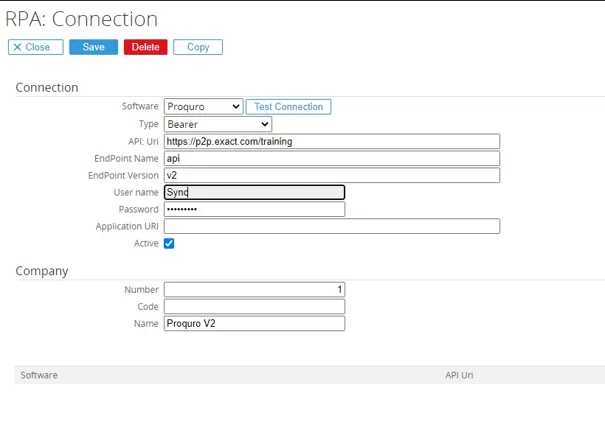
RPA Connection Fields (Proquro V2)
SoftwareChoose Proquro V2 as Software
TypeChoose type Bearer authentication
API UriThe API Uri used for Proquro, in screenshot it is using the training Uri. The API Uri would be [Uri]/webapi
Endpoint nameThe Endpoint name can be left empty not used for v2 of the API
Endpoint versionThe Endpoint version can be left empty not used for v2 of the API
User nameUser setup for API connection
PasswordPasword setup for API connection
Application UriThe Uri to open the Proquro application
NumberCompany number of your Proquro company (used for reference only to recognize the connection).
CodeCompany code of your Proquro company (used for reference only to recognize the connection).
NameCompany name of your Proquro company (used for reference only to recognize the connection).
SoftwareGemak
Section titled “SoftwareGemak”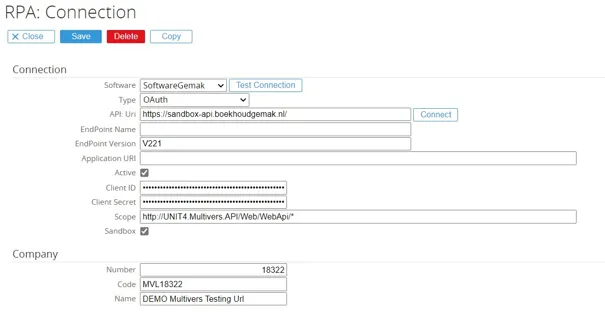
RPA Connection Fields (SoftwareGemak)
SoftwareChoose SoftwareGemak as software
TypeChoose type OAuth authentication
API UriThe Uri to access the SoftwareGemak API For the sandbox/test environment that would be https://sandbox-api.boekhoudgemak.nl/, when sandbox is selected also enable the Sandbox option. For the live environment use https://api.boekhoudgemak.nl/
Endpoint nameThe Endpoint name does not need to be set
Endpoint versionSet the latest endpoint version for SoftwareGemak, V…
User nameThe Uri to open the SoftwareGemak application
PasswordPasword setup for API connection
Application UriThe Uri to open the Proquro application
NumberMake the connection active so this can be used in RPA
CodeCan be left empty and will use building ClientID. If using an own environment ClientID need to be filled in here.
NameCan be left empty and will use building ClientSecret. If using an own environment ClientSecret need to be filled in here.
NameScope of the API, which will need to be set to http://UNIT4.Multivers.API/Web/WebApi/*
NumberCompany number of your SoftwareGemak company (used for reference only to recognize the connection). The number part in the code can be set here.
CodeCompany code of your SoftwareGemak company you want to use for this connection. The company code can be seen when opening the application.
The Facebook provider is available in batch/version 75 (Installer after 1st December 2021) of RPA/RPA and allows for using Facebook API in RPA/RPA views. Next release would also allow for creating/updating Facebook messaging API. For Facebook you have to different type of connections, one is connection for the user and one is the connection for a specific Facebook page. Both will have their own connection. The page can be access after the user is authenticated and access token is set for the page.
Facebook(User)
Section titled “Facebook(User)”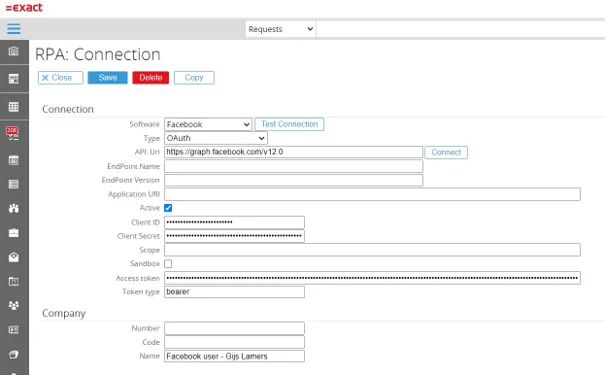
RPA Connection Fields (Facebook)
SoftwareChoose Facebook as Software
TypeWindows Authentication can be used to accessing the Exact Synergy Social API by entering the appropriate user credential.
API UriCurrent latest version of the API is v12.0 https://graph.facebook.com/v12.0
Connect (button)After ClientID and ClientSecret are set the connection can be authenticated by clicking the connect button.
Client IDThe ClientID and ClientSecret can be generated via the Facebook developer site, after a developer account is created: https://developers.facebook.com/
Client SecretSee ClientID
Code*Code to identify the Facebook, can be left empty.
NumberCode to identify the Facebook connection, can be left empty.
NameName to identify the Facebook connection, can be left empty.
-
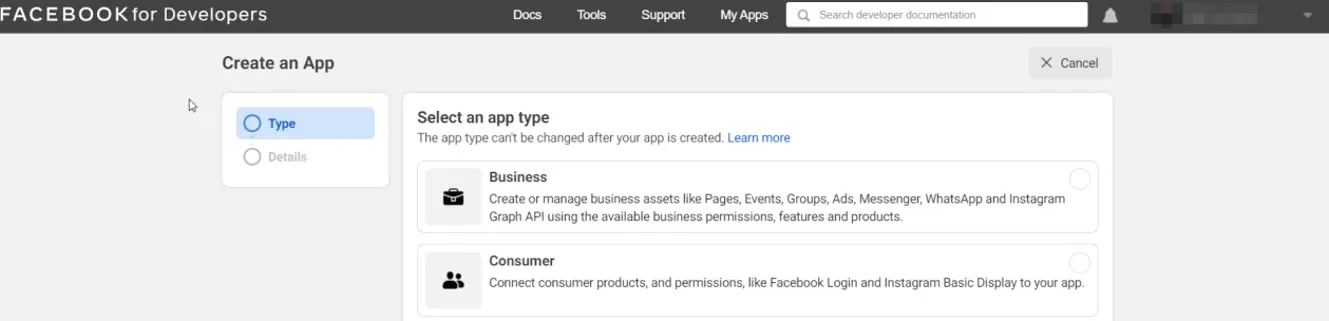
Click “Create App” to make a new account

-
When create app select the app type could be ‘Business’ or ‘None’
-
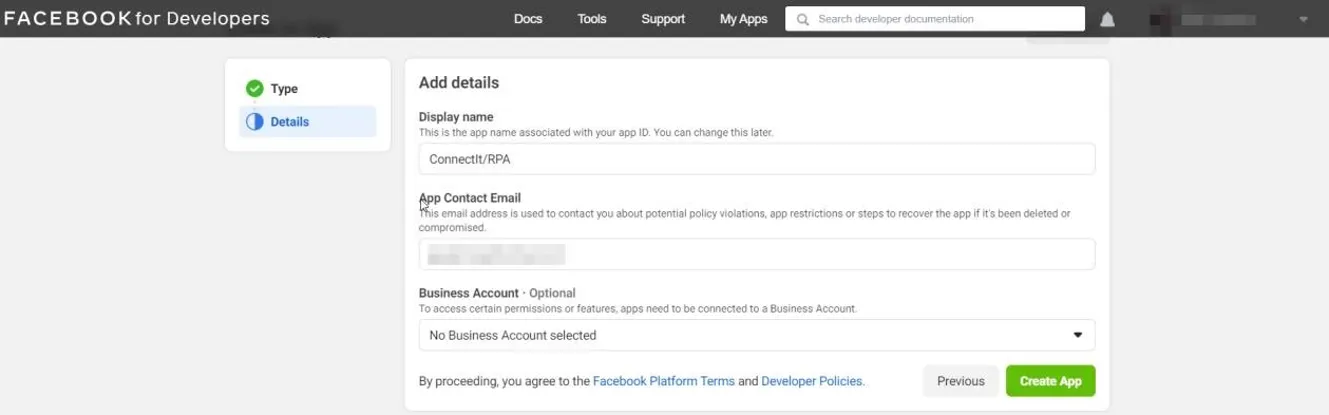
Fill in the app name and contact email, and select business account if available.
-
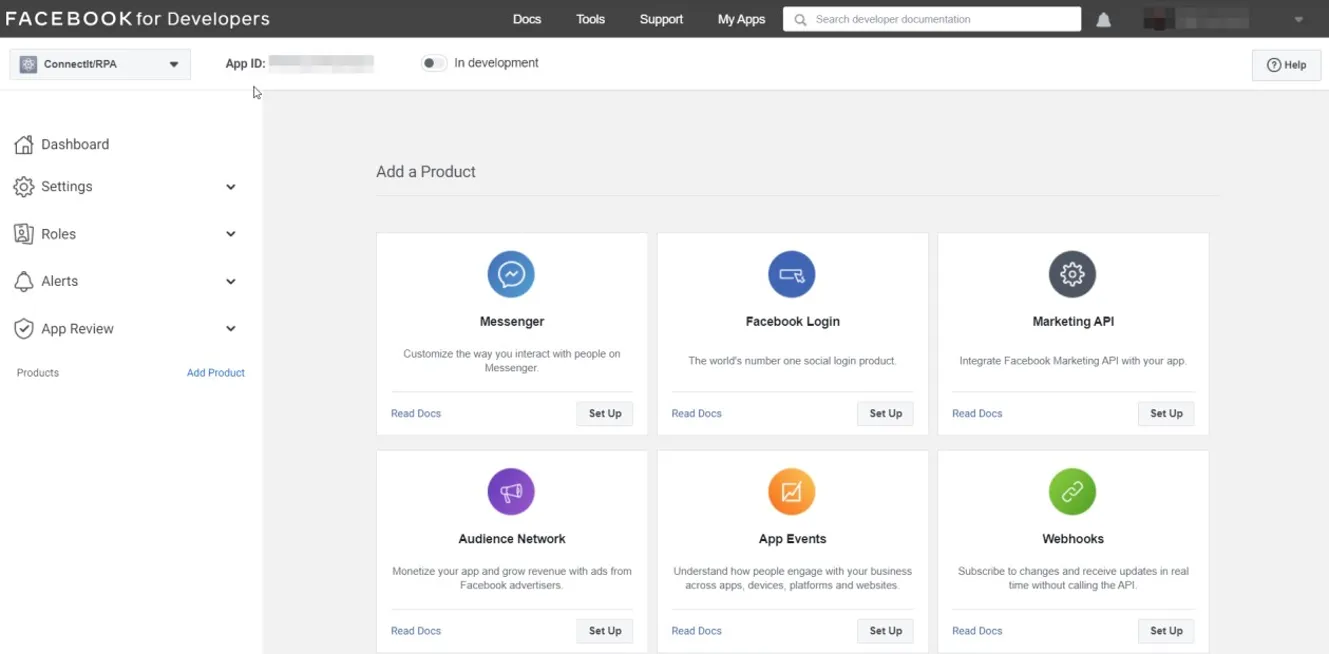
Select the product to use, for example messenger to use the messenger API
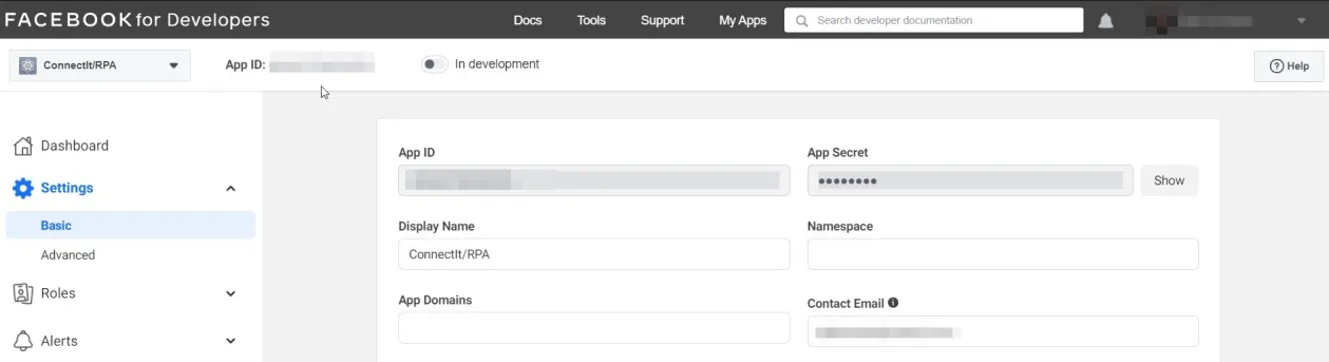
-
Then in the settings under Basic your ClientID (App ID) and Client Secret can be copied to the Facebook connection.
Facebook (Page)
Section titled “Facebook (Page)” -
For the created APP on your Facebook developer account also add the pages that you want to access.
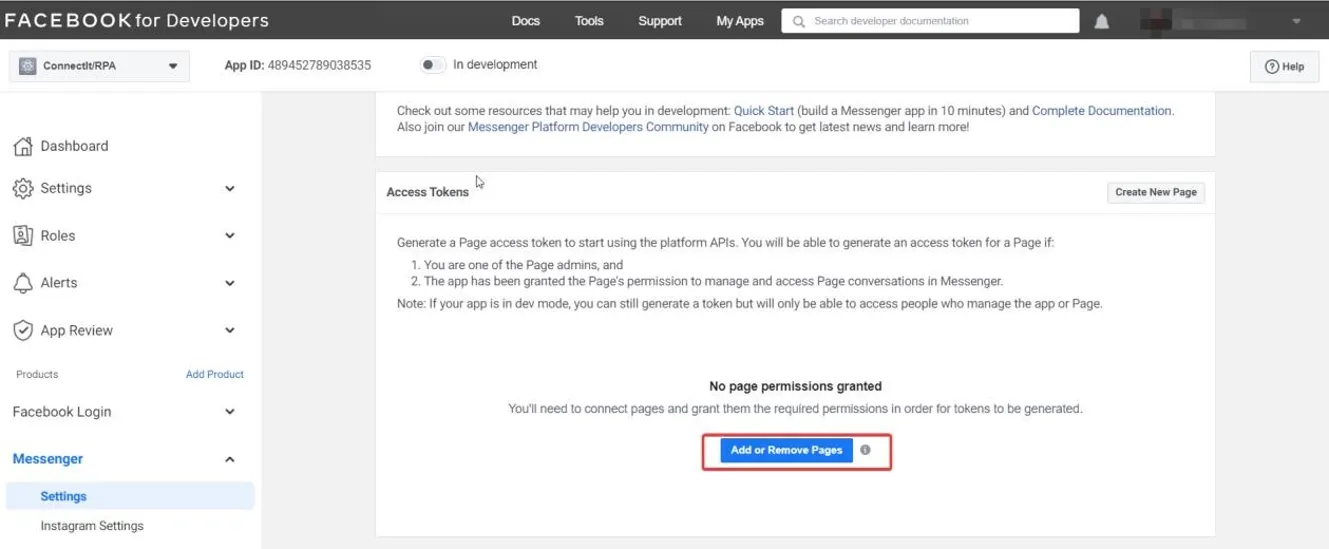
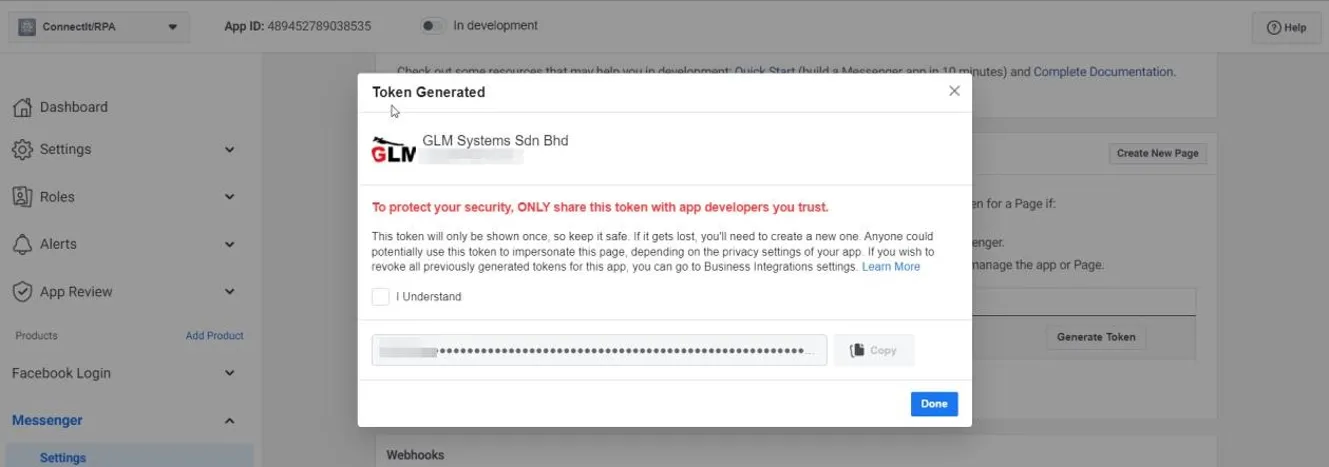
-
Once the page is added you can generate an access token for the page. Fill in this access token in your Facebook connection.
-
The connection can be created by first making a copy of the connection made for the user.
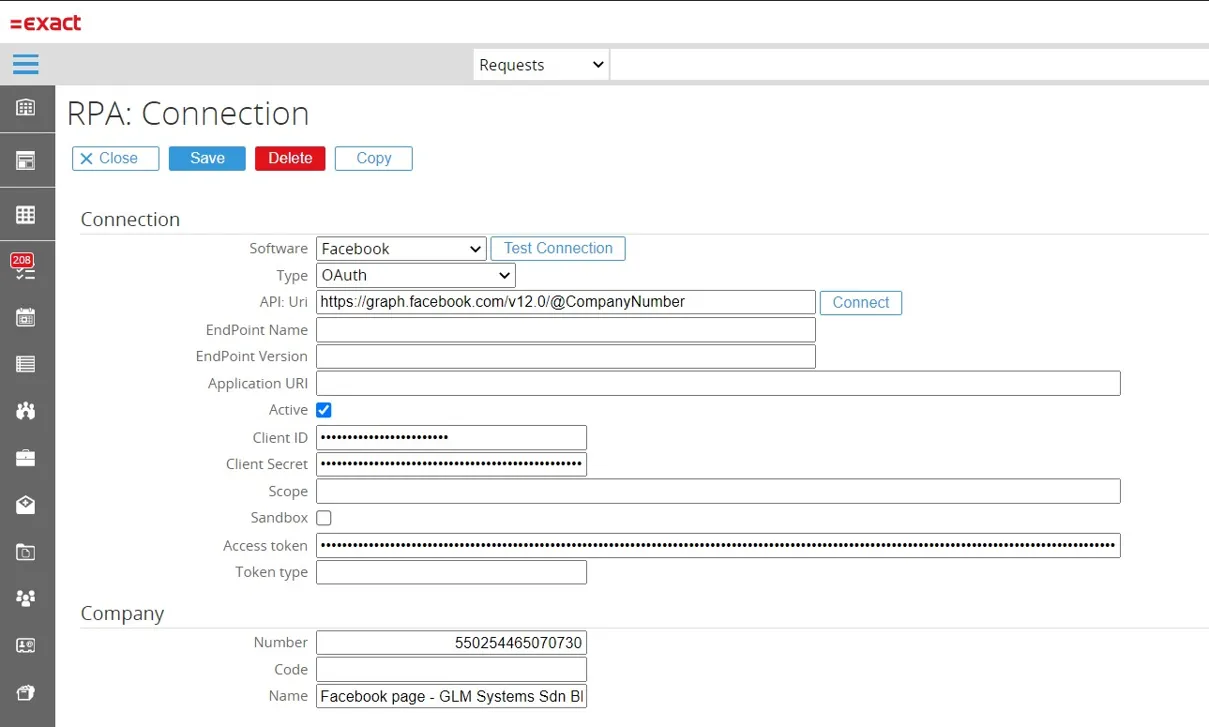
RPA Connection Fields (Facebook Page)
SoftwareChoose Facebook Page as Software
TypeFor type use OAuth
API UriCurrent latest version of the API is v12.0 https://graph.facebook.com/v12.0/@CompanyNumber The @CompanyNumber will be replaced by the company number which is entered, which is the Facebook page id. You can see the Facebook page ID’s from the FacebookAccounts RPA/RPA view (once the Facebook (user) connection is created and the Facebook views are imported via the Templates\Facebook folder.
Client IDCopied from the Facebook user connection
Client SecretCopied from the Facebook user connection
CodeCode to identify the Facebook page, can be left empty.
NumberNumber to identify the Facebook page id, need to be filled in
NameName to identify the Facebook page name, can be left empty.
HubSpot
Section titled “HubSpot”Starting November 30, 2022, HubSpot API Keys will no longer be able to be used as an authentication method to access HubSpot APIs. In Addition, starting July 15, 2022, accounts without a HubSpot API Key already generated will no longer be able to create one.
HubSpot(*with API Key)
Section titled “HubSpot(*with API Key)”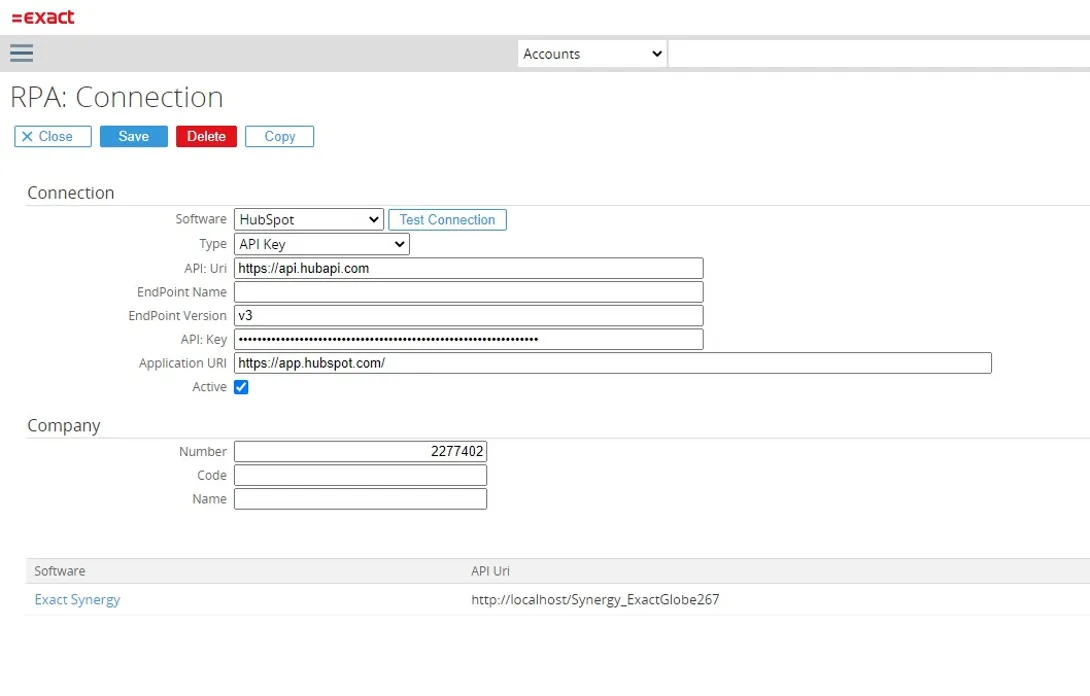
RPA Connection Fields (HubSpot)
SoftwareChoose HubSpot as Software
TypeChoose type API key
API UriTUse https://api.hubapi.com
Endpoint nameLeave endpoint name empty
Endpoint versionEndpoint version is v3
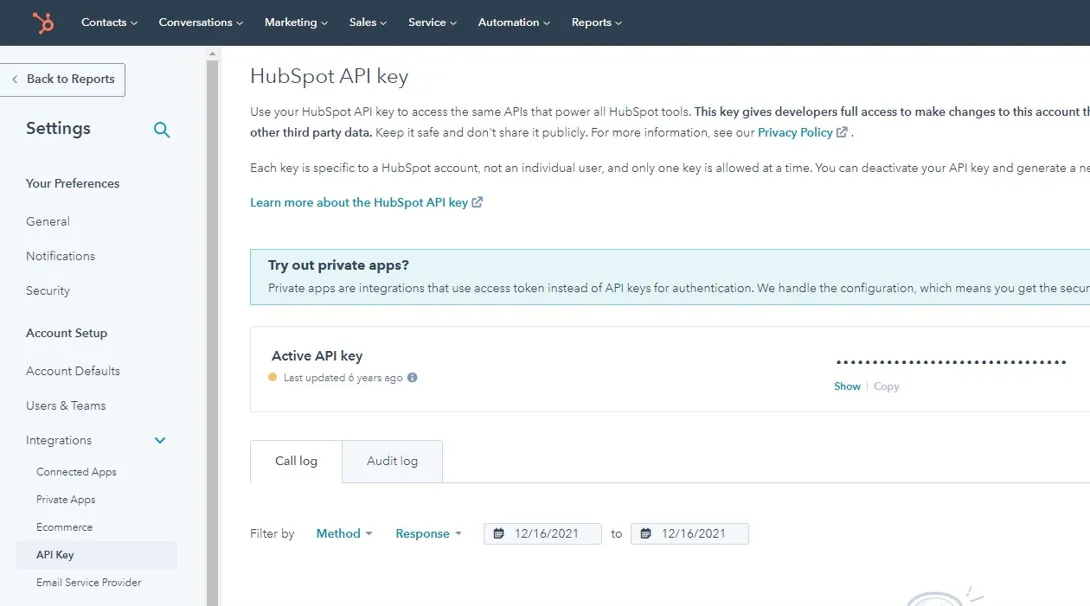
API KeyGet the API key from you HubSpot account, go to the profile & preferences and in the settings Account Settings / Integrations / API Key. From here you can generate the API Key.
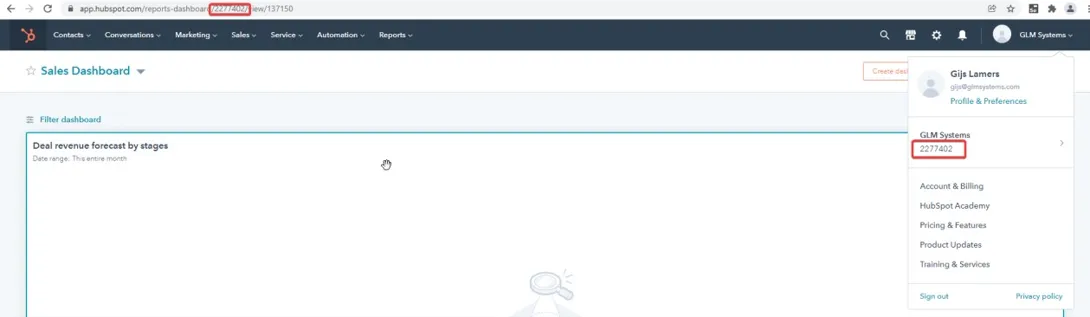
NumberThis is your HubSpot account number and can be found in the Url of the application or when checking the profile and preferences.
CodeCan be left empty
NameYour HubSpot company name
-
API Key Get the API key from you HubSpot account, go to the profile & preferences and in the settings Account Settings / Integrations / API Key. From here you can generate the API Key.
-
Number This is your HubSpot account number and can be found in the Url of the application or when checking the profile and preferences.
HubSpot (*with OAuth)
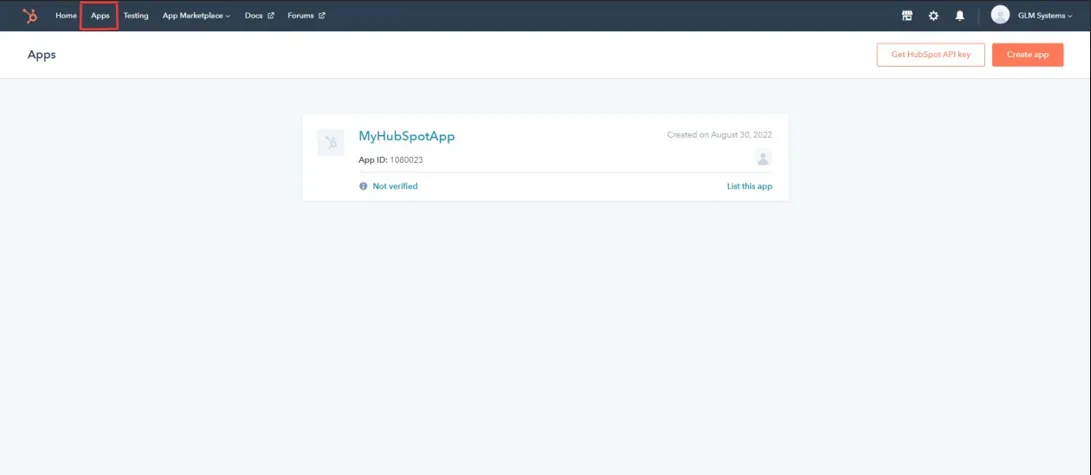
Section titled “HubSpot (*with OAuth)” -
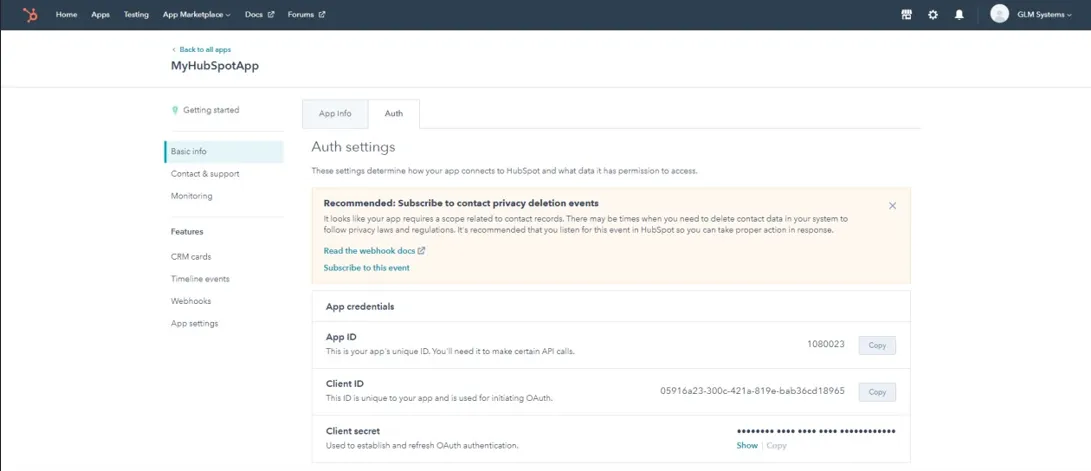
Create App Developer Account The first thing you need to do is create App Developer Account. You can create the account in https://app.hubspot.com/signup-hubspot/developers. After you create the App navigate to Apps in the main navigation bar. Click the Auth tab to view your client ID and client secret, as well as the app’s assigned scopes. You’ll need this information when initiating an OAuth connection between your app and HubSpot.
-
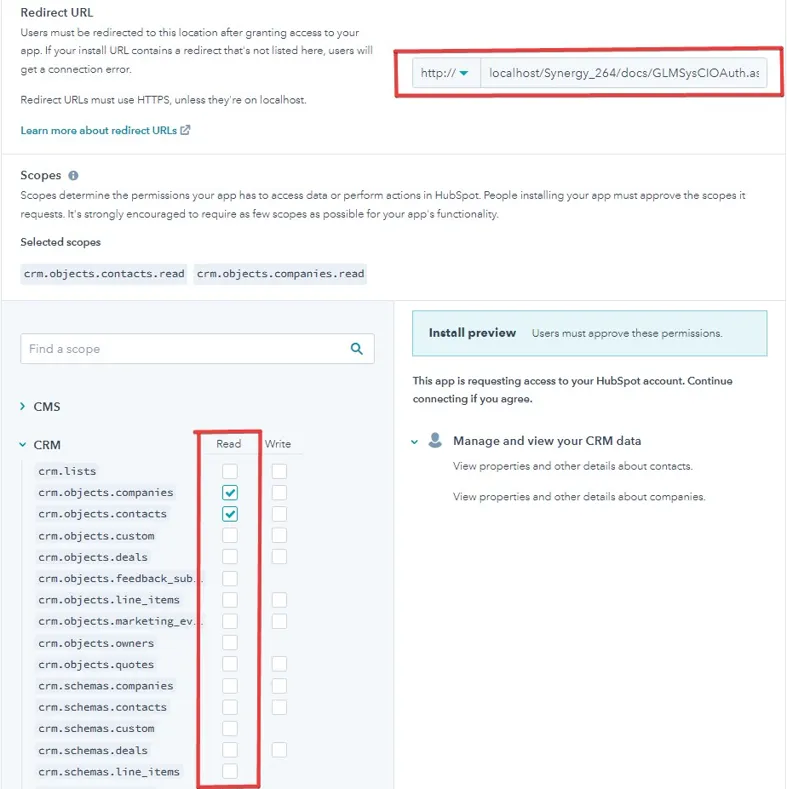
Also you need to add the Redirect URL(http://*servername/*virtualdirectory/docs/GLMSysCIOAuth.aspx) and Scopes as you can see the example below:
RPA Connection Fields (HubSpot OAuth)
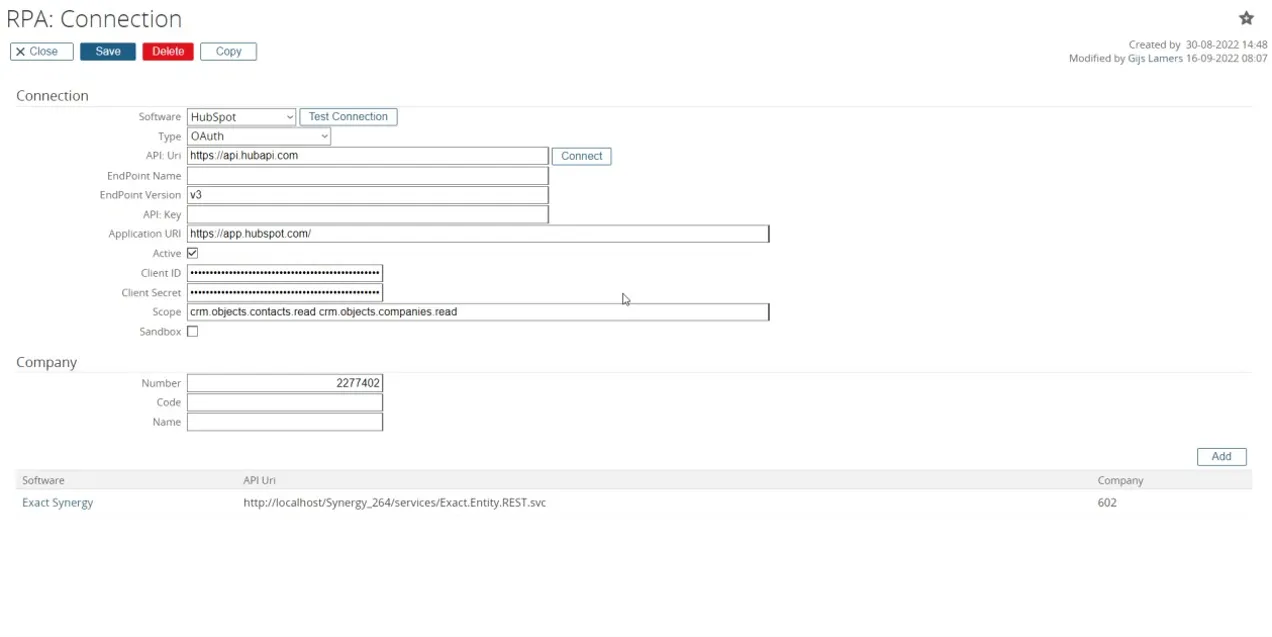
SoftwareSelect HubSpot as Software
TypeChoose type OAuth
API UriUse https://api.hubapi.com
Application UriUse https://app.hubspot.com/
ClientIDCan be found in your developer app setting.
ClientSecretCan be found in your developer app setting
ScopesCan be found in your developer app setting
Endpoint nameLeave endpoint name empty
Endpoint versionEndpoint version is v3
API KeyLeave the API Key empty
NumberThis is your HubSpot account number and can be found in the Url of the application or when checking the profile and preferences.
CodeCan be left empty
NameYour HubSpot company name
File Provider
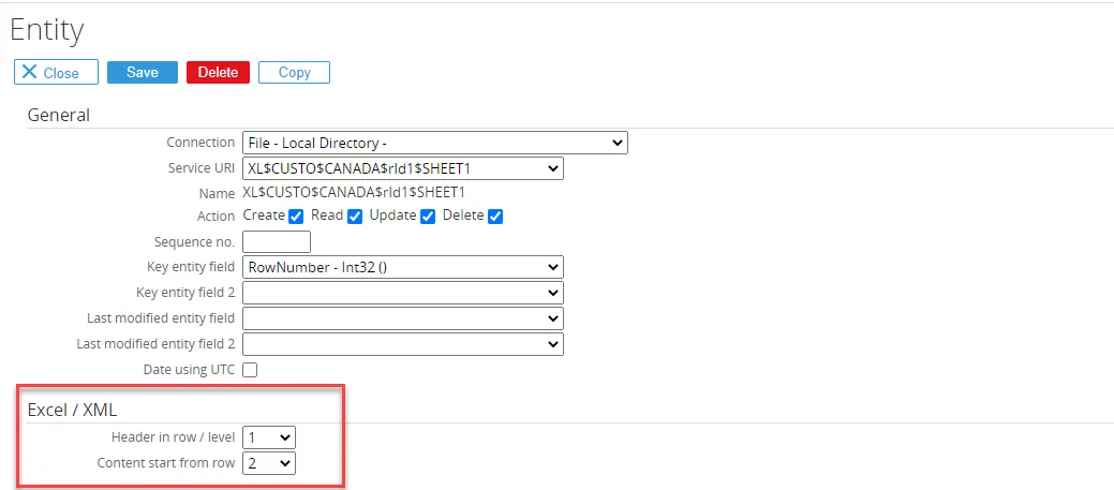
Section titled “File Provider”Starting January 2023, the File Provider will allow to read, create, update, delete files. Additionally, it will be able to read from and write data to Excel, CSV and XML files.
File (Local Folder/Path)
Section titled “File (Local Folder/Path)”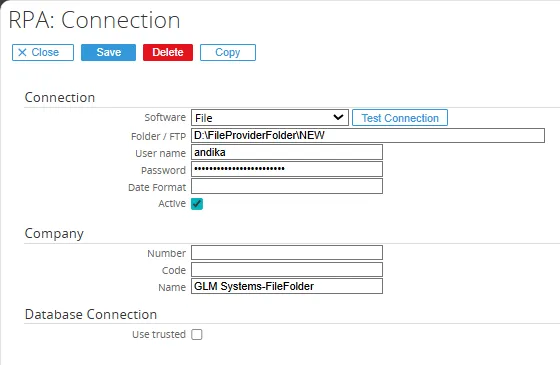
File (FTP)
Section titled “File (FTP)”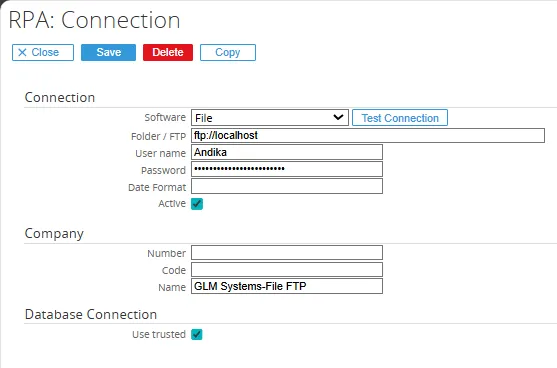
-
You must input the Username and Password.
File (Network folder)
Section titled “File (Network folder)”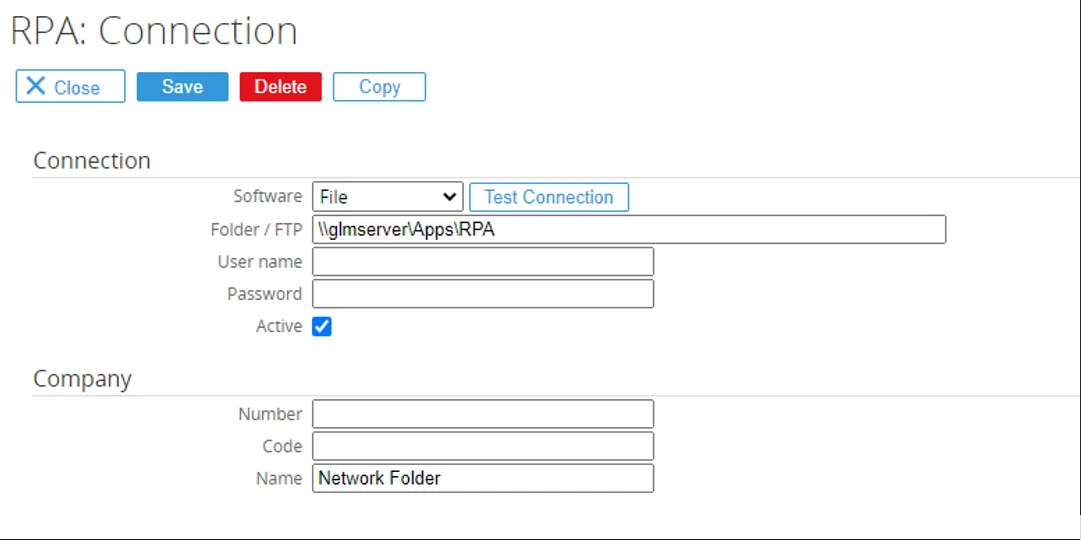
-
How to use File in Rules, you must register the entities and you can find in the Module/RPA/Setup/Integration/Entities.
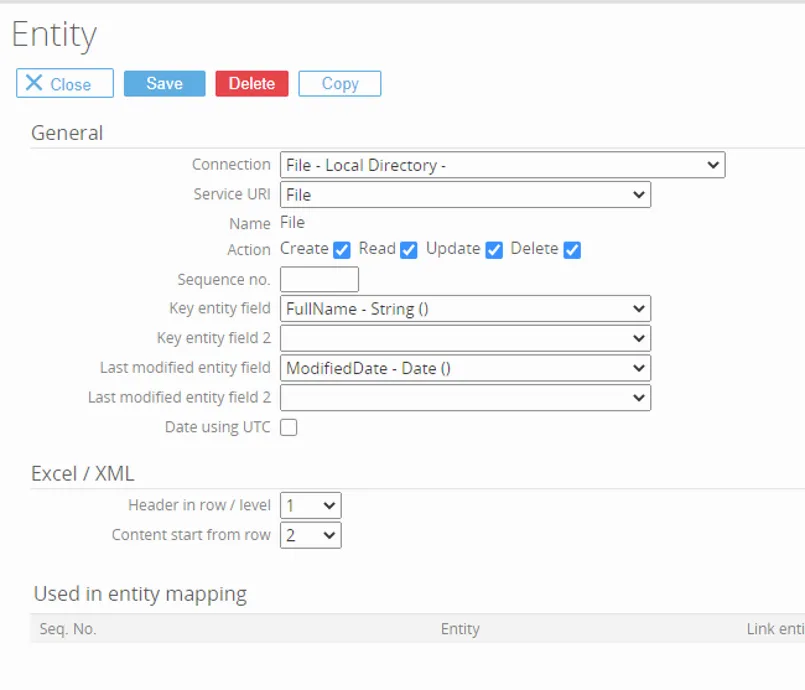

-
How to register entities for Excel, CSV, XML files.
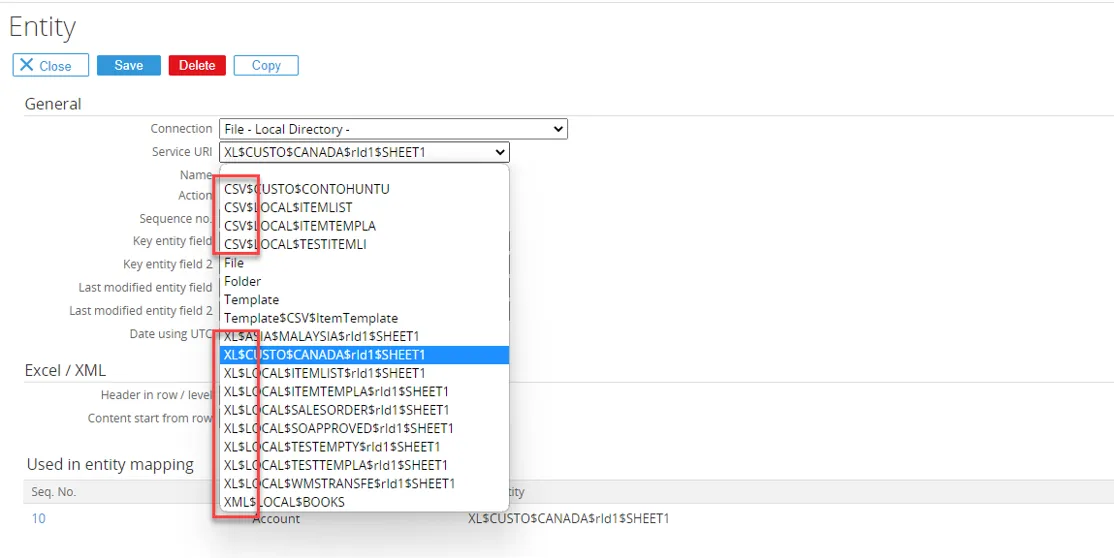
-
When you want to put the excel, csv and xml files data, you must ensure you specify the start row correctly. The systems will then check the data based on the row number. Please refer to the red highlights for more information.
Azure DevOps
Section titled “Azure DevOps”There are two alternative ways to access Azure DevOps APIs, by using OAuth or Personal Access Token as an authentication method. follow the steps below: Register OAuth Application To use modern authentication (OAuth), for accessing Azure DevOps API will needs a Client ID, Client Secret & scope. To get that information, follow the steps below.
-
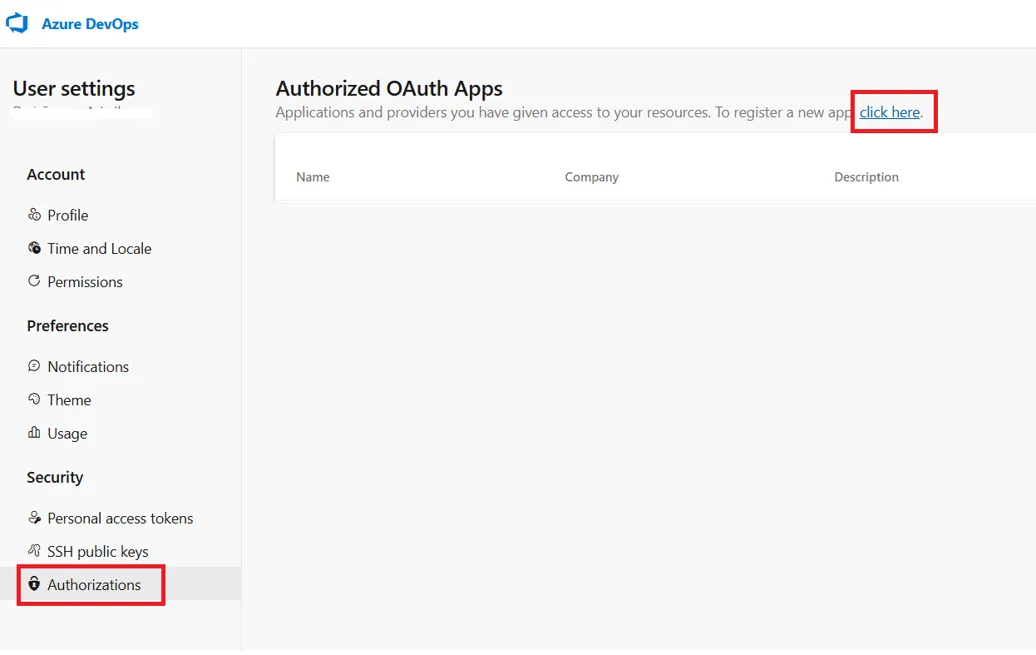
Register OAuth application with login into Azure DevOps https://dev.azure.com/ then go to User Settings and menu Authorizations and navigate to “click here” to create Authorized OAuth Apps.
-
Input the mandatory field & Enter
https://{synergy_url}/docs/GLMSysCIOAuth.aspxfor Authorization callback URL field & checked for Work Items (full)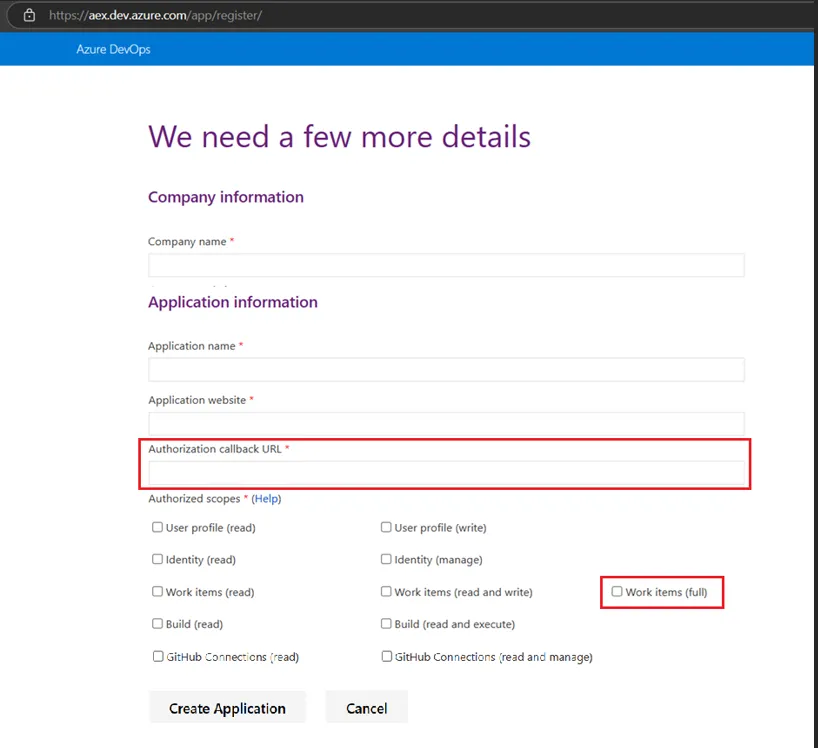
-
After success created, then copy the detail information of ClientID, Client Secret & Scope
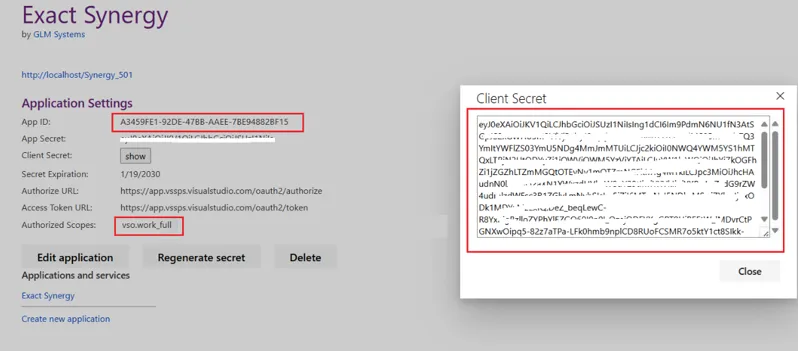
-
Record the Client ID, Client Secret & Scope value for use in the RPA connection
Generate Personal Access Token
Section titled “Generate Personal Access Token”To get that information, follow the steps below.
-
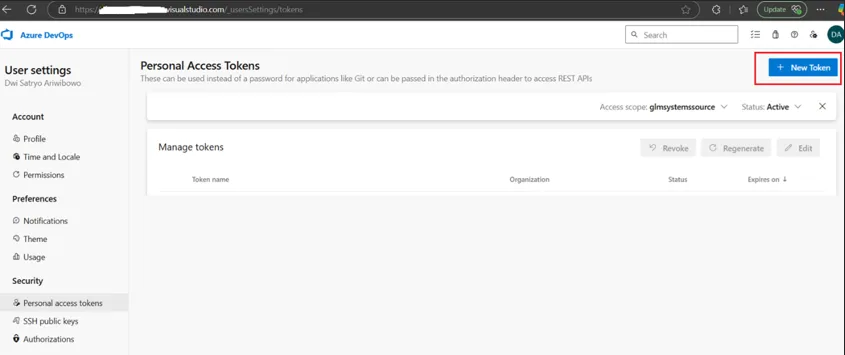
Please login to Azure Devops https://dev.azure.com/ then go to menu Personal Access Token and navigate to “New Token”.
-
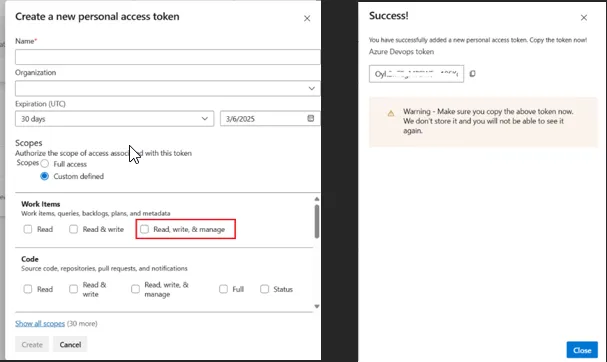
Please fill mandatory field, Select Organization & Checked the Work Items (Read, write & manage) and then after success created, Please copy the token.
-
Record the Personal Access Token value for use in the RPA connection
Configure the Connection of Azure DevOps in the RPA
Section titled “Configure the Connection of Azure DevOps in the RPA”Azure Devops Connection (* with OAuth)
Section titled “Azure Devops Connection (* with OAuth)”- Under Software, select Azure DevOps
- Under Type, select OAuth
- Enter
https://dev.azure.comfor the API:Uri field - Enter
_apis/projectsfor the EndPoint Name field - Enter
api-version=7.2-preview.3for the EndPoint Version field - Tick the Active checkbox
- Enter the Client ID from app registration to the Client ID field
- Enter the recorded Client Secret to the Client Secret field
- Enter the Scope from app registration to the Scope field
- Select use token type “Access Token”
- Enter
MicrosoftDocs/vsts-rest-api-specs/refs/heads/master/specification/wit/7.2/workItemTracking.jsonas Swagger Filename (if entity shows an error, let it empty) - Enter Azure DevOps Organization for the Company Name field
- Click the Save button
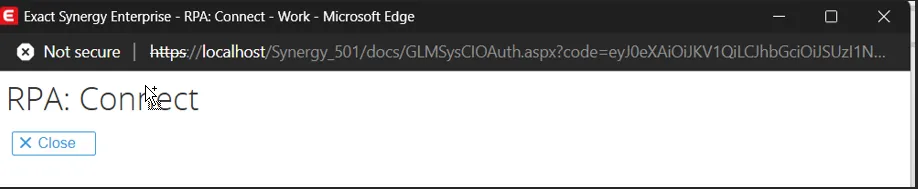
- Click the Connect button, and follow the steps until it shows “RPA: Connect”

Azure Devops Connection (*with Personal Access Token)
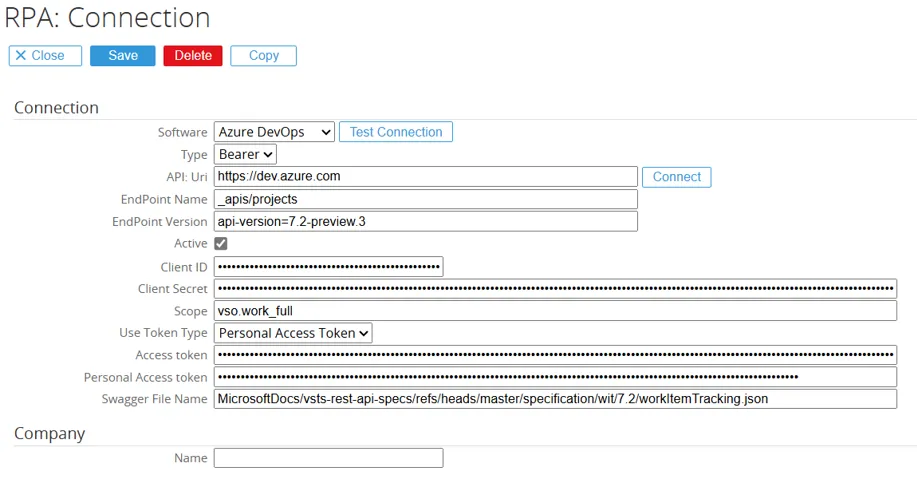
Section titled “Azure Devops Connection (*with Personal Access Token)”- Under Software, select Azure DevOps
- Under Type, select Bearer
- Enter
https://dev.azure.comfor the API:Uri field - Enter
_apis/projectsfor the EndPoint Name field - Enter
api-version=7.2-preview.3for the EndPoint Version field - Tick the Active checkbox
- Enter the Scope from app registration to the Scope field
- Select use token type “Personal Access Token”
- Enter the recorded Personal Access Token (from Azure DevOps) to the Personal Access Token field
- Enter
MicrosoftDocs/vsts-rest-api-specs/refs/heads/master/specification/wit/7.2/workItemTracking.jsonas Swagger Filename (if entity shows an error, let it empty) - Enter Azure DevOps Organization for the Company Name field
- Click the Save button
- Click the Connect button
Setup Integration
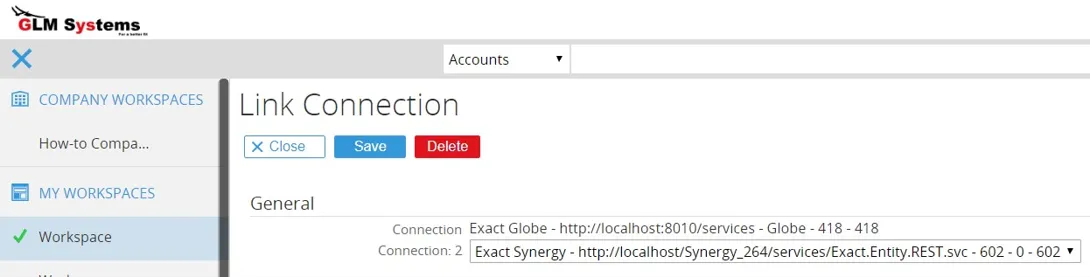
Section titled “Setup Integration”Setup the connection link
Section titled “Setup the connection link”A link between two connections is required for the integration. This way the integration knows which main connection is linked to which linked connection. As there could be multiple connections. The connection link is used in the integration mapping. Add the bottom of the connection maintenance, click the add button to add the connection which should be linked.
Import mapping
Section titled “Import mapping”For the software solutions supported by RPA, and when applicable, a default mapping xml file would be available in the respective Templates folder. In the templates folder open the software solution folder you want to integrate with and in the folder look for the [ProviderName]EntityMappings.xml. This file would be for an integration between the software solution and Exact Synergy. The file can be imported from RPA/Integration/Setup: Templates/Import For Exact Globe and Exact Synergy there is already an integration available via ELIS. There could be scenarios where additional integration is needed or limited integration is needed then the RPA integration framework could be used. There is some basic default mapping available which can be imported from the Templates\Exact Globe folder. Look for the ExactGlobeEntityMapings.xml.
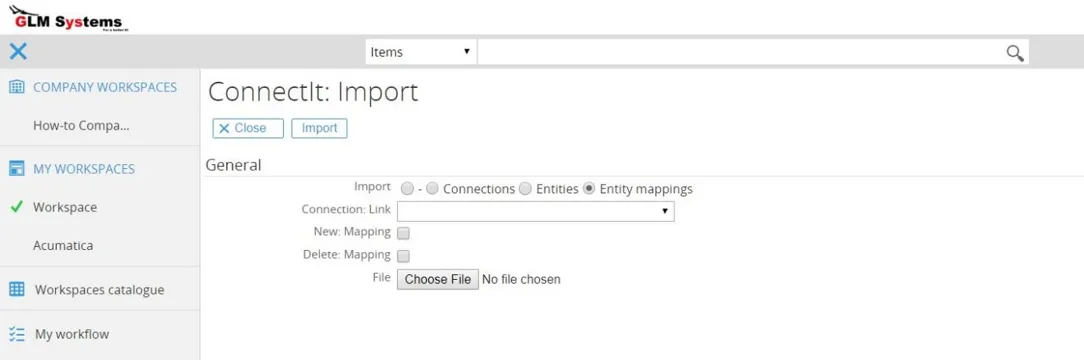
Import Select the option Entity mappings
Connection: Link Select the Connection link required for the entity mappings. This connection link will be used instead of the connection link in the xml file and the connection linked to the entities.
New: Mapping In case the mapping already exists, this will still create a new mapping.
Delete: Mapping In case mapping already exists, the existing mapping will be deleted.
Insert ‘dummy’ record into Data Link table
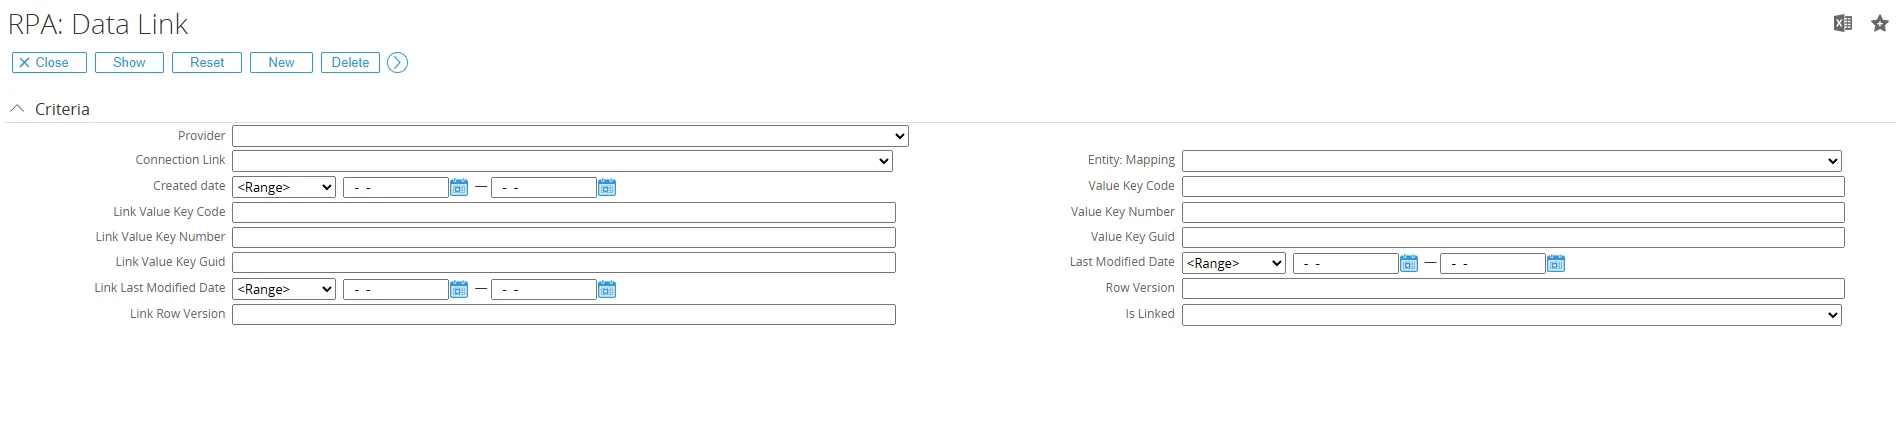
Section titled “Insert ‘dummy’ record into Data Link table”Via Modules > RPA > Reports > Integration > Data Link, dummy records can be inserted into the Data Link able. The Data Link table is used to store the link between to two mapped connections and any data that is synced. The key from records on both sides is stored here together with the modified date of the record. The modified date information is used to check which data should be imported (linked: connection to main connection)/exported (main connection to linked connection).
When no record is available yet for a specific entity mapping, all data will be imported and exported. This is the reason before start if not all data need to be transferred to insert a dummy record so that only data that is changed after the time the dummy record is inserted will be imported/exported.
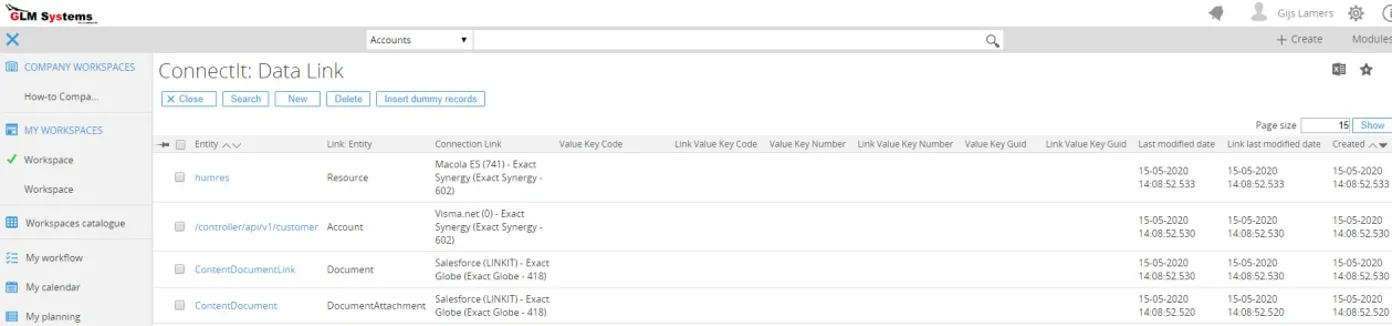
Columns RPA Data Link
EntityThe entity related to the main connection.
Link : EntityThe entity related to the linked connection.
Connection LinkThe connection link, when multiple connections are linked, there will also be a data link for each connection link.
Value Key Code / Value Key Number / Value Key GuidDepending on the key data type setup in the entity the corresponding column will be used to store the key value.
Link Value Key Code / Link Value Key Number / Link Value Key GuidDepending on the key data type setup in the link: entity the corresponding column will be used to store the key value.
Last Modified DateThis would be the modified date of the main connection record
Link Last Modified DateThis would be the modified date of the linked connection record
Setup background jobs for import and export
Section titled “Setup background jobs for import and export”Once the default mapping is imported the background jobs can be setup to start the syncing of data. There are two batch files available in the setup/installer. The batch files make use of the Exact.Process.exe to run the import and export logic. The direction of the import is from main connection point of view. Export would mean send data from the main connection to the linked connection. Import would mean send data from the linked connection to the main connection.
Terminal window 1. GLMSysRPAExport.cmdReplace the virtual directory Synergy with the actual virtual directoryset virtualdirectory=Synergyset exactprocess="%~dp0Exact.Process.exe"%exactprocess% /DBCONFIG:%virtualdirectory% /ASSEMBLY:GLMSys.CI.Jobs /CLASS:ProcessBase /Direction:E2. GLMSysRPAImport.cmdReplace the virtual directory Synergy with the actual virtual directory set virtualdirectory=Synergy set exactprocess="%~dp0Exact.Process.exe"%exactprocess% /DBCONFIG:%virtualdirectory% /ASSEMBLY:GLMSys.CI.Jobs /CLASS:ProcessBase /Direction:IIn the cmd file there is a virtual directory, change this directory to your Exact Synergy virtual directory from where Exact Synergy is running. Create a task schedule in the windows task scheduler or a SQL job for these command files. Which will start the export and import of data on a schedule. These jobs can be setup the same way other standard Exact Synergy jobs are setup.
The background jobs support the following parameters, syntax is /[Parameter name]:[value] :
Parameter Name Description Value(s) Direction Direction of the sync I: Import1: ImportE: Export0: ExportProviderName Name of the provider for which the import should run. Used when linked to multiple software. ExactGlobe,ExactSynergy,Salesforce,ExactOnline, …ID Specific ID for data to export or import PendingID ID for the pending record to import or export ToEntityName Name of the entity where the data will be written to Entity name of the linked connection FromEntityName Name of the entity where the data will be written from Entity name of the main connection SkipPending Determines whether to retry records in the pending list 0: Include retry of pending records1: Exclude/Skip retry of pending recordsFromLastModifiedDate Date to re-import or re-export records. When set, it overrides the DataLink table’s last modified record. Note: Remove this parameter after re-import/re-export to avoid always starting from this date. yyyy-mm-dd(e.g.,2020-10-30)
oryyyy-mm-dd-hh.mm(e.g.,2020-10-30-8.15)Example command line file import for accounts, contact and addresses and skip any record which are in the pending list.
Terminal window ::Replace the virtual directory Synergy with the actual virtual directory set virtualdirectory=Synergyset exactprocess="%~dp0Exact.Process.exe"%exactprocess% /DBCONFIG:%virtualdirectory% /ASSEMBLY:GLMSys.CI.Jobs /CLASS:ProcessBase /Direction:I /FromEntityName:Account /SkipPending:1%exactprocess% /DBCONFIG:%virtualdirectory% /ASSEMBLY:GLMSys.CI.Jobs/CLASS:ProcessBase /Direction:I /FromEntityName:ContactPerson /SkipPending:1%exactprocess% /DBCONFIG:%virtualdirectory% /ASSEMBLY:GLMSys.CI.Jobs /CLASS:ProcessBase /Direction:I /FromEntityName:Addresses /SkipPending:1
Setup background job for truncate integration log and rules log
Section titled “Setup background job for truncate integration log and rules log”The integration and rules have logging capabilities which can help out in troubleshooting any issues. To control the size of the log, log records can be deleted after a x number of days using the Log job.
In the settings Modules > RPA > Setup > Setting > Settings setting the number of days can be set for the Integration and Rules Engine log
To run the truncate of the log a sql job or scheduled task can be set up with the following parameters for the Exact.Process.exe
[Synergy location]\BIN\Exact.Process.exe /DBCONFIG:[Virtual Directory] /ASSEMBLY:GLMSys.CI.Jobs /CLASS:Log
Setup view builder
Section titled “Setup view builder”Import view
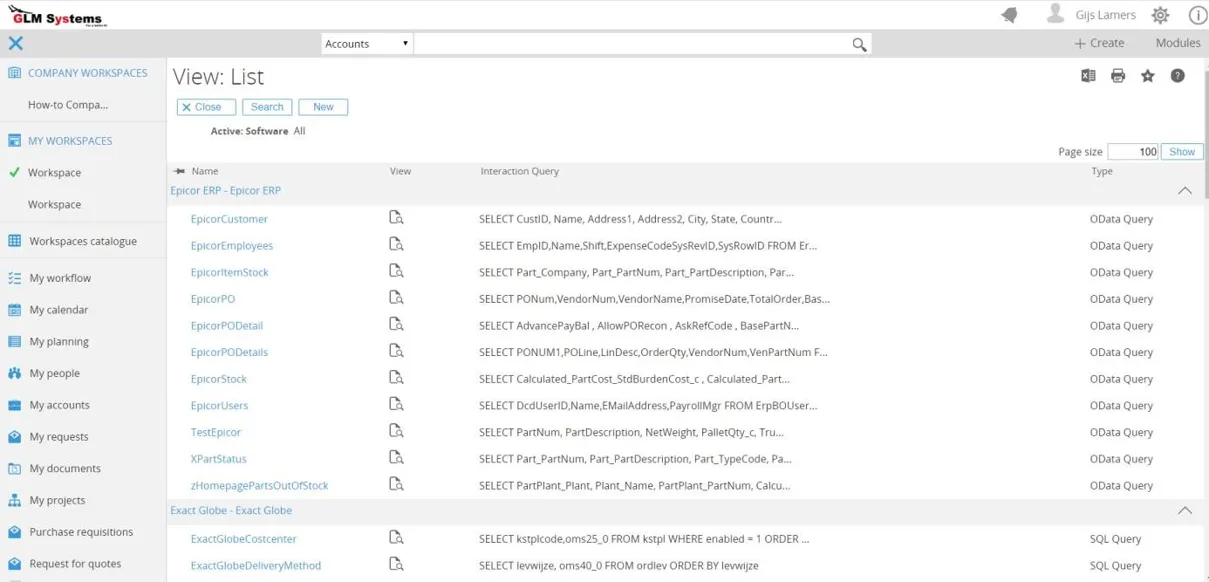
Section titled “Import view”Via Modules > RPA > Setup > Templates > Import the standard available views can be imported. The views can be imported via the Templates folder and each software will have some standard views which can be imported. The views xml will have the following name [ProviderName]Views.xml. The file can be imported from Modules > RPA > Setup > Templates > Importt. Keep the default selection ‘Views’ to import the views.
Installation application starter
Section titled “Installation application starter”Exact Globe
Section titled “Exact Globe”From Exact Synergy it is possible to start an Exact Globe application, this could be a maintenance application, list or entry application. To make use of this a separate installation need to be done on the user PC in the Exact Globe folder. In the RPA installer Templates\Exact Globe folder there is ExactGlobeSpawner.zip.
Project plus has 2 feature :
Macola
Section titled “Macola”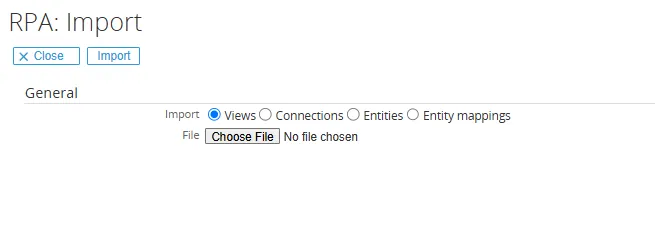
After the import the views will be available in Modules > Reports > Views >List
Setup rules engine
Section titled “Setup rules engine”Back office setup: Exact Globe
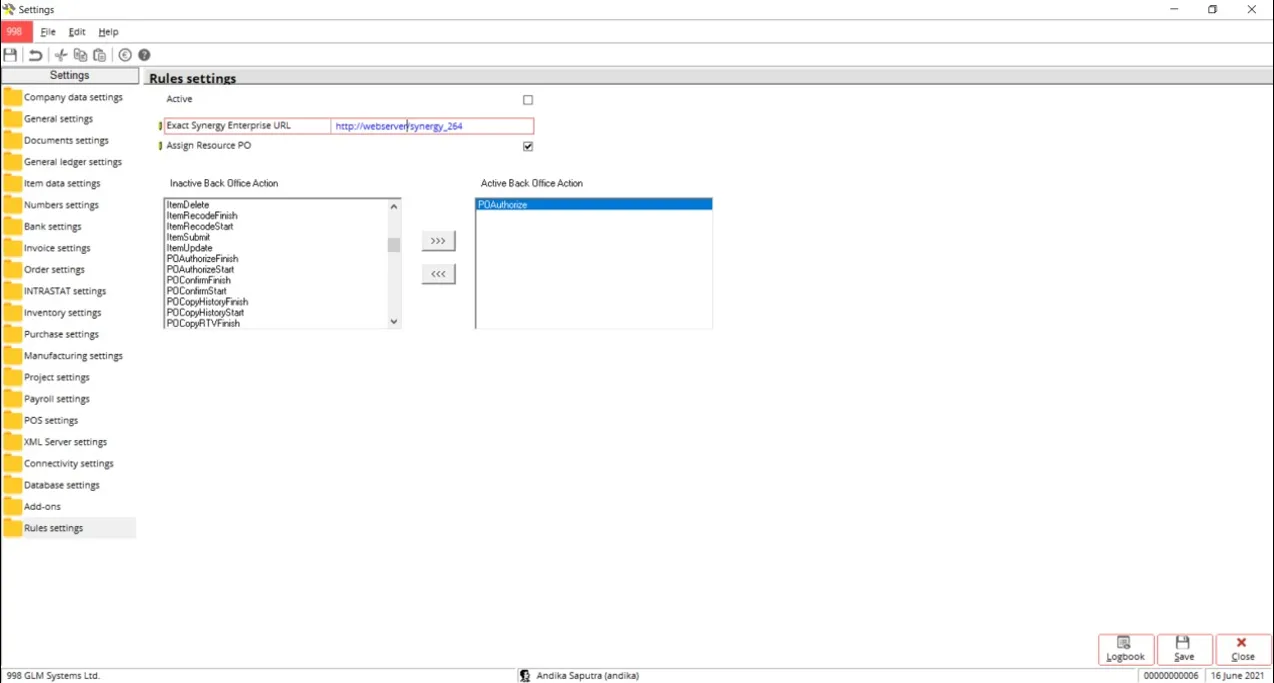
Section titled “Back office setup: Exact Globe”When in Exact Globe actions like saving of data, authorizing, unauthorizing and other processing action are performed by the user the rules engine in Synergy will be called so that rules can be executed, and validation message or actions can be triggered. To enable this in Exact Globe the Exact Synergy Enterprise URL needs to be set in the Rules settings.
The rules engine also has a template for PO approval, one additional option given is, after a purchase order is created or a purchase order is unauthorized the user has the option to select a specific person to be assigned based on the current actors of a workflow. Select System > General > Settings
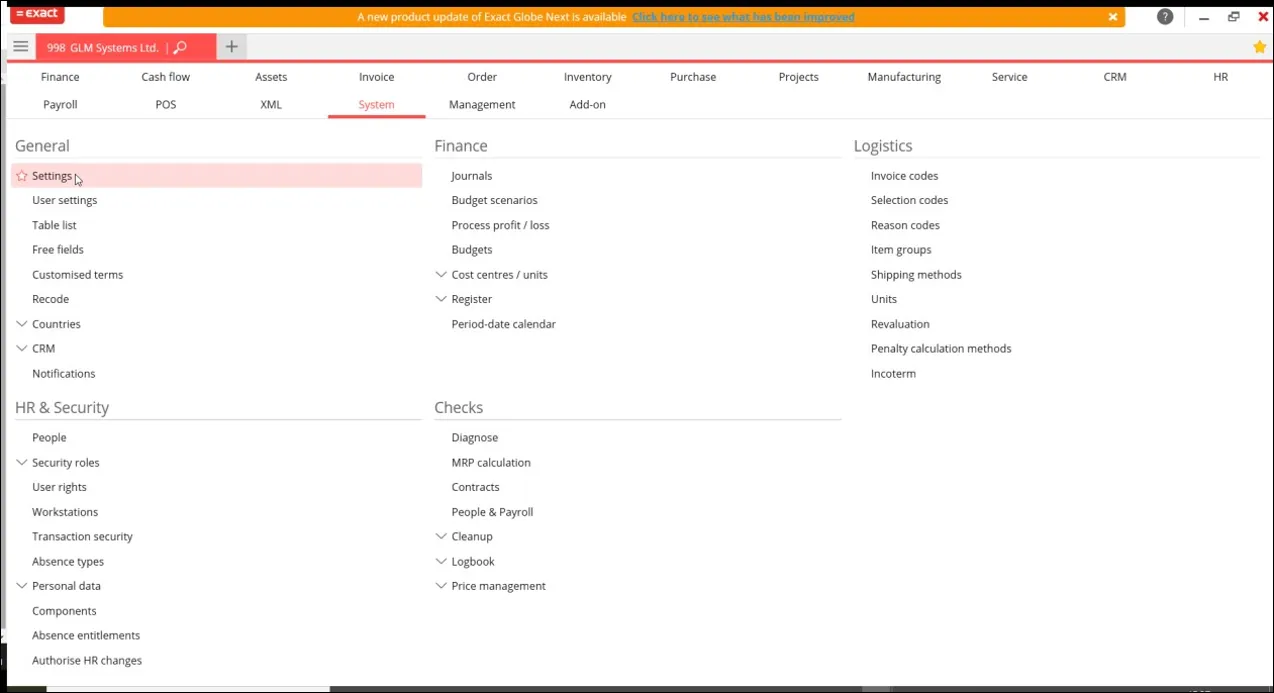
Click Rules Settings, Enter URL in Exact Synergy Enterprise URL, select the backoffice action you want to use in the rules engine In Exact Synergy for extra validation or actions.
Setup email
Section titled “Setup email”Setup email exchange/SMTP settings
Section titled “Setup email exchange/SMTP settings”To be able to send email from the Rules Engine and to send out any error notification email when a scheduled rule fails, the email Exchange or SMTP settings need to be set.
This is done via Modules > RPA > Setup > Email or Modules > System Plus > Setup > General > Settings.
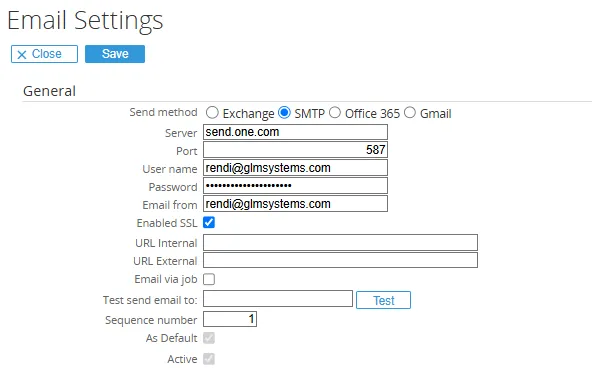
Email Settings
ServerThe email server used to send messages. Example (SMTP one.com): send.one.com
PortThe port used to send email
User nameYour email address for SMTP authentication
PasswordThe password for the email account or username
DomainYour domain name
Email fromThe sender address. Note: With Gmail or Outlook Live, the actual sender will be the username email
Enabled SSLEnable secure communication (SSL/TLS)
URL InternalYour internal Synergy URL, used by Workflow Plus email notifications after approve, realize, process, or reject
URL ExternalYour external Synergy URL, used by Workflow Plus email notifications after approve, realize, process, or reject
Email via jobSend emails via a background job if direct sending is delayed
Test emailThe address to send a test email to
Setup email office 365
Section titled “Setup email office 365”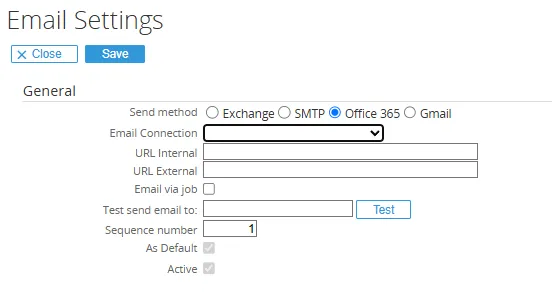
Setup email Gmail (Sign in with app password)
Section titled “Setup email Gmail (Sign in with app password)”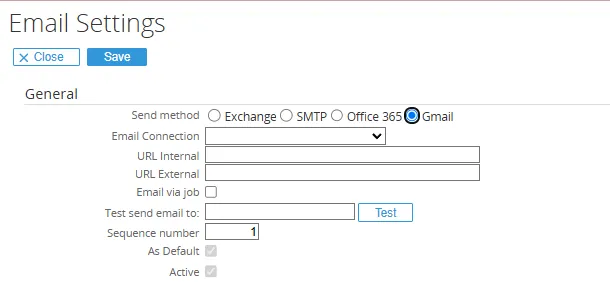
To generate an app-specific password for Gmail:
- Go to your Google Account.
- Select Security.
- Under Signing in to Google, select 2-Step Verification.
- At the bottom of the page, select App passwords.
- Enter a name that helps you remember where you’ll use the app password.
- Select Generate.
- Follow the on-screen instructions to enter the app password.
The app password is the 16-character code that generates on your device. - Select Done.
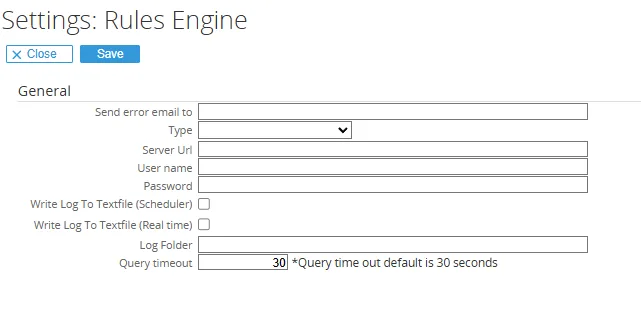
Setup send error email to
Section titled “Setup send error email to”For any erros happening in the Rules Engine when the rule is scheduled an email can be sent out for the errors that are happening. Go to Modules > RPA > Setup > Setting > Rules and set the email where any error should be sent to
Import rules
Section titled “Import rules”Examples rules can be imported from the Templates[Software solution] and Examples folder. Look for any file which have Rules included in the name. The rules can be imported from Modules > RPA > Templates > Rules:Import or from Rules > Setup > XML > Import.
After the Rules are imported, they can be seen in the RPA/Interaction/Search/Rules. Select the Division and/or the Connection for which the rules should be imported.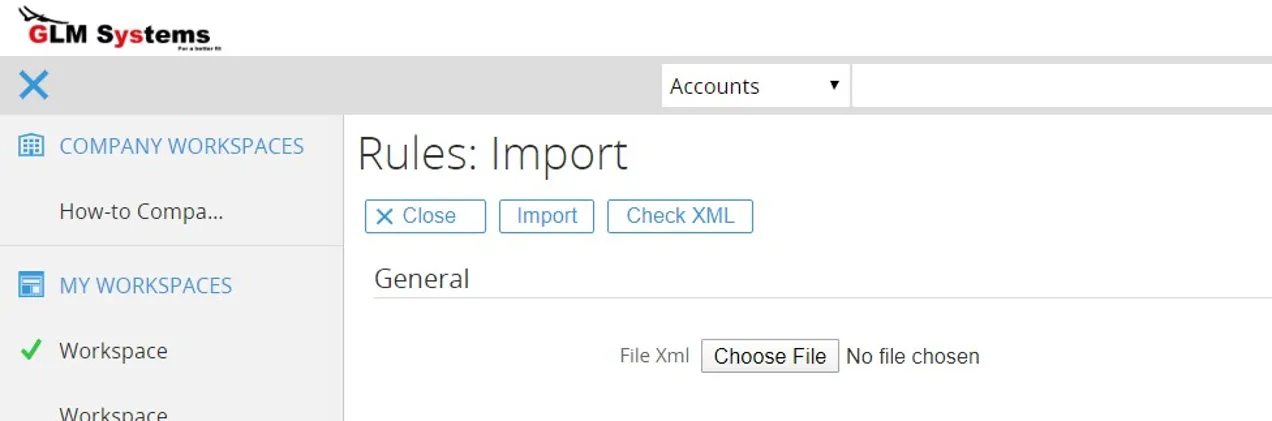
Import (button)
Import will import the xml with the rulesCheck XML (button) The check xml is used to see which divisions and connections are used in the xml. After check, any division and connection used will need to be mapped to the available division and connection in Exact Synergy.

Maintain and configure
Section titled “Maintain and configure”Integration
Section titled “Integration”The default mappings for the integration are already imported as part of the setup. But any additional integration requirement can be setup by the following 5 steps:
After these 5 steps the export and/or import can be started. The integration result is all captured in the log and pending list.
Create new entity for the main connection
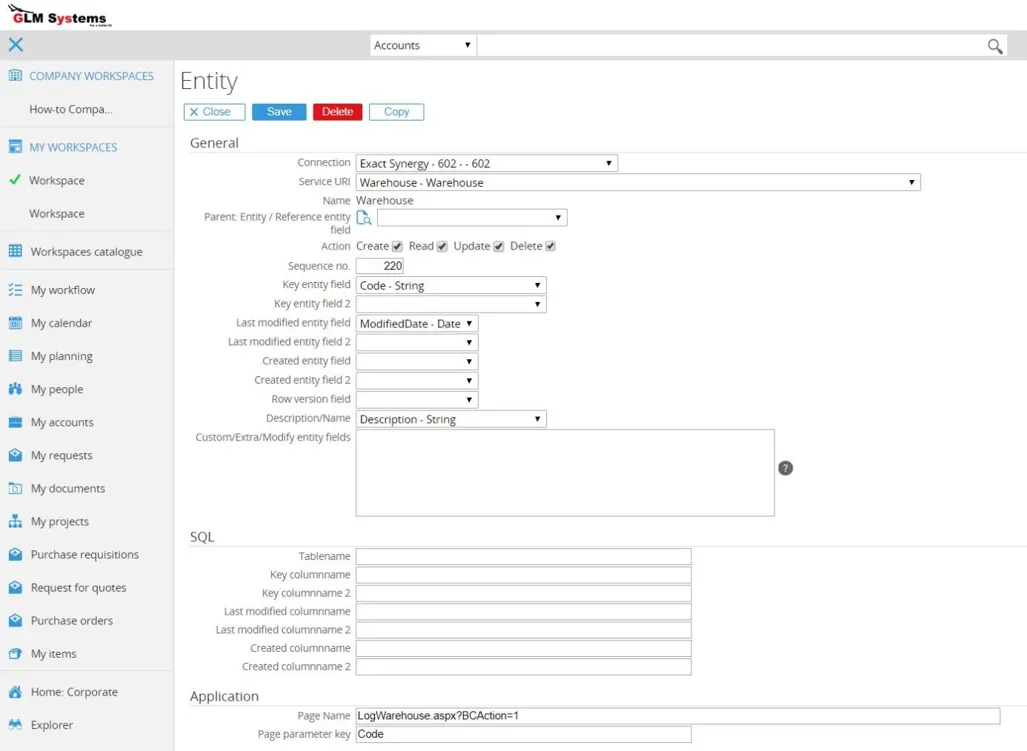
Section titled “Create new entity for the main connection”Via RPA > Setup > Integration > Entities, a new entity can be created.
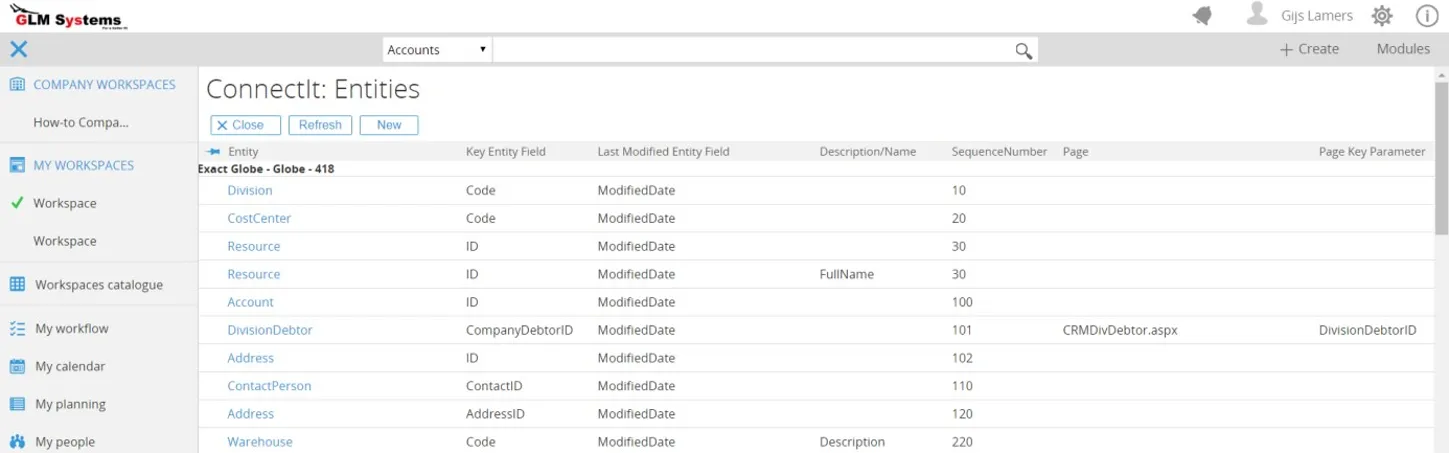
For this example, we create a new enity for warehouse
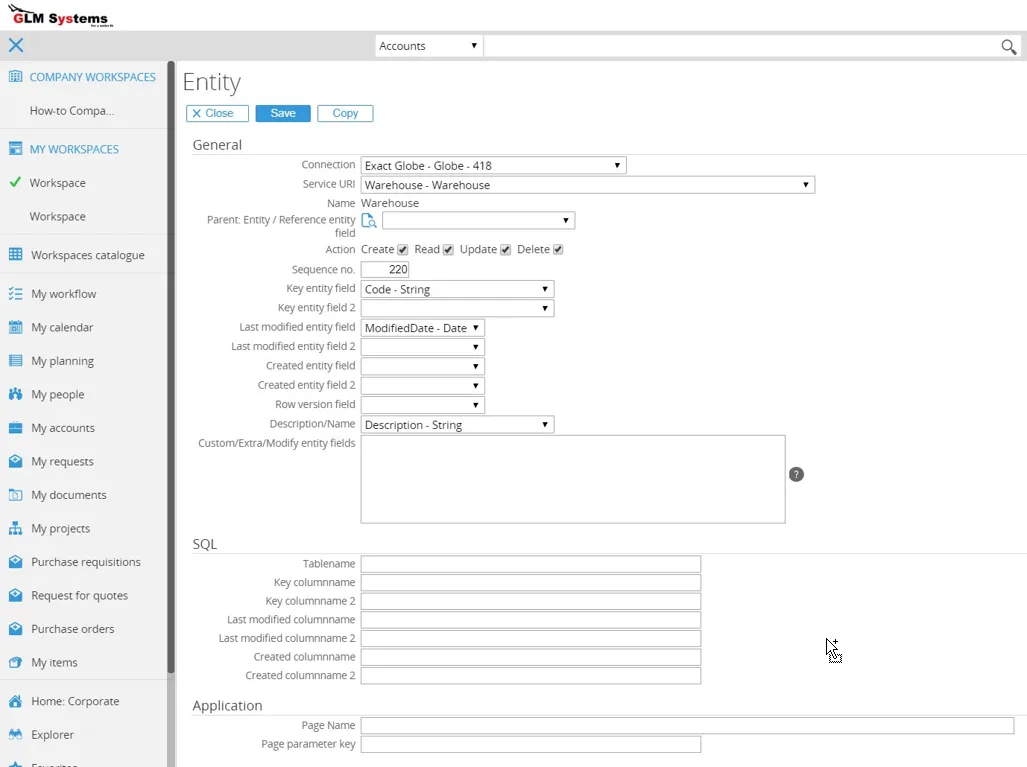
Field Description Connection Select the connection to be used for this entity, once the connection is selected the Service URI list will automatically be populated with available entities for the selected connection. Service URI All available entities for the selected connection, select the entity which need to be used in the integration. Name Name of the entity automatically filled after the entity is selected. Parent: Entity The parent entity can be used to use fields in the mapping which are stored at the parent record for this entity. Reference entity field The reference/link field between the parent entity and this entity. The field in the entity which is the value of the parent key. Action Available actions create, read, update and/or delete for this entity. Not always every entity has all the options available. Some could be read only. This all depends on the API. Sequence no. The sequence no. given to this entity this will determine the order in which the data is displayed. This will help in determining which records should be import exported first. The order of the import/export will be determined by the sequence no. in the entity mapping. Key entity field Select the key field for the entity. This key field will be stored in Exact Synergy in the Data Link table together with the related/linked record for the software which is integrated to The list of available fields is automatically populated based on the selected entity in the service URI field. Available fields list Automatically populated based on the selected entity in the Service URI field. Key entity field 2 Select the key entity field 2 in case more than 1 key is used. Last modified entity field Modified date field, this field is used to keep track of the changes on the data. The last modified date is also stored in the Data Link table and is used to import or export only the latest changes. Last modified entity field 2 Some software solutions split the date and time into two different fields. This would be the time field (SAP B1). Created entity field Some software solutions (SAP B1) will only set the modified date when data is changed not when the data is created. Created entity field 2 Some software solutions (SAP B1) will only set the modified date when data is changed not when the data is created and have the date and time into two different fields. Row Version Field Some software solutions (Epicor) don’t use a date field to indicate a change in the record, they make use of a row version field. Which is also a specific type in SQL. Description/Name Description/Name field of the entity, this will be used so that a view can be built automatically to look up data for these entities. Custom/Extra/Modify entity fields For some software solutions and their entities, it is possible to retrieve additional fields which are not exposed directly via the entity (and therefore don’t show up as an entity field to be selected as a key field or modified field). Any fields added here will then automatically be added to the list of available fields of this entity. The syntax to get a field which is not exposed as field by the entity but is available as field is: [field name],[Type]; Example (Salesforce): ContentDocument.Title,String; ContentDocument.Description,String; Example (Exact Globe): Custom/site.LastModifiedDateTime,DateTime; Custom field syntax [field name],[Type]; e.g., Salesforce: ContentDocument.Title,String; ContentDocument.Description,String; Exact Globe: Custom/site.LastModifiedDateTime,DateTime. SQL The SQL information filled in here will be used to get the last modified records directly via SQL (if SQL is available) by passing the API. Some API (example SAP B1) don’t have an option via the API to query the data. The API can only be used to create, update or delete the data. By setting the table information and the related key and modified fields the query can be constructed to retrieve the data. Table name Table name related to the entity. Key column name Key of the table should be the column where the key of the entity is linked to. Key column name 2 Last modified column, which is the second part of the modified column, the time part of the modified date. Last modified column name Column with the created date Last modified column name 2 Column with the created time Created column name Column that stores the created date. Created column name 2 Column that stores the created time. Application Page name The page to maintain / view the record for this entity. Applicable for browser based applications. Application which can be opened directly from Exact Synergy also can be added here (Exact Globe, Macola or Epicor). Page parameter key URL parameter for opening the record. In the log and pending list this information is used to open the record directly when this information is set. Some parameters can be used here to get information from the connection: Some parameters can be used here to get information from the connection:
Parameter Description @CompanyCodeWill be replaced by the company code set at the connection @CompanyNumberWill be replaced by the company number set at the connection @CompanyNameWill be replaced by the company name set at the connection 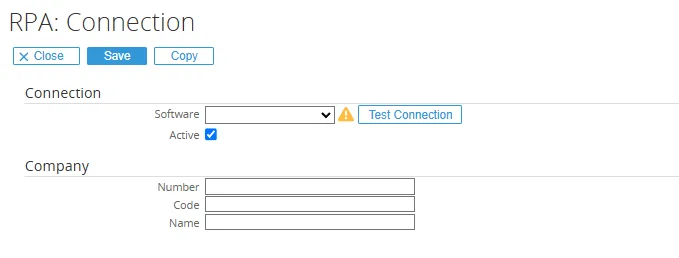
Example (Exact Globe) CompanyID=@CompanyCode&ScreenId=IN204000&SiteCD
Result (Exact Globe) CompanyID=12345&ScreenId=IN204000&SiteCD
Example (Exact Online) docs/CRMAccountCard.aspx?Division=@CompanyNumber
Result (Exact Online) docs/CRMAccountCard.aspx?Division=12345
Create new entity for linked connection
Section titled “Create new entity for linked connection”The entity created for the main connection will need the linked connection equivalent entity.
Once the related entity is created these two entities can be linked in the entity mapping.
Map/link entities
Section titled “Map/link entities”Via RPA > Setup > Integration > Mapping , a new entity mapping can be created or maintained.  In the entity mapping the main connection entity and the linked connection entity will be linked together.
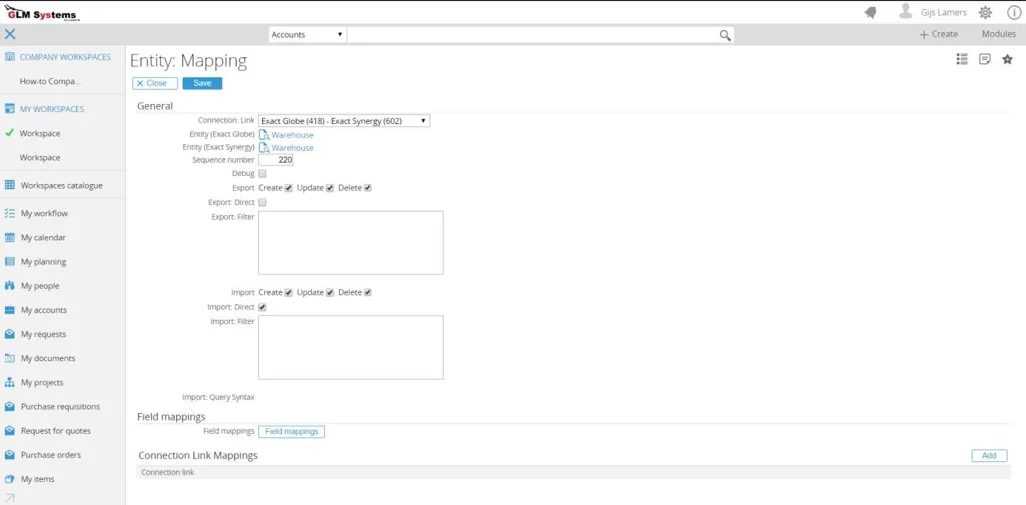
Connection: Link The linked between the main connection and linked connection. There could be more than 1 connection link in case multiple divisions are used. Once the Connection: Link is selected the entity and linked entity which need to be mapped can be selected.
Entity (main software name) Select the main entity to map
Entity (linked software name) Select the linked entity to map
Sequence number Sequence number to decide in which order the import/export for the entity mapping should be executed. To make sure when fields which have dependencies on other entities, that these entities are synced first.
Export Which option to enable for the export: Create, Update and/or Delete. Export is data from main connection to linked connection.
Export: Direct By default, a background job is used to handle the export, this option Export: Direct will export data once the data is saved. This is only possible where the providers have the option to send a ‘push notification’ when data is changed.
This could be enabled for example for Exact Online, Salesforce and Acumatica
Export: Filter Any filter to be applied for the export of data. This would be the filter that would be applied on Exact Globe data before the export is done.
The syntax is SQL syntax and will automatically be converted to the syntax supported by the provider, which could be SQL, OData or any propriety format. For providers which support OData, OData syntax is also supported (for example Exact Online).
Example (Exact Globe, Warehouse, exclude blocked warehouses) Blocked = False
Example (Salesforce, Account, account of type prospect modified after a certain date) LastModifiedDate >= 2019-01-01T00:00:00+00:00 AND Type = ‘Prospect’
Example (Salesforce, Creditor/Debtor custom object, only debtor creditor from a specific financial administration)
RecordTypeId = '0124H000000h8uFQAQ'AND byner__Financial_administration__c = '@LinkConnectionCompanyDescription'AND byner__Debtor_Creditor_number__c <> ''AND byner__Current_account_IBAN__c <> ''Example (Exact Online, Division, only division same as the connection) Code = @ConnectionCompanyNumber or Code eq @ConnectionCompanyNumber
Example (Exact Online, CRM/Accounts, only get active accounts)
StartDate le datetime’@TODAY’ and (EndDate ge datetime’@TODAY’ or EndDate eq null) and (Status eq ‘S’ or Status eq ‘P’ or Status eq ‘C’)
As seen in the Exact Online example parameters are supported based on information in the connection.
The following parameters are available
Parameter Description @CompanyCodeWill be replaced by the company code set at the connection where the data is originating from. Based on the direction set for ProcessBase job. @CompanyNumberWill be replaced by the company number set at the connection where the data is originating from. Based on the direction set for ProcessBase job. @ConnectionCompanyCodeWill be replaced by the company code set at the main connection. The main connection is where the connection link is setup. 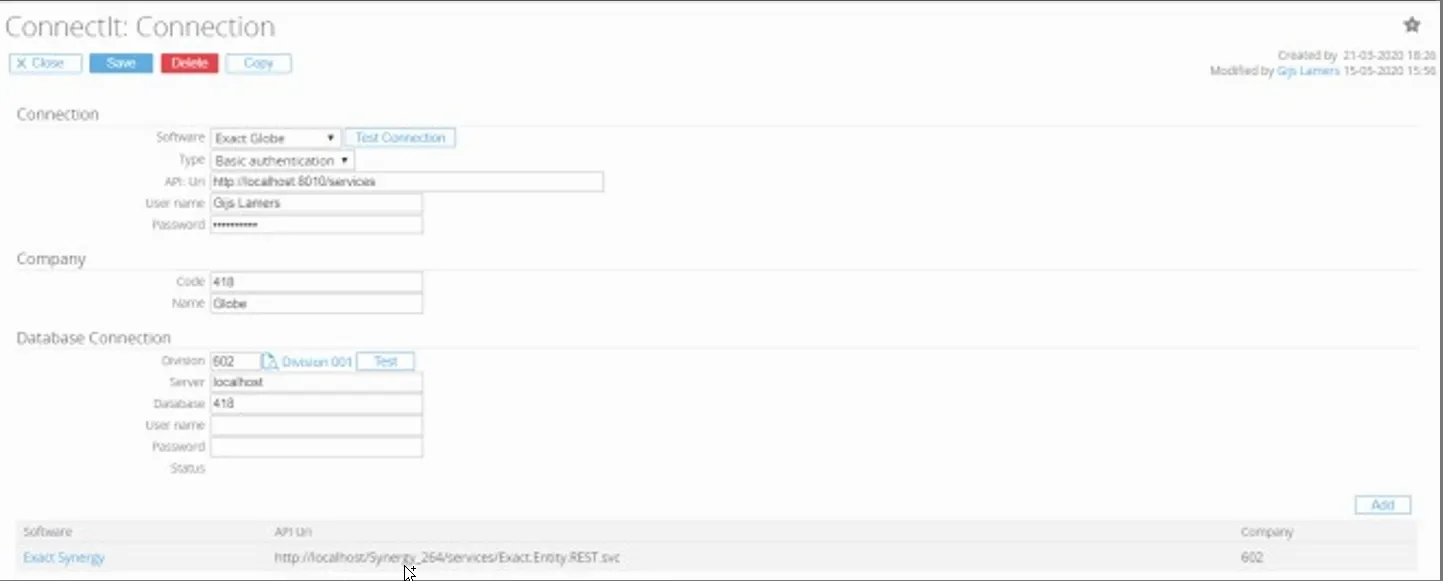
@ConnectionCompanyNumberWill be replaced by the company number set at the main connection. @ConnectionCompanyDescriptionWill be replaced by the company description set at the main connection. @LinkConnectionCompanyCodeWill be replaced by the company code set at the linked connection. Normally this would be the Exact Synergy connection. 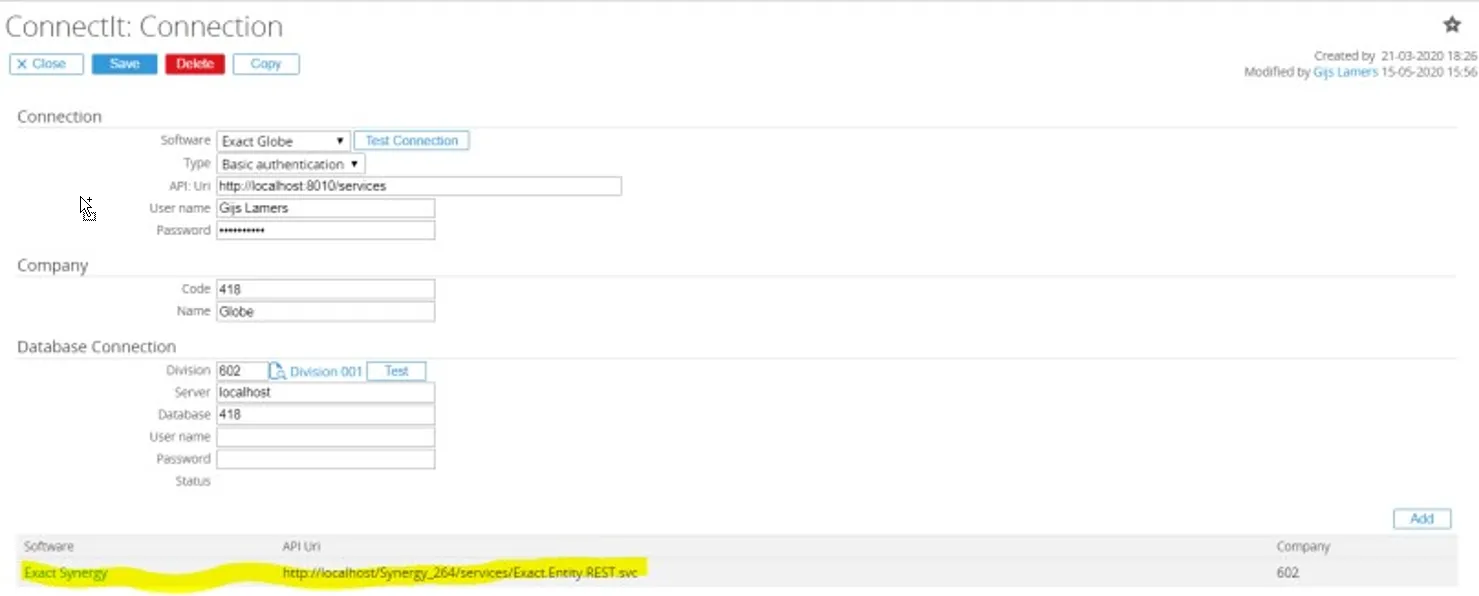
@LinkConnectionCompanyNumberWill be replaced by the company number set at the linked connection. @LinkConnectionCompanyDescriptionWill be replaced by the company description set at the linked connection. @TODAYWill be replaced by today’s date. Import Which option to enable for the import: Create, Update and/or Delete. Import is the data flow from linked connection to main connection.
Import: Filter Any filter to be applied for the import of data into the main connection. This would be the filter that would be applied on the linked connection data before the import is done.
The syntax is SQL syntax and will automatically be converted to the syntax supported by the provider, which could be SQL, OData or any propriety format. Example (Exact Synergy, Resource, only type of employees which are active) ResourceType = ‘E’ AND Status = ‘A’
Example (Exact Synergy, Account, only accounts of type supplier): CustomerType = ‘S’
Example (Exact Synergy, Document, prepare for download) PrepareDownload = true
Example (Exact Globe, Account, only customers and suppliers), use brackets when or is used: (CustomerType eq ‘S’ or CustomerType eq ‘C’)
Import: Direct By default, a background job is used to handle the import, this option Import: Direct will import data once the data is saved in the linked connection (if the connection support notification, for an Exact Synergy connection this is possible).
In case a connection is made between Salesforce and Exact Globe, where Exact Synergy is not used to store the data. It will depend on which is the ‘linked’ connection.
The Import: Direct will also only work if the provider has an option to send a ‘push notification’ upon change of data.
Field mapping (button) Opens the field mappings for this entity mapping, also can be opened from the entity mapping list.

Connection Link Mappings It is possible that multiple divisions in Exact Synergy are linked to multiple Exact Globe, Exact Online or other software administrations. For each Exact Synergy division, a connection is setup and also for each Exact Globe, Exact Online or other administration a connection is setup. Each matching connection will be linked and can be selected in the Connection Link Mappings.
By linking the connection link here, the mapping only needs to be done once. This would only be applicable if all the settings and field mappings would be exactly the same. In case there are different requirements between divisions a new entity mapping need be set up specifically for that connection link.
Map fields
Section titled “Map fields”Once the entity mapping is done the field mapping can be done.
Open the field mapping via the list of entity mappings or via the entity mapping by clicking on the hyperlink in the ‘Field: mappings’ column.

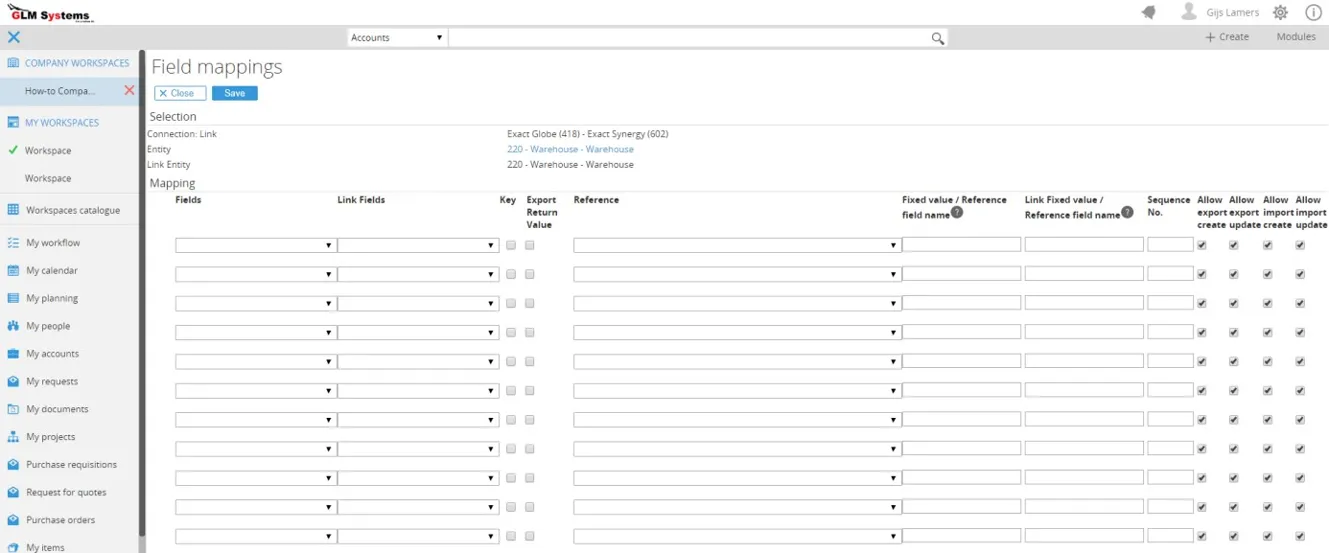
Fields Fields available in the main entity
Link: Fields List of fields available in the linked entity
Key In case an alternative key is needed to look for data, a combination of field mappings can be selected.
Example looking for the description / name of the warehouse. So, the code maybe different but once the name is found using the key it will map these two records. Another example would be for address to have a combined key for account, contact and address type.
Export return value This option can return a value after the record is created or updated. One example would be the debtor code generated in Exact Globe which would be returned to Salesforce.
Values (button) The values button will become visible after the field mapping is saved and allows to map values or add a transformation query. This will be described in ‘map field values’.
Reference List of all available entity mappings. When for example for the item entity there is a warehouse field then the entity mapping warehouse can be used as reference. The code will then automatically be converted to the Exact Globe code or Exact Synergy code. Another example would be managing field which would have the reference resource, the resource value would than automatically be converted to the correct value.
Fixed: value When data is a fixed value, the value can be entered here. There are also parameters available in the integration which can be used. The fixed value is the value which will go into Exact Globe when the import is running.
Parameter Description @NEWIDWill generate a new GUID as value. @TodayWill set today date as value. @DivisionWill use the division of the user which is running the job. @ConnectionCompanyCodeWill be replaced by the company code set at the connection. @ConnectionCompanyNumberWill be replaced by the company number set at the connection. @ConnectionSoftwareIDWill be replaced by the software ID of the connection. @FromConnectionCompanyCodeWill be replaced by the company code from the connection where the data is coming from. @FromConnectionCompanyNumberWill be replaced by the company number from the connection where the data is coming from. @FromConnectionSoftwareIDWill be replaced by the software ID from the connection where the data is coming from. @ToConnectionCompanyCodeWill be replaced by the company code from the connection where the data is sent to. @ToConnectionCompanyNumberWill be replaced by the company number from the connection where the data is sent to. @ToConnectionSoftwareIDWill be replaced by the software ID from the connection where the data is sent to. Link Fixed: value When data is a fixed value, the value can be entered here. There are also parameters available in the integration which can be used. The fixed value is the value which will be used for the Exact Synergy field when export is done.
The parameters that can be used are the same parameters which are available as for the Fixed: Value.
Sequence no This will be used in combination with the value mapping. The value mapping query will allow to make use of other fields from the field mapping (by using @fieldname). The sequence no. will determine the order in which the field values are retrieved and formatted. In that case if other fields are used in the formatting query these field can be retrieved first.
Allow export create Determines if the field value should be set when data is exported to Exact Synergy and the data doesn’t exists yet in Exact Synergy.
Allow export update Determines if the field value should be updated when data is exported to Exact Synergy and data exists in Exact Synergy.
Allow import create Determines if the field value should be set when data is imported into Exact Globe and the data doesn’t exists yet in Exact Globe.
Allow import update Determines if the field value should be set when data is imported into Exact Globe and the data exists in Exact Globe.
Map fields values
Section titled “Map fields values”The map field values can be opened from the field mapping Values button.
Mapping field values or using the query is used when the data need to be converted.
For example, when in one system Blocked field is passed on as value ‘Blocked’, but in the other system the data needs to be only the letter ‘B’. The value mapping can then be used to map these two. Map the value ‘Blocked’ against the value ‘B’. The other option is to write a formatting query which can be executed on SQL or as a query for that connection to get the correct value.For example, for a resource field mapping when the Exact Synergy resource number is stored as a field in the user table. A query then can be done to get the correct Exact Synergy resource which should be used.
SELECT ResourceNumber FROM User WHERE Id = @OwnerId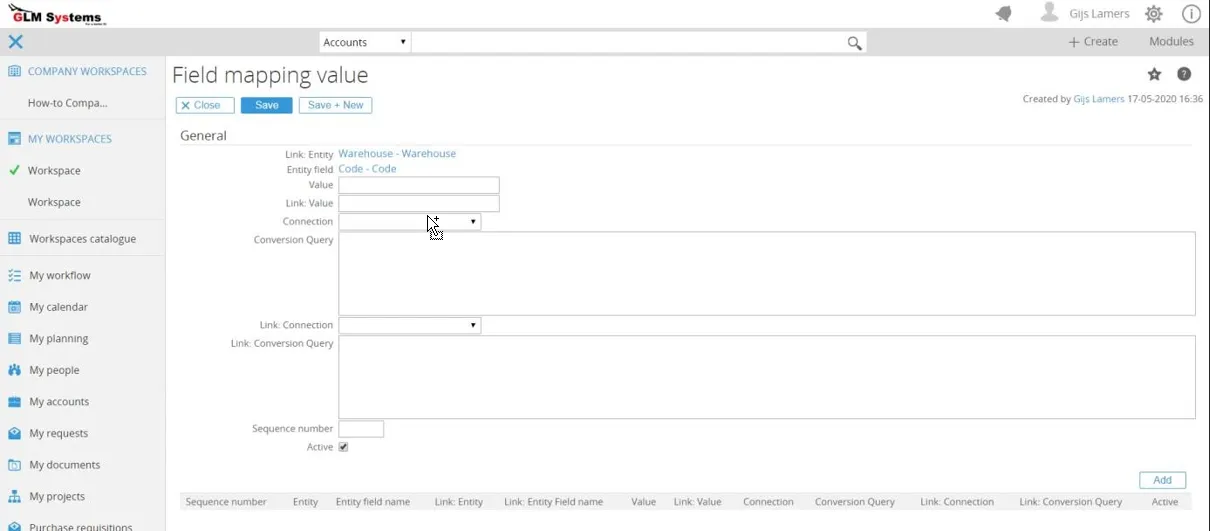
Link: Entity The two entities linked
Entity field The two fields linked
Value Value from the main entity
Link: Value Value from the linked entity
Connection Which connection to use for the conversion query, when left empty the query is executed as a SQL query on the Exact Synergy database.
Conversion Query SQL query to convert the data to the required data, the query will be run on the Synergy database.
Parameters in the query can be used to do the conversion for example, where WH is added in front of the code when importing the data into Exact Globe. @Code is the Exact Synergy entity field name.
SELECT ‘WH’ + ‘@Code’Link: Connection Which connection to use for the link: conversion query, when left empty the query is executed as a SQL query on the Exact Synergy database. Link: Conversion Query This is converting the Exact Globe data to Synergy data. Below example is adding ‘WH’ in front of the WarehouseID entity field value coming from Exact Globe.
sql SELECT ‘WH’ + ‘@WarehouseID’Another example, checking if account number is not empty, when empty use the account number from the settings:
SELECTCASEWHEN @AccountNumber IS NULL OR @AccountNumber = '' THEN(SELECT StringValue FROM BacoSettings WHERE SettingName = 'AccountCodeNextNumber')ELSE @AccountNumberEND AS AccountCodeSequence number The order in which the vale mapping should be executed.
Active Activate the value mapping, default it is activated.
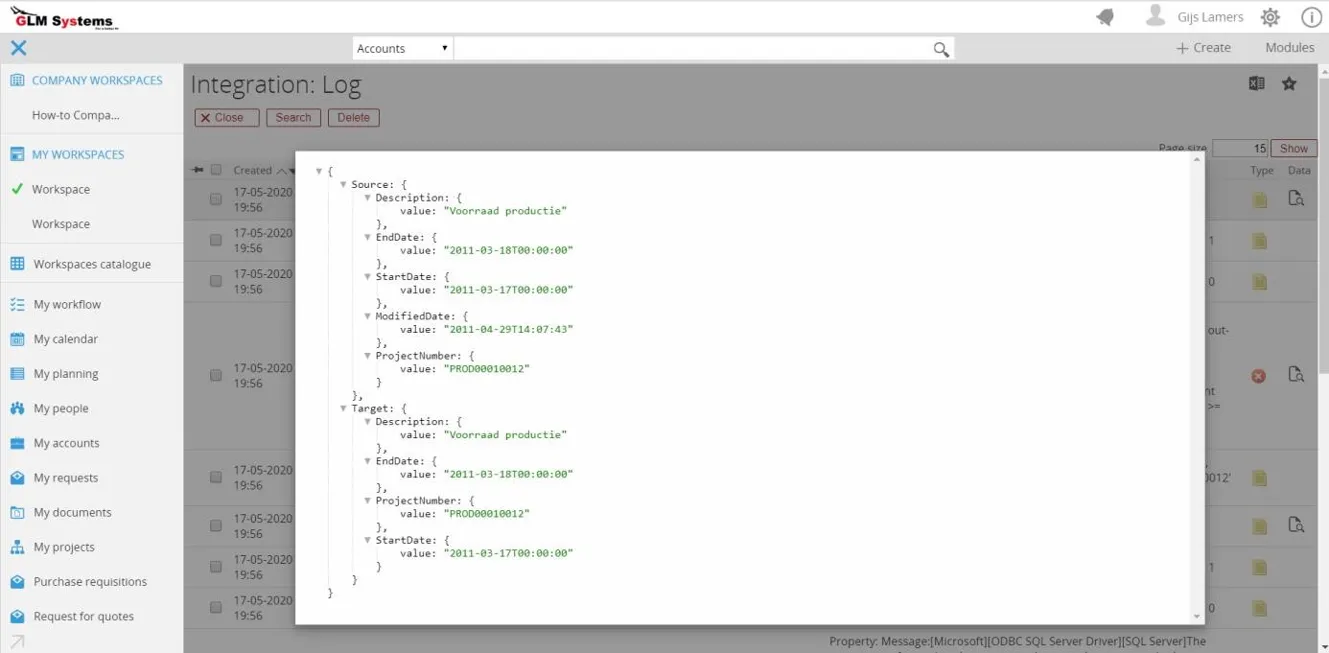
Monitor log
Section titled “Monitor log”After the import and export are done the result can be seen in the monitor log.

Log Record Fields
CreatedThe creation date of the log record.
CompanyThe company for the main connection.
Link: CompanyThe company for the linked connection.
Sequence no.The sequence configured in the entity mapping.
EntityThe entity for the main connection.
Link: EntityThe entity for the linked connection.
SourceIndicates whether the operation is Export or Import.
KeyThe key value of the record.
ReasonThe reason the data was not imported or exported, or an informational message.
TypeThe log record type: Error, Warning, or Message.
DataWhen in the entity mapping the debug is enabled, the data retrieved (source) and the data sent (target) can be seen here. This will help in troubleshooting as from here you can exactly see what data is retrieved and passed on.
Data
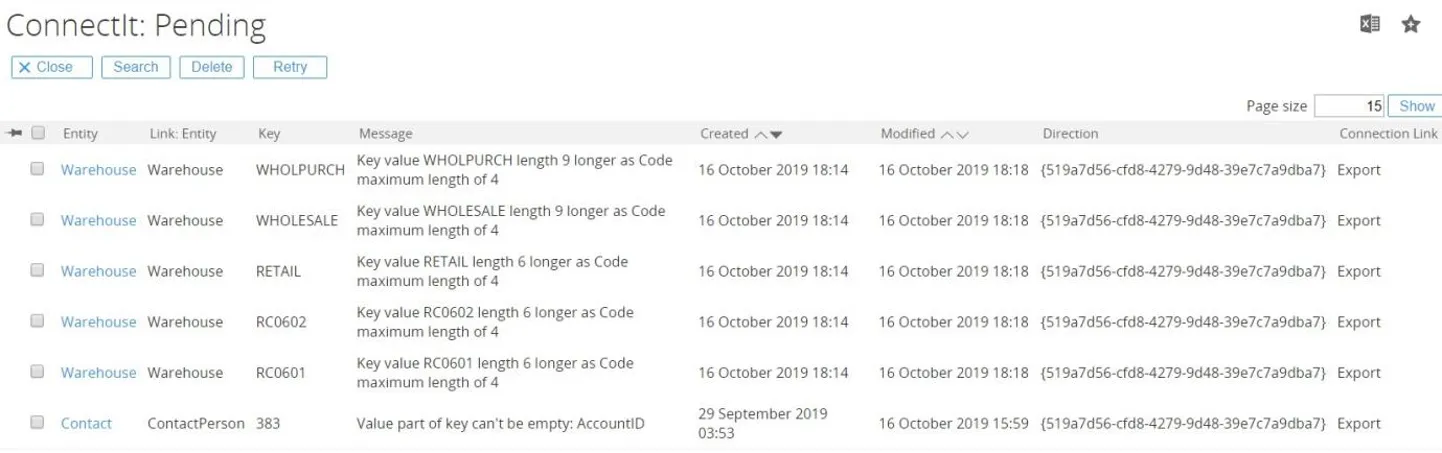
Monitor pending
Section titled “Monitor pending”Any records which can’t be exported or imported can be found in the pending log. With the reason / message because they can’t be imported. Every time the export or import is running these records would be retried.
Terminal window :: Replace the virtual directory Synergy with the actual virtual directoryset virtualdirectory=Synergyset exactprocess="%~dp0Exact.Process.exe"%exactprocess% /DBCONFIG:%virtualdirectory% /ASSEMBLY:GLMSys.CI.Jobs /CLASS:ProcessBase /Direction:E /SkipPending:1Data Link
Section titled “Data Link”Data link can be found via RPA > Reports > Integration > Data Link. The data link is the link of data between Exact Globe and Synergy. The data link also stores the modified date for software solutions that are mapped for each of the records. This is used during the import and export.
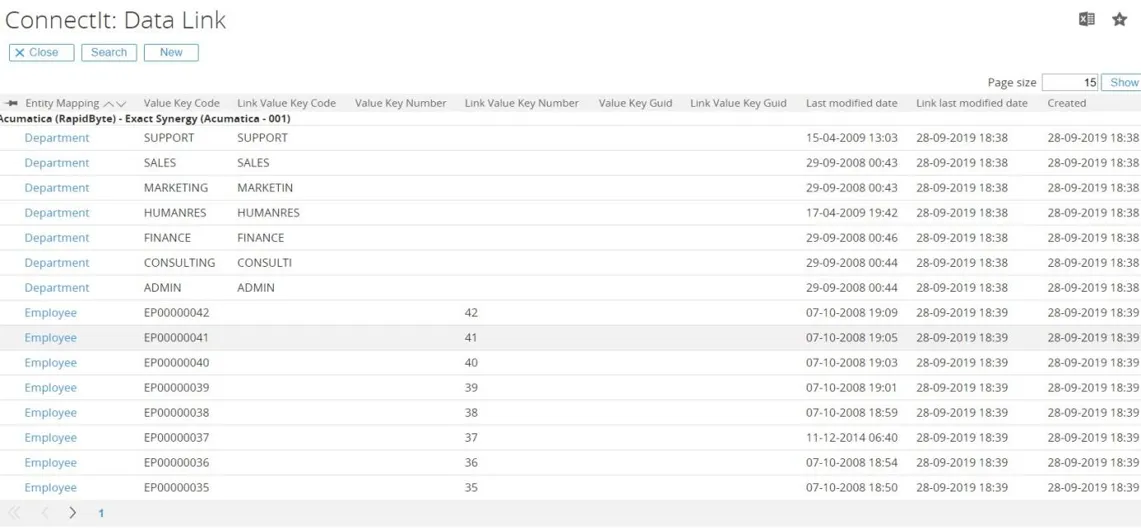
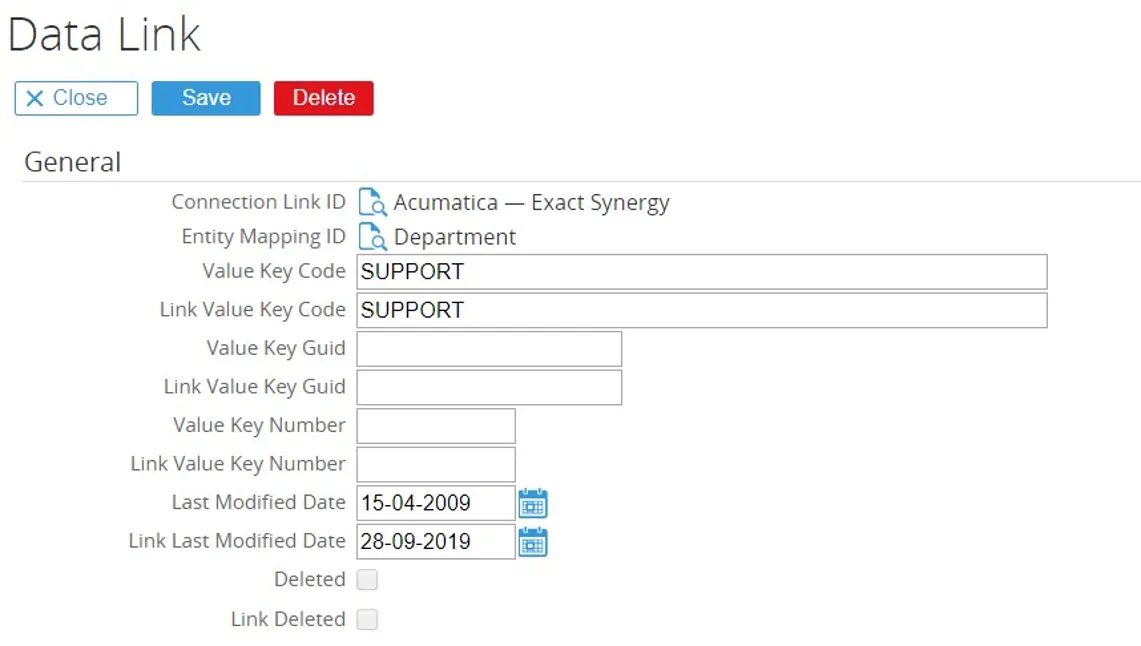
Data Link Fields
Connection Link IDThe connection link for the data link.
Entity Mapping IDThe entity mapping for the data link.
Value Key Code / Value Key Guid / Value Key Number One of these 3 values will be set depending on the type of data. During the import or export this information is automatically filled.
Link Value Key Code / Link Value Key Guid / Link Value Key NumberOne of these 3 values will be set depending on the type of data. During the import or export this information is automatically filled.
Last Modified Date Last modified date of the main entity record
Link Last Modified DateLast modified date of the linked entity record
Re-import or re-export data
Section titled “Re-import or re-export data”Once all data is synced records will only be synced again when a record is saved. But sometimes you would want to re-import or re-export all or some of the records.
Re-import or re-export could be needed because of:
• An additional field is mapped and will need to be send over for all the records
• Data is updated in SQL manually but the modified date was not being updated, because the modified date is not updated the integration will not pick up the records.
Insert from data link
Section titled “Insert from data link”When going to RPA / Reports / Pending page there is one option available to insert all pending records again based on the records in the data link table. The insert can be done via the ‘Insert data from DataLink’ button. This button is disabled and will only be enabled when the Entity Mapping is selected and the Direction.
This option will insert all records in the data link for the entity mapping in the pending. The next time the import or export will run the records will be synced. Remember to set the SkipPending:0 in the batch file used for the import or export.
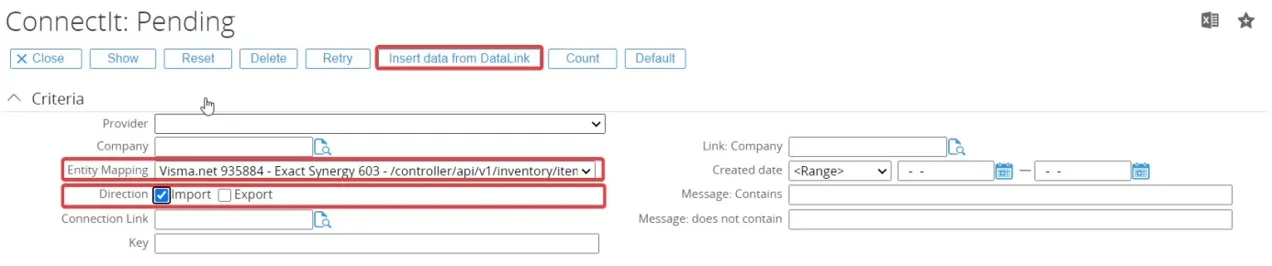
Re-import or re-exported from a back dated date
Section titled “Re-import or re-exported from a back dated date”One of the parameters as described in the parameter section is the FromLastModifiedDate. When this parameter is used in the batch file it will import or export all records changed after that date.
Example batch script with FromLastModifiedDate parameter:
Terminal window Replace the virtual directory Synergy with the actual virtual directory set virtualdirectory=Synergy_ExactGlobeset exactprocess="C:\Exact Synergy Enterprise 265\bin\Exact.Process.exe"%exactprocess% /DBCONFIG:%virtualdirectory% /ASSEMBLY:GLMSys.CI.Jobs/CLASS:ProcessBase /Direction:E /ProviderName:Email /ToEntityName:Document /FromLastModifiedDate:2021-01-25
File provider
Section titled “File provider”Below is an example that shows how to set integration between Account in Globe and Excel in File Provider. We can run the job after setting this up.
-
After creating entities for both provider (Globe and File), you can create a mapping entities configuration like image below.
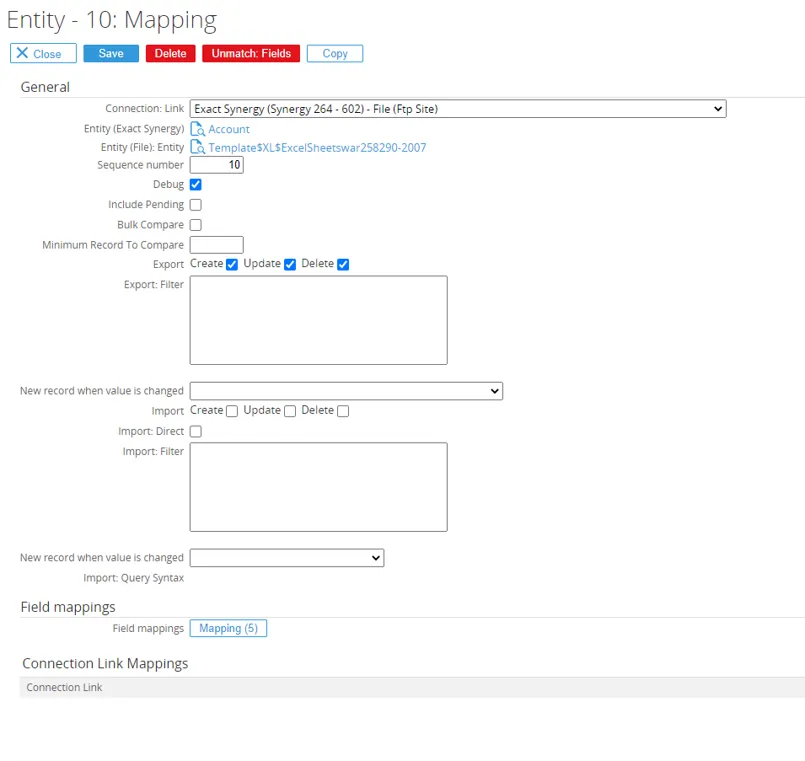
-
After creating the entity mapping, you can continue to create field mapping and follow the example below.

View builder
Section titled “View builder”The views that are imported and created can be used to view data and interact on data from other software solutions in Exact Synergy. The views can be used in Exact Synergy in the:
• Workspace
• Cards monitor
• Cards section
• Workflow section
• Field browser/lookup
Maintain view
Section titled “Maintain view”- The view can be created from RPA > Entry > Views > Create and maintained from RPA > Reports > Views > List.
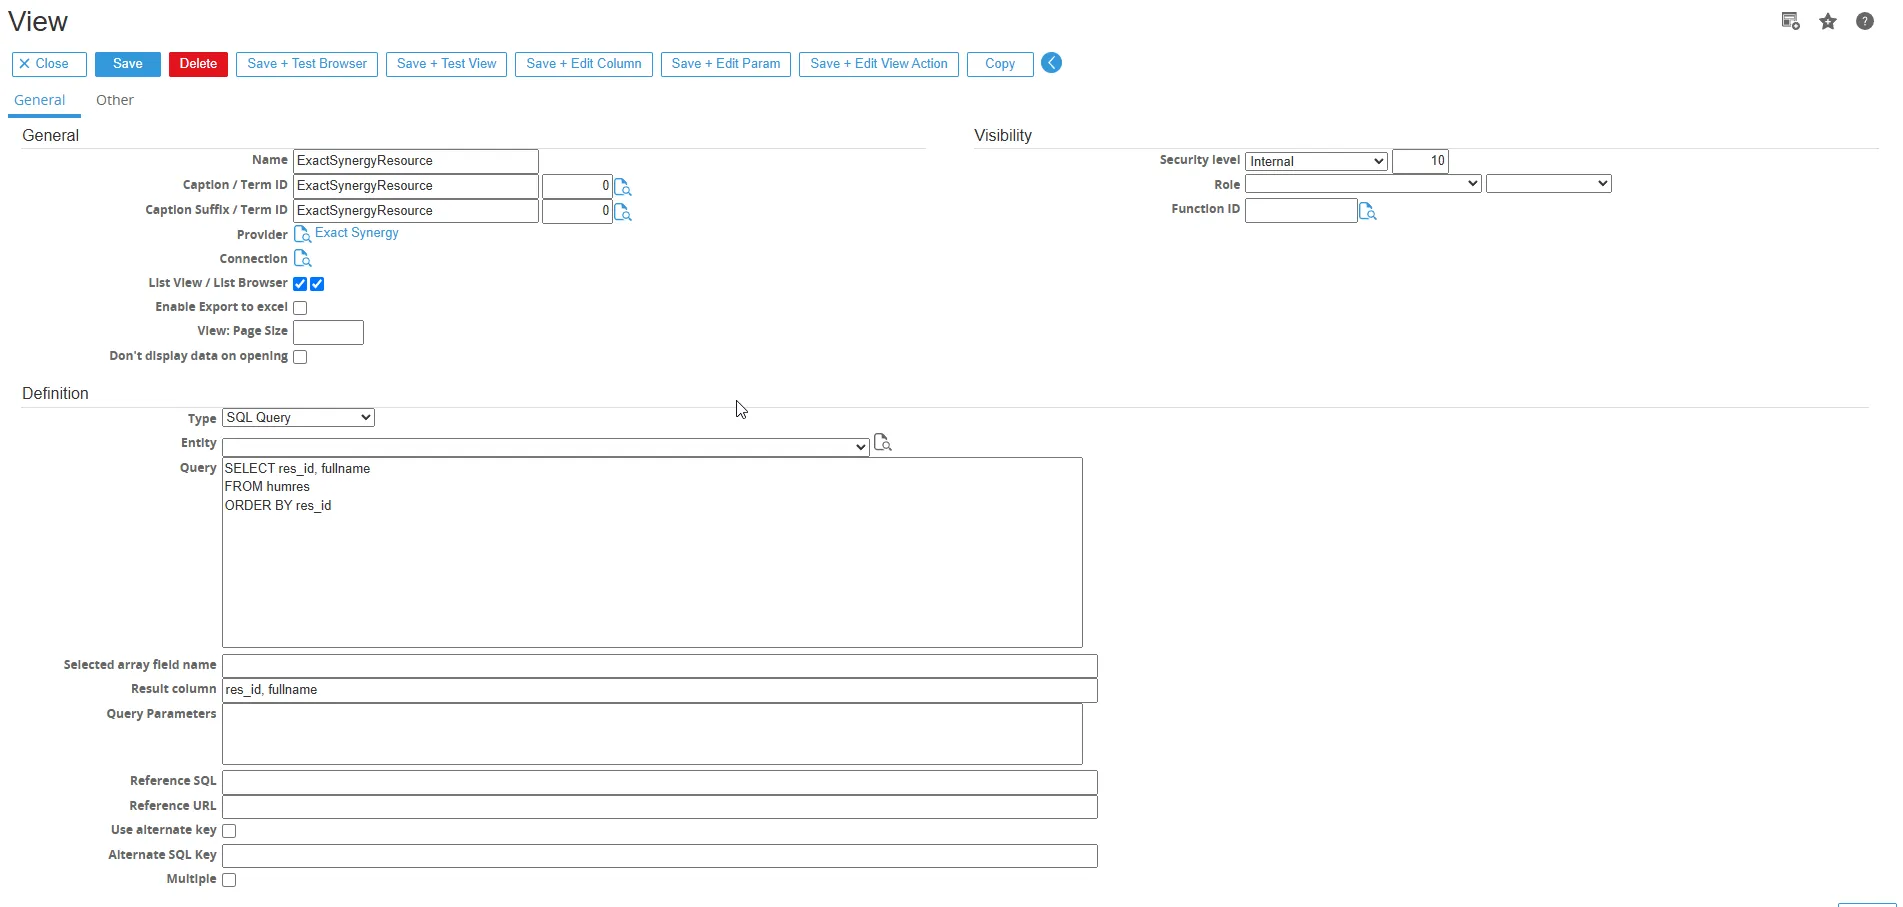
-
The explanation about each buttons in View Buttons :
-
Save + test Browser Once the List browser checkbox is checked, the save + test browser will become available to save and test the browser based on the view.
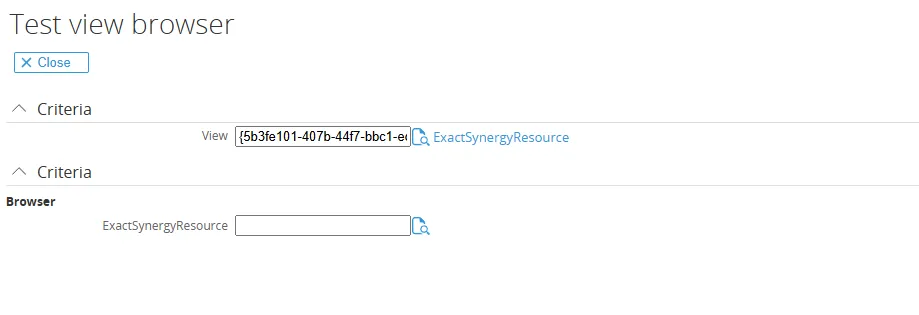
-
Save + Test View Once the List view checkbox is checked, the save + test view button will become available to test and check the view.

-
Save + Edit column Save the view and maintain the columns in the view.
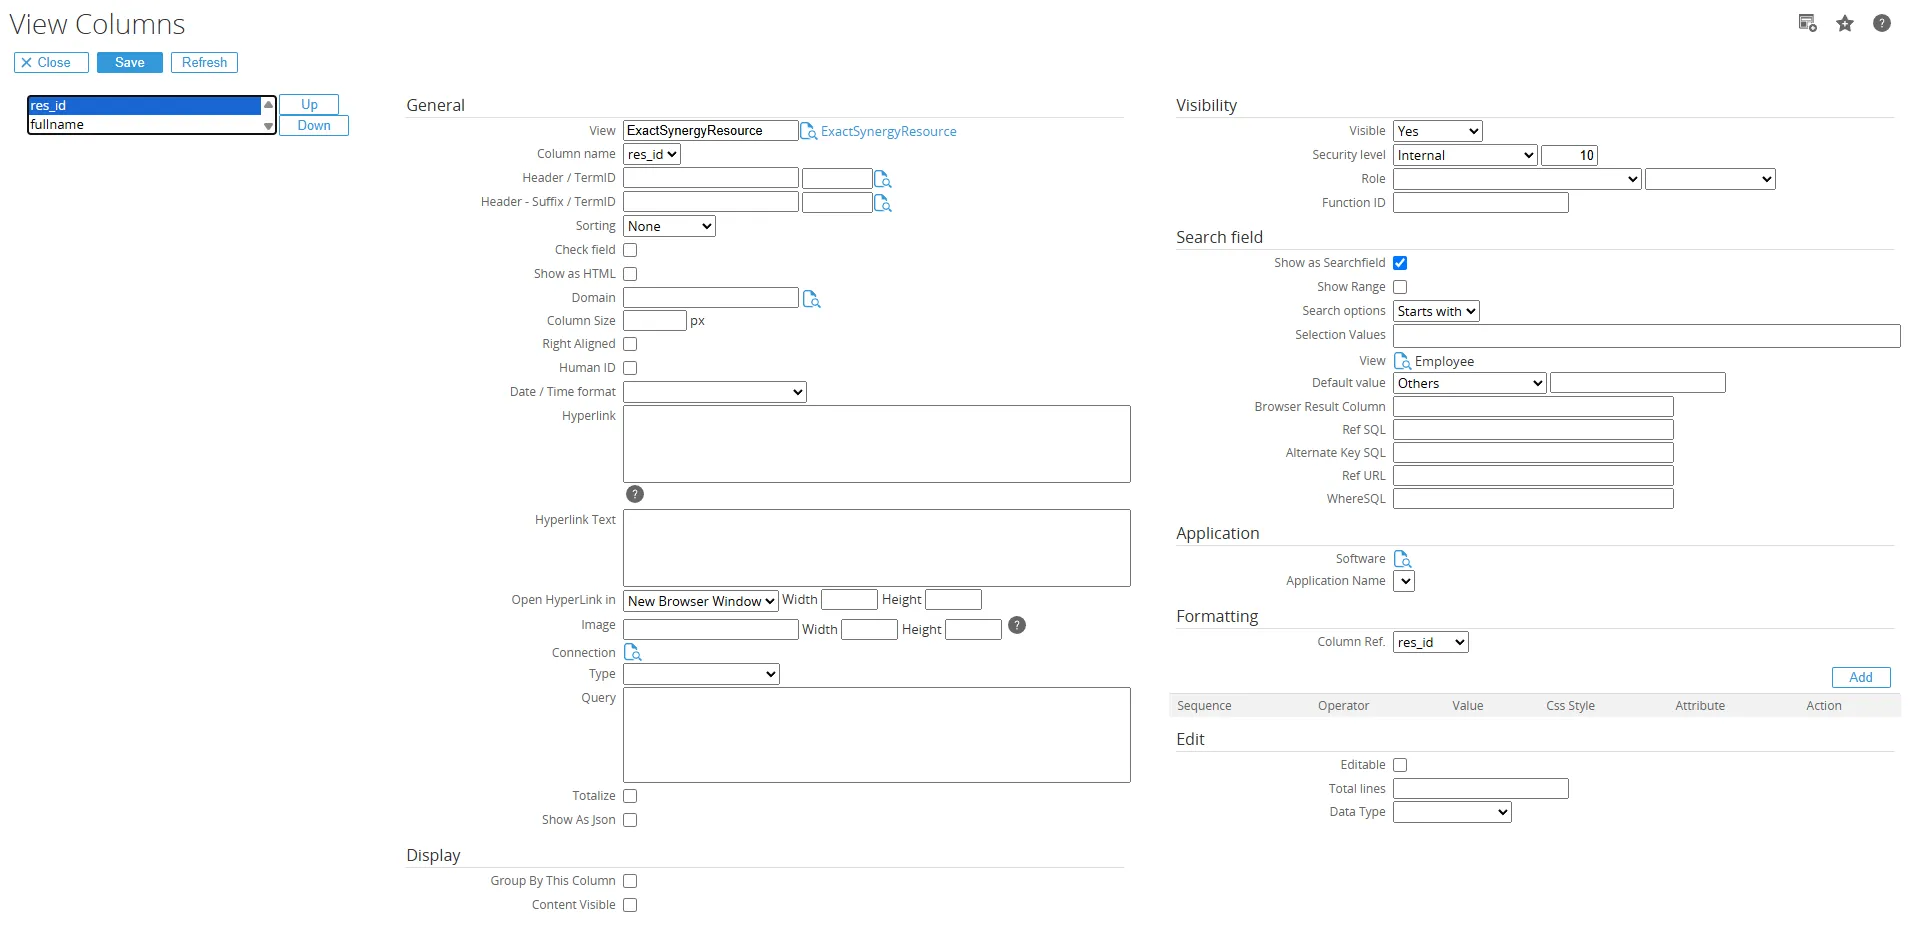
-
Save + Edit parameter Save the view and maintain the parameters in the view
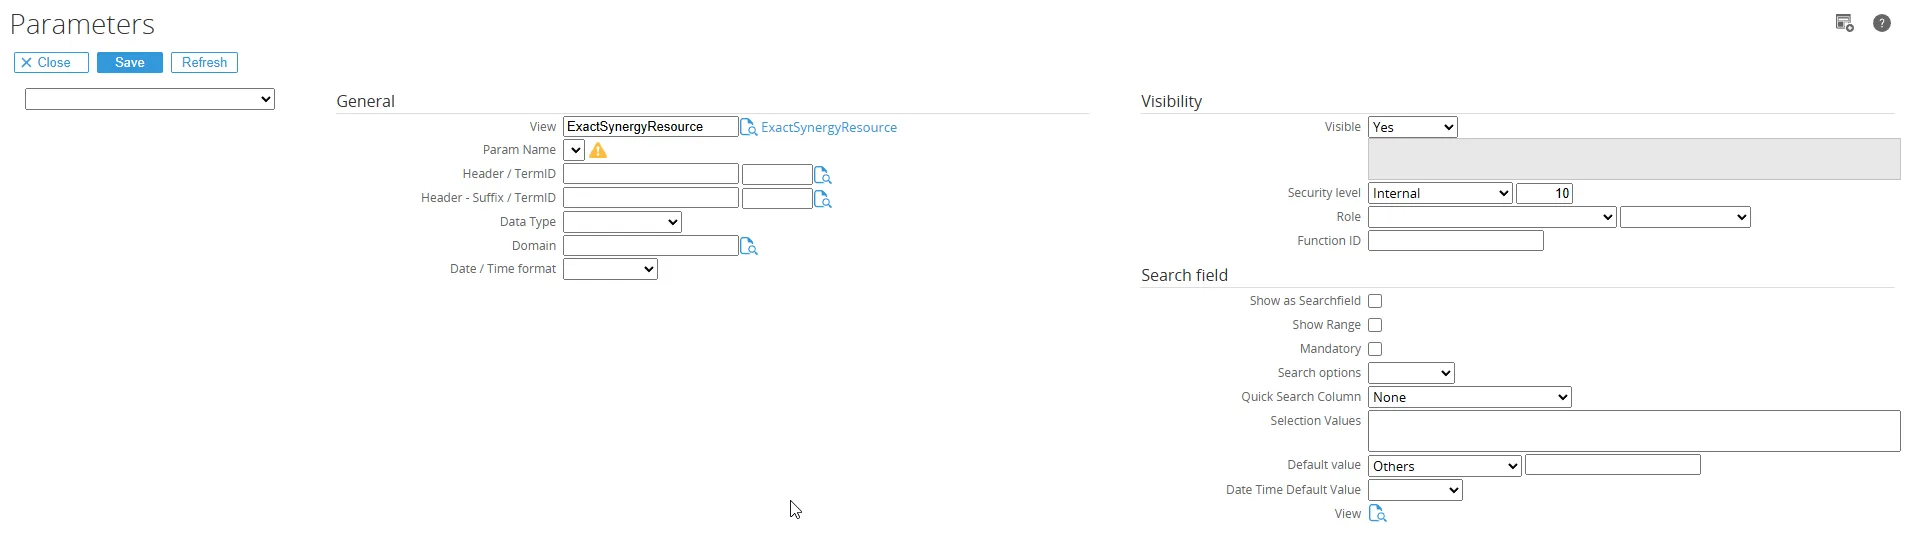
-
Copy Copy the view to a new view.
Below is the explanation of the fields found in “Fields General” section :
Fields General
NameName of the view, normally for the view we will start with the software name to easily identify for which software the view is applicable. ExactGlobeSalesOrders, EpicorSalesOrders etc.
CaptionCaption of the view, the description displayed at the header of the view.
Term IDTerm ID for the caption of the view. Terms can be found under System / Setup / Terms / Search, this will help in making the view multilingual.
Caption SuffixSuffix for the caption, for example ‘: History’, the full caption then could be ‘Sales order: history’
Term ID Term ID for the caption suffix of the view.
SoftwareThe software for which the view is created. When the software is selected it will also prefill the type field.
ConnectionThe connection to be used for the view, when there is only 1 connection which is using the selected software the connection doesn’t need to be filled in. The connection will be picked up automatically.
List View Determines how the view will be used, when list view is checked the view can be used in the workspace, monitor and sections in Exact Synergy
List BrowserDetermines how the view will be used, when List browser is checked the view can be used in the free fields in Exact Synergy. When this is not checked the view will not show up as possible browser.
Enable Export to ExcelWhen checked the data in the view can be exported to Excel.
View: Page sizeTo set the default view page size.
Don’t display data on openingTo prevent data from displaying automatically when the view is opened, you can configure it so that no data is shown by default. Instead, the user must click the “Search” button first to load and display the data.
When the fields are selected the query will be built up automatically for the selected fields. The only part that needs to be added will be the ORDER BY column used for the default sort.
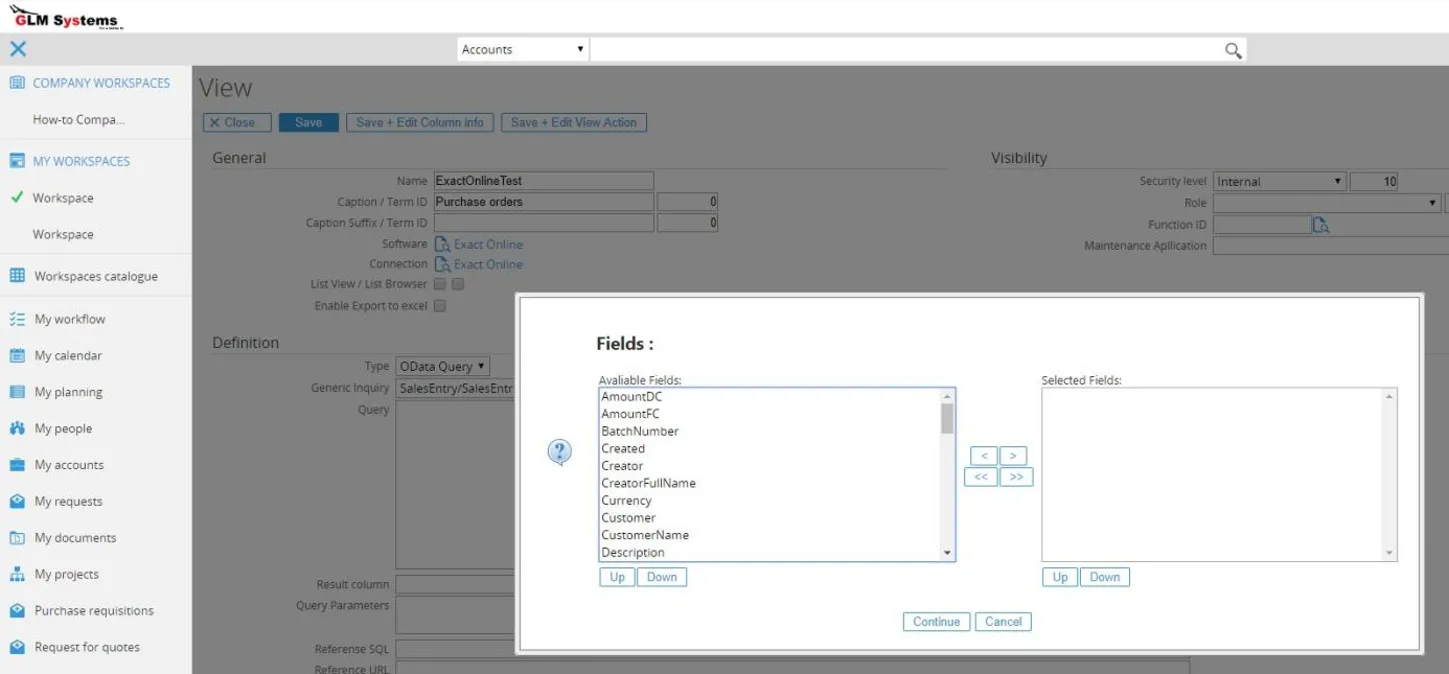
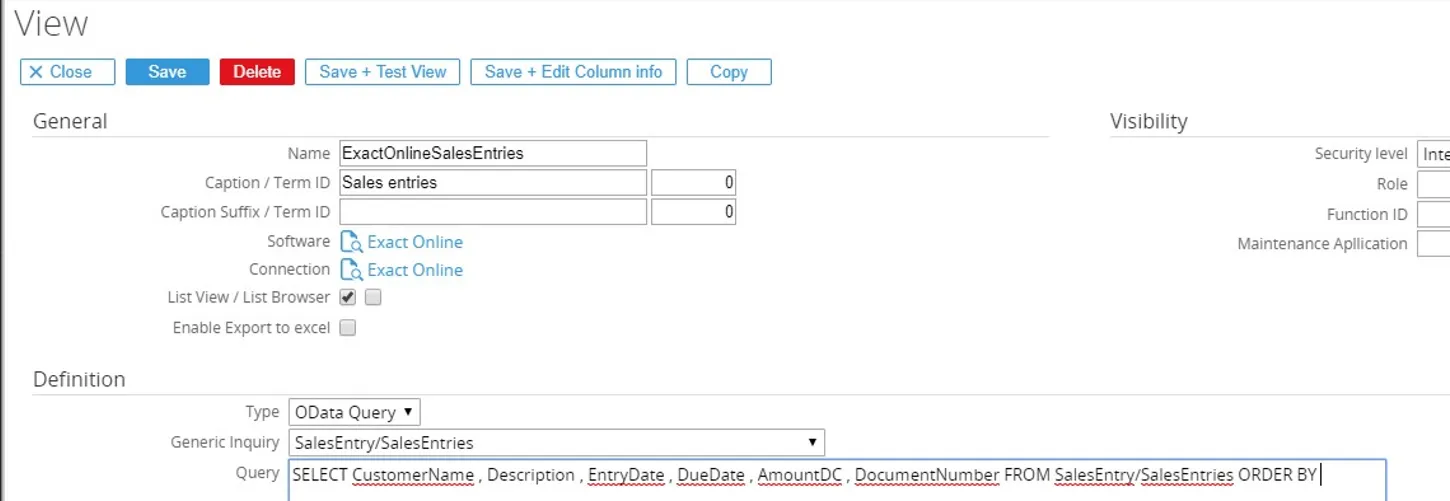
Below is the explanation of the fields found in “Definition” section :
Definition Fields
TypeFor the view there are three types available and which type can be used will depend on the software : - SQL Query, available when provider has SQL enabled
- SQL Store procedure, available when provider has SQL enabled
- OData, available when provider has OData enabledGeneryc query / Entity List of all the entities available for a provider/software. When the entity is selected a popup is shown to set which fields should be used in the query
Queryhe query to be executed, the syntax is using a normal SQL syntax for both SQL Query and OData query. When the view is built and the data retrieved, the query will be converted to the required format by the provider.
In case of providers which are using OData the ‘normal’ SQL query will then be converted to the OData format required to retrieve the data. But the user will not need to know this syntax and can use a normal SQL syntax. There are limitations where OData doesn’t support all SQL query functions but basic SQL syntax works.Result columnUsed for view enabled as a browser, this would be the key and description that are returned. The columns are separated by a comma. Example: Code, Description
Query parametersIn the query, parameters can be used in two ways, ? and @[Name] (@ will be explained in the parameters section). When ? is used the column where the ? is used for will be listed in the query parameter separated by :
For example (Exact Online)
SELECT CustomerName , Description , EntryDate , DueDate , AmountDC ,DocumentNumber FROM SalesEntry/SalesEntries WHERE CustomerName = ? ORDER BY CustomerNameQuery parameters: CustomerName When the view is tested a popup is shown to fill in the parameter value
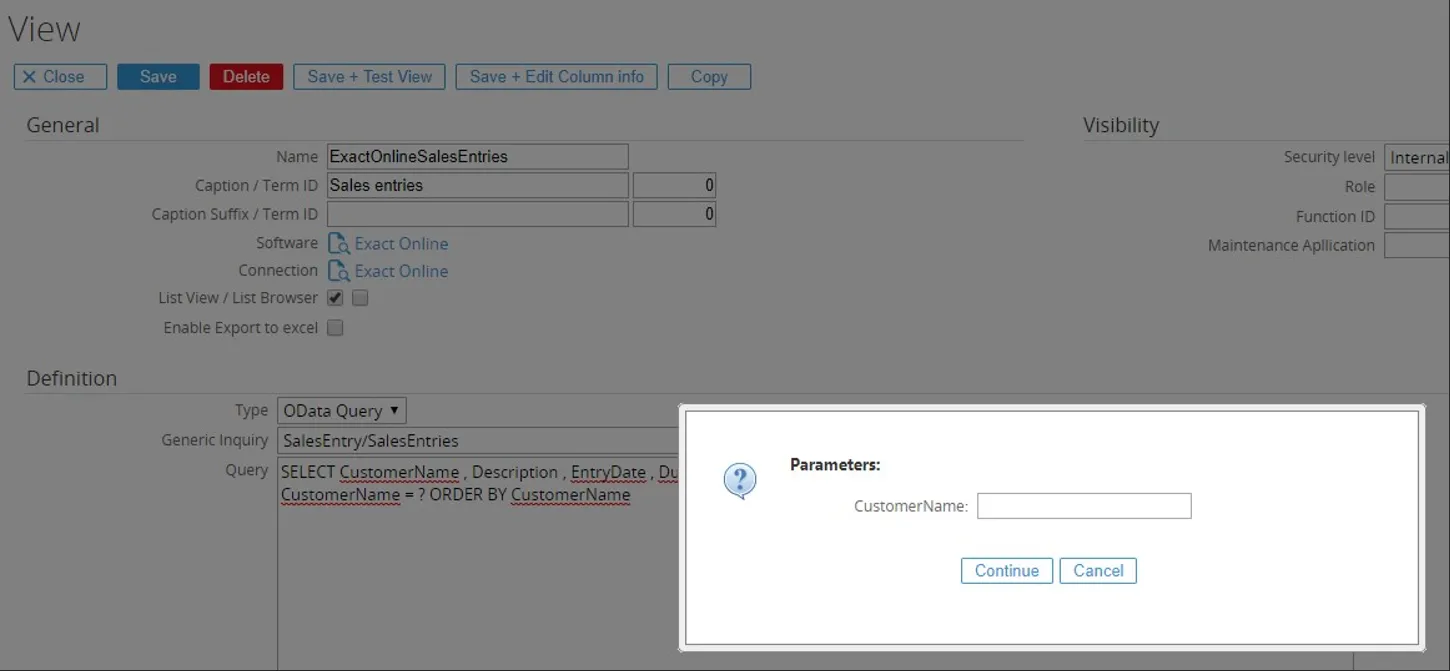
Reference SQL Used for view enabled as a browser, Query to show the value behind the browser field when a page is opened.
Reference URL Used for view enabled as a browser, the hyperlink to open the related page.
Use alternate key Used for view enabled as a browser, use a different key to be shown in the screen then stored in the database.
Alternate key sql Used for view enabled as a browser, Query to retrieve the alternate key value
Multiple Used for view enabled as a browser, when checked the browser can return multiple values. Used in CRM Quotation Plus add-on.
Visibility Determine when the view will be visible and for which users the view will be displayed and accessible.
Security level Security level for which the view is visible.
Role Role which the user should have to have access to the view
Function ID Function which should be linked to role and user to have access to the view
Maintenance application Used for view enabled as a browser, will have a new button to create a new record or edit the record from the browser.
Used in

Used in monitor From here the view can be added to a monitor section on an Exact Synergy card. Once the view is available on a card that will be shown here and be maintained by opening the link.
Used in section From here the view can be added to a section on an Exact Synergy card. Once the view is added to a card section that will be shown here and can be maintained by opening the link.
Used in request When the view is used in a request that will be shown here. The view can be added to a request type via the request section.
Used in rules When the view is used in a rules that will be shown here.
Used in Document When the view is used in a document that will be shown here.
Totalize Function in view columns
Section titled “Totalize Function in view columns”This section explains how to create a view with totalize functions such as SUM, COUNT, AVERAGE, MIN, and MAX in Exact Synergy RPA.
-
-
Open your Exact Synergy application.
-
Go to RPA > Setup > Import
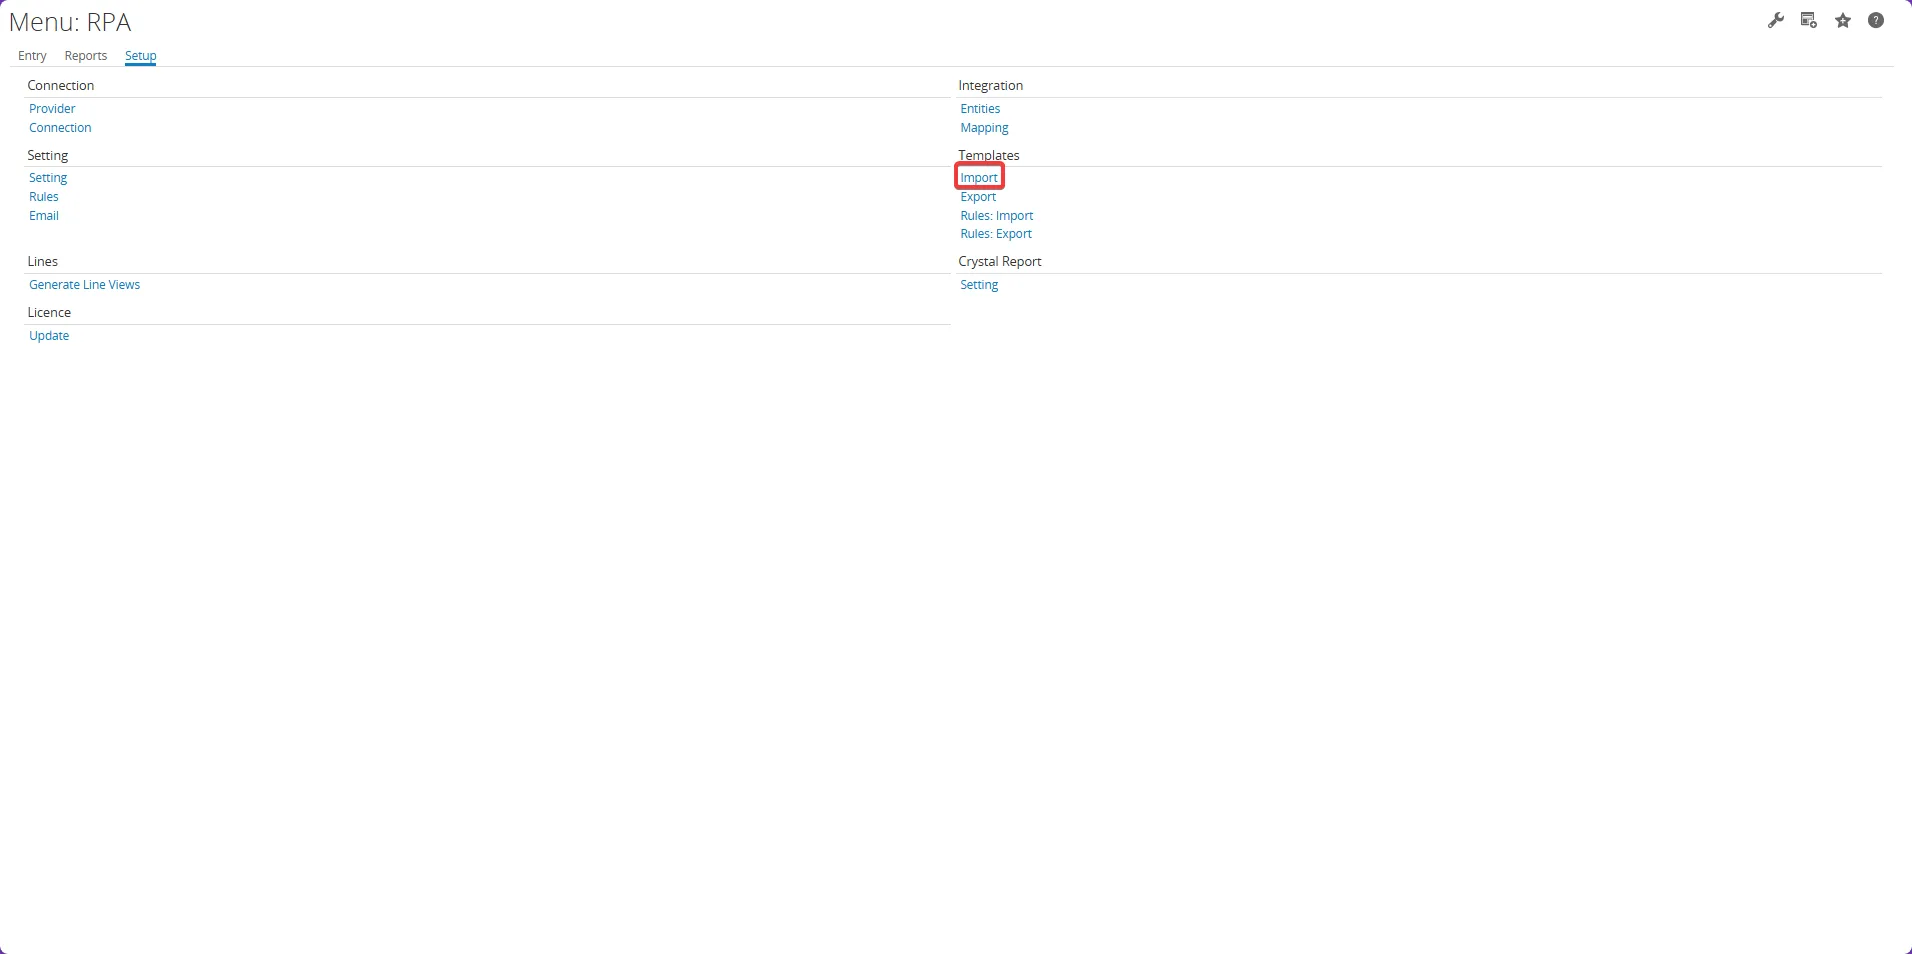
-
Select the file you want to import.
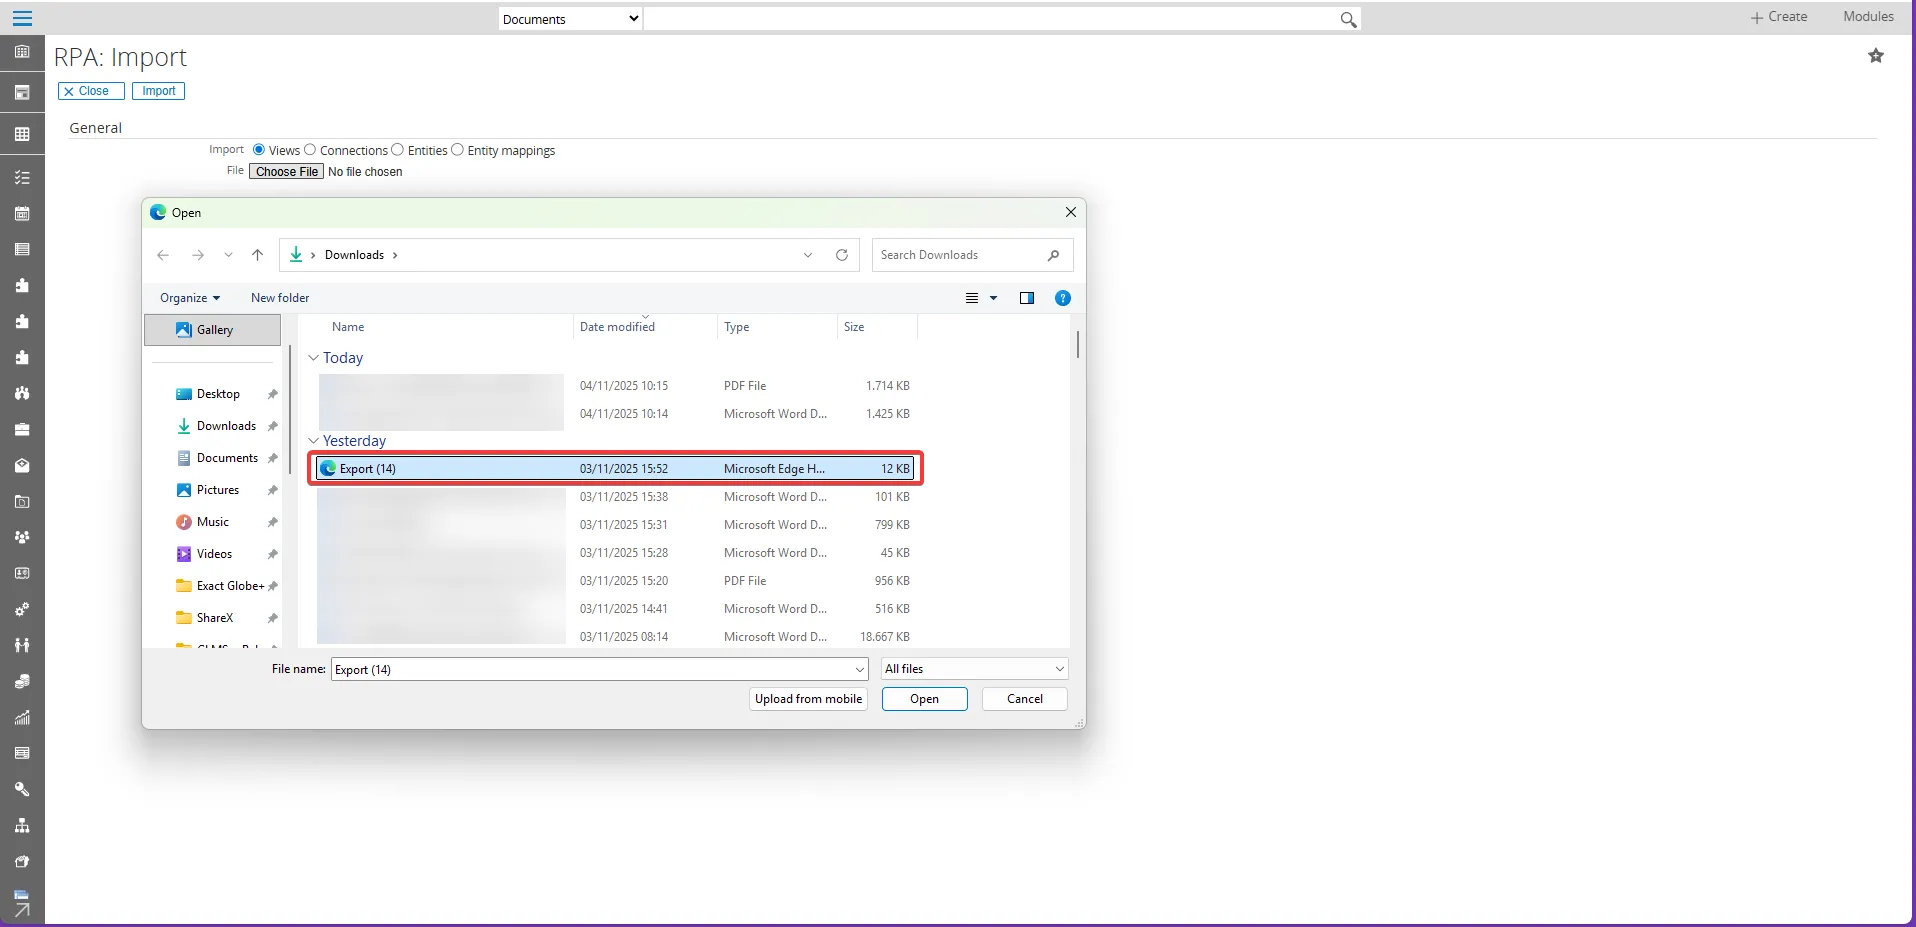
-
Click “Import” button to upload the file.
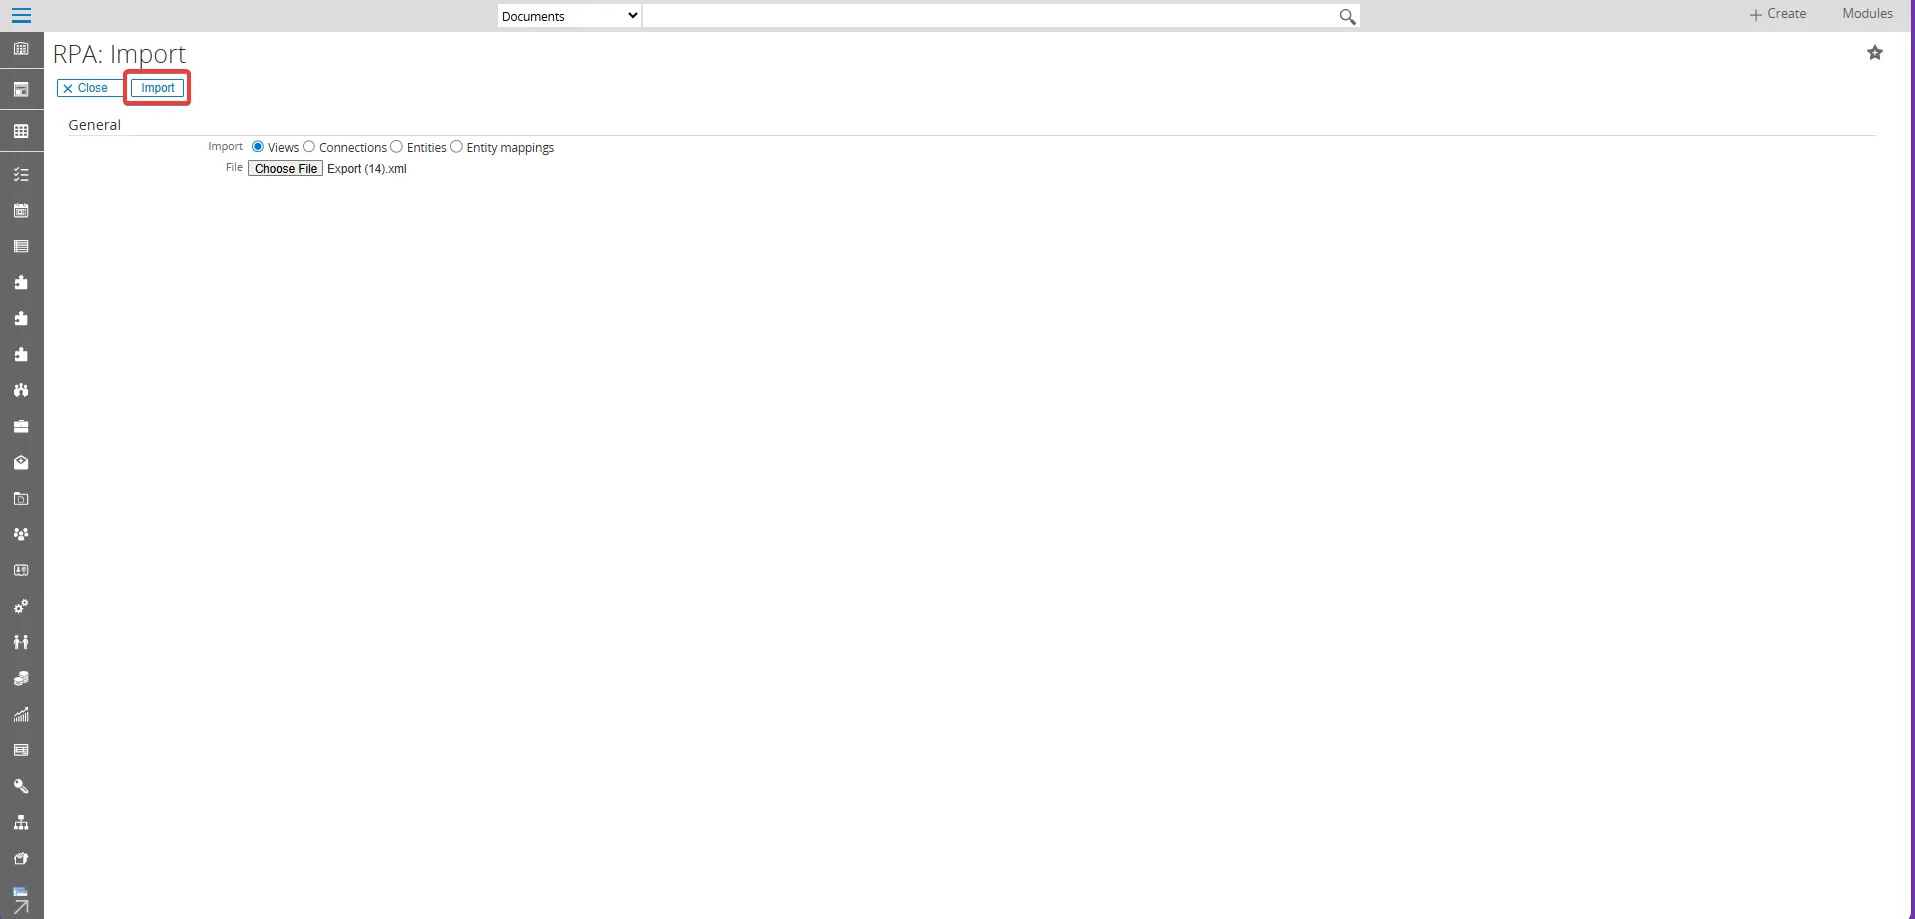
-
The imported file will appear in the list.
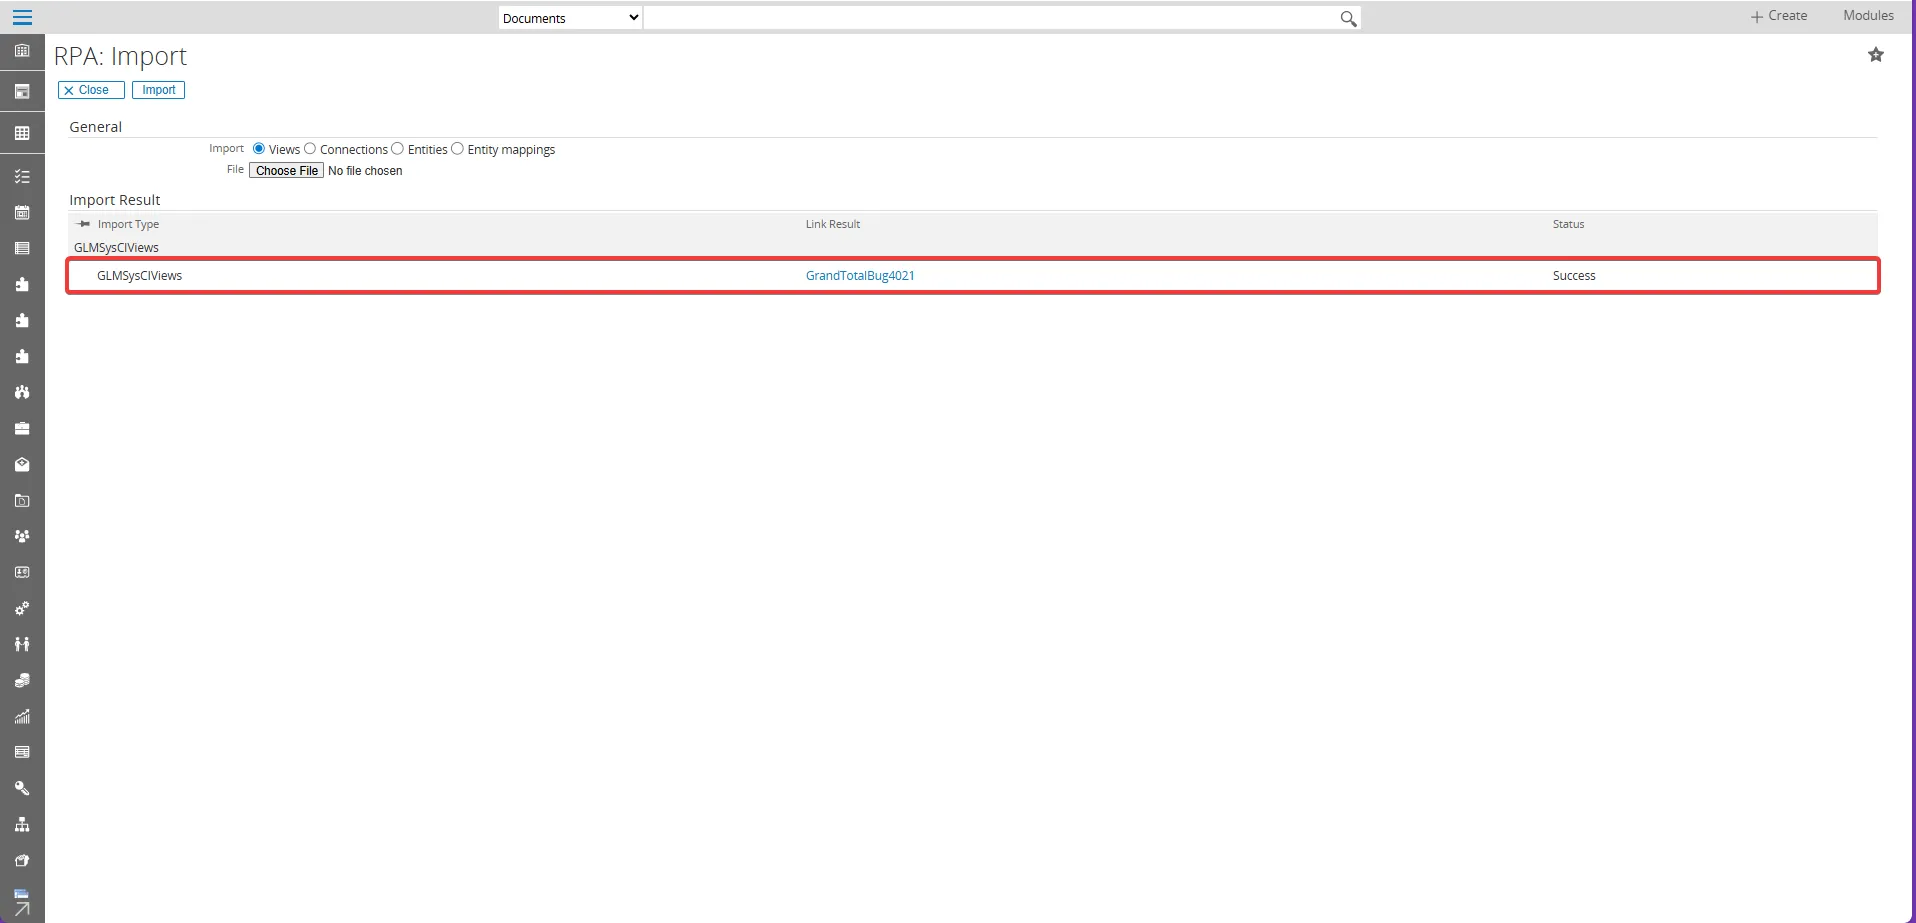
-
Click the expand button to view the details of the imported file.
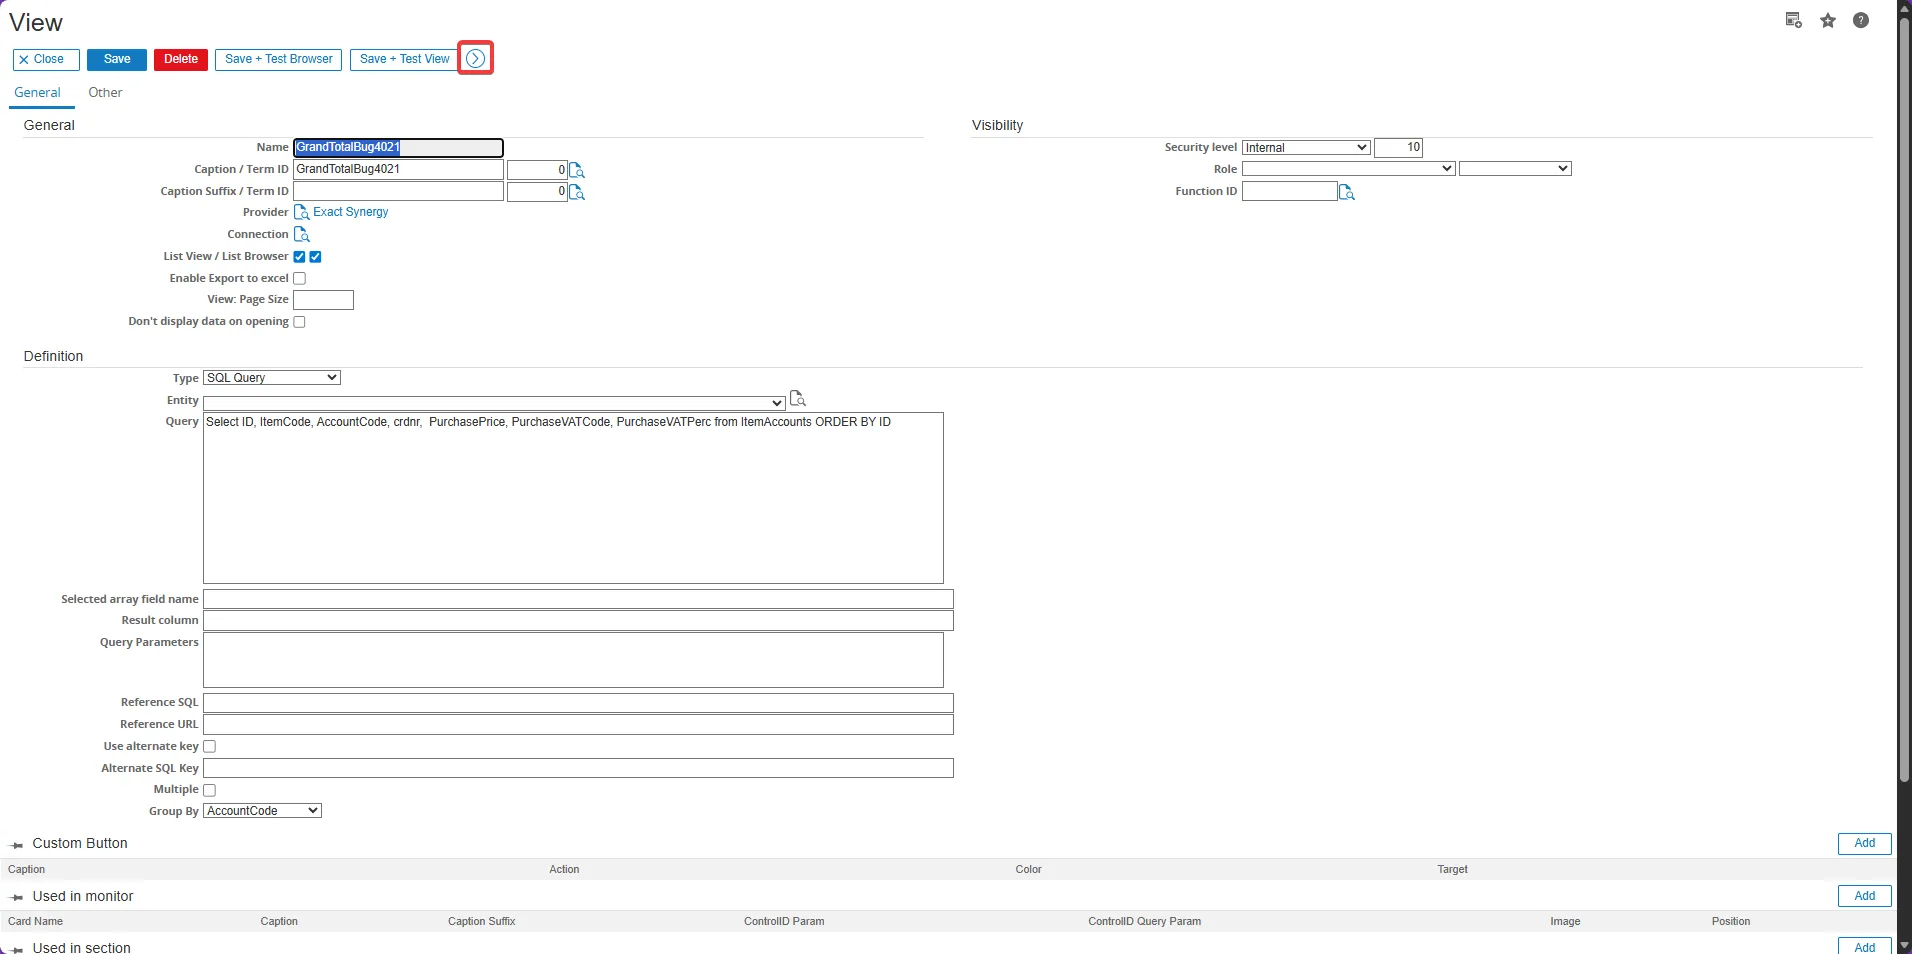
-
You will see the SQL query used for the view. Edit your query to ensure it matches the table fields you want for your view.
Click “Save + Edit Column” to proceed.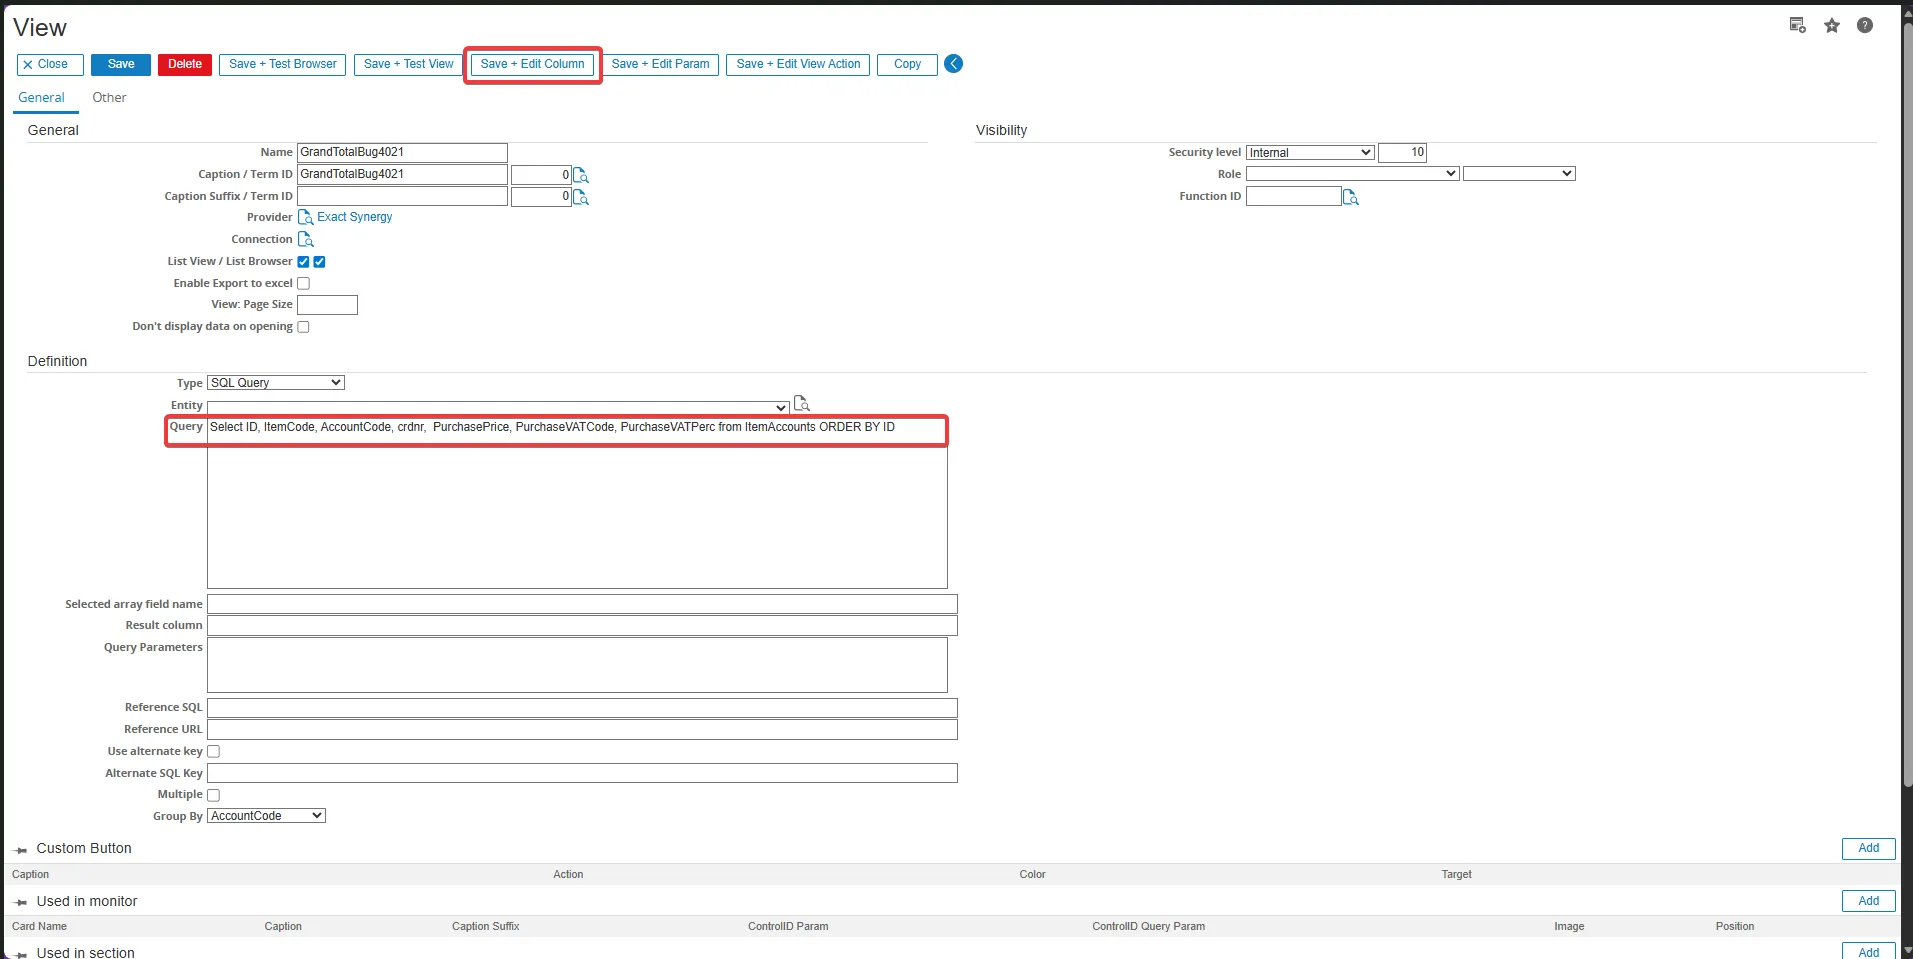
-
You will be directed to the View Columns page to maintain your view’s columns.
Important note Ensure the Domain field is filled with the same domain as the column you want to total. For example, for an Amount column, use the “Amount” domain. -
Adjust and verify that the columns and aggregate function are correct. For example, to create a view with the COUNT function:
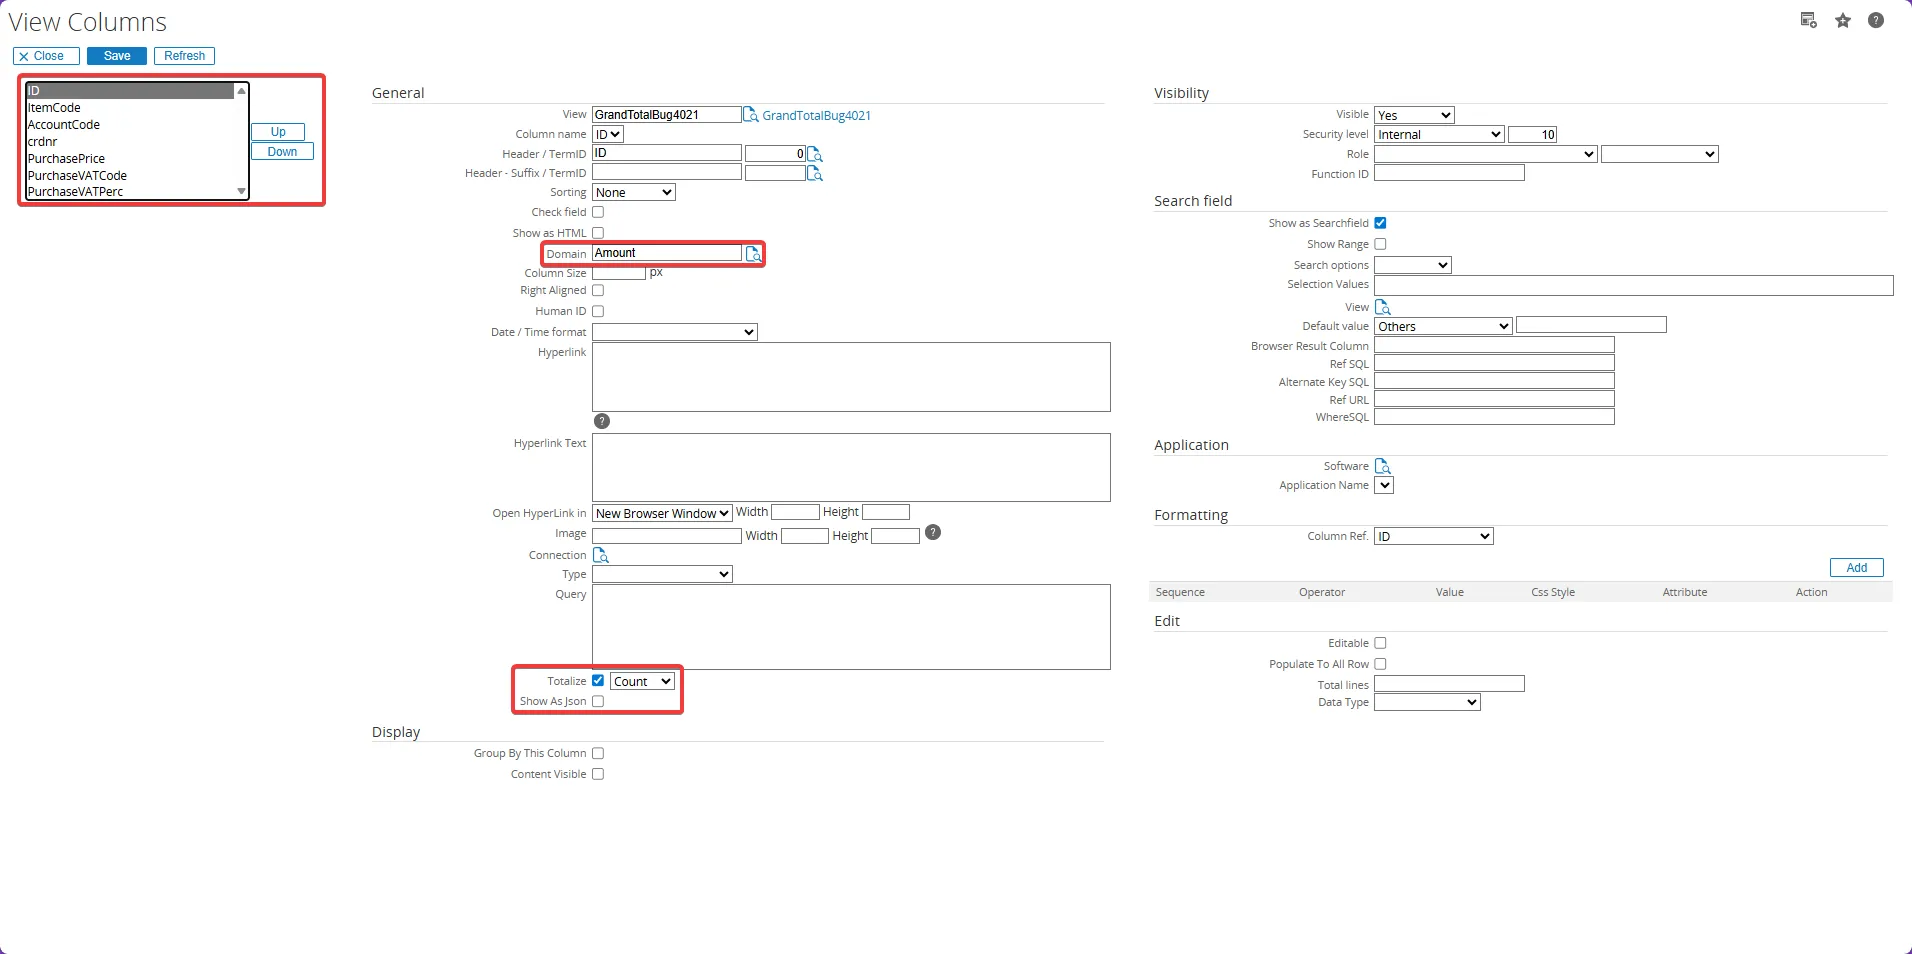
-
To create a view using the SUM function:
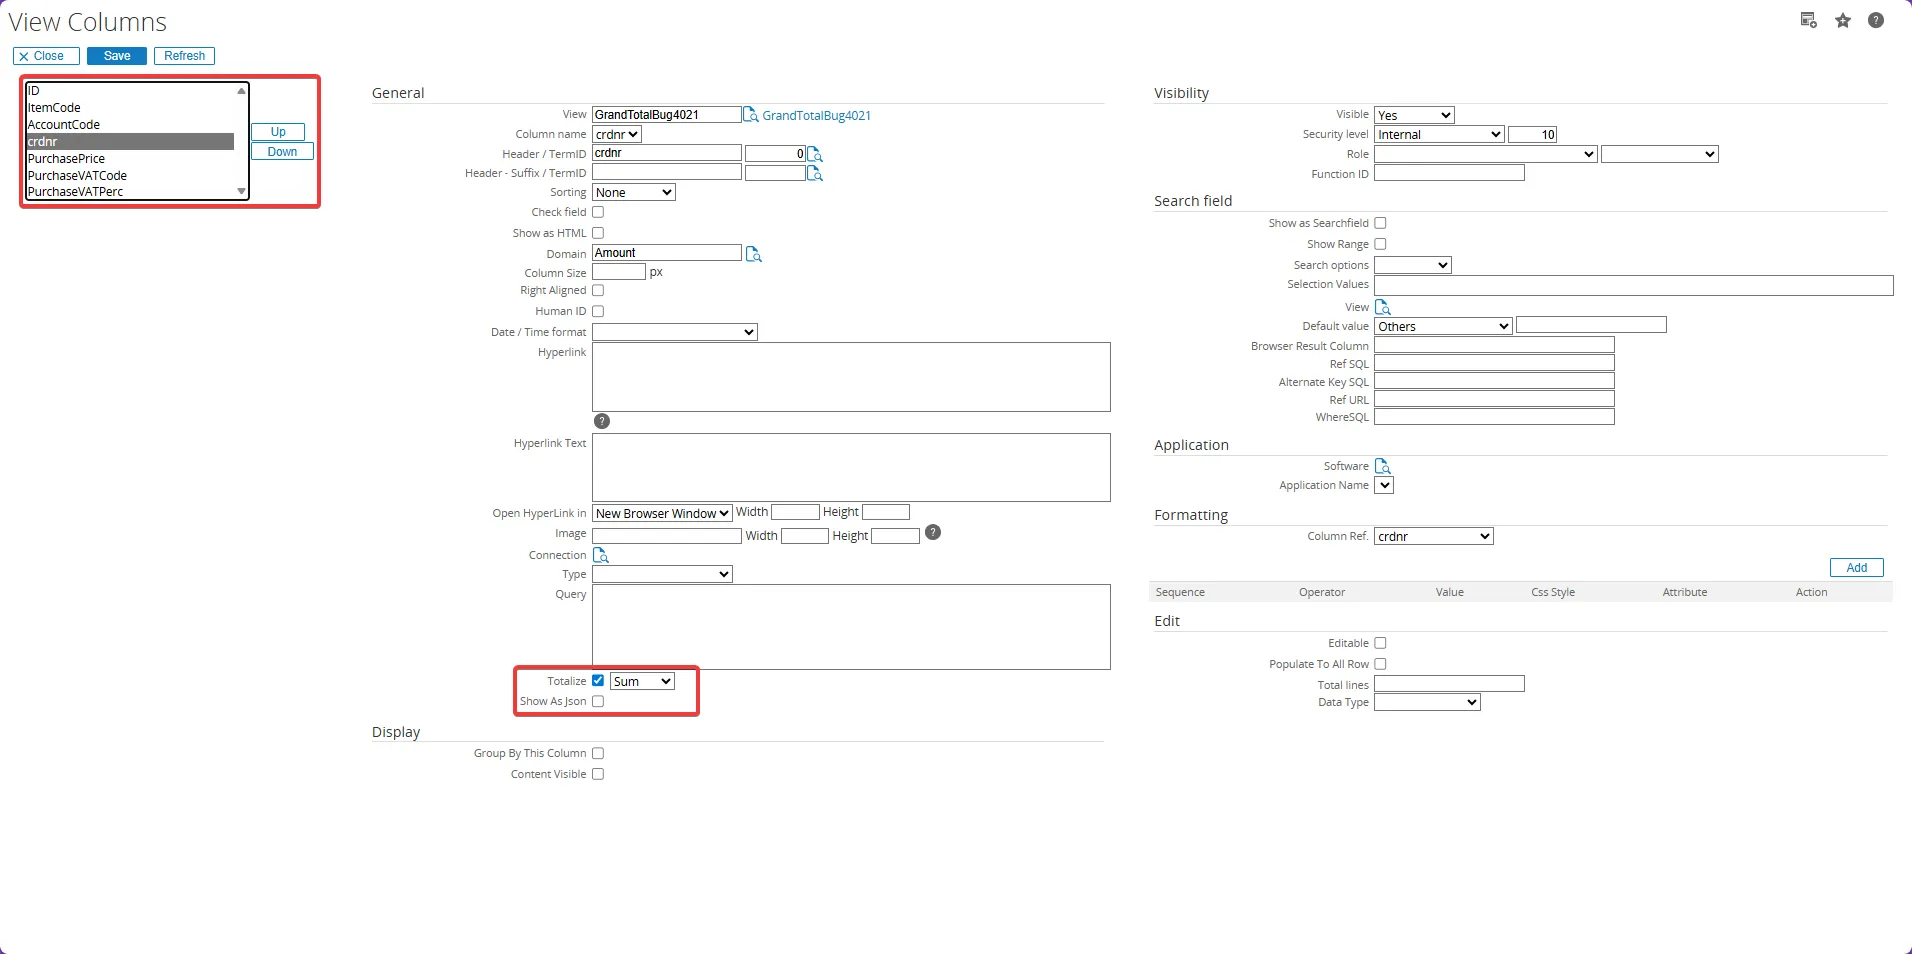
-
To create a view using the AVERAGE function:
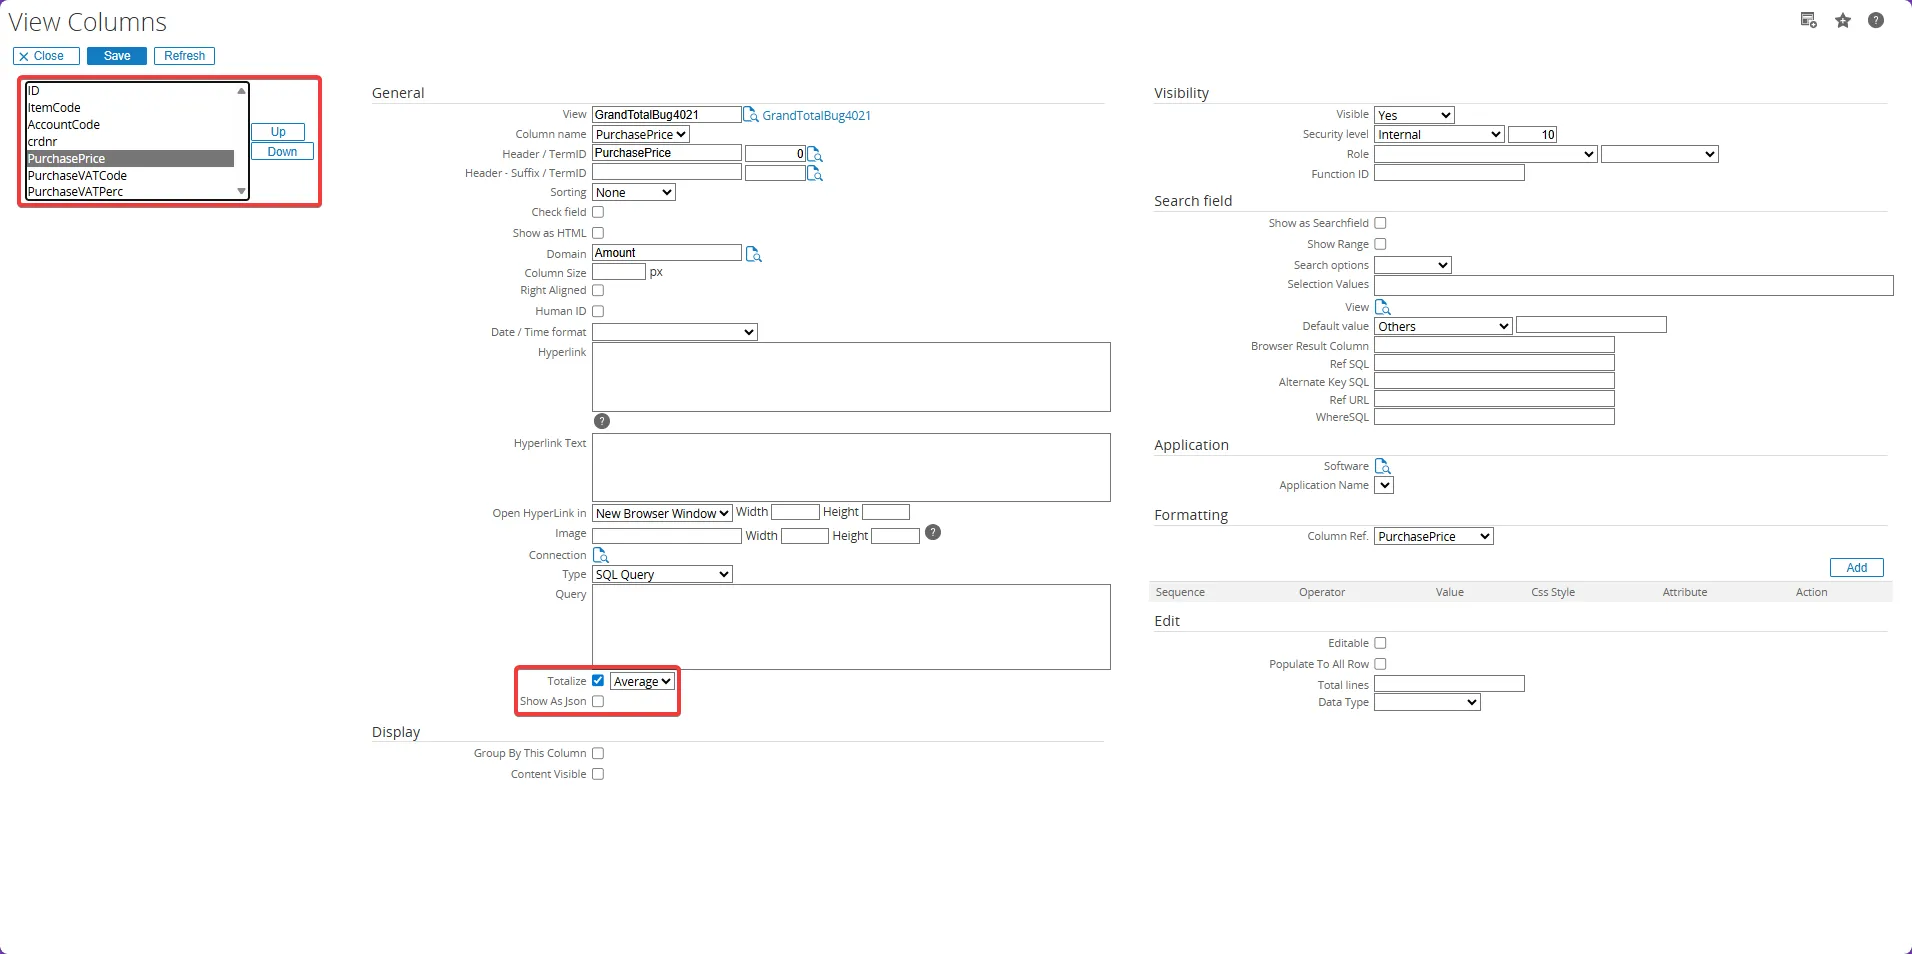
-
To create a view using the MIN function:
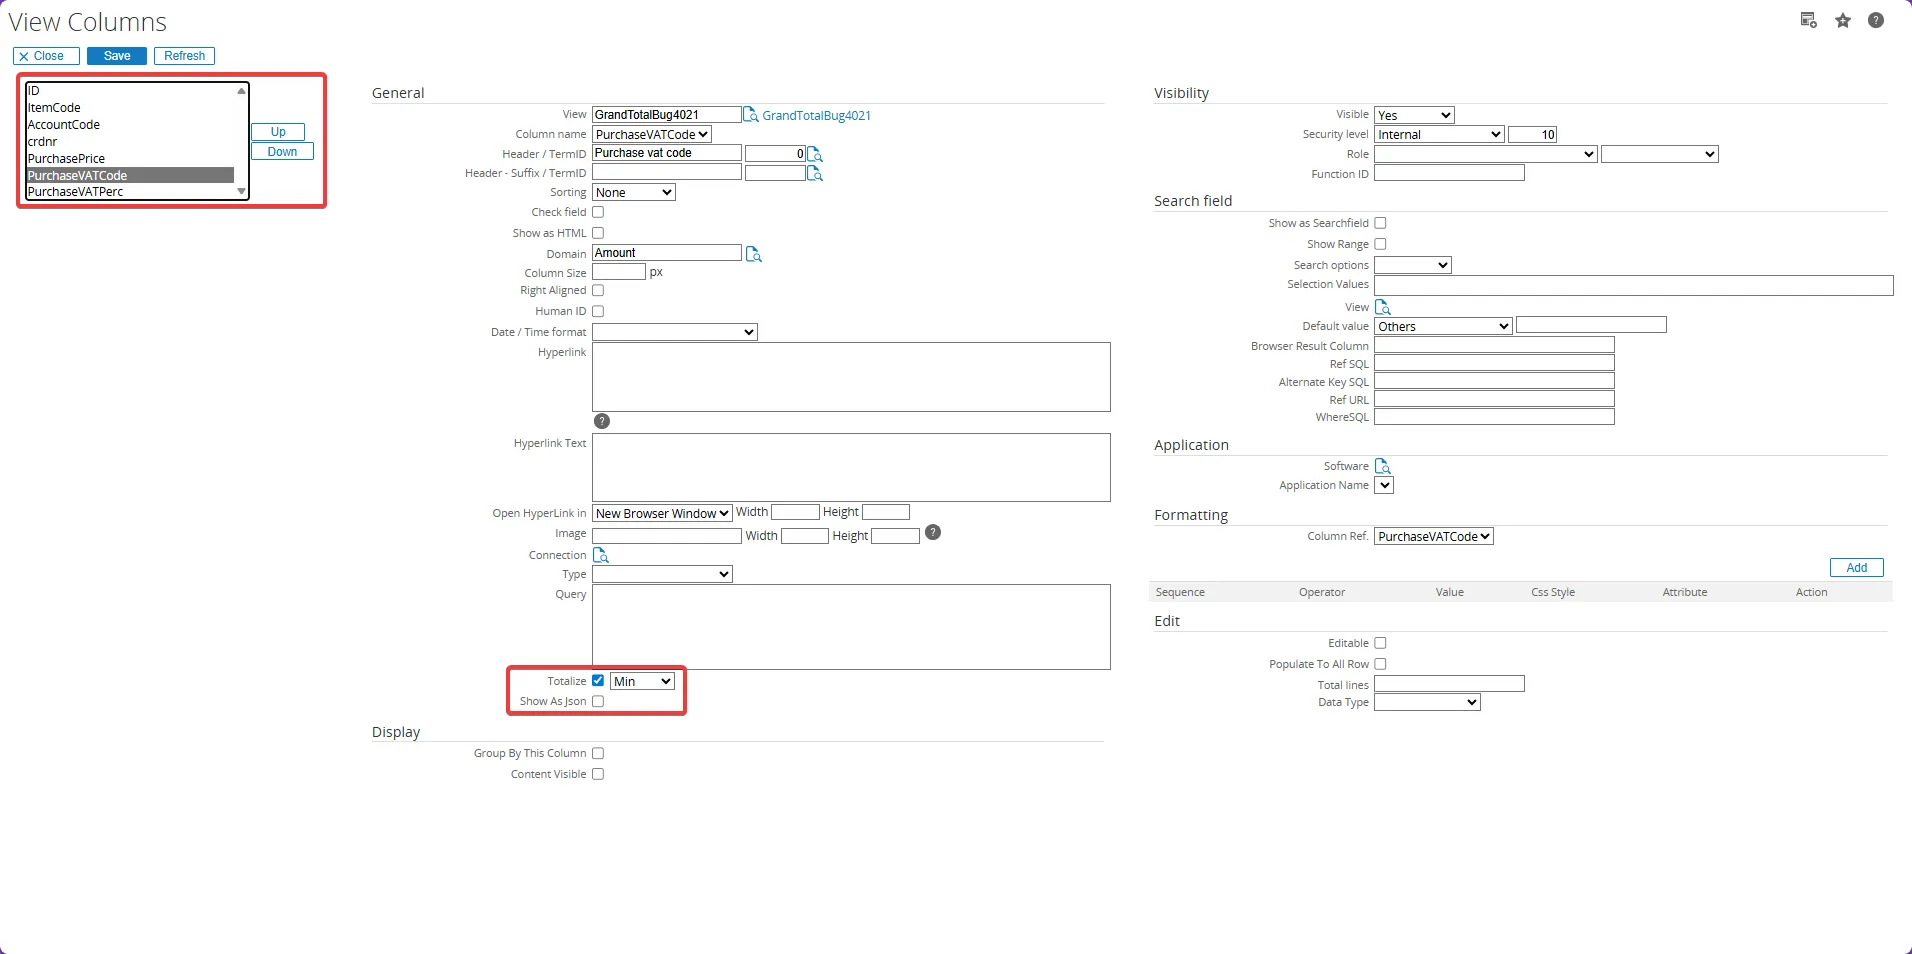
-
To create a view using the MAX function:
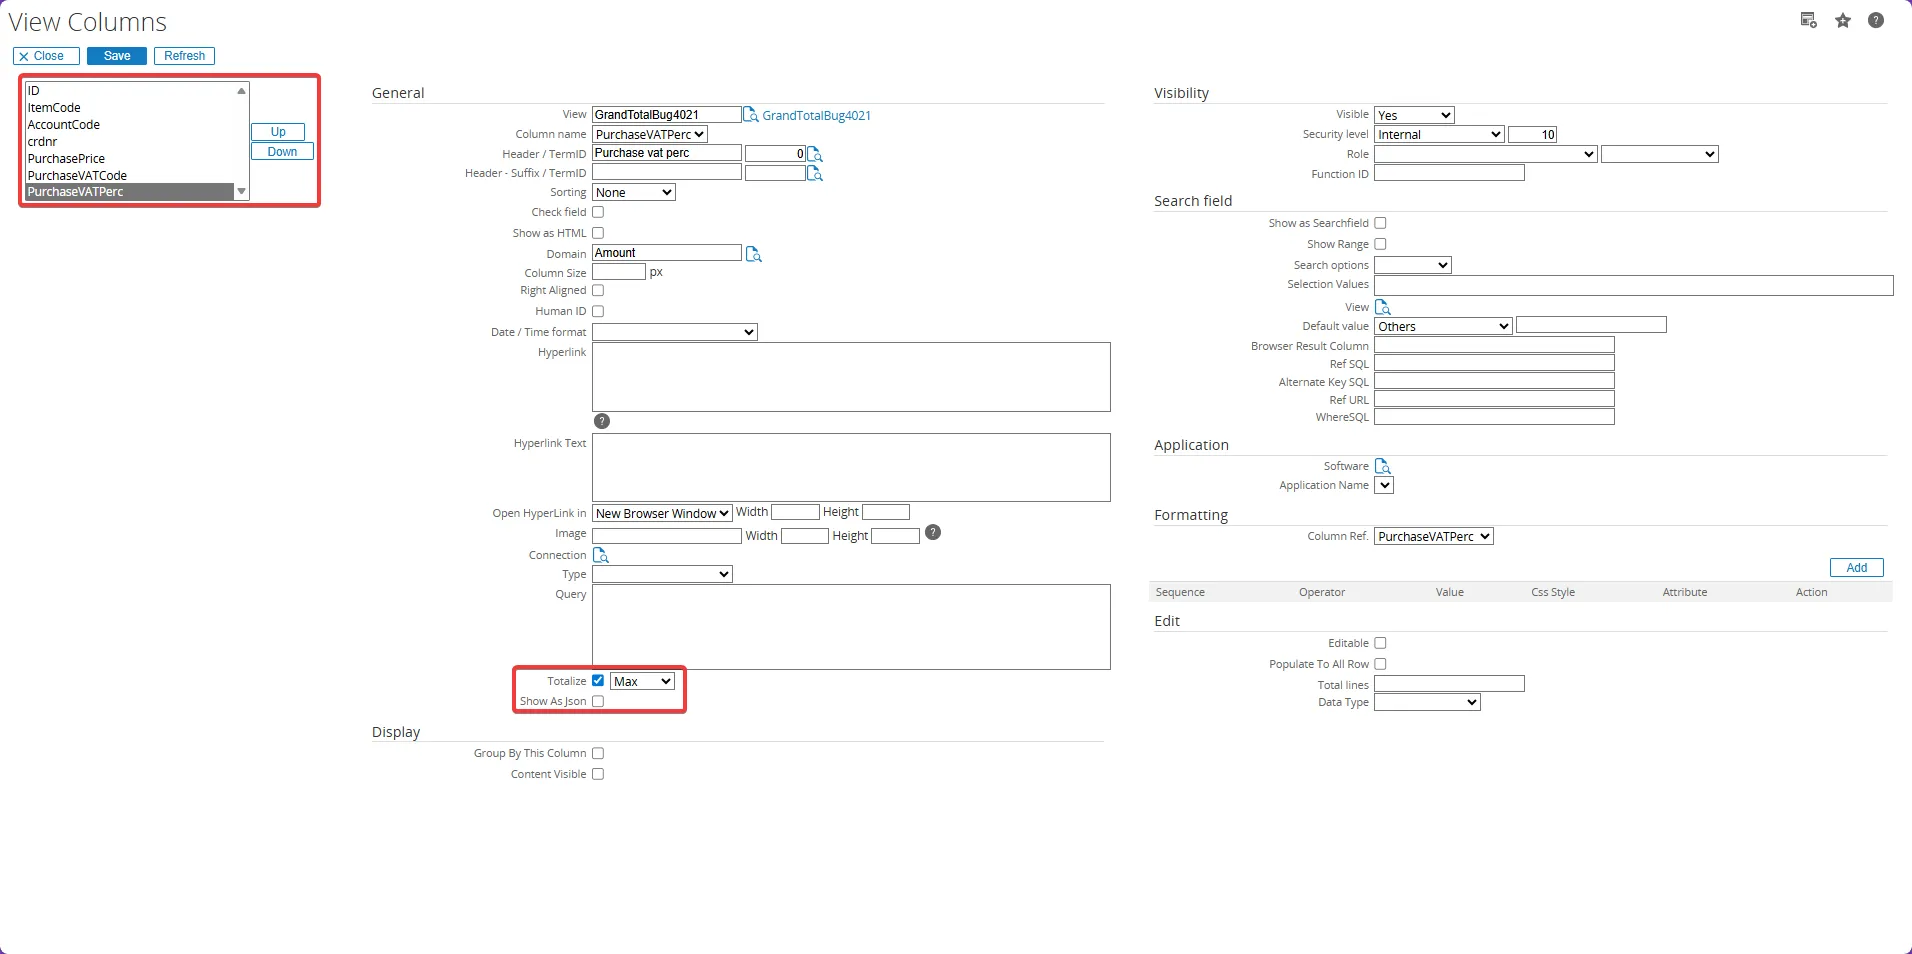
-
Click the expand button to see more details for the column you want to totalize.
-
Once you’re done configuring the view’s columns, click “Save + Test View” to test your created view.
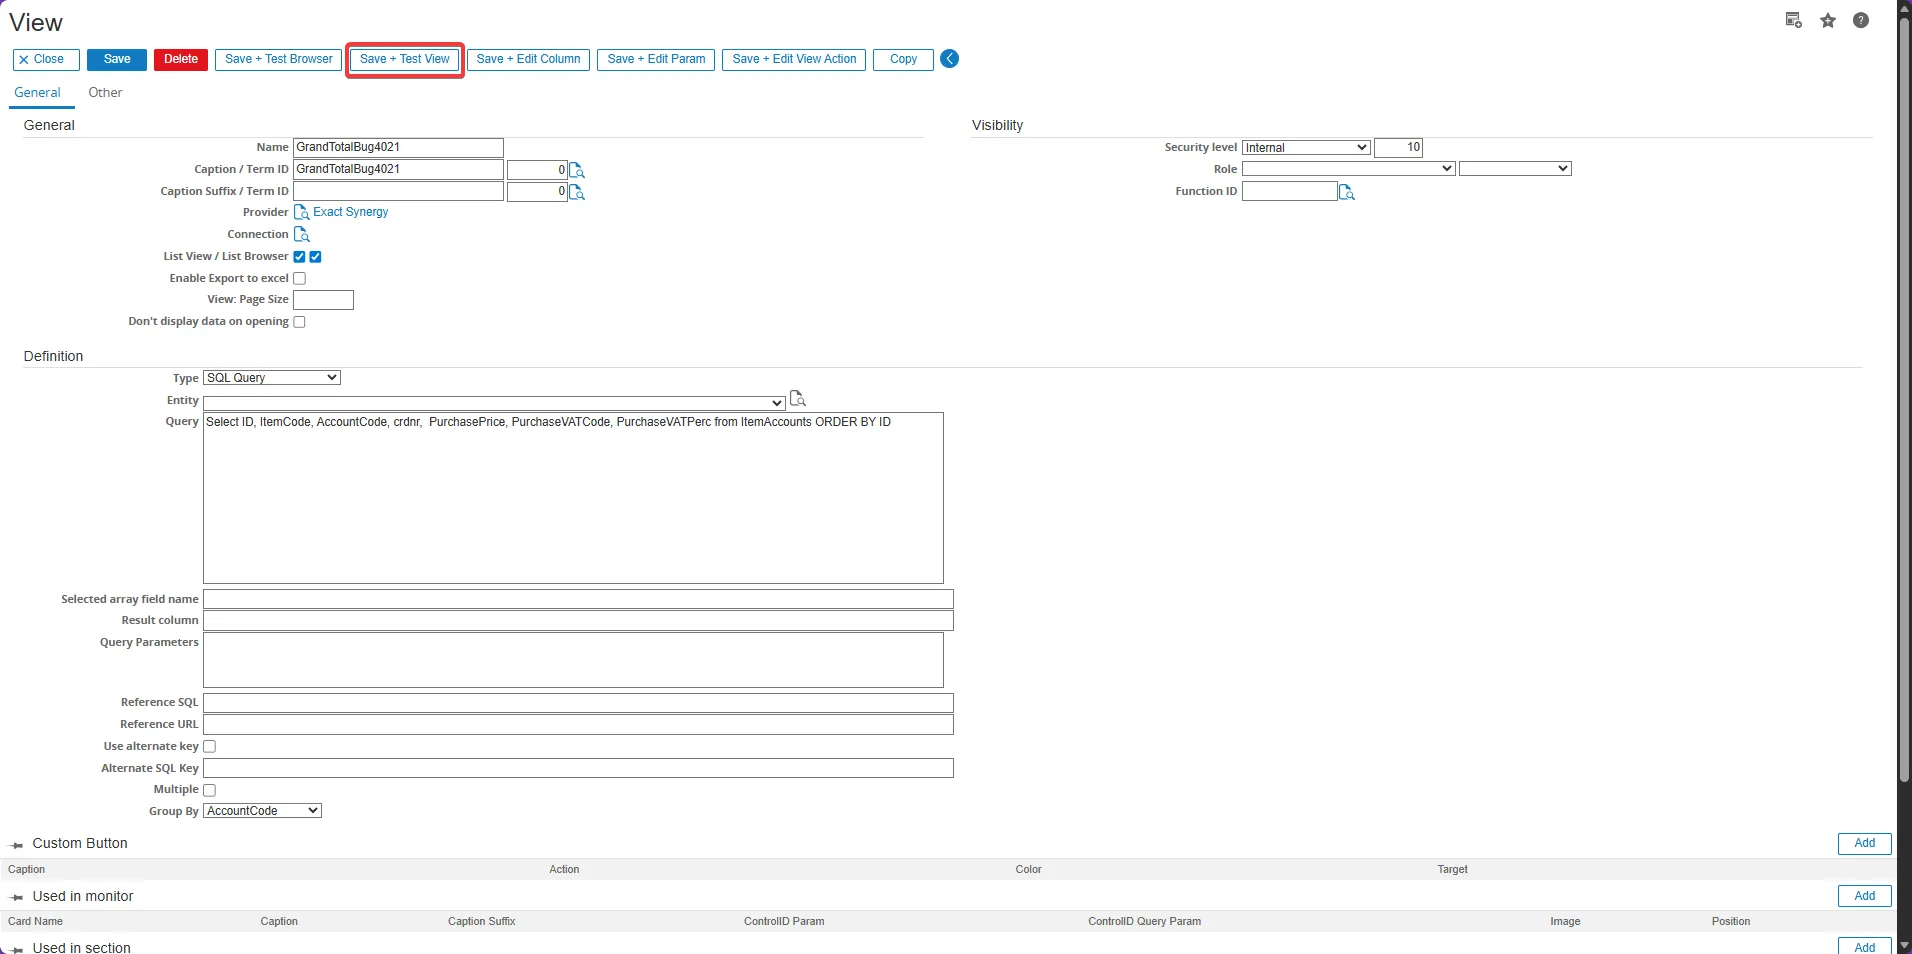
-
Your view with Totalize functions is now ready to use. And you can see the totalized results in your view.
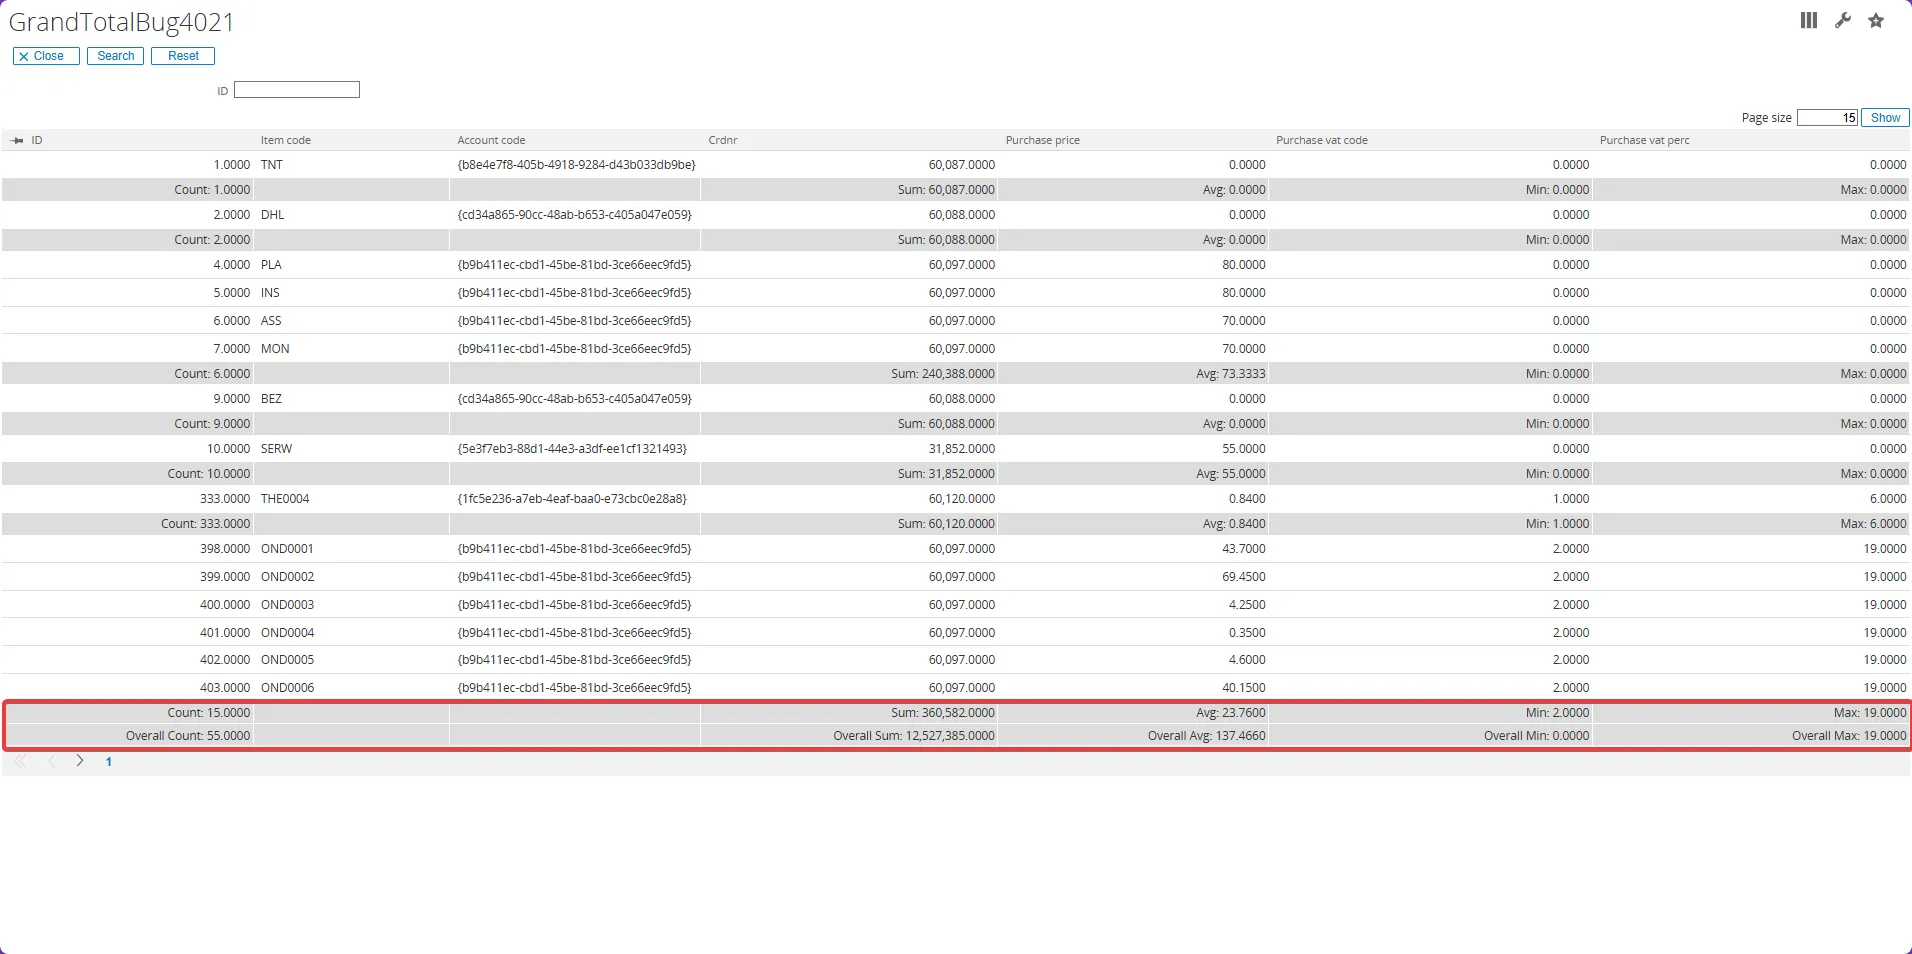
Maintain view columns
Section titled “Maintain view columns”In the view when clicking save + edit column info, the View columns screen will be opened to maintain the columns available in the query.
For each column the specifics can be set how the data should be displayed.
The list of columns on the left side of the screen are showing the columns that can be selected to e change. The right side of the screen will have all available options for a column.
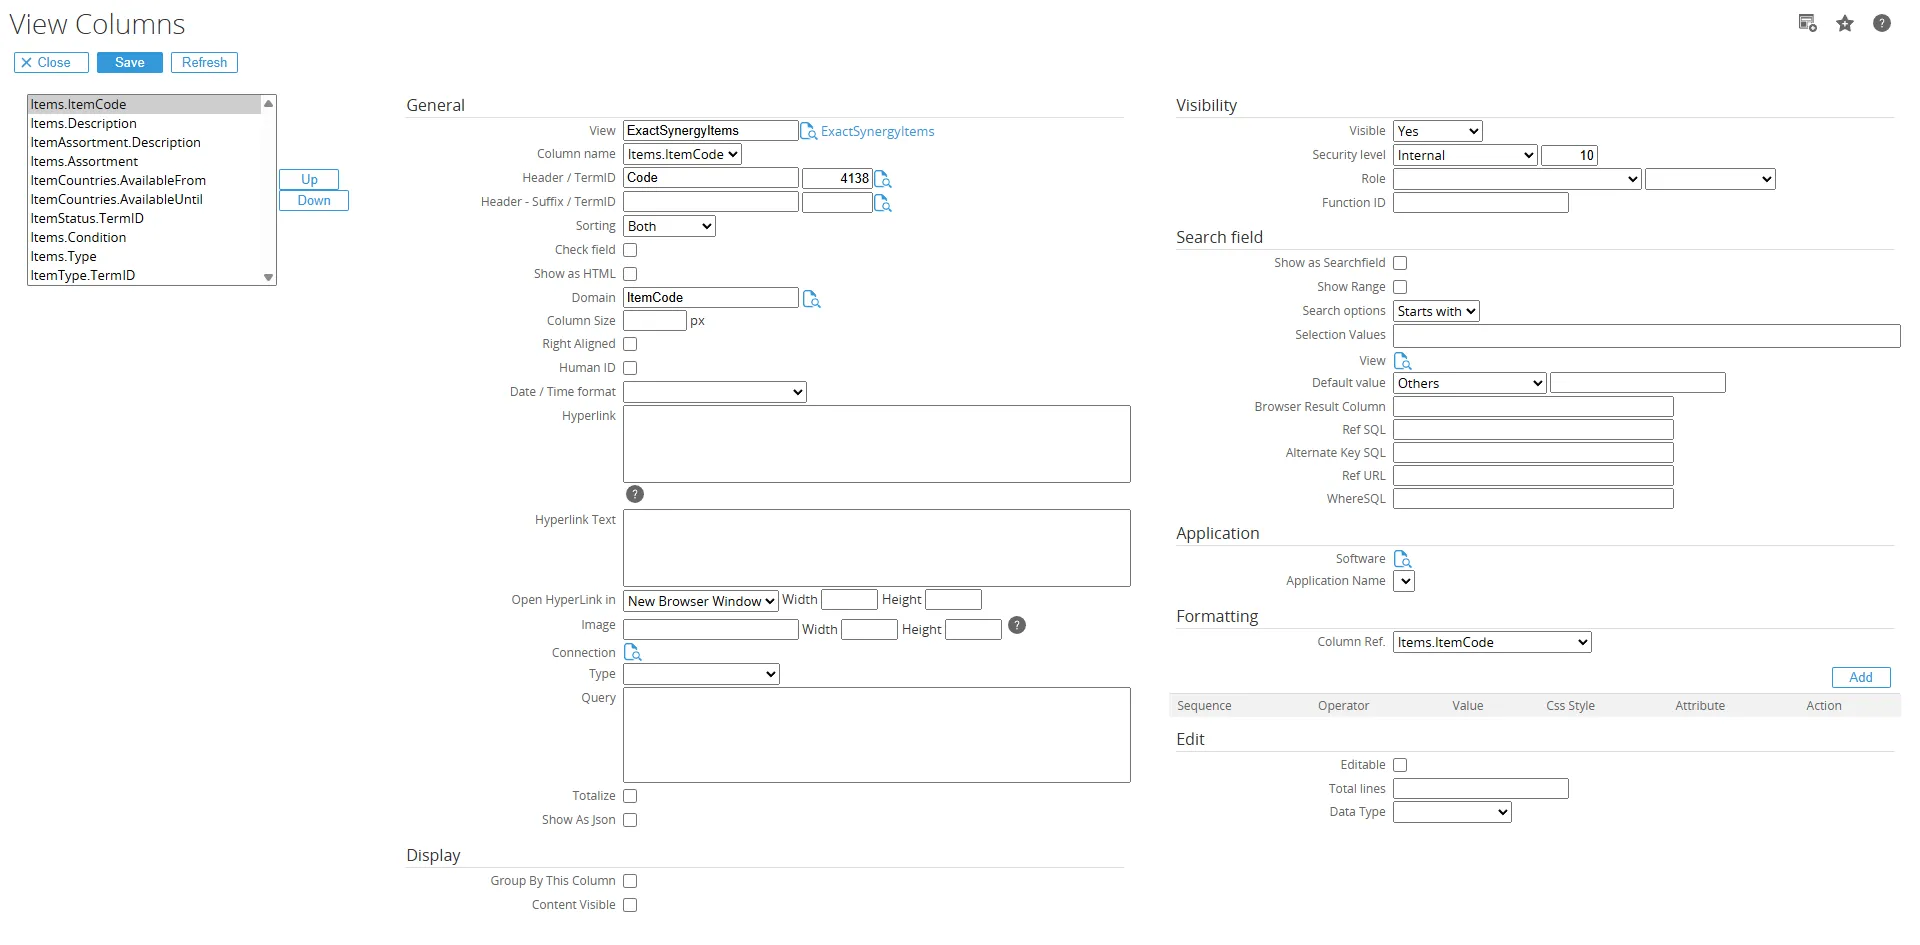
General
Header / Term ID The header and term id of the column, by default the column name is used when no header name/description is set.
Header Suffix / Term ID The header suffix and term id of the column
Sorting Enable sorting for a column. The following options are available: • None
• Both
• Ascending
• Descending
Checkmark This would be for a true/false, yes/no, 1/0 field where when true a green check would be displayed.
Domain Type of the field, the domains are the available domains in Exact Synergy. By selecting the domain, it will determine how the field would be displayed.

Column Size Width of the column
Right Aligned Make the value in the column right aligned.
Human ID A number as result from the query Exact Synergy will be displayed in the same form as a request number or document number would be formatted in Exact Synergy
Example: 7412 will become 00.007.412
Date/Time format The format in which the date and/or time value would be displayed. The options are
• Date + Time
• Date Only
• Time Only
The format of the date used will follow the setting in the Exact Synergy user preferences.
Hyperlink The hyperlink to use for the column. The hyperlink also supports parameters to use the values from the column by using @columnname. In addition also parameter like @ConnectionAPIUri can be used to get values from the connection.
Several examples:
Open another view
GLMSysCIDynamicList.aspx?Name=ExactGlobeOrderDetail&ParamValue=@ordernr@ordenr is one of the columns and GLMSysCIDynamicList.aspx is the page to start a view. This hyperlink is zooming in to a detail view to see the order details order lines.
Open a SSRS report
SSRSRepBrowserParameters.aspx?rs:ID=%7b125eccb3-aded-4726-8cbe- 2574b1f448d5%7d&ord_no=@ord_no&rc:StartPage=1Open google maps with multiple values
https://www.google.com/maps/dir/@g.PostCode/@h.PostCodeOpen an existing workflow request
WflRequest.aspx?BCAction=1&ID=@r.IDOpen back office order in Exact Synergy by passing on @ConnectionDivisionCode
LogOrderBO.aspx?Division=@ConnectionDivisionCode&Number=@ordernrOpen Exact Online Sales Order
@ConnectionAPIUri/docs/SlsSalesOrderEntry.aspx?BCAction=1&EntryID=%7b@OrderID%7d&_Divi sion_=@ConnectionCompanyNumberParameter Description @ConnectionCompanyCodeWill be replaced by the company code set at the connection. @ConnectionCompanyNumberWill be replaced by the company number set at the connection. @ConnectionSQLDivisionCodeWill be replaced by the division code set at the SQL section of the connection. @ConnectionDivisionCodeWill be replaced by the division code set at the connection. @ConnectionAPIUriWill be replaced by the API URI set at the connection. @ConnectionApplicationUriWill be replaced by the Application URI set at the connection. This is only enabled when API URI and Application URI are different for a provider. Hyperlink Text Query for the text to show for the hyperlink, if the text should be different from the value of the column.
The query also can be
SELECT '@Description'which will get the value from the description column.Open Hyperlink in
The behaviour of the hyperlink.• New Browser Window
• New Window
• New Tab
• Same Window
Width Width of the new window
Height Height of the new window
Image Image which could be used for the hyperlink, the image would be an image available in the Exact Synergy docs\images folder.
Examples:
Workflow.svg, Add.svg, Activity.svg
Query Query in Exact Synergy to get data from Exact Synergy. This query can be used to find data in Exact Synergy which is related to the data from the connection. This is normally done for a dummy, placeholder column in the query. In the query a placeholder column an be used like ‘’ AS RequestID or ‘’ AS Lines.
This query will then get the value from Exact Synergy by running the query. The parameters are the column names used in the query (@columname).
Examples: Get the RequestID related to an order number
SELECT TOP 1 ID FROM Absences WHERE Type = 1 AND OrderNumber = '@OrderNbr'Get the Request HID related to an order number
SELECT TOP 1 hid FROM Absences WHERE Type = 118 AND OrderNumber = '@OrderNbr'Get the Exact Synerygy account id based on an other software @CustomerID
SELECT cmp_wwn FROM cicmpy WHERE LTRIM(RTRIM(cmp_code)) = @CustomerIDGet total of request meeting certain criteria
SELECT COUNT(*) FROM Absences WHERE Type=9028 AND FreeTextField_01 = @RefNbrDisplay request comments in combination with data from other systems
SELECT TOP 1 RequestComments FROM Absences WHERE Type = 1 AND OrderNumber = '@OrderNbr'Totalize To showing the totalize on the last row
Show As json To display it as JSON, a button will appear to show the value in a pop-up.
Display
Group By This Column For grouping in the view, the data will be grouped based on the column where the values are the same.
Content Visible
Visibility
Visible Is the column visible or not. We don’t want to display guid values but we still can use the values in the sub query.
Security level Make a column visible based on a security level
Role Make a column visible based on a role
Function ID Make a column visible based on a function id
Search field
Show as search field When this field is checked the column will be visible as a search field / filter. This filter can be used to search on the data.
Show range Make the search field a range field to be able to search on a range of values.
Search options The following search options are supported for the search fields:
• Equal to
• Starts with
• Contains
Selection values Make a combobox out of the search field by passing on available selection values
The selection values can be a query or a list of values.
Syntax:
Values: [key],[description],[termid];[key2],[description2],[termid2] or
Query: SELECT [key],[description],[termid] FROM table
Example: 10,Open,0;50,Processed,0
SELECT ItemClassCode,Description from ItemClasses where ClassID = 4SELECT DatabaseChar, Description, TermID FROM DDTests WHERE TableName = 'ItemUnits' AND FieldName='UnitType' ORDER BY DescriptionView The search field also can be a browser based on a view. Select the view to be used, the view shown here will have the ‘List browser’ option checked.
Default Value The first column is used to determine the data type, and the second column is used to set the value. It will then automatically be applied to the SearchField.
Browser Result Columns The key and description to be returned when a value is selected from the browser
Example:
Code,Name
Reference SQL SQL query to return the description when the page is opened.
Alternate Key SQL SQL query to return the alternate key, normally used when the key is a guid and the code need to be displayed.
Reference URL Hyperlink to open the related application
Where SQL SQL where clause for the browser
Application
This section is to open up a client application directly from Exact Synergy. This allows for opening a Exact Globe application directly from Exact Synergy.
Software
The software for which the application should be opened.Application name The application name of the application to be opened, the possible values are stored in the database.
Fomating
Format a column value giving the column a css style and/or attribute for the cell
Column Ref The column which will have the value to compare against to determine the formatting to be used.
Edit
Editable For set the column as editable field
Total lines Setting the data type is used to determine which column the value will be saved to in the RulesViewAction. For example, if the type is set to String, it will automatically map to TextField1, TextField2, TextField3, and so on based on the column order.
Data Type
Maintain view column formatting
Section titled “Maintain view column formatting”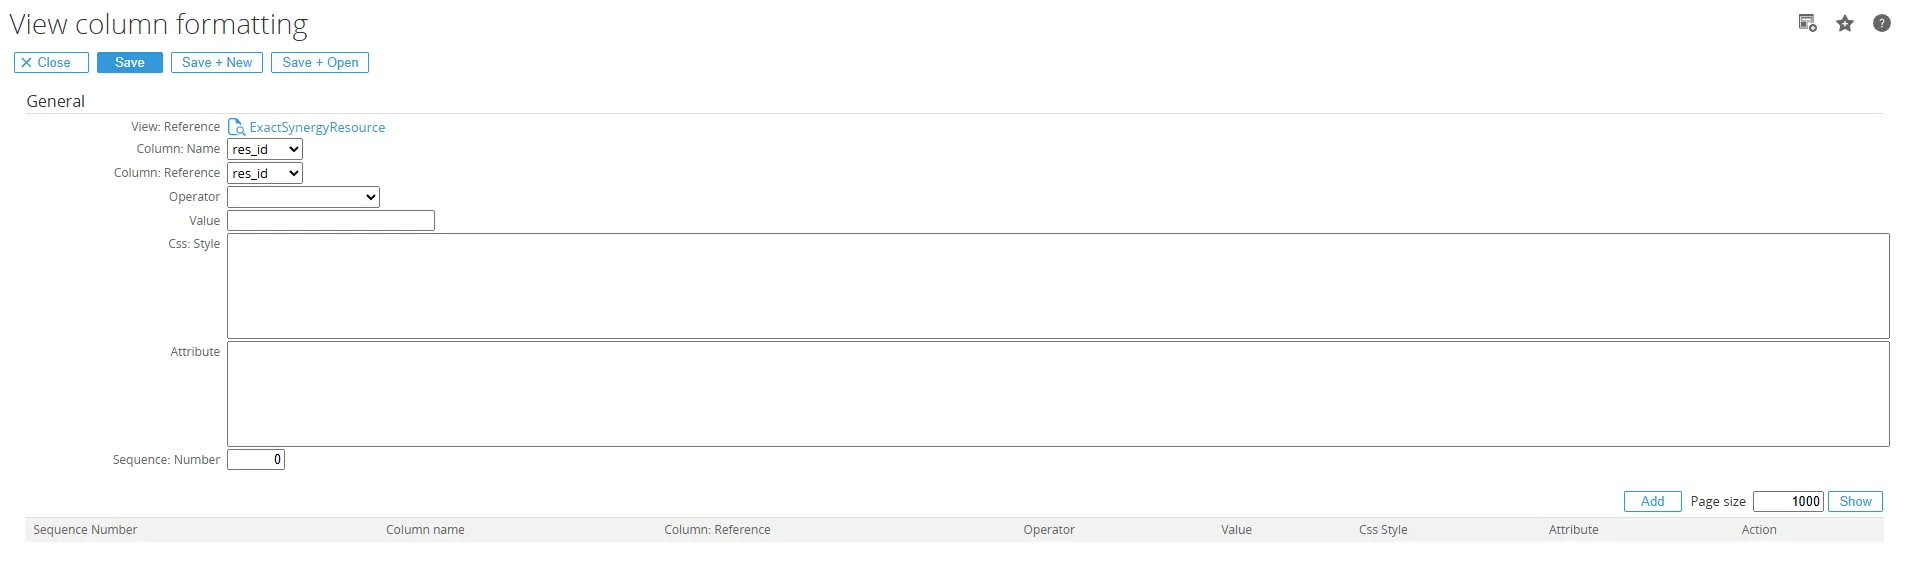
View The view related to the column formatting
Column Name Column which is being formatted
Colum Reference Column value to be used for comparison
Operator Comparison operator
Value Value to compare against
Css: Style Css style can be added here which will be applicable for this cell
Example: color:red;background-color:white

Attributes Cell attributes
Example title=“Negative amount”
Sequence Number The order of the formatting to be executed.
Maintain view parameters
Section titled “Maintain view parameters”In the stored procedure or query parameters can be used. Parameters are used with @.
An example query is shown below where the parameter is used to compare number of days a request is created.
@NumberOfDays < DateDiff(d,syscreated,GetDate()) THEN 1 ELSE 0 END AS Overdue FROMAbsences ORDER BY HIDWhen a parameter is in the query the parameter can be maintained by clicking the ‘Save + Edit param info’ button in the view maintenance. Any parameter used in the view can be maintained here. It has similar fields with the view column maintenance.
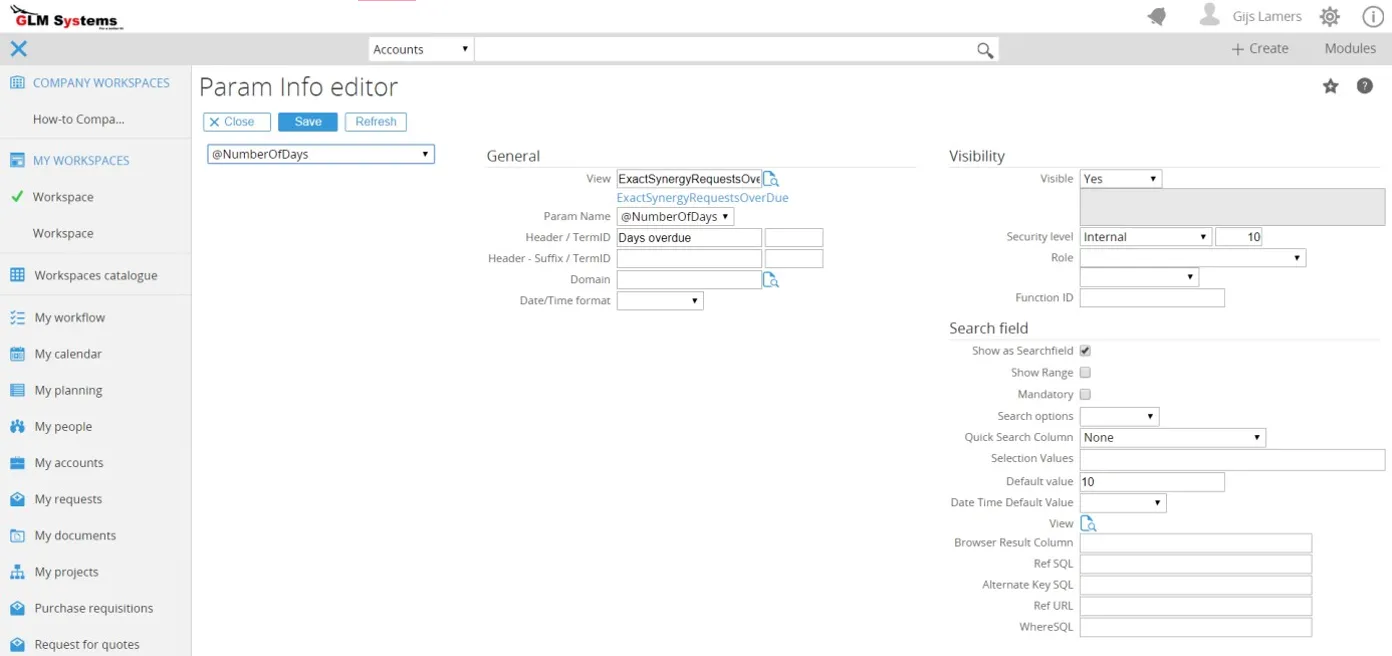
General
Header / Term ID The header and term id of the parameter search field, by default the parameter name is used when no header name/description is set.
Header Suffix / Term ID The header suffix and term id of the parameter
Domain Type of the field, the domains are the available domains in Exact Synergy. By selecting the domain, it will determine how the search field would behave.
Date/Time format The format in which the date and/or time value would be displayed. The options are • Date + Time
• Date Only
• Time Only
The format of the date used will follow the setting in the Exact Synergy user preferences.
Visibility
Visible Is the parameter visible or not.
Security level Make a parameter field visible based on a security level
Role Make a parameter field visible based on a role
Function ID Make a column visible based on a function id
Search field
Show as search field When this field is checked the column will be visible as a search field / filter. This filter can be used to search on the data.
Show range Make the search field a range field to be able to search on a range of values.
Mandatory Is the parameter mandatory
Search options The following search options are supported for the search fields: • Equal to
• Starts with
• Contains
Selection values Make a combobox out of the search field by passing on available selection values
The selection values can be a query or a list of values.
Syntax:Values: [key],[description],[termid];[key2],[description2],[termid2] orQuery: SELECT [key],[description],[termid] FROM tableExample:10,Open,0;50,Processed,0SELECT ItemClassCode,Description from ItemClasses where ClassID = 4SELECT DatabaseChar, Description, TermID FROM DDTests WHERE TableName = 'ItemUnits' AND FieldName='UnitType' ORDER BY DescriptionDefault value Default value for the parameter
Date time default value Default for a date with the following options:
Today, Yesterday, Tomorrow, Last Week, Last Month, Last Year, Next Week, Next Month, Next Year
View The search field also can be a browser based on a view. Select the view to be used, the view shown here will have the ‘List browser’ option checked.
Browser Result Columns The key and description to be returned when a value is selected from the browser
Example: Code,Name
Reference SQL SQL query to return the description when the page is opened.
Alternate Key SQL SQL query to return the alternate key, normally used when the key is a guid and the code need to be displayed.
Reference URL Hyperlink to open the related application
Where SQL SQL where clause for the browser
Maintain view action
Section titled “Maintain view action”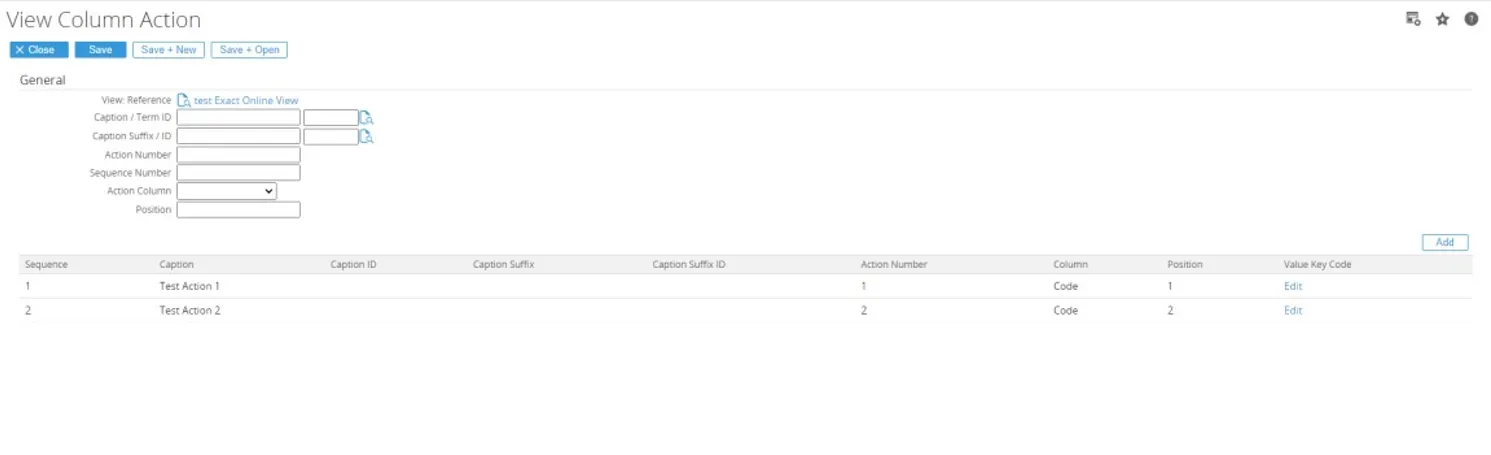
View: Reference The View: Reference indicate which view that will be added by the view column action.
Caption Suffix / Term ID The Caption and Term ID of the view column action, by default if empty the button caption will be “custom”.
Caption Suffix / Term ID The Caption suffix and suffix term id of the view column action
Action Number The Action Number indicate which action of the GLMSysRulesActions will be triggered/run by Rules Engine
Sequence Number The Sequence Number indicate which sequence of the rules related to GLMSysRulesActions will be triggered/run by Rules Engine
Action Column The Action Column indicate which key value of the GLMSysRulesActions that will be triggered/run by Rules Engine
Position The Action Column indicate which key value of the GLMSysRulesActions that will be triggered/run by Rules Engine
List View : View Column Action The list view of all the view column action based on the View: Reference.
List View : Related Rules In the first Picture you will not see this List view, the list view will be show if you edit an existing view column action or click the “Save + Open” button which will be showing the new view column action that has been created.
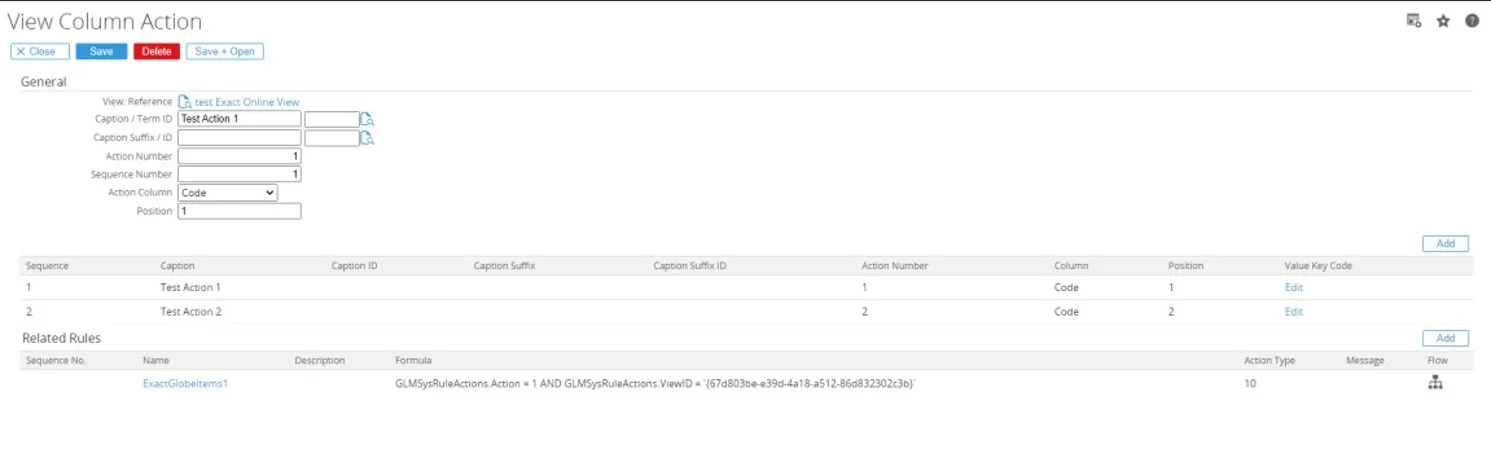
View in card section
Section titled “View in card section”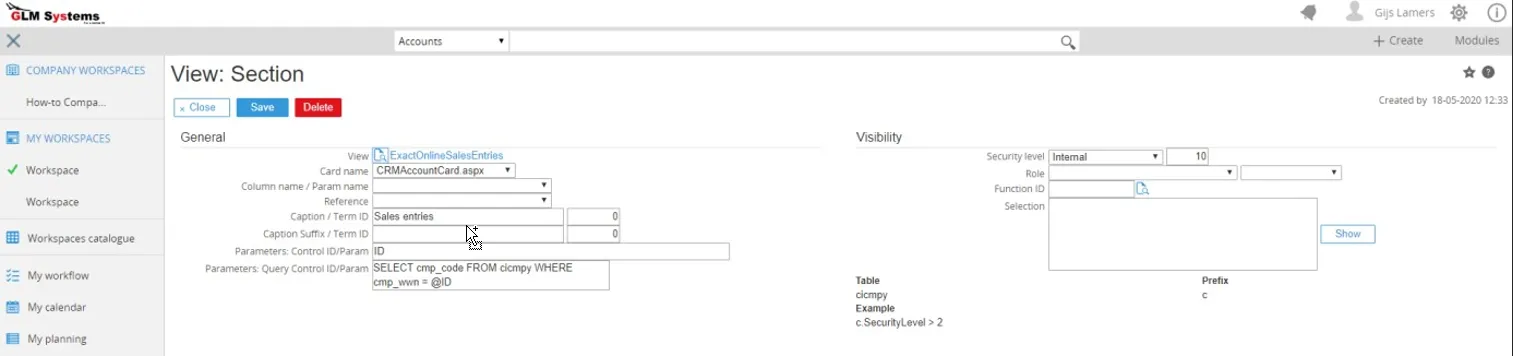
View in card monitor
Section titled “View in card monitor”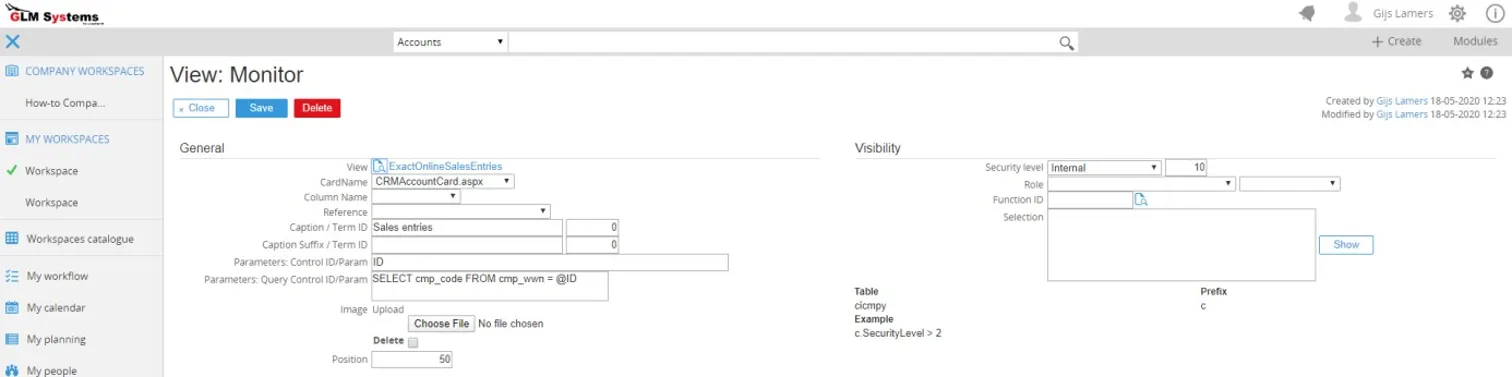
View in workflow section
Section titled “View in workflow section”From the request type a new section can be added. One of the types for a section is ‘view’. When type view is selected, the view also can be selected.

Fields
Height The height for the view in the request
Show as iframe Normally the view will be displayed as list view in the section. By setting this option an iframe will be used.
View The view which is selected for this section
View in workflow request field
Section titled “View in workflow request field”In the request fields in Synergy there an extra section ‘Browser’ where a RPA View, Standard browser or custom browser can be selected.
The browser section will show for free fields and standard fields which have a browser/lookup. This will then allow you to replace the standard browser and have your own browser with extra column or extra information in the hyperlink. For the view the option ‘List browser’ need to be checked before the view will show in the list.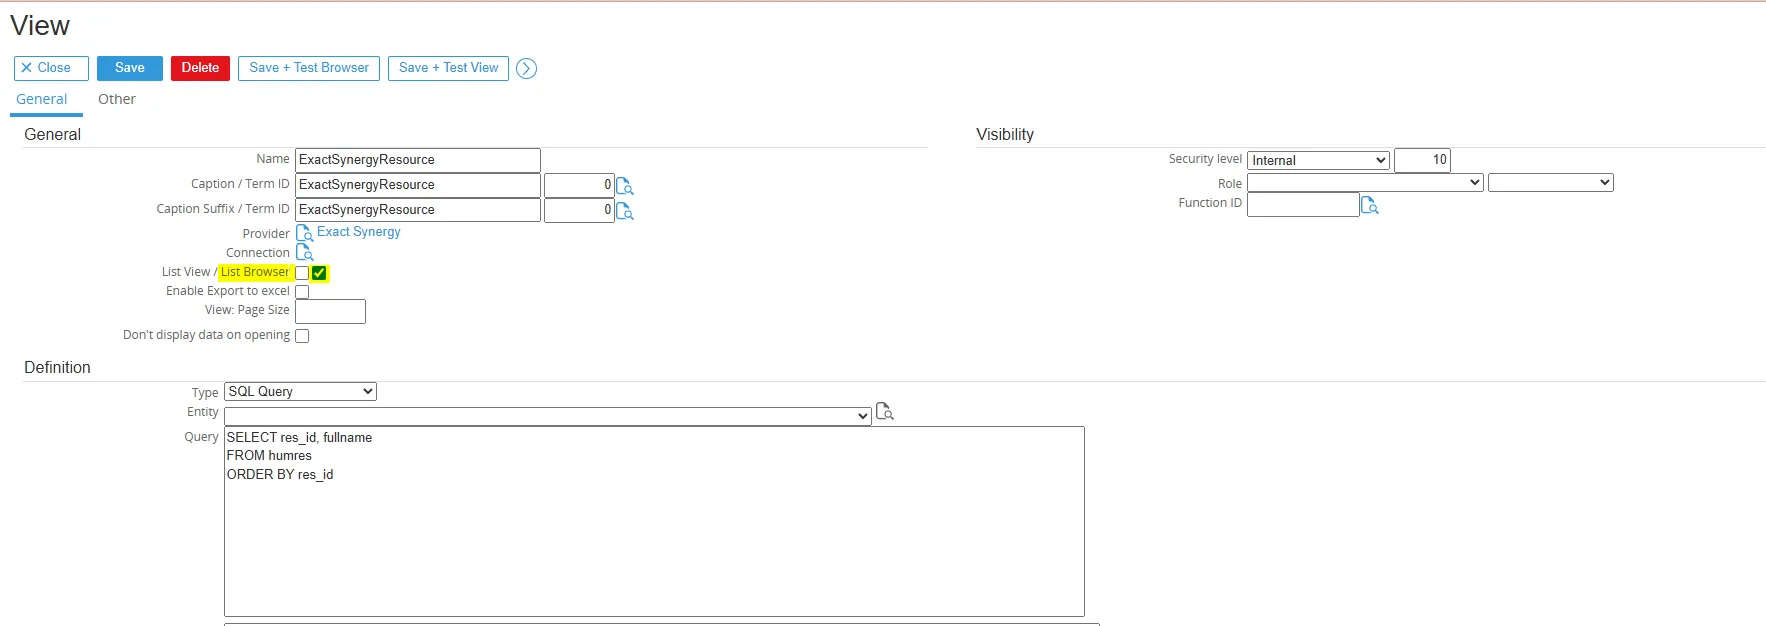
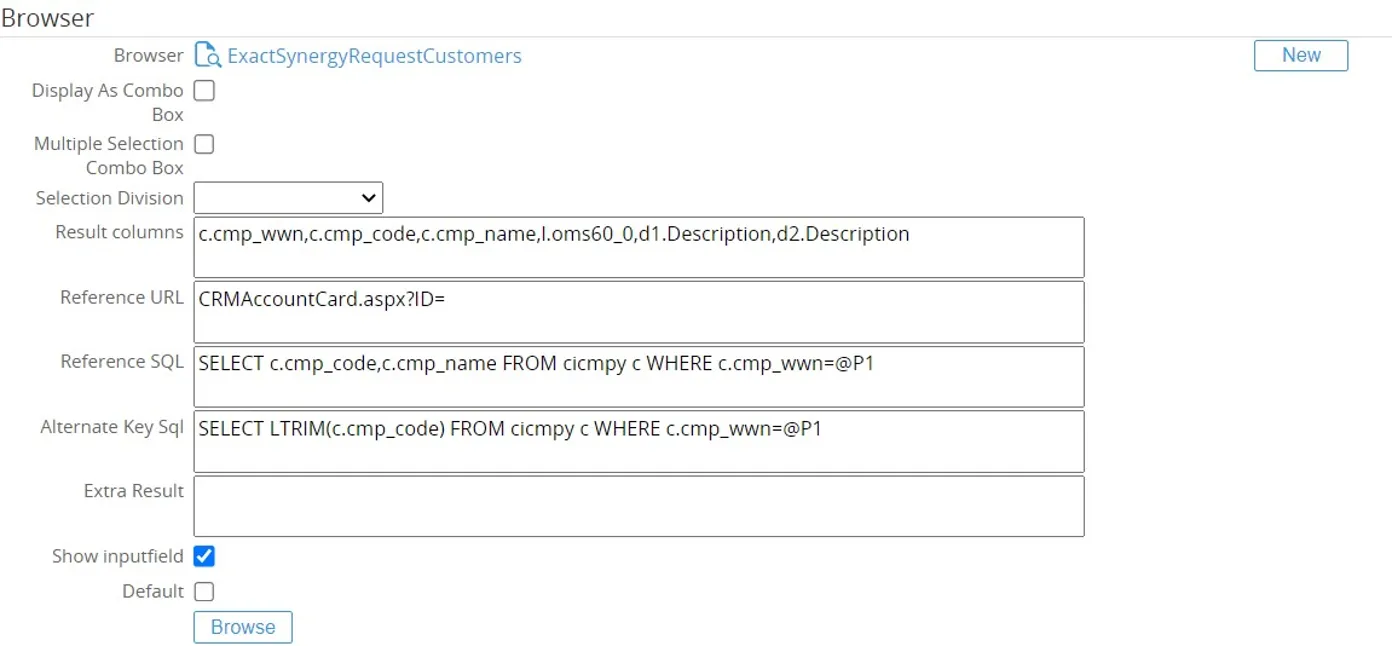
Fields
Browser The view, standard defined browser, repository browser or customer browser to use for the request field.
New (button) Option to create a new browser, part of previous solution now replaced by RPA view
Display as combo box Instead of showing a browser display the field as a combo box for easier selection (not supported for RPA view)
Multiple selection combo Allow for multiple selection when combo box option is used (not supported for RPA view)
Selection division Used for browser to query data on Exact Globe. This option only needed to be set when the browser is not a view but a standard or custom repository browser which should read the data from Exact Globe.
The following options are available.
Create: Division = Use the division linked to the creator of the request
Person: Division = Use the division from the person linked to the person field
Current: Division = Use the division linked to the current person opening the request
Division 2: Field = Division is based on request division field
Fixed: Division = Select the division to be used
Result columns After selecting the value from the browser this would be the values returned which would be the value to store in the database, alternate key (if used) and the description to show in the link behind the field, separated by a coma.
Example: c.cmp_wwn,c.cmp_code,c.cmp_name,l.oms60_0,d1.Description,d2.Description
The first field c.cmp_wwn would be the value stored in the database, the rest of the field would display in the link or are used as extra results to populate in other fields in the request after selection of the value.
All the columns should follow the column names in the view or browser.
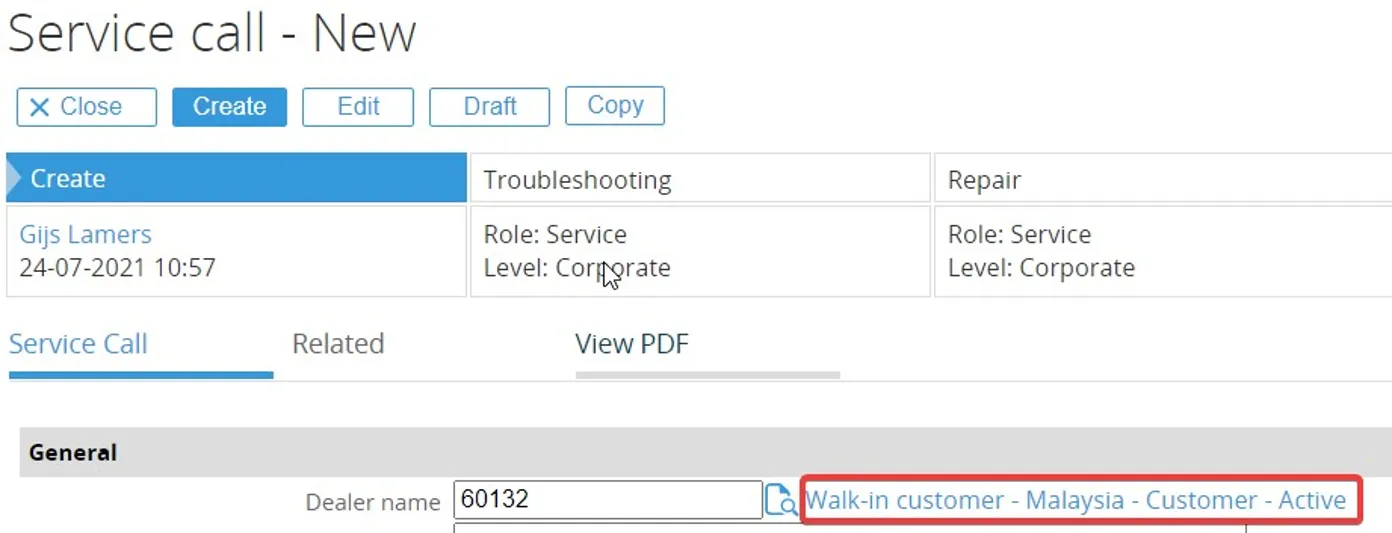
Reference URL The URL used for the hyperlink. The syntax is the page name you want to have is link and ending with =, CRMAccountCard.aspx?ID=. The result key value would be appended to this link.
Reference SQL The browse result column would return values for the hyperlink when selecting a value. When the request is opened the hyperlink value would be retrieved by a query. If this is not set the hyperlink would not show for a request which is opened again after it is saved.
This would be a query with the @P1 as parameter for the key: SELECT c.cmp_code,c.cmp_name FROM cicmpy c WHERE c.cmp_wwn=@P1
Alternate Key SQL In case of the account view example shown her in the explanation the key column is of type guid (cmp_wwn) which should be store in the database. We don’t want to display this to the user so we show an alternate key in the case the account code (cmp_code). @P1 parameter is used and will be replaced by the key value to run the query SELECT LTRIM(c.cmp_code) FROM cicmpy c WHERE c.cmp_wwn=@P1
Extra result Extra result can be used to populate other fields in the request based on the value which is selected. For example, for account we can use the phone number or email to fill into a phone number and/or email field in the request.
In the extra result field the syntax would be the control name/id of the field in the request. When doing a view source in the page the control name can be found. After the control name/id the column name need to be specified. Control name/id,column name More than 1 field to return sperate by a ; Control name/id,column name;Control name/id 2,column name 2
Example FreeTextField_08,c.cmp_tel;FreeTextField_25,c.cmp_e_mail
The second step is to add the fields also to the result columns:
c.cmp_wwn,c.cmp_code,c.cmp_name,l.oms60_0,d1.Description,d2.Description,c.cmp_tel,c.cmp_e _mail
Show input field Show the input field for the field

Default When only 1 value for the field it will automatically set the value
View in workflow request line field
Section titled “View in workflow request line field”Via a workflow section lines can be added. For the Line fields of type browser also views can be used and configured similar as in the request field browser section.

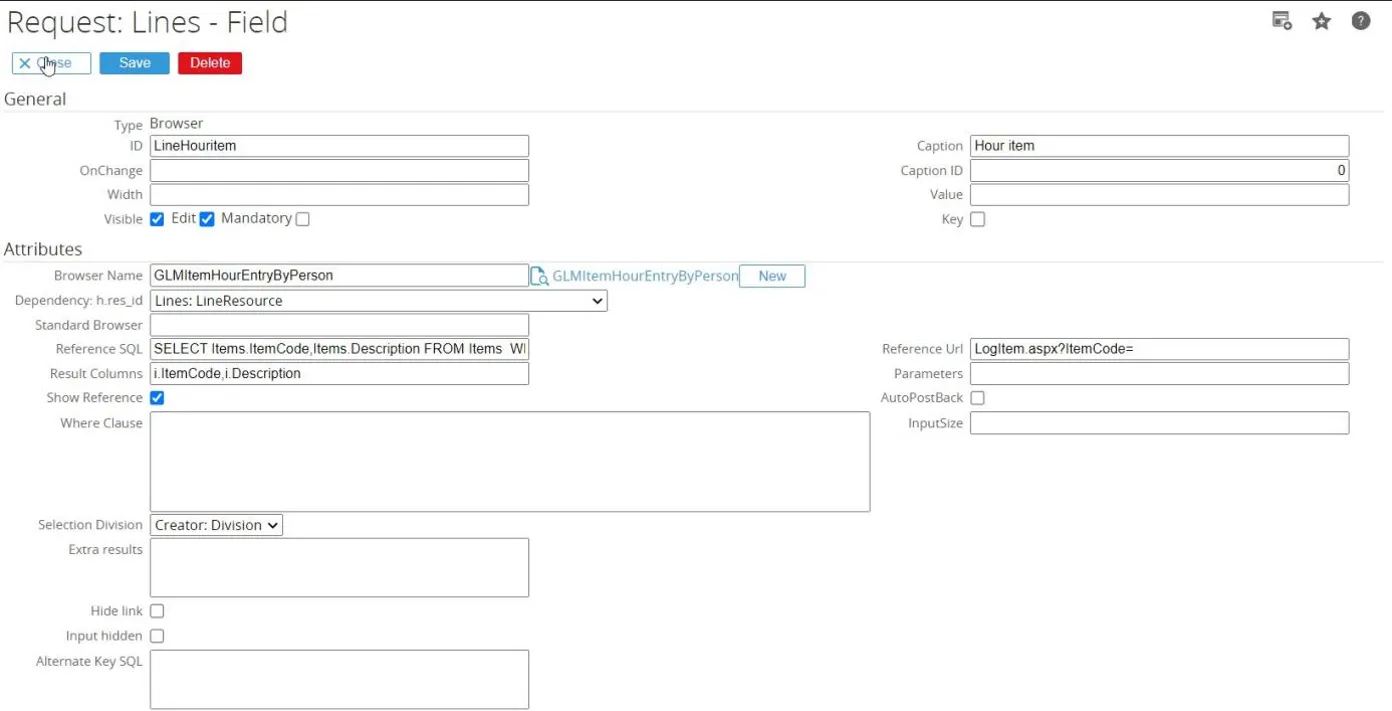
View in account, contact and address free fields
Section titled “View in account, contact and address free fields”This feature is used to display views on the account, contact and address free fields. Go to Modules > Customers > Setup then click Free fields – Accounts to set Account free fields, or Free fields
– Contacts to set Contacts free fields or Free fields
– Addresses to set Addresses free fields.
Click on one of free fields, for example: Text 1
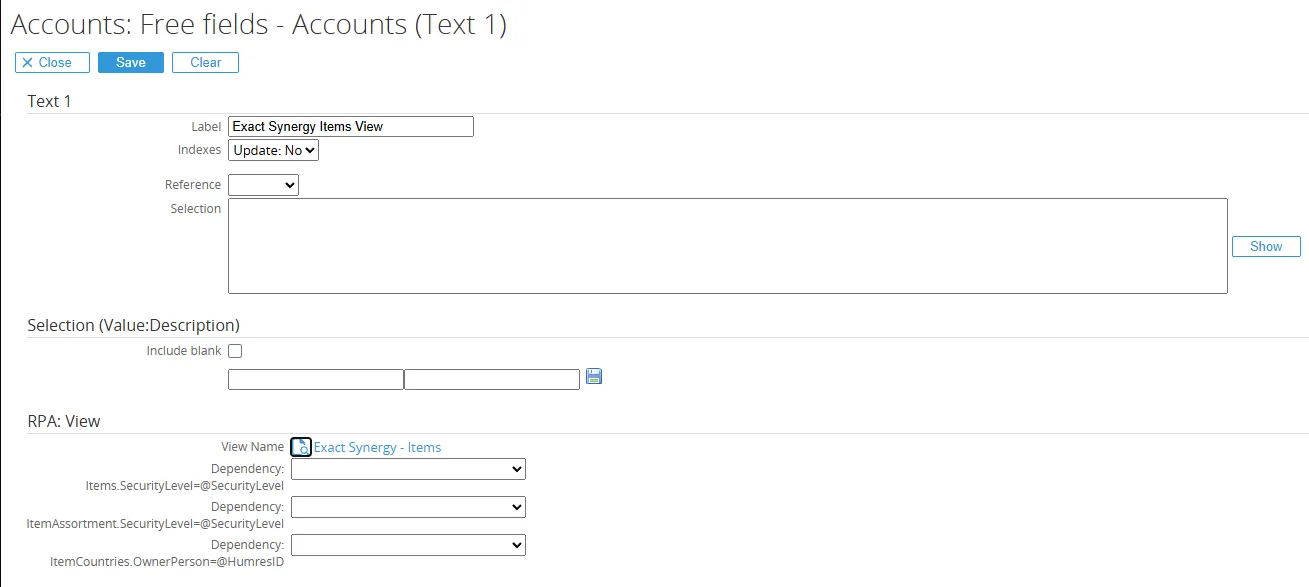
Fill in the field label, then click on the browse icon to select View Name, for example ExactSynergyItems.
Go to customize page on the Account/Contact/Address page to showing a free fieds:

And then, the view will display on the Account/Contact/Address page.
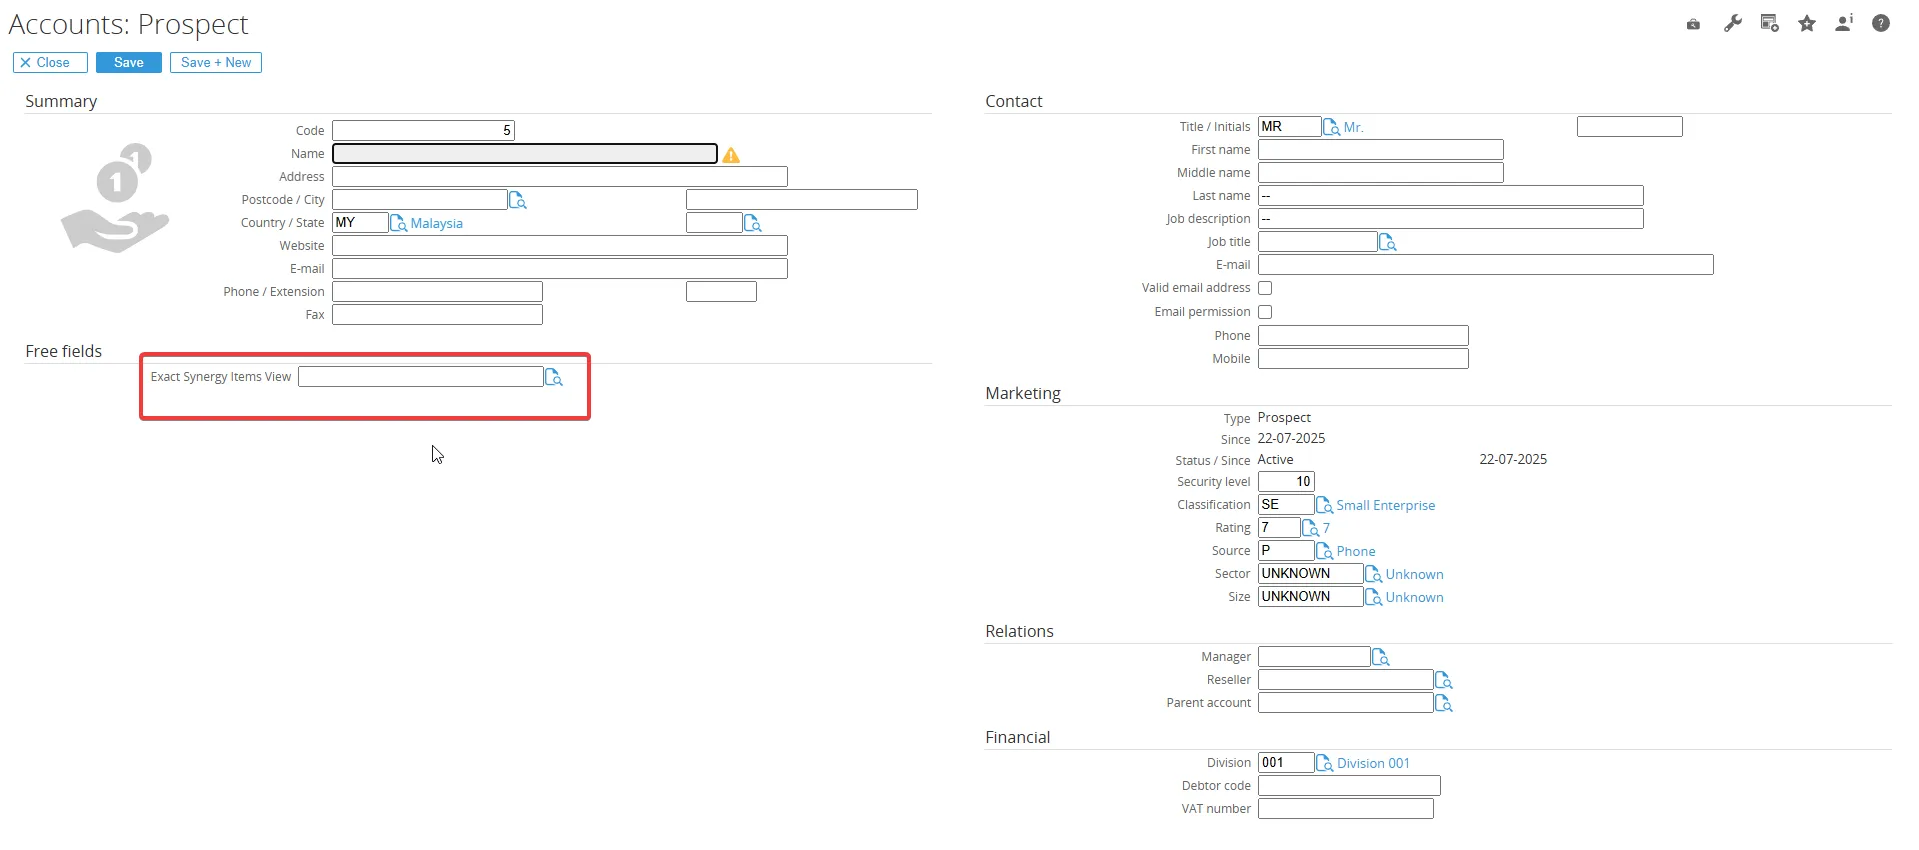
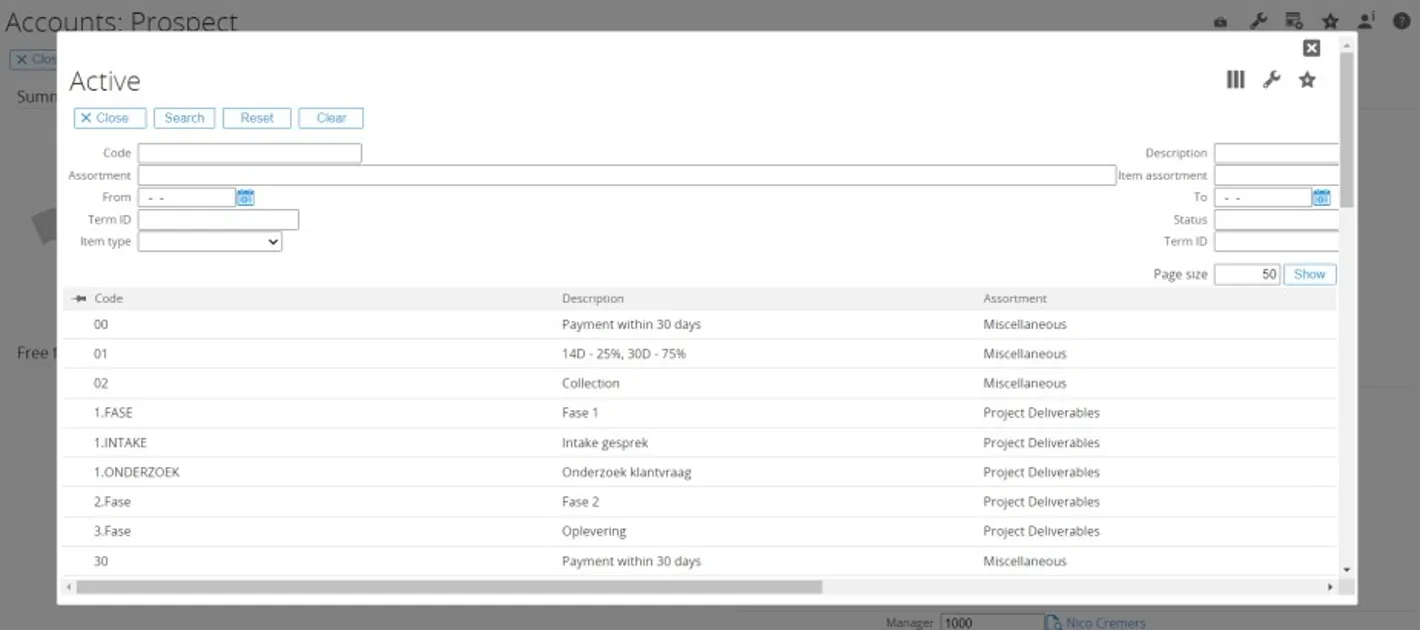
View in document free fields
Section titled “View in document free fields”This feature is used to display views on the document free fields. To set it, select document type for example: Exact Demo. Select Free Field, then click Add button

Select field via click browse icon, for example: Free: Text 1, in the Browser section click Browse icon to select a View, then click Save button.

then the view will be able to be used and appear in the fields that have been added
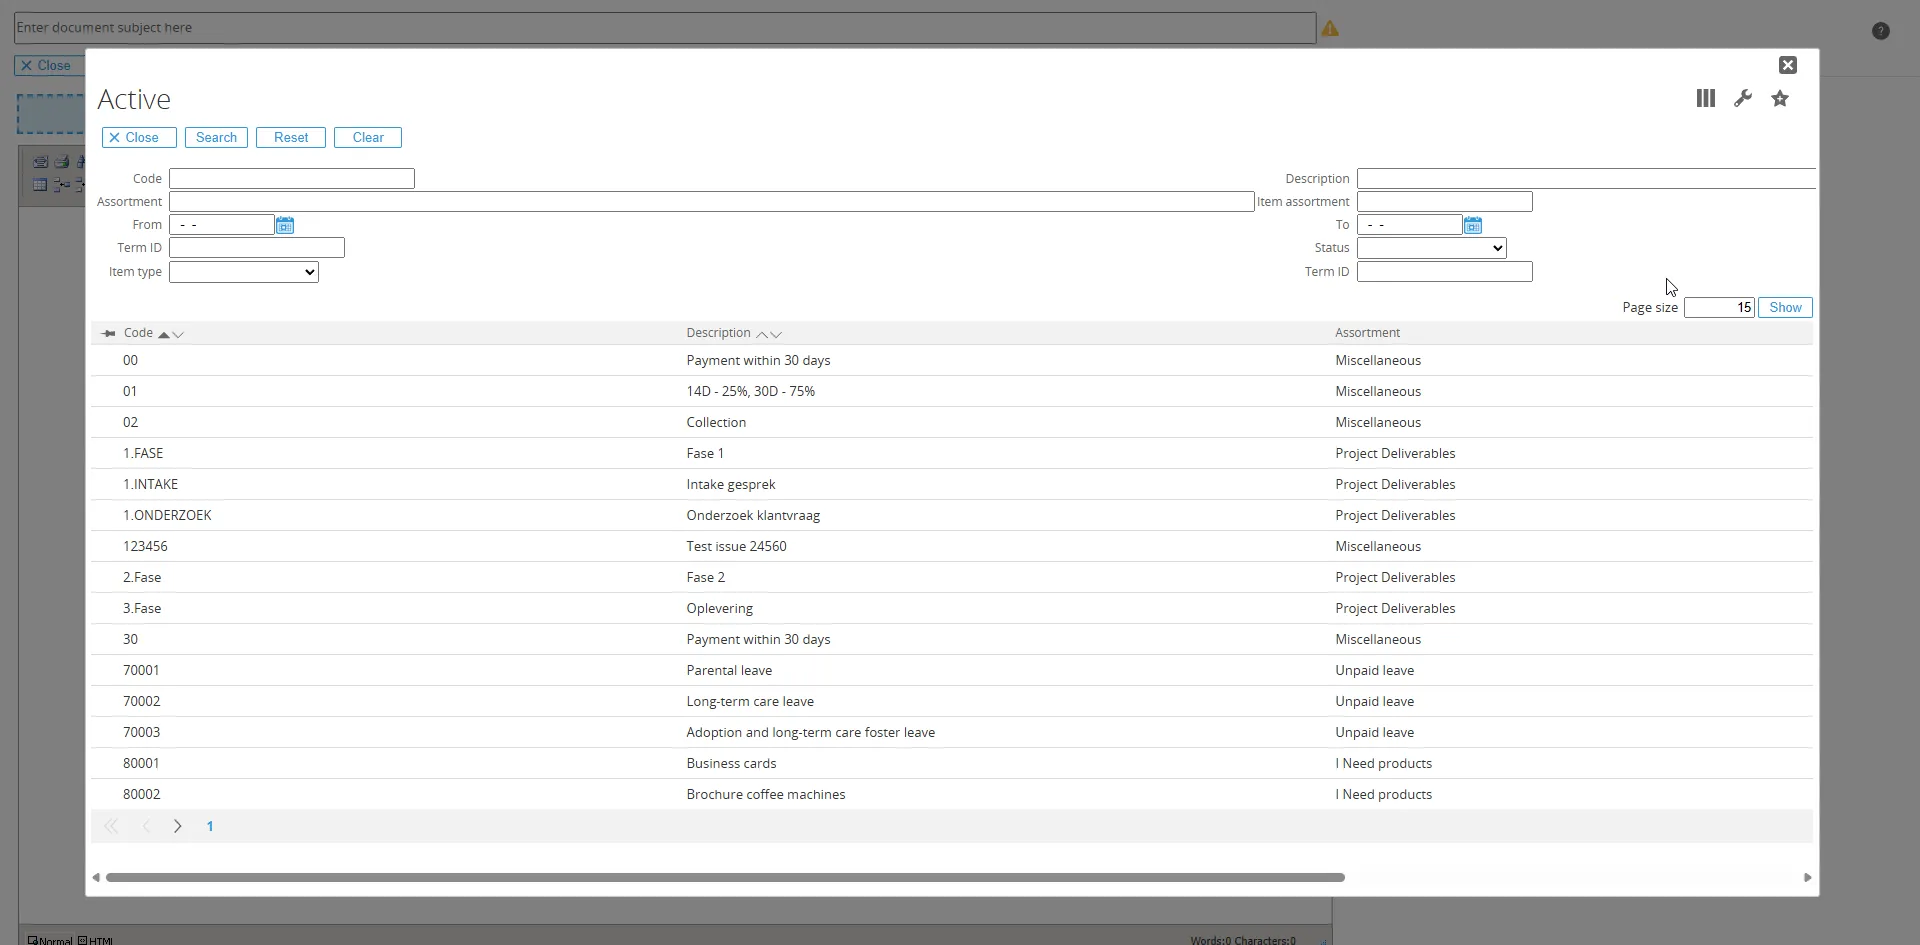
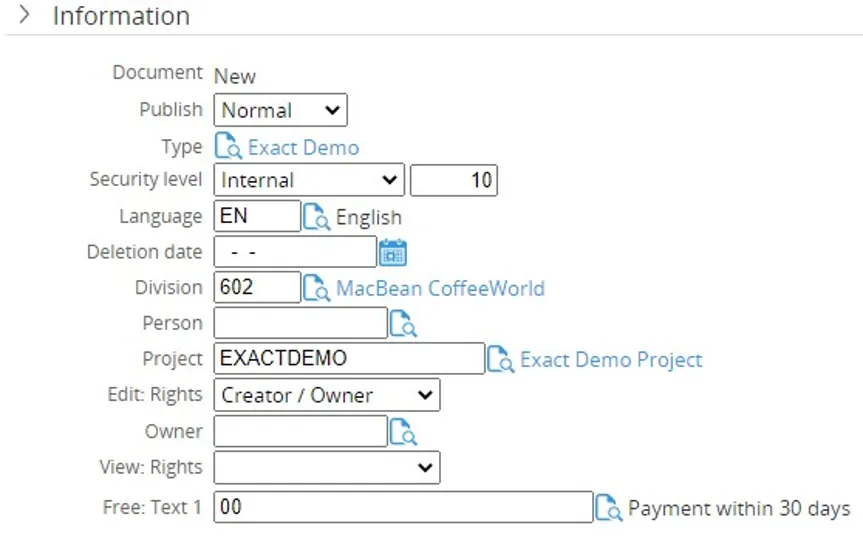
View in workspace
Section titled “View in workspace”This feature is used to display views on the workspace. To set it, click the button on the workspace page, select the RPA menu, add a list view widget.
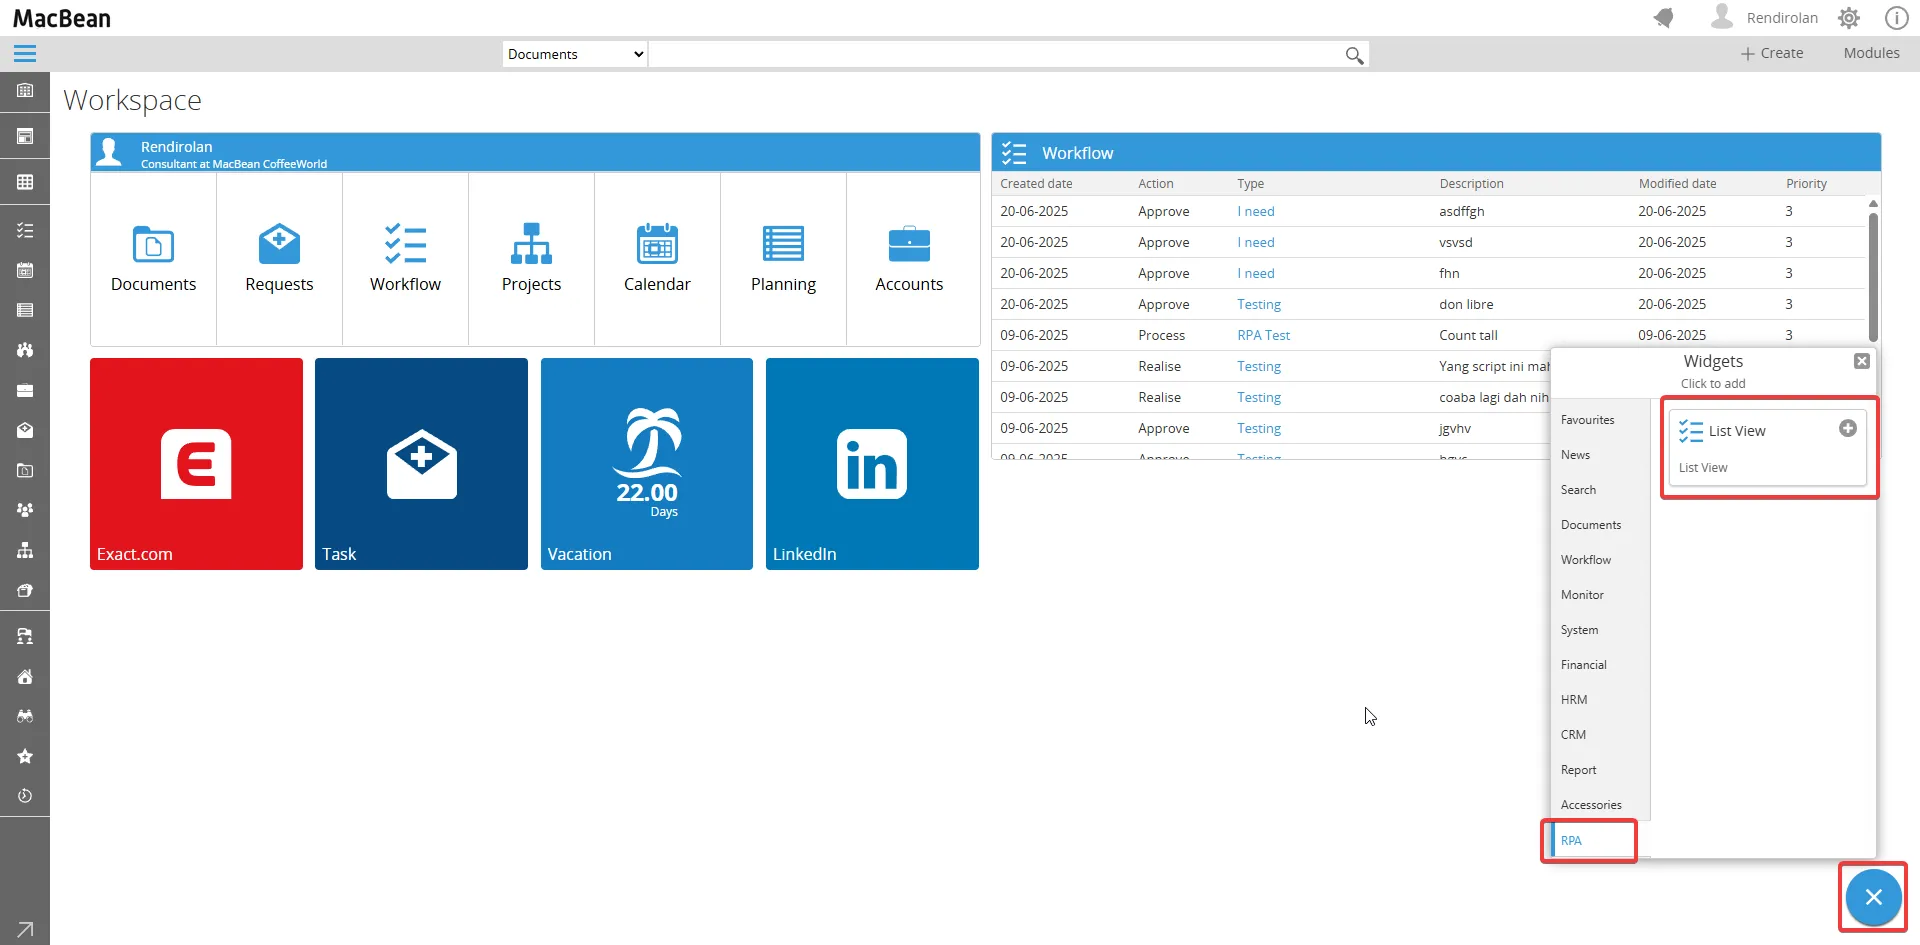
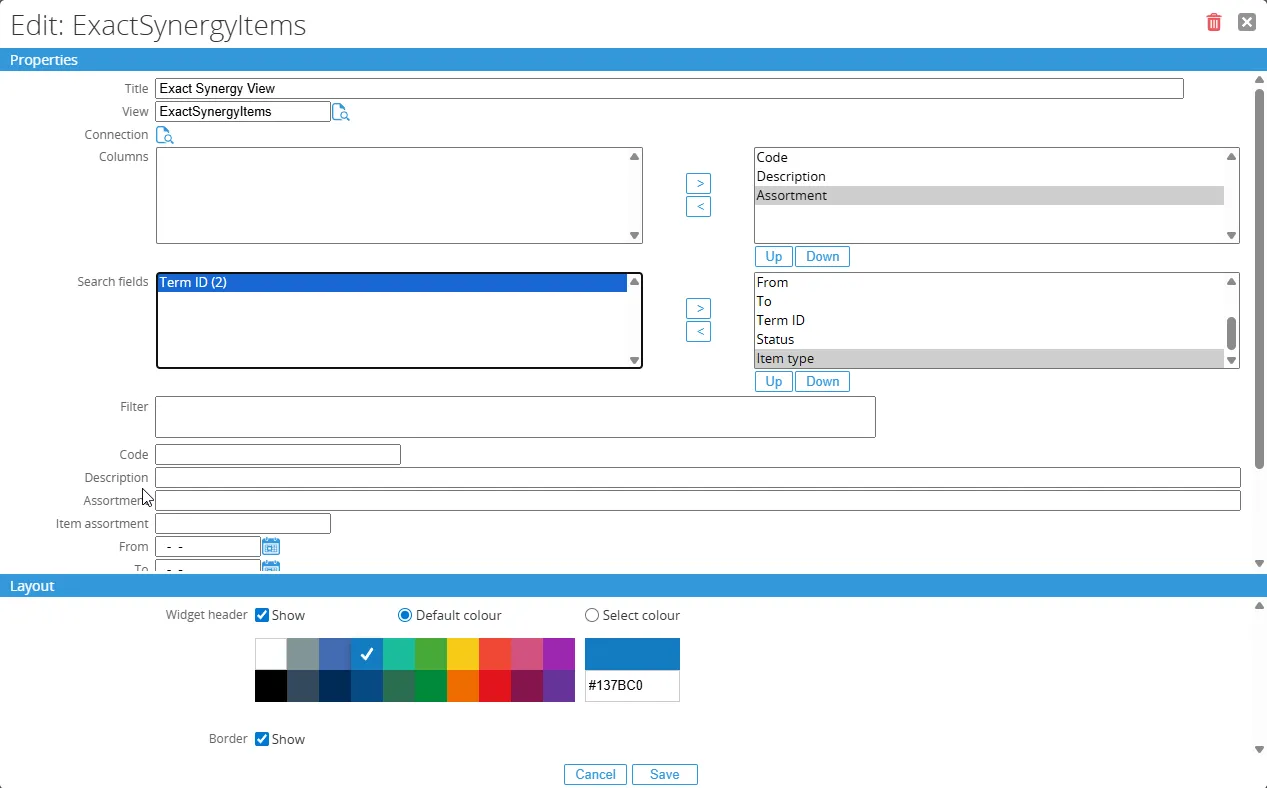
Enter the title, select the view by clicking the browse icon or clicking F2 on the keyboard, select Connection, Select the fields that will be used as columns, then select the fields that will be used as search fields, click save, then view will appear in the workspace as below:
Maintain editable view lines
Section titled “Maintain editable view lines”This feature is used to make fields in the list view editable and in combination with the rules engine we can then use that information to update or create data via the rules engine.
Select the view to maintain editable view lines, for example: ExactSynergyItems. Click Save + Edit Column to maintain View Columns, select columns for example: Description, tick on the Editable Field, enter the Total lines to set the lines, and select Data Type for example: String, then click save.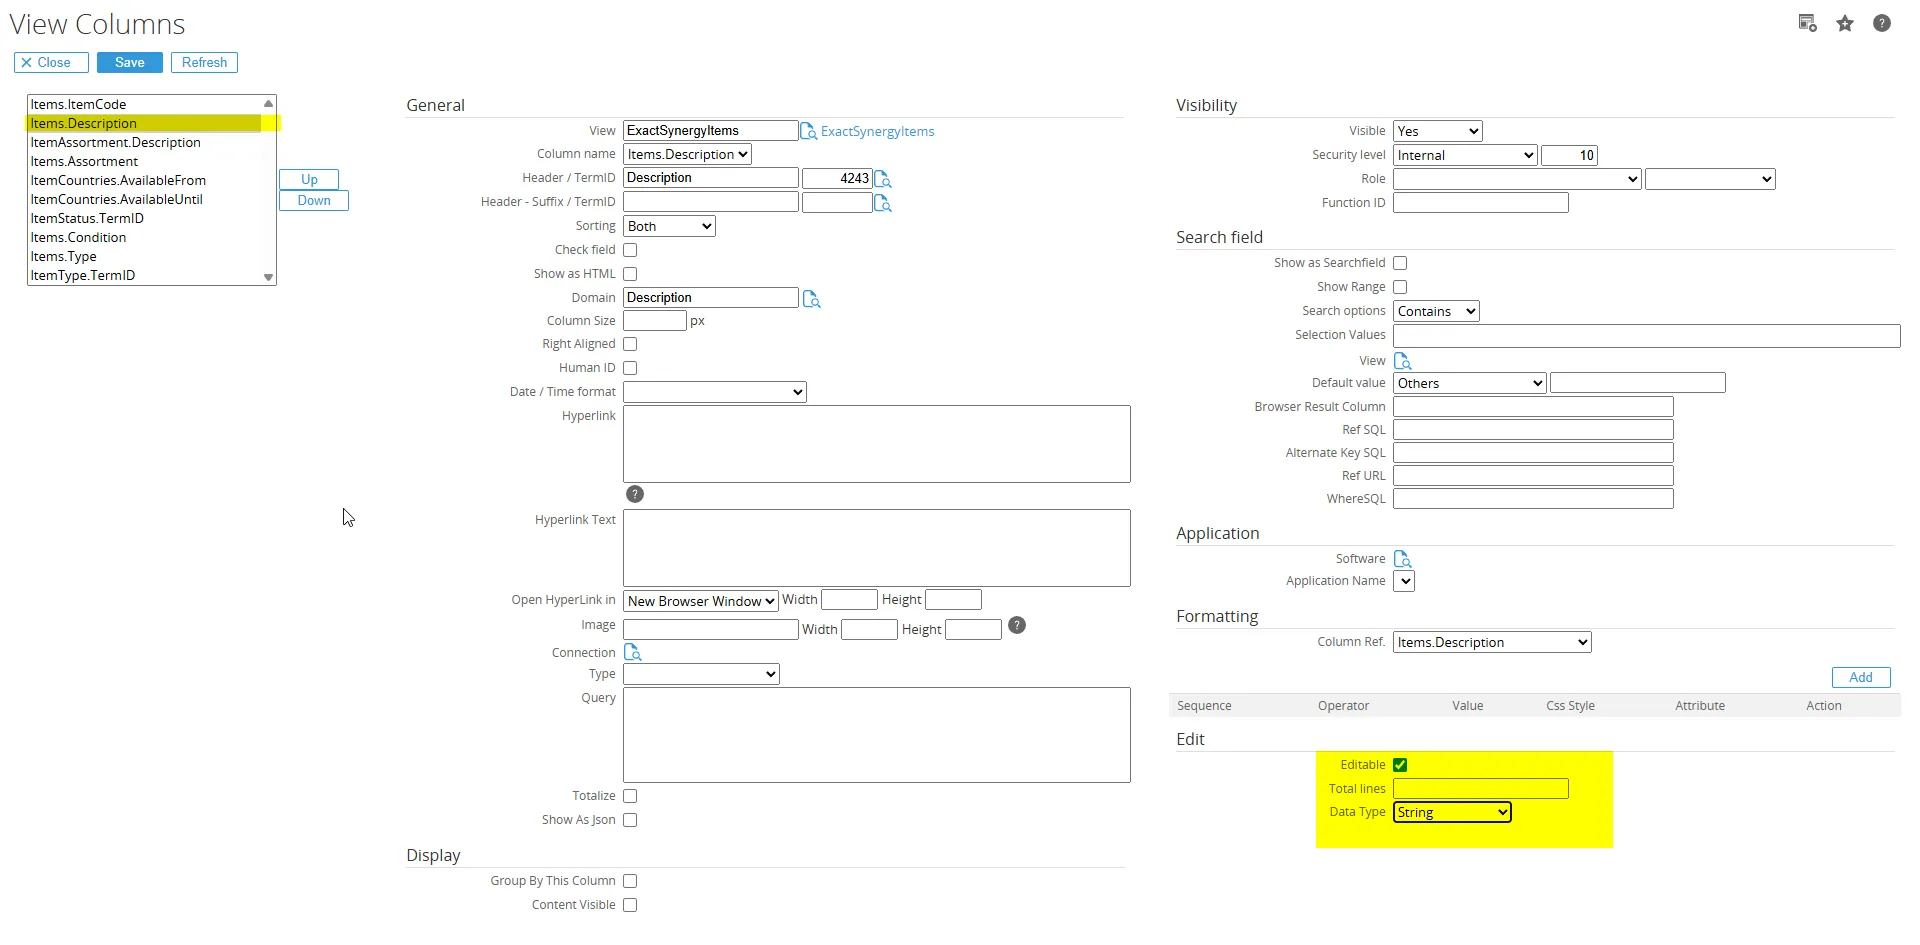
Click save + Edit View Action to add new button: Save (Update) Then click Add button to add some Rules related the Save (Update) button.
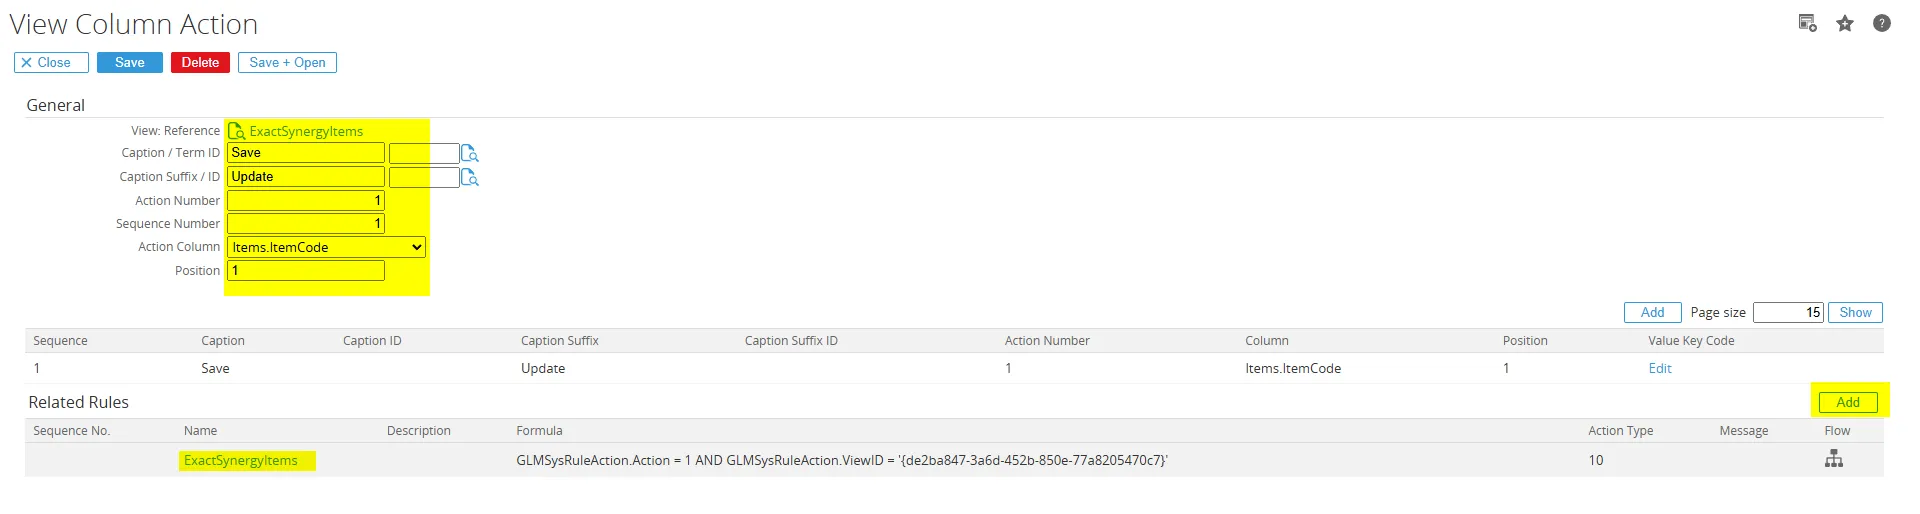
To check it click Save + Test View.
To update some field, tick the field to be edited/updated, then edit/update Description Field then click Save (Update) button.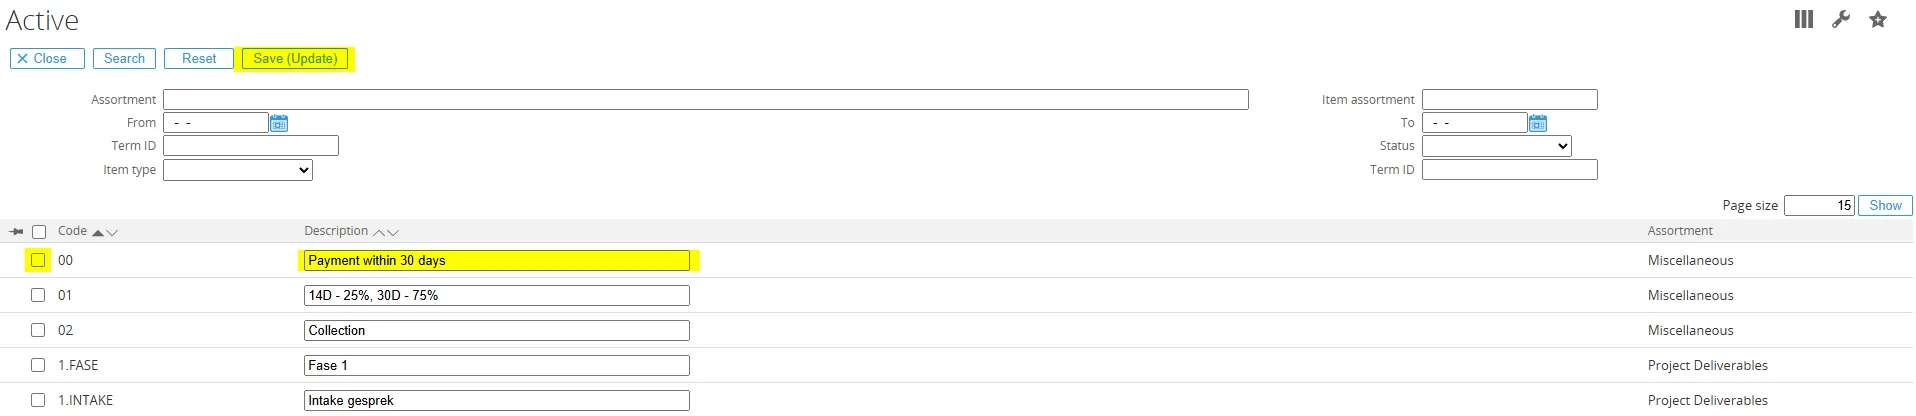
The view lines will be updated.
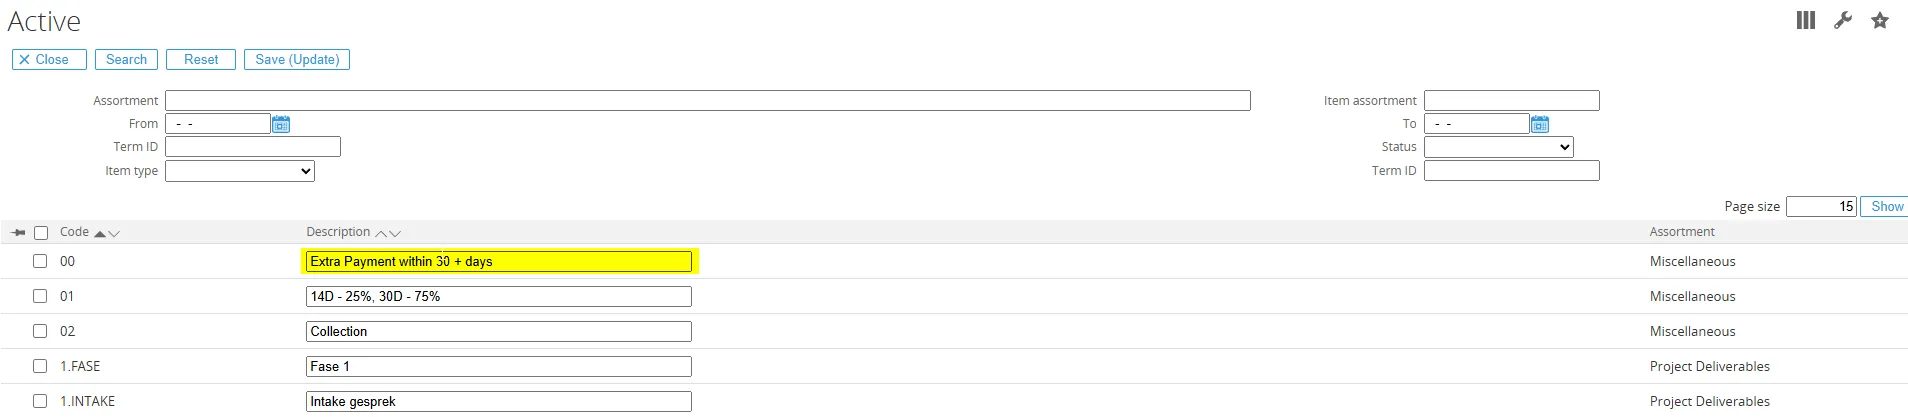
Maintain view name same as standard browser
Section titled “Maintain view name same as standard browser”When RPA view used as a Browser with the same name as standard browser on the Repository, it is possible to replace the Browser from RPA view. If the View has the same name as standard browser, there will be a warning message on The View maintenance page.
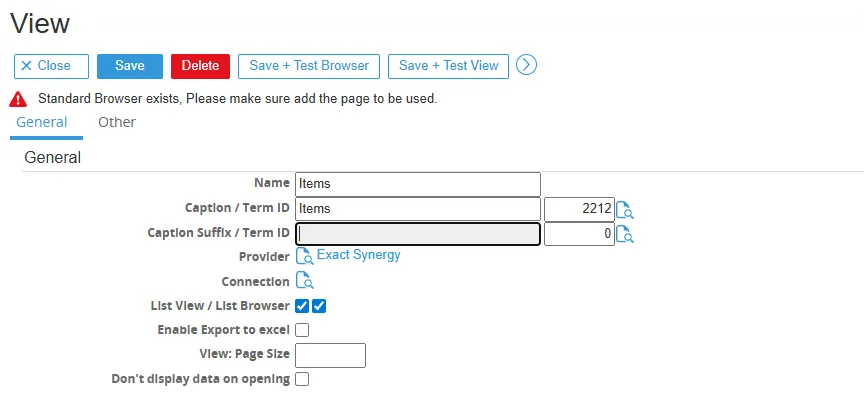


Maintain view stored procedures
Section titled “Maintain view stored procedures”To maintain view Stored Procedures begin by navigating to Modules > RPA > Entry > Views > Create. Enter the Name and Caption for the view, and select the desired Provider and connection. Ensure that List View/List Browser options are enabled, and specify the Type as SQL Stored Procedure. Choose “bacoGetSetting” as the entity, then click Save + Edit Param. Check the “Show as Searchfield” option and save the changes to complete the view creation process.
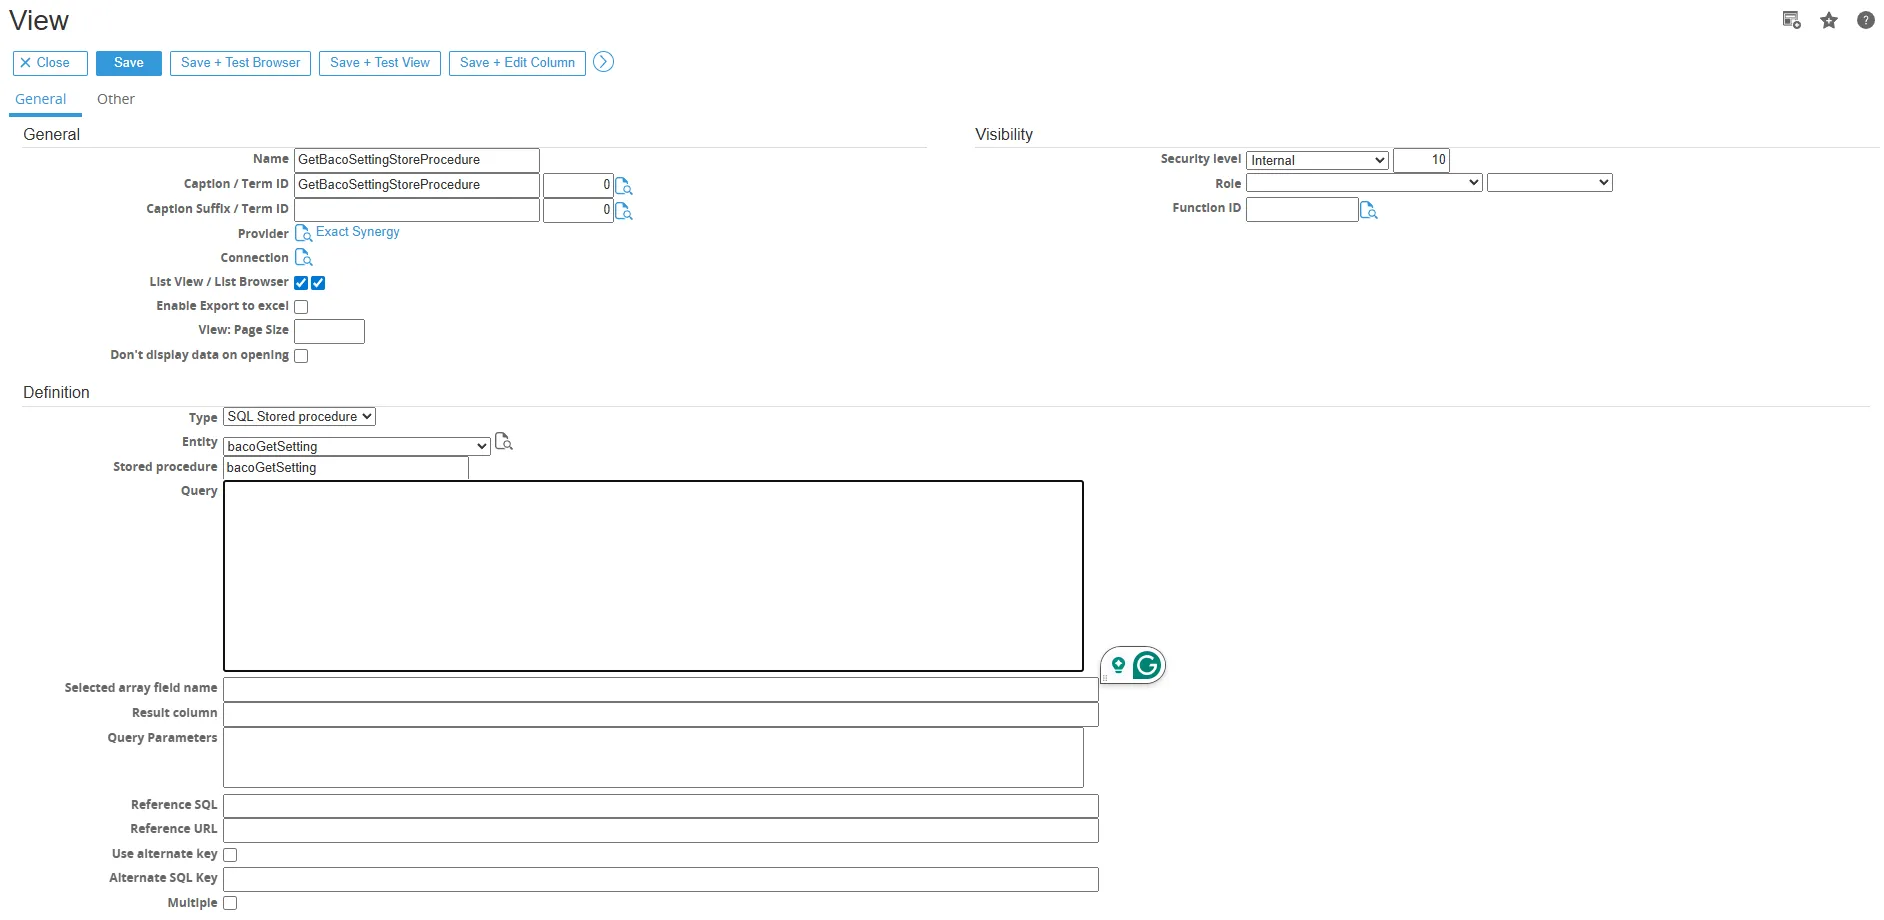
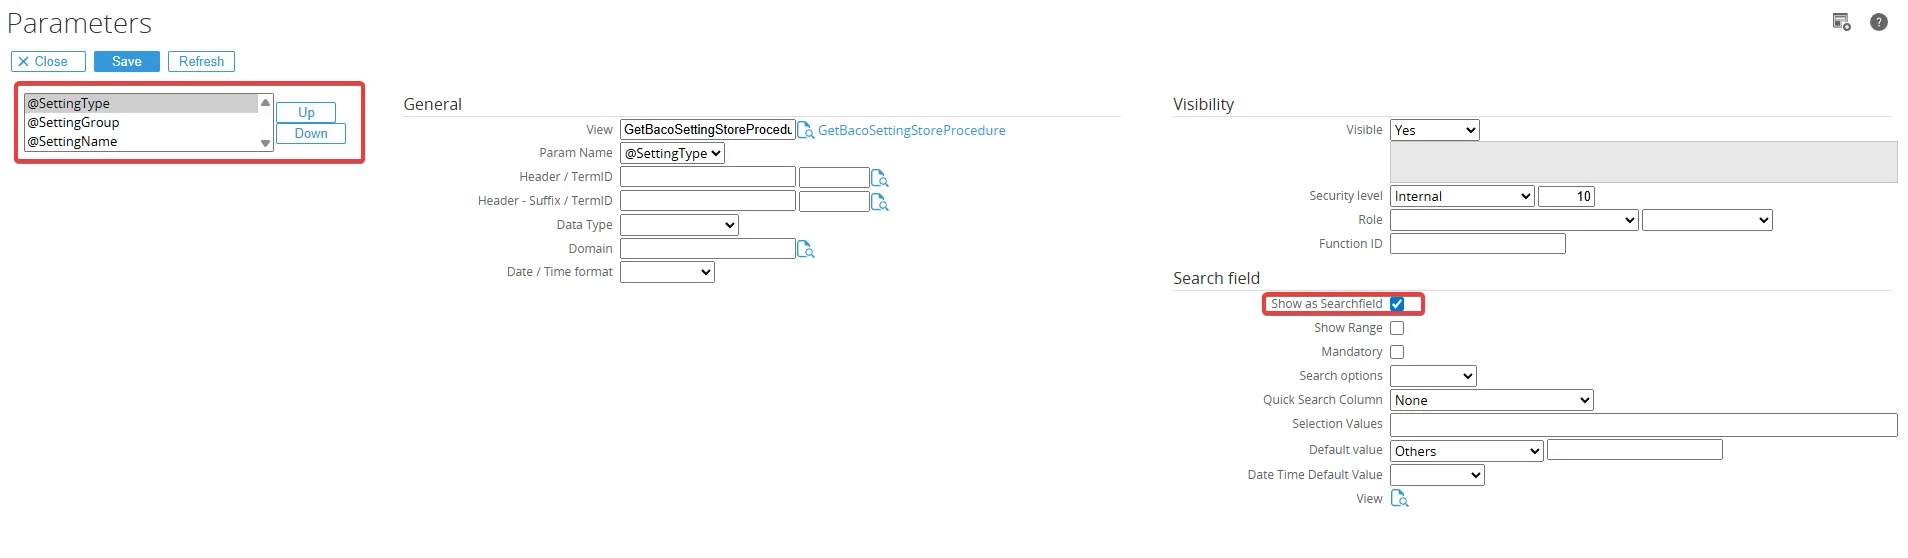
Then, Query and query parameters will be automatically filled in
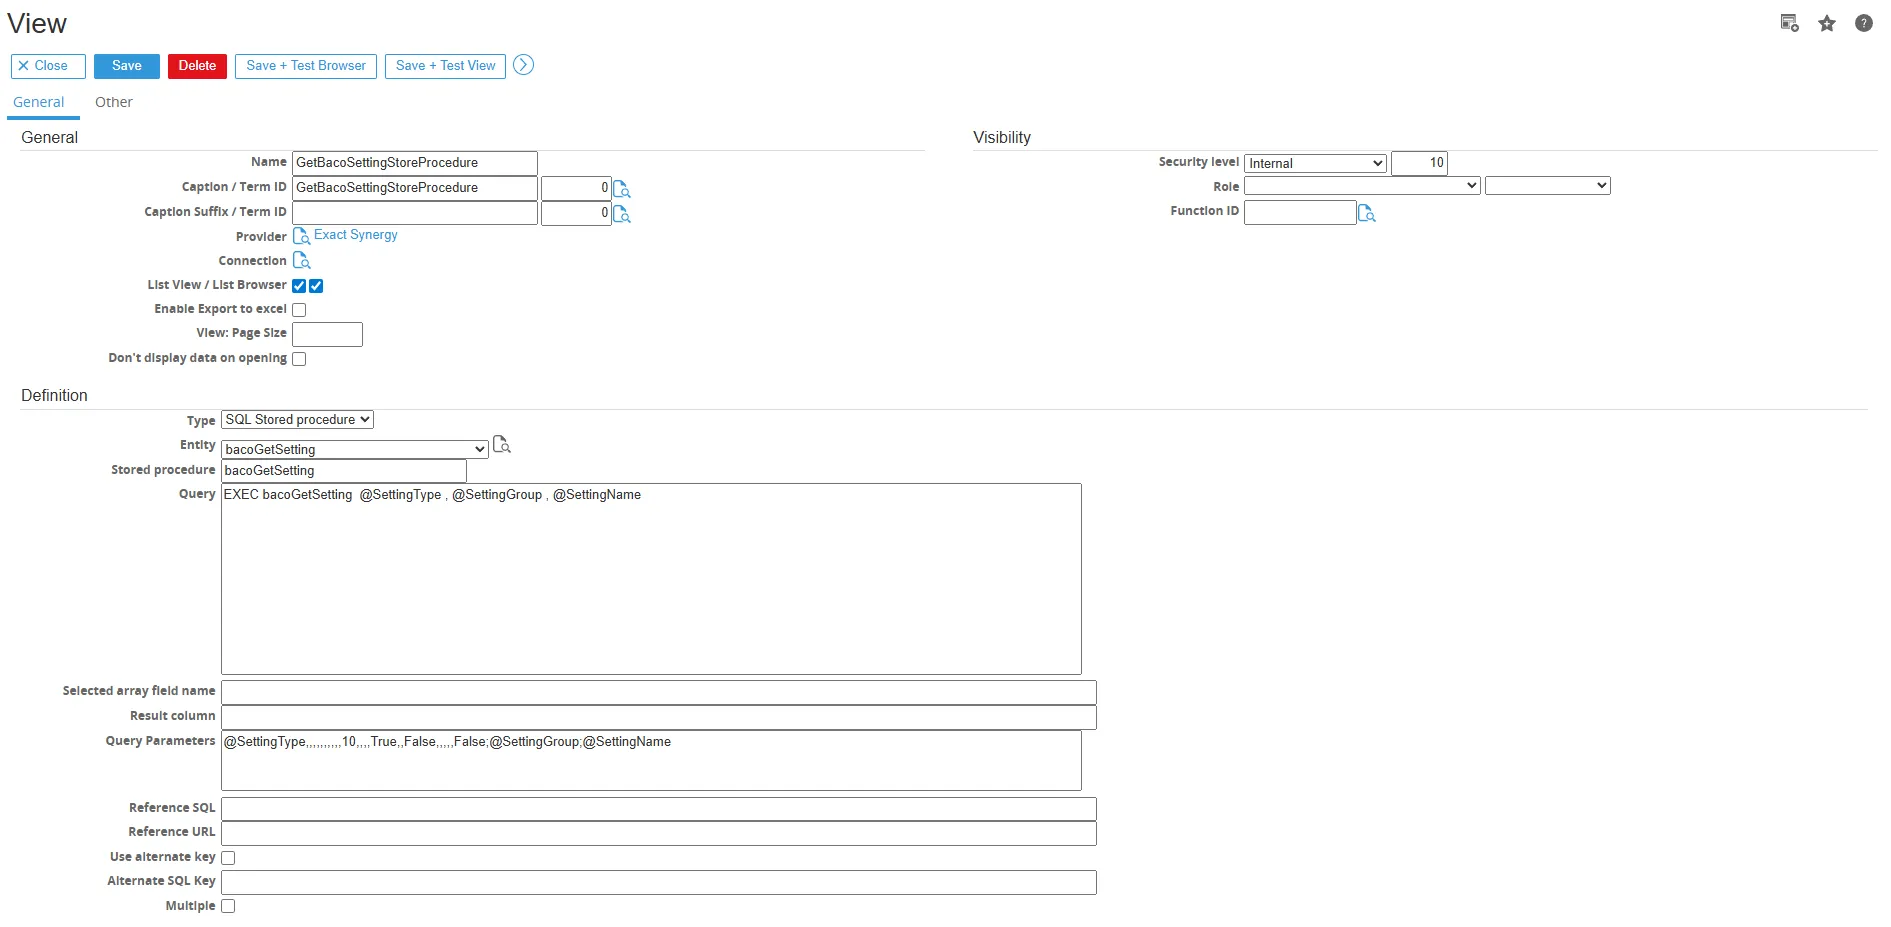
Click Save Test+View, and entering the SettingType, SettingGroup, and SettingName column.
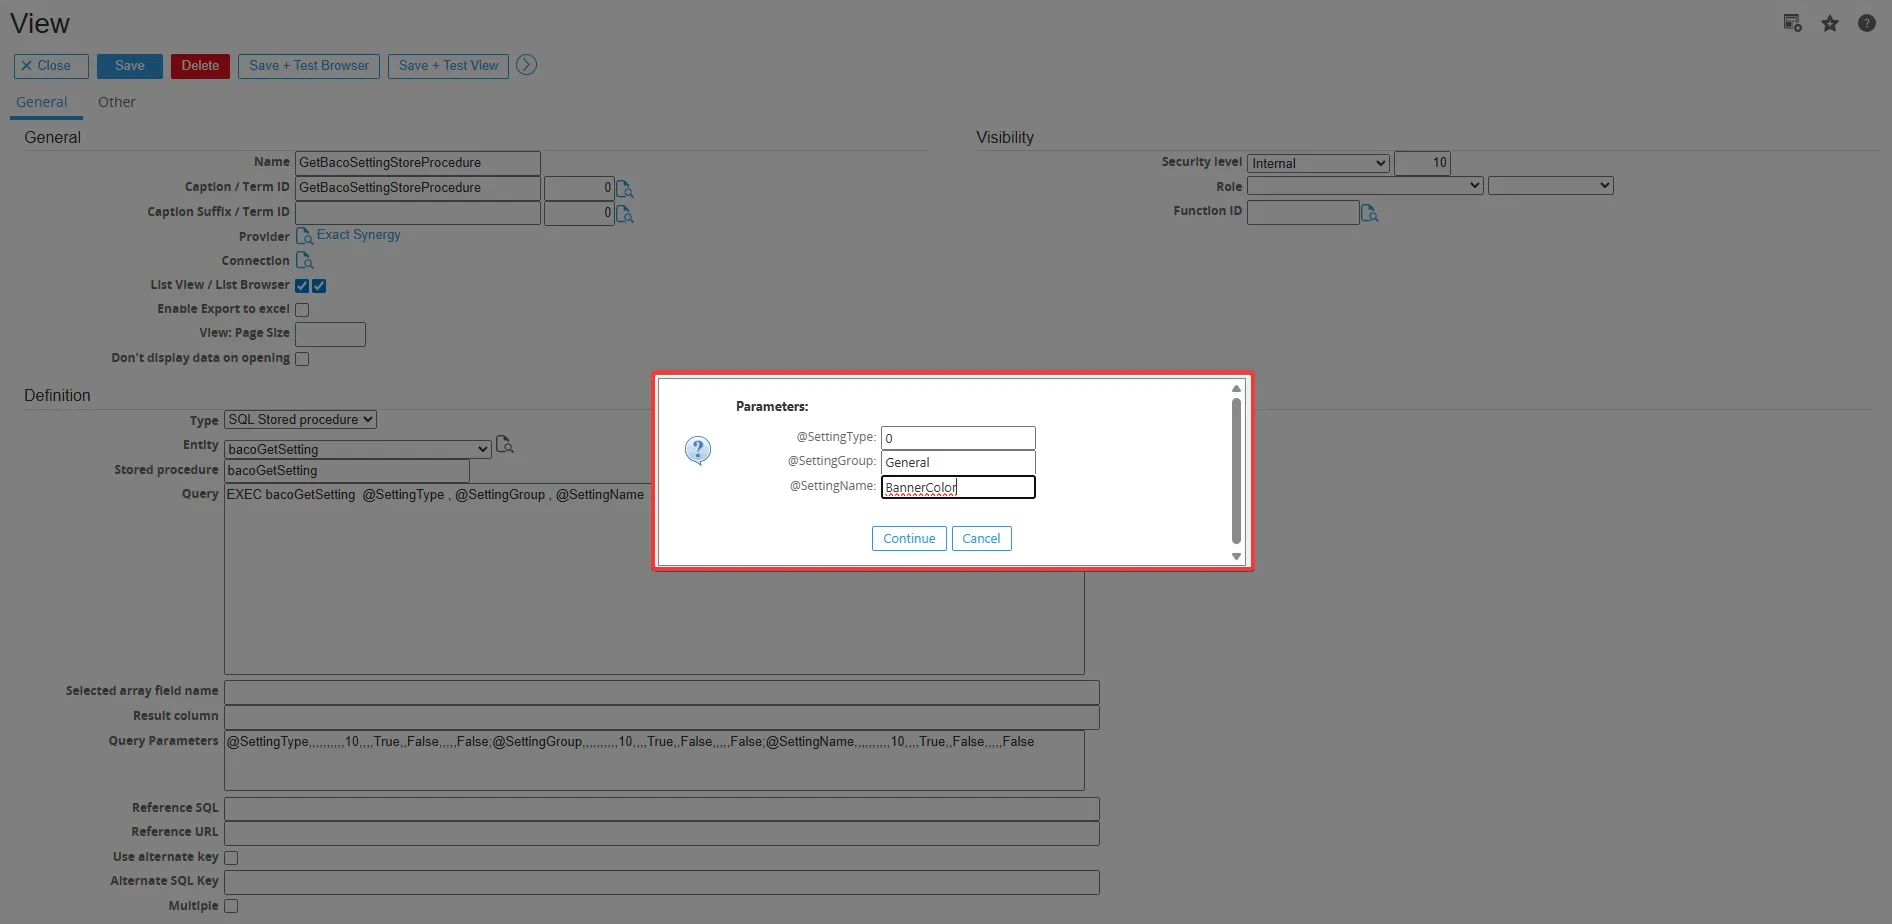
The data will be displayed.
Setup Spawner
Section titled “Setup Spawner”Setup the spawner from the Globe folder
Section titled “Setup the spawner from the Globe folder”- Copy ConnectItLaunch – GlobePlus.reg to the root folder of the Globe+ installation, for example: C:\Program Files\Exact Globe+.
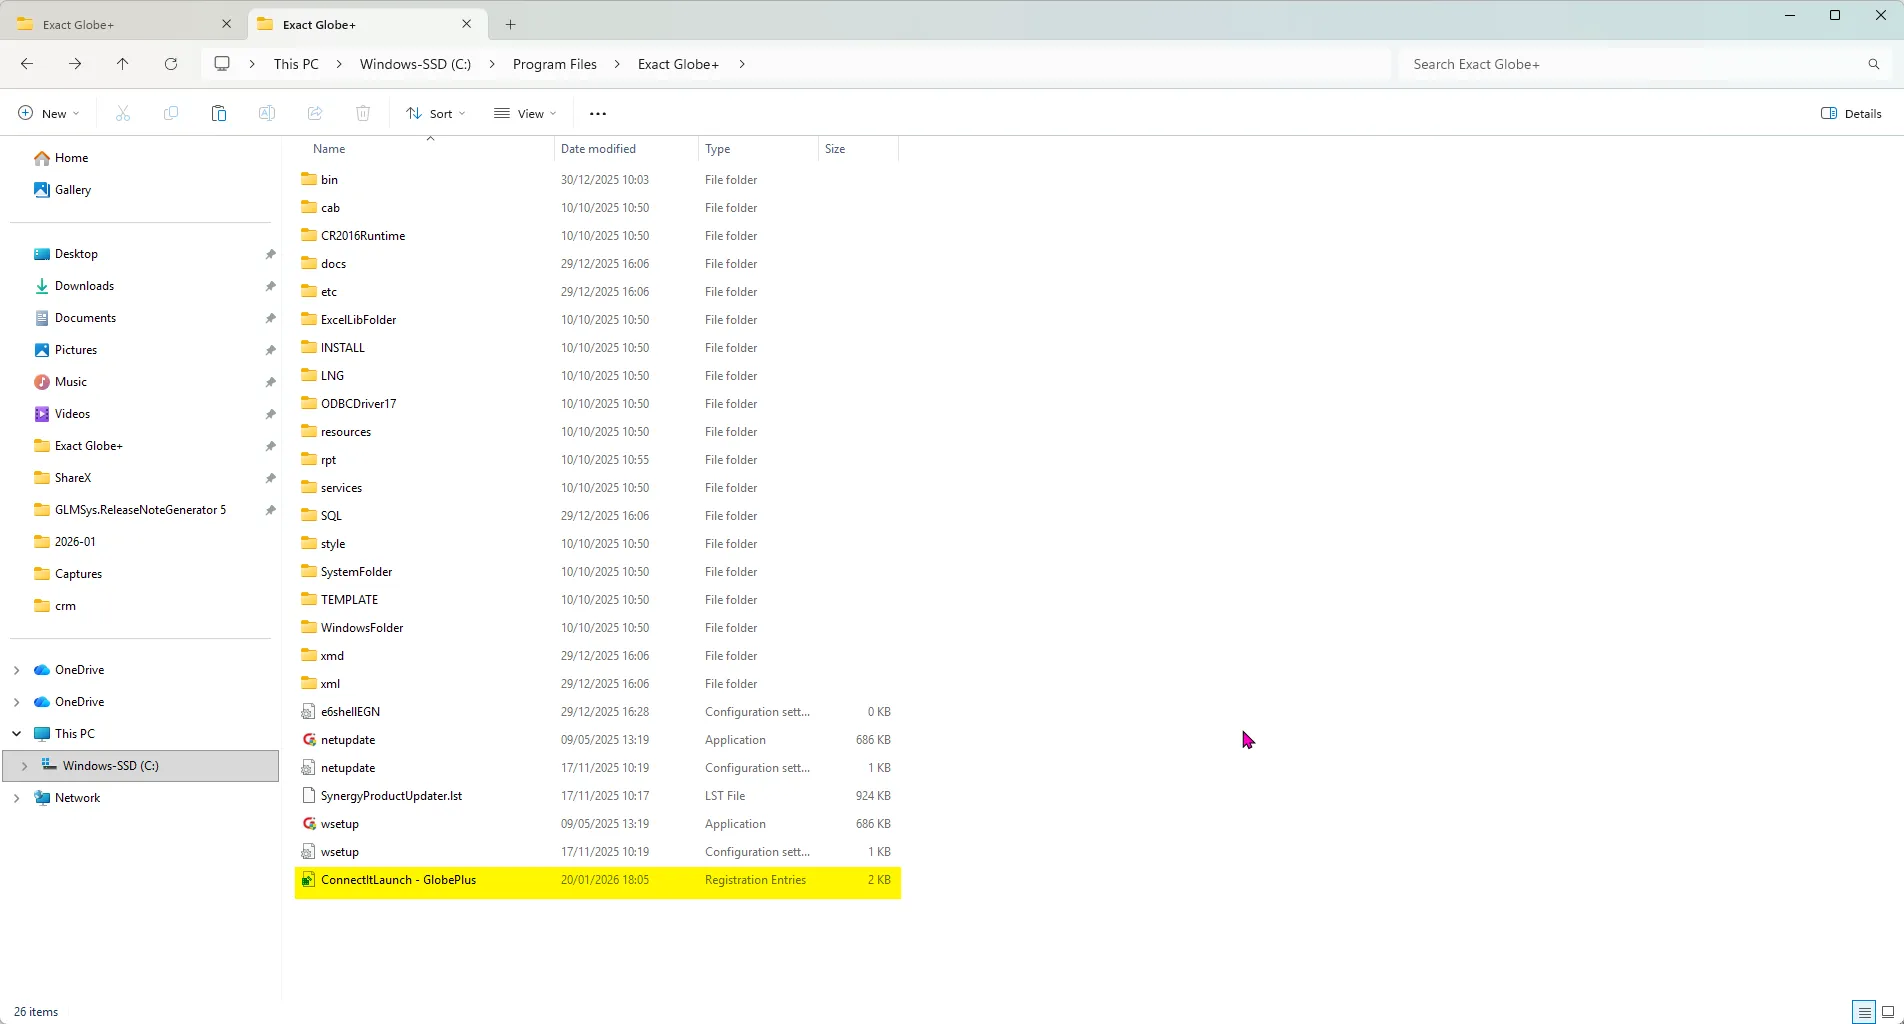
- Click Run to start the registration.
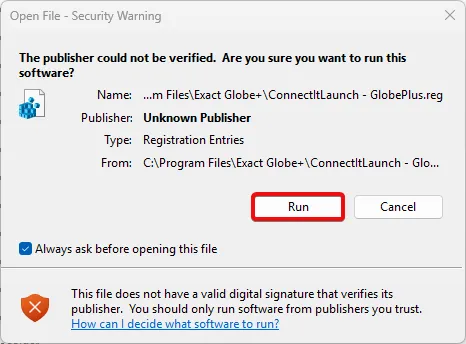
- If the registry is successful, a confirmation message will appear.
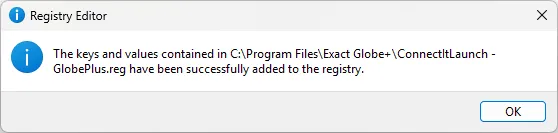
- Next, copy GLMSys.EG.AppSpawner.exe to the bin folder of Globe+ installation, for example: C:\Program Files\Exact Globe+\bin.
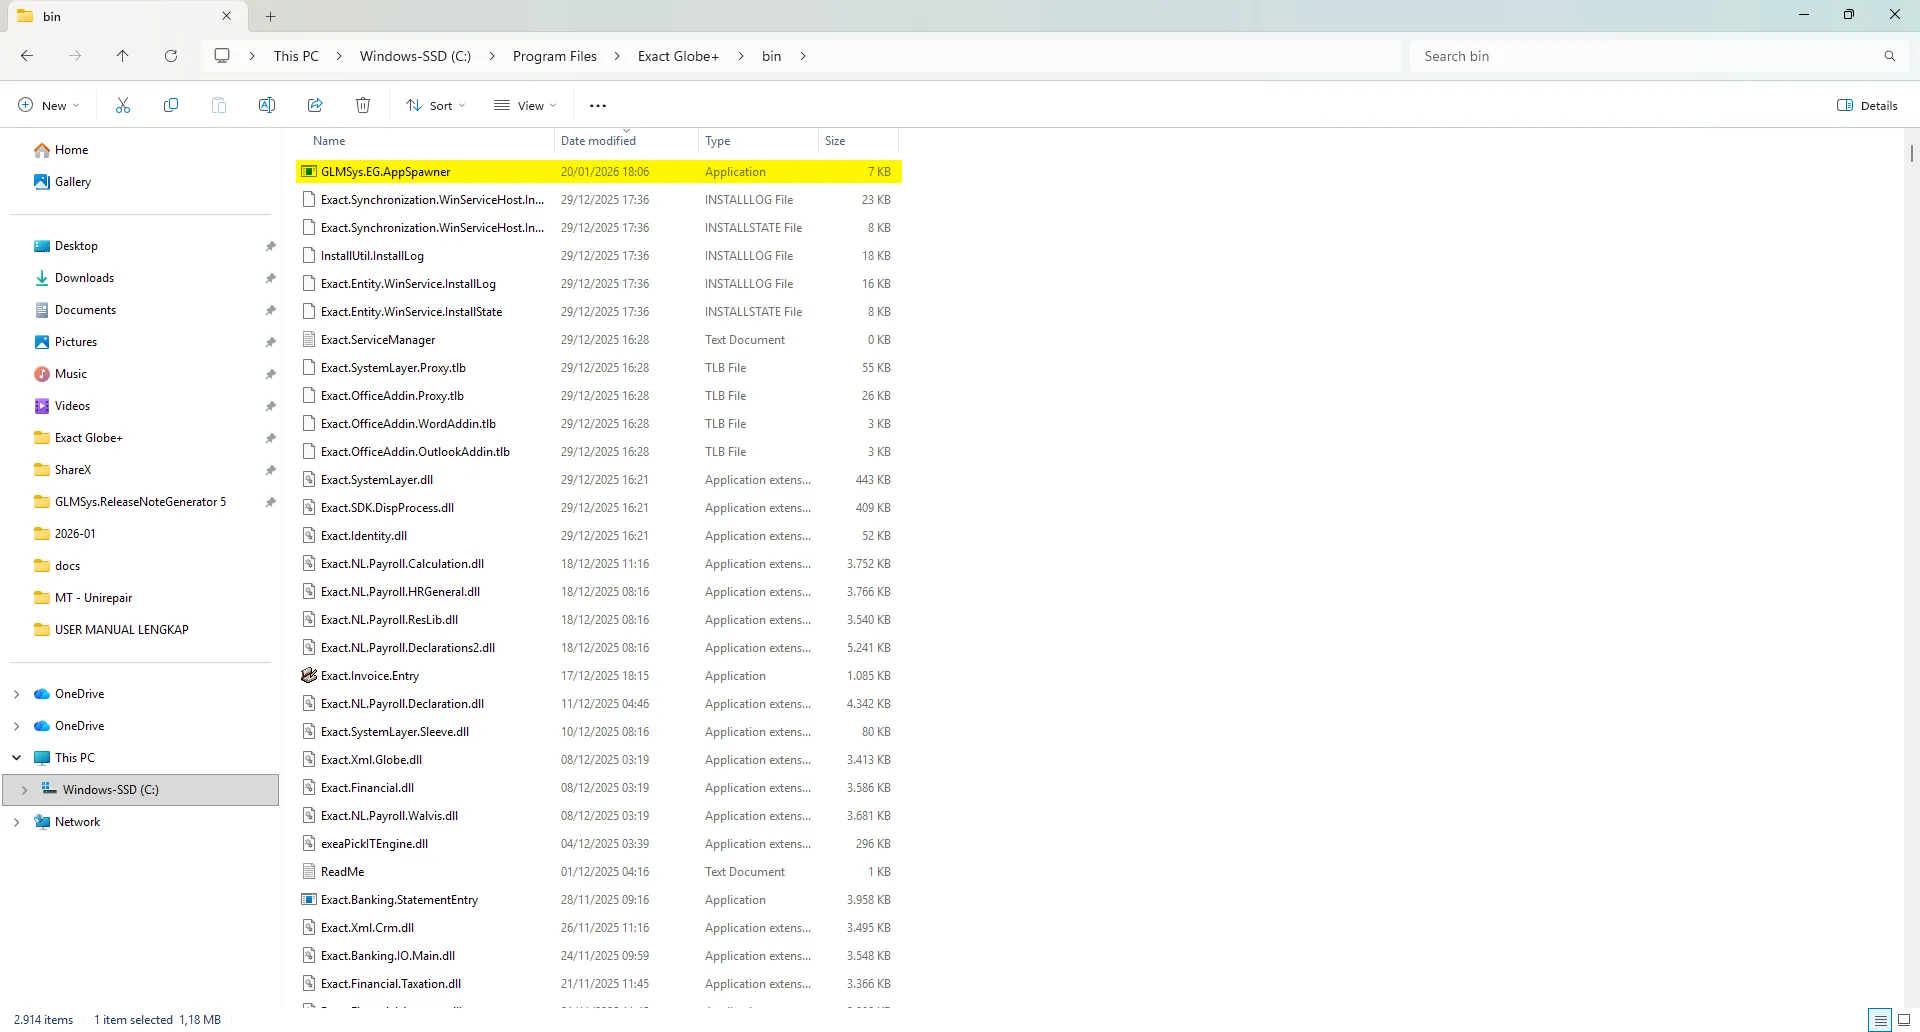
- Open and edit the ConnectItLaunch – GlobePlus.reg file.
- Make sure that the Globe installation folder path is correct, and that the launcher name is connectit-launch-globeplus.
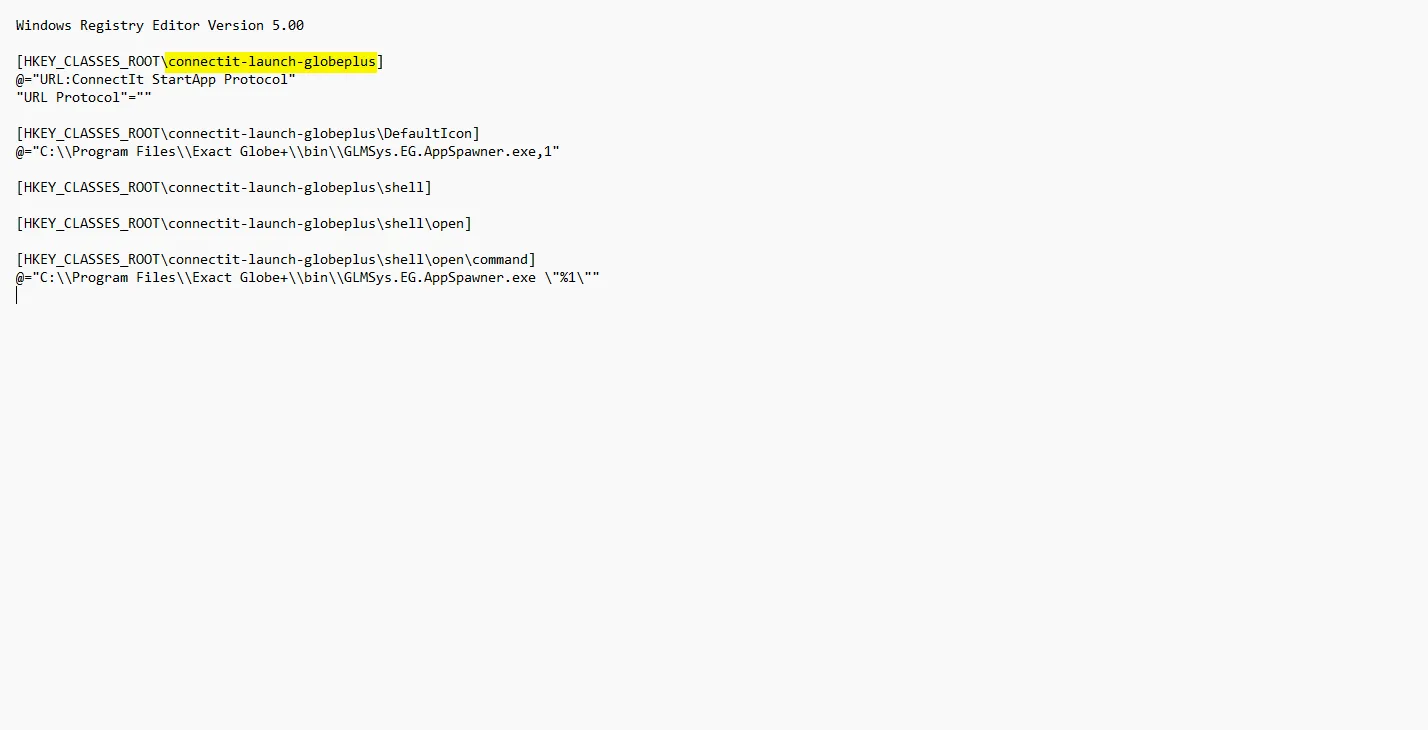
- Run (double click) ConnectItLaunch – GlobePlus.reg.
Setup the spawner from the Synergy folder
Section titled “Setup the spawner from the Synergy folder”- Copy GLMSysCILaunchExactGlobePlus.js to the docs Synergy folder.
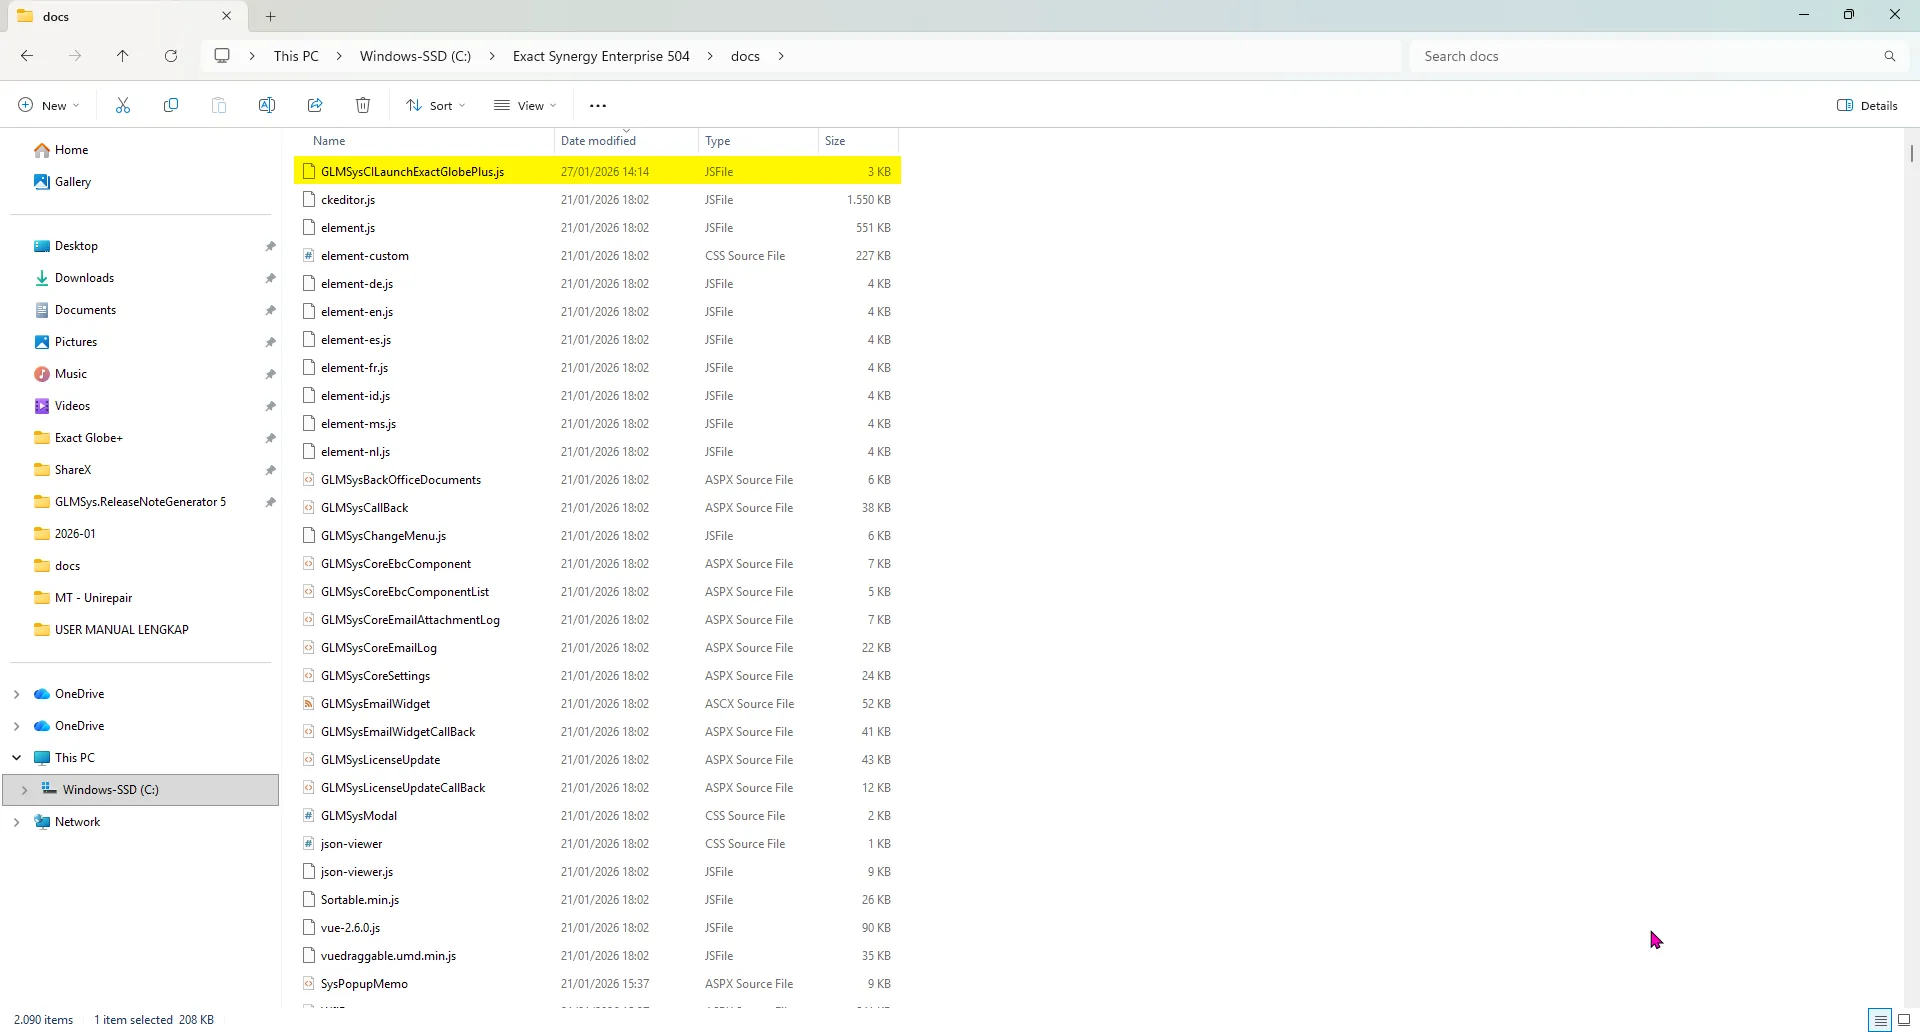
- Open GLMSysCILaunchExactGlobePlus.js and change the servername and databasename values to match your server and database.
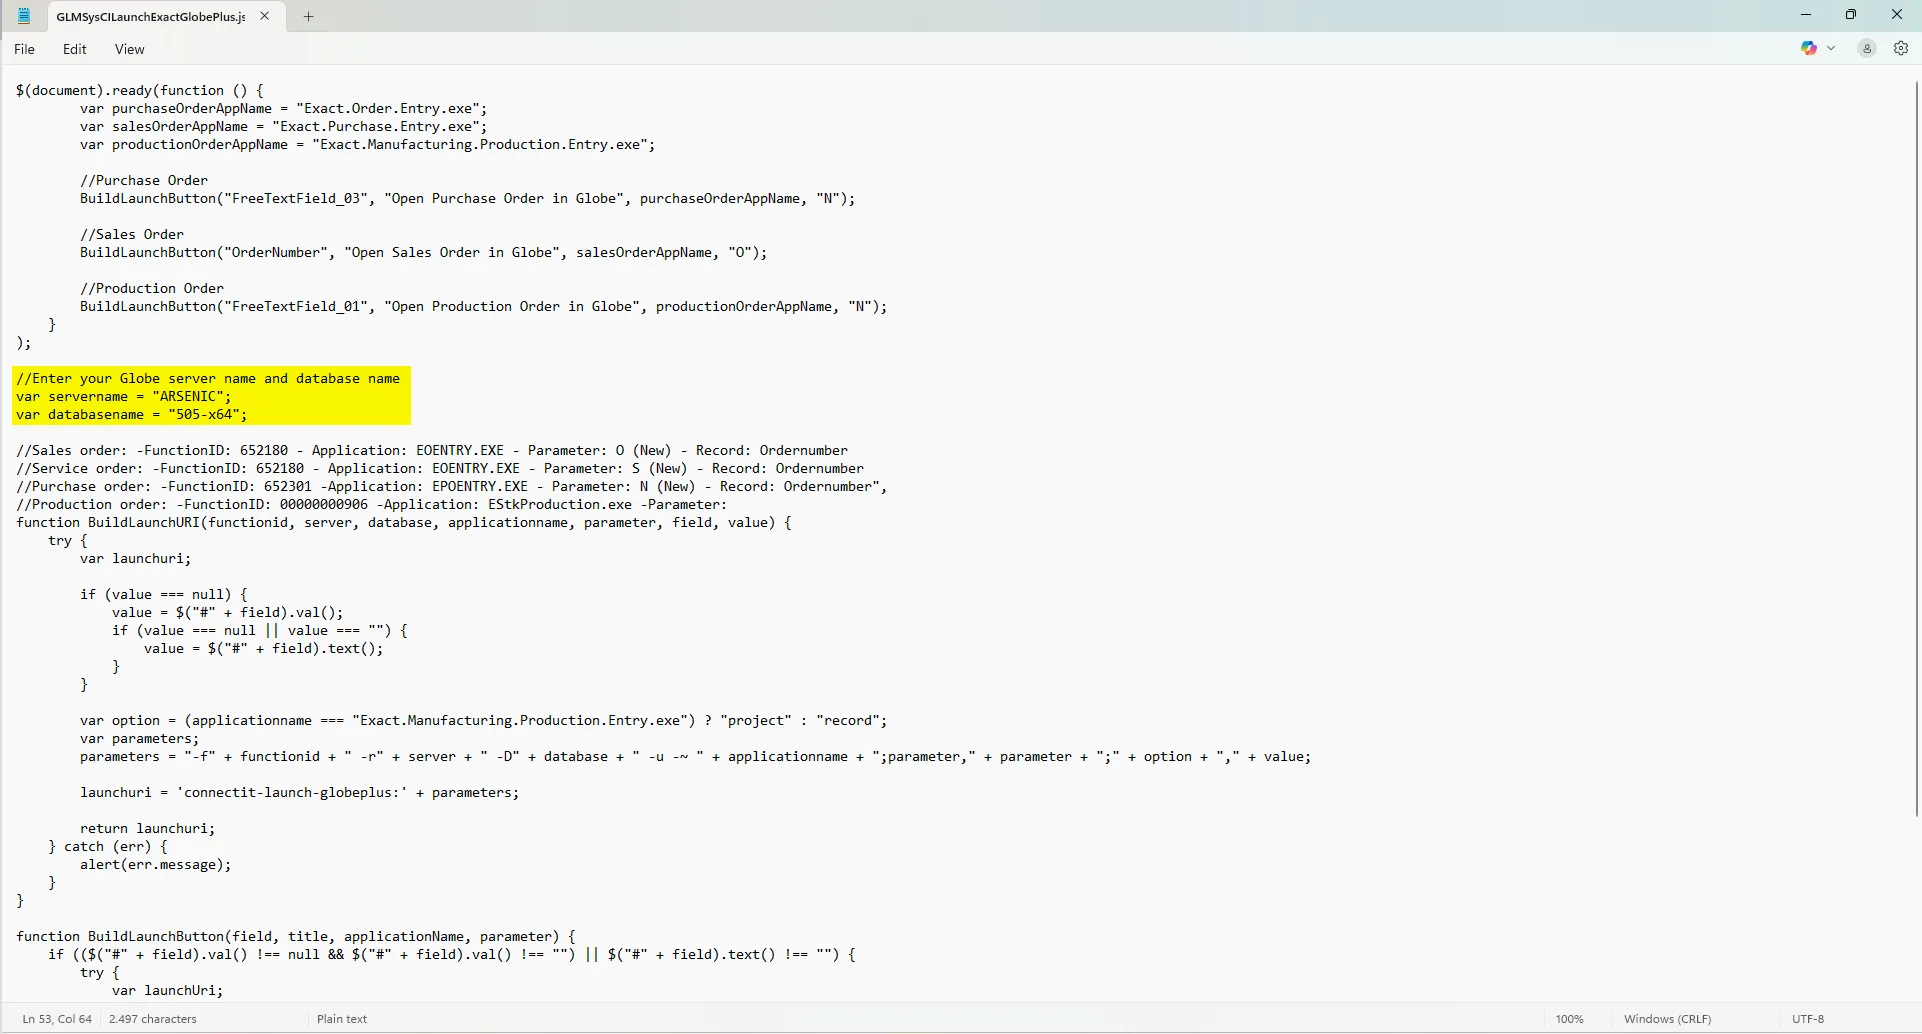
Maintain and configure the spawner
Section titled “Maintain and configure the spawner”-
Create a new Request Type.
-
Go to Modules > Workflow > Setup > Request > Request types and create a new request type, for example: TestSpawner.
-
Click the Add (Section) button to create a new section.
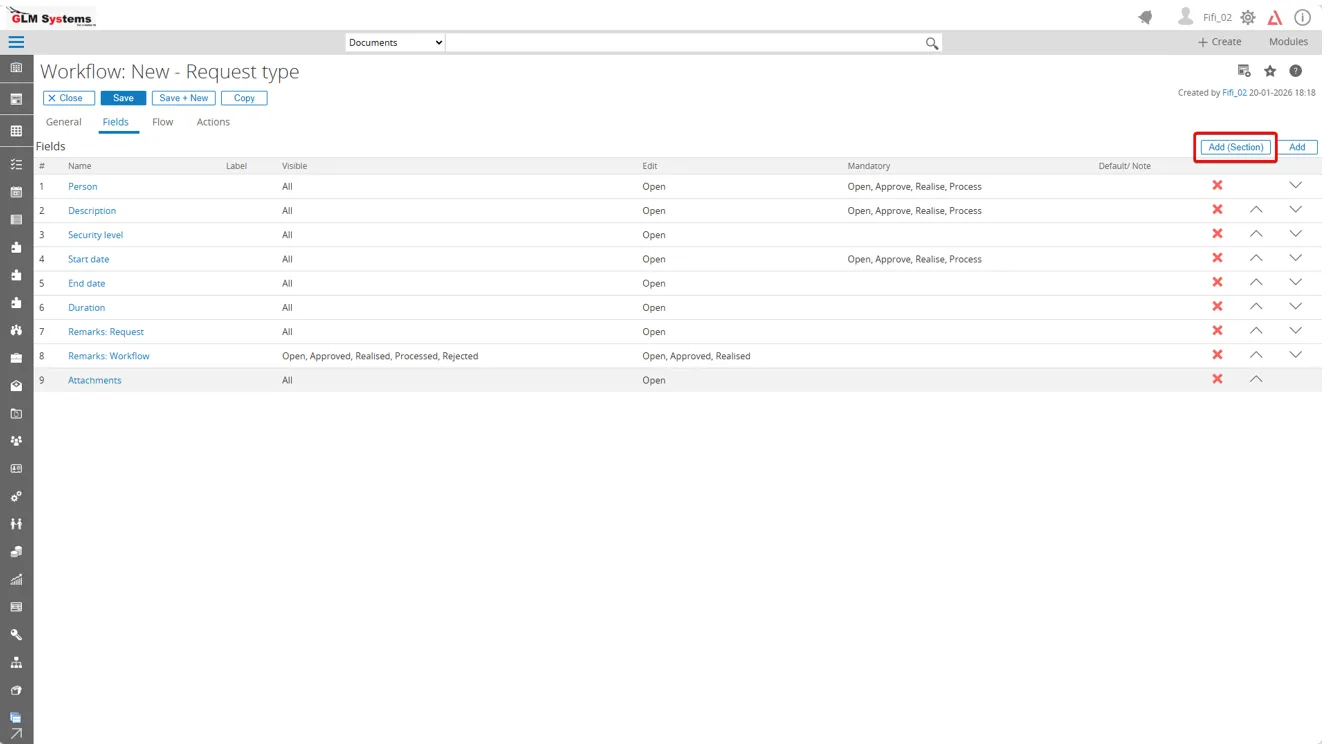
-
In the Note field, enter the following script:
<script type="text/javascript" src="GLMSysCILaunchExactGlobePlus.js"></script><script>$(document).ready(function () {BuildLaunchButton("OrderNumber", "Open Sales Order in Globe", salesOrderAppName, "N");});</script>-
Rename the label to :
-
Click the Save button.
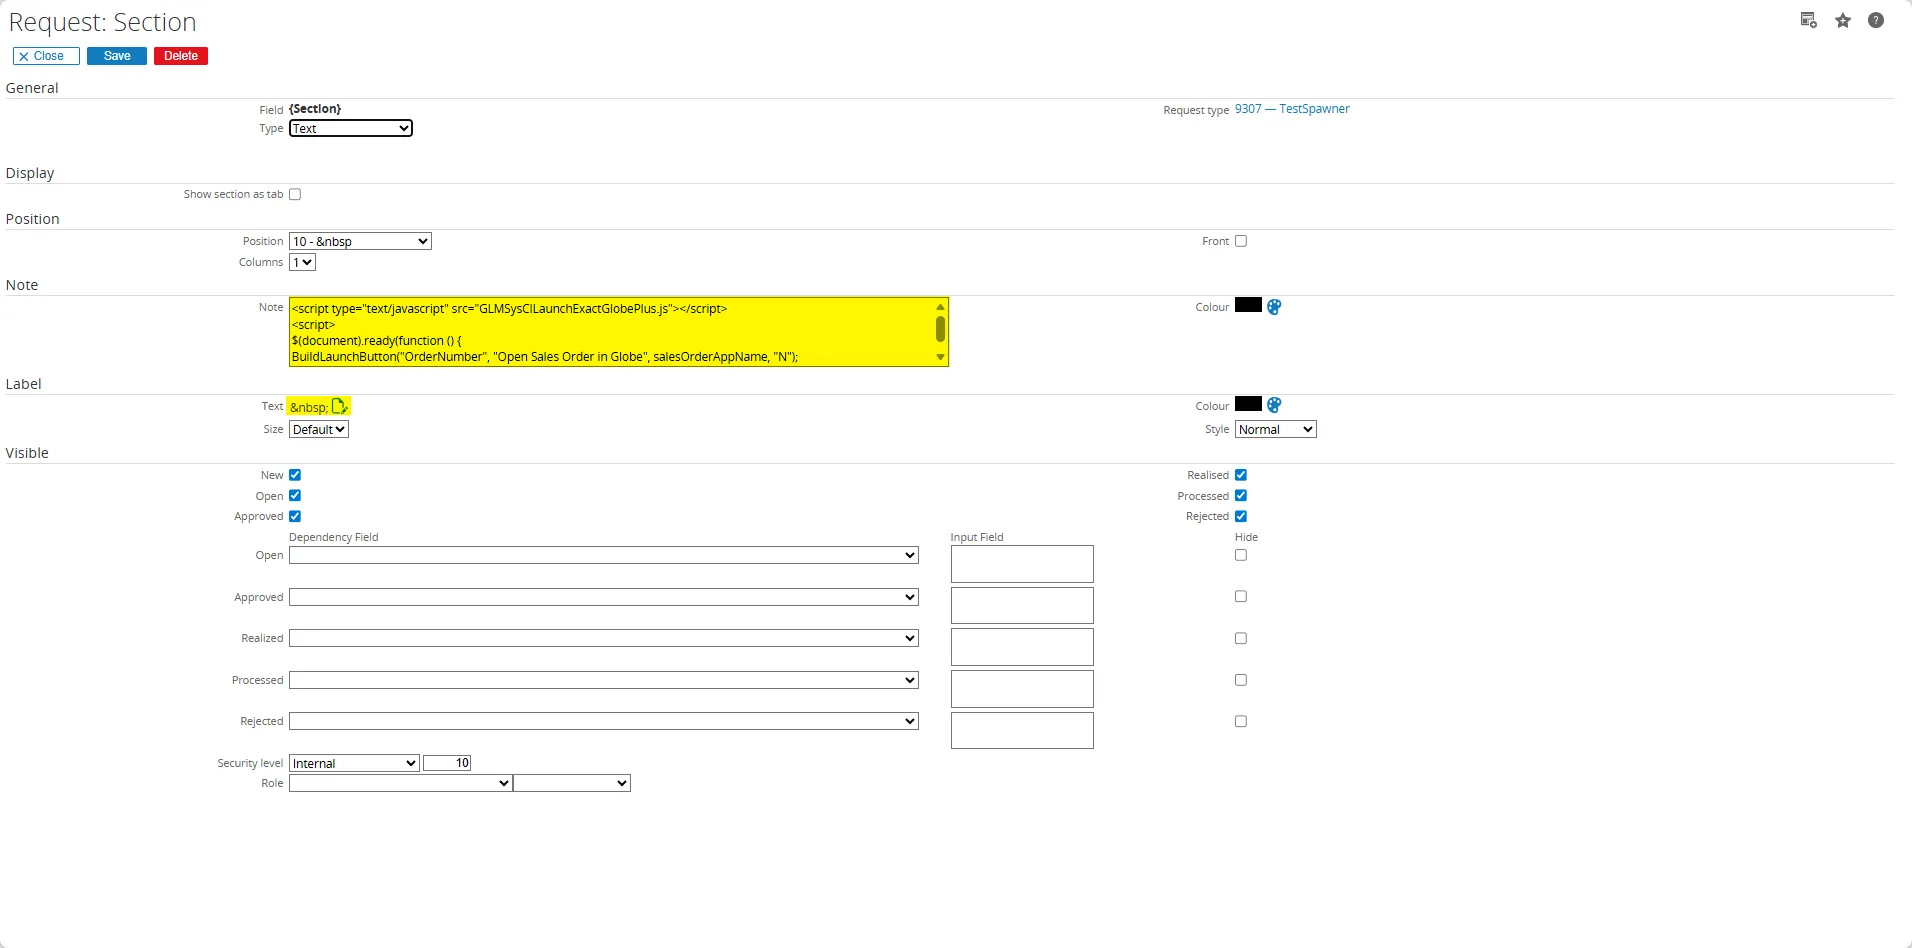
-
Click the Add button to add a new free field.
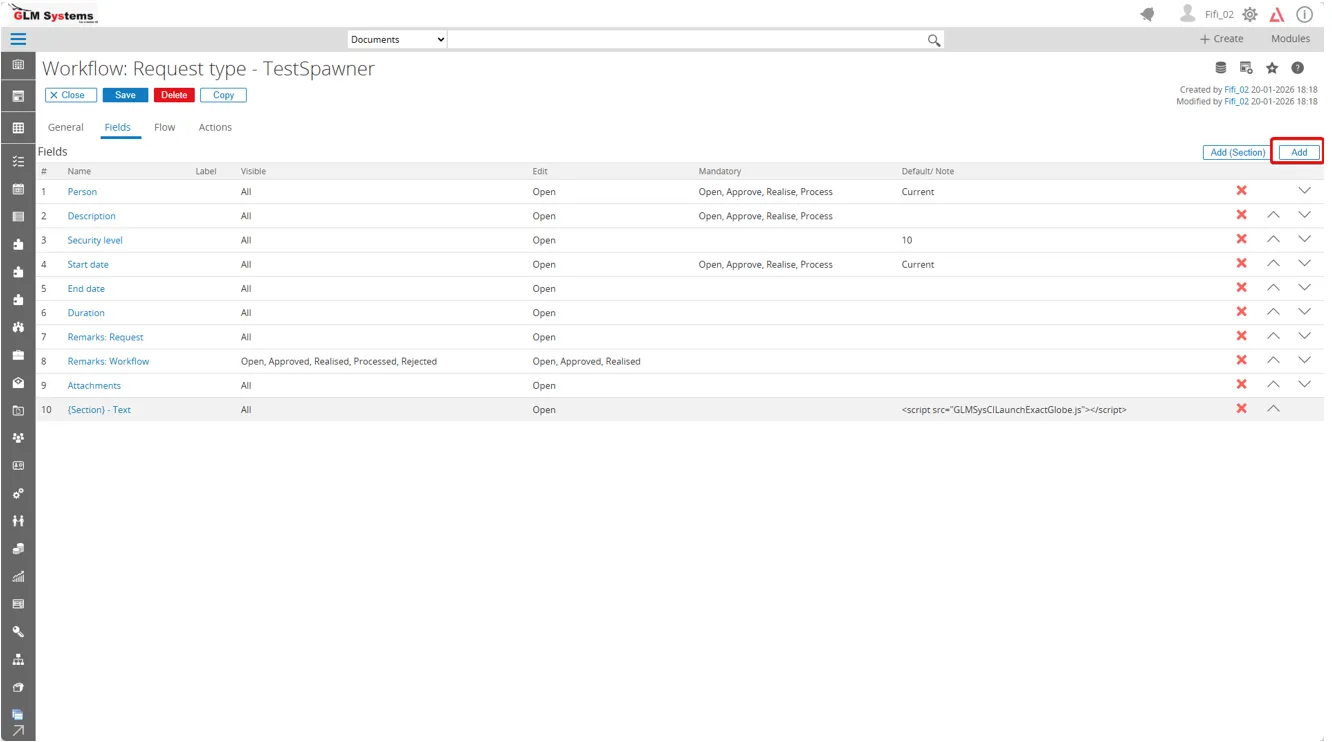
-
You can rename the fields as needed to make it easier to identify the field numbers. For example:
- Free: Text 1 for the production order number.
- Free: Text 3 for the purchase order number.
- Sales order number for the order number.
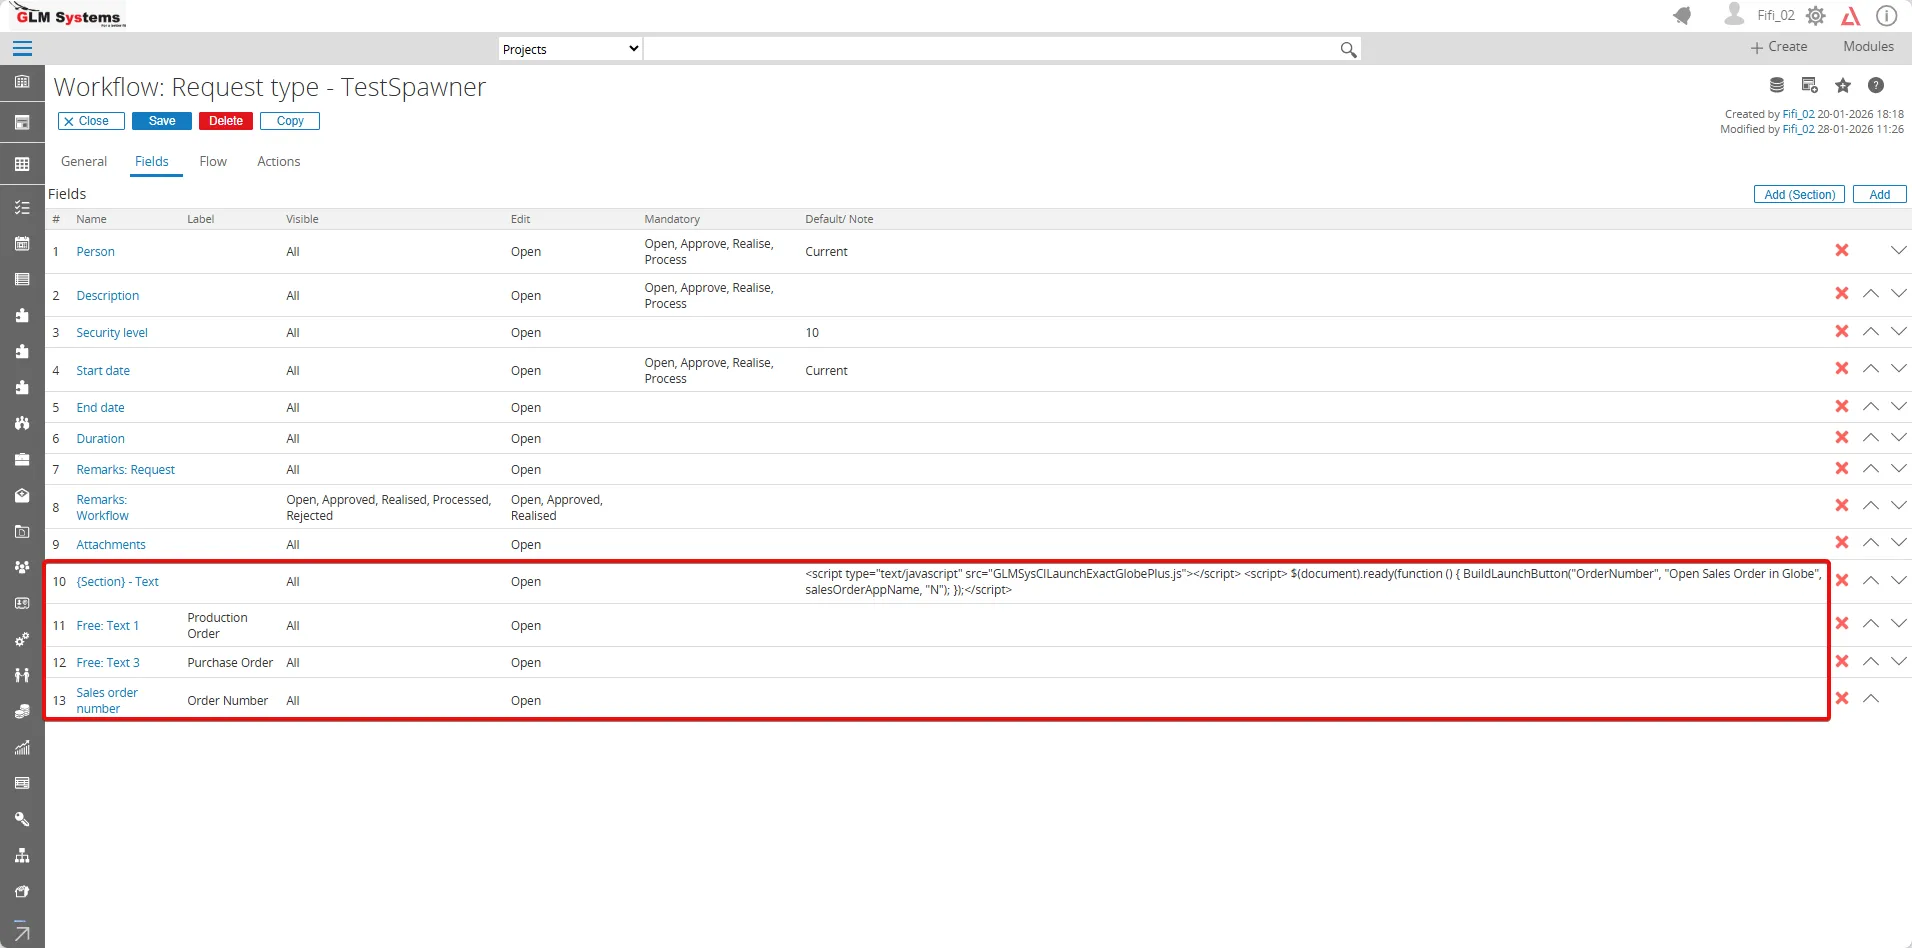
-
The free fields must match the configuration in the JavaScript file used in the Remark section.
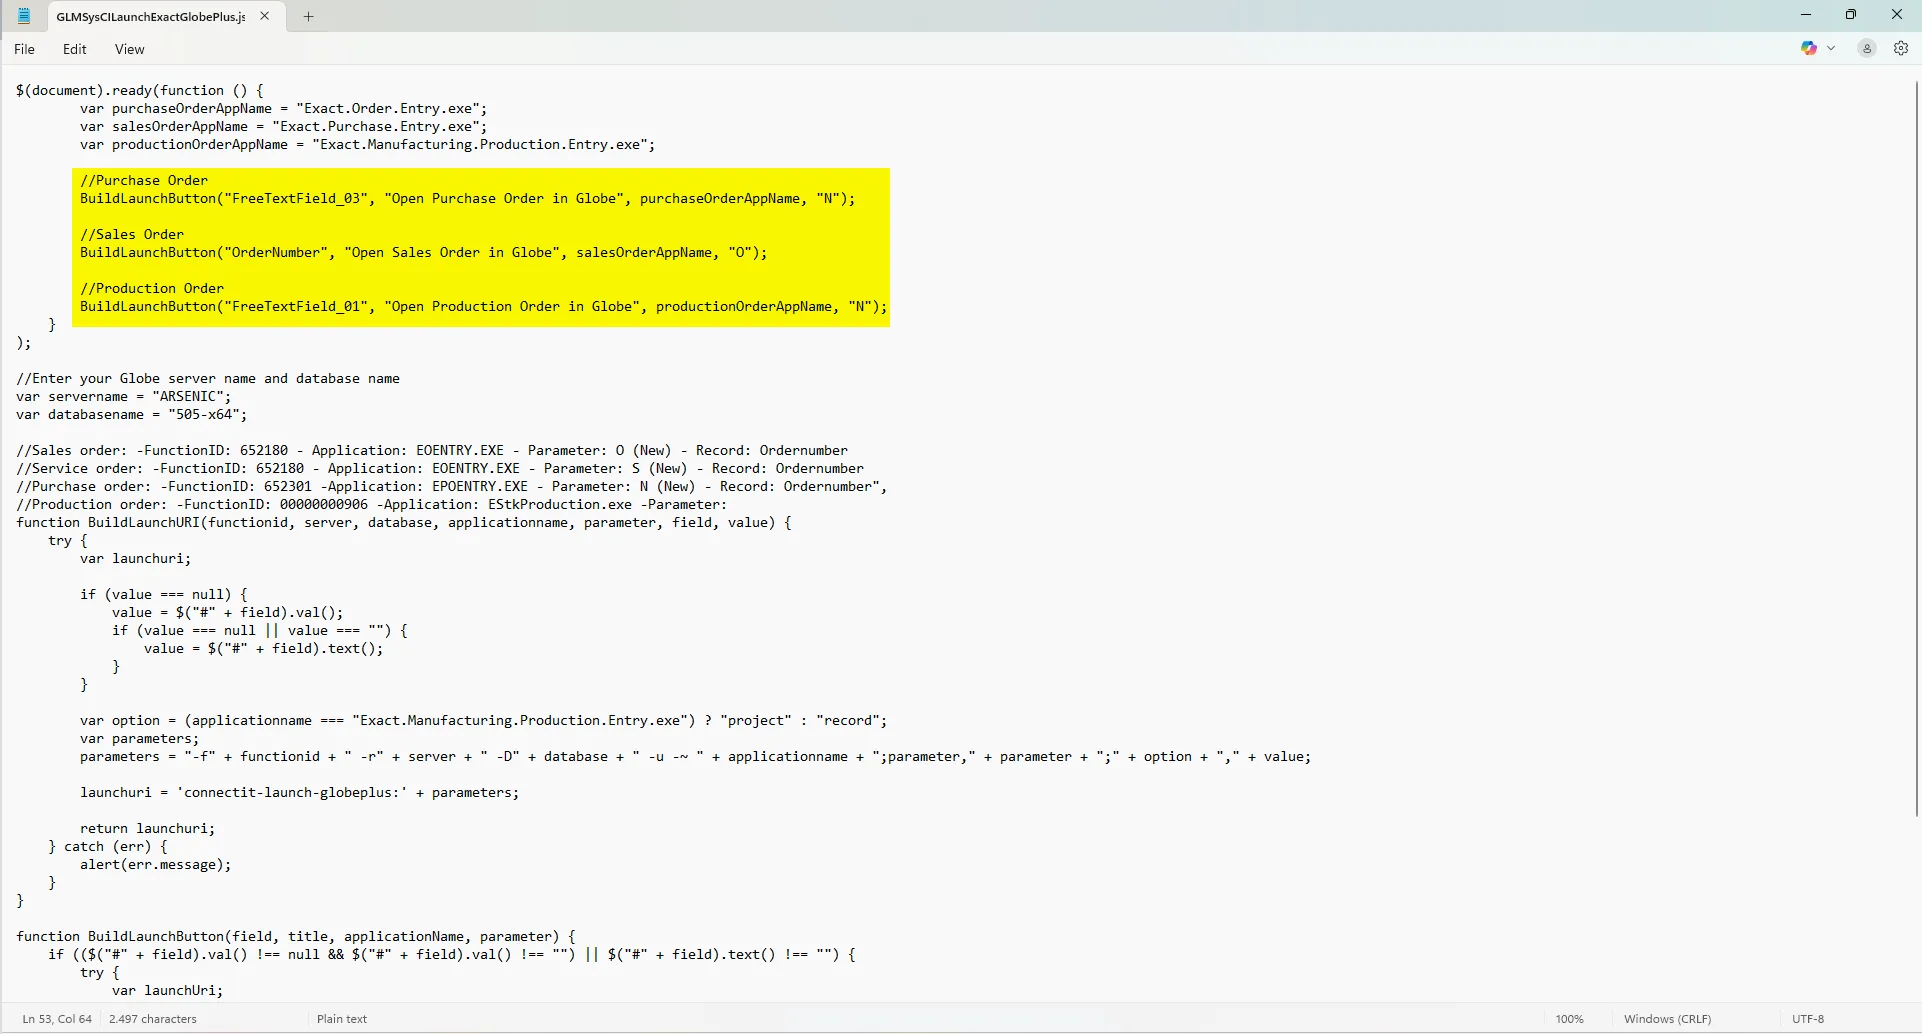
-
Open the request, the Exact Globe+ icon is now displayed. When you click the Globe button, it automatically navigates to the Exact Globe+ application.
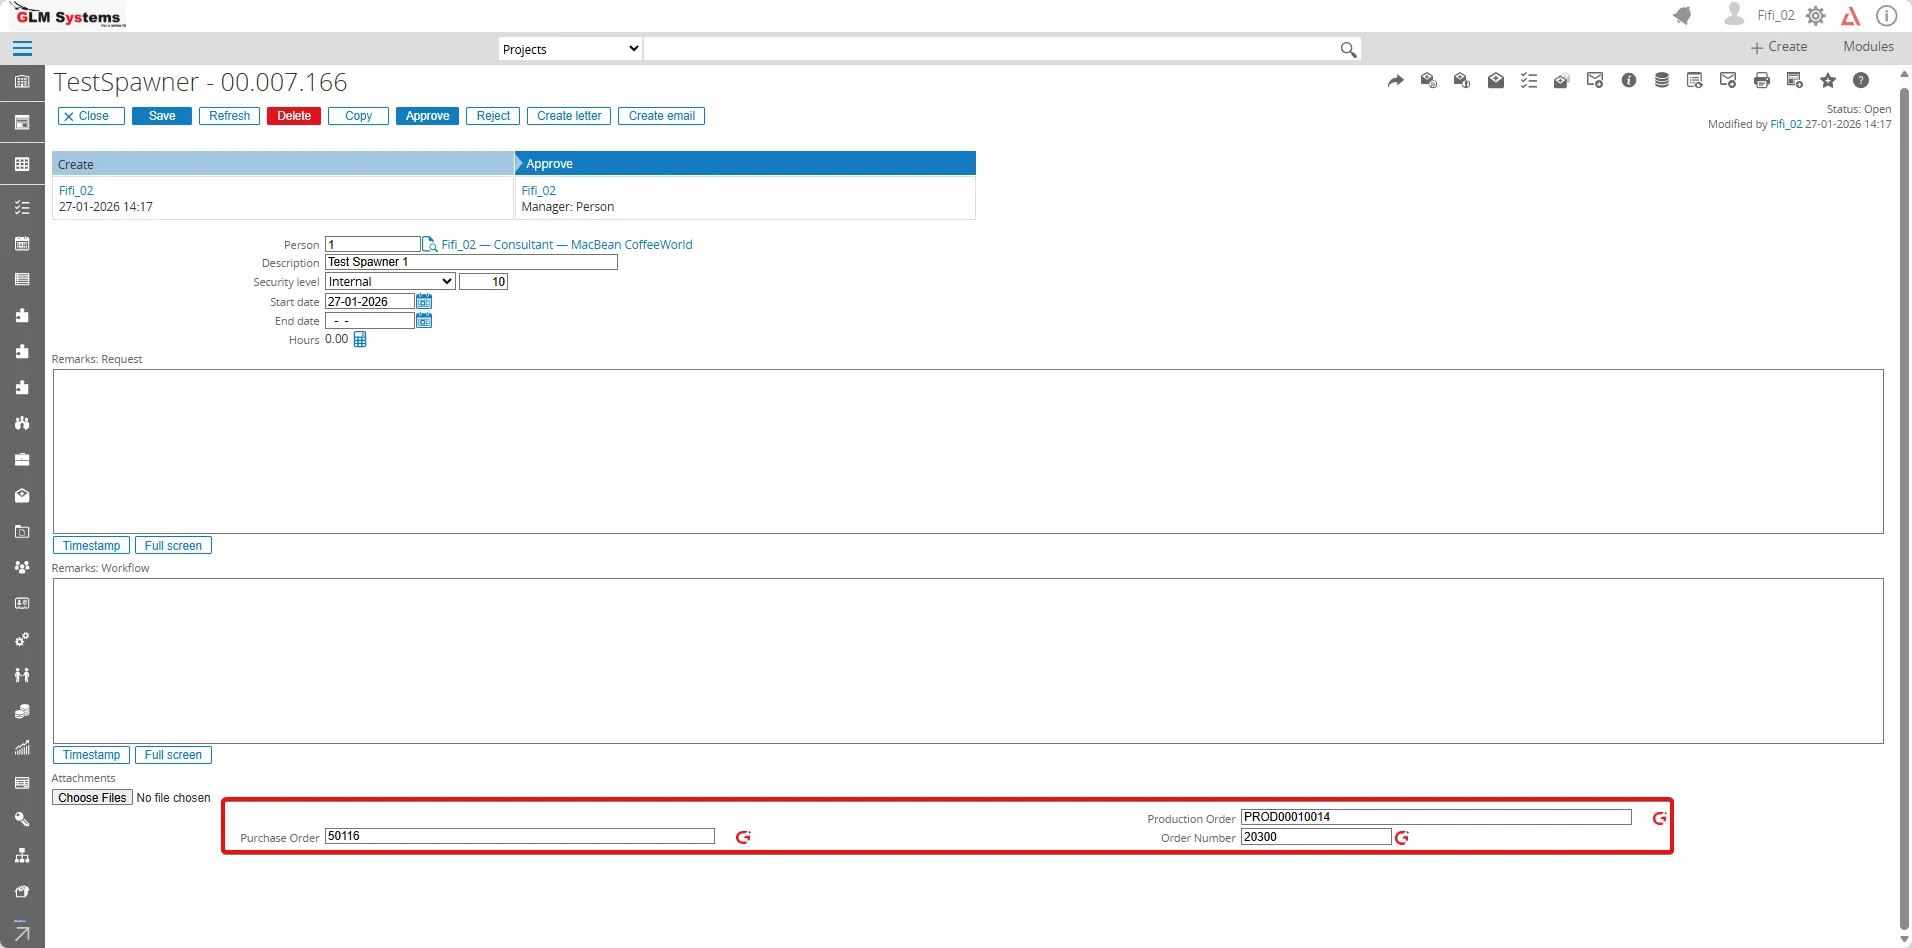
-
A pop-up message is displayed. Click Open GLMSysAppSpawner.
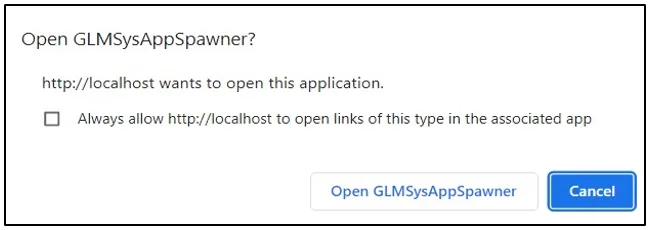
-
The Exact Globe+ screen opens, and showing the data that corresponds to the production order number that you entered in the Production order number field.
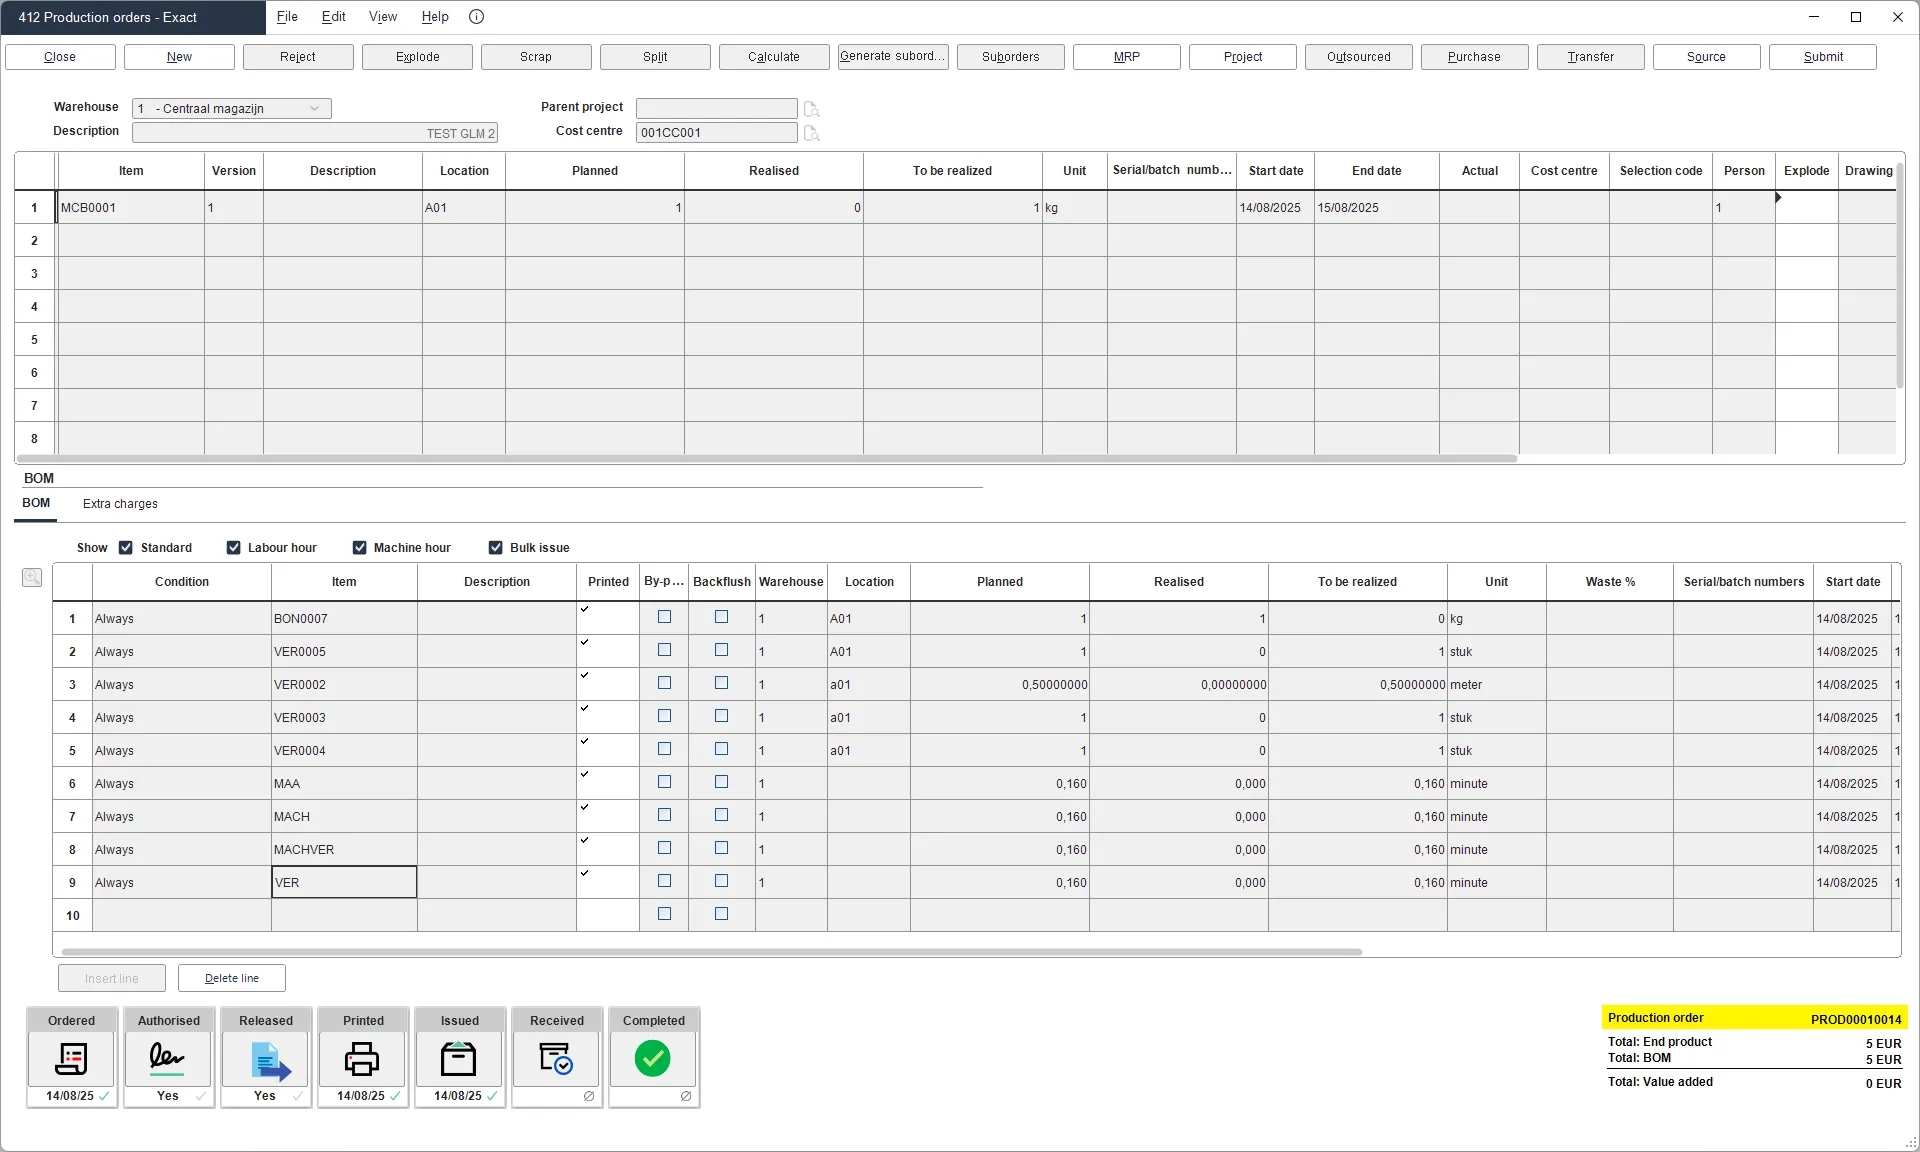
Rules Engine
Section titled “Rules Engine”Automation within Synergy and Exact Globe is done via the Rules Engine. The Rules Engine allows to create, update and delete date from Exact Synergy into Exact Globe. Based on actions in Synergy data can be created in Exact Globe.
Introduction
Section titled “Introduction”Once installed the rules engine is ready for use when only used in Synergy when using the rules engine to trigger backoffice actions some minor setup is needed in your back office application.
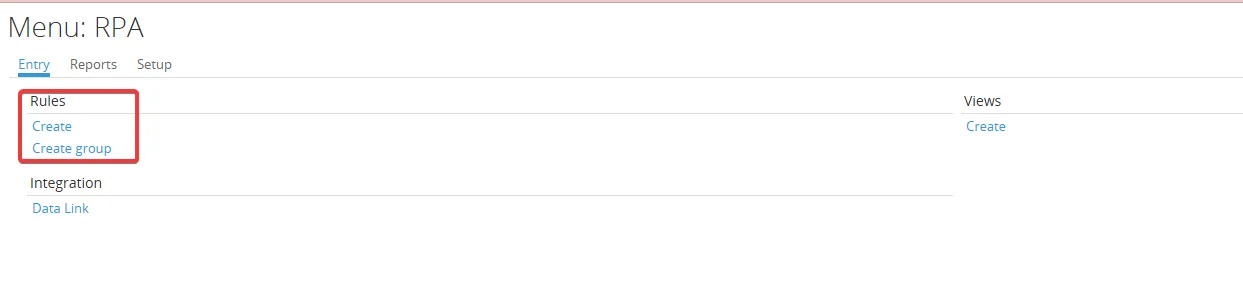
The rules are using the Exact Entity Service naming (Exact Web Service). By using the Exact Entity Service the fields have clear understandable names which would not always be the case when using the SQL tables and field directly. The rule creator supports intellisense so property names (field names) can easily be found. When creating the rule you will enter the entity name followed with ‘.’ and the list of properties will appear where you can select from.
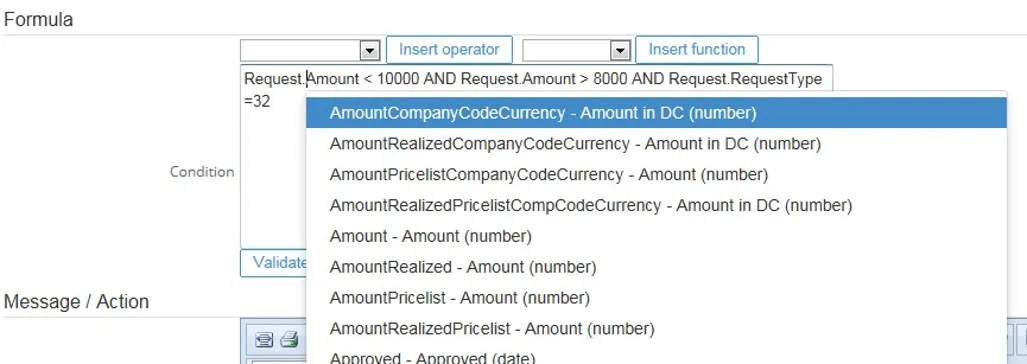
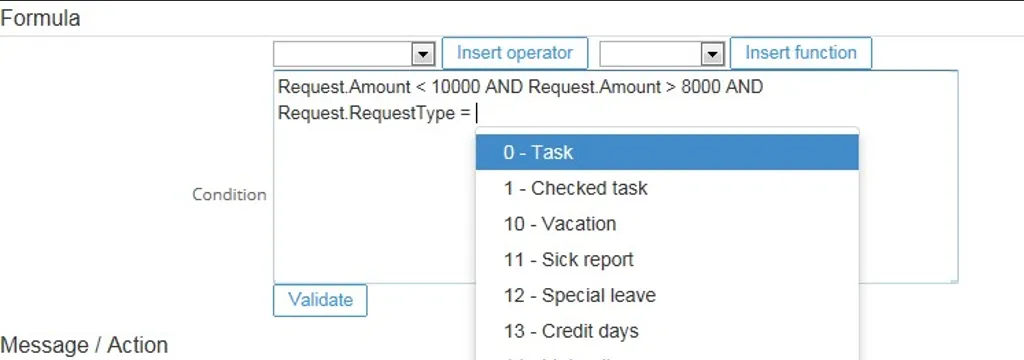
The different types of messages that can be shown to the user are: • Error message, when the rule is executed and the rule result is positive the user will be shown an error message on the specified application and the user will not be able to continue. • Warning message, when the rule is executed and the rule result is positive the user will be shown a popup when where the options ‘continue’ and ‘cancel’ are available. When choosing ‘continue’ the data will be saved. When choosing ‘cancel’ the data will not be saved and the user can change the input. • Access denied, when the rule is executed and the rule result is positive the user will be shown a message access denied and the data can’t be viewed.
• Note, when the rule is executed and the rule result is positive the user will be shown a popup when the application is opened. This could be a message to inform the user the take a certain action.The messages shown to the user can be setup at the rule maintenance and does also support formatting. This gives the option to add hyperlinks in the message. The message also allows for ‘merge tags’ so that the message can contain data which is retrieved from the database and is not static.
The different types of actions that can be triggered are: • Action: Create, when the rule is executed and the rule result is positive it will allow creating data. For example based on a completion of a request automatically an item can be created. Another example would be to create additional workflow/request tasks based on the rule, this will allow for adding additional persons to the workflow so they also can take action on the workflow. • Action: Update, when the rule is executed and the rule result is positive it will allow updating data. • Action: Delete, when the rule is executed and the rule result is positive it will allow removing data.
There is one more type of action supported in the rules engine which is:
• Scripting, this will give you the option to add JavaScript to the standard pages. Similar as you can do in the workflow request type setup when using a section. This gives you the opportunity to make some simple modifications to the pages without requiring any SDK or Configurator knowledge or expertise. As long as you are familiar with JavaScript / jQuery you can make some simple modification in a page.
The rules can be simple formulas which only will check one set of criteria. Think of extra validation on one or more fields where based on one check / rule the user will be shown an error, warning or message.
The rules also can be a full set of rules which are linked together via a parent child structure and will be executed starting at the first rule and going through all the child rules and based on the outcome in each step it will stop or go to another rule until the last step is reached. This scenario could be applicable for purchase order approval. Where based on amount, supplier, certain products different approval flows should be started.
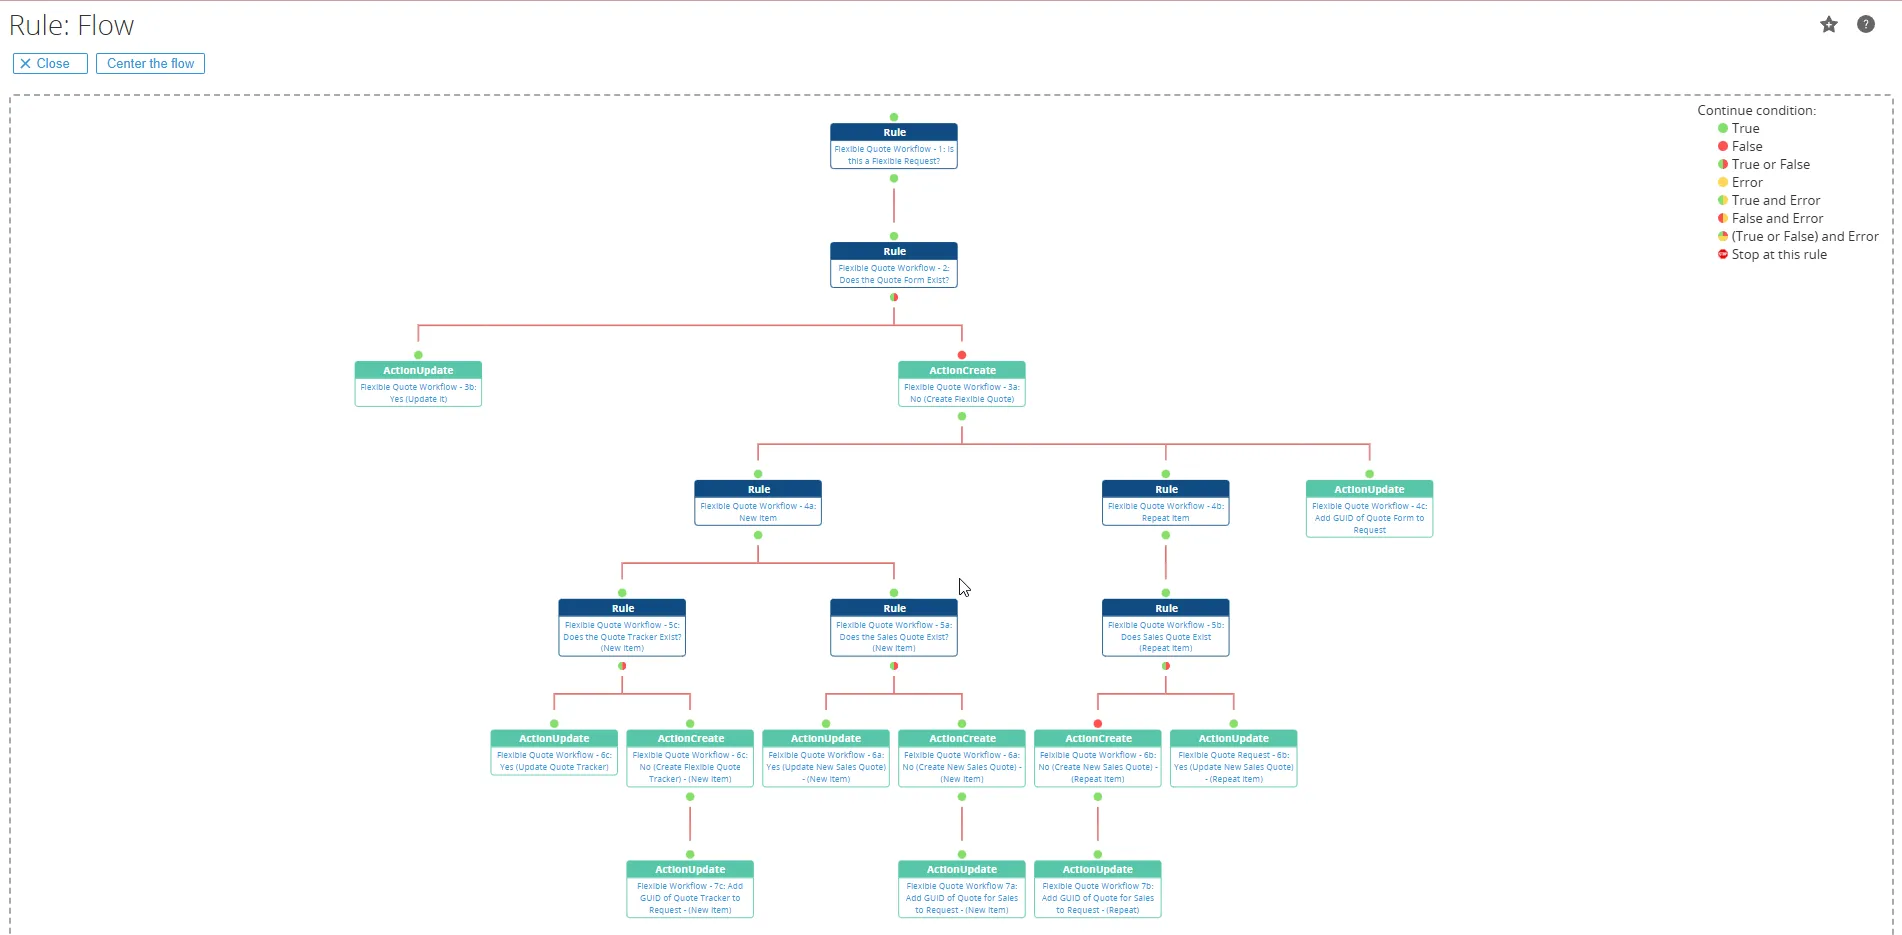
Rule listing
Section titled “Rule listing”The available rules will be available in the RPA Repport menu.
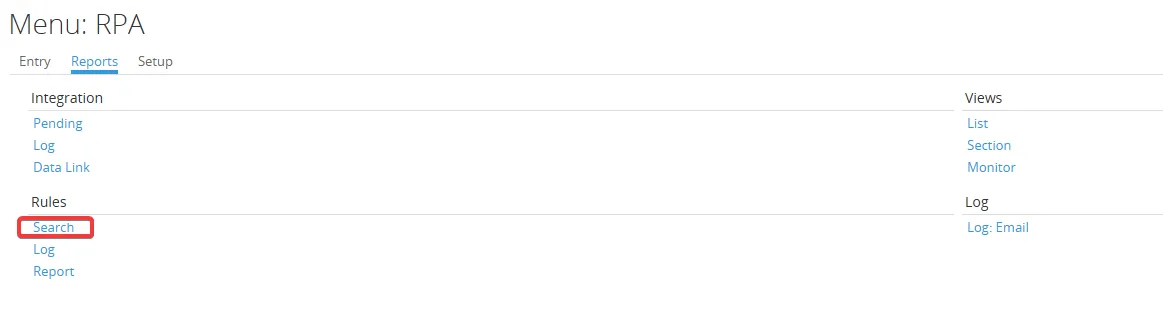

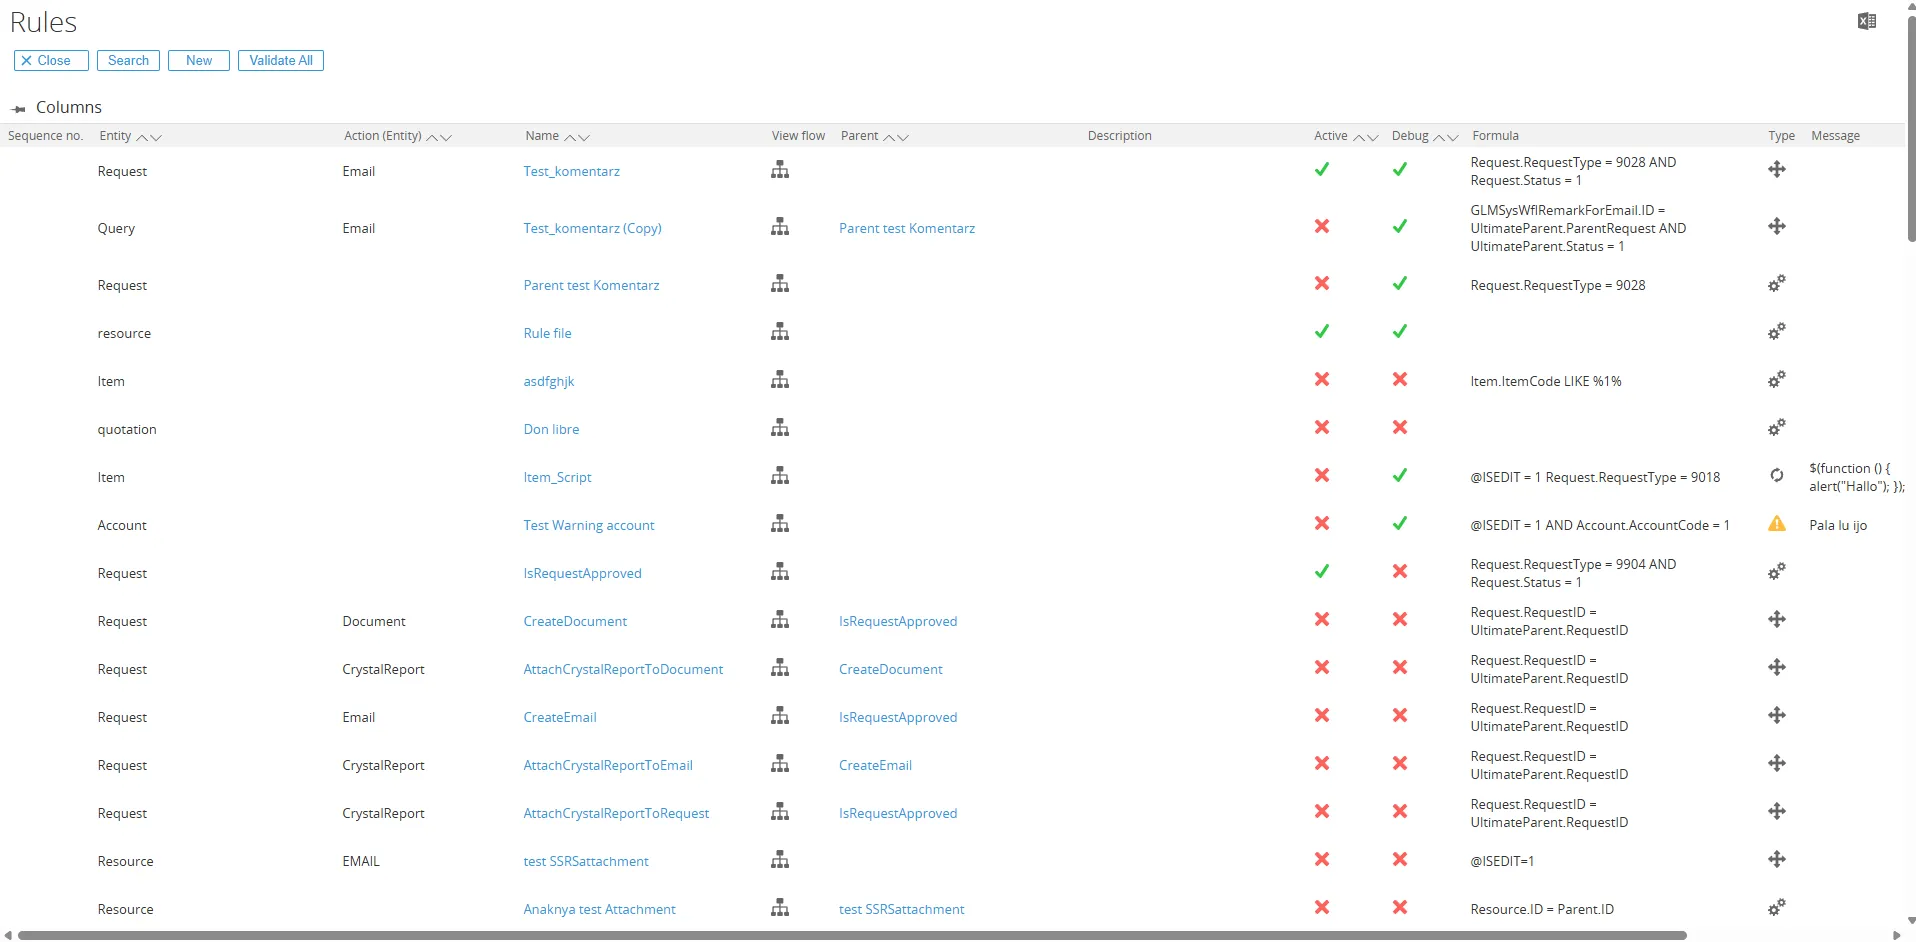
From the listing the rule can be opened, or a new rule can be created.
The rule listing is also accessible from within the Synergy pages. Pages which are supported by the rule engine will have an additional toolbar button from where the rule search can be opened. In that case the rule entity is already prefilled so you can easily see if there are any rules built on the page.
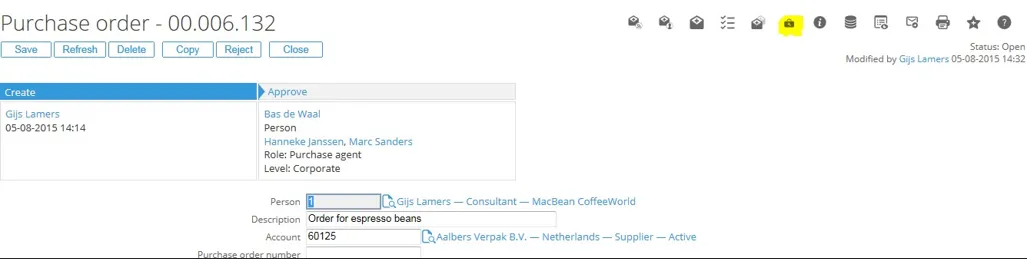
Rule maintenance
Section titled “Rule maintenance”The rule maintenance can be started via the rule search/listing or via the Rule – Entry menu.
Rule maintenance message (Error, Warning, Access Denied, Note)
Section titled “Rule maintenance message (Error, Warning, Access Denied, Note)”
Buttons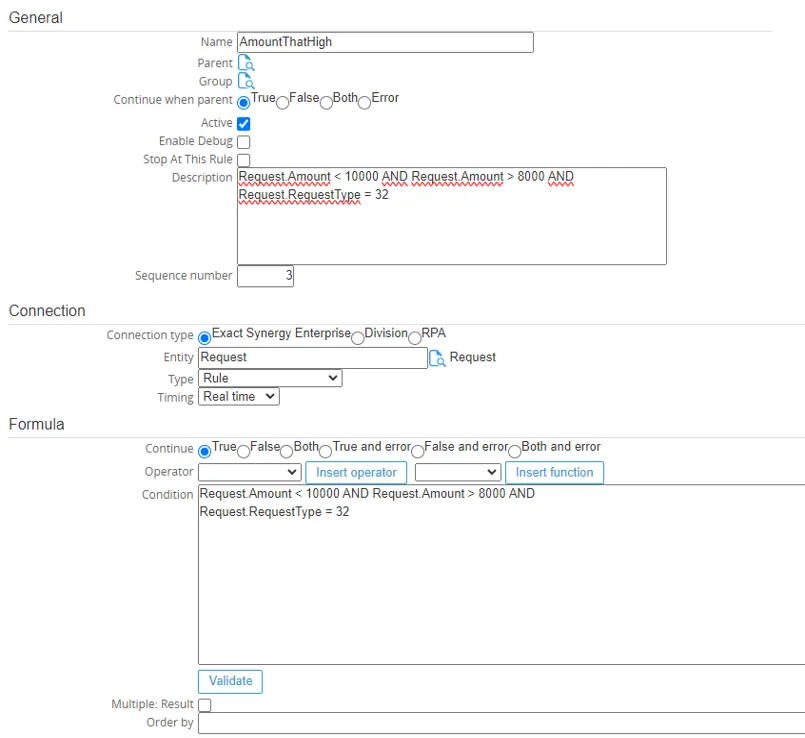
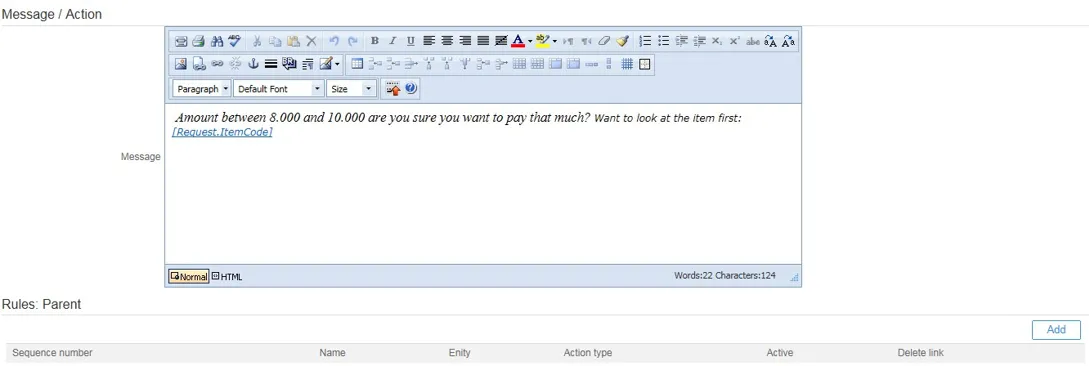
Save: Save the rule
Delete: Delete the rule
Copy: Copy the rule to a new rule
Flow: Will open the page which will show the flow in which the rule is involved. The flow will always start with the highest / ultimate parent.
Search: start the search for the rules.
FieldsName: Name of the rule
Parent: Parent of the rule if there is a parent. When a parent is selected and the rule is saved a link will be made between the rule and parent.
Continue when parent: Set when the rule should be executed depending on the parent result. Two options are available ‘true’ and ‘false’. In case the rule should be executed when the parent rule validates positive select the option true. In case the rule should be executed when the parent rule validates negative the option ‘false’ should be selected.
Active: Is the rule active or not, when inactive the rule will not be executed
Debug: When debug is selected any error given will also give the rule name from which the error is raised. In addition, it will also log the rules being executed in the GLMSysRulesLog table to further analyze which rule could be causing a problem. This would be applicable for when more complicated rules are setup which involves a lot of steps.
Description: Description of the rule
Sequence number: Sequence number of the rule to determine which rule should be executed first.
Back office: Division: When the rule should be executed on the back office database the division will need to be set.
Entity: The selected entity will determine on which application the rule is executed.
For example:
• Request, the rule will be executed when the user is using the Workflow request application. This can be on the desktop or mobile app (on mobile the warning and note functionality is not supported as this gives a popup which can’t done for the mobile app)
• Account, the rule will be executed when the user is using the account maintenance application.
Type: Select which type of message or which type of action should happened when the rule criteria are met.
• Error • Warning • Access Denied • Action: Create • Action: Update • Action: Create/Update • Action: Delete • Scripting • Rule • Note
Continue: True : This means there is data present. False : This means there is no data present. Both : This means data may or may not be present. True and error: This means if there is data present, and if there is an error, continue anyway. False and error: This means if there is no data present, and if there is an error, continue anyway. Both and error: This means whether data is present or not, if there is an error, continue anyway.
Condition / Rule: The rule to be executed is defined here. The operators and function available are on the drop down box.
In the text area the rule will be entered. An example of a rule:
Request.Amount < 10000 AND Request.Amount > 8000 AND Request.RequestType =32 In this example when the amount is between 8000 and 10000 for request type 32 a message will be given or an action executed.Another example:
Request.YesNoFreeField1 = 1 AND Request.TextFreeField1 IS NULL AND Request.RequestType =20
This rule will check if the Boolean field 1 is checked and if the text free field is empty for request type 20. So this rule is doing a conditional mandatory check.
The validate button will validate your rule to see if the syntax is correct and if it can correctly run the rule on the database.
Amount between 8.000 and 10.000 are you sure you want to pay that much?
Want to look at the item first: [Request.ItemCode]
The above example the field [Request.ItemCode] will pick the item code from the request and the field is also using in the hyperlink so the user can directly open the item card for the specific item code.
The merge tags need to be inside square brackets [EntityName.PropertyName].
Rule maintenance action (create, update or delete)
Section titled “Rule maintenance action (create, update or delete)”The general and formula sections are the same as when creating a rule which shows a message. The different part will be the message / action section.
When the type is set to or is action the list of actions is shown at the bottom of the rule maintenance. In the above screenshot the action is to create an additional request task (workflow action).
When opening the entity hyperlink a new screen is opened this allows you to maintain the action.
Fields
Back office: Division: When data should be created, or actions triggered in the back office the division will need to be set.
Entity: Which entity should be created, updated or deleted
Skip when triggered by rule: Applicable when back office actions are triggered (entity TriggerEGBackOfficeAction). To prevent going in a loop when modelling an approval flow for the back office where the approval can be done both in the back office and in Synergy via the workflow.
Mapping section: The mapping section allows you to tell what the values should be of the data to be created.
The first column will show you the available fields for the entity to be created. The next 3 columns are the 3 options of which value should be set for the field:
• Field mapping: Use the field from the entity which triggered this action. In the above example the rule was for Request so we can use the request fields to set the value for the request task
• Value mapping: Set a fixed value for the data to be created
• Formula mapping: Build a formula which will get the value or values that are needed. The formula mapping supports SELECT statement and using values of parent rules
Parent rules can by using the keyword Parent. Up to 5 levels are supported. To get the most top parent the key word UltimateParent can be used.
Only one of the above options should be used to determine the value of a field. So either field mapping, value mapping or formula mapping.
5.3.4.1 Text templating in formula mapping
The formula mapping allows the use of Scripting Language for text templating. With data get from RPA, this will allow the various template generation like building paragraph, list, table etc.
For syntax documentation, click here
Rule Maintenance Rule
Section titled “Rule Maintenance Rule”The rule maintenance ‘rule’ action/message type is used to execute a rule and based on the outcome of the rule it will continue to another rule which can again be a rule or one of the other types.
This way a decision tree can be made and based on a different outcome different action can be taken
The rules can linked together add the rule maintenance page in the last section which will have a list of the parents and child’s related to the rule.
A child can be added using the ‘add existing’ or ‘add’ button in the Rules: Child list. A link can be removed by clicking the delete link image in each row.
A rule can have two different timings real time and scheduled. Real time will be triggered the moment the user saved a record in Exact Synergy. Scheduled will be running via an Exact Synergy job which can be scheduled as a SQL job or via the task scheduler.
In the installation set in the root there is a file GLMSysRulesBackgroundJobs.cmd which can be used to run the rules which have the timing set to scheduled.
::Replace the virtual directory ‘Synergy’ with the actual virtual directory set virtualdirectory=Synergy set
exactprocess=”%~dp0Exact.Process.exe”
%exactprocess% /DBCONFIG:%virtualdirectory% /ASSEMBLY:GLMSys.Rules.Jobs /CLASS:Scheduler
In the cmd file there is a virtual directory, change this directory to your Exact Synergy virtual directory from where Exact Synergy is running.
Create a task schedule in the windows task scheduler or a SQL job for these command files. Which will start the rule on a schedule.
The background jobs support the following parameters, syntax is /[Parameter name]:[value] :
Parameter name Description Value(s)
RuleName Name of the top/ultimate parent rule for the scheduled rules. Multiple rules can be supplied separated by a , Example: RuleX
Example: RuleX,RuleY,RuleZ
Show additional rule debug info
Section titled “Show additional rule debug info”The decision tree built via the rule engine can become big and it when it doesn’t work as expected it can be difficult to pin point which rule is causing the problem.
Why didn’t a certain rule didn’t get executed or what was the result of a rule. To help finding out which rules were executed the ‘Enable debug’ will need to be set in the parent.
Once the debug is set all the rules executed will be logged into the GLMSysRulesLog table. The table will contain the following columns:
Fields
RuleID: Division: The id of the rule which is executed
Query: The query executed by the rule
QueryParams: The parameter value used in the query
QueryParamNames: The parameter names used in the query
Result: : The result of the query
The GLMSysRulesLog table can be linked with the GLMSysRules table to get the rule specific setting for further troubleshooting
SELECT rl.Created,r.Name,rl.Result,r.Description,r.RuleFormula,r.ContinueWhenParent,* FROM GLMSysRulesLog rl
INNER JOIN GLMSysRules r ON r.ID = rl.RuleID
ORDER BY rl.Created
In addition to logging the executed rules to the GLMSysRulesLog table it will also show the rule name to any message displayed to the user so it easy to know which rule could be causing a problem.
For example, a rule which is built for Synergy (the rule given the message is rule AmountNotAllowedToBe0):
For example when a rule is started from the back office (The rule giving the message is PORequestApproveZ810):
Example
Section titled “Example”Add additional persons in the approve status based on request amount
Section titled “Add additional persons in the approve status based on request amount”I have a purchase order approval request in Synergy and based on the amount I would like additional persons in the approval stage.
When the amount is below 10.000 it will add person A to the flow and when the amount is above 10.000 it should add person B to the flow.
The result after setting up the rules will look like:
POCreated
Rule: Request.RequestType =9017 AND Request.Status =0
Rule description: Check for request of type 9017 and where the status is open. Only continue to the child when the result is true.
POAmountBelow10000
Rule: Request.RequestID = Parent.RequestID AND Request.Amount < 10000 AND
Request.RequestType =9017
Rule description: Check if the request amount is below 10.000. The request is linked back to the parent rule via the Parent.RequestID. For this rule it will continue when the result is both true and false. When true assign the purchase agent. When false check if the amount is above 10.000
POAmountAbove10000
Rule: Request.RequestID = UltimateParent.RequestID AND Request.Amount >= 10000
Rule description: The rule will get the RequestID from the UltimateParent which in this example is POCreated.
AssignPurchaseAgent
Rule: Request.RequestID = Parent.RequestID
AssignDirector
Rule: Request.RequestID = Parent.RequestID AND Request.Amount >= 10000
Rule description: For this rule we have a rule with the type “Action: Create” where in this example to will create a request task.
For the mapping of the request task we will map the following fields:
Action – Approve (value)
RequestID – RequestID (request field)
ResourceID – 1004 (value)
JsonParser function in view columns
Section titled “JsonParser function in view columns”This section explains how to use the JsonParser function in RPA View Builder to parse JSON data within your views. Here is a refined and clear version of your instructions, with improved structure and flow suitable for documentation or user guidance:
- Go to: RPA > Setup > Templates > Rules: Import
- Select Setup > Templates > Rules: Import
- Choose the file you want to import
- Click Open to add the file for import
- Click the Import button to upload the file
- The file will now appear on the Import Result list
- Click the link for your imported rules file
- When the rule form opens, click the description of the file
On 001 GetTaskRequest:
Make sure the condition label is correct, then follow these steps:
- Type the desired condition. For example : This condition matches a request to its ultimate parent record.
Click the Validate button until the message “No errors found” appears - Click the Save button
- Click on the file 001 GetJsonData to expand the data
On 001 GetJsonData:
Ensure the condition label is also correct, then follow these steps:
- Type the desired condition. For example, match the requestID to the request you want to update and retrieve the request whose requestType equals 1 (Checked Task)
Click the Validate button until the message “No errors found” appears - Click the Save button
- Make sure the request formula is already filled with the correct condition
On 001 UpdateRequest:
Ensure the condition label is also correct, then follow these steps:
- Type the desired condition. For example, we want to get the Parent.DATA and stock quantity from Click the Validate button until the message “No errors found” appears
- Make sure the request formula is already filled with the correct condition
- Click the Save button
- When all configurations are complete:
- Return to the RPA Modules
- Go To Modules > Workflow
- Report > Search
- Click the Show button
- Click the Request that you made
- Now, it is already filled with the remark you requested
- Next, Go to Reports > Rules > Log
- Click the Show button to display the list of columns
- Click the Search icon to expand the detailed data
- The files in the Request Log will display the same values as those in the SQL database
- You should now see that the values are correct and match the data in the SQL database as shown by
Value = 2,itemCode = "BEK0004", andstockQuantity = 2
RPA - Troubleshooting
Section titled “RPA - Troubleshooting”RPA menu/module not showing any applications
Section titled “RPA menu/module not showing any applications”This happens when the license is not copied over yet to the xml folder or the license is not correct.
We are recommending that accounts before they update their Synergy
License (either for new Functionality, Annual Contract or Additional Users – we are contacted first so that we may review and if necessary, provide a new license proactively.
Synergy connection – HTTP Error 401.2 - Unauthorized
Section titled “Synergy connection – HTTP Error 401.2 - Unauthorized”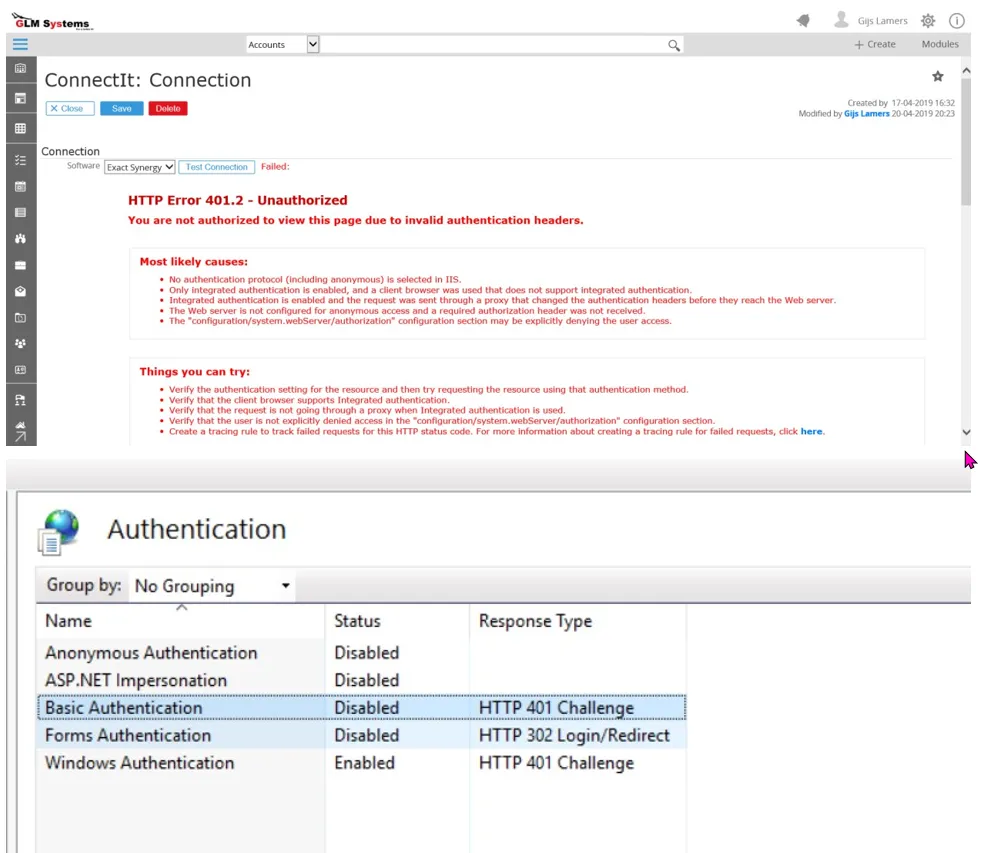
Synergy connection HTTP 401.1 - Unauthorized
Section titled “Synergy connection HTTP 401.1 - Unauthorized”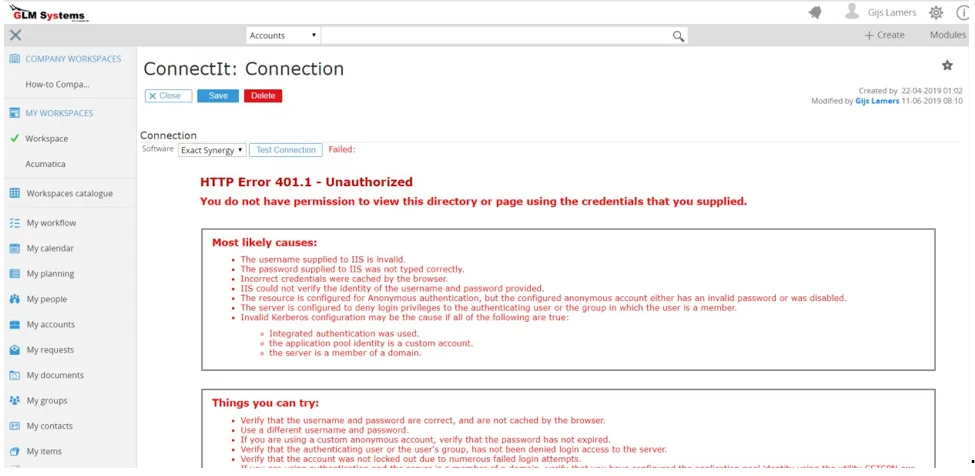
Connecting to Synergy give only ‘Failed:’ message
Section titled “Connecting to Synergy give only ‘Failed:’ message”When connecting to Synergy only a failed message is given an no details
Step to resolve:
Enable HTTP Errors in the windows features to get the detailed error.
RequestEntityTooLarge when importing data into Exact Synergy
Section titled “RequestEntityTooLarge when importing data into Exact Synergy”Step to resolve: Make the following changes to the web.config In the system.serviceModel tag add the binding element which is setting the maxBufferPoolSize, maxReceivedMessageSize,maxBufferSize and transferMode
<system.serviceModel> <serviceHostingEnvironment aspNetCompatibilityEnabled="true" multipleSiteBindingsEnabled="true" minFreeMemoryPercentageToActivateService="0" /> <bindings> <webHttpBinding> <binding maxBufferPoolSize="2147483647" maxReceivedMessageSize="2147483647" maxBufferSize="2147483647" transferMode="Streamed"> </binding> </webHttpBinding> </bindings></system.serviceModel>User cannot see RPA features
Section titled “User cannot see RPA features”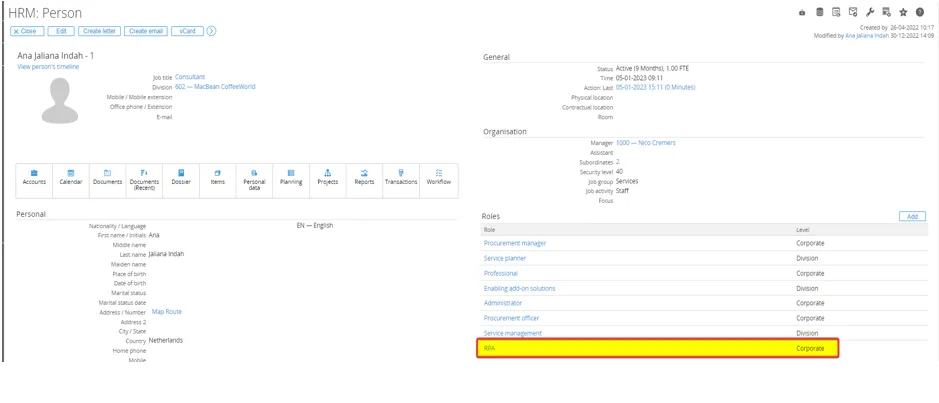
Increasing HTTP Request Timeout Limit when Rebuild Schema
Section titled “Increasing HTTP Request Timeout Limit when Rebuild Schema”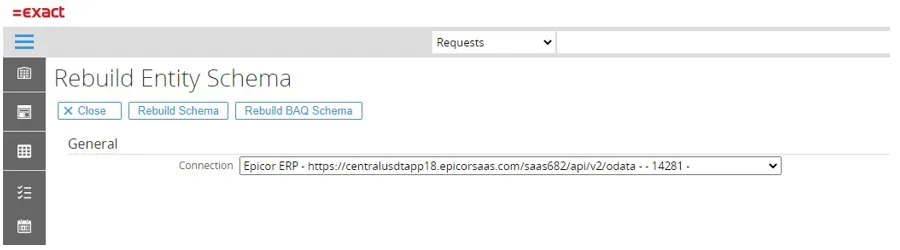
Add a new tag location as a child of the Configuration tag, set the ‘path’ property as specific aspx page, add the ‘system.web’ element, add ‘httpRuntime’ element, and set the ‘executionTimeout’ property (in seconds).
<configuration><location path="docs/GLMSysCIRebuildSchemaMaint.aspx"><system.web><httpRuntime executionTimeout="1800" /></system.web></location></configuration>Failed: HTTP Request is unauthorized with client authentication scheme ‘Ntlm’
Section titled “Failed: HTTP Request is unauthorized with client authentication scheme ‘Ntlm’”
ActiveX component can’t create object.
Section titled “ActiveX component can’t create object.”
Unblock EXE and DLL files in the Globe+ library
Section titled “Unblock EXE and DLL files in the Globe+ library”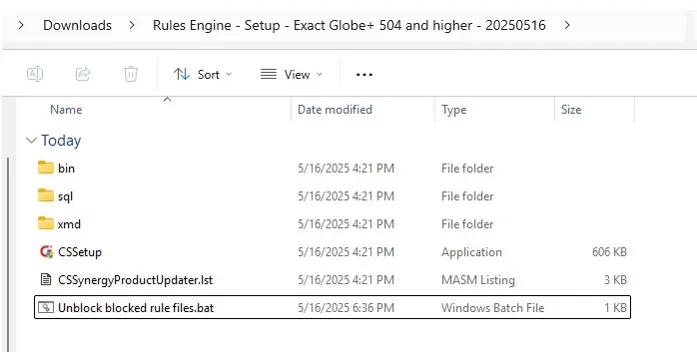
Failed: The HTTP request is unauthorized with client authentication scheme ‘Ntlm’
Section titled “Failed: The HTTP request is unauthorized with client authentication scheme ‘Ntlm’”When testing the Globe connection in RPA, the connection test fails and does not return a successful result.
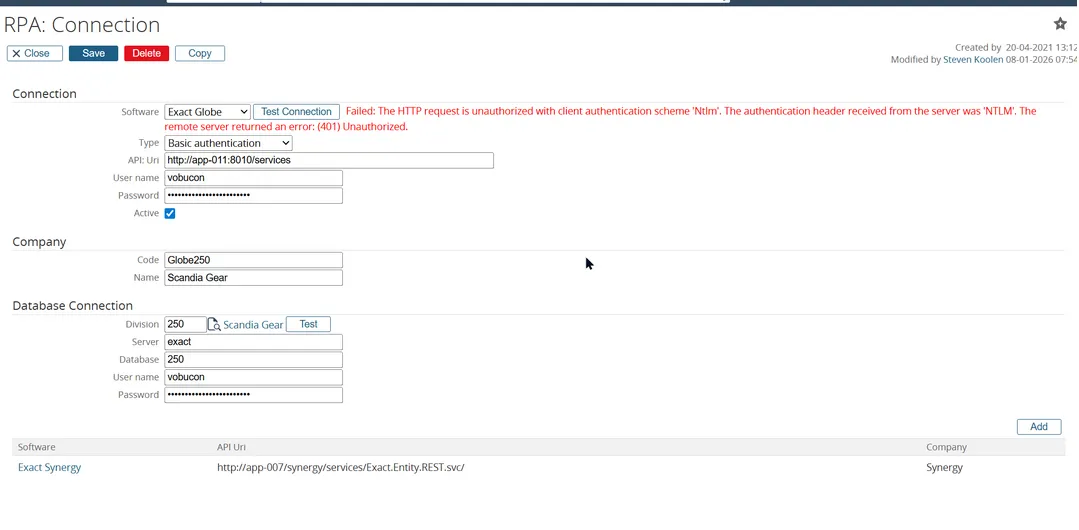
- Re-enter the password and click Test Connection.
- Check the back-office connection and try to test the connection again.
- If the two steps above do not resolve the issue, remove the Rules Engine settings, specifically the Type and Server URL fields.
Error: BadRequest Incoming email provider (integration issue)
Section titled “Error: BadRequest Incoming email provider (integration issue)”From the error log, there are two pieces of information we can obtain :
- BadRequest: Invalid filter clause - an identifier was expected at position 19.
- BadRequest: Parsing OData
$selectand$expandfailed - couldn’t find a property namedvalueon the type. For the incoming email provider, especially when using the OAuth connection type, if you encounter a BadRequest error like one above, you should check themessagesandmessages/{id}/attachmentsentities.
For these entities, make sure that:
- The selected array field name is filled with value
- The Date using UTC option is checked